
:max_bytes(150000):strip_icc()/how-to-watch-mission-impossible-movies-in-order-61da86fffee741fc89a1dbc52dddd4e4.jpg)
Youtube’s Top 5 Apps That Trim Your Long Video Links Down
Youtube’s Top 5 Apps That Trim Your Long Video Links Down
Top 5 YouTube Link Shortener You Must Try in 2024

Liza Brown
Mar 27, 2024• Proven solutions
Being one of the largest video-sharing platforms, Youtube is used throughout the world to share and find all kinds of material and content in form of videos. Because of its huge community, the videos of Youtube are shared on all platforms throughout the internet. If you are the one who often shares Youtube links with others then you must know how important it is to keep the links as short as possible. There are so many reasons for avoiding long links while sharing Youtube links with others. Whether it’s a blog, social media platform, or a chat, keeping the Youtube link while sharing it can positively impact the viewer. Several Youtube link shorteners can help you shorten the links and make them worthy of sharing. In this article, we will list down Top 5 Youtube link shorteners to help you choose the best. But before moving towards link shorteners, let’s discuss the benefit of using Youtube link shorteners.
Why should we use Youtube Link Shorteners?
One of the vital reasons to use Youtube Link Shortener is to increase the click-throughs and shares. Short links are more prone to getting clicks and shares because they look simple and professional as compare to long and stuffy links. If we compare both the links, the short version, and the long version, we will clearly see the difference. The short links look more beautiful and attractive as compare to the long ones. Which means it can attract more people to click and share.
Another big advantage of shortened links is their usability of social platforms such as Facebook, Instagram, LinkedIn, and others. These links take small space as well as help in making your post look appealing to the viewers.
1. Y2U
Platform:Website
Price: Free
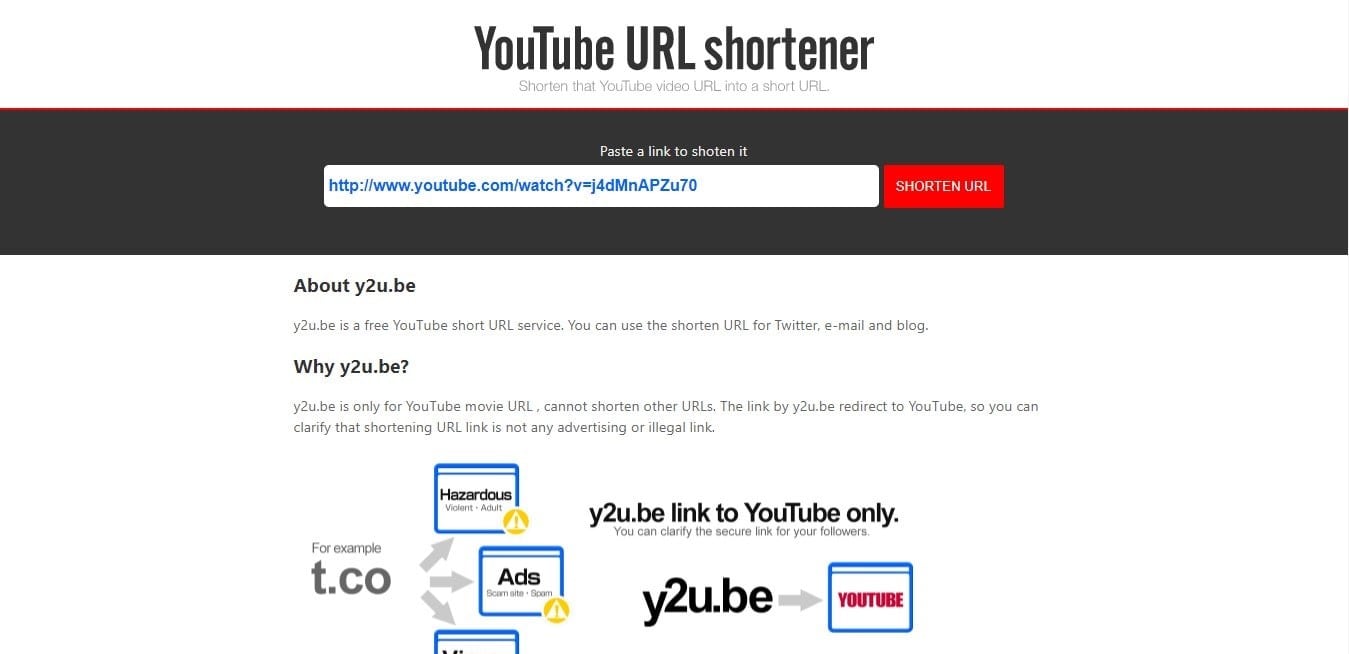
Y2U is a web-based platform that helps its user to convert long Youtube links into small and shareable links. It is a simple and easy-to-use Youtube link shortener. It converts the link into three forms, a short link, a very short link, and a QR code. You can use any of these links to share it with your friends or share it on social media platforms such as Facebook and Instagram Bios. It only requires you to paste a Youtube video link directly into this platform and click shorten URL. It allows the users to make their URL worthy to be shared on blogs, Twitter, and chats.
Features
- Simple and User-Friendly Interface
- Free to use Youtube link shortener
- Convert links to QR codes
- Make your links share-worthy
2. Bitly
Platform:Website
Price: Free - $199
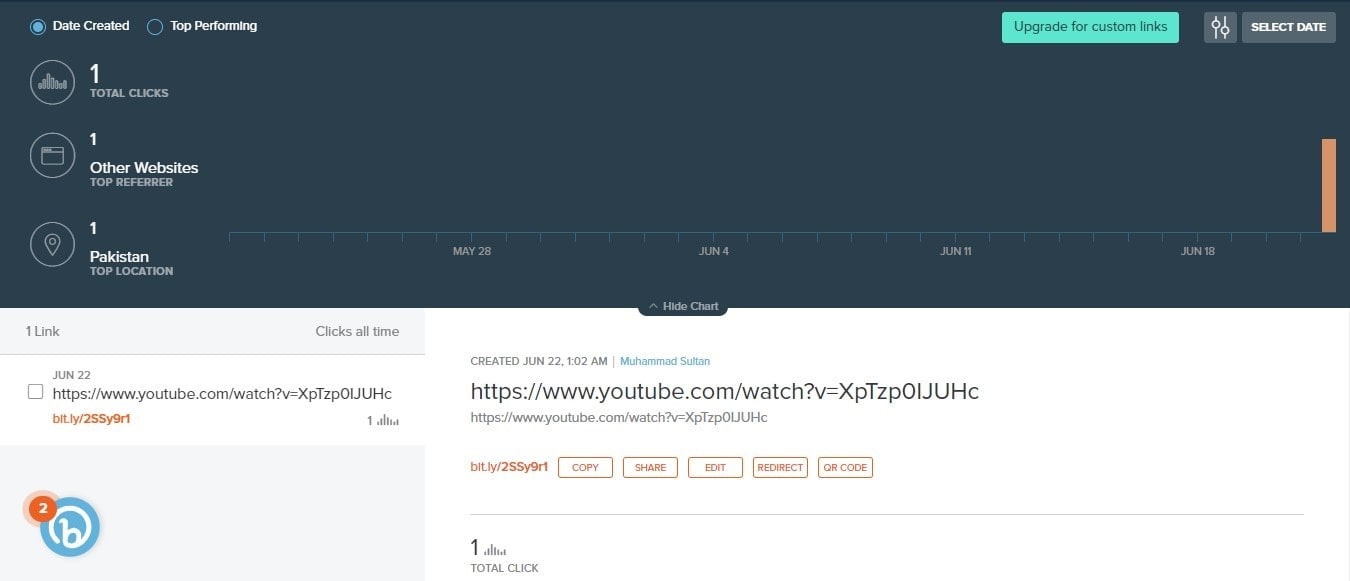
Bitly is more than just a simple Youtube link shortener. It contains a wide range of features and options to help its users brand their links, customize them, Analyze the results, and more. One of the best things about Bitly is its ability to track down each link that is shortened using this platform. It provides you with a full analysis of the links and how they are performing. You can use the basic features like the Youtube link shortening and data related to links for free. But it has other options as well that can be acquired by paying a small portion of the money to the platform. This marvelous platform worths each penny you spend on it. It not only makes the links short but also makes them look beautiful and attractive to the viewer.
Features
- Shorten your links with Traceability
- Analyze how your link is performing
- Count the number of clicks a particular link is getting
- Analyze the demographics of the clicks
3. RB.GY
Platform: Website
Price: Free - $9
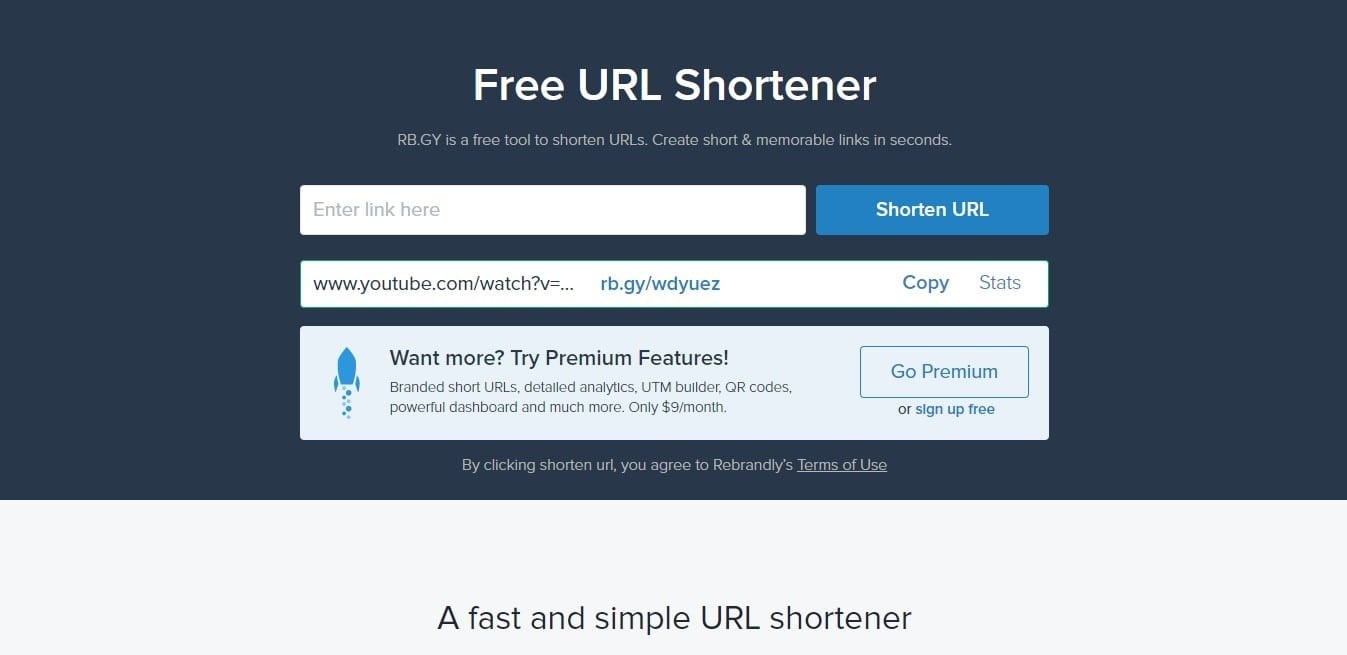
RG.GY is an amazing and simple Youtube link shortener that allows you to make the long and ugly Youtube link look small, attractive, and appealing. It also allows you to track down the links that you shorten using RB.GY. These short links can be used on blogs, SMS, social media platforms, emails, and ads for better results and increased click-throughs. If you are a brand and want your links to resemble and showcase your brand when you share them, then this platform can help you achieve this goal. It provides its users with branded domain for $2/year only. These branded links provide 39% more click-through rates than simply shortened links.
Features
- Create your own Branded and Short Youtube Links
- Increase the click-through rate by 39%
- Make your Youtube links look attractive
- Availability of both, Free and Paid version
4. Short.io
Platform: Website
Price: Free - $150
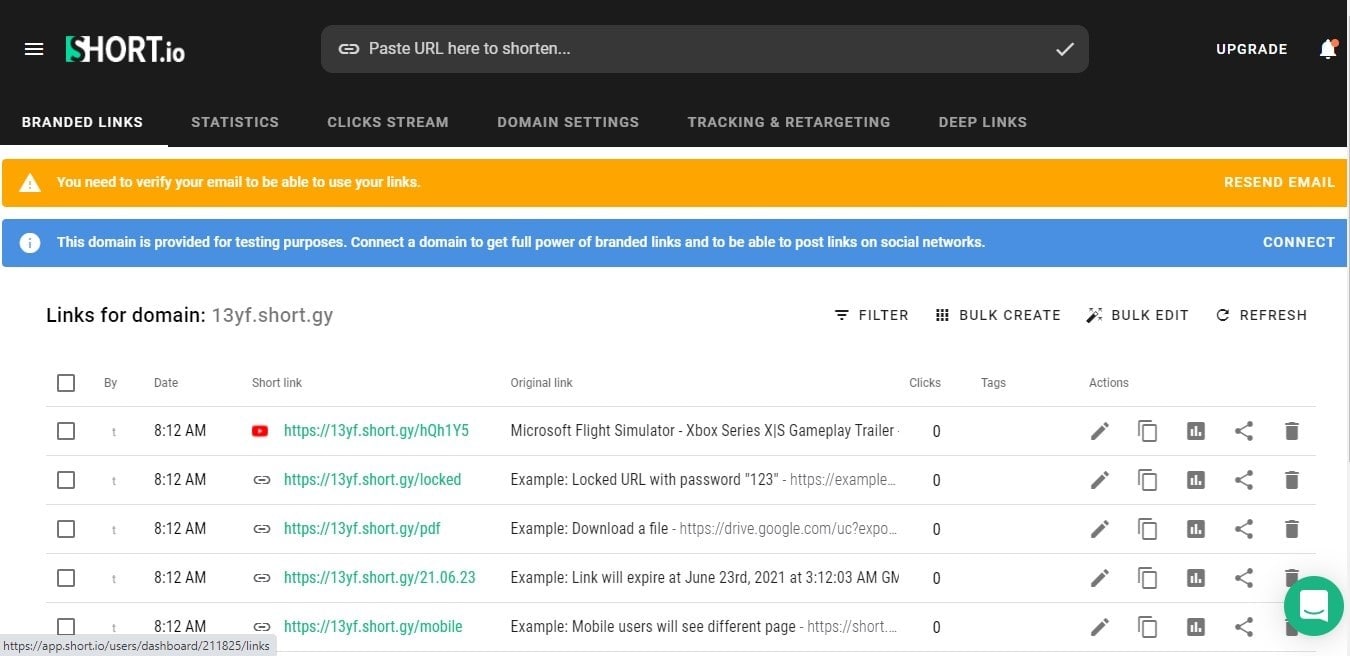
Short.io is a powerful and effective Youtube link shortener and link tacker. It provides its users with a wide range of facilities to shorten their links and track everything related to their links. It lets you check the number of clicks your link is getting, from which source you are getting a large number of clicks, the location of the one clicking it, and much more to be excited about. This platform allows you to add a chrome extension into your chrome browser to make the process of shortening and tracking the links easy and smooth. Its free version lets you access all the basic features. If you want to access more powerful and effective features, you have to subscribe to any packages ranging from $20 to $150, depending upon your requirements.
Features
- Powerful Youtube link shortener
- Wide range of features
- Track your link performance throughout the internet
5. Hyper Host
Platform: Website
Price: Free
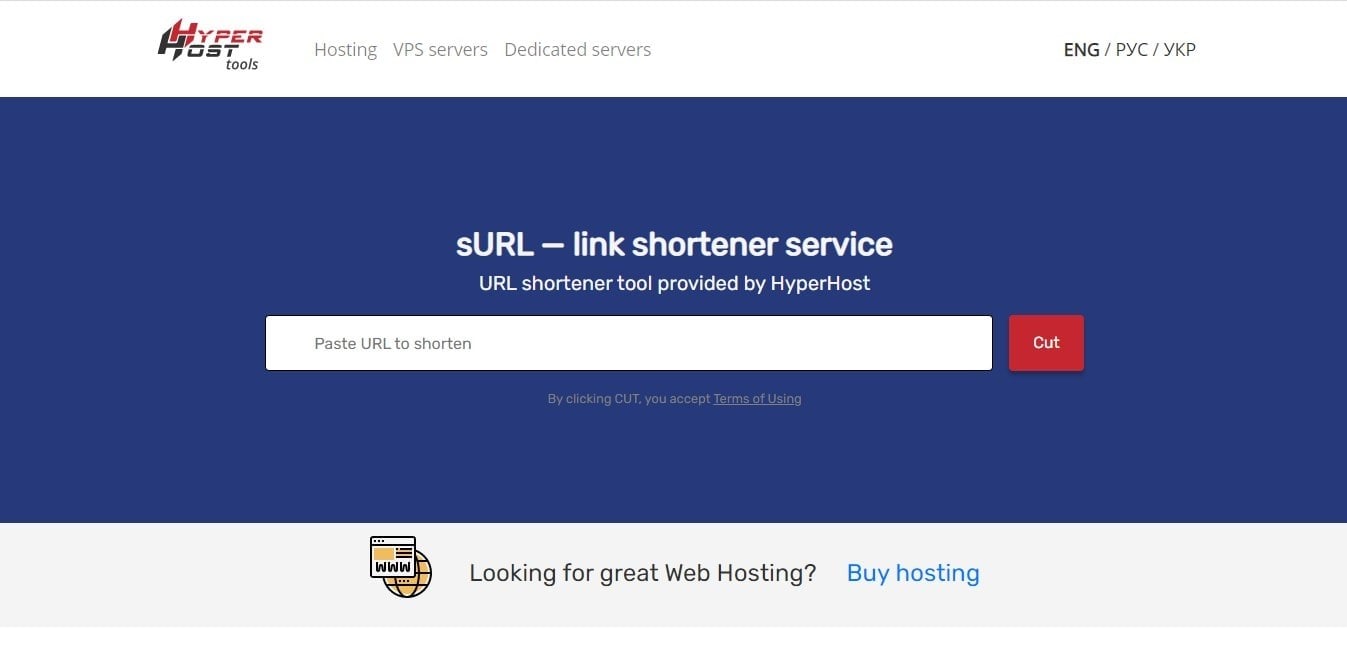
Hyper Host is the simplest and easy-to-use Youtube link shortener. You don’t have to sign up or provide any kind of information in order to use it. It allows you to shorten the links and helps you track the clicks on your links with their links statistics. It provides its user with a wide range of useful information such as the location of the click, which browser was used to access the link, and what was the operating system that brought you the click. It is a completely free-to-use platform.
Features
- User-friendly Interface
- Make your links attractive and small
- Analyze your links
- Track country, browser, and operating system
Conclusion
In this world of digitalization, every brand must have an online presence and Youtube is one of the biggest and most important Videos sharing platforms to utilize. All the above Youtube link shorteners are the best tools that you can find on the internet that will help you shorten the links and make Youtube links branded. Each tool has its own benefits and features. Choose any of these platforms based upon your requirement and need.


Liza Brown
Liza Brown is a writer and a lover of all things video.
Follow @Liza Brown
Liza Brown
Mar 27, 2024• Proven solutions
Being one of the largest video-sharing platforms, Youtube is used throughout the world to share and find all kinds of material and content in form of videos. Because of its huge community, the videos of Youtube are shared on all platforms throughout the internet. If you are the one who often shares Youtube links with others then you must know how important it is to keep the links as short as possible. There are so many reasons for avoiding long links while sharing Youtube links with others. Whether it’s a blog, social media platform, or a chat, keeping the Youtube link while sharing it can positively impact the viewer. Several Youtube link shorteners can help you shorten the links and make them worthy of sharing. In this article, we will list down Top 5 Youtube link shorteners to help you choose the best. But before moving towards link shorteners, let’s discuss the benefit of using Youtube link shorteners.
Why should we use Youtube Link Shorteners?
One of the vital reasons to use Youtube Link Shortener is to increase the click-throughs and shares. Short links are more prone to getting clicks and shares because they look simple and professional as compare to long and stuffy links. If we compare both the links, the short version, and the long version, we will clearly see the difference. The short links look more beautiful and attractive as compare to the long ones. Which means it can attract more people to click and share.
Another big advantage of shortened links is their usability of social platforms such as Facebook, Instagram, LinkedIn, and others. These links take small space as well as help in making your post look appealing to the viewers.
1. Y2U
Platform:Website
Price: Free
Y2U is a web-based platform that helps its user to convert long Youtube links into small and shareable links. It is a simple and easy-to-use Youtube link shortener. It converts the link into three forms, a short link, a very short link, and a QR code. You can use any of these links to share it with your friends or share it on social media platforms such as Facebook and Instagram Bios. It only requires you to paste a Youtube video link directly into this platform and click shorten URL. It allows the users to make their URL worthy to be shared on blogs, Twitter, and chats.
Features
- Simple and User-Friendly Interface
- Free to use Youtube link shortener
- Convert links to QR codes
- Make your links share-worthy
2. Bitly
Platform:Website
Price: Free - $199
Bitly is more than just a simple Youtube link shortener. It contains a wide range of features and options to help its users brand their links, customize them, Analyze the results, and more. One of the best things about Bitly is its ability to track down each link that is shortened using this platform. It provides you with a full analysis of the links and how they are performing. You can use the basic features like the Youtube link shortening and data related to links for free. But it has other options as well that can be acquired by paying a small portion of the money to the platform. This marvelous platform worths each penny you spend on it. It not only makes the links short but also makes them look beautiful and attractive to the viewer.
Features
- Shorten your links with Traceability
- Analyze how your link is performing
- Count the number of clicks a particular link is getting
- Analyze the demographics of the clicks
3. RB.GY
Platform: Website
Price: Free - $9
RG.GY is an amazing and simple Youtube link shortener that allows you to make the long and ugly Youtube link look small, attractive, and appealing. It also allows you to track down the links that you shorten using RB.GY. These short links can be used on blogs, SMS, social media platforms, emails, and ads for better results and increased click-throughs. If you are a brand and want your links to resemble and showcase your brand when you share them, then this platform can help you achieve this goal. It provides its users with branded domain for $2/year only. These branded links provide 39% more click-through rates than simply shortened links.
Features
- Create your own Branded and Short Youtube Links
- Increase the click-through rate by 39%
- Make your Youtube links look attractive
- Availability of both, Free and Paid version
4. Short.io
Platform: Website
Price: Free - $150
Short.io is a powerful and effective Youtube link shortener and link tacker. It provides its users with a wide range of facilities to shorten their links and track everything related to their links. It lets you check the number of clicks your link is getting, from which source you are getting a large number of clicks, the location of the one clicking it, and much more to be excited about. This platform allows you to add a chrome extension into your chrome browser to make the process of shortening and tracking the links easy and smooth. Its free version lets you access all the basic features. If you want to access more powerful and effective features, you have to subscribe to any packages ranging from $20 to $150, depending upon your requirements.
Features
- Powerful Youtube link shortener
- Wide range of features
- Track your link performance throughout the internet
5. Hyper Host
Platform: Website
Price: Free
Hyper Host is the simplest and easy-to-use Youtube link shortener. You don’t have to sign up or provide any kind of information in order to use it. It allows you to shorten the links and helps you track the clicks on your links with their links statistics. It provides its user with a wide range of useful information such as the location of the click, which browser was used to access the link, and what was the operating system that brought you the click. It is a completely free-to-use platform.
Features
- User-friendly Interface
- Make your links attractive and small
- Analyze your links
- Track country, browser, and operating system
Conclusion
In this world of digitalization, every brand must have an online presence and Youtube is one of the biggest and most important Videos sharing platforms to utilize. All the above Youtube link shorteners are the best tools that you can find on the internet that will help you shorten the links and make Youtube links branded. Each tool has its own benefits and features. Choose any of these platforms based upon your requirement and need.
Liza Brown
Liza Brown is a writer and a lover of all things video.
Follow @Liza Brown
From Editing Desk to YouTube: Post-Production Processes
How to Upload a Video from iMovie to YouTube?
Liza Brown
Aug 18, 2022• Proven solutions
“Is iMovie good for YouTube?”
The iMovie is not only good for YouTube but various other social media platforms. The thing is, you have to compromise with the quality offered by Apple’s video editor iMovie. Well, iMovie is perfect for getting started for beginners. But, the professionals and ones who want a bit high features than basic ones should look elsewhere. Thus, we always recommend alternatives to a particular software for our audience. In this article, there is a mention of Wondershare Filmora to overcome the drawbacks of iMovie.
Without further ado, let’s begin with how to upload a video from iMovie to YouTube. We want to lead with the best iMovie export settings, specific troubleshooting issues, and our alternative intro section to overcome iMovie’s limitations.
Part 1: How to Upload a Video from iMovie to YouTube?
iMovie is ideal for making YouTube videos if you are too basic and are not looking for advanced features. Remember that professionalism pays in these platforms and helps you stand better among others. If you’re still interested in making introductory videos, here is a step-by-step guide on uploading a video to YouTube from iMovie on Mac first and leading with iPhone.
Step-by-Step Tutorial on how to upload a video from iMovie to YouTube on Mac
Step 1: Create a Project
On the first step, go to iMovie on Mac and click the Create New tab below.
Step 2: Import Media
Click the Import Media button and browse the files on your computer, as shown below.
Step 3: Edit Clips
It’s time to edit video footage. Drag your video to the timeline, as shown below.
Then, you can trim and drag the edges of video clips to allow editing.
Step 4: Add Titles
You can add titles by clicking the Title tab and further drag the Title’s template into the timeline.
Step 5: Export the Video
Click the Export button as follows after editing is over.
Select YouTube to upload your video over the platform directly.
Step 6: Save
After selecting the desired platform, click the Next tab to proceed with saving the file.
At last, save your video as shown below.
Step-by-Step Tutorial on how to upload iMovie to YouTube from iPhone
Step 1: Share the iMovie Project
Go to iMovie on your iPhone. Open the iMovie project on your iPhone and tap the Share button to select YouTube. Enter the information of Title, Description, Size, Tags, Privacy, and Location (optional).
Step 2: Upload iMovie Files
For ease of use, you can upload saved videos in Photo Library on your iPhone. Then, you can upload iMovie videos via the YouTube iOS app. Sign In to YouTube and click the Camera icon at the top of the Home page. Select your iPhone Photo Library file and set the video Title, Description, Size, Tags, and Privacy. Then, hit the Upload button to confirm.
Part 2: The Best iMovie Export Settings for YouTube Videos
As we all know that iMovie consists of a bit long procedure to export projects. Here are some tips on the best iMovie export settings to avoid an unnecessary headache.
- Set small resolution: Small resolution plays a more significant role, especially while uploading. Thus, you can set the smallest resolution in the Email tab of the Export button.
2. Change Export settings in the File tab: There is a File tab under the Export button. Click it and find various settings that you need to change to get the best export settings for YouTube 2021. Make the Title of the video as small as possible. Set the resolution at 1080P than 4K.
However, it isn’t going to upgrade the resolution if your video is already in the 1080P definition. Now, the last setting that will crazily offer you the best quality and lots of space-saving. You have to select Best (ProRes) in quality settings for this purpose. These settings also take less time to upload to YouTube.
3. Compress is not for speed: Various options you see in the Compresstab are not for speed. They are for how you save the video on a desktop. Thus, always choose the Better Quality tab than Faster.
- Do not export directly to YouTube: iMovie is pretty basic and doesn’t offer great settings to upload your video instantly. You may have to make changes to the uploaded video even if you do this as per our step-by-step guide mentioned above.
Part 3: How to fix the “Failed to Upload to YouTube” Error on iMovie?
The “iMovie to YouTube failed” problem occurs when you directly upload a YouTube video from iMovie. The issue will result if you upload from any third-party uploader. That is why the direct upload doesn’t work, especially in iMovie. You can opt to share your video to the desktop first and then drag it to upload to the YouTube platform.
Part 4: Upload Videos to YouTube with the Best Alternative to iMovie - Wondershare Filmora
“What can I use instead of iMovie to overcome its limitations?”
When you see that iMovie is not uploading to YouTube or iMovie upload to YouTube got stuck, go for a better alternative. In this section, we’d like to recommend Wondershare Filmora that offers the best export settings compared to iMovie. It is the go-to solution if you can’t upload video from iMovie to YouTube directly. Filmora further provides intuitive editing tools that professionally make your YouTube video projects.
Export Key Aspects of Wondershare Filmora in comparison to iMovie:
- It offers a long list of export resolutions to choose from.
- You get separate video and audio settings such as Encoder, Channel, Frame Rate, Bit Rate, Resolution, etc.
- It is further compatible with export to various devices including the iPhone, Samsung, iPod, Apple TV, iPad, Google Pixel, PSP, Smart TV, etc.
Step-by-Step Guide on how to upload a video from iMovie to YouTube via Wondershare Filmora
Step 1: Click the Export button and select resolution
After your project in Wondershare Filmora is over, click the Export tab and select video resolution from the Local tab, as shown below.
It has a list of formats. You can also edit the Name and saving location here.
Step 2: Select Quality
Select the Settings button and choose from three quality levels of Best, Better, and Good. You can also adjust video and audio parameters, including the Encoder, Frame Rate, Resolution, Bit Rate, etc.
Step 3: Select platform
Select the YouTube tab, Sign In to your YouTube account, and hit the Export button after modifying the Title and Quality if needed. Also, make sure to check the Enable GPU accelerated video encoding tab.
Select Wondershare Filmora as the ultimate solution even if iMovie upload to YouTube not showing up.
Conclusion
Hopefully, we’ve informed you of the relevant facts on how to upload a video from iMovie to YouTube. We have also examined the number of troubleshooting issues involved in the iMovie video editor. Well, you will get to face similar kinds of export difficulties in the iMovie editor. Also, the entire procedure to end the exporting task is a bit long in iMovie compared to any other video editing software. Thus, it’s crucial to check out what other alternatives the technological world has today. We can’t state to you a better beginner-friendly yet advanced editing option than Wondershare Filmora that rightly outtakes the iMovie video editor in all aspects.
Liza Brown
Liza Brown is a writer and a lover of all things video.
Follow @Liza Brown
Liza Brown
Aug 18, 2022• Proven solutions
“Is iMovie good for YouTube?”
The iMovie is not only good for YouTube but various other social media platforms. The thing is, you have to compromise with the quality offered by Apple’s video editor iMovie. Well, iMovie is perfect for getting started for beginners. But, the professionals and ones who want a bit high features than basic ones should look elsewhere. Thus, we always recommend alternatives to a particular software for our audience. In this article, there is a mention of Wondershare Filmora to overcome the drawbacks of iMovie.
Without further ado, let’s begin with how to upload a video from iMovie to YouTube. We want to lead with the best iMovie export settings, specific troubleshooting issues, and our alternative intro section to overcome iMovie’s limitations.
Part 1: How to Upload a Video from iMovie to YouTube?
iMovie is ideal for making YouTube videos if you are too basic and are not looking for advanced features. Remember that professionalism pays in these platforms and helps you stand better among others. If you’re still interested in making introductory videos, here is a step-by-step guide on uploading a video to YouTube from iMovie on Mac first and leading with iPhone.
Step-by-Step Tutorial on how to upload a video from iMovie to YouTube on Mac
Step 1: Create a Project
On the first step, go to iMovie on Mac and click the Create New tab below.
Step 2: Import Media
Click the Import Media button and browse the files on your computer, as shown below.
Step 3: Edit Clips
It’s time to edit video footage. Drag your video to the timeline, as shown below.
Then, you can trim and drag the edges of video clips to allow editing.
Step 4: Add Titles
You can add titles by clicking the Title tab and further drag the Title’s template into the timeline.
Step 5: Export the Video
Click the Export button as follows after editing is over.
Select YouTube to upload your video over the platform directly.
Step 6: Save
After selecting the desired platform, click the Next tab to proceed with saving the file.
At last, save your video as shown below.
Step-by-Step Tutorial on how to upload iMovie to YouTube from iPhone
Step 1: Share the iMovie Project
Go to iMovie on your iPhone. Open the iMovie project on your iPhone and tap the Share button to select YouTube. Enter the information of Title, Description, Size, Tags, Privacy, and Location (optional).
Step 2: Upload iMovie Files
For ease of use, you can upload saved videos in Photo Library on your iPhone. Then, you can upload iMovie videos via the YouTube iOS app. Sign In to YouTube and click the Camera icon at the top of the Home page. Select your iPhone Photo Library file and set the video Title, Description, Size, Tags, and Privacy. Then, hit the Upload button to confirm.
Part 2: The Best iMovie Export Settings for YouTube Videos
As we all know that iMovie consists of a bit long procedure to export projects. Here are some tips on the best iMovie export settings to avoid an unnecessary headache.
- Set small resolution: Small resolution plays a more significant role, especially while uploading. Thus, you can set the smallest resolution in the Email tab of the Export button.
2. Change Export settings in the File tab: There is a File tab under the Export button. Click it and find various settings that you need to change to get the best export settings for YouTube 2021. Make the Title of the video as small as possible. Set the resolution at 1080P than 4K.
However, it isn’t going to upgrade the resolution if your video is already in the 1080P definition. Now, the last setting that will crazily offer you the best quality and lots of space-saving. You have to select Best (ProRes) in quality settings for this purpose. These settings also take less time to upload to YouTube.
3. Compress is not for speed: Various options you see in the Compresstab are not for speed. They are for how you save the video on a desktop. Thus, always choose the Better Quality tab than Faster.
- Do not export directly to YouTube: iMovie is pretty basic and doesn’t offer great settings to upload your video instantly. You may have to make changes to the uploaded video even if you do this as per our step-by-step guide mentioned above.
Part 3: How to fix the “Failed to Upload to YouTube” Error on iMovie?
The “iMovie to YouTube failed” problem occurs when you directly upload a YouTube video from iMovie. The issue will result if you upload from any third-party uploader. That is why the direct upload doesn’t work, especially in iMovie. You can opt to share your video to the desktop first and then drag it to upload to the YouTube platform.
Part 4: Upload Videos to YouTube with the Best Alternative to iMovie - Wondershare Filmora
“What can I use instead of iMovie to overcome its limitations?”
When you see that iMovie is not uploading to YouTube or iMovie upload to YouTube got stuck, go for a better alternative. In this section, we’d like to recommend Wondershare Filmora that offers the best export settings compared to iMovie. It is the go-to solution if you can’t upload video from iMovie to YouTube directly. Filmora further provides intuitive editing tools that professionally make your YouTube video projects.
Export Key Aspects of Wondershare Filmora in comparison to iMovie:
- It offers a long list of export resolutions to choose from.
- You get separate video and audio settings such as Encoder, Channel, Frame Rate, Bit Rate, Resolution, etc.
- It is further compatible with export to various devices including the iPhone, Samsung, iPod, Apple TV, iPad, Google Pixel, PSP, Smart TV, etc.
Step-by-Step Guide on how to upload a video from iMovie to YouTube via Wondershare Filmora
Step 1: Click the Export button and select resolution
After your project in Wondershare Filmora is over, click the Export tab and select video resolution from the Local tab, as shown below.
It has a list of formats. You can also edit the Name and saving location here.
Step 2: Select Quality
Select the Settings button and choose from three quality levels of Best, Better, and Good. You can also adjust video and audio parameters, including the Encoder, Frame Rate, Resolution, Bit Rate, etc.
Step 3: Select platform
Select the YouTube tab, Sign In to your YouTube account, and hit the Export button after modifying the Title and Quality if needed. Also, make sure to check the Enable GPU accelerated video encoding tab.
Select Wondershare Filmora as the ultimate solution even if iMovie upload to YouTube not showing up.
Conclusion
Hopefully, we’ve informed you of the relevant facts on how to upload a video from iMovie to YouTube. We have also examined the number of troubleshooting issues involved in the iMovie video editor. Well, you will get to face similar kinds of export difficulties in the iMovie editor. Also, the entire procedure to end the exporting task is a bit long in iMovie compared to any other video editing software. Thus, it’s crucial to check out what other alternatives the technological world has today. We can’t state to you a better beginner-friendly yet advanced editing option than Wondershare Filmora that rightly outtakes the iMovie video editor in all aspects.
Liza Brown
Liza Brown is a writer and a lover of all things video.
Follow @Liza Brown
Also read:
- 2024 Approved Download YouTube's Best Moments Without Full Streaming
- Twice the Joy, Twice the Fun Televised Repetition Made Easy
- 2024 Approved 10 Top Editing Apps at No Cost Online
- [New] Achieve Financial Insight The Simple Three Steps To Assess YouTube Earning Potential
- Uncover the Best 12 Flipscreen Vlogging Cameras on a Budget
- [Updated] Boosting Clickthrough Rates with Attention-Grabbing YouTube Thumbnails
- [Updated] Assessing the Impact of Purchased View Count on Channels
- Easy-to-Navigate Top 10 YouTube Downloader Tools
- Opening Doors Creating an Account on YouTube
- Earnings Expansion on Glamour Channels for 2024
- Video Valedictions Sign-Off Strategies for Online Platforms
- Mastering YouTube Tagging for Content Visibility
- [New] A Comprehensive Walkthrough for Embedding YouTube Plays in Web Design
- Elevate Your Shots Vlogger's Guide to the 9 Finest Camera Gadgets
- [New] Access the Archived Unique Methods for Viewing Old YouTube
- Enjoy Every Frame Best Free Download Apps for Mobile Devices for 2024
- 2024 Approved Detailed Insights Into YouTube's Monthly Income Model
- In 2024, Dive Into the World of Youtuber Shorts
- Simplified Design Guide Add Your Own Style to Your Video Shorts
- Ecological Architecture Merging Nature and City Planning
- [New] Escalate Your Channel's Popularity to 1K+
- [New] Enhancing Your Spotify Collection with YouTube Music Integration
- [Updated] EditEssence System
- Elevate Your Smartphone Shots Best Camera Accessories for Filmmakers
- 2024 Approved Diversify Your Watchlist - The Top 27 Non-YouTube Video Hubs
- [Updated] Affordable Methods to Craft Your Own YouTube Intros
- [New] Discord Live Stream Recording Guide
- In 2024, 5 Techniques to Transfer Data from Infinix Hot 40 Pro to iPhone 15/14/13/12 | Dr.fone
- Updated Free Video Editing Made Easy Top Online Choices for 2024
- 2024 Approved Android & iPhone's Powerful Picklist Boosting Facebook Likeability
- [New] In 2024, From Observing to Involved The TikTok Life Journey
- Updated How to Add Green Screen in OBS for 2024
- In 2024, How to Exclude Unwanted Sounds in Your Recordings Using Audacity
- In 2024, Dominating TikTok The Ultimate List of Trending Tags
- Spotify Keeps Crashing A Complete List of Fixes You Can Use on Vivo Y100 | Dr.fone
- Unlock Your Device iCloud DNS Bypass Explained and Tested, Plus Easy Alternatives On iPhone 7
- Title: Youtube’s Top 5 Apps That Trim Your Long Video Links Down
- Author: Kevin
- Created at : 2024-05-25 16:57:39
- Updated at : 2024-05-26 16:57:39
- Link: https://youtube-videos.techidaily.com/youtubes-top-5-apps-that-trim-your-long-video-links-down/
- License: This work is licensed under CC BY-NC-SA 4.0.
