
:max_bytes(150000):strip_icc()/fernando-hernandez-DoWI-BnPPMo-unsplash-294289923b2642479e748a2591e45095.jpg)
YouTube Thumbnails Revamp with Vibrant Neon Borders
YouTube Thumbnails Revamp with Vibrant Neon Borders
Your YouTube video, or any other clip published on any forum, gets a larger number of hits if it has an attractive thumbnail. And, the fact is, a thumbnail becomes 10x more attractive when the main character that the image has have a neon border around it.
With that said, in the following sections, you will learn a couple of methods on how to add a YouTube thumbnail border around the main characters and/or objects that are significant to the clip.
In this article
01 Add Glowing Neon Border to YouTube Thumbnail with Filmora
02 Add a Glowing Neon Border in YouTube Thumbnail with Canva
03 Outline a Person in a YouTube Thumbnail with Photoshop
Part 1: How to Add Neon Border to YouTube Thumbnail for Free with Filmora
Being one of the most versatile and intuitive post-production tools available in the market today, Wondershare Filmora X allows you to add a neon border to a YouTube thumbnail quite conveniently. You can learn how to get this done on Windows or Mac by following the steps given below.
For Win 7 or later (64-bit)
For macOS 10.12 or later
Step 1: Define Project Settings and Add Image to the Timeline
Launch Wondershare Filmora X on your PC (a MacBook Pro M1 is used here), ensure that the project aspect ratio is set to 16:9 (Widescreen) on the splash screen, and click New Project. On the main interface, click the Preview quality and display settings icon from the upper-right area of the Timeline, click Change Project Aspect Ratio, click to select 1280 x 720 (HD) from the Resolution menu of the Project Settings box, and click OK to save the custom project settings.

Then select My Media from the menu bar if not already selected, click Project Media from the navigation pane, and click Import from the Media box to select and import the image of the main character or object that you want to use in the thumbnail.

Now, drag the image from the Media box to the Timeline at the bottom.

Step 2: Clear Image Background, Add Border, and Add Custom Background
Go to Effects from the menu bar, click to select the Default tab and then AI Portrait from the navigation pane, and click and drag the Human Segmentation preset from the right box, and place it over the image track in the Timeline.

Double-click the image layer, scroll down the upper-left box to the Video Effects section, and use the Edge Thickness and Edge Feather sliders to adjust the character’s edges to make them as realistic as possible. Click OK when done.

Next, click and drag the Human Border preset over the image track in the Timeline, and follow the same procedure to customize the border. This will give the character a neon border effect.

Now, use the method explained earlier to import a custom image for the background, and drag and place it under the previous track in the Timeline.

If you are running the latest version of Filmora, you will find there are some neon light effects available under AI Portrait as well.

Step 3: Add Titles to Thumbnail
Go to Titles from the menu bar, click to select the Default tab and then Lower 3rds from the navigation pane, and click and drag your preferred lower-third preset from the right window to a separate layer in the Timeline. Double-click the lower-third layer, and use the available options in the upper-left window to change the text, its color, etc., and drag the textbox to place it to your preferred position on the image as well. Click OK to save the changes.
Next, click to select Titles from the navigation pane, and drag your preferred title from the right window to the upper-most track in the Timeline. Now use the method explained earlier to edit the text, its color, position, etc. to make it look professional.

For more tips and tricks for creating YouTube thumbnail, you can check this You Tube thumbnail creating guide.
Step 4: Get the Neon Border Thumbnail
Click the Snapshot (Camera) icon from the upper-right area of the Timeline, go to My Media from the menu bar, right-click the thumbnail of the screenshot you captured, and click Reveal in Finder (on Mac) or Reveal in Explorer (on Windows) to get to the folder the YouTube thumbnail border is saved in.

Part 2: How to Add a Glowing Neon Border in Your YouTube Thumbnail with Canva
Canva is another intuitive editing program that works on the web interface rather than having you download and install an app on your PC. You can add a neon border for YouTube thumbnails using Canva by following the instructions given below:
Step 1: Define Project Settings and Add a Background
After signing in to your Canva account, click Create a design from the top-right corner of the page, click Custom size from the bottom, define 1280 and 720 in the Width and Height fields on the box that appears respectively, and click Create new design.

Now, click to select Background from the navigation bar on the left (if the Background tool is not visible, click More and then choose Background from the expanded list), and click to select a background from the images available in the center pane.

Step 2: Upload an Image and Add Effects
Click Uploads from the navigation bar, click the More icon from the right of the Upload media button present at the top of the center pane, choose your preferred method to upload the image (with the transparent background) that you want to use, upload the image, and drag it from the center pane to the Canvas.
Note: You can use any of the tools available online to remove the background from your image for free.

To add a YouTube thumbnail border, make sure that the image that you added to the Canvas is selected, click the Duplicate icon from the upper-right area, and use the scaling handles of the copy of the image to increase its size a bit. Reposition the image back to its original location as well.
Then, click Edit image from the upper-left corner of the Canvas, click Duotone from the Edit image pane at the center, if need be, click See all, choose your preferred duotone effect to apply on the image, choose your preferred highlight and shadow colors from the box that appears next, and click Back from the top of the pane.

Next, click See all next to the Adjust section from the center pane, and drag the Blur slider to the right to increase the blur effect on the image.

Step 3: Position the Layers
While keeping the duplicate image selected, click the Position button from the upper-right area of the Canvas, and click Background to send the second image behind the first one to get the neon border effect for the photo.

Part 3: How to Outline a Person in a YouTube Thumbnail with Photoshop
Because YouTube thumbnails are nothing but static images, creating YouTube thumbnail border with Adobe Photoshop is comparatively easier. The process of doing this is given below:
Step 1: Define Document Preferences and Import an Image
Launch Adobe Photoshop on your PC, click Create new, and on the New Document customization box, define the width and height values to 1280 and 720 pixels respectively. Select Transparent from the Background Contents menu as well if not already selected. Click Create from the bottom to create a new Photoshop document with the specified document settings. Next, open the folder that contains the source image, drag the photo to Photoshop, and press Enter to place the photo.

Step 2: Remove Background from the Image
Make sure that the image layer is selected in the Layers panel on the right, go to Select from the menu bar at the top, and click Subject. From the bottom of the Layers panel, click the Add a mask icon to get rid of the background, leaving only the human on the Canvas.

Step 3: Add a Custom Background and an Outline Around the Subject
Use the method explained earlier to import a background image of your choice to Photoshop. Drag the background image layer to the bottom in the Layers panel. Double-click the masked layer, click to select Stroke from the left pane of the Layer Style box, and use the options available on the right to manage the size, color, position, etc. of the stroke that has been added around the human subject. Click OK when done, and then export the image normally to use it as a YouTube thumbnail border.

Summary
It is important to know that the default resolution of a YouTube thumbnail is 1280 x 720 pixels that is usually written and referred to as 720p. While adding a YouTube thumbnail border, it is also imperative to have a good sense of color combination and fonts. Furthermore, a decent tool like Wondershare Filmora X must be used to add an appealing neon border around the main subject in the thumbnail image easily and quickly.
02 Add a Glowing Neon Border in YouTube Thumbnail with Canva
03 Outline a Person in a YouTube Thumbnail with Photoshop
Part 1: How to Add Neon Border to YouTube Thumbnail for Free with Filmora
Being one of the most versatile and intuitive post-production tools available in the market today, Wondershare Filmora X allows you to add a neon border to a YouTube thumbnail quite conveniently. You can learn how to get this done on Windows or Mac by following the steps given below.
For Win 7 or later (64-bit)
For macOS 10.12 or later
Step 1: Define Project Settings and Add Image to the Timeline
Launch Wondershare Filmora X on your PC (a MacBook Pro M1 is used here), ensure that the project aspect ratio is set to 16:9 (Widescreen) on the splash screen, and click New Project. On the main interface, click the Preview quality and display settings icon from the upper-right area of the Timeline, click Change Project Aspect Ratio, click to select 1280 x 720 (HD) from the Resolution menu of the Project Settings box, and click OK to save the custom project settings.
Then select My Media from the menu bar if not already selected, click Project Media from the navigation pane, and click Import from the Media box to select and import the image of the main character or object that you want to use in the thumbnail.
Now, drag the image from the Media box to the Timeline at the bottom.
Step 2: Clear Image Background, Add Border, and Add Custom Background
Go to Effects from the menu bar, click to select the Default tab and then AI Portrait from the navigation pane, and click and drag the Human Segmentation preset from the right box, and place it over the image track in the Timeline.
Double-click the image layer, scroll down the upper-left box to the Video Effects section, and use the Edge Thickness and Edge Feather sliders to adjust the character’s edges to make them as realistic as possible. Click OK when done.
Next, click and drag the Human Border preset over the image track in the Timeline, and follow the same procedure to customize the border. This will give the character a neon border effect.
Now, use the method explained earlier to import a custom image for the background, and drag and place it under the previous track in the Timeline.
If you are running the latest version of Filmora, you will find there are some neon light effects available under AI Portrait as well.
Step 3: Add Titles to Thumbnail
Go to Titles from the menu bar, click to select the Default tab and then Lower 3rds from the navigation pane, and click and drag your preferred lower-third preset from the right window to a separate layer in the Timeline. Double-click the lower-third layer, and use the available options in the upper-left window to change the text, its color, etc., and drag the textbox to place it to your preferred position on the image as well. Click OK to save the changes.
Next, click to select Titles from the navigation pane, and drag your preferred title from the right window to the upper-most track in the Timeline. Now use the method explained earlier to edit the text, its color, position, etc. to make it look professional.
For more tips and tricks for creating YouTube thumbnail, you can check this You Tube thumbnail creating guide.
Step 4: Get the Neon Border Thumbnail
Click the Snapshot (Camera) icon from the upper-right area of the Timeline, go to My Media from the menu bar, right-click the thumbnail of the screenshot you captured, and click Reveal in Finder (on Mac) or Reveal in Explorer (on Windows) to get to the folder the YouTube thumbnail border is saved in.
Part 2: How to Add a Glowing Neon Border in Your YouTube Thumbnail with Canva
Canva is another intuitive editing program that works on the web interface rather than having you download and install an app on your PC. You can add a neon border for YouTube thumbnails using Canva by following the instructions given below:
Step 1: Define Project Settings and Add a Background
After signing in to your Canva account, click Create a design from the top-right corner of the page, click Custom size from the bottom, define 1280 and 720 in the Width and Height fields on the box that appears respectively, and click Create new design.
Now, click to select Background from the navigation bar on the left (if the Background tool is not visible, click More and then choose Background from the expanded list), and click to select a background from the images available in the center pane.
Step 2: Upload an Image and Add Effects
Click Uploads from the navigation bar, click the More icon from the right of the Upload media button present at the top of the center pane, choose your preferred method to upload the image (with the transparent background) that you want to use, upload the image, and drag it from the center pane to the Canvas.
Note: You can use any of the tools available online to remove the background from your image for free.
To add a YouTube thumbnail border, make sure that the image that you added to the Canvas is selected, click the Duplicate icon from the upper-right area, and use the scaling handles of the copy of the image to increase its size a bit. Reposition the image back to its original location as well.
Then, click Edit image from the upper-left corner of the Canvas, click Duotone from the Edit image pane at the center, if need be, click See all, choose your preferred duotone effect to apply on the image, choose your preferred highlight and shadow colors from the box that appears next, and click Back from the top of the pane.
Next, click See all next to the Adjust section from the center pane, and drag the Blur slider to the right to increase the blur effect on the image.
Step 3: Position the Layers
While keeping the duplicate image selected, click the Position button from the upper-right area of the Canvas, and click Background to send the second image behind the first one to get the neon border effect for the photo.
Part 3: How to Outline a Person in a YouTube Thumbnail with Photoshop
Because YouTube thumbnails are nothing but static images, creating YouTube thumbnail border with Adobe Photoshop is comparatively easier. The process of doing this is given below:
Step 1: Define Document Preferences and Import an Image
Launch Adobe Photoshop on your PC, click Create new, and on the New Document customization box, define the width and height values to 1280 and 720 pixels respectively. Select Transparent from the Background Contents menu as well if not already selected. Click Create from the bottom to create a new Photoshop document with the specified document settings. Next, open the folder that contains the source image, drag the photo to Photoshop, and press Enter to place the photo.
Step 2: Remove Background from the Image
Make sure that the image layer is selected in the Layers panel on the right, go to Select from the menu bar at the top, and click Subject. From the bottom of the Layers panel, click the Add a mask icon to get rid of the background, leaving only the human on the Canvas.
Step 3: Add a Custom Background and an Outline Around the Subject
Use the method explained earlier to import a background image of your choice to Photoshop. Drag the background image layer to the bottom in the Layers panel. Double-click the masked layer, click to select Stroke from the left pane of the Layer Style box, and use the options available on the right to manage the size, color, position, etc. of the stroke that has been added around the human subject. Click OK when done, and then export the image normally to use it as a YouTube thumbnail border.
Summary
It is important to know that the default resolution of a YouTube thumbnail is 1280 x 720 pixels that is usually written and referred to as 720p. While adding a YouTube thumbnail border, it is also imperative to have a good sense of color combination and fonts. Furthermore, a decent tool like Wondershare Filmora X must be used to add an appealing neon border around the main subject in the thumbnail image easily and quickly.
Digital Domain Decision: Which Platform for Your Videos?
Create Your YouTube Shorts with Wondershare Filmora
An easy and powerful YouTube Shorts editor
Numerous video and audio effects to choose from
Detailed tutorials provided by the official channel
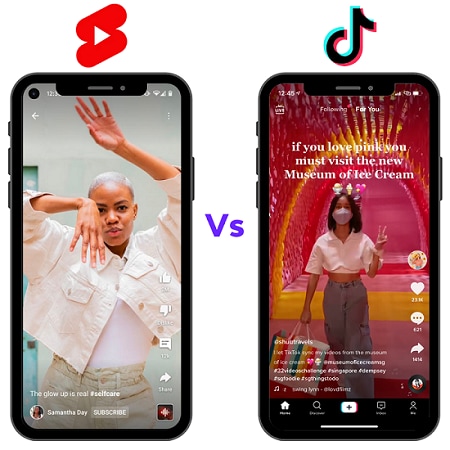
Social media platform is a solace to many users. You get entertained and also have a chance to share your videos with the world. Among the popular apps are TikTok and Shorts. TikTok got to the market earlier but has so far found a new competitor in the field. Shorts video has now fully emerged from YouTube and has almost the same playing ground. But it is still unclear whether YouTube Shorts and TikTok are comparable. While TikTok has over 2 billion downloads, YouTube, on the other hand, already has a massive audience for the tough tussle.
Both TikTok and Shorts give both creators and viewers the chance to share short videos for entertainment and promotional purposes. However, they are different in various aspects. Both the apps have their disadvantages and advantages, depending on a user’s preference. Dive into the next section to discover whether TikTok’s impact is about to be threatened by YouTube Shorts.
In this article
01 Are YouTube Shorts and Tiktok the same thing?
02 YouTube Shorts & TikTok: Which one Should You Choose for Personal Usage?
03 How to make quality videos for the apps you choose?
Are YouTube Shorts and Tiktok the same thing?
Shorts and TikTok are not the same in various ways. TikTok first emerged in the market way before Shorts. TikTok was initially known as musically; and later revamped fully as TikTok in 2016. It immediately gained a massive audience worldwide. This is what brought about competition from other apps, trying to replicate TikTok. Apps like Instagram and Facebook added some functionality to their platform to no match. Finally, YouTube pulled it off in 2020, rolling its version of Short videos but in beta version. These two apps have adequate similarities and differences.
They are both for short-form videos and allow creators to add music from audio libraries. You can also earn some good bucks with these two apps. However, they differ in some aspects. As Shorts can only be 15-seconds long, TikTok can go as long as three minutes. You can also view TikTok directly from its app while for Shorts, you need a separate app, YouTube.
YouTube Shorts & TikTok: Which one Should You Choose for Personal Usage?
Let’s focus on the TikTok and Shorts video by perusing the similarities and differences deeply.
- Similiarity
Check out in which aspects TikTok and Shorts are similar to each other.
1) Monetization
Both platforms provide creators with tools to earn money from their content. TikTok’s first move was to pay selected influencers about $500 for joining the app and creating content. Creators make money from TikTok by promoting products and services of their audience as well as launching their careers through the app. Likewise, brands also get to creators through the “TikTok Creator Marketplace” platform for promotions.
You can also earn on YouTube Shorts from Google AdSense. This is an in-built video monetization that creators use for showing ads on their videos. Earnings will accumulate every month-end for withdrawal.
2) Analytics
Both YouTube and Shorts offer analytics like adding comments, likes, shares, and many more. Likewise, you can view your videos on either desktop or mobile platforms. With both platforms, you get an endless number of videos to watch and discover by scrolling. Also, both apps focus on short videos to entertain viewers.
3) Subscribe directly to creators
You can directly get in touch with both YouTube shorts and TikTok creators. This gives an open leeway to discover new creators to follow and subscribe to. All you need to do is go to the creators’ videos in both feeds and hit the “Follow” or “Subscribe” button. Henceforth, you’ll start seeing what they post and keep in touch with their signs of progress.
4) Privacy
Both apps have taken consideration into privacy issues. They allow creators to set their videos to either private or public. By this, your audience will only view what is set as “Public”. You can deter this by setting your content to “Private” or choosing who can view your content. This is a good aspect to let only those who wish to view certain clips as per your wish.
5) Edit video
There’s much that your video can portray. In both apps, you choose what to give to your audience. Both platforms enable you edit your video before posting. You can alter the speed by increasing or decreasing it for slow motion. Also, you can set timers to help with the filming process among other functionalities.
- Difference
1) Instant messaging app
Generally, YouTube is not a traditional social media platform. Even though YouTube Shorts allows users to create videos, it is not a platform that users can engage in communication via instant messaging app. On the other hand, TikTok lets you directly message other users as you share experiences. This makes TikTok a one-stop social media exchange point where you easily interact with your peers and get instant feedback. You can also create group chats and keep the fun going.
2) In dependability
TikTok Shorts videos also differ from the concept of stand along and built-in features. TikTok is a standalone app that doesn’t depend on another app for its normal operations. Users can independently create content directly from the app. On the contrary, Shorts is a built-in app on YouTube and users have to access it via the YouTube platform. This may be a plus for YouTube but it could eventually turn away those who want to work independently from the app.
3) Interface
With TikTok, users can add video captions from the bottom left of the screen. It also comprises a large library of editing precepts like filters, greenscreen effects, among others. YouTube Shorts, on the other hand, is rich in a library of music. Users can access popular songs and directly switch to YouTube for trending videos as well.
- What More Should You Consider When Choosing - Your Personal Need
Settling on YouTube Shorts and TikTok largely depends on your preferences. But being that TikTok has been in the limelight for a longer time, it has mastered users’ and creators’ preferences, bringing more to the table than YouTube Shorts.
Both TikTok and Shorts have an immense user base. But being a standalone app, TikTok still has a chance of scaling the heights. Remember that Shorts is still in the “Beta” version and has not fully exploded even though it’s a built-in app on YouTube.
TikTok stands a chance of being chosen by many users as it is an independent platform. Users can connect with friends through news feed content or messaging. When it comes to editing tools, the app’s extensive library lets you add presets to your taste. It constantly keeps creators at bay, rolling new filters and effects for the unique creation of content. Additionally, TikTok engages users via its “Q&A” feature where users can pose any hot questions to creators for answers. And beauty is that creators can respond to such comments with a video. More so, you can use the “Discovery” tab to view trending hashtags and sounds, which YouTube Shorts lack.
With TikTok, users can add video captions from the bottom left of the screen. It also comprises a large library of editing precepts like filters, greenscreen effects, among others. YouTube Shorts, on the other hand, is rich in a library of music. Users can access popular songs and directly switch to YouTube for trending videos as well.
How to make quality videos for the apps you choose?
Even though TikTok and YouTube Shorts both let you edit your videos, you can stile up your game with other editing apps like Filmora. This app will save your time and effort while giving you compelling video outcomes. Filmora comprises advanced features such as social import to let you import video clips and photos from social media platforms. Filmora is available on both Windows and Mac, widely accessible on a vast array of devices.
- Video effects: Easily discover creative filters, transitions, and other motion elements.
- Split Screen: This feature lets you uniquely create fun videos by multiplying or splitting the screen.
- Color match: Apply color correction settings on various clips at once.
- Remove noise: Filmora lets you remove background noise, giving you quality video output.
For Win 7 or later (64-bit)
For macOS 10.12 or later
Conclusion
Settling on Shorts or Tiktok will largely depend on your preferences and personal needs. If you are looking for short video promotion on YouTube Shorts and Tiktok , you may need to consider different things. Yes, Shorts has some upper hand over TikTok like the ability to edit your videos after being published, a dislike button, and a scheduling tool that lets you schedule when your video goes live. TikTok is still above the cut being that it has been here long before Shorts. More so, it offers advanced editing features for quality video output. Above all, it works independently, a feature that most users adore as compared to the encasing of Shorts within YouTube.
Also read:
- 2024 Approved Cutting-Edge PC Techniques for Stellar YouTube Video Production
- 2024 Approved Crafting Compelling Narratives with Strategic YouTube Banners
- [Updated] Charting the Course for Your YouTube Music Narrative
- Student's Guide to Top 10 Best History YouTube Sources
- [New] Anime for Your Life’s Highlights Today's Most Captivating Streaming Channels [2023 New]
- In 2024, Discover the Best Tools & Tips to Accurately Tag Your Videos
- In 2024, Crafting Captivating Video Narratives for YouTube Success
- Dive Into Video Production Mastering Green Screens on YT
- Expert Tips Migrating Twitch Videos to YouTube
- Elevate Your Mobile Shoot - Ranking the Best 9 CamGear Innovations
- In 2024, Direct From Device to Digital World Recording Your Apple Gadgets
- Making Monetization Measurable Joining YouTube's 2024 Partnership
- [Updated] Discovering the Secret to Engaging Content with ASPECT RATIOS in YOUTUBE
- [Updated] Enhance Creativity With 6 Premium and Complimentary Video Downloaders
- Breakthrough Tools An Analysis of the Top 10 Cost-Effective Video Design Schools on YouTube for 2024
- [New] Crafting a Viral Video Journey 6 Key Strategies on YouTube
- Elevate Your YT Presence and Skyrocket To 1000+ Fans
- Quick Realignment YouTube on Mac Display Ratio
- Enhance Youtubes' Conversations with Emojis
- 2024 Approved Best Transcription Aid for Your YouTube Videos
- Elevate Your Streaming Game From Twitch Viewers to YouTube Fans
- Revolutionizing Channel Presence The Secret of Higher Subscriber Numbers
- [Updated] Elevate Video Content with Proven Strategies for YouTube Shorts Growth
- Upload YouTube Shorts Detailed Instructions From Desktop/Mobile
- 2024 Approved Essential Science YouTube Networks Expand Your Mind
- Step-by-Step Designing a Standout YouTube Video Intro
- [New] Achieve More Views Tailoring and Scaling YouTube Images
- The Director's Toolkit YouTube Lessons on Film Making
- [Updated] A Filmmaker's Approach to YouTube Splitscreen Videos
- [Updated] Direct Download Destiny #10 Online Tool Reviewers' Choice
- Cut the Cord Clutter Simultaneous Playthrough of Videos for 2024
- A Step-by-Step Expedition to YouTube's Unseen Layers for 2024
- Valorant Portraits - Instant Professional Thumbnail Designs
- [Updated] Best Practices Choosing YouTube's Most Popular Video Formats
- [Updated] Entry Level Landing Low-Cost, Profitable YouTube Platforms
- Branding in Videos Incorporating Logos/Watermarks for YouTube Content for 2024
- Discover Essential YouTube Music Channels for 2024
- 2024 Approved Bypass Latency with AV1 in YouTube Settings
- Comprehensible Guide to High-Quality Audios on YouTube for 2024
- 2024 Approved A Step-by-Step Strategy for Merging Your YouTube & TikTok Presence
- In 2024, Amass 1,000 Visionary Supporters Fast-Track Style
- In 2024, Beat Buzzers Up-and-Coming Background Scores For YT Shorts
- Elevate Thumbnails Fantasy Elements Added for 2024
- Epic Entertainment A Rundown of Hilarious YouTuber Hits for 2024
- In 2024, Analyzing the Post-Upload Process in YouTube's Ecosystem
- In 2024, Your Ultimate Selfie Validation Handbook
- Updated 2024 Approved Get Noticed on Facebook The Importance of Proper Video Cover Sizing
- All Things You Need to Know about Wipe Data/Factory Reset For Xiaomi Redmi A2+ | Dr.fone
- [New] 2024 Approved Twitter Video Requirement - Aspect Ratio
- 2024 Approved Unmissable Virtual Realms for Gamers
- 10 Best Music Video Templates to Make Your Video Popular for 2024
- New In 2024, VideoForge Mac Edition
- New In 2024, Free Video Editing Software for Old PCs 32-Bit Windows Compatibility
- [Updated] Snapchat Ad 101 Create Stunning & Effective Snapchat Ads for 2024
- In 2024, How to use iSpoofer on Vivo S17e? | Dr.fone
- [New] How Superficial Shares Spell Social Deterioration
- [Updated] IPad Timelapse Essentials for Beginners
- [Updated] In 2024, Ultimate Collection #Top 6 FB Lite Vids
- 2024 Approved PC and Mac's Best Screenshot Apps Ranked
- 2024 Approved Prime Choices Beyond OBS for Video Capture
- [Updated] Android Photography Excellence Tips and Tools
- Undead Unleashed Discovering the Ultimate Zombie Games
- Master iPhone's Artistic Capabilities Capturing Movement Blur
- [Updated] 2024 Approved Unveiling the Hidden Process of Downloading Fb Content
- Best iPhone Video Editors Ranked and Reviewed for 2024
- In 2024, How to Unlock iPhone 6s Plus When We Dont Have Apple ID or Password?
- Troubleshooting Guide How to Fix an Unresponsive Poco F5 Pro 5G Screen | Dr.fone
- The Ultimate 3GP Video Cutter Tutorial 2023 Edition for 2024
- In 2024, The Essentials for Dominating Instagram Stories
- Updated Top Free Animation Tools for Windows and Mac Users for 2024
- Dynamic Presentations How to Integrate Screens Into Online Spaces for 2024
- Top 15 Augmented Reality Games Like Pokémon GO To Play On Oppo Find N3 Flip | Dr.fone
- 9 Best Free Android Monitoring Apps to Monitor Phone Remotely For your Nubia Red Magic 8S Pro+ | Dr.fone
- 2024 Approved How to Archive Your Nintendo Switch Gameplay
- [New] Elevate Your Videos Advanced Recording in Adobe Presenter for 2024
- [New] In 2024, Social Exploration Pinpointing Popular Videos on the World's Biggest Network
- Recover your photos after Motorola Moto G84 5G has been deleted.
- In 2024, Easily Unlock Your Nokia 130 Music Device SIM
- Getting the Pokemon Go GPS Signal Not Found 11 Error in Oppo Reno 10 Pro 5G | Dr.fone
- In 2024, 3 Ways to Fake GPS Without Root On Vivo Y200 | Dr.fone
- Hassle-Free Ways to Remove FRP Lock on Oppo A2with/without a PC
- In 2024, 4 Most-Known Ways to Find Someone on Tinder For Realme C67 4G by Name | Dr.fone
- In 2024, How To Remove Phone Number From Your Apple ID on Your iPhone 15 Plus?
- How to Fix My Xiaomi Redmi 13C 5G Location Is Wrong | Dr.fone
- [New] 2024 Approved Capture Discord Conversations with These Top Free Apps
- 2024 Approved Transforming Ideas Into Engaging Captivate Content
- Guide on How To Erase iPhone XS Max Devices Entirely | Dr.fone
- [New] Surgical Switch Mastering the Process of Changing Your TikTok Username
- Title: YouTube Thumbnails Revamp with Vibrant Neon Borders
- Author: Kevin
- Created at : 2024-05-25 16:57:01
- Updated at : 2024-05-26 16:57:01
- Link: https://youtube-videos.techidaily.com/youtube-thumbnails-revamp-with-vibrant-neon-borders/
- License: This work is licensed under CC BY-NC-SA 4.0.
