
:max_bytes(150000):strip_icc():format(webp)/GettyImages-1353420724-65161751b9924195880d3273e327cb54.jpg)
"YouTube Promo Mastery Pro Tips & Techniques"
YouTube Promo Mastery: Pro Tips & Techniques
While there are a lot of ways you could advertise your business online, YouTube video ads are quickly becoming the most popular advertising solution. This is because more and more people choose to watch videos than any other form of video.
But to make sure that you are putting your best foot forward when it comes to video ads, you need to invest in a YouTube ad creator that is easy to use and effective. Here, we will be looking at the best YouTube video creators that you can use.
Why Use YouTube Video Ads
Before we look at some of the tools you can use to create YouTube video ads, it is important to mention some of the reasons why you may want to choose YouTube ads over other solutions. YouTube ads when compared to PPC are relatively cheaper and you also choose how much you are willing to pay when a user clicks on the ads. This makes it unlikely that you could spend more than you intended to.
YouTube ads are also more targeted than any other form of advertising. You have a lot of options when choosing who you want to target including metrics such as demographics, topics, similar audiences, customer matches, life events, and more.
Since the ad is a video, it generates far more engagement than a text ad on any other platform. Even though it is an ad, the video is still a great way for your brand to connect with potential audiences.
Types of Video Ads for YouTube
The following are the different types of YouTube ads that you can create;
**Video Discovery
Video discover ads appear on the search page results and are usually composed of a thumbnail image and a few lines of text. They also have a very recognizable “Ad” in the box to let all users know that this is sponsored content.
**In-Stream Ads
In-stream video ads can be skippable or non-skippable. Skippable in-stream video ads will often play for a minimum of 5 seconds before allowing the user to skip to the video content. Non-skippable in-stream video ads do not have the “skip” button and the user has to watch the video to the end.
**Pre-roll Ads
A pre-roll ad is just an in-stream ad that is not skippable. It doesn’t give the user the option of skipping the app and they have to watch the entire ad before they can watch the video. The pre-roll video ad is usually 15 to 60 seconds long.
**Bumper Ads
Bumper ads are tiny non-skippable 6-second ads that will play right before the video content loads. They can be an ideal way to promote an event or a new brand. Since they are only 6 seconds long, they can be very easy to make.
Best YouTube Ad Creators
The following are the best YouTube ad creators that you can use to make your YouTube video ad;
Filmora
Best For: All Types of YouTube Video ads
Price: Free Trial Available with plans starting from $54.99 a year.
Rating: 4.8/5
Wondershare Filmora is one of the best video creation software in the market and therefore can be very useful when creating YouTube video ads of any kind. It has powerful features that can benefit both beginner and professional users, allowing users to create stunning videos of any length.
For Win 7 or later (64-bit)
For macOS 10.12 or later
It comes with a library of more than 300 templates, filters, overlays, and numerous other effects that you can use to create your video. You can even add audio and music to the video to make your ad stand out more.
Animoto
Best For: All Types of YouTube Video Ads
Price: A free plan is available with paid plans starting from $15 a month
User Rating: 4.3/5

Animoto is another great solution that you can use to create YouTube ads of all kinds and publish them directly on the video-sharing platform. It has a very simple drag-and-drop operation that can allow you to create your YouTube video ad in just a few minutes.
It offers you a lot of resources that you can use to create the video including a huge library of up to one million photos and video clips as well as licensed audio tracks that you can use freely. This is on top of the numerous effects that you can use to make your video ad stand out more.
Promo.com
Best For: All Types of YouTube Video Ads
Price: Free plan is available with paid plans starting at $39 a month
User Rating: 4.4/5

Promo.com is another great solution that you can use to create YouTube video ads to give your brand the upper hand. It simplifies the video creation process by providing you with pre-made templates that you can add elements to create the video. You also get a library of music, photos, and video clips that you can choose to add to the video.
It also allows you to publish the video directly on social media apps. Since it doesn’t limit the size of the video that you can create, it is also an ideal solution for creating other types of videos.
Biteable
Best For: All Types of YouTube Ads
Price: Free Plan is available with paid plans starting at $19 a month
User Rating: 4.3/5

Biteable is also a great choice when you want to create YouTube ad videos. It is a professional solution that gives you a lot of options when it comes to video creation with a rich resource of over 1.8 million photos, clips, and pre-made animations to choose from.
The videos that you create with Biteable are of very high resolution and you have unlimited exports so you can use the same video over and over again. It also doesn’t limit the size or length of the video that you can create making it an ideal solution to create all types of videos.
InVideo
Best For: All Types of YouTube Ads
Price: Free plan is available with paid plans from $10 a month
User Rating: 4.7/5

This is an online solution that is very easy to use and that creates stunning videos. The interface allows you to upload your images, video clips, and audio and then use one of the many templates to create the video. The templates are also customizable, giving you additional options to customize your video in many ways.
InVideo allows you to upload the video that you create directly to social media platforms. It also has a very large library of resources that you can use to create the video including more than 3000 professionally made templates and more than a million premium photos and videos to choose from.
Adobe Spark
Best For: All Types of YouTube Ad Videos
Price: Free Plan available with paid plans starting at $9.99 a month
User Rating: 4.5/5

If you are looking for a solution that will allow you to make unique and very high-quality video ads, then Adobe Spark is a great choice. It has a ton of resources that you can use to make your video ad stand out including multiple themes, layouts, storyboards, and unique fonts.
You also have access to thousands of free images to spice up your creation and exclusive templates that you will not find anywhere else. But like most Adobe software, it can be hard to get started with Adobe Spark, especially for beginner users.
Animaker
Best For: All Types of YouTube Ad videos
Price: It doesn’t offer a free plan. Paid plans start at $10 per month.
User Rating: 4.6/5

Animaker is a professional video editing tool that can create very high-quality and unique videos. It is also one of the only tools that you can use to add subtitles to a video. You get to choose from a lot of professionally made templates and choose from a large library of images and videos to add to your project.
It also allows you to add audio to the video in the form of voiceover or music. You can also use the live editing feature to make changes to a video that is already uploaded to YouTube.
Powtoon
Best For: Animated YouTube Ads
Price: It doesn’t offer a free plan. Paid plans start at $20 a month
User Rating: 4/5

Powtoon is a great solution when the YouTube ad video that you want to create is an animated video. It has numerous features designed to help you create the most interactive animated videos. You have a lot of resources to choose from including various animation styles, whiteboards, and infographics.
It also has a very large library of templates, videos, images, and audio to choose from. But Powtoon doesn’t offer a free plan and hence there is no way for you to test its function before purchasing it.
Magisto
Best For: All Types of YouTube Ads
Price: It doesn’t offer a free plan. Paid plans start at $34.99 a month
User Rating: 4.4/5

Magisto is an online video editing tool that you can use to create video ads very quickly. It is completely deployed on the cloud which means that you don’t have to download any software on your computer. The user interface is very easy to use, allowing users to create professional-quality videos in a matter of minutes.
If you are using it to create longer videos, you can edit the scenes of the video individually and add as many effects as are relevant to your project. It can also be used to create and edit videos on Android and iOS devices.
Creatopy
Best For: All Types of YouTube Ads
Price: A free plan is available. Paid plans start at $17 a month
User Rating: 4.3/5

Creatopy is a simple to use and highly effective video editor that can come in handy when creating YouTube video ads. It offers you the chance to create videos of any size, making it an ideal choice not just for video ads but all types of video ads.
You can upload your images and audio files to add to the video project, or you can choose from the built-in library. Then you can use one or more of the many effects to add the finishing touch.
Tips for Creating YouTube Ads
The following are just some tips to help you create effective and profitable YouTube Video ads;
- Choose the type of ad you would like to create wisely. Learn the different types of YouTube ads and select one based on your brand, advertising budget, and projected reach.
- Use the YouTube targeting options to give your ads the best chance at success. Ensure that you are choosing the right targets to avoid spending money on targets that will not engage with your ad.
- You may also want to use your videos in a remarketing campaign. Remarketing targets the same audience that you targeted before, increasing your chances of getting more engagement.
- When creating the ad, ensure that the content in the ad is compelling and feels natural. Even though the audience will be watching sponsored content it should feel just like any other video.
- You can also drive more engagement by adding interactive elements to the video. These can be calls-to-action, auto-end screens, and cards to showcase your products.
Related FAQs About YouTube Ads
**How do you create a YouTube Ad?
You can easily create a YouTube ad using one of the video editing tools that we have outlined above. Choose the type of YouTube video ad you want to create as it will inform the length of the video you will create.
**Is it Free to Make YouTube Ads?
It can be free. If you choose to use a free video editor, you can create a YouTube ad for free. But you should know that you will still have to pay for YouTube to serve the ad.
**What is a YouTube Ad Specialist?
A YouTube Ads Specialist is a professional who is responsible for creating a YouTube ads strategy and implementing the strategy by creating the YouTube video ads.
**Can I Put My Ads on YouTube?
Yes. YouTube allows you to run your ads and even choose the placement of the ads and target the audiences you want YouTube to serve the ads to.
YouTube video ads can be a great way to reach as many people as you can with your products and services. Now you have several options that you can use to create the ads.
For macOS 10.12 or later
It comes with a library of more than 300 templates, filters, overlays, and numerous other effects that you can use to create your video. You can even add audio and music to the video to make your ad stand out more.
Animoto
Best For: All Types of YouTube Video Ads
Price: A free plan is available with paid plans starting from $15 a month
User Rating: 4.3/5
Animoto is another great solution that you can use to create YouTube ads of all kinds and publish them directly on the video-sharing platform. It has a very simple drag-and-drop operation that can allow you to create your YouTube video ad in just a few minutes.
It offers you a lot of resources that you can use to create the video including a huge library of up to one million photos and video clips as well as licensed audio tracks that you can use freely. This is on top of the numerous effects that you can use to make your video ad stand out more.
Promo.com
Best For: All Types of YouTube Video Ads
Price: Free plan is available with paid plans starting at $39 a month
User Rating: 4.4/5
Promo.com is another great solution that you can use to create YouTube video ads to give your brand the upper hand. It simplifies the video creation process by providing you with pre-made templates that you can add elements to create the video. You also get a library of music, photos, and video clips that you can choose to add to the video.
It also allows you to publish the video directly on social media apps. Since it doesn’t limit the size of the video that you can create, it is also an ideal solution for creating other types of videos.
Biteable
Best For: All Types of YouTube Ads
Price: Free Plan is available with paid plans starting at $19 a month
User Rating: 4.3/5
Biteable is also a great choice when you want to create YouTube ad videos. It is a professional solution that gives you a lot of options when it comes to video creation with a rich resource of over 1.8 million photos, clips, and pre-made animations to choose from.
The videos that you create with Biteable are of very high resolution and you have unlimited exports so you can use the same video over and over again. It also doesn’t limit the size or length of the video that you can create making it an ideal solution to create all types of videos.
InVideo
Best For: All Types of YouTube Ads
Price: Free plan is available with paid plans from $10 a month
User Rating: 4.7/5
This is an online solution that is very easy to use and that creates stunning videos. The interface allows you to upload your images, video clips, and audio and then use one of the many templates to create the video. The templates are also customizable, giving you additional options to customize your video in many ways.
InVideo allows you to upload the video that you create directly to social media platforms. It also has a very large library of resources that you can use to create the video including more than 3000 professionally made templates and more than a million premium photos and videos to choose from.
Adobe Spark
Best For: All Types of YouTube Ad Videos
Price: Free Plan available with paid plans starting at $9.99 a month
User Rating: 4.5/5
If you are looking for a solution that will allow you to make unique and very high-quality video ads, then Adobe Spark is a great choice. It has a ton of resources that you can use to make your video ad stand out including multiple themes, layouts, storyboards, and unique fonts.
You also have access to thousands of free images to spice up your creation and exclusive templates that you will not find anywhere else. But like most Adobe software, it can be hard to get started with Adobe Spark, especially for beginner users.
Animaker
Best For: All Types of YouTube Ad videos
Price: It doesn’t offer a free plan. Paid plans start at $10 per month.
User Rating: 4.6/5
Animaker is a professional video editing tool that can create very high-quality and unique videos. It is also one of the only tools that you can use to add subtitles to a video. You get to choose from a lot of professionally made templates and choose from a large library of images and videos to add to your project.
It also allows you to add audio to the video in the form of voiceover or music. You can also use the live editing feature to make changes to a video that is already uploaded to YouTube.
Powtoon
Best For: Animated YouTube Ads
Price: It doesn’t offer a free plan. Paid plans start at $20 a month
User Rating: 4/5
Powtoon is a great solution when the YouTube ad video that you want to create is an animated video. It has numerous features designed to help you create the most interactive animated videos. You have a lot of resources to choose from including various animation styles, whiteboards, and infographics.
It also has a very large library of templates, videos, images, and audio to choose from. But Powtoon doesn’t offer a free plan and hence there is no way for you to test its function before purchasing it.
Magisto
Best For: All Types of YouTube Ads
Price: It doesn’t offer a free plan. Paid plans start at $34.99 a month
User Rating: 4.4/5
Magisto is an online video editing tool that you can use to create video ads very quickly. It is completely deployed on the cloud which means that you don’t have to download any software on your computer. The user interface is very easy to use, allowing users to create professional-quality videos in a matter of minutes.
If you are using it to create longer videos, you can edit the scenes of the video individually and add as many effects as are relevant to your project. It can also be used to create and edit videos on Android and iOS devices.
Creatopy
Best For: All Types of YouTube Ads
Price: A free plan is available. Paid plans start at $17 a month
User Rating: 4.3/5
Creatopy is a simple to use and highly effective video editor that can come in handy when creating YouTube video ads. It offers you the chance to create videos of any size, making it an ideal choice not just for video ads but all types of video ads.
You can upload your images and audio files to add to the video project, or you can choose from the built-in library. Then you can use one or more of the many effects to add the finishing touch.
Tips for Creating YouTube Ads
The following are just some tips to help you create effective and profitable YouTube Video ads;
- Choose the type of ad you would like to create wisely. Learn the different types of YouTube ads and select one based on your brand, advertising budget, and projected reach.
- Use the YouTube targeting options to give your ads the best chance at success. Ensure that you are choosing the right targets to avoid spending money on targets that will not engage with your ad.
- You may also want to use your videos in a remarketing campaign. Remarketing targets the same audience that you targeted before, increasing your chances of getting more engagement.
- When creating the ad, ensure that the content in the ad is compelling and feels natural. Even though the audience will be watching sponsored content it should feel just like any other video.
- You can also drive more engagement by adding interactive elements to the video. These can be calls-to-action, auto-end screens, and cards to showcase your products.
Related FAQs About YouTube Ads
**How do you create a YouTube Ad?
You can easily create a YouTube ad using one of the video editing tools that we have outlined above. Choose the type of YouTube video ad you want to create as it will inform the length of the video you will create.
**Is it Free to Make YouTube Ads?
It can be free. If you choose to use a free video editor, you can create a YouTube ad for free. But you should know that you will still have to pay for YouTube to serve the ad.
**What is a YouTube Ad Specialist?
A YouTube Ads Specialist is a professional who is responsible for creating a YouTube ads strategy and implementing the strategy by creating the YouTube video ads.
**Can I Put My Ads on YouTube?
Yes. YouTube allows you to run your ads and even choose the placement of the ads and target the audiences you want YouTube to serve the ads to.
YouTube video ads can be a great way to reach as many people as you can with your products and services. Now you have several options that you can use to create the ads.
How to Seamlessly Stream YouTube Videos From Your iDevice
Create High-Quality Video - Wondershare Filmora
An easy and powerful YouTube video editor
Numerous video and audio effects to choose from
Detailed tutorials provided by the official channel
Initially, iOS users had the option to load videos directly to YouTube via the tap-to-upload feature. However, this option is missing in the recent iOS devices versions. Therefore, many users search for possible ways to post a video on YouTube from iPhone. For this, you have to put some considerations into place before moving on. The video title length should not exceed 100 characters, while the description is maintained at 5,000 characters. Also, ensure the video length doesn’t exceed 15 minutes. Let’s roll out the best ways to upload your videos and make that big catch on subscribers.

In this article
01 [ How to upload a video to YouTube from iPhone or iPad](#Part 1)
02 [Why your phone doesn’t post videos to YouTube](#Part 2)
03 [Make your YouTube video better with Filmora](#Part 3)
How to upload a video to YouTube from iPhone or iPad
Are you ready to start on that big adventure and share your videos on YouTube? Follow these steps to learn how to upload a video to YouTube from your iPhone.
Method 1: Upload using the YouTube iOS app
Using the YouTube app is the simplest way to upload your YouTube videos. The YouTube app should be installed on your iOS device.
Step 1. Launch the YouTube app on your device, then sign in to your account. If you don’t have an account yet, you will need to “Sign up” for a new one before continuing the upload process.
Step 2. Click on the “+” icon found at the bottom of the screen.
Step 3. Then choose the “Upload a video” option from the populated list of options.
Step 4. Check out the pop-up that appears and “Allow access” to it.
Step 5. Edit your video to your preference by trimming or cropping as you desire. Then click on the “Next” option.

Step 6. Add “title and description” to your video. Remember, the title should contain less than 100 characters and the description no more than 500 characters.
Step 7. Then set the visibility mode as “Public” to enable you to share your video over the internet.
Step 8. Click on the “Upload” button to finally upload your video to YouTube.

Method 2: Upload using Photo App
The Photo App has a “Share” option that you can use to upload your videos to YouTube. Here is the guide.
Step 1. Go to your iOS device and tap on the “Photos” app.
Step 2. Then tap on the “Videos Folder” to locate the video you wish to upload to YouTube.

Step 3. Next, tap on the video that you want to upload.
Step 4. Then tap on the “Share” icon located at the bottom left of your iOS device screen.
Step 5. You’ll then access a “Share” menu from where you have various share options for your video.
Step 6. Choose the “YouTube” option to continue to share your video there. At this juncture, ensure you have logged in to your Google Account.

Step 7. You need to provide a “Title” and “Description” of your video. Then go to the “Privacy” Options and make your video “Public.”
Step 8. Finally, tap on the “Publish” tab found at the top-right corner of your screen to make your video viewable by the public.

Method 3: Upload video to YouTube using Safari
Safari is another alternative method to upload a video to YouTube.
Step 1. First, go to “youtube.com” on Safari and sign in.

Step 2. Then tap on the “account” icon at the top right side of the screen.
Step 3. Hit on the “Upload” icon and wait to be redirected to the YouTube Studio desktop site.
Step 4. Click on the “Select Files” option.
Step 5. Choose the video you wish to add to YouTube from the “Photo” library and tap on the “Add” button.

Step 6. Add your video’s “title and description” and hit the “Next” button.
Step 7. Tap on the “Next” button once more to go to the “Visibility” page.
Step 8. Select the “Public” option to upload your video to the public.
Why your phone doesn’t post videos to YouTube
Despite learning how to upload to YouTube from iPhone, you may be perplexed to realize that your phone refuses to post videos to YouTube. What could be the reason?
1) YouTube issues
In most cases, the problem doesn’t arise from your phone but from YouTube. This streaming app may also experience some hitches along the way. Remember that even if your phone sync with your YouTube account to upload videos from the “Camera Roll,” YouTube isn’t managed from the Camera Roll but the YouTube app directly. You can solve the issue by signing out of your YouTube account and signing back in.
2) Connection Strength
Some videos may appear quite large and cause a time-out during the upload process. Check your Wi-Fi or internet connection strength to determine if it needs a boost or wait until the streaming strength is strong for a quick upload. Test your internet speed by searching “internet test speed” on Google. Then click the “Run Speed Test” in the search box. A window will open and give you an estimate of the Mbps that your connection is operating at. If too low, switch to other alternatives.
3) Verify your YouTube account
Verifying your account will help you to enjoy YouTube’s full features. It’s then that you’ll manage to upload videos without any drawbacks. Also, that’s when you’ll manage to upload longer videos that go beyond the 15-minute duration.
4) Pay attention to the video size
There is a limit for videos to post to YouTube. If it is too large or long, the upload will cancel before completion.
5) Be patient
YouTube can save your partial upload for 24 hours. So, you can continue to upload from where you left. Learn to be patient as there could be a surge of user traffic, especially during evenings.
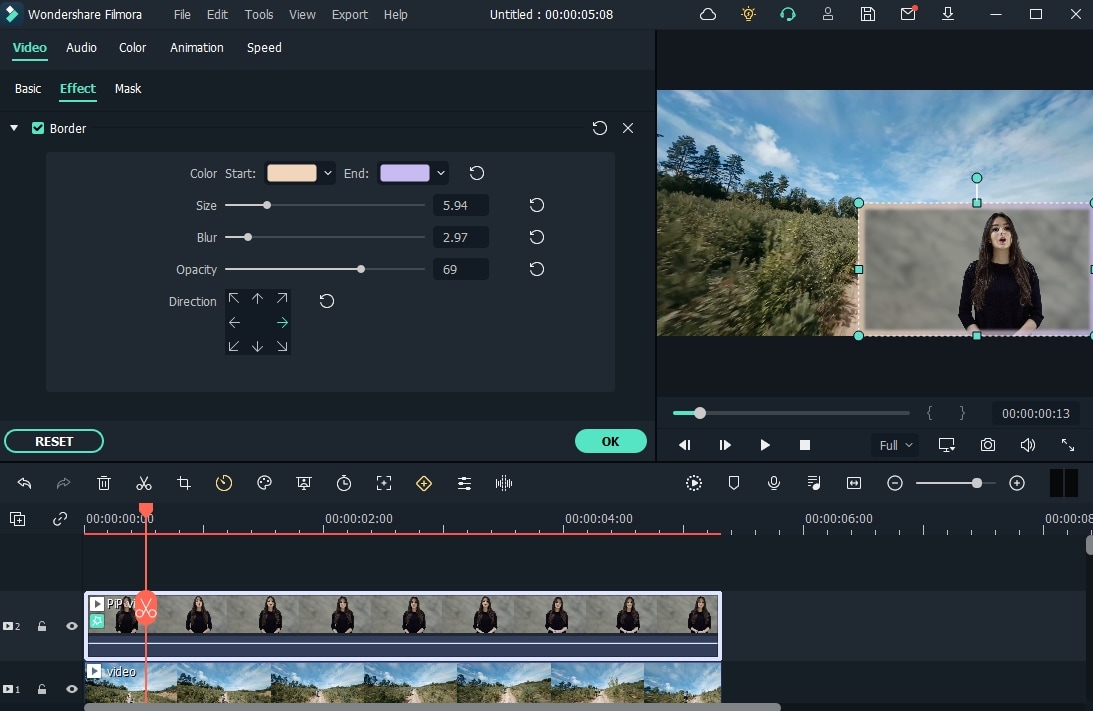
Make your YouTube video better with Filmora
Good video quality will make you go miles ahead of your marketing gig. You can use Filmora mobile application to make your videos look better before uploading them to YouTube. This intuitive video editing app has advanced features and several ways to compose creative videos.
- Stunning video effects that let you add animated text to video
- Easily record your voice-overs with its perfect sound effects
- Split functionality that allows you to slice your video footage into two or more separate video clips
- Playback your clips in reverse and adjust the speed for fast or slow motion
- Select the best aspect ratio for your video
- Advanced camera to create emoji selfies and other video beautification
- Directly share your videos to social media sites like YouTube and Facebook.
Check out the steps to edit your video with Filmora on your iOS device
Step 1. Download and install Filmora
For iOS devices, go to the “Apple Store” to download and install the app. Also, allow it to access your videos, camera, and pictures in the process.
Step 2. Import video
You may already have a video in your library that you wish to upload to YouTube. Nonetheless, you can shoot a video afresh to add. To shoot one, you need to settle on a topic before recording and downloading other images you may need. Ensure you watch what you are filming and use adequate lighting during the shooting process.
Next, begin to import your video file. Just open the application and select the “Create new video” option. Then choose the “Video” icon and select a folder that contains the video to be added. Hit the “Add” button from the bottom right corner.
Step 3. Edit video
Filmora has several editing features to make your video better. Use the “Edit tools” feature to turn your video into an impeccable piece. Easily add filters, adjust the speed, or create subtitles, among other functions. You can also split, trim, or delete the unwanted clip parts.
It is important to add a title and description to your video. Just use the “Titles” button to add the title. Other precepts that you can add include transitions, sound like voice-over,
Step 4. Export and share
You’ve just finished creating and editing your video. Click on the “Save” tab and let the application export your video. Then select the “Save to Camera Roll” option to save the video to your iPhone. Finally, you can upload and share the video directly to your YouTube account.
Conclusion
● However, it appears to be a difficult task; you must have found relief after going through these procedures. You don’t need prior knowledge on how to upload a video to YouTube from your iPhone. Several options are at your disposal. You can use the Safari, YouTube app, or the Photo app to upload your videos. The better part is that you can create top-notch videos with Filmora. This mobile video editing app has a lot to offer, ensuring quality content.
Initially, iOS users had the option to load videos directly to YouTube via the tap-to-upload feature. However, this option is missing in the recent iOS devices versions. Therefore, many users search for possible ways to post a video on YouTube from iPhone. For this, you have to put some considerations into place before moving on. The video title length should not exceed 100 characters, while the description is maintained at 5,000 characters. Also, ensure the video length doesn’t exceed 15 minutes. Let’s roll out the best ways to upload your videos and make that big catch on subscribers.
In this article
01 [ How to upload a video to YouTube from iPhone or iPad](#Part 1)
02 [Why your phone doesn’t post videos to YouTube](#Part 2)
03 [Make your YouTube video better with Filmora](#Part 3)
How to upload a video to YouTube from iPhone or iPad
Are you ready to start on that big adventure and share your videos on YouTube? Follow these steps to learn how to upload a video to YouTube from your iPhone.
Method 1: Upload using the YouTube iOS app
Using the YouTube app is the simplest way to upload your YouTube videos. The YouTube app should be installed on your iOS device.
Step 1. Launch the YouTube app on your device, then sign in to your account. If you don’t have an account yet, you will need to “Sign up” for a new one before continuing the upload process.
Step 2. Click on the “+” icon found at the bottom of the screen.
Step 3. Then choose the “Upload a video” option from the populated list of options.
Step 4. Check out the pop-up that appears and “Allow access” to it.
Step 5. Edit your video to your preference by trimming or cropping as you desire. Then click on the “Next” option.
Step 6. Add “title and description” to your video. Remember, the title should contain less than 100 characters and the description no more than 500 characters.
Step 7. Then set the visibility mode as “Public” to enable you to share your video over the internet.
Step 8. Click on the “Upload” button to finally upload your video to YouTube.
Method 2: Upload using Photo App
The Photo App has a “Share” option that you can use to upload your videos to YouTube. Here is the guide.
Step 1. Go to your iOS device and tap on the “Photos” app.
Step 2. Then tap on the “Videos Folder” to locate the video you wish to upload to YouTube.
Step 3. Next, tap on the video that you want to upload.
Step 4. Then tap on the “Share” icon located at the bottom left of your iOS device screen.
Step 5. You’ll then access a “Share” menu from where you have various share options for your video.
Step 6. Choose the “YouTube” option to continue to share your video there. At this juncture, ensure you have logged in to your Google Account.
Step 7. You need to provide a “Title” and “Description” of your video. Then go to the “Privacy” Options and make your video “Public.”
Step 8. Finally, tap on the “Publish” tab found at the top-right corner of your screen to make your video viewable by the public.
Method 3: Upload video to YouTube using Safari
Safari is another alternative method to upload a video to YouTube.
Step 1. First, go to “youtube.com” on Safari and sign in.
Step 2. Then tap on the “account” icon at the top right side of the screen.
Step 3. Hit on the “Upload” icon and wait to be redirected to the YouTube Studio desktop site.
Step 4. Click on the “Select Files” option.
Step 5. Choose the video you wish to add to YouTube from the “Photo” library and tap on the “Add” button.
Step 6. Add your video’s “title and description” and hit the “Next” button.
Step 7. Tap on the “Next” button once more to go to the “Visibility” page.
Step 8. Select the “Public” option to upload your video to the public.
Why your phone doesn’t post videos to YouTube
Despite learning how to upload to YouTube from iPhone, you may be perplexed to realize that your phone refuses to post videos to YouTube. What could be the reason?
1) YouTube issues
In most cases, the problem doesn’t arise from your phone but from YouTube. This streaming app may also experience some hitches along the way. Remember that even if your phone sync with your YouTube account to upload videos from the “Camera Roll,” YouTube isn’t managed from the Camera Roll but the YouTube app directly. You can solve the issue by signing out of your YouTube account and signing back in.
2) Connection Strength
Some videos may appear quite large and cause a time-out during the upload process. Check your Wi-Fi or internet connection strength to determine if it needs a boost or wait until the streaming strength is strong for a quick upload. Test your internet speed by searching “internet test speed” on Google. Then click the “Run Speed Test” in the search box. A window will open and give you an estimate of the Mbps that your connection is operating at. If too low, switch to other alternatives.
3) Verify your YouTube account
Verifying your account will help you to enjoy YouTube’s full features. It’s then that you’ll manage to upload videos without any drawbacks. Also, that’s when you’ll manage to upload longer videos that go beyond the 15-minute duration.
4) Pay attention to the video size
There is a limit for videos to post to YouTube. If it is too large or long, the upload will cancel before completion.
5) Be patient
YouTube can save your partial upload for 24 hours. So, you can continue to upload from where you left. Learn to be patient as there could be a surge of user traffic, especially during evenings.
Make your YouTube video better with Filmora
Good video quality will make you go miles ahead of your marketing gig. You can use Filmora mobile application to make your videos look better before uploading them to YouTube. This intuitive video editing app has advanced features and several ways to compose creative videos.
- Stunning video effects that let you add animated text to video
- Easily record your voice-overs with its perfect sound effects
- Split functionality that allows you to slice your video footage into two or more separate video clips
- Playback your clips in reverse and adjust the speed for fast or slow motion
- Select the best aspect ratio for your video
- Advanced camera to create emoji selfies and other video beautification
- Directly share your videos to social media sites like YouTube and Facebook.
Check out the steps to edit your video with Filmora on your iOS device
Step 1. Download and install Filmora
For iOS devices, go to the “Apple Store” to download and install the app. Also, allow it to access your videos, camera, and pictures in the process.
Step 2. Import video
You may already have a video in your library that you wish to upload to YouTube. Nonetheless, you can shoot a video afresh to add. To shoot one, you need to settle on a topic before recording and downloading other images you may need. Ensure you watch what you are filming and use adequate lighting during the shooting process.
Next, begin to import your video file. Just open the application and select the “Create new video” option. Then choose the “Video” icon and select a folder that contains the video to be added. Hit the “Add” button from the bottom right corner.
Step 3. Edit video
Filmora has several editing features to make your video better. Use the “Edit tools” feature to turn your video into an impeccable piece. Easily add filters, adjust the speed, or create subtitles, among other functions. You can also split, trim, or delete the unwanted clip parts.
It is important to add a title and description to your video. Just use the “Titles” button to add the title. Other precepts that you can add include transitions, sound like voice-over,
Step 4. Export and share
You’ve just finished creating and editing your video. Click on the “Save” tab and let the application export your video. Then select the “Save to Camera Roll” option to save the video to your iPhone. Finally, you can upload and share the video directly to your YouTube account.
Conclusion
● However, it appears to be a difficult task; you must have found relief after going through these procedures. You don’t need prior knowledge on how to upload a video to YouTube from your iPhone. Several options are at your disposal. You can use the Safari, YouTube app, or the Photo app to upload your videos. The better part is that you can create top-notch videos with Filmora. This mobile video editing app has a lot to offer, ensuring quality content.
Also read:
- Transforming View Counts with Strategic Video Tagging Techniques
- [New] A Symphony of Selection Assembling Your Best Music Choices on YouTube
- Elevate Your Vlogging Game with Tripod Mastery for 2024
- The Ultimate User-Friendly Untangle for YouTube Earnings Assessment
- The Ultimate Guide to Aspect Ratios for YouTube Images
- 10 Fastest Growing YouTube Channels to Inspire You
- [New] Engage, Enchant Elevate Your Unboxing Content
- Unifying Your Digital Storytelling via Merged YouTube Media
- Aim Higher Boosting Views and Reach on YouTube for 2024
- [New] A Filmmaker's Dream The 8 Best No-Fee Video Editors on the Market
- In 2024, Audience Appreciation Assessment Self and Seekers Vs. Rival Repertoires
- Enhance Productions No-Cost Sounds Available for 2024
- Building Captivating Online Media Summaries
- Kickstarting Your YouTube Journey Building & Earning
- Chart Success Using YouTube Statistics to Grow Engagement
- Snapshots of Sound Characters Short Musical Roles
- [New] Enabling Earnings A Step-by-Step Approach for Mobile YouTubers
- Enrich Your Knowledge Student-Approved History YouTubes To Watch for 2024
- Paving the Way The Trailblazing Ladies of Online Video Content
- [Updated] Elevating Your YT Content with the Top Thumbnail Hacks
- Interactive Nomenclature Strategy for Apps
- 2024 Approved Dominate YouTube with These Strategic FreeFire Video Hashtags
- [Updated] Crafting Professionalism The Best Practices for Post-Upload Editing
- In 2024, Elevate Your Channel's Popularity with 12 Key Growth Techniques
- In 2024, Amplify Online Impact Through Savvy Templates Design
- 2024 Approved Essential GIF Making Software The Ultimate Guide
- In 2024, Detailed Guidance on Crafting Dynamic YT Profiles
- [Updated] Embarking on a Virtual Odyssey Through YT Stories
- [Updated] Channel Control Center Creator Studio Essentials
- [Updated] Defeating Darkness in Youtube Videos
- Expert Stock Videos Top Channels for Analysis
- In 2024, Crafting Perfect YouTube Intro/End Videos at No Cost
- Strategies for Finding High-Impact Keywords for YouTube Content
- 2024 Approved Channel Elevation Reach YouTube Affiliate Level with 10K Views
- Video Sharing Giants Clash Vimeo vs YouTube
- 2024 Approved Engaging Scriptwriting Techniques for Higher Video Rankings
- [New] Cutting-Edge Techniques A Guide to Next-Level Effectiveness in Your YouTube Ads
- [Updated] Epicurean Escapades Crafting Kitchen Films
- Light Up the Screen Techniques for Stunning YouTube Visuals
- 2024 Approved Cohesive Title Blueprint for Social & Mobile Platforms
- [New] Budget-Friendly PC Screen Recorders
- In 2024, Can I Bypass a Forgotten Phone Password Of Realme C51?
- In 2024, Advanced Mobile Mounting Accurate Camera Positioning
- Navigate Mac's Screen Capture Like a Pro with Simple Keys for 2024
- In 2024, Expert's Guide to Rapid Time-Lapsing
- [New] Bandicam Vs. Camtasia A Comparative Review for 2024
- What You Should Know About Pexels.com for 2024
- In 2024, Enhancing Authenticity Techniques to Apply on Insta Photos
- In 2024, How to Make A Funny Vlog for TikTok?
- [Updated] Unfollow Trail on the Social Giant Instagram for 2024
- In 2024, Learn Color Correction in After Effects with These Videos
- Effortless Audio Recording on ChromeOS Top Tips for Success
- Revolutionize Your TikTok Videos Streamlined Methods for New Borders for 2024
- Best Music Live Streaming Services for 2024
- How to Remove Find My iPhone without Apple ID On your iPhone 14 Plus?
- Network Locked SIM Card Inserted On Your Vivo Y56 5G Phone? Unlock It Now
- New 2024 Approved From Flat to Fabulous How to Add 3D Effects to Your Windows Videos
- In 2024, Forgot Apple iPhone XS Max Backup Password? Heres What to Do
- Cutting-Edge TikTok Techniques for New Video Borders for 2024
- In 2024, About Motorola Edge 40 FRP Bypass
- [New] Streamlining Your Instagram Storytelling with Size Tweaks for 2024
- Everything You Need To Know About Unlocked Apple iPhone 13 | Dr.fone
- 8 Quick Fixes Unfortunately, Snapchat has Stopped on Honor X50 GT | Dr.fone
- In 2024, Different Methods To Unlock Your iPhone 15 | Dr.fone
- Title: "YouTube Promo Mastery Pro Tips & Techniques"
- Author: Kevin
- Created at : 2024-05-25 16:56:41
- Updated at : 2024-05-26 16:56:41
- Link: https://youtube-videos.techidaily.com/youtube-promo-mastery-pro-tips-and-techniques/
- License: This work is licensed under CC BY-NC-SA 4.0.
