
:max_bytes(150000):strip_icc():format(webp)/connect-tv-to-stereo-system-3135127-83ec0f315fa54c1290555169d689ad88.jpg)
Visual Transcript Generator
Visual Transcript Generator
Captions, like subtitles, can be a great way to improve the engagement of your video by reaching more and more audiences. But adding captions to your video is not an easy thing to do and without the right video caption maker, it can seem like an impossible task.
But it is important to add captions to your video, not just so you can target people who don’t understand the language or those who prefer to read rather than watch the video, but also to improve SEO and visibility.
Here, we will be looking at some of the best tools that you can use to add captions to your video.
Filmora Audio Recorder
Record computer system audio
Capture microphone audio
Customize recording volume
Record screen and webcam as well
Best Video Caption Makers
The following are the top video caption makers that you can choose from;
YouTube Automatic Caption
If you already have your own YouTube channel, you can use the built-in speech recognition feature to generate accurate captions for your video. This feature can generate captions in a number of languages including English, Portuguese, German, Spanish, Korean, French, Italian, and Dutch which is more than some of the premium caption generators in the market.
The main reason most people choose this solution is that it is fairly simple to use. You don’t have to do much; just upload the video and the automatic caption generator will create the captions you need.
Key Features
- It is easy to use and freely accessible
- You can use it to generate captions in a number of different languages
- It is very accurate
- You can use it to generate transcripts for the video
Kapwing Auto-Subtitle Maker
Kapwing is an online solution that will generate subtitles and captions for most videos. But it does limit the size of the video that it can generate subtitles on to about 500 MB. There is a free version of the program that although limited in functionality will not add a watermark to the generated captions file. But free users can only get captions for up to 7 minutes of video, making it a less ideal solution when you have a longer video.
Key Features
- You can generate captions and subtitles for free
- It is accessible online and you don’t have to install software on your computer to get the captions
- It has a very simple user interface, making the caption generation process quick and easy
- In addition to generating subtitles and captions, you can edit existing files.
Adobe Premiere Pro CC
You may know Adobe Premiere as one of the most popular video editing programs on the market, but most people are unaware that it can also be used to generate captions for the video. This tool can be very useful in the creation of high-quality videos and you can generate an accurate caption or subtitle for the video as well.
But Adobe Premiere is not an easy solution to use for both video editing and adding captions, particularly for beginner users. But it is certainly one of the best ways to create and edit videos on your computer.
Key Features
- Even though the interface is not easy to use, it is clear and flexible
- You have numerous options to add the captions including font style and color
- The captions that you add using this tool will be very accurate
- It can also be used to edit existing subtitle and caption files
Amara Subtitle Editor
Amara subtitle editor will not be able to help you create or generate captions for your video, but it can be a good solution to edit a subtitle file that you already have. It can be very useful in syncing the subtitles with the video and you can use it to make minor changes to the subtitle.
While editing the subtitle file is easy, creating a caption file using Amara can be a lengthy process since you would have to type in the text.
Key Features
- It can be used to edit caption and subtitles files easily
- The user interface is pleasant and easy to use
- It is completely free
Aegisubs
Aegisubs is another tool that you can use to create subtitles for your video. But we must warn you right off the bat that this tool is not very user-friendly and you may find that you will spend a lot of time trying to generate subtitles for your video. But it is a free solution and widely accessible on most platforms.
Key Features
- It can be used to create subtitles and captions in different languages
- It supports numerous video and audio formats
- It has a simple user interface that is easy to navigate
- It doesn’t have speech recognition and you’ll have to enter all the text manually
AHD Subtitle Maker
AHD subtitle maker is a Windows program that can be used to create subtitles and captions for your video in a variety of formats such as SRT. It is a completely free solution that can also be used to edit subtitle files in numerous ways, even changing the format of the file.
Among other things, you can use AHD subtitle maker to translate, change, copy and delete selected text from a subtitle file and even replace the text with something else.
Key Features
- It is a free program that works on all versions of Windows
- It can generate subtitle and caption files in a variety of formats
- You can use it to generate subtitle files or edit existing files in various ways
- It can also be used to generate various types of content including ID3 tags for music files
Videocaptionmaker.com
To generate captions and subtitles on your Mac for free, the best option is Video Caption Maker. The full version of the program is available for free and it can be used to create a subtitle file or make changes to a subtitle file you already have.
Key Features
- You can use it to add text to a video in a simple and straightforward way
- It can also be used to make changes to existing subtitles by changing the fonts, styles, backgrounds, positions, and more
- It will also add a visual waveform to an audio file to identify the start and end time
- It supports numerous video formats including .mov, .mp4, .mpeg, .3gpp, .3gpp2
Jubler
Jubler is a program that can edit subtitles and captions for videos. It can also be used to create new subtitles although it doesn’t automatically generate the captions and you will have to type them in. But when it comes to editing subtitles, this tool is very effective, allowing you to change the font style, color, and even positioning of the subtitles.
Key Features
- It works on all platforms including Windows, Mac, and Linux
- It will graphically display the subtitles so you can easily move them to the desired location
- It supports all subtitle and caption file formats
- It allows you to edit the subtitles in many ways
- It can be used to translate the subtitles to various languages
Related FAQs
**How Do I Make a Caption for a Video?
Making a caption for your video can be easy depending on the type of program you choose to use. A good rule of thumb is to choose solutions that auto generates the captions as they save you a lot of time. If there are issues after the captions have been generated, you can then use a subtitled editor to fix them, more preferable to typing in the subtitles or captions yourself.
**How Do I Get Automatic Captions for my Video?
If you are uploading your video on YouTube, you can easily generate automatic captions from the YouTube studio. Just use these simple steps;
Step 1: Sign in to YouTube Studio and in the left menu, select “Subtitles.”
Step 2: Click on the video that you want to add subtitles
Step 3: Select “More” under Subtitles and then go through the captions to make sure they are correct. If not, you can edit them on this page.
If you are not using YouTube to share your video, you can use one of the solutions we have outlined in this article to generate automatic captions.
**How Long Does It Take to Caption a Video?
The amount of time that you spend creating a caption for your video is entirely dependent on the captioning tool that you use. Automatic caption generators can create captions in a few seconds but manual subtitle tools can lengthen the process, especially for a longer video.
Conclusion
Captions are a great way to get users to engage with your videos. Studies have shown that a captioned video is far more likely to get more engagements and shares on social media. And since it can be very easy to make caption for you video, why not utilize this little known resource and get your videos to stand out a little bit more.
Keep Them Coming Back: Top 6 Ways To Enhance Your Audience’s Staying Power on YouTube
6 Ways To Increase Audience Retention on YouTube

Richard Bennett
Mar 27, 2024• Proven solutions
Audience retention is one of your most important stats on YouTube. It is even more important than your view count. Your view count really only tells you how many people are finding and clicking on your videos, not whether they are actually watching them. Audience retention refers to how much of a video a viewer watches before clicking away, which is very useful information to have. If you know when people are leaving your videos then you know what you need to work on.
You May Also Like: How to analyse your and your competitors’ YouTube Channel >>
How to structure a YouTube video >>
- Part 1: What is Audience Retention?
- Part 2: How to See Your Audience Retention Report in YouTube?
- Part 3: What is a Good Audience Retention Rate on YouTube?
- Part 4: 6 Ways to Increase YouTube Audience Retention
Part 1: What is Audience Retention?
To put it in simple terms, YouTube audience retention is about how much of each video your viewers watch. It’s usually expressed as a percentage, so if your viewer gets half way through, they will have a retention of 50 per cent.
For YouTube analytics, audience retention is taken as a mean of the retention figures for each of your viewers. For example, if you post a ten-minute video and half your viewers get to the five-minute mark, that’s a retention of 50 per cent. If the other half watch it right to the end, that’s a retention of 100 per cent. The mean of these two figures is 75 per cent, and that’s what YouTube will use as your audience retention figure.
This retention rate affects how highly your video is ranked on YouTube, with videos boasting higher audience retention rates appearing higher in the search results than those which do not. This is because both YouTube and Google are highly focussed on customer satisfaction, and a long watch time means a very happy customer was watching that video. For this reason, it’s well worth considering how to increase YouTube audience retention as it demonstrates that you’re making great content as well as helping you get more viewers.
Part 2: How to See Your Audience Retention Report in YouTube?
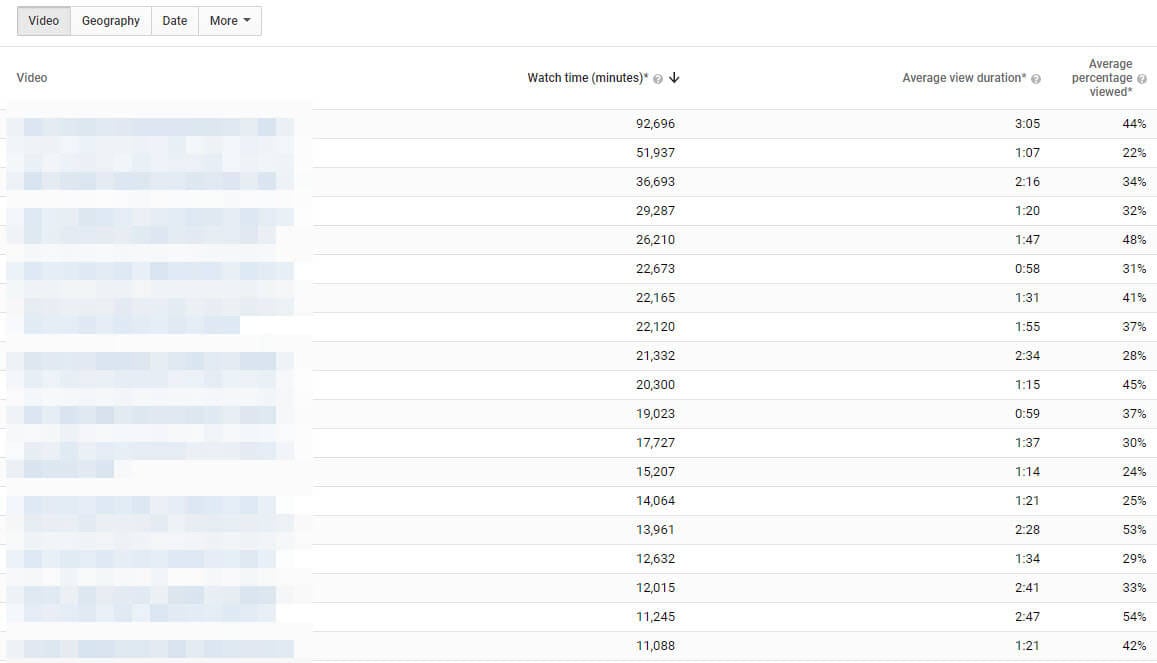
YouTube will produce reports to help you keep track of your audience retention. There are two types of audience retention reports; absolute and relative. Absolute allows you to view a graph of your video’s retention and see when people might be clicking away, or if they are skipping to later parts of your video. If you lose a lot of viewers in the first 15 seconds of your videos then that is a clear indication that your content is not what the viewers who find your videos really want. The relative report is where your video is compared to the average retention of similar videos.
Note that by ‘similar videos’, YouTube means videos of a similar length. There is no way to compare your videos only to other videos in your genre. The relative report will always be somewhat skewed because your videos will be measured against very different content.
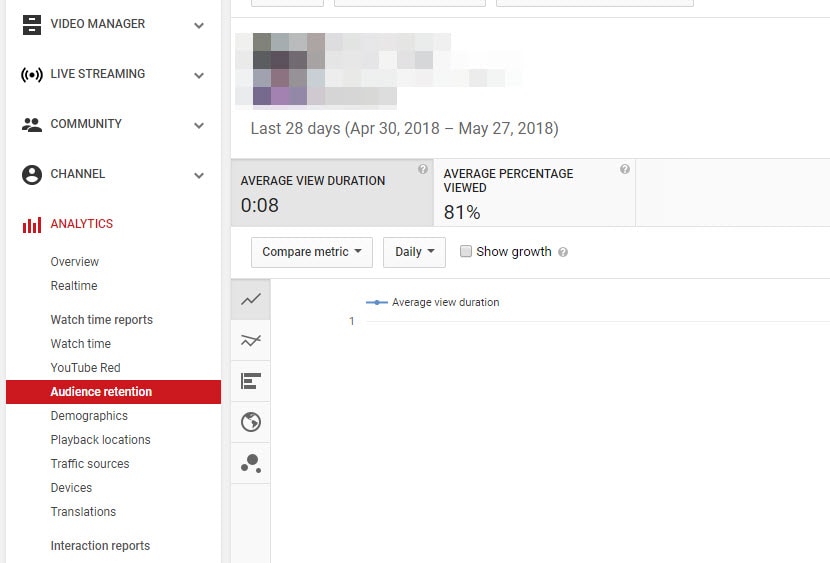
To see an audience retention report log into your YouTube account and go to yourCreator Studio. There, selectAudience RetentionunderAnalytics.
Part 3: What is a Good Audience Retention Rate on YouTube?
When you’re considering how to increase YouTube audience retention, it can be good to have a goal in mind. Obviously 100 per cent is going to be the Holy Grail of retention rates, but how many videos are actually going to achieve that? It only takes for one person to ‘accidentally’ click on your video and rapidly click away, or for someone to have to stop for outside reasons, to drag your average down.
According to the YouTube community, a good goal to aim for is around 50 per cent, but as there is a lot which can affect your retention rate, that number may be different for you. Low view numbers sometimes get higher retention rates because it’s mainly subscribers watching, whereas channels with millions of views may suffer due to more people abandoning. Rather than setting yourself a golden number, focus instead on increasing your retention rate from wherever it is now, and celebrate your own success instead of measuring yourself against others.
Part 4: 6 Ways to Increase YouTube Audience Retention
If you’re serious about learning how to increase YouTube audience retention, here are five of the best ideas for you:
1. Compare your videos
Investigating your audience retention report will highlight the videos where you achieved maximum success. Think about what you did here, and work to replicate that technique. Perhaps you were talking about a product, or maybe your structured your video slightly differently. It’s up to you to dissect your video and find out what it was that kept people watching for longer, so that you can repeat this success in the future. You can also use some influencer marketing platform such as InflueNex to take a look at the videos in your similar channels, and learn the popular videos on their channels.
2. Get on with it
Research shows that YouTube viewers have an incredibly short attention span. Depending on who you believe, you could have as much as six seconds or as little as just three to grab their attention and compel them to carry on watching. If you want to improve your audience retention, coming in with an engaging, attention grabbing statement right at the start is crucial to your success. Nobody wants to waste their time watching someone waffle on for ages about their granny or their favorite hobbies, so get right down to it straight away, by telling them what’s in store.
3. Make it visually engaging
Perhaps all you’ve got is a presentation to make. You’re not a gamer, you’re not showing clips of your cat and you’re not doing a makeup tutorial, so surely all you need is a camera, good lighting and your face, right? Wrong. Viewers like to see the visual content changing, and videos which have a range of scenes are usually far more successful than those where it’s just a person talking to camera. Think about how you can insert cutaways, pop up text, different footage and other graphics to keep it interesting for your viewers.
4. Make it shorter
This one is a no brainer really. If you make a one-minute video, how hard is it going to be to keep viewers watching to the end compared to a 20-minute marathon. However, going too short can be negative too, unless you really do have something very quick and simple to showcase. Long videos work well for YouTubers in the gaming niche, in particular, because viewers want to know the end result, but for most of us, these sorts of viewing statistics are hard to reach.
If you consider a viewer who watches three minutes of your content, would you rather they watched three minutes of a ten-minute video and then clicked away bored, or would you rather they finished an entire video that was only three minutes long? Both in terms of audience retention and of your own reputation, having a viewer finish a short video is much more valuable to you than losing someone half way through a long one. That person probably enjoyed your content to the end and will more than likely watch another one of your videos. Conversely, the one you lost half way through was bored enough to stop watching and will probably not bother viewing any other videos of yours in future.
5. Keep them hooked
Think carefully about your YouTube video structure. Ideally, you will tell them at the very start that you’ve got something amazing to share with them later on. This could be a tip, a tutorial, a new product reveal or even something funny. Whatever it is, tell them they’re going to love it from the start, and keep reminding them to watch from the end to get this gift. That doesn’t mean you shouldn’t give them great content all the way through, just that you should save a carrot for the end of the ride to reward those loyal viewers.
So, now you know how to increase YouTube audience retention, what are you going to do about it? Have a go at modifying your videos to boost the numbers who will watch to the end and let us know how you got on.
6. Use an Excellent Video Editor
Content is the king. It is necessary to use a powerful video editor to help you edit videos. With an excellent video editor like Filmora, you can custom stunning videos effortlessly.


Richard Bennett
Richard Bennett is a writer and a lover of all things video.
Follow @Richard Bennett
Richard Bennett
Mar 27, 2024• Proven solutions
Audience retention is one of your most important stats on YouTube. It is even more important than your view count. Your view count really only tells you how many people are finding and clicking on your videos, not whether they are actually watching them. Audience retention refers to how much of a video a viewer watches before clicking away, which is very useful information to have. If you know when people are leaving your videos then you know what you need to work on.
You May Also Like: How to analyse your and your competitors’ YouTube Channel >>
How to structure a YouTube video >>
- Part 1: What is Audience Retention?
- Part 2: How to See Your Audience Retention Report in YouTube?
- Part 3: What is a Good Audience Retention Rate on YouTube?
- Part 4: 6 Ways to Increase YouTube Audience Retention
Part 1: What is Audience Retention?
To put it in simple terms, YouTube audience retention is about how much of each video your viewers watch. It’s usually expressed as a percentage, so if your viewer gets half way through, they will have a retention of 50 per cent.
For YouTube analytics, audience retention is taken as a mean of the retention figures for each of your viewers. For example, if you post a ten-minute video and half your viewers get to the five-minute mark, that’s a retention of 50 per cent. If the other half watch it right to the end, that’s a retention of 100 per cent. The mean of these two figures is 75 per cent, and that’s what YouTube will use as your audience retention figure.
This retention rate affects how highly your video is ranked on YouTube, with videos boasting higher audience retention rates appearing higher in the search results than those which do not. This is because both YouTube and Google are highly focussed on customer satisfaction, and a long watch time means a very happy customer was watching that video. For this reason, it’s well worth considering how to increase YouTube audience retention as it demonstrates that you’re making great content as well as helping you get more viewers.
Part 2: How to See Your Audience Retention Report in YouTube?
YouTube will produce reports to help you keep track of your audience retention. There are two types of audience retention reports; absolute and relative. Absolute allows you to view a graph of your video’s retention and see when people might be clicking away, or if they are skipping to later parts of your video. If you lose a lot of viewers in the first 15 seconds of your videos then that is a clear indication that your content is not what the viewers who find your videos really want. The relative report is where your video is compared to the average retention of similar videos.
Note that by ‘similar videos’, YouTube means videos of a similar length. There is no way to compare your videos only to other videos in your genre. The relative report will always be somewhat skewed because your videos will be measured against very different content.
To see an audience retention report log into your YouTube account and go to yourCreator Studio. There, selectAudience RetentionunderAnalytics.
Part 3: What is a Good Audience Retention Rate on YouTube?
When you’re considering how to increase YouTube audience retention, it can be good to have a goal in mind. Obviously 100 per cent is going to be the Holy Grail of retention rates, but how many videos are actually going to achieve that? It only takes for one person to ‘accidentally’ click on your video and rapidly click away, or for someone to have to stop for outside reasons, to drag your average down.
According to the YouTube community, a good goal to aim for is around 50 per cent, but as there is a lot which can affect your retention rate, that number may be different for you. Low view numbers sometimes get higher retention rates because it’s mainly subscribers watching, whereas channels with millions of views may suffer due to more people abandoning. Rather than setting yourself a golden number, focus instead on increasing your retention rate from wherever it is now, and celebrate your own success instead of measuring yourself against others.
Part 4: 6 Ways to Increase YouTube Audience Retention
If you’re serious about learning how to increase YouTube audience retention, here are five of the best ideas for you:
1. Compare your videos
Investigating your audience retention report will highlight the videos where you achieved maximum success. Think about what you did here, and work to replicate that technique. Perhaps you were talking about a product, or maybe your structured your video slightly differently. It’s up to you to dissect your video and find out what it was that kept people watching for longer, so that you can repeat this success in the future. You can also use some influencer marketing platform such as InflueNex to take a look at the videos in your similar channels, and learn the popular videos on their channels.
2. Get on with it
Research shows that YouTube viewers have an incredibly short attention span. Depending on who you believe, you could have as much as six seconds or as little as just three to grab their attention and compel them to carry on watching. If you want to improve your audience retention, coming in with an engaging, attention grabbing statement right at the start is crucial to your success. Nobody wants to waste their time watching someone waffle on for ages about their granny or their favorite hobbies, so get right down to it straight away, by telling them what’s in store.
3. Make it visually engaging
Perhaps all you’ve got is a presentation to make. You’re not a gamer, you’re not showing clips of your cat and you’re not doing a makeup tutorial, so surely all you need is a camera, good lighting and your face, right? Wrong. Viewers like to see the visual content changing, and videos which have a range of scenes are usually far more successful than those where it’s just a person talking to camera. Think about how you can insert cutaways, pop up text, different footage and other graphics to keep it interesting for your viewers.
4. Make it shorter
This one is a no brainer really. If you make a one-minute video, how hard is it going to be to keep viewers watching to the end compared to a 20-minute marathon. However, going too short can be negative too, unless you really do have something very quick and simple to showcase. Long videos work well for YouTubers in the gaming niche, in particular, because viewers want to know the end result, but for most of us, these sorts of viewing statistics are hard to reach.
If you consider a viewer who watches three minutes of your content, would you rather they watched three minutes of a ten-minute video and then clicked away bored, or would you rather they finished an entire video that was only three minutes long? Both in terms of audience retention and of your own reputation, having a viewer finish a short video is much more valuable to you than losing someone half way through a long one. That person probably enjoyed your content to the end and will more than likely watch another one of your videos. Conversely, the one you lost half way through was bored enough to stop watching and will probably not bother viewing any other videos of yours in future.
5. Keep them hooked
Think carefully about your YouTube video structure. Ideally, you will tell them at the very start that you’ve got something amazing to share with them later on. This could be a tip, a tutorial, a new product reveal or even something funny. Whatever it is, tell them they’re going to love it from the start, and keep reminding them to watch from the end to get this gift. That doesn’t mean you shouldn’t give them great content all the way through, just that you should save a carrot for the end of the ride to reward those loyal viewers.
So, now you know how to increase YouTube audience retention, what are you going to do about it? Have a go at modifying your videos to boost the numbers who will watch to the end and let us know how you got on.
6. Use an Excellent Video Editor
Content is the king. It is necessary to use a powerful video editor to help you edit videos. With an excellent video editor like Filmora, you can custom stunning videos effortlessly.
Richard Bennett
Richard Bennett is a writer and a lover of all things video.
Follow @Richard Bennett
Also read:
- 2024 Approved Best Study Partners in History Top 10 Youtubers & Channels
- [Updated] Designing Distinctive Denouements
- Building a Successful Online Presence WireCast Streaming to Youtube for 2024
- [Updated] Comedic Content Concepts 7 Hilarious Vlog Ideas for Laughter Lovers
- [New] Best Webcams for YouTube Livestreaming
- A Beginner's Guide to Embedding YouTube Playlists in Code
- 2024 Approved Embracing Constructive Feedback, Ignoring the Rest
- Crafting Classic Cinematography Step-by-Step Guide for 2024
- Efficient Processes for Uploading Videos From iOS Gadgets for 2024
- Step-by-Step Tutorial to Create Engaging Valorant Videos with Thumbnails
- [New] Elevate Video Appeal Crafting Unforgettable Thumbnail Images
- [Updated] A Tale of Two Approaches Polite vs Aggressive Asking
- Convert YouTube Videos Smoothly Into Professional WebM Files
- 2024 Approved Embrace Creativity How to Attain Filmora FCC Accreditation
- 25 Ultimate Android & iOS Downloading Tools Reviewed for 2024
- [Updated] Effortless MP3 Conversion From YouTube for Mac Users
- Best 12 YouTube Game Openers A Comparative Guide (No Expense)
- Accessing Global Hitters The #1-#6 Short Video Downloaders
- [New] Elite Gaming Setup Essentials Revealed
- What Drives YouTube's Content Creator Hub?
- Joyful Views Essential 15 Comical YouTubers to Relax With
- Generating Auto Subscribe URLs for YouTube Channels
- Profitable Playgrounds for YouTube Geeks 2024
- [New] Efficiency at Fingertips Swiftly Upload Videos From iPhone/iPad to YouTube
- YouTube Profitability Initial Steps to Earnings
- Unlocking YouTube's Encrypted Video Secrets
- Streamlining Ad Revenue Post-Monetization YT Tips & Tricks
- [New] Converting iMovie Edits for Online Exhibition - YouTube Edition
- Exquisite Couple Clips The Best Weddings Online (8 Picks)
- [New] Driving View Counts Upward on YouTube 6 Proven Techniques
- Enhance Your Video to YouTube Specifications
- [New] Discovering Your Favorite Makeup Vloggers on YouTube
- 2024 Approved Creative Teaching Incorporating YouTube Into Your Curriculum
- Choosing the Best Camera for Filming Mirrorless or DSLR for 2024
- In 2024, Charting a Path to Profit Calculating Video View Requirements
- [Updated] Becoming a Confident Content Creator YouTube's Top Tips
- [Updated] Comprehensively Understanding YouTube's Aspect Ratio Ecosystem
- In 2024, Essential Guide to Social Media Video Ratios on Facebook
- How to Combine Several Xvid Files Into One Windows, Mac,Android, iPhone & Online for 2024
- In 2024, Beyond Brand Promotion Real Insights Into Instagram Reels
- Is pgsharp legal when you are playing pokemon On OnePlus Nord CE 3 Lite 5G? | Dr.fone
- What You Need To Know To Improve Your Nokia G310 Hard Reset | Dr.fone
- 2024 Approved Cutting Out Background Sounds - Free/Paid Options for Clear Videos
- Elevating Your Gaming Experience A Comprehensive Guide to Voice Alteration Using Morphvox
- Ways to stop parent tracking your Motorola Moto G24 | Dr.fone
- [New] In 2024, Mastering Camera Roll Export to Snapchat A Step-by-Step Guide
- Updated Best 15 Greatest Claymation Movies of All Time
- In 2024, Best Web-Based Video Creators with Audio Capabilities
- How To Erase Private Data From Apple iPhone 14 | Dr.fone
- 2024 Approved The Bottom Line Best Practices for OGG Conversion
- [Updated] Tech-Savvy Strategies to Maximize Whiteboard Functionality Across Devices
- Title: Visual Transcript Generator
- Author: Kevin
- Created at : 2024-05-25 16:54:41
- Updated at : 2024-05-26 16:54:41
- Link: https://youtube-videos.techidaily.com/visual-transcript-generator/
- License: This work is licensed under CC BY-NC-SA 4.0.
