
:max_bytes(150000):strip_icc()/GettyImages-95580139-58b6df383df78cdcd83a3cc0-c406246bb39a40fe956b182b1676994f.jpg)
"Video Enhancement Embedding YouTube Into Google Slides"
Video Enhancement: Embedding YouTube Into Google Slides
Create High-Quality Video - Wondershare Filmora
An easy and powerful YouTube video editor
Numerous video and audio effects to choose from
Detailed tutorials provided by the official channel
Google Slide presentation is a powerful tool for creators to keep their audience engaged. This online platform lets you create and demonstrate your ideas. It will capture your viewers’ attention from the very beginning. It also doesn’t matter whatever learning style you engage. Adding YouTube videos to Google Slide will appeal to all levels of individuals.
More so, it is the best way to provide a break for both the audience and the creator. You can break Google Slide presentations with videos to offer some break. Viewers and the presenter get a breather in the process. The presenter can take a short break from speaking while the video plays. Let’s now dive into how to embed a YouTube video in Google Slides.

In this article
01 Why should we add a video to Google Slides?
02 How to add a YouTube video to Google Slide
03 How to choose the right video for your Slides?
Why should we add a video to Google Slides?
There is a great impact of adding video to Google Slides.
For attention
Videos will automatically awaken you, especially if your thoughts have started to sway during a presentation. A video has a direct way of showing creativity. The audience automatically connects the dots between the video and the presentation lines alike.
To stimulate discussion
A picture is worth a thousand words. There is a way that an added video will help the audience connect to the day’s topic. It will bring up several ideas and stir up discussion with the presenter.
Easy following
With videos embedded in Google Slide, viewers will find it easy to understand and digest. Videos automatically eliminate boredom and make any topic interesting.
How to add a YouTube video to Google Slide
Use these two methods to add a YouTube video to Google Slides. Via the Search and Direct link.
Method 1. Embed YouTube video to Google Slide by search and selection
Google has owned YouTube since the year 2006. You can, therefore, integrate Google’s products with YouTube easily.
Step 1. First, go to the slide where you want to embed your video.
Step 2. Then choose the “Insert” option from the menu bar and hit the “Video” option.

Step 3. It would be best if you now viewed the “YouTube” search bar to type in the video you want to embed. You can use keywords to search for the video in question and view instant search results.
Step 4. Then select the video you want to embed, and you’ll see it appear on the “Slide.”

Step 5. Format your video. Remember that the entire video will be embedded. You don’t necessarily need the whole video. It is time to select just a brief but relevant clip from the video to use. Then position your video to the right point using the axes from the exact starting point to the finished part you want the video to appear in.
Method 2. Embed YouTube video to Google Slide by direct link
You can engage this method if you want to include the entire video.
Step 1. Get the URL of the specific YouTube video that you want to use.

Step 2. Then go to your browser’s “Address bar” to copy the YouTube link.
Step 3. Next, open the “Presentation” slide to put your video to.
Step 4. Choose the “Insert” tab from the menu bar.
Step 5. Then hit on the “Video” option from the drop-down menu that appears.
Step 6. A new window will open automatically. Choose the “By URL” tab.
Step 7. Then paste the YouTube video URL in the “Paste YouTube URL Here” bar section.

Step 8. Wait for the video file to load and press the “Select” option. The video will immediately appear in the presentation slide. Just drag and drop the video in your preferred position.
Note: You can do a few edits inside the application. Set the timer when your video should start and when to stop. You can also adjust the video player size.
How to choose the right video for your Slides?
Not all videos will make an impact on your Google Slide. You need to use the best shot that adds value to your presentation. These guidelines will help you to settle on the best video.
Be Professional – choose the best video for your presentation. Remember that the video is part of the presentation and carries more weight. Settling for quality video will bring out the professionalism in you.
Relevant – how do you know that what you are showing your audience corresponds to the presentation piece? Ensure that the video you add has something to do with the Google Slide presentation topic. The two should naturally flow to make it easy to understand the whole concept.
Precise – your presentation is not about the video. The ideal length should not exceed 60 seconds. The longer the video, the greater the chance for your audience to lose track along the way.
Know every footage you are working with – this will help you pick the best shots for your presentation. So, learn every aspect of the video before settling down to use it.
Add new content – even though one content may suit several presentations, don’t rely on the same piece each time. Your audience will want to feel something fresh each time you are presenting. So, compose different videos for different scenarios to make that big impact.
Create an eye-catching video for your Slides with Filmora
The video quality matters when it comes to creating your Slides. The best video creator – Filmora – works in simple steps to give you an eye-catching video. It will create videos for all scenarios like marketing, tutorial, gaming, etc.
Key features of Filmora
- It offers you advanced video effects like filters, motion elements, etc
- You can multiply your fun with multiple screens with the Split Screen feature
- Easily change backgrounds using the Green Screen feature
- The speed control lets you fast forward or slow down a special moment
- Import your video clips to social media platforms
- You can also adjust the audio of your tracks using the Audio Mixer feature
Follow this guide to create a video for your slide with Filmora
Step 1. Launch Filmora
First, begin by downloading and installing Filmora on your computer device. Once installed, launch it and allow it to run. You can either create a new project or open an existing project to work on.
Step 2. Create a new project
Here, click on the “New Project” tab on the app’s welcome screen. The editor should load immediately. Then proceed to register the product. Just hit on the “Register” tab.
Step 3. Import video
Check the upper left corner of your screen to see the “Import” tab. Click on it and choose the “Import Media Files” option. Next, navigate to the location of your computer’s local list to select the clip or video you want to edit. Then, hit the “Import” button to add the video to the timeline for editing.
Step 4. Edit video
Drag and drop the raw footage to Filmora’s timeline to begin editing. Here, you can trim, add other video clips, merge, and add effects as you wish. Likewise, you can add opening titles, subtitles, and end credits to your video. More so, this tool offers different templates to use. Just drag and drop the templates you wish to use to a specific location on the timeline.
Step 5. Preview your file
Last but not least, you can preview your files. Click on the “Play” tab to start previewing your video clips. The main essence of this part is to allow you to make the necessary changes to your clips if there is a need.
Step 6. Export and Share
With Filmora, you can export your file to various social media platforms. But first, go to the “Output window” and select the video file format to use. This software supports several output formats to apply to any platform and device. Just click on the “Format” tab and choose the file format to use. Then also change the resolution and other parameters like frame rate and channel of your video in the “Settings” section. Finally, share your video to your YouTube channel and get ready to add the video to the Google Slide presentation.
For Win 7 or later (64-bit)
For macOS 10.12 or later
Conclusion
● You now know how to put a YouTube video in Google Slides the simple way. You can search for your YouTube videos or directly use the URL link. Whatever the case, remember that it’s the quality of your video that carries more weight. Thanks to the availability of third-party apps that you can use to create and improve the quality of your videos.
● Filmora is at your service to create high-resolution videos that you can export in any format to your YouTube channel. The tool is intuitive, and it won’t matter whether you haven’t tried it before. It is a perfect choice for both professionals and first-time users.
Google Slide presentation is a powerful tool for creators to keep their audience engaged. This online platform lets you create and demonstrate your ideas. It will capture your viewers’ attention from the very beginning. It also doesn’t matter whatever learning style you engage. Adding YouTube videos to Google Slide will appeal to all levels of individuals.
More so, it is the best way to provide a break for both the audience and the creator. You can break Google Slide presentations with videos to offer some break. Viewers and the presenter get a breather in the process. The presenter can take a short break from speaking while the video plays. Let’s now dive into how to embed a YouTube video in Google Slides.
In this article
01 Why should we add a video to Google Slides?
02 How to add a YouTube video to Google Slide
03 How to choose the right video for your Slides?
Why should we add a video to Google Slides?
There is a great impact of adding video to Google Slides.
For attention
Videos will automatically awaken you, especially if your thoughts have started to sway during a presentation. A video has a direct way of showing creativity. The audience automatically connects the dots between the video and the presentation lines alike.
To stimulate discussion
A picture is worth a thousand words. There is a way that an added video will help the audience connect to the day’s topic. It will bring up several ideas and stir up discussion with the presenter.
Easy following
With videos embedded in Google Slide, viewers will find it easy to understand and digest. Videos automatically eliminate boredom and make any topic interesting.
How to add a YouTube video to Google Slide
Use these two methods to add a YouTube video to Google Slides. Via the Search and Direct link.
Method 1. Embed YouTube video to Google Slide by search and selection
Google has owned YouTube since the year 2006. You can, therefore, integrate Google’s products with YouTube easily.
Step 1. First, go to the slide where you want to embed your video.
Step 2. Then choose the “Insert” option from the menu bar and hit the “Video” option.
Step 3. It would be best if you now viewed the “YouTube” search bar to type in the video you want to embed. You can use keywords to search for the video in question and view instant search results.
Step 4. Then select the video you want to embed, and you’ll see it appear on the “Slide.”
Step 5. Format your video. Remember that the entire video will be embedded. You don’t necessarily need the whole video. It is time to select just a brief but relevant clip from the video to use. Then position your video to the right point using the axes from the exact starting point to the finished part you want the video to appear in.
Method 2. Embed YouTube video to Google Slide by direct link
You can engage this method if you want to include the entire video.
Step 1. Get the URL of the specific YouTube video that you want to use.
Step 2. Then go to your browser’s “Address bar” to copy the YouTube link.
Step 3. Next, open the “Presentation” slide to put your video to.
Step 4. Choose the “Insert” tab from the menu bar.
Step 5. Then hit on the “Video” option from the drop-down menu that appears.
Step 6. A new window will open automatically. Choose the “By URL” tab.
Step 7. Then paste the YouTube video URL in the “Paste YouTube URL Here” bar section.
Step 8. Wait for the video file to load and press the “Select” option. The video will immediately appear in the presentation slide. Just drag and drop the video in your preferred position.
Note: You can do a few edits inside the application. Set the timer when your video should start and when to stop. You can also adjust the video player size.
How to choose the right video for your Slides?
Not all videos will make an impact on your Google Slide. You need to use the best shot that adds value to your presentation. These guidelines will help you to settle on the best video.
Be Professional – choose the best video for your presentation. Remember that the video is part of the presentation and carries more weight. Settling for quality video will bring out the professionalism in you.
Relevant – how do you know that what you are showing your audience corresponds to the presentation piece? Ensure that the video you add has something to do with the Google Slide presentation topic. The two should naturally flow to make it easy to understand the whole concept.
Precise – your presentation is not about the video. The ideal length should not exceed 60 seconds. The longer the video, the greater the chance for your audience to lose track along the way.
Know every footage you are working with – this will help you pick the best shots for your presentation. So, learn every aspect of the video before settling down to use it.
Add new content – even though one content may suit several presentations, don’t rely on the same piece each time. Your audience will want to feel something fresh each time you are presenting. So, compose different videos for different scenarios to make that big impact.
Create an eye-catching video for your Slides with Filmora
The video quality matters when it comes to creating your Slides. The best video creator – Filmora – works in simple steps to give you an eye-catching video. It will create videos for all scenarios like marketing, tutorial, gaming, etc.
Key features of Filmora
- It offers you advanced video effects like filters, motion elements, etc
- You can multiply your fun with multiple screens with the Split Screen feature
- Easily change backgrounds using the Green Screen feature
- The speed control lets you fast forward or slow down a special moment
- Import your video clips to social media platforms
- You can also adjust the audio of your tracks using the Audio Mixer feature
Follow this guide to create a video for your slide with Filmora
Step 1. Launch Filmora
First, begin by downloading and installing Filmora on your computer device. Once installed, launch it and allow it to run. You can either create a new project or open an existing project to work on.
Step 2. Create a new project
Here, click on the “New Project” tab on the app’s welcome screen. The editor should load immediately. Then proceed to register the product. Just hit on the “Register” tab.
Step 3. Import video
Check the upper left corner of your screen to see the “Import” tab. Click on it and choose the “Import Media Files” option. Next, navigate to the location of your computer’s local list to select the clip or video you want to edit. Then, hit the “Import” button to add the video to the timeline for editing.
Step 4. Edit video
Drag and drop the raw footage to Filmora’s timeline to begin editing. Here, you can trim, add other video clips, merge, and add effects as you wish. Likewise, you can add opening titles, subtitles, and end credits to your video. More so, this tool offers different templates to use. Just drag and drop the templates you wish to use to a specific location on the timeline.
Step 5. Preview your file
Last but not least, you can preview your files. Click on the “Play” tab to start previewing your video clips. The main essence of this part is to allow you to make the necessary changes to your clips if there is a need.
Step 6. Export and Share
With Filmora, you can export your file to various social media platforms. But first, go to the “Output window” and select the video file format to use. This software supports several output formats to apply to any platform and device. Just click on the “Format” tab and choose the file format to use. Then also change the resolution and other parameters like frame rate and channel of your video in the “Settings” section. Finally, share your video to your YouTube channel and get ready to add the video to the Google Slide presentation.
For Win 7 or later (64-bit)
For macOS 10.12 or later
Conclusion
● You now know how to put a YouTube video in Google Slides the simple way. You can search for your YouTube videos or directly use the URL link. Whatever the case, remember that it’s the quality of your video that carries more weight. Thanks to the availability of third-party apps that you can use to create and improve the quality of your videos.
● Filmora is at your service to create high-resolution videos that you can export in any format to your YouTube channel. The tool is intuitive, and it won’t matter whether you haven’t tried it before. It is a perfect choice for both professionals and first-time users.
Delving Into Trending Video Exchange
What Is the YouTube Highlighted Comment?

Liza Brown
Mar 27, 2024• Proven solutions
Did you just come across a comment tagged with Highlight on YouTube and wondering what it means? In our guide, you will find an answer to this, along with related queries like how YouTube highlighted comment works, the removal process, its benefits, and more.
If you own a YouTube channel or are starting one, even you can do this. Without further ado, let’s jump straight into the core of YouTube’s highlighted comments. We’ve categorized this article into a total of 8 parts for simple and better understanding.
- Part 1: What Does Highlighted Comment Mean On YouTube?
- Part 2: What Does Highlighted Comments Look Like on YouTube?
- Part 3: How to Make Comment Highlighted?
- Part 4: How to Highlighted Comments URL?
- Part 5: How to Reply to Highlighted Comments?
- Part 6: How to Remove Highlighted Comments?
- Part 7: Tips for Writing a Comment
- Part 8: Benefits of Highlighted Comments
Part 1: What Does The Highlighted Comment Mean On YouTube?
Before you get on with highlighting your comments, you must understand what it means exactly. You may follow comments on the videos posted by several YouTubers, but the highlighted ones are always making it to the top of the list.
Having said that, neither the content creator nor users or moderators choose to highlight YouTube comments to begin with. They are no rocket science, but only a tad bit more than what you know as a bookmarking feature.
Think of highlighted comments as a “tag”. You might notice this in the form of a ‘new activity YouTube notification’ link you receive on your registered email. Only you can see this tag when you click the notification and arrive at Youtube.com to either view or reply to a comment.
Highlighting comments (HC’s) are an automatic feature generated by YouTube. It draws the YouTuber’s & viewer’s attention to relevant activities. Don’t fail to notice that the highlight disappears once you are done interacting in the tagged comment thread. However, they are reloadable by tapping the comment timestamp.
For instance, you may want to check the following links. The 2 URLs lead you to the same video, but only one of them shows a highlighted comment.
- https://www.youtube.com/watch?v=XWhjJjhpmQA&lc=Ugya-89WYAlutJurKGh4AaABAg
- https://www.youtube.com/watch?v=XWhjJjhpmQA
Notice the name “lc” in the first URL- that stands for linked comment. YouTube might include this additional parameter. If a reply comment (HR) gets highlighted, the parent comment gets raised to the top.
Part 2: What Does The Highlighted Comment Look Like?
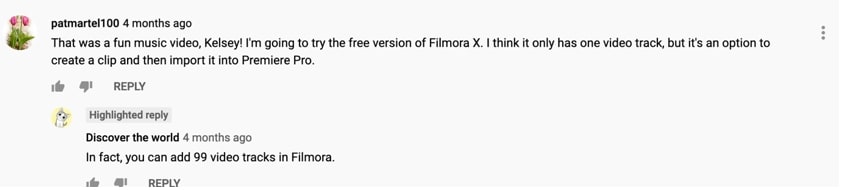
YouTube has been working on improving the navigation of the comment section for videos, and highlighted comments are one of them. These comments appear even above the pinned comments on a video. The label of a highlighted comment is displayed above the commentator’s name in a light grey shade.

YouTube labels comment replies as well and call it “Highlighted Reply.” You can see this tag above the replier’s name in the same color tone.
Part 3: How to Make My Comment Highlighted?
Now, making YouTube highlight your comment on a popular video is nothing less than an art. YouTube doesn’t make it easy for you. The advantage of getting your comment highlighted on YouTube is limitless.
Thus, anybody who wants to get their YouTube comment an HC tag has to follow a few simple steps, which we will discuss below in another section. Finding the correct or relevant video content that can benefit your channel from such a comment is an excellent place to start.
For example, if you are a YouTuber who deals in tech information, you need to look for a popular video or channel with a similar genre, in this case, technical knowledge. The more popular the channel is, the more is the chance of a viewer checking the comments on its videos. You will only benefit if you’re comment is highlighted on pages of Youtuber’s who are huge.
Part 4: How to Get the URL of Highlighted Comments?
The ways to acquire the URL or link for a highlighted comment are different for both parties- viewer and host.
Suppose you are a viewer who is going through the comments section of a video. If you want to get the highlighted URL for the comment, simply click on the timestamp (e.g., 2 weeks ago) beside the commentator’s username.
On the other hand, for a YouTuber, getting access to the comment URL is relatively straightforward. The host will get a notification on his or her registered email-id when a viewer publishes a comment on their posted video. You will find the link to the highlighted comment in the notification
Part 5: How to Reply to Highlighted Comments?
Replying to “highlighted comments” on your YouTube channel is pretty easy since this feature was developed, keeping the user’s convenience in mind. If you want to follow up or reply to such comments, you can do so from your email or YouTube Dashboard.
If you click the notification bell icon, whenever a viewer drops a new comment on one of your videos, YouTube will send you a notification via email. On opening the email, you will find a clickable “Reply” option. Or else, if you follow the comment section in the YouTube Dashboard, you can directly view or reply to highlighted comments from here as well.
Have you ever wondered why a highlighted comment always shows at the top of the comment list? Both the above options will lead you to the comment thread on YouTube. To help you find the new activity easily, it appears with the highlight tag on it. The purpose is to remind you that you are here for that specific comment.
Part 6: How to Remove Highlighted Comments?
Can you, as a video maker, remove highlighted comments on YouTube? The direct answer to this would be a ‘No.’ It is because based on how you have opened the specific video, YouTube does it automatically.
Alternatively, you can try out a few temporary solutions.
- You can edit the particular URL of the video where the highlighted tag is showing. Remove the red part of the URL (example given below) starting with “&”:
https://www.youtube.com/watch?v=XWhjJjhpmQA&lc=Ugya-89WYAlutJurKGh4AaABAg After removing the above parameter, reload the original video link (below):
https://www.youtube.com/watch?v=XWhjJjhpmQA
- Try logging out from your Google Account and browse YouTube (anonymously). Doing this will ensure that you no longer see any highlighted comments. However, at the same time, this will restrict you from interacting in any way with that video, let alone leaving a comment.
Part 7: Tips for Writing a Comment that will be Pinned as a Highlighted Comment?
Many frequently inquire on the internet about how they can improve the chances of getting their comment pinned, as highlighted on YouTube. The secret lies in how you write the statement. We’ve listed a few pro tips below that can help:
- First, go through all the posted comments under the video. It will help you identify what is missing. You can comment or write the missing point in comprehendible and straightforward words. Also, never forget to acknowledge the YouTuber’s talent.
- Remember, no one has the time to read long comments. So, when you know what you want to write, try to shorten your sentences. A short and crisp comment draws more attention.
- After you have framed your comment, make sure that it is grammatically correct. YouTube and Google hate grammatical errors.
- Do not hit the post option already. Before publishing it, you must cross-check that your comment has all the above points in place.
- Lastly, you have to wait after publishing on the video’s comment section. YouTube will highlight your comment if it passes according to the YouTube policy and if the search engine finds it unique.
Part 8: Are Highlighted Comments Beneficial?
Being a convenience feature, a highlighted comment on YouTube is 100% beneficial. That is especially true if you are looking for ways to optimize your channel.
YouTube is undeniably the second largest search engine on the web. Highlight comments can potentially increase the outreach of your content and, consequently, your brand presence.
As said earlier, these comments always show first on the comment section. Needless to say, many people who watch the videos also scroll down to the comments section to start a conversation or see what other viewers are saying about this video.
In the process, alongside the interaction, they also check out the channels or profiles of the commentators. Viewers often visit the pages of these channels, and if they happen to enjoy the video content, they will subscribe to the YouTuber’s channel. If your comment gets highlighted, your YouTube channel can be one of them.
Conclusion
YouTube can be an intimidating tool for marketing and more so for newcomers. Every YouTuber wishes that their channel performs better than the previous day. Even though the highlighted comment or highlighted reply feature doesn’t have any direct benefits, it can indeed help in optimizing your YouTube channel.
It can connect you with potential viewers and increase the number of people that visit your channel regularly. However, how many of them stay and hit the “Subscribe” button is a different story altogether and is wholly based on whether they like what you share through your videos.
In this article, we have shared facts on YouTube’s commonly seen highlighted comment feature. Yet, the term is a heavily misleading one, as far as viewers and Youtuber’s are concerned. We have also covered all other aspects and queries related to this term. Here’s hoping they clarify all your doubts.
Liza Brown
Liza Brown is a writer and a lover of all things video.
Follow @Liza Brown
Liza Brown
Mar 27, 2024• Proven solutions
Did you just come across a comment tagged with Highlight on YouTube and wondering what it means? In our guide, you will find an answer to this, along with related queries like how YouTube highlighted comment works, the removal process, its benefits, and more.
If you own a YouTube channel or are starting one, even you can do this. Without further ado, let’s jump straight into the core of YouTube’s highlighted comments. We’ve categorized this article into a total of 8 parts for simple and better understanding.
- Part 1: What Does Highlighted Comment Mean On YouTube?
- Part 2: What Does Highlighted Comments Look Like on YouTube?
- Part 3: How to Make Comment Highlighted?
- Part 4: How to Highlighted Comments URL?
- Part 5: How to Reply to Highlighted Comments?
- Part 6: How to Remove Highlighted Comments?
- Part 7: Tips for Writing a Comment
- Part 8: Benefits of Highlighted Comments
Part 1: What Does The Highlighted Comment Mean On YouTube?
Before you get on with highlighting your comments, you must understand what it means exactly. You may follow comments on the videos posted by several YouTubers, but the highlighted ones are always making it to the top of the list.
Having said that, neither the content creator nor users or moderators choose to highlight YouTube comments to begin with. They are no rocket science, but only a tad bit more than what you know as a bookmarking feature.
Think of highlighted comments as a “tag”. You might notice this in the form of a ‘new activity YouTube notification’ link you receive on your registered email. Only you can see this tag when you click the notification and arrive at Youtube.com to either view or reply to a comment.
Highlighting comments (HC’s) are an automatic feature generated by YouTube. It draws the YouTuber’s & viewer’s attention to relevant activities. Don’t fail to notice that the highlight disappears once you are done interacting in the tagged comment thread. However, they are reloadable by tapping the comment timestamp.
For instance, you may want to check the following links. The 2 URLs lead you to the same video, but only one of them shows a highlighted comment.
- https://www.youtube.com/watch?v=XWhjJjhpmQA&lc=Ugya-89WYAlutJurKGh4AaABAg
- https://www.youtube.com/watch?v=XWhjJjhpmQA
Notice the name “lc” in the first URL- that stands for linked comment. YouTube might include this additional parameter. If a reply comment (HR) gets highlighted, the parent comment gets raised to the top.
Part 2: What Does The Highlighted Comment Look Like?
YouTube has been working on improving the navigation of the comment section for videos, and highlighted comments are one of them. These comments appear even above the pinned comments on a video. The label of a highlighted comment is displayed above the commentator’s name in a light grey shade.
YouTube labels comment replies as well and call it “Highlighted Reply.” You can see this tag above the replier’s name in the same color tone.
Part 3: How to Make My Comment Highlighted?
Now, making YouTube highlight your comment on a popular video is nothing less than an art. YouTube doesn’t make it easy for you. The advantage of getting your comment highlighted on YouTube is limitless.
Thus, anybody who wants to get their YouTube comment an HC tag has to follow a few simple steps, which we will discuss below in another section. Finding the correct or relevant video content that can benefit your channel from such a comment is an excellent place to start.
For example, if you are a YouTuber who deals in tech information, you need to look for a popular video or channel with a similar genre, in this case, technical knowledge. The more popular the channel is, the more is the chance of a viewer checking the comments on its videos. You will only benefit if you’re comment is highlighted on pages of Youtuber’s who are huge.
Part 4: How to Get the URL of Highlighted Comments?
The ways to acquire the URL or link for a highlighted comment are different for both parties- viewer and host.
Suppose you are a viewer who is going through the comments section of a video. If you want to get the highlighted URL for the comment, simply click on the timestamp (e.g., 2 weeks ago) beside the commentator’s username.
On the other hand, for a YouTuber, getting access to the comment URL is relatively straightforward. The host will get a notification on his or her registered email-id when a viewer publishes a comment on their posted video. You will find the link to the highlighted comment in the notification
Part 5: How to Reply to Highlighted Comments?
Replying to “highlighted comments” on your YouTube channel is pretty easy since this feature was developed, keeping the user’s convenience in mind. If you want to follow up or reply to such comments, you can do so from your email or YouTube Dashboard.
If you click the notification bell icon, whenever a viewer drops a new comment on one of your videos, YouTube will send you a notification via email. On opening the email, you will find a clickable “Reply” option. Or else, if you follow the comment section in the YouTube Dashboard, you can directly view or reply to highlighted comments from here as well.
Have you ever wondered why a highlighted comment always shows at the top of the comment list? Both the above options will lead you to the comment thread on YouTube. To help you find the new activity easily, it appears with the highlight tag on it. The purpose is to remind you that you are here for that specific comment.
Part 6: How to Remove Highlighted Comments?
Can you, as a video maker, remove highlighted comments on YouTube? The direct answer to this would be a ‘No.’ It is because based on how you have opened the specific video, YouTube does it automatically.
Alternatively, you can try out a few temporary solutions.
- You can edit the particular URL of the video where the highlighted tag is showing. Remove the red part of the URL (example given below) starting with “&”:
https://www.youtube.com/watch?v=XWhjJjhpmQA&lc=Ugya-89WYAlutJurKGh4AaABAg After removing the above parameter, reload the original video link (below):
https://www.youtube.com/watch?v=XWhjJjhpmQA
- Try logging out from your Google Account and browse YouTube (anonymously). Doing this will ensure that you no longer see any highlighted comments. However, at the same time, this will restrict you from interacting in any way with that video, let alone leaving a comment.
Part 7: Tips for Writing a Comment that will be Pinned as a Highlighted Comment?
Many frequently inquire on the internet about how they can improve the chances of getting their comment pinned, as highlighted on YouTube. The secret lies in how you write the statement. We’ve listed a few pro tips below that can help:
- First, go through all the posted comments under the video. It will help you identify what is missing. You can comment or write the missing point in comprehendible and straightforward words. Also, never forget to acknowledge the YouTuber’s talent.
- Remember, no one has the time to read long comments. So, when you know what you want to write, try to shorten your sentences. A short and crisp comment draws more attention.
- After you have framed your comment, make sure that it is grammatically correct. YouTube and Google hate grammatical errors.
- Do not hit the post option already. Before publishing it, you must cross-check that your comment has all the above points in place.
- Lastly, you have to wait after publishing on the video’s comment section. YouTube will highlight your comment if it passes according to the YouTube policy and if the search engine finds it unique.
Part 8: Are Highlighted Comments Beneficial?
Being a convenience feature, a highlighted comment on YouTube is 100% beneficial. That is especially true if you are looking for ways to optimize your channel.
YouTube is undeniably the second largest search engine on the web. Highlight comments can potentially increase the outreach of your content and, consequently, your brand presence.
As said earlier, these comments always show first on the comment section. Needless to say, many people who watch the videos also scroll down to the comments section to start a conversation or see what other viewers are saying about this video.
In the process, alongside the interaction, they also check out the channels or profiles of the commentators. Viewers often visit the pages of these channels, and if they happen to enjoy the video content, they will subscribe to the YouTuber’s channel. If your comment gets highlighted, your YouTube channel can be one of them.
Conclusion
YouTube can be an intimidating tool for marketing and more so for newcomers. Every YouTuber wishes that their channel performs better than the previous day. Even though the highlighted comment or highlighted reply feature doesn’t have any direct benefits, it can indeed help in optimizing your YouTube channel.
It can connect you with potential viewers and increase the number of people that visit your channel regularly. However, how many of them stay and hit the “Subscribe” button is a different story altogether and is wholly based on whether they like what you share through your videos.
In this article, we have shared facts on YouTube’s commonly seen highlighted comment feature. Yet, the term is a heavily misleading one, as far as viewers and Youtuber’s are concerned. We have also covered all other aspects and queries related to this term. Here’s hoping they clarify all your doubts.
Liza Brown
Liza Brown is a writer and a lover of all things video.
Follow @Liza Brown
Also read:
- Today's Vital Views YouTube’s Quick Hit List
- Charting a Course for Growth Precise YouTube Stats From Social Blade's Hub for 2024
- [New] Addressing YouTube Shorts No Image Upload Issue?
- What Are Ethical Alternatives to Buying Likes?
- In 2024, Eliminate YouTube Shorts Permanent Guide
- Skyrocket Your Channels with Smart Use of YouTube Data
- [Updated] Enabling Autoplay YouTube Without Alerts
- 2024 Approved Crafting Animation Dynamic, Bouncy Text Techniques
- 2024 Approved Essential Guide for Prime Webcams in YouTube Live Broadcasts
- [Updated] Discovering the Secrets to Targeted YouTubes Likes and Views
- Converting Videos to Gifs Online The Ultimate YouTube Resource
- Time Travel Tutorials Top 10 YouTube Sources for History Buffs
- Tailored Insights Setting Up Your Personal/Business YT Channel Mobilely
- 2024 Approved Dominating Digital Space Top 5 YouTube Tactics Revealed
- 2024 Approved A Complete List of Creative and Catchy YouTube Channel Titles for Modern Blogging (Maximum Length 156 Characters)
- [Updated] Blogging Basics for Business Beginnings
- Automate Playlist Retrieval From YouTube Directly for 2024
- Monetizing Success A Guide to Purchasing YouTube Content
- [New] Download All YouTube Images for Free
- 5 Steps to Crafting Engaging, Cost-Effective YouTube Ads for 2024
- Premier Microphone Picks for Blogging Pros
- [Updated] Diving Into the World of Youtubers Starting Your Channel, Earning Cash
- Chortle Chamber Ideas for 7 Amusing Online Sessions for 2024
- Effortless Calls Combining YouTube & Green Screens
- [New] Dominating Search Results Essential YouTube SEO Tricks
- Boosting Your Video Income on Youtube - Essentials
- The Editor's Playbook Essential Strategies for Youtube Video Crafting
- In 2024, How to Buy 1 Million YouTube Views Safely From Trusted Providers
- 2024 Approved Countering Harshness Maintaining Poise Online
- [Updated] Beyond YouTube Elite Video Sharing Hubs Revealed
- 2024 Approved Crafting Content for Success How to Start Your Own YouTube Chanel
- Exploring NextGen Videostreaming Platforms
- Determinants of YouTube Video Prominence and Success
- IOS Video Posting Made Easy Step-by-Step Guide
- Break Through Bot Barriers Rising From the Crowd
- Leveraging Both Platforms A Detailed Guide to YouTube-Facebook Linking
- 17 Best Lights and Lighting Equipment for YouTube Videos for 2024
- [New] Chuckle-Filled Chapters Best Comedy Video Plans in a Nutshell
- How to Add Video to Text for Free
- Stand Out in the Stream Top Name Generators Reviewed
- 2024 Approved Dynamic & Attractive YouTubes Channel Names for Modern Vloggers (Up to 156 Characters)
- [Updated] FREE Best YouTube Video Editor Apps for Android
- [Updated] Conquer Small Screen Navigate Through These Best Free & Online Downloader Tools
- [Updated] Best Hashtags for YouTube To Get Your Views to 6 Figures
- [New] Best Camera Apps to Shoot and Record Videos on iPhone and Andriod Phones
- In 2024, 25 Ultimate Android & iOS Downloading Tools Reviewed
- New Windows 8 FLV Video Editor Simplify Your Editing Process for 2024
- Updated In 2024, Best Online MP3 Cutter And Joiner
- [Updated] 2024 Approved Evaluating the Superiority of SplitCam's Recording
- New In 2024, Free and Fabulous Top WMV Video Editors
- In 2024, Latest Guide How To Bypass Xiaomi 13T FRP Without Computer
- How to Unlock iCloud Activation Lock and iCloud Account From iPhone 11?
- [Updated] Facilitating Instant Sharing TikTok Videos on Facebook for 2024
- Why Does iTools Virtual Location Not Work For Apple iPhone XS Max/iPad? Solved | Dr.fone
- [Updated] From Joke to Jest Constructing Impactful Social Media Memes
- [Updated] In 2024, Livestreaming Facebook Made Simple for All Tech Users
- [Updated] In 2024, Unleash Photos on Instagram with Ease – Follow This Guide
- In 2024, How to use iSpoofer on Vivo Y77t? | Dr.fone
- [New] Maximizing Engagement in Post-Facebook Algorithm World for 2024
- 2024 Approved Streamlined Video Editors with Automatic Reframing Features
- Tecno Camon 20 Premier 5G Not Connecting to Wi-Fi? 12 Quick Ways to Fix | Dr.fone
- [Updated] 2024 Approved No-Fee Budget-Friendly Screen Reader Pro
- New 2024 Approved Soulful Sounds for Somber Days Unearthing Emotional Tunes
- [New] 2024 Approved Expert Tips to Master Camera Snap in Zoom Calls
- In 2024, How to Turn Off Find My Apple iPhone 14 Plus when Phone is Broken?
- [Updated] A Critical Look at SNS HDR's Potential & Alternatives
- [New] Mac-Centric Review The Complete Guide to ScreenFlow V4 for 2024
- [New] Mastering the Basics A Thorough Guide to Using Mobizen Recorders
- [Updated] In 2024, Ultimate Recording Suite - AZ's Top App Reviews & Backups
- [Updated] In 2024, Master the Art of Recording 10 Best No-Cost Mac Software
- Elevate Content with Properly Sized Videos on Instagram for 2024
- How to Remove Apple ID from iPhone 15 Pro Max without Password?
- [Updated] In 2024, How To Record Perfect Videos in Total Quietude
- Infinix Unlock Tool - Remove android phone password, PIN, Pattern and fingerprint
- [Updated] In 2024, Guffaw Gazette Twitter's Funniest Threads
- Updated In 2024, How Does the YouTube AI Algorithm Work - AI EXPLAINED
- [New] 2024 Approved Learn to Modify Snapchat's Audio Effect in Two Ways
- 2024 Approved Compact, Powerful & Stylish #8 Top 5K Monitors
- 4 Ways to Transfer Music from Itel A70 to iPhone | Dr.fone
- 2024 Approved Add Flesh to Your Video Content Before Posting Them for Your Audience to See Using Meme Texts. Use the Tutorial Guide Shared in This Post
- Updated 2024 Approved Best Movie Intro Software Create Professional-Looking Intros
- In 2024, Hassle-Free Ways to Remove FRP Lock on Infinix Note 30i Phones with/without a PC
- Get It Right A Beginner's Guide to iPhone Screen Shots
- Add MP3 Elements to PPT Display Panels
- Title: "Video Enhancement Embedding YouTube Into Google Slides"
- Author: Kevin
- Created at : 2024-05-25 16:53:54
- Updated at : 2024-05-26 16:53:54
- Link: https://youtube-videos.techidaily.com/video-enhancement-embedding-youtube-into-google-slides/
- License: This work is licensed under CC BY-NC-SA 4.0.
