
![[Updated] Essential Tips for Successful YouTube Broadcasts](https://www.lifewire.com/thmb/hfQflvBCf7d-XN3Ks-apahbRORg=/400x300/filters:no_upscale():max_bytes(150000):strip_icc():format(webp)/is-audible-worth-it-00616437e29b4d108264ba36057bbdde.jpg)
[Updated] Essential Tips for Successful YouTube Broadcasts
Essential Tips for Successful YouTube Broadcasts
The Ultimate Guide to YouTube Live Streaming

Richard Bennett
Mar 27, 2024• Proven solutions
Live streaming on YouTube is a great way to get more engagement from your audience, even if you do not have a huge following. As long as you have some reliable subscribers leaving comments on your videos you should be able to schedule a live stream and know it will have an audience. People feel a personal connection with their favorite vloggers so if you give your subscribers a chance to interact with you in real time they will probably plan to join in. The key to a good live streaming is to respond to comments and questions from people who are watching. Besides watching the live chat of your video you can create a hashtag for your stream and monitor it on twitter.
Table of Contents
- Why Livestream?
- Type of Content to Livestream
- What You Need to Livestream On YouTube
- 4 Ways to Setup Your Livestream On YouTube
- 8 Tips to Improve Your Livestream on YouTube
- How to Grow As A Livestreamer on YouTube
Why Livestream?
You have grown your audience, and now you want to take your channel to the next level and diversify your content.
Whether you are vlogging, gaming, or running tutorials on YouTube, there is potential to host a live broadcast. It’s not limited to any genre, you simply need to create content that people are interested in watching.
Before we get started into the How, let’s start with a few reasons Why you should be live streaming your content.
Connect and engage with your audience
When a viewer leaves a comment during a livestream you will be able to see it right away and respond. Having an instantaneous conversation with a viewer while they are watching your video will encourage more engagement and establish a ber relationship with your viewers — and you will know that these viewers are not bots.
Increase watch time and session watch time on your channel
If you are making YouTube videos on average 10 minutes long, and the viewer only watches half of it, that’s only 5 minutes of watch time, which is fine… But if you are live streaming for 45 minutes, and you are able to hold the viewer’s attention, you can surpass what your regular videos can do.
Make videos faster
As a YouTuber, you are always striving to be more efficient. Live streaming allows you to do that as you can set up and go. The content you end up creating during the duration of your livestream can then also be condensed into a highlight reel or a recap.
With a bit of planning before you go live, you can create a week’s worth of content in one go, instead of having multiple schedules for livestream content and your standard publishing videos.
Type of Content to Livestream
Live streaming has a lot of value, but what type of content should you be streaming?
Here are a few popular ideas for content that will attract viewers to your livestream:
Q&A session
Unboxing
Game or challenge
Sneak preview or review
Live events (just make sure the Internet can support it)
A demo or a tutorial
A live commentary or (if you are a gamer) Let’s Play video
What You Need to Livestream On YouTube
A Plan or Outline
It’s good to know what your livestream is going to be about before you start. Is there a key message you want to hit, an action you want your viewers to take, or a structure you want to follow.
Just because it’s live, doesn’t mean it all has to be improvised. If you go in without a plan, you might end up feeling flustered or getting stressed out. Allow for spontaneous comments or events to take you off your initial plan, but always return to your outline so you know how to wrap up your livestream when you have to.
Stable Internet Connection
You cannot conduct a quality livestream, if your Internet is bad. When evaluating your internet connection for live streaming on YouTube, look at the Upload speed. Depending on the quality of your video, these are the minimum upload speed rates your Internet will need to perform:
480p = 1.5 mbps
720p = 3 mbps
1080 = 5 mbps
In addition, be aware of external causes that may be slowing down your internet such as someone else using it, a poorly performing router, or a damaged cable.
Camera
If you have a smartphone or a laptop with a webcam built in, that is the best camera for you to get started live streaming. It’s good to have a milestone and work towards a more advanced camera, but until then, don’t feel discouraged because you don’t have expensive gear. If you have a smartphone, a laptop, or a basic webcam, that’s perfectly fine.
Microphone
You don’t need a great microphone for live streaming, you only need a good one. If you do want to spend several hundred to a thousand dollars for a professional studio microphone, nobody will stop you, but know this, a mic that is easy to use is as important as the audio quality as you develop a consistent live streaming schedule.
Streaming Software (For Higher Quality Streams)
Once upon a time, to livestream on YouTube, you needed additional software to capture content from desktop, camera, microphone, etc, called encoding software — but not anymore.
Those encoding software, such as OBS , Wirecast , and VMix , are required if you are producing content that requires a high frame rate such as gaming, but not mandatory if you are simply vlogging or running a tutorial.
If you are using Chrome, you canstream live on YouTube without using an encoder .
A Capture Card (For Higher Quality Streams)
You will need a capture card when you are capturing footage from a different PC or console. If you are a gamer and you are using one PC to stream and one PC to play your game, then you should consider getting a capture card.
4 Ways to Setup Your Livestream On YouTube
There are 4 main ways you can start live streaming on YouTube. The one that works best for you depends on the content you are going to be streaming.
1. Camera/Go Live (Chrome Browser)
By accessing www.youtube.com/webcam on the Google Chrome browser, you can start streaming immediately through your connected webcam. This way is best for a simple Q&A or letting your viewers know your thoughts in a timely situation. This method does not require an encoder.
There are 3 ways to access livestream this way:
1. Click here to connect to your YouTube channel
2. You can access it from the top menu on YouTube

3. You can access it by clicking Camera under the Live Streaming tab in your Creator Studio
2. Google Hangouts On Air (Quick)
Another way to livestream without an encoding software is by using the Google Hangouts On Air feature.
This is great if you want the feel of your livestream to be similar to a board meeting, where you can invite people, split screen, and share screen to illustrate your point.
Here’s how you can access this Google Hangouts On Air:
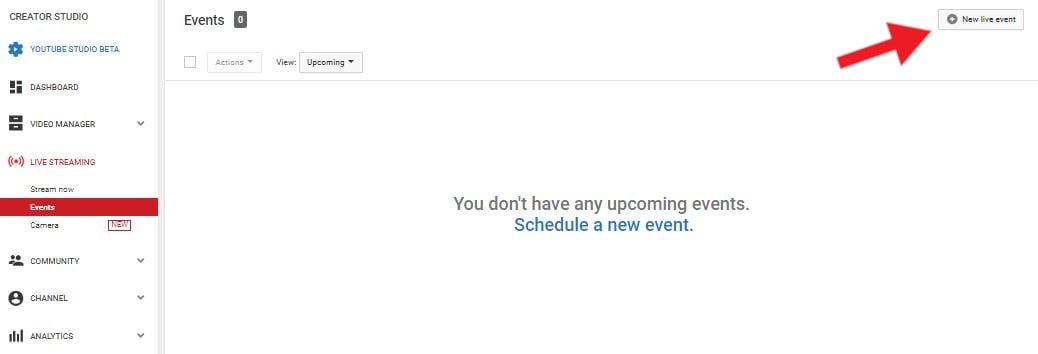
Step 1: Go to Events under the Live Streaming tab in your Creator Studio
Step 2: Click New Live Event button on the top right corner
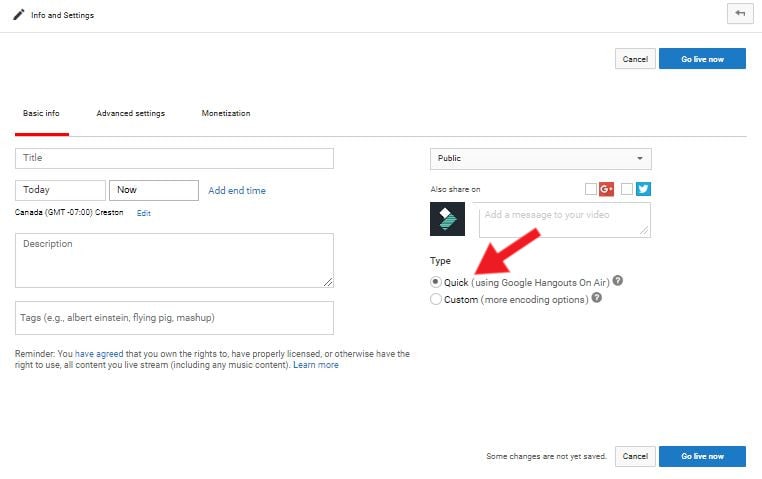
Step 3: Enter the event’s Info and Setting page. Fill out the details of your Livestream, and under Type, select Quick (using Google Hangouts On Air).
Step 4: You can schedule your livestream or Go Live immediately by clicking one of the blue buttons on the left-hand side.
3. Mobile
Live streaming via your mobile device gives you a lot more freedom to maneuver. You can walk around and give your viewers a tour — but remember to stay within the WiFi or LTE range. That means you still won’t be able to livestream well inside an elevator.
Here’s how you can livestream on mobile:
Step 1: Access the YouTube app and make sure you are signed in to the account you want to livestream from.
Step 2: At the top, click on the camera icon
Step 3: Click on Go Live
Pro Tip: When live streaming, always hold your smartphone horizontally. This allows your video to be oriented as a landscape, instead of a portrait.
4. Custom Encoder
The fourth way of live streaming on YouTube is with encoding software. This is the recommended method if video quality is essential, such as gaming videos.
Step 1: Download and install an encoding software. In this example, we’ll be using OBS .
Step 2: Open OBS
Step 3: Go to YouTube Creator Studio and enter the Stream Now page
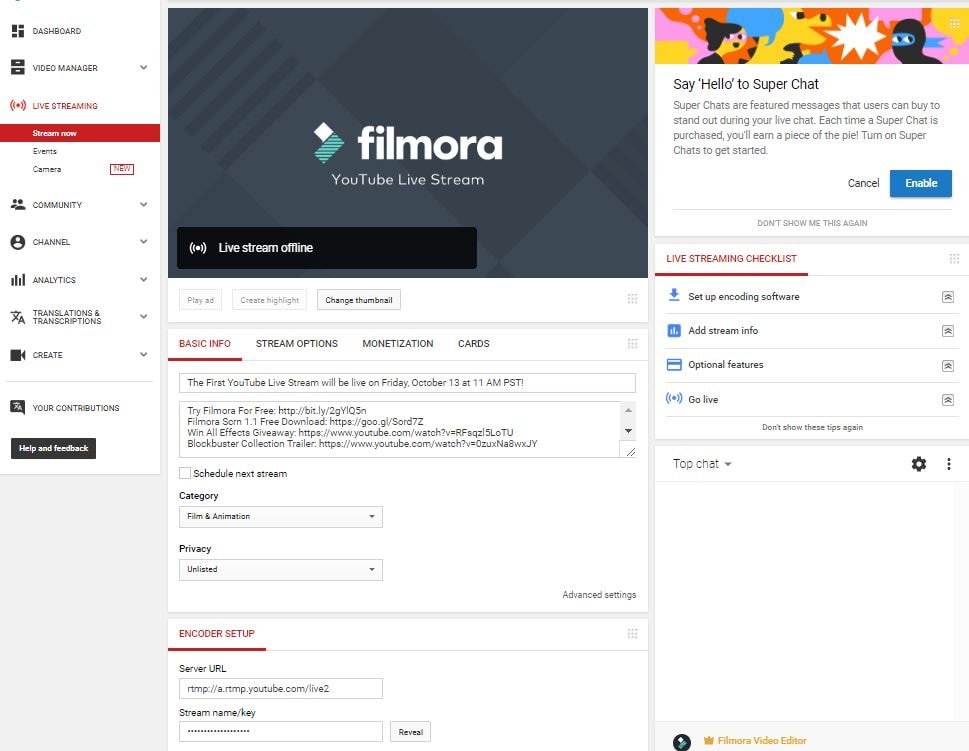
Step 4: Under Encoder Setup, copy Stream name/key (Warning: DO NOT share this key with anyone)
Step 5: Return to OBS and enter the Setting menu on the lower right-hand side of the application
Step 6: Click into the Stream tab
a) Under Stream Type, select Streaming Services
b) Under Service, select YouTube/YouTube Gaming
c) Under Server, select Primary YouTube ingest server
d) In Stream Key box, paste the Stream Key you copied from YouTube
e) Click Apply and then OK
Step 7: Plug in your webcam
Step 8: In the main OBS dashboard, under the Sources menu, click the + icon and add Video Capture Device. You should now see visuals from your Webcam.
Step 9: Select the Resolution you want for your video and click OK
Step 10: Return to your YouTube Streaming Page and fill out the details of your livestream
Step 11: Go back to OBS and click Start Streaming
Step 12: See on YouTube Streaming Page at the top that you are Live. You are officially streaming. Once You are finished streaming, return to OBS and click Stop Streaming to end the stream.
8 Tips to Improve Your Livestream on YouTube
Do Speed Test
Before you start your livestream, do a speed test of your Internet. Check out from here.
Have Good Lighting
Be aware of your surroundings when you are about to livestream. You don’t need the top-notch lighting kit, you can simply sit beside a window and allow natural lights to illuminate your stream.
Shoot A Live Test (Unlisted)
Have a technical rehearsal by doing a livestream test, then rewatching it, and evaluating the quality of the audio and visual.
You don’t have to worry about your audience logging in and seeing your test if you set the Privacy of the stream to Unlisted.
Look at the Lens, Not the Screen
If you are streaming with the selfie camera on your smartphone or using your camera’s viewfinder to make sure you are in the frame, remember that you need to be looking at the lens — not the image of yourself.
Eye contact is important in building trust, and if you are looking at yourself, it will appear as if you are looking past your viewers instead of at them.
Show It To Your Viewers
Whatever you are talking about, if you can, show it to your viewers. YouTube is a visual medium, and that means your viewers can become disinterested if there’s nothing visual holding their attention.
In the beginning, you probably won’t have a multi-camera setup, so you cannot cut away from your livestream. However, you can share the screen and you can bring physical objects into a frame.
If you are talking about your dog, show her on camera. If you’re presenting something with a lot of steps, create a Powerpoint slideshow.
Consider what visuals or props you can add to your livestream to enhance your performance.
Find A Way to Make it Evergreen
Evergreen content refers to content that is relevant for a great length of time. Talking about an event isn’t evergreen, because the event will soon pass and become old news. However, giving some tips for how to plan an event would be evergreen content.
Since your livestream will be saved on YouTube and your viewers can replay and watch it. They’re more likely to enjoy it if the content is relevant and interesting.
It Doesn’t Have to Be Long
A livestream doesn’t need to be 40 minutes long. It only needs to be long enough for you to get your story across — and if you want to answer some questions and engage with your audience. As soon as your story is over, even if it’s only 5 minutes, that’s okay. Don’t stress about the length of your stream, it’s not an endurance competition.
Allow Yourself to Make Mistakes
Another thing you shouldn’t worry about at all is making mistakes. When you are doing livestreams pretend you are engaging with someone in real life. In real life, you aren’t able to edit out your mistakes, whether it’s a word mispronounced or coffee spilling. Roll with it and laugh it off.
How to Grow As A Livestreamer on YouTube
Let People Know When You Are Streaming
Give people enough time to schedule it in, don’t spring it on them in the last minute. Share it on social media, your website, and any other means.
Create a Streaming Link 2 Days Before
Share your livestream link via social media to remind everyone to tune in when you go live. Looking for your link? It should look something like this: <www.youtube.com/user/\[channelname\]/live>
Reach Out To the Communities Most Interested
If you are going to be live streaming about a specific topic, such as photography, you should reach out to those who are interested in the topic. Highlight what aspect of photography you are going to be streaming and attract new viewers to your content.
Be Aware of Time Difference
If you have an international audience, find time to livestream where you can get the optimal amount of viewers.
You can find the location of your main demographic in your YouTube analytics .
Create a Channel Trailer to Promote Livestream
Make a video and host it as your channel trailer, that way anyone who lands on your YouTube page will see the promo for your livestream.
Promote Through Feature Content and Channel
YouTube has a feature that enables you to use your existing content to promote your upcoming livestream.
Here’s how to set it up:
Key Takeaways
- Live streaming will help you make more videos, engage with your audience, and grow your channel.
- You don’t need expensive equipment to livestream on YouTube, you only need a webcam and a microphone.
- YouTube has made live streaming as easy as a few clicks, no additional software needed unless you are gaming.
- Always do a test run of your livestream to ensure the internet, audio, and visual are all working properly.
- Create content and reach out to communities to promote your livestream.
Have you encountered any obstacles when setting up your livestream on YouTube? Let us know in the comments below, we are happy to help!
Richard Bennett
Richard Bennett is a writer and a lover of all things video.
Follow @Richard Bennett
Richard Bennett
Mar 27, 2024• Proven solutions
Live streaming on YouTube is a great way to get more engagement from your audience, even if you do not have a huge following. As long as you have some reliable subscribers leaving comments on your videos you should be able to schedule a live stream and know it will have an audience. People feel a personal connection with their favorite vloggers so if you give your subscribers a chance to interact with you in real time they will probably plan to join in. The key to a good live streaming is to respond to comments and questions from people who are watching. Besides watching the live chat of your video you can create a hashtag for your stream and monitor it on twitter.
Table of Contents
- Why Livestream?
- Type of Content to Livestream
- What You Need to Livestream On YouTube
- 4 Ways to Setup Your Livestream On YouTube
- 8 Tips to Improve Your Livestream on YouTube
- How to Grow As A Livestreamer on YouTube
Why Livestream?
You have grown your audience, and now you want to take your channel to the next level and diversify your content.
Whether you are vlogging, gaming, or running tutorials on YouTube, there is potential to host a live broadcast. It’s not limited to any genre, you simply need to create content that people are interested in watching.
Before we get started into the How, let’s start with a few reasons Why you should be live streaming your content.
Connect and engage with your audience
When a viewer leaves a comment during a livestream you will be able to see it right away and respond. Having an instantaneous conversation with a viewer while they are watching your video will encourage more engagement and establish a ber relationship with your viewers — and you will know that these viewers are not bots.
Increase watch time and session watch time on your channel
If you are making YouTube videos on average 10 minutes long, and the viewer only watches half of it, that’s only 5 minutes of watch time, which is fine… But if you are live streaming for 45 minutes, and you are able to hold the viewer’s attention, you can surpass what your regular videos can do.
Make videos faster
As a YouTuber, you are always striving to be more efficient. Live streaming allows you to do that as you can set up and go. The content you end up creating during the duration of your livestream can then also be condensed into a highlight reel or a recap.
With a bit of planning before you go live, you can create a week’s worth of content in one go, instead of having multiple schedules for livestream content and your standard publishing videos.
Type of Content to Livestream
Live streaming has a lot of value, but what type of content should you be streaming?
Here are a few popular ideas for content that will attract viewers to your livestream:
Q&A session
Unboxing
Game or challenge
Sneak preview or review
Live events (just make sure the Internet can support it)
A demo or a tutorial
A live commentary or (if you are a gamer) Let’s Play video
What You Need to Livestream On YouTube
A Plan or Outline
It’s good to know what your livestream is going to be about before you start. Is there a key message you want to hit, an action you want your viewers to take, or a structure you want to follow.
Just because it’s live, doesn’t mean it all has to be improvised. If you go in without a plan, you might end up feeling flustered or getting stressed out. Allow for spontaneous comments or events to take you off your initial plan, but always return to your outline so you know how to wrap up your livestream when you have to.
Stable Internet Connection
You cannot conduct a quality livestream, if your Internet is bad. When evaluating your internet connection for live streaming on YouTube, look at the Upload speed. Depending on the quality of your video, these are the minimum upload speed rates your Internet will need to perform:
480p = 1.5 mbps
720p = 3 mbps
1080 = 5 mbps
In addition, be aware of external causes that may be slowing down your internet such as someone else using it, a poorly performing router, or a damaged cable.
Camera
If you have a smartphone or a laptop with a webcam built in, that is the best camera for you to get started live streaming. It’s good to have a milestone and work towards a more advanced camera, but until then, don’t feel discouraged because you don’t have expensive gear. If you have a smartphone, a laptop, or a basic webcam, that’s perfectly fine.
Microphone
You don’t need a great microphone for live streaming, you only need a good one. If you do want to spend several hundred to a thousand dollars for a professional studio microphone, nobody will stop you, but know this, a mic that is easy to use is as important as the audio quality as you develop a consistent live streaming schedule.
Streaming Software (For Higher Quality Streams)
Once upon a time, to livestream on YouTube, you needed additional software to capture content from desktop, camera, microphone, etc, called encoding software — but not anymore.
Those encoding software, such as OBS , Wirecast , and VMix , are required if you are producing content that requires a high frame rate such as gaming, but not mandatory if you are simply vlogging or running a tutorial.
If you are using Chrome, you canstream live on YouTube without using an encoder .
A Capture Card (For Higher Quality Streams)
You will need a capture card when you are capturing footage from a different PC or console. If you are a gamer and you are using one PC to stream and one PC to play your game, then you should consider getting a capture card.
4 Ways to Setup Your Livestream On YouTube
There are 4 main ways you can start live streaming on YouTube. The one that works best for you depends on the content you are going to be streaming.
1. Camera/Go Live (Chrome Browser)
By accessing www.youtube.com/webcam on the Google Chrome browser, you can start streaming immediately through your connected webcam. This way is best for a simple Q&A or letting your viewers know your thoughts in a timely situation. This method does not require an encoder.
There are 3 ways to access livestream this way:
1. Click here to connect to your YouTube channel
2. You can access it from the top menu on YouTube
3. You can access it by clicking Camera under the Live Streaming tab in your Creator Studio
2. Google Hangouts On Air (Quick)
Another way to livestream without an encoding software is by using the Google Hangouts On Air feature.
This is great if you want the feel of your livestream to be similar to a board meeting, where you can invite people, split screen, and share screen to illustrate your point.
Here’s how you can access this Google Hangouts On Air:
Step 1: Go to Events under the Live Streaming tab in your Creator Studio
Step 2: Click New Live Event button on the top right corner
Step 3: Enter the event’s Info and Setting page. Fill out the details of your Livestream, and under Type, select Quick (using Google Hangouts On Air).
Step 4: You can schedule your livestream or Go Live immediately by clicking one of the blue buttons on the left-hand side.
3. Mobile
Live streaming via your mobile device gives you a lot more freedom to maneuver. You can walk around and give your viewers a tour — but remember to stay within the WiFi or LTE range. That means you still won’t be able to livestream well inside an elevator.
Here’s how you can livestream on mobile:
Step 1: Access the YouTube app and make sure you are signed in to the account you want to livestream from.
Step 2: At the top, click on the camera icon
Step 3: Click on Go Live
Pro Tip: When live streaming, always hold your smartphone horizontally. This allows your video to be oriented as a landscape, instead of a portrait.
4. Custom Encoder
The fourth way of live streaming on YouTube is with encoding software. This is the recommended method if video quality is essential, such as gaming videos.
Step 1: Download and install an encoding software. In this example, we’ll be using OBS .
Step 2: Open OBS
Step 3: Go to YouTube Creator Studio and enter the Stream Now page
Step 4: Under Encoder Setup, copy Stream name/key (Warning: DO NOT share this key with anyone)
Step 5: Return to OBS and enter the Setting menu on the lower right-hand side of the application
Step 6: Click into the Stream tab
a) Under Stream Type, select Streaming Services
b) Under Service, select YouTube/YouTube Gaming
c) Under Server, select Primary YouTube ingest server
d) In Stream Key box, paste the Stream Key you copied from YouTube
e) Click Apply and then OK
Step 7: Plug in your webcam
Step 8: In the main OBS dashboard, under the Sources menu, click the + icon and add Video Capture Device. You should now see visuals from your Webcam.
Step 9: Select the Resolution you want for your video and click OK
Step 10: Return to your YouTube Streaming Page and fill out the details of your livestream
Step 11: Go back to OBS and click Start Streaming
Step 12: See on YouTube Streaming Page at the top that you are Live. You are officially streaming. Once You are finished streaming, return to OBS and click Stop Streaming to end the stream.
8 Tips to Improve Your Livestream on YouTube
Do Speed Test
Before you start your livestream, do a speed test of your Internet. Check out from here.
Have Good Lighting
Be aware of your surroundings when you are about to livestream. You don’t need the top-notch lighting kit, you can simply sit beside a window and allow natural lights to illuminate your stream.
Shoot A Live Test (Unlisted)
Have a technical rehearsal by doing a livestream test, then rewatching it, and evaluating the quality of the audio and visual.
You don’t have to worry about your audience logging in and seeing your test if you set the Privacy of the stream to Unlisted.
Look at the Lens, Not the Screen
If you are streaming with the selfie camera on your smartphone or using your camera’s viewfinder to make sure you are in the frame, remember that you need to be looking at the lens — not the image of yourself.
Eye contact is important in building trust, and if you are looking at yourself, it will appear as if you are looking past your viewers instead of at them.
Show It To Your Viewers
Whatever you are talking about, if you can, show it to your viewers. YouTube is a visual medium, and that means your viewers can become disinterested if there’s nothing visual holding their attention.
In the beginning, you probably won’t have a multi-camera setup, so you cannot cut away from your livestream. However, you can share the screen and you can bring physical objects into a frame.
If you are talking about your dog, show her on camera. If you’re presenting something with a lot of steps, create a Powerpoint slideshow.
Consider what visuals or props you can add to your livestream to enhance your performance.
Find A Way to Make it Evergreen
Evergreen content refers to content that is relevant for a great length of time. Talking about an event isn’t evergreen, because the event will soon pass and become old news. However, giving some tips for how to plan an event would be evergreen content.
Since your livestream will be saved on YouTube and your viewers can replay and watch it. They’re more likely to enjoy it if the content is relevant and interesting.
It Doesn’t Have to Be Long
A livestream doesn’t need to be 40 minutes long. It only needs to be long enough for you to get your story across — and if you want to answer some questions and engage with your audience. As soon as your story is over, even if it’s only 5 minutes, that’s okay. Don’t stress about the length of your stream, it’s not an endurance competition.
Allow Yourself to Make Mistakes
Another thing you shouldn’t worry about at all is making mistakes. When you are doing livestreams pretend you are engaging with someone in real life. In real life, you aren’t able to edit out your mistakes, whether it’s a word mispronounced or coffee spilling. Roll with it and laugh it off.
How to Grow As A Livestreamer on YouTube
Let People Know When You Are Streaming
Give people enough time to schedule it in, don’t spring it on them in the last minute. Share it on social media, your website, and any other means.
Create a Streaming Link 2 Days Before
Share your livestream link via social media to remind everyone to tune in when you go live. Looking for your link? It should look something like this: <www.youtube.com/user/\[channelname\]/live>
Reach Out To the Communities Most Interested
If you are going to be live streaming about a specific topic, such as photography, you should reach out to those who are interested in the topic. Highlight what aspect of photography you are going to be streaming and attract new viewers to your content.
Be Aware of Time Difference
If you have an international audience, find time to livestream where you can get the optimal amount of viewers.
You can find the location of your main demographic in your YouTube analytics .
Create a Channel Trailer to Promote Livestream
Make a video and host it as your channel trailer, that way anyone who lands on your YouTube page will see the promo for your livestream.
Promote Through Feature Content and Channel
YouTube has a feature that enables you to use your existing content to promote your upcoming livestream.
Here’s how to set it up:
Key Takeaways
- Live streaming will help you make more videos, engage with your audience, and grow your channel.
- You don’t need expensive equipment to livestream on YouTube, you only need a webcam and a microphone.
- YouTube has made live streaming as easy as a few clicks, no additional software needed unless you are gaming.
- Always do a test run of your livestream to ensure the internet, audio, and visual are all working properly.
- Create content and reach out to communities to promote your livestream.
Have you encountered any obstacles when setting up your livestream on YouTube? Let us know in the comments below, we are happy to help!
Richard Bennett
Richard Bennett is a writer and a lover of all things video.
Follow @Richard Bennett
Streamline Your Shoots: Top Lenses Recommended by Professionals
Best Camera Lenses for YouTube
Richard Bennett
Mar 27, 2024• Proven solutions
A DSLR is the ideal camera for some vlogs, and using a DSLR means you get to customize the look of your vlog by choosing the perfect lens. Choosing the best camera lens for your YouTube channel can be tricky because there are so many options. This article will walk you through some of them, and make two recommendations of great vlogging lenses. If you already have a good understanding of how camera lenses work then feel free to scroll down to the lens recs.
Part 1. Understanding Lenses: Zoom lens, Fixed lens, aperture, f-stop
There are two main categories of camera lenses: ‘zoom’ – lenses that allow you to zoom in and out – and ‘fixed’. If your lenses are tools then zoom lenses are Swiss army knives; they are very versatile. Fixed lenses, also called prime lenses, have more specific purposes. Do you need a tool that can do a lot of things, or a tool that is perfect for one specific job? Sometimes it is useful to have access to both.
We have explained the differences between Fixed lens and Zoom lens and advantages of using each lens, check this article: Zoom Lens vs. Fixed Lenses: Which one is best for YouTuber? for the detailed information.
Before we get into the recommendations here is a little background information on lenses in general:
Beginner’s Guide to Aperture and F-Stops
In order to be able to select the lens you’ll be using to record your YouTube videos, you first need to understand a few very basic concepts, such as aperture or f-stops.
1.What is a lens’s aperture?
The aperture of your lens is the hole through which light reaches your camera’s sensor, or the film if you are using a film camera. The wider your aperture is the more light you are letting into your camera. In low light it is better to have a wide aperture, and when you are working with a lot of light it is better to have a narrow aperture so your footage is not overexposed.
Aperture is simply an opening in the lens that lets the light through. If you want to increase the amount of the light that is reaching the camera’s sensor you need to open up the aperture blades that are located in the lens. The f-values like f/1.2 or f/1.8 indicate that the aperture is wide open and that the camera is receiving the maximum amount of light a lens you’re using can provide.
2.What is an ‘f-stop’?
Light passes through your lens’s aperture on its way to your camera’s sensor, and the f-stop of your lens relates to the amount of light it lets in. The lower your f-stop, the wider your aperture, and the more light you are letting into your camera. The more light you let into your camera the easier it is to achieve a blurred background. A lot of vloggers love blurring their backgrounds because it is a quick way to disguising the rooms they are shooting in.
F-stops are written like ‘f/1.8’ or ‘f/4’ on your lens. For more information on f-stops and blurring your background read “The Best Bokeh Lens - How to Get the Blurred Background for YouTube Videos” and watch Tasha’s video.
F-stops or f-numbers indicate how open the aperture is, so for example if your camera is displaying f/32 value it means that your camera is letting very little light to get through to the camera’s sensor. The f-number depends on a few other parameters such as shutter speed, exposure or ISO values. Large apertures provide a shallow depth of field which creates a smooth and artistic background blur, while a small aperture enables you to keep both the background and the foreground of your shot in focus.
Part 2: Types of Camera Lenses
The visual aspect of a video may not be the only thing you’ll have to dedicate special attention to while recording your YouTube video, but it is surely one of the most important factors of the video production process. A lens you are using will largely contribute to the aesthetics of the video. That’s why you need to know which type of lens will deliver the best results when shooting different types of scenes. Here are some of the most common types of lenses you’ll encounter.
Standard lenses
These lenses are featured in almost all camera kits, so the chances are that if you have a DSLR camera you already have a standard, mid-range lens. These lenses commonly have a fixed 50mm focal length, although zoom lenses with focal lengths in the range between 35mm and 75mm are also considered standard. You can use them to capture medium shots, single or multiple figure shots, and in some cases establishing shots, because they offer enough versatility to cover a multitude of different scenes. Standard lenses often have large apertures, which makes them quite useful if you often shoot videos under light conditions you can’t control.
Macro lenses
Details, product shots or any other subject that can be filmed from close proximity looks better if they are recorded with macro lenses. The high contrast and sharpness these lenses provide allow you to create stunning close-ups of all hosts, guests or actors in your YouTube videos. What’s more, if you are presenting a new product to your audience you can use the macro lens to make some captivating shots that will attract more audience. Zoom lenses can also be used for macro photography and video, although prime macro lenses produce better results.
Telephoto lenses
The subjects of your videos don’t always have to be in your immediate surroundings, because telephoto lenses let you capture scenes that are several miles away from you. Wildlife or sports videographers frequently use telephoto lenses because they don’t have another way of getting close to their subjects. However, telephoto lenses with 70-300mm focal length can also be used to take stunning portraits or close up shots. The biggest downside of telephoto lenses is their weight because the lenses with higher focal lengths can weigh up to 10lbs, which makes them a bit inconvenient to always carry with you.
Wide-angle lenses
Recording videos of vast open spaces, breathtaking vistas or beautiful city views is much easier if you have a wide-angle lens. The short focal length allows the lens to have a wider field of view which covers more space than standard or telephoto lenses. Wide-angle lenses also have lower apertures than lenses with longer focal lengths which results in images that have a shallow depth of field. Ultra-wide lenses like fisheye distort the view so the videos recorded with these lenses often suffer from the lack of realism.
Specialist lenses
YouTubers who are working on demanding projects can try to solve their troubles by using a specialist lens. Soft-focus lenses can help you take better portraits while tilt-shift lenses allow you to control the perspective. However, it is hard to imagine a scenario in which you’ll need a specialist lense if you are just starting out since even experienced videographers only use special lenses when they have absolutely no better way to record a scene.
Part 3: Recommended Best Camera Lenses for Shooting YouTube Videos
Here are a couple great lenses that might be good fits for you and your YouTube channel. The thing that makes them both ideal for vlogging is that they have low enough f-stops to blur out your background.
| Camera Lens | Type | Price | Aperture | Focal Length |
|---|---|---|---|---|
| Canon EF-S 10-18mm f/4.5-5.6 IS STM Lens | Wide angle | $279 | f/4.5-5.6 | 10 -18mm |
| Rokinon 8mm f/3.5 | Fisheye | $249 | f/3.5 | 8mm |
| Canon 50mm f/1.8 STM Lens | Prime | $125 | f/1.8 | 50mm |
| Canon EF 135mm f/2L USM Lens | Telephoto | $999 | f/2 | 135mm |
| Tamron SP AF 17-50mm f/2.8 | Standard Zoom | $299 | f/2.8 | 17 -50mm |
| Sony 30mm f/3.5 Macro | Macro | $278 | f/3.5 | 30mm |
1.Canon EF-S 10-18mm f/4.5-5.6 IS STM Lens
Canon released this lens in 2014 and shortly after it has gained the reputation of one of the most reliable wide to ultra-wide lenses for Canon cameras. Like most STM lenses, it offers incredibly fast autofocus technology that makes it a great choice for fast-paced action videos. The lens is equipped with an image stabilization system which guarantees that your videos are going to remain sharp even if the camera wasn’t perfectly still while you were recording. Somewhat smaller aperture range makes this lens poor choice for low light scenes, although you can get decent results if you manage to keep the camera still.
2. Rokinon 8mm Ultra Wide f/3.5 Fisheye Lens
Outdoor videos look much cooler when they are recorded with a wide-angle lens because the wider field of view enables you to capture more space in a shot. Fisheye lenses were made popular by GoPro cameras because they make the videos look more fun while producing high image quality. Rokinon 8mm lens allows you to adjust focus and aperture manually so you can fine-tune your shot before hitting the record button. To make things even better this model is compatible with a wide range of cameras including Pentax, Canon or Nikon DSLRs. It has a relatively fast aperture that enables it to deliver solid performances under low light conditions.
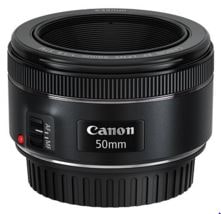
3.Canon EF 50mm f/1.8 STM Lens
The EF 50mm is a fixed lens with an f-stop of 1.8, which means it is great for blurring your background and performs well even in poorer lighting conditions. This is a really great lens for an opinion or beauty vlog, where you do not need to move around. You can stay put right where the focus is sharpest and stand out by blurring everything behind you. If you tend to reuse the same sets then you do not really need a zoom feature. If your shooting conditions rarely change then it is just as easy to use a reliable fixed lens like the EF 50mm since you will not need to be rethinking your set up and adjusting.
If you are looking for an inexpensive prime lens that lets you create sharp videos with shallow depth of field, you should look no further. This model is one of three Canon’s 50mm prime lenses, although the 50mm f/1.4 USM and 50mm f/1.2 ‘L’ USM models are much more expensive. You can use it to record a lot of different types of YouTube videos, like product reviews or makeup tutorials. The 50 mm f/1.8 STM lens doesn’t have image stabilization technology so you should try to be as still as you can possibly be when shooting handheld videos in order to avoid recording footage that has a lot of camera shakes.
4.Canon EF 135mm f/2L USM Lens
Recording moving objects from a distance requires you to have a lens that allows you to smoothly track their movements while keeping the subject in focus. The Canon EF 135mm f2/L USM lens is perhaps one of the best telephoto lenses on the market because it uses L glass that is widely accepted as the best in the industry. The Canon’s telephoto lens is compatible with ASP-C and Full Frame EF mount cameras. Keep in mind that this is also a prime lens and you can’t increase or decrease its focal length, but even so, it is a perfect choice for documentary-style videos.
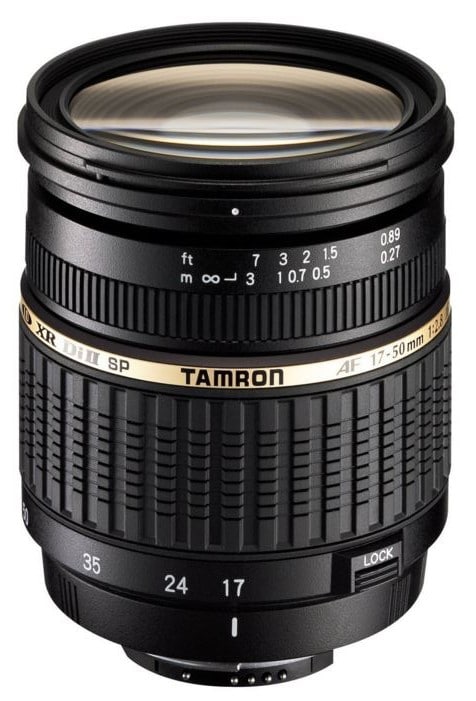
5.Tamron SP AF 17-50mm f/2.8 XR Di II LD Aspherical (IF) Lens
The Tamron’s standard zoom lens offers good value at a very reasonable price. The maximum aperture is f/2.8, while the minimum aperture value this lens supports is f/32, which means that its users can easily experiment with different depths of field. The lens is compatible with most Canon cameras so if you have a camera from another manufacturer you may have to use the lens adapter in order to mount it onto your camera. Like most standard zoom lenses, Tamron SP AF model is highly versatile and you can use it to record a wide range of different scenes.
A lot of zoom lenses do not have wide enough apertures to create blurred backgrounds, but this Tamron lens is an exception at f/2.8. This low f-stop also means that it performs better in poor lighting conditions than a lot of other zoom lenses. If your shooting conditions change a lot – if you often change locations, for example – then it will be good to have a sturdy, well-built, zoom lens like the AF 17-mm that can be quickly adapted to new angles and distances.
6.Sony 30mm f/3.5 Macro
All Sony’s APS-C format E mount cameras are compatible with this multi-purpose lens. When mounted the 30mm lens provides a 45mm focal length equivalent, which means that you can use it to take macro shots of products or to record medium or close-up shots. This is a prime lens, so changing the focal length isn’t really an option, but the 1:1 life-size magnification, as well as the 0.9-inch working distance, allow you to get close to the subjects in the video. The aperture range is between f/3.5 and f/22 which means that you can choose how shallow the depth of field in your shot should be.
If you are using a 4k camera to shoot your YouTube video, check out best camera lens for 4k professional production.
Richard Bennett
Richard Bennett is a writer and a lover of all things video.
Follow @Richard Bennett
Richard Bennett
Mar 27, 2024• Proven solutions
A DSLR is the ideal camera for some vlogs, and using a DSLR means you get to customize the look of your vlog by choosing the perfect lens. Choosing the best camera lens for your YouTube channel can be tricky because there are so many options. This article will walk you through some of them, and make two recommendations of great vlogging lenses. If you already have a good understanding of how camera lenses work then feel free to scroll down to the lens recs.
Part 1. Understanding Lenses: Zoom lens, Fixed lens, aperture, f-stop
There are two main categories of camera lenses: ‘zoom’ – lenses that allow you to zoom in and out – and ‘fixed’. If your lenses are tools then zoom lenses are Swiss army knives; they are very versatile. Fixed lenses, also called prime lenses, have more specific purposes. Do you need a tool that can do a lot of things, or a tool that is perfect for one specific job? Sometimes it is useful to have access to both.
We have explained the differences between Fixed lens and Zoom lens and advantages of using each lens, check this article: Zoom Lens vs. Fixed Lenses: Which one is best for YouTuber? for the detailed information.
Before we get into the recommendations here is a little background information on lenses in general:
Beginner’s Guide to Aperture and F-Stops
In order to be able to select the lens you’ll be using to record your YouTube videos, you first need to understand a few very basic concepts, such as aperture or f-stops.
1.What is a lens’s aperture?
The aperture of your lens is the hole through which light reaches your camera’s sensor, or the film if you are using a film camera. The wider your aperture is the more light you are letting into your camera. In low light it is better to have a wide aperture, and when you are working with a lot of light it is better to have a narrow aperture so your footage is not overexposed.
Aperture is simply an opening in the lens that lets the light through. If you want to increase the amount of the light that is reaching the camera’s sensor you need to open up the aperture blades that are located in the lens. The f-values like f/1.2 or f/1.8 indicate that the aperture is wide open and that the camera is receiving the maximum amount of light a lens you’re using can provide.
2.What is an ‘f-stop’?
Light passes through your lens’s aperture on its way to your camera’s sensor, and the f-stop of your lens relates to the amount of light it lets in. The lower your f-stop, the wider your aperture, and the more light you are letting into your camera. The more light you let into your camera the easier it is to achieve a blurred background. A lot of vloggers love blurring their backgrounds because it is a quick way to disguising the rooms they are shooting in.
F-stops are written like ‘f/1.8’ or ‘f/4’ on your lens. For more information on f-stops and blurring your background read “The Best Bokeh Lens - How to Get the Blurred Background for YouTube Videos” and watch Tasha’s video.
F-stops or f-numbers indicate how open the aperture is, so for example if your camera is displaying f/32 value it means that your camera is letting very little light to get through to the camera’s sensor. The f-number depends on a few other parameters such as shutter speed, exposure or ISO values. Large apertures provide a shallow depth of field which creates a smooth and artistic background blur, while a small aperture enables you to keep both the background and the foreground of your shot in focus.
Part 2: Types of Camera Lenses
The visual aspect of a video may not be the only thing you’ll have to dedicate special attention to while recording your YouTube video, but it is surely one of the most important factors of the video production process. A lens you are using will largely contribute to the aesthetics of the video. That’s why you need to know which type of lens will deliver the best results when shooting different types of scenes. Here are some of the most common types of lenses you’ll encounter.
Standard lenses
These lenses are featured in almost all camera kits, so the chances are that if you have a DSLR camera you already have a standard, mid-range lens. These lenses commonly have a fixed 50mm focal length, although zoom lenses with focal lengths in the range between 35mm and 75mm are also considered standard. You can use them to capture medium shots, single or multiple figure shots, and in some cases establishing shots, because they offer enough versatility to cover a multitude of different scenes. Standard lenses often have large apertures, which makes them quite useful if you often shoot videos under light conditions you can’t control.
Macro lenses
Details, product shots or any other subject that can be filmed from close proximity looks better if they are recorded with macro lenses. The high contrast and sharpness these lenses provide allow you to create stunning close-ups of all hosts, guests or actors in your YouTube videos. What’s more, if you are presenting a new product to your audience you can use the macro lens to make some captivating shots that will attract more audience. Zoom lenses can also be used for macro photography and video, although prime macro lenses produce better results.
Telephoto lenses
The subjects of your videos don’t always have to be in your immediate surroundings, because telephoto lenses let you capture scenes that are several miles away from you. Wildlife or sports videographers frequently use telephoto lenses because they don’t have another way of getting close to their subjects. However, telephoto lenses with 70-300mm focal length can also be used to take stunning portraits or close up shots. The biggest downside of telephoto lenses is their weight because the lenses with higher focal lengths can weigh up to 10lbs, which makes them a bit inconvenient to always carry with you.
Wide-angle lenses
Recording videos of vast open spaces, breathtaking vistas or beautiful city views is much easier if you have a wide-angle lens. The short focal length allows the lens to have a wider field of view which covers more space than standard or telephoto lenses. Wide-angle lenses also have lower apertures than lenses with longer focal lengths which results in images that have a shallow depth of field. Ultra-wide lenses like fisheye distort the view so the videos recorded with these lenses often suffer from the lack of realism.
Specialist lenses
YouTubers who are working on demanding projects can try to solve their troubles by using a specialist lens. Soft-focus lenses can help you take better portraits while tilt-shift lenses allow you to control the perspective. However, it is hard to imagine a scenario in which you’ll need a specialist lense if you are just starting out since even experienced videographers only use special lenses when they have absolutely no better way to record a scene.
Part 3: Recommended Best Camera Lenses for Shooting YouTube Videos
Here are a couple great lenses that might be good fits for you and your YouTube channel. The thing that makes them both ideal for vlogging is that they have low enough f-stops to blur out your background.
| Camera Lens | Type | Price | Aperture | Focal Length |
|---|---|---|---|---|
| Canon EF-S 10-18mm f/4.5-5.6 IS STM Lens | Wide angle | $279 | f/4.5-5.6 | 10 -18mm |
| Rokinon 8mm f/3.5 | Fisheye | $249 | f/3.5 | 8mm |
| Canon 50mm f/1.8 STM Lens | Prime | $125 | f/1.8 | 50mm |
| Canon EF 135mm f/2L USM Lens | Telephoto | $999 | f/2 | 135mm |
| Tamron SP AF 17-50mm f/2.8 | Standard Zoom | $299 | f/2.8 | 17 -50mm |
| Sony 30mm f/3.5 Macro | Macro | $278 | f/3.5 | 30mm |
1.Canon EF-S 10-18mm f/4.5-5.6 IS STM Lens
Canon released this lens in 2014 and shortly after it has gained the reputation of one of the most reliable wide to ultra-wide lenses for Canon cameras. Like most STM lenses, it offers incredibly fast autofocus technology that makes it a great choice for fast-paced action videos. The lens is equipped with an image stabilization system which guarantees that your videos are going to remain sharp even if the camera wasn’t perfectly still while you were recording. Somewhat smaller aperture range makes this lens poor choice for low light scenes, although you can get decent results if you manage to keep the camera still.
2. Rokinon 8mm Ultra Wide f/3.5 Fisheye Lens
Outdoor videos look much cooler when they are recorded with a wide-angle lens because the wider field of view enables you to capture more space in a shot. Fisheye lenses were made popular by GoPro cameras because they make the videos look more fun while producing high image quality. Rokinon 8mm lens allows you to adjust focus and aperture manually so you can fine-tune your shot before hitting the record button. To make things even better this model is compatible with a wide range of cameras including Pentax, Canon or Nikon DSLRs. It has a relatively fast aperture that enables it to deliver solid performances under low light conditions.
3.Canon EF 50mm f/1.8 STM Lens
The EF 50mm is a fixed lens with an f-stop of 1.8, which means it is great for blurring your background and performs well even in poorer lighting conditions. This is a really great lens for an opinion or beauty vlog, where you do not need to move around. You can stay put right where the focus is sharpest and stand out by blurring everything behind you. If you tend to reuse the same sets then you do not really need a zoom feature. If your shooting conditions rarely change then it is just as easy to use a reliable fixed lens like the EF 50mm since you will not need to be rethinking your set up and adjusting.
If you are looking for an inexpensive prime lens that lets you create sharp videos with shallow depth of field, you should look no further. This model is one of three Canon’s 50mm prime lenses, although the 50mm f/1.4 USM and 50mm f/1.2 ‘L’ USM models are much more expensive. You can use it to record a lot of different types of YouTube videos, like product reviews or makeup tutorials. The 50 mm f/1.8 STM lens doesn’t have image stabilization technology so you should try to be as still as you can possibly be when shooting handheld videos in order to avoid recording footage that has a lot of camera shakes.
4.Canon EF 135mm f/2L USM Lens
Recording moving objects from a distance requires you to have a lens that allows you to smoothly track their movements while keeping the subject in focus. The Canon EF 135mm f2/L USM lens is perhaps one of the best telephoto lenses on the market because it uses L glass that is widely accepted as the best in the industry. The Canon’s telephoto lens is compatible with ASP-C and Full Frame EF mount cameras. Keep in mind that this is also a prime lens and you can’t increase or decrease its focal length, but even so, it is a perfect choice for documentary-style videos.
5.Tamron SP AF 17-50mm f/2.8 XR Di II LD Aspherical (IF) Lens
The Tamron’s standard zoom lens offers good value at a very reasonable price. The maximum aperture is f/2.8, while the minimum aperture value this lens supports is f/32, which means that its users can easily experiment with different depths of field. The lens is compatible with most Canon cameras so if you have a camera from another manufacturer you may have to use the lens adapter in order to mount it onto your camera. Like most standard zoom lenses, Tamron SP AF model is highly versatile and you can use it to record a wide range of different scenes.
A lot of zoom lenses do not have wide enough apertures to create blurred backgrounds, but this Tamron lens is an exception at f/2.8. This low f-stop also means that it performs better in poor lighting conditions than a lot of other zoom lenses. If your shooting conditions change a lot – if you often change locations, for example – then it will be good to have a sturdy, well-built, zoom lens like the AF 17-mm that can be quickly adapted to new angles and distances.
6.Sony 30mm f/3.5 Macro
All Sony’s APS-C format E mount cameras are compatible with this multi-purpose lens. When mounted the 30mm lens provides a 45mm focal length equivalent, which means that you can use it to take macro shots of products or to record medium or close-up shots. This is a prime lens, so changing the focal length isn’t really an option, but the 1:1 life-size magnification, as well as the 0.9-inch working distance, allow you to get close to the subjects in the video. The aperture range is between f/3.5 and f/22 which means that you can choose how shallow the depth of field in your shot should be.
If you are using a 4k camera to shoot your YouTube video, check out best camera lens for 4k professional production.
Richard Bennett
Richard Bennett is a writer and a lover of all things video.
Follow @Richard Bennett
Also read:
- In 2024, ASMR Production 101 Essential Strategies for Cutting-Edge Video Making
- [New] Elevating Your Vlog Through Proper Lighting
- Earning Estimates for YouTube Creators AdSense Pay-Out per 1,000 Viewers
- In 2024, Channel Mastery Leverage Customizable Description Templates for More Followers
- Elite 7 DSLR Options Superior for Professional Videography for 2024
- 2024 Approved Boundless Creativity Fantasy Backdrops on Thumbnails
- Best 8 Linux Apps for Professional Editing for 2024
- Bite-Size Broadcasting Battle Which Platform Dominates in Shorter Videos, In 2024
- [Updated] Enhance Your Shorts' Appeal with Personalized Thumbnails
- Crafting Dynamic Collab Videos with Content Partners on YouTube
- Outstanding Films Not on Mainstream Lists
- YouTube Style Essentials - Download for FREE
- Tailoring Video Dimensions for Diverse Apps
- 2024 Approved A Deep-Dive Into Digital Platform Wealth Dailymotion & YouTube Comparison
- The Balancing Act Creative Freedom vs Major Company Support
- 2024 Approved Combining YouTube and iMovie for Professional Results
- Youtube Tunes? Here's How to Download Safely & Free
- In 2024, Bridging YouTube and iMovie with Seamless Audio Transfer
- In 2024, 10 YouTube Tips for Teachers
- 2024 Approved Best YouTube To GIF Makers You Should Use (Online & Desktop)
- [New] Best Live Recording Gadgets for YouTube Content Creators
- Unlocking the Potential of Feast-Filled Videography
- Elevate Your Content Premier YouTube Rank Tracker Apps
- 2024 Approved Crafting a Captivated Audience in 3 Steps
- 15 Best Funny YouTube Channels to Watch When You're Bored
- The Ultimate Checklist for Adding Effective On-Screen Captions to Your Videos
- [Updated] A Chill-Out Guide Selecting Inviting Winter Backgrounds
- Audiovisual Alchemy Formulating Your YouTube Playlist
- In 2024, Choosing Streaming Giants Vimeo, YouTube, or DailyMotion?
- Craft Professional Scenes - Access These Top 8 Free Green Screen Backdrops Sites for 2024
- 2024 Approved Access YT Comments Desktop/iOS/Android Edition Explained
- 2024 Approved Ensuring Data Privacy While Transforming YouTube Video Audio to MP3
- In 2024, What Is the Best Video Format for YouTube?
- Is It Illegal to Document Video on YouTube Platform?
- Master Your Content Essential Trimmer Tools for YouTube
- [New] Engaging Viewers at the End of a YT Video
- 2024 Approved Creating User-Friendly YouTube Subscribe Icons
- Average Payout for a Million-View YouTube Video for 2024
- In 2024, Creating Engaging Haul Videos Techniques & Tips
- [New] Club Craft How to Download Best DJ Vids
- YouTube Video Organization The Art of Chapter Addition
- [Updated] 15 Must-Have Openers for Maximum YouTube Engagement
- The Mystery of YouTube's Viewer Count Puzzle
- In Pursuit of Perfection Stepwise Processes for Outstanding Educational Content on YouTube
- [New] A Visual Hook Creating Captivating YouTube Thumbnails to Drive Traffic
- Incor Writings on the Best Practices for YouTube Commentary
- Enlarge Your Digital Footprint Proven Methods to Multi-Stream on Youtube & Twitch for 2024
- Diverse Designs at Your Fingertips From These 6 Websites for 2024
- [New] Driving View Counts Upward on YouTube 6 Proven Techniques
- [Updated] 2024 Approved Step-By-Step Method for Changing Your Instagram Tone
- How to Change your Vivo Y200e 5G Location on Twitter | Dr.fone
- In 2024, How to Cast Infinix Smart 8 Plus to Computer for iPhone and Android? | Dr.fone
- In 2024, Ultimate Guide to Share Your IGTV Story with Ease
- How To Unlock Any Xiaomi Redmi K70 Pro Phone Password Using Emergency Call
- In 2024, 3 Methods to Mirror Vivo Y27 4G to Roku | Dr.fone
- In 2024, Pokemon Go No GPS Signal? Heres Every Possible Solution On Apple iPhone 7 Plus | Dr.fone
- [Updated] In 2024, In-Depth Guide OBS for Gamers
- [New] Mastering Recording Deciding Between Slower and Faster Frame Rates
- How To Reset Your Apple iPhone 15 Pro Without iTunes? | Dr.fone
- Easiest Fix Included! Top 5 Ways to Convert HDR to SDR Videos for 2024
- [New] In 2024, Navigating Twitter's Promotional Features
- [New] Desktops in Focus - Free Capture Tutorials
- [Updated] Activating/Deactivating Picture-in-Picture Feature
- 3 Easy Solutions to Hard Reset Realme C33 2023 | Dr.fone
- Ways to trade pokemon go from far away On Lava Blaze Curve 5G? | Dr.fone
- Apply These Techniques to Improve How to Detect Fake GPS Location On Samsung Galaxy A15 4G | Dr.fone
- Quick Fix for Clearer Focus in Google Meet
- In 2024, How To Fix iPhone 13 mini Unavailable Issue With Ease | Dr.fone
- Updated Revolutionize Your Online Gaming with Morphvox – A Voice Changers Handbook
- In 2024, How to Add Text to Video
- In 2024, How to Unlock Realme 12+ 5G Bootloader Easily
- Photoshop Magic Master the Art of Background Elimination
- Updated Latest Top Darth Vader Voice Generators for All Platforms for 2024
- [Updated] 2024 Approved Combat Black Screen Disruptions in Gaming Feeds
- In 2024, Does Airplane Mode Turn off GPS Location On Nubia Z50S Pro? | Dr.fone
- 7 Top Ways To Resolve Apple ID Not Active Issue For iPhone 13
- Experience the Next Level of Virtual Reality with HTC's Vive Headset
- In 2024, Network Locked SIM Card Inserted On Your Vivo Y78 5G Phone? Unlock It Now
- Updated 2024 Approved Streamlining Sound Creation The 6 Most User-Friendly, Free Online Auditory Editing Tools
- Where Is the Best Place to Catch Dratini On Samsung Galaxy S23+ | Dr.fone
- How To Deal With the Oppo Find N3 Screen Black But Still Works? | Dr.fone
- Updated In 2024, Top 6 Zoom-Compatible Vocal Modifiers Amplify Your Personality on Video Calls
- Title: [Updated] Essential Tips for Successful YouTube Broadcasts
- Author: Kevin
- Created at : 2024-05-25 16:52:59
- Updated at : 2024-05-26 16:52:59
- Link: https://youtube-videos.techidaily.com/updated-essential-tips-for-successful-youtube-broadcasts/
- License: This work is licensed under CC BY-NC-SA 4.0.
