
![[Updated] Essential Guidelines to Create Impactful YouTube Banners](https://www.lifewire.com/thmb/4tUkHI9DMwB9qvnmAkwvCvX7ps8=/400x300/filters:no_upscale():max_bytes(150000):strip_icc()/GIF-Gallery-Instagram-iPhone-8635408-3bc01cb02a56401883d0b483d91a57f0.jpg)
[Updated] Essential Guidelines to Create Impactful YouTube Banners
Essential Guidelines to Create Impactful YouTube Banners
How To Make Good YouTube Banner - Dos and Don’ts

Richard Bennett
Oct 26, 2023• Proven solutions
It’s important to learn how to make a good YouTube banner because, when you click into a channel, the first thing you usually see and pay attention to is the channel art.
Channel art gives viewers a first impression of who you are and allows viewers to know what your channel is all about. Channel art can be a great way to show creativity, and there are also ways you can design your banner to help your channel grow.
Here are the Dos and Don’ts of YouTube Channel Art.
- What Kind of Background Should I Use?
- Should I Use My Face?
- What Should I Write on Banner?
- How Can I Make My Channel Art Look Good?


Part 1: What Kind of Background Should I Use?
DO: High-Quality Photos
It’s easy to take pictures with our phones, but not all of these pictures will look great blown up for channel art.
When choosing great photos for your background, pick ones that are high quality and don’t become pixelated once they are blown up. There are tons of free stock photo websites out there to help you find a high-quality picture that’s perfect for your channel.
DON’T: Use Chaotic Patterns
Using patterns for the background of your channel banner can help your channel look super creative and stand out from others. However, if you use a pattern that is chaotic and hard on the eyes, you may not attract many subscribers. When using patterns, choose patterns that are not heavy in color and have too many lines or shapes. There should be an evenness to the shapes and negative space within the pattern itself. Try to stay away from patterns that are 3D which can conflict with the viewer’s eyesight and make them dizzy.
Part 2: Should I Use My Face?
Whether you should use your face on your channel banner depends on what your channel is about. If you have a channel focused on beauty, fashion, fitness, or family vlogs then it’s a good idea to include your face. It comes off personable and helps viewers relate to you. If you have a channel that is about something like gaming, tech reviews, or book reviews then it isn’t necessary to include your face because the focus of your content isn’t you as a personality.
If you do include pictures, here are some tips:
Don’t: Use Blurry Photos
If your photos are blurry, pixilated, or poor quality then don’t use them. Using blurry pictures comes off as unprofessional.
That doesn’t mean you have to hire a photographer to take pictures for your channel. The average smartphone takes really great pictures, so long as you have enough light. If you need a great picture, use a high-quality selfie or ask a friend to take a nice picture of you.
Don’t: Use Outdated Pictures
It is always best to use a current photo of yourself. Many times viewers will go and follow you on social media as well. If they see that you have current photos on your social media but not on your channel, they are become confused and perhaps lose interest.
Part 3: What Should I Write on My Banner?

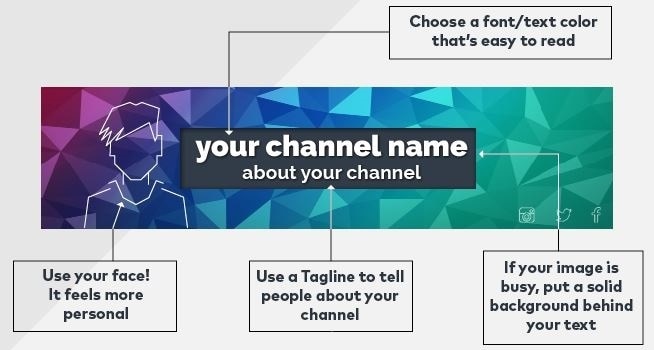
Do: Include Your Channel Name
While including your channel name in your banner seems like a no brainer, it is often left out by aspiring YouTubers. Displaying your channel name in a large font allows it to be more visible for viewers - your channel name is already on the page, but it is underneath your channel art and doesn’t stand out.
Seeing your channel name included in your banner also helps viewers to know they are on the right page, if there are YouTubers out there with similar names to yours.
Do: Include Upload Days
Consistent upload days are highly important for gaining more views and subscribers. Including your exact upload days helps viewers know when they should expect new videos from you. I made the mistake of not including upload days when I first started my channel 3 years ago. I had drops in views because my subscribers didn’t know when I would upload videos.
If you find that you cannot stick to a certain upload day, try to include how often you will post instead. For example, you can say, “New Videos Posted Weekly.” Viewers will respect you more and even be more likely to subscribe when you tell them your upload days. They want a guarantee that you’re going to post again in the near future.
Do: Include Social Media
Social media accounts are important to include in your channel art because we live in a social media generation. People are on social media every second of the day. If you are looking to take your YouTube channel seriously, it is good practice to ask viewers to follow you on your social media.
Including social media icons in your channel art lets people know where they can find you. Another good reason to include your current social media in your banner is that sometimes you might join a new platform or quit an old one. You may be using Twitter for months and then decide that you like Facebook better. Your current social media handles keep subscribers from having to guess which one to follow you on.
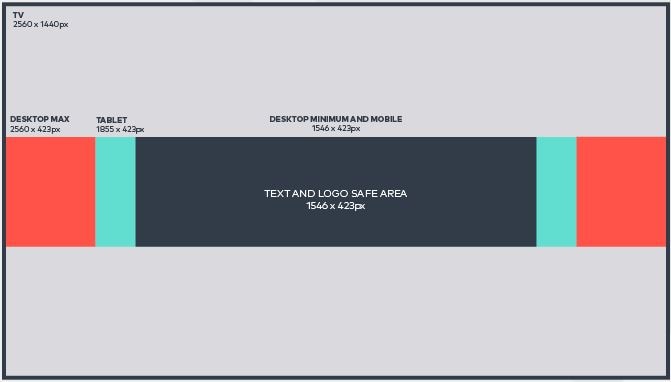
Make sure everything important fits in the safe area!
Do: Include Brief Channel Description or Tag Line
Aside from your channel name, you should also include a brief channel description or tag line to tell your viewers what your channel is all about. If you’re an aspiring beauty guru, you may include something like Makeup Tutorials, Product Reviews, or Mommy Makeovers. Or, you may include a cool tag line that describes the goal of your channel, like “Empowering Mother’s Through Makeup.”
I’ve noticed that YouTubers that use 2-3 descriptive words in their channel art make many different types of videos on their channel but they all full under those categories.
YouTubers that use tag lines are using their channel as a platform to carry out a specific mission on giving help or educating others.
Whether you decide to use descriptive words or a tag line, they will help your channel tremendously by setting expectations for your viewers.
Part 4: How Can I Make My Channel Art Look Good?
Do: Create Consistent Branding
Since becoming a YouTuber myself, I’ve come to learn that paying attention to your branding is very important. Focus attention to what colors and fonts you use. The colors you use for your channel can influence your audience to feel a certain way. For example, using yellow can show that you’re happy and upbeat while using blue can show you’re more calm and relaxed. Whatever color you choose, make sure it’s a true representation of who you are.
Using the right font can also be important to your channel. There are many different fonts available now. When choosing a font, choose one that goes with your channel that is easy to read. You might choose a very pretty cursive font, but if your viewers can’t read it, it can be useless.
Don’t: Include Images That Have Nothing to Do with Your Channel
This simple mistake can cost you many subscribers. For example, if your channel is about Beauty videos, then your channel art shouldn’t include pictures of food or you eating a burger. Your channel art is the first thing that viewers see when clicking on your page. You want them to instantly know what your channel is all about without having to find it in the description box. If your channel is about a few different things, then include all of those images in the channel art so they still know what your channel about. Just don’t confuse your viewers as to what your channel is really about.
Don’t: Have Images and Text That Cut Off
YouTube helps YouTubers by giving them a free channel art template to use as a guide when creating channel art. The template includes 3 different perspectives on how your channel art will be viewed by people looking at mobile devices, computer screens, and TVs. Many people make the mistake of creating art on the TV perspective which then cuts off images and text for the mobile and computer views. To save you the trouble of having images that cut off, it’s best to create your channel in the mobile dimensions that way it will be seen in the computer and TV dimensions with no problem.
Joshelle is a YouTuber from Atlanta, GA. She has a YouTube channel called ElleToshea where she shows viewers how to improve their homes and spaces on an affordable budget through DIY home decor. ElleToshea features minimalist home decor styles based off popular stores such as Anthropologie and Urban Outfitters.
Now that you know how to make a good YouTube banner, what will you do next?
Touch Up YouTube Videos with Filmora
Wondershare Filmora features lots of utilities for both video and audio editing. You can change the video speed or change the aspect ratio easily. Besides, there are plentiful filters, elements, effects and overlays built, so you can use them without costing any extra fee.
Richard Bennett
Richard Bennett is a writer and a lover of all things video.
Follow @Richard Bennett
Richard Bennett
Oct 26, 2023• Proven solutions
It’s important to learn how to make a good YouTube banner because, when you click into a channel, the first thing you usually see and pay attention to is the channel art.
Channel art gives viewers a first impression of who you are and allows viewers to know what your channel is all about. Channel art can be a great way to show creativity, and there are also ways you can design your banner to help your channel grow.
Here are the Dos and Don’ts of YouTube Channel Art.
- What Kind of Background Should I Use?
- Should I Use My Face?
- What Should I Write on Banner?
- How Can I Make My Channel Art Look Good?
Part 1: What Kind of Background Should I Use?
DO: High-Quality Photos
It’s easy to take pictures with our phones, but not all of these pictures will look great blown up for channel art.
When choosing great photos for your background, pick ones that are high quality and don’t become pixelated once they are blown up. There are tons of free stock photo websites out there to help you find a high-quality picture that’s perfect for your channel.
DON’T: Use Chaotic Patterns
Using patterns for the background of your channel banner can help your channel look super creative and stand out from others. However, if you use a pattern that is chaotic and hard on the eyes, you may not attract many subscribers. When using patterns, choose patterns that are not heavy in color and have too many lines or shapes. There should be an evenness to the shapes and negative space within the pattern itself. Try to stay away from patterns that are 3D which can conflict with the viewer’s eyesight and make them dizzy.
Part 2: Should I Use My Face?
Whether you should use your face on your channel banner depends on what your channel is about. If you have a channel focused on beauty, fashion, fitness, or family vlogs then it’s a good idea to include your face. It comes off personable and helps viewers relate to you. If you have a channel that is about something like gaming, tech reviews, or book reviews then it isn’t necessary to include your face because the focus of your content isn’t you as a personality.
If you do include pictures, here are some tips:
Don’t: Use Blurry Photos
If your photos are blurry, pixilated, or poor quality then don’t use them. Using blurry pictures comes off as unprofessional.
That doesn’t mean you have to hire a photographer to take pictures for your channel. The average smartphone takes really great pictures, so long as you have enough light. If you need a great picture, use a high-quality selfie or ask a friend to take a nice picture of you.
Don’t: Use Outdated Pictures
It is always best to use a current photo of yourself. Many times viewers will go and follow you on social media as well. If they see that you have current photos on your social media but not on your channel, they are become confused and perhaps lose interest.
Part 3: What Should I Write on My Banner?
Do: Include Your Channel Name
While including your channel name in your banner seems like a no brainer, it is often left out by aspiring YouTubers. Displaying your channel name in a large font allows it to be more visible for viewers - your channel name is already on the page, but it is underneath your channel art and doesn’t stand out.
Seeing your channel name included in your banner also helps viewers to know they are on the right page, if there are YouTubers out there with similar names to yours.
Do: Include Upload Days
Consistent upload days are highly important for gaining more views and subscribers. Including your exact upload days helps viewers know when they should expect new videos from you. I made the mistake of not including upload days when I first started my channel 3 years ago. I had drops in views because my subscribers didn’t know when I would upload videos.
If you find that you cannot stick to a certain upload day, try to include how often you will post instead. For example, you can say, “New Videos Posted Weekly.” Viewers will respect you more and even be more likely to subscribe when you tell them your upload days. They want a guarantee that you’re going to post again in the near future.
Do: Include Social Media
Social media accounts are important to include in your channel art because we live in a social media generation. People are on social media every second of the day. If you are looking to take your YouTube channel seriously, it is good practice to ask viewers to follow you on your social media.
Including social media icons in your channel art lets people know where they can find you. Another good reason to include your current social media in your banner is that sometimes you might join a new platform or quit an old one. You may be using Twitter for months and then decide that you like Facebook better. Your current social media handles keep subscribers from having to guess which one to follow you on.
Make sure everything important fits in the safe area!
Do: Include Brief Channel Description or Tag Line
Aside from your channel name, you should also include a brief channel description or tag line to tell your viewers what your channel is all about. If you’re an aspiring beauty guru, you may include something like Makeup Tutorials, Product Reviews, or Mommy Makeovers. Or, you may include a cool tag line that describes the goal of your channel, like “Empowering Mother’s Through Makeup.”
I’ve noticed that YouTubers that use 2-3 descriptive words in their channel art make many different types of videos on their channel but they all full under those categories.
YouTubers that use tag lines are using their channel as a platform to carry out a specific mission on giving help or educating others.
Whether you decide to use descriptive words or a tag line, they will help your channel tremendously by setting expectations for your viewers.
Part 4: How Can I Make My Channel Art Look Good?
Do: Create Consistent Branding
Since becoming a YouTuber myself, I’ve come to learn that paying attention to your branding is very important. Focus attention to what colors and fonts you use. The colors you use for your channel can influence your audience to feel a certain way. For example, using yellow can show that you’re happy and upbeat while using blue can show you’re more calm and relaxed. Whatever color you choose, make sure it’s a true representation of who you are.
Using the right font can also be important to your channel. There are many different fonts available now. When choosing a font, choose one that goes with your channel that is easy to read. You might choose a very pretty cursive font, but if your viewers can’t read it, it can be useless.
Don’t: Include Images That Have Nothing to Do with Your Channel
This simple mistake can cost you many subscribers. For example, if your channel is about Beauty videos, then your channel art shouldn’t include pictures of food or you eating a burger. Your channel art is the first thing that viewers see when clicking on your page. You want them to instantly know what your channel is all about without having to find it in the description box. If your channel is about a few different things, then include all of those images in the channel art so they still know what your channel about. Just don’t confuse your viewers as to what your channel is really about.
Don’t: Have Images and Text That Cut Off
YouTube helps YouTubers by giving them a free channel art template to use as a guide when creating channel art. The template includes 3 different perspectives on how your channel art will be viewed by people looking at mobile devices, computer screens, and TVs. Many people make the mistake of creating art on the TV perspective which then cuts off images and text for the mobile and computer views. To save you the trouble of having images that cut off, it’s best to create your channel in the mobile dimensions that way it will be seen in the computer and TV dimensions with no problem.
Joshelle is a YouTuber from Atlanta, GA. She has a YouTube channel called ElleToshea where she shows viewers how to improve their homes and spaces on an affordable budget through DIY home decor. ElleToshea features minimalist home decor styles based off popular stores such as Anthropologie and Urban Outfitters.
Now that you know how to make a good YouTube banner, what will you do next?
Touch Up YouTube Videos with Filmora
Wondershare Filmora features lots of utilities for both video and audio editing. You can change the video speed or change the aspect ratio easily. Besides, there are plentiful filters, elements, effects and overlays built, so you can use them without costing any extra fee.
Richard Bennett
Richard Bennett is a writer and a lover of all things video.
Follow @Richard Bennett
The Ultimate Guide to Free Converting YouTube Videos to WAV
YouTube to WAV File: 4 Best Free Convert Solutions
Richard Bennett
Mar 27, 2024• Proven solutions
YouTube to WAV converter is a very common phenomenon. This is done by the users as they want to play the video on selected devices.
In this article, we will help you manage to convert YouTube to WAV file with ease.
You will Learn :
- What is WAV?
- How to Convert YouTube to WAV Format? (4 Options)
- Tips to Convert YouTube to WAV
- Beside WAV Other Popular Formats for YouTube Videos
What is WAV?
WAV, known as Wave Form Audio File Format and is fully supported by Windows, is a common format that was launched back in 1991, which supports most of the older devices as well.
For the users that want uncompressed and lossless quality prefer to use WAV format. It is extended from the RIFF format to the RF64 format.
How to Convert YouTube to WAV Format?
Some many ways and programs can be used as YouTube to WAV converter. All these programs are easy to use and definitive guides are also available online. Some of the best ways are mentioned below.
Option 1: Convert YouTube to WAV by Wondershare Filmora
Filmora is by far the best program that can be used to convert YouTube to WAV format. YouTube to WAV file conversion has never been as easy as it is with this program. The program is easy to use and allows the users to overcome the issues which other programs present.
Features of the Program
- It is one of the very few programs that come with split-screen functionality. It means that the video and audio can be played simultaneously on a single interface.
- The audio equalizer ensures that the tuning is done as per the requirements.
- There is an advanced functionality of text editing which allows the users to mention the text onto the converted video as well.
- The UI of the program is graphical and hence it is easy to use. The independent reviews have granted a score of 9.5 based on this functionality of the program.
- The part selection is available in the program. It means that multiple conversions can be done at the same time without losing quality.
How to Convert YouTube to WAV Using Filmora?
This YouTube WAV converter is easy to use. The best part is that it is compatible with major platforms i.e. Windows and Mac. The processes for both will be explained in detail so that you can understand the program better.
The Process to Convert YouTube to WAV:
Step 1: Download Filmora for Windows or Mac (depends on your operating system).
If you want to download the program for Windows then click below download icon:
For Mac version download click below icon:
Step 2: There are three ways to import media into the program.
Methond 1: Click File > Import Media. Choose the YouTube file that you want to convert to WAV format. If the file is on another device then you can get it from there as well.

Method 2: Click Import Media on the main interface and select the file from the window that pops up.
Method 3: You can also drag and drop the files onto the interface to make sure that they are imported.
Step 3: You now just need to export the video in the WAV format. Click the Export button and then go for the Local tab. The export formats that are currently supported by the program are WMV, MP4, AVI, MOV, F4V, MKV, TS, 3GP, MPEG-2, WEBM, GIF and MP3.

Step 4: You can then alter the settings within the settings tab. The bit rate is the main thing that defines the quality of the video. Once the settings are done press OK
Step 5: You can also export the video as per the device that you want to play it on.
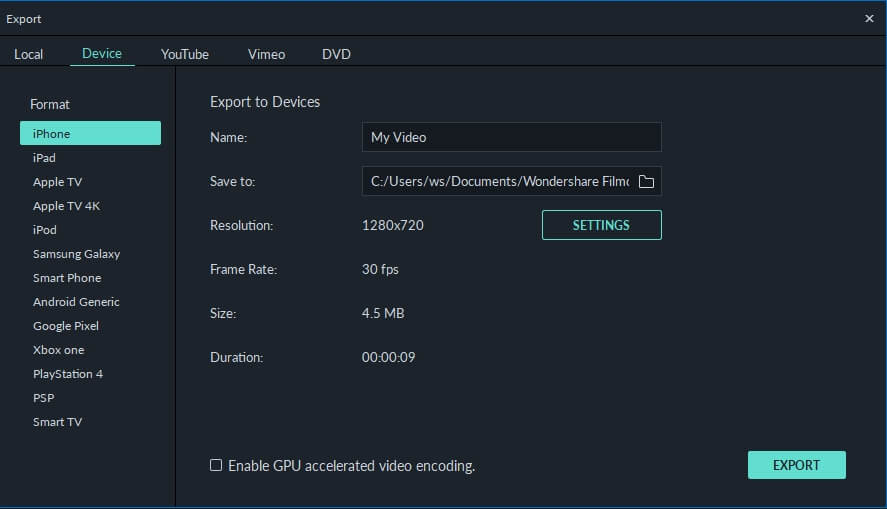
Step 6: You can also upload the video to social media platforms such as YouTube and Vimeo.
Step 7: You can also burn the converted format onto a DVD. Select the appropriate settings and press Export.
The process is explained as under. For video guides please visit Filmora 101 as it will get you the complete knowledge thoroughly.
You may also like: How to Convert YouTube to MP4 Safely? [Step by Step Guide] >>
Option 2: Other Way to Convert YouTube to WAV on Windows
5K Player is one of the best and the most used players that also work as YouTube to WAV conversion platform as well. The process is very easy to follow and is mentioned as under.
Step 1: Copy and paste the URL of the video on the desired location within the player. Click download and the process starts.

Step 2: Click “To Music” and select the WAV format from the drop-down that appears. You can also choose the bit rate, frame rate, and resolution. Once the conversion is completed you can save the file and the process ends here.
You may also like: >> How to to Convert WMV to MP4 Easily?
Option 3: Other Way to Convert YouTube to WAV on Mac
The Allavsoft is one of the best converters that can be used to convert YouTube to WAV on Mac. The process is simple and has been explained as under.
Step 1: Paste the URL of the YouTube video that you want to convert. You can also select the download quality and can access the file once the download has been completed.

Step 2: You can then select the format and once the conversion has been completed click the download button. The same has been depicted by numbers 2 and 3 in the picture below. WAV lossless quality should be selected from the dropdown to make sure that the work is done without any issue and problem.
Right format selection is important as the conversion is done instantly.
Option 4: YouTube to WAV Conversion Online
The process that you need to follow is explained as under.
Step 1: Visit https.//www.savethevideo.com/convert to access the converter.
Step 2: Paste the URL of the YouTube video that you want to convert and click the “Convert” button:

Step 3: Wait till the converter fetches the information.
Step 4: From the drop-down make sure that you select the WAV format.
Step 5: Click “Convert” once again and the process of conversion starts.
Step 6: The video then starts to download in the desired format.
Step 7: Click “Download” and save the file to the desired location. This concludes the process in full.
Tips to Convert YouTube to WAV
Below are some tips that would be useful for the users that want to convert YouTube to WAV format.
1. Always use the multipurpose software. It will allow you to download and convert the video at the same time-saving time.
2. Lossless quality is always to be selected while you are converting the format. It will make sure that the video is never compressed at all.
3. One of the best ways to convert the video is to disable the background noise. This will lead to awesome results.
4. Converting from YouTube to WAV also requires you to choose the software that is fast and reliable or else you will get the outcome which is not as per your requirements.
5. Free software programs can also get the malware to your system and therefore these are not recommended at all.
6. WAV is a format that is of high quality as the converters have loads of options so it is advised to use these carefully.
7. Make sure that the converters that are used are the ones that are highly rated and have a graphical user interface.
8. The YouTube to WAV downloader should be there on with the converter as it will make the process easy and you don’t need tons of software programs for a single purpose.
9. Always go for the program that supports the containers instead of just the format. If a program supports the containers then it is easy to convert a number of formats.
10. The conversion should be done with converters that do not cause any type of loss to enhance the quality as well.
Beside WAV Other Popular Formats for YouTube Videos
Many other video formats should be used to make sure that the best and the most advanced outcome is generated. Some of the most popular formats are as under.
- Audio Video Interleave Format, AVI
It is one of the oldest formats that are on the market. It was developed by Microsoft as a part of their video processing format for Windows. It was made publically available in 1992.
This one of the oldest formats is used universally. Many people consider it the standard to save videos. The AVI files are simple to use and are supported by almost every video player currently on the market.
It is easy to store as it takes less space than many other formats that are on the market. It will also let you transfer the files relatively faster due to the small size.
- Flash Video Format, FLV
The flash player by Adobe is one of the most common software programs on the system. This has made this video format one of the common ones on the market. The format can be played with ease as the supported plugins are there for other apps as well.
The flash content is supported by all browsers and therefore it is common to play these videos without any additional plugins. The best part of this format is the lossless quality that it provides to its users. Even if you compress these videos they remain HD as the quality remains the same.
- Apple QuickTime Movie, MOV
Among the Mac users, it is one of the most used formats. Developed by Apple it is a format that allows the users to overcome issues such as playback errors. The new version has also been launched which is known as QuickTime X.
The best part of this format is that it is available for Windows users as well. The files of the MOV format are usually of high quality. It is for the same that the size of such files is large as compared to other formats.
- Moving Pictures Expert Group 4, MP4
Introduced in 1998 it is a format that is used by the motion pictures association responsible for setting the standards. The format is widely used and is supported by various platforms as well as devices.
Even after the MP4 file is compressed it remains lossless and the quality remains the same. The HTML5 that has been launched currently also supports this format. It is compatible with almost all of the browsers that are on the market.
- 264
As the name suggests it is one of the best and the most used formats for HD videos. The compression remains lossless and even if the resolution is low the quality is maintained. The MP4 container is the one that is used to contain this format.
Most of the streaming devices, as well as the services, use this format while referring to HD video. The best part is that the format is widely accepted as industry standards for HD videos. Most of the users all over the world use this format to save their HD videos with ease.
- OGG
It is one of the most used video formats. It has been developed by the Xiph.org foundation to maintain the video as well as the audio quality on different platforms. The format is free and the documentation, as well as the configuration, can be downloaded by anyone.
- Advanced Systems Format, .ASF
If you want to stream videos then this is the format that is considered to be the best. It is still being used by the major popular streaming platforms of the world. The .ASF format is one of the best and it allows the users to overcome issues such as quality loss as well as streaming related issues.
You may also like: How to Post/Share a Video From YouTube on Instagram >>
Conclusion
If you require lossless compression then YouTube to WAV conversion is something that is required. Some many ways and means can be used to make sure that the idea is approached. The best way is to use Filmora as it is an easy and efficient operation.
The best way to get around the issue is to always use the service that is embedded with quality.
If you like this article then it is requested to comment and share it on social media. It will not only help others but will also let them have knowledgeable ideas.
Richard Bennett
Richard Bennett is a writer and a lover of all things video.
Follow @Richard Bennett
Richard Bennett
Mar 27, 2024• Proven solutions
YouTube to WAV converter is a very common phenomenon. This is done by the users as they want to play the video on selected devices.
In this article, we will help you manage to convert YouTube to WAV file with ease.
You will Learn :
- What is WAV?
- How to Convert YouTube to WAV Format? (4 Options)
- Tips to Convert YouTube to WAV
- Beside WAV Other Popular Formats for YouTube Videos
What is WAV?
WAV, known as Wave Form Audio File Format and is fully supported by Windows, is a common format that was launched back in 1991, which supports most of the older devices as well.
For the users that want uncompressed and lossless quality prefer to use WAV format. It is extended from the RIFF format to the RF64 format.
How to Convert YouTube to WAV Format?
Some many ways and programs can be used as YouTube to WAV converter. All these programs are easy to use and definitive guides are also available online. Some of the best ways are mentioned below.
Option 1: Convert YouTube to WAV by Wondershare Filmora
Filmora is by far the best program that can be used to convert YouTube to WAV format. YouTube to WAV file conversion has never been as easy as it is with this program. The program is easy to use and allows the users to overcome the issues which other programs present.
Features of the Program
- It is one of the very few programs that come with split-screen functionality. It means that the video and audio can be played simultaneously on a single interface.
- The audio equalizer ensures that the tuning is done as per the requirements.
- There is an advanced functionality of text editing which allows the users to mention the text onto the converted video as well.
- The UI of the program is graphical and hence it is easy to use. The independent reviews have granted a score of 9.5 based on this functionality of the program.
- The part selection is available in the program. It means that multiple conversions can be done at the same time without losing quality.
How to Convert YouTube to WAV Using Filmora?
This YouTube WAV converter is easy to use. The best part is that it is compatible with major platforms i.e. Windows and Mac. The processes for both will be explained in detail so that you can understand the program better.
The Process to Convert YouTube to WAV:
Step 1: Download Filmora for Windows or Mac (depends on your operating system).
If you want to download the program for Windows then click below download icon:
For Mac version download click below icon:
Step 2: There are three ways to import media into the program.
Methond 1: Click File > Import Media. Choose the YouTube file that you want to convert to WAV format. If the file is on another device then you can get it from there as well.
Method 2: Click Import Media on the main interface and select the file from the window that pops up.
Method 3: You can also drag and drop the files onto the interface to make sure that they are imported.
Step 3: You now just need to export the video in the WAV format. Click the Export button and then go for the Local tab. The export formats that are currently supported by the program are WMV, MP4, AVI, MOV, F4V, MKV, TS, 3GP, MPEG-2, WEBM, GIF and MP3.
Step 4: You can then alter the settings within the settings tab. The bit rate is the main thing that defines the quality of the video. Once the settings are done press OK
Step 5: You can also export the video as per the device that you want to play it on.
Step 6: You can also upload the video to social media platforms such as YouTube and Vimeo.
Step 7: You can also burn the converted format onto a DVD. Select the appropriate settings and press Export.
The process is explained as under. For video guides please visit Filmora 101 as it will get you the complete knowledge thoroughly.
You may also like: How to Convert YouTube to MP4 Safely? [Step by Step Guide] >>
Option 2: Other Way to Convert YouTube to WAV on Windows
5K Player is one of the best and the most used players that also work as YouTube to WAV conversion platform as well. The process is very easy to follow and is mentioned as under.
Step 1: Copy and paste the URL of the video on the desired location within the player. Click download and the process starts.
Step 2: Click “To Music” and select the WAV format from the drop-down that appears. You can also choose the bit rate, frame rate, and resolution. Once the conversion is completed you can save the file and the process ends here.
You may also like: >> How to to Convert WMV to MP4 Easily?
Option 3: Other Way to Convert YouTube to WAV on Mac
The Allavsoft is one of the best converters that can be used to convert YouTube to WAV on Mac. The process is simple and has been explained as under.
Step 1: Paste the URL of the YouTube video that you want to convert. You can also select the download quality and can access the file once the download has been completed.
Step 2: You can then select the format and once the conversion has been completed click the download button. The same has been depicted by numbers 2 and 3 in the picture below. WAV lossless quality should be selected from the dropdown to make sure that the work is done without any issue and problem.
Right format selection is important as the conversion is done instantly.
Option 4: YouTube to WAV Conversion Online
The process that you need to follow is explained as under.
Step 1: Visit https.//www.savethevideo.com/convert to access the converter.
Step 2: Paste the URL of the YouTube video that you want to convert and click the “Convert” button:
Step 3: Wait till the converter fetches the information.
Step 4: From the drop-down make sure that you select the WAV format.
Step 5: Click “Convert” once again and the process of conversion starts.
Step 6: The video then starts to download in the desired format.
Step 7: Click “Download” and save the file to the desired location. This concludes the process in full.
Tips to Convert YouTube to WAV
Below are some tips that would be useful for the users that want to convert YouTube to WAV format.
1. Always use the multipurpose software. It will allow you to download and convert the video at the same time-saving time.
2. Lossless quality is always to be selected while you are converting the format. It will make sure that the video is never compressed at all.
3. One of the best ways to convert the video is to disable the background noise. This will lead to awesome results.
4. Converting from YouTube to WAV also requires you to choose the software that is fast and reliable or else you will get the outcome which is not as per your requirements.
5. Free software programs can also get the malware to your system and therefore these are not recommended at all.
6. WAV is a format that is of high quality as the converters have loads of options so it is advised to use these carefully.
7. Make sure that the converters that are used are the ones that are highly rated and have a graphical user interface.
8. The YouTube to WAV downloader should be there on with the converter as it will make the process easy and you don’t need tons of software programs for a single purpose.
9. Always go for the program that supports the containers instead of just the format. If a program supports the containers then it is easy to convert a number of formats.
10. The conversion should be done with converters that do not cause any type of loss to enhance the quality as well.
Beside WAV Other Popular Formats for YouTube Videos
Many other video formats should be used to make sure that the best and the most advanced outcome is generated. Some of the most popular formats are as under.
- Audio Video Interleave Format, AVI
It is one of the oldest formats that are on the market. It was developed by Microsoft as a part of their video processing format for Windows. It was made publically available in 1992.
This one of the oldest formats is used universally. Many people consider it the standard to save videos. The AVI files are simple to use and are supported by almost every video player currently on the market.
It is easy to store as it takes less space than many other formats that are on the market. It will also let you transfer the files relatively faster due to the small size.
- Flash Video Format, FLV
The flash player by Adobe is one of the most common software programs on the system. This has made this video format one of the common ones on the market. The format can be played with ease as the supported plugins are there for other apps as well.
The flash content is supported by all browsers and therefore it is common to play these videos without any additional plugins. The best part of this format is the lossless quality that it provides to its users. Even if you compress these videos they remain HD as the quality remains the same.
- Apple QuickTime Movie, MOV
Among the Mac users, it is one of the most used formats. Developed by Apple it is a format that allows the users to overcome issues such as playback errors. The new version has also been launched which is known as QuickTime X.
The best part of this format is that it is available for Windows users as well. The files of the MOV format are usually of high quality. It is for the same that the size of such files is large as compared to other formats.
- Moving Pictures Expert Group 4, MP4
Introduced in 1998 it is a format that is used by the motion pictures association responsible for setting the standards. The format is widely used and is supported by various platforms as well as devices.
Even after the MP4 file is compressed it remains lossless and the quality remains the same. The HTML5 that has been launched currently also supports this format. It is compatible with almost all of the browsers that are on the market.
- 264
As the name suggests it is one of the best and the most used formats for HD videos. The compression remains lossless and even if the resolution is low the quality is maintained. The MP4 container is the one that is used to contain this format.
Most of the streaming devices, as well as the services, use this format while referring to HD video. The best part is that the format is widely accepted as industry standards for HD videos. Most of the users all over the world use this format to save their HD videos with ease.
- OGG
It is one of the most used video formats. It has been developed by the Xiph.org foundation to maintain the video as well as the audio quality on different platforms. The format is free and the documentation, as well as the configuration, can be downloaded by anyone.
- Advanced Systems Format, .ASF
If you want to stream videos then this is the format that is considered to be the best. It is still being used by the major popular streaming platforms of the world. The .ASF format is one of the best and it allows the users to overcome issues such as quality loss as well as streaming related issues.
You may also like: How to Post/Share a Video From YouTube on Instagram >>
Conclusion
If you require lossless compression then YouTube to WAV conversion is something that is required. Some many ways and means can be used to make sure that the idea is approached. The best way is to use Filmora as it is an easy and efficient operation.
The best way to get around the issue is to always use the service that is embedded with quality.
If you like this article then it is requested to comment and share it on social media. It will not only help others but will also let them have knowledgeable ideas.
Richard Bennett
Richard Bennett is a writer and a lover of all things video.
Follow @Richard Bennett
Also read:
- From Shortcuts to Sharing Merging YouTube & TikTok Pathways
- Exemplars Crafting Multimedia Narratives with Images & Melody
- Confirmation Procedures for YouTube Users for 2024
- Become a Viral Sensation Maximizing Your YouTube Reach for 2024
- Select From the Leading 7 Android Apps to Eradicate Ads
- Essential Gear Picking the Very Best Among Top 9 Free Logomakers for 2024
- In 2024, Best Microphone for Different YouTube Channel Types
- Detailed Guide to Convert YouTube Shorts to Mp4
- Revolutionize Your Videos - Here Are the Top 8 Free Cutting Suites
- Essential Tips on Acquiring Profitable YT Channels
- [New] Breaking Down YouTube Short Barriers
- [Updated] Elevate Video Quality Mastering Aspect Ratio and Size Settings on YouTube
- [Updated] Enhance YouTube Thumbnails Top Techniques for Stunning Backdrops
- Bright Ideas Top 17 Lighting Setups for YouTubers
- A Guide for Mobile Filmmakers on Crafting YouTube Thumbnails
- [Updated] Broadcasting Brilliance in Final Fragments
- 2024 Approved Top 10 Free Movies to Watch on YouTube
- 2024 Approved Detailed Instructions for Embedding and Displaying YouTube Playlists Online
- Unlock Creativity Top 8 Online Resources for Beginners
- The Ultimate Selection of YouTube Content Cutters Online
- [Updated] Affordable Gear for Aspiring Content Creators
- Instructions Removing Videos From YouTube's Watchlater
- [New] Dial Up the Impact with 50 FREE Branding Graphics
- The Counterplay Creative Ways to Watch YouTube in Reverse
- Navigating YouTube Sharing with Google Credentials
- Tallying Up Mr. Beast's Billions
- Best YouTube Thumbnail Size You Should Know[The Ultimate Guide]
- Avoid Shaky Footage Proper Tripod Usage Techniques in Vlog Creation for 2024
- YouTube's Edge & Dailymotion's Charms An In-Depth Look
- 2024 Approved 10 Top-Ranked YouTube News Entities
- [Updated] Essential Guide to Aspect Ratios for Effective YouTube Engagement
- [Updated] Deleting YouTube Content A Step-by-Step Guide
- Eliminate Cacophony Perfecting Sound Quality for YouTube for 2024
- Elevate Your Content The Secrets to Increased Subscribers
- In 2024, Claim Cost-Free Visuals From Highest-Rated 4 YouTube Sources
- Updated Mastering Jump Cuts in Final Cut Pro X A Step-by-Step Guide
- [New] In 2024, Unlocking the Secrets to Tops 10 Viral TikTok Initiatives
- How To Enable USB Debugging on a Locked Nokia C300 Phone
- [Updated] Power Up Storage Ultimate PS5 Hard Drives Compared for 2024
- In 2024, How To Do Tecno Phantom V Fold Screen Sharing | Dr.fone
- Updated 2024 Approved Animate for Free Top 10 Whiteboard Animation Software for Windows and Mac
- [Updated] Upgrading Minecraft Stability via RAM Adjustment for 2024
- How to Fix My Vivo S18e Location Is Wrong | Dr.fone
- Top Five Mac Screen Seize Techniques (Char Limit 156)
- How To Remove or Bypass Knox Enrollment Service On Realme GT Neo 5 SE
- [Updated] 2024 Approved A Harmonious Link Spotify with Discord
- In 2024, How Do I SIM Unlock My Apple iPhone SE (2022)?
- Become a Pic Pro The Top 10 iPhones/Android Apps with Stickers
- New In 2024, Auditory Craftsmanship Exploring the Best Tools for Editing Sounds with Benefits and Limitations
- Discover Top-Tier, Cost-Effective Mobile Imaging Enhancers
- New In 2024, Top 15 Greatest Claymation Movies of All Time
- Updated In 2024, Fast and Easy Method to Match Color in Photoshop
- Updated Cacophony of the Gigantic An Archive of Titans Roaring Audio for 2024
- Adventure Awaits in These Top 5 Samsung Gear VR Titles
- In 2024, What is the best Pokemon for pokemon pvp ranking On Xiaomi Civi 3? | Dr.fone
- Title: [Updated] Essential Guidelines to Create Impactful YouTube Banners
- Author: Kevin
- Created at : 2024-05-25 16:52:36
- Updated at : 2024-05-26 16:52:36
- Link: https://youtube-videos.techidaily.com/updated-essential-guidelines-to-create-impactful-youtube-banners/
- License: This work is licensed under CC BY-NC-SA 4.0.
