![[Updated] Essential Free Tools Convert YouTube Audio to MP3 on iPhone](https://www.lifewire.com/thmb/86F84KXmC5S52L9NAF6LQTtWmFE=/540x405/filters:no_upscale():max_bytes(150000):strip_icc()/Google-IO-narrow-5f29c4777cf94e1291f3921f22964aed.jpg)
"[Updated] Essential Free Tools Convert YouTube Audio to MP3 on iPhone"
Essential Free Tools: Convert YouTube Audio to MP3 on iPhone
6 Free Software to Convert YouTube to MP3 for iPhone

Ollie Mattison
Mar 27, 2024• Proven solutions
Loved a video on YouTube, but was unable to find the MP3 version? Worry not! Now, with a YouTube music converter, you can easily convert YouTube videos into MP3 files for your iPhone and enjoy them to your heart’s content. A trusted brand can offer you the best MP3 audio files out of your favorite YouTube videos within no time. Here we bring free apps to convert music for your iPhone.
- Part 1: YouTube to MP3 Converter on iPhone
- Part 2: YouTube to MP3 Converter for iPhone (on Desktop)
- Part 3: FAQs About YouTube to MP3 Converter
You may also like:
How to convert Youtube to mp3 [three ways] >>
How to video chat call on Snapchat with 3 steps >>
Best 10 Flvto Alternatives to Convert YouTube Videos >>
Best Video Resolution Converter >>
Part 1: YouTube to MP3 Converter on iPhone
1. Video to MP3 Converter
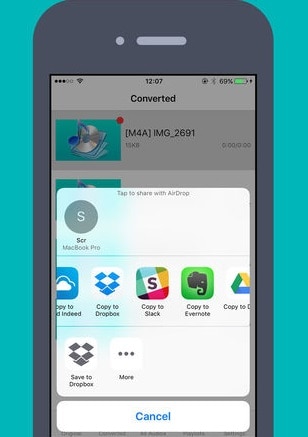
Video to MP3 Converter is an App that allows you to convert videos into different formats of audio such as MP3, M4A, OPUS, WAV, and a lot more, and save it on your iPhone.
The features of this App are –
- You can select audio tracks and customize sample rate, volume, and bitrate.
- You can decide the starting and ending point of the audio to be converted.
- You can import audio or video from Album, camera roll, One Drive, Google Drive, Dropbox, or iCloud.
- You can open audio files with this App and share them with other Apps as well.
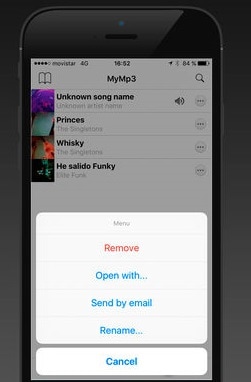
2. MyMP3
MyMP3 can convert videos available on your device into MP3 quickly. You can save recorded audio into MP3 and WAV format.
The main features of MyMP3 are –
- You can convert local videos into MP3 and share them on any social media, email, or instant messaging App.
- It allows you to edit the metadata.
- You can record from a microphone, CD, turntable, audio streamed from the internet, Skype call or phone calls, and the likes.
- It allows ripping CDs, renaming batch files, scheduling recordings, silence detection, and playlist management while recording vinyl albums.
Part 2: YouTube to MP3 converter for iPhone (on Desktop)
1. Filmora Editor
You can use Filmora as a YouTube music converter which will help in converting without much effort. Filmora is basically a video editing software that can help you edit videos in various ways. You can edit any of your video projects with ease when using Filmora. In order to convert Youtube to MP3 in iPhone, you can choose iPhone as the target device while exporting. Let’s check out some amazing features of this software. Or you can learn more from Wondershare Video Community .
Key Features:
- Anyone can easily use it for its extremely easy interface and design.
- People can have the delight in various graphical features with this tool such as filters and overlays.
- With this software, one can seamlessly merge multiple videos without compromising quality.
- There are lots of advanced tools associated with Filmora including background blur option, audio mixer, screen splitting, text editing, green screen, speed ramping, and more.
- If you are looking for stunning effects, Filmstocks, NewBlue FX and BorisFX can definitely meet any of your needs.
- 4k videos are also supported via Filmora easily.


2. Freemake Video Downloader
Freemake Video Downloader is a YouTube music converter that allows you to save YouTube videos and MP3s on your iPhone. While converting the videos into MP3s you need to specify the destination device (Export to iPod/iPhone), so that the right format can be set for the same.
Features of this application are –
- You can have the audios exported to iTunes automatically.
- Simple 3 step process to download and save YouTube videos into your iPhone.

3. Any Audio Converter
Any Audio Converter is an online converter and downloader that allows you to convert YouTube videos to MP3 for iPhone to your desired quality, and size of audio files. This YouTube music converter can convert downloaded videos and music to MP3, WAV, and WMA faster with better quality.
Major features of this audio converter are –
- You can download online videos and music from more than 100 sites.
- It helps you to rip and extract audio from CDs and videos.
- It supports audio conversion in multiple formats without compromising the quality.
- You can burn videos to AVCHD DVD or DVD.
- You can edit videos with special effects, clips, or crop effects.

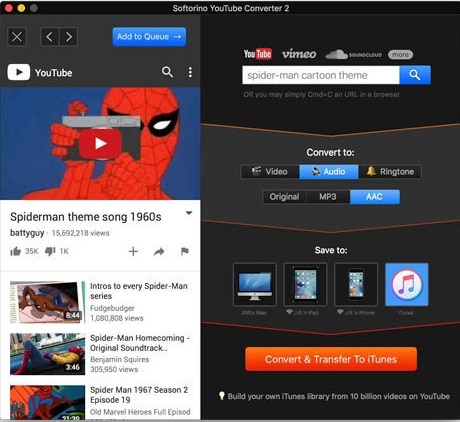
4. Softorino YouTube Converter 2
Softorino YouTube Converter 2 can not only convert YouTube to MP3 for iPhone, but also to MP4 for all iOS devices as well. It is compatible with over 60 top sources.
- With this App, you can access videos, music, and ringtones as well.
- It supports all iOS devices and delivers 4K ultra HD, with subtitles.
- Automatically connects your device to Wi-Fi, and recognizes content automatically for the album

Part 3: FAQs About YouTube to MP3 Converter
1. Can You Convert YouTube Videos to mp3 on iPhone?
Yes, you can. There are numerous YouTube to mp3 convert websites and YouTube audio downloader apps that let you convert YouTube videos to mp3 on your iPhone.
But there are legal issues you need to consider before joining the conversion trend. Technically, it is not illegal to convert a YouTube video to MP3 - but it is illegal to download a copyrighted music video. Moreover, YouTube has stated that stream-ripping violates their Terms of Service, and both YouTube & Google have tried to shut down numerous websites that provide video conversion services.
2. How Can I Save a Song From YouTube to My iPhone?
There are several ways to do that. The legal and recommended method is to get a YouTube Music Premium subscription. This will enable you to download songs from YouTube and save them on your iPhone for offline consumption. The alternative way involves numerous websites and apps that enable you to convert YouTube videos to mp3 and download them on your iPhone. This approach, however, is illegal and should be avoided.
Final Verdict
After going through the list of YouTube music converters in this article, we have found that Filmora is the ultimate solution for all your video download and audio conversion needs. With its matchless features, this App makes your life simple and melodious. However, it is our suggestion, the final call will be yours. We would like to know which was your choice and how was the experience using it. Thanks, readers for having a glance at this post. We hope you are delighted after reading it and finding what you needed.
Ollie Mattison
Ollie Mattison is a writer and a lover of all things video.
Follow @Ollie Mattison
Ollie Mattison
Mar 27, 2024• Proven solutions
Loved a video on YouTube, but was unable to find the MP3 version? Worry not! Now, with a YouTube music converter, you can easily convert YouTube videos into MP3 files for your iPhone and enjoy them to your heart’s content. A trusted brand can offer you the best MP3 audio files out of your favorite YouTube videos within no time. Here we bring free apps to convert music for your iPhone.
- Part 1: YouTube to MP3 Converter on iPhone
- Part 2: YouTube to MP3 Converter for iPhone (on Desktop)
- Part 3: FAQs About YouTube to MP3 Converter
You may also like:
How to convert Youtube to mp3 [three ways] >>
How to video chat call on Snapchat with 3 steps >>
Best 10 Flvto Alternatives to Convert YouTube Videos >>
Best Video Resolution Converter >>
Part 1: YouTube to MP3 Converter on iPhone
1. Video to MP3 Converter
Video to MP3 Converter is an App that allows you to convert videos into different formats of audio such as MP3, M4A, OPUS, WAV, and a lot more, and save it on your iPhone.
The features of this App are –
- You can select audio tracks and customize sample rate, volume, and bitrate.
- You can decide the starting and ending point of the audio to be converted.
- You can import audio or video from Album, camera roll, One Drive, Google Drive, Dropbox, or iCloud.
- You can open audio files with this App and share them with other Apps as well.
2. MyMP3
MyMP3 can convert videos available on your device into MP3 quickly. You can save recorded audio into MP3 and WAV format.
The main features of MyMP3 are –
- You can convert local videos into MP3 and share them on any social media, email, or instant messaging App.
- It allows you to edit the metadata.
- You can record from a microphone, CD, turntable, audio streamed from the internet, Skype call or phone calls, and the likes.
- It allows ripping CDs, renaming batch files, scheduling recordings, silence detection, and playlist management while recording vinyl albums.
Part 2: YouTube to MP3 converter for iPhone (on Desktop)
1. Filmora Editor
You can use Filmora as a YouTube music converter which will help in converting without much effort. Filmora is basically a video editing software that can help you edit videos in various ways. You can edit any of your video projects with ease when using Filmora. In order to convert Youtube to MP3 in iPhone, you can choose iPhone as the target device while exporting. Let’s check out some amazing features of this software. Or you can learn more from Wondershare Video Community .
Key Features:
- Anyone can easily use it for its extremely easy interface and design.
- People can have the delight in various graphical features with this tool such as filters and overlays.
- With this software, one can seamlessly merge multiple videos without compromising quality.
- There are lots of advanced tools associated with Filmora including background blur option, audio mixer, screen splitting, text editing, green screen, speed ramping, and more.
- If you are looking for stunning effects, Filmstocks, NewBlue FX and BorisFX can definitely meet any of your needs.
- 4k videos are also supported via Filmora easily.
2. Freemake Video Downloader
Freemake Video Downloader is a YouTube music converter that allows you to save YouTube videos and MP3s on your iPhone. While converting the videos into MP3s you need to specify the destination device (Export to iPod/iPhone), so that the right format can be set for the same.
Features of this application are –
- You can have the audios exported to iTunes automatically.
- Simple 3 step process to download and save YouTube videos into your iPhone.
3. Any Audio Converter
Any Audio Converter is an online converter and downloader that allows you to convert YouTube videos to MP3 for iPhone to your desired quality, and size of audio files. This YouTube music converter can convert downloaded videos and music to MP3, WAV, and WMA faster with better quality.
Major features of this audio converter are –
- You can download online videos and music from more than 100 sites.
- It helps you to rip and extract audio from CDs and videos.
- It supports audio conversion in multiple formats without compromising the quality.
- You can burn videos to AVCHD DVD or DVD.
- You can edit videos with special effects, clips, or crop effects.
4. Softorino YouTube Converter 2
Softorino YouTube Converter 2 can not only convert YouTube to MP3 for iPhone, but also to MP4 for all iOS devices as well. It is compatible with over 60 top sources.
- With this App, you can access videos, music, and ringtones as well.
- It supports all iOS devices and delivers 4K ultra HD, with subtitles.
- Automatically connects your device to Wi-Fi, and recognizes content automatically for the album
Part 3: FAQs About YouTube to MP3 Converter
1. Can You Convert YouTube Videos to mp3 on iPhone?
Yes, you can. There are numerous YouTube to mp3 convert websites and YouTube audio downloader apps that let you convert YouTube videos to mp3 on your iPhone.
But there are legal issues you need to consider before joining the conversion trend. Technically, it is not illegal to convert a YouTube video to MP3 - but it is illegal to download a copyrighted music video. Moreover, YouTube has stated that stream-ripping violates their Terms of Service, and both YouTube & Google have tried to shut down numerous websites that provide video conversion services.
2. How Can I Save a Song From YouTube to My iPhone?
There are several ways to do that. The legal and recommended method is to get a YouTube Music Premium subscription. This will enable you to download songs from YouTube and save them on your iPhone for offline consumption. The alternative way involves numerous websites and apps that enable you to convert YouTube videos to mp3 and download them on your iPhone. This approach, however, is illegal and should be avoided.
Final Verdict
After going through the list of YouTube music converters in this article, we have found that Filmora is the ultimate solution for all your video download and audio conversion needs. With its matchless features, this App makes your life simple and melodious. However, it is our suggestion, the final call will be yours. We would like to know which was your choice and how was the experience using it. Thanks, readers for having a glance at this post. We hope you are delighted after reading it and finding what you needed.
Ollie Mattison
Ollie Mattison is a writer and a lover of all things video.
Follow @Ollie Mattison
Lighting Tips for Vlogging: How to Light
Lighting Tips for Vlogging: How to Light

Richard Bennett
Mar 27, 2024• Proven solutions
One of the best things you can do for your video quality is to ensure you have great lighting. Viewers find poor lighting distracting and it’s hard for them to see how great your content is if they are busy thinking about why your video is so dark. By creating a great lighting set up you can ensure that the people watching your videos are only thinking about how much they’re enjoying them.
Going outside and using natural light is the cheapest way to get a lot of light for your videos. If your vlog is not suited to the great outdoors then you need to get more strategic. You can turn on all the lights in your living room and still end up with a dark, grainy, video.
Video Lighting Basics: Three Point Lighting

The most common technique of lighting a scene is called three-point lighting. It involves three different sources of light in the shot and is used by portrait photographers, which is also a great method for lighting your vlog.
The brightest source of light is also known as the key light which need to be high quality. A window will work, but if you do not have access to one where you are filming then consider an LED panel light or a softbox light like the ones used in portrait photography.
This first light will create a dramatic shadow across half of your face. You want to reduce this shadow, but not get rid of it completely.
Rather than setting up another light source on the opposite side of the camera, put up a reflector to bounce some light back onto your face. This reflector is called your ‘Fill Light’.
The fill light is less bright than the primary source of light and it is placed on the side opposite to the key light. Its purpose is to reduce shadows produced by the key light and the reflector will need to be mounted on a stand.
The final step to creating three point lighting is to set up another light behind you. This is your ‘Backlight’, and it will help you stand out from your background. Backlight or Hair light is always placed behind and above the subject to create separation between the subject in the shot and the background. This basic lighting technique can be applied in almost every scene you shoot, which is why it is important to keep an open mind and to continue experimenting with possible light setups.
Watch Video! Top Lighting Tips for Vlogging
Lightning Tips for Aspiring YouTube Videographers
Becoming the master of light will take some time and practice, so it is crucial to remain curious and anxious to learn new tricks throughout that process if you want to continually become better. These tips will help you make the first steps on that journey.
1. Focus Your Key Light
Try to focus your Key Light so that it lights only you and not your background. Do this by mounting anything that can cast a shadow onto your Key Light to control the area where the light hits. If you are using a window for your Key Light then you can use a curtain. If you use a softbox light then your light will already be somewhat focused.
2. Use Natural Lighting
The light provided by the Sun is still the best light source, you can have in your video. The trouble is that natural light changes quickly, which makes it highly unpredictable. The best way to deal with this challenge is to come prepared to the set and to get the shot you want as quickly as you can.
3. Try DIY Lightning
Literally, anything from candles to LED light bulbs can serve as a source of light in a shot. You just need to pay attention to the light temperature, because warmer light sources may highlight reds and yellows that can make your footage look less realistic.
4. Use Lightning Kits
This is by far the best option if you want to be in complete control of the light on your set. You can adjust the intensity of the lights, use filters, diffusers and all sorts of other accessories to create the light that flatters the subjects of your videos. The only downside is that you’ll have to spend a considerable amount of money if you want to have a professional lighting kit.
5. Set up reflectors
Sets of reflectors are often under $50, so they are fairly affordable. However, some vloggers choose to forgo purchasing reflectors and make their own out of tinfoil.

If your strong main light is too hard on your eyes then you can use a translucent ‘reflector’ to soften it. Set your translucent reflector, or other screen, up in front of your main light to diffuse it.
If you are hosting a beauty vlog then you might consider a slightly different set up. Instead of having your main light off to one side set it up directly in front of you so your entire face is lit evenly. It is still a good idea to use fill lights in this set up to give you some dimension, and a backlight is even more essential for helping you stand out from the background. The even light hitting your face will also make you look flat if you do not use a backlight.

If you are using all of the lighting options available to you and your video still looks too dark then you can try brightening it by opening up the aperture of your camera lens/setting a lower f-stop. Letting more light into your camera can help your footage look brighter, although you also run the risk of making things look overexposed/ washed out if you are not careful.
If you are stuck shooting in low light conditions it is best to use a lens with a wider aperture/lower f-stop. This will make the best of the light you do have.
Richard Bennett
Richard Bennett is a writer and a lover of all things video.
Follow @Richard Bennett
Richard Bennett
Mar 27, 2024• Proven solutions
One of the best things you can do for your video quality is to ensure you have great lighting. Viewers find poor lighting distracting and it’s hard for them to see how great your content is if they are busy thinking about why your video is so dark. By creating a great lighting set up you can ensure that the people watching your videos are only thinking about how much they’re enjoying them.
Going outside and using natural light is the cheapest way to get a lot of light for your videos. If your vlog is not suited to the great outdoors then you need to get more strategic. You can turn on all the lights in your living room and still end up with a dark, grainy, video.
Video Lighting Basics: Three Point Lighting
The most common technique of lighting a scene is called three-point lighting. It involves three different sources of light in the shot and is used by portrait photographers, which is also a great method for lighting your vlog.
The brightest source of light is also known as the key light which need to be high quality. A window will work, but if you do not have access to one where you are filming then consider an LED panel light or a softbox light like the ones used in portrait photography.
This first light will create a dramatic shadow across half of your face. You want to reduce this shadow, but not get rid of it completely.
Rather than setting up another light source on the opposite side of the camera, put up a reflector to bounce some light back onto your face. This reflector is called your ‘Fill Light’.
The fill light is less bright than the primary source of light and it is placed on the side opposite to the key light. Its purpose is to reduce shadows produced by the key light and the reflector will need to be mounted on a stand.
The final step to creating three point lighting is to set up another light behind you. This is your ‘Backlight’, and it will help you stand out from your background. Backlight or Hair light is always placed behind and above the subject to create separation between the subject in the shot and the background. This basic lighting technique can be applied in almost every scene you shoot, which is why it is important to keep an open mind and to continue experimenting with possible light setups.
Watch Video! Top Lighting Tips for Vlogging
Lightning Tips for Aspiring YouTube Videographers
Becoming the master of light will take some time and practice, so it is crucial to remain curious and anxious to learn new tricks throughout that process if you want to continually become better. These tips will help you make the first steps on that journey.
1. Focus Your Key Light
Try to focus your Key Light so that it lights only you and not your background. Do this by mounting anything that can cast a shadow onto your Key Light to control the area where the light hits. If you are using a window for your Key Light then you can use a curtain. If you use a softbox light then your light will already be somewhat focused.
2. Use Natural Lighting
The light provided by the Sun is still the best light source, you can have in your video. The trouble is that natural light changes quickly, which makes it highly unpredictable. The best way to deal with this challenge is to come prepared to the set and to get the shot you want as quickly as you can.
3. Try DIY Lightning
Literally, anything from candles to LED light bulbs can serve as a source of light in a shot. You just need to pay attention to the light temperature, because warmer light sources may highlight reds and yellows that can make your footage look less realistic.
4. Use Lightning Kits
This is by far the best option if you want to be in complete control of the light on your set. You can adjust the intensity of the lights, use filters, diffusers and all sorts of other accessories to create the light that flatters the subjects of your videos. The only downside is that you’ll have to spend a considerable amount of money if you want to have a professional lighting kit.
5. Set up reflectors
Sets of reflectors are often under $50, so they are fairly affordable. However, some vloggers choose to forgo purchasing reflectors and make their own out of tinfoil.
If your strong main light is too hard on your eyes then you can use a translucent ‘reflector’ to soften it. Set your translucent reflector, or other screen, up in front of your main light to diffuse it.
If you are hosting a beauty vlog then you might consider a slightly different set up. Instead of having your main light off to one side set it up directly in front of you so your entire face is lit evenly. It is still a good idea to use fill lights in this set up to give you some dimension, and a backlight is even more essential for helping you stand out from the background. The even light hitting your face will also make you look flat if you do not use a backlight.
If you are using all of the lighting options available to you and your video still looks too dark then you can try brightening it by opening up the aperture of your camera lens/setting a lower f-stop. Letting more light into your camera can help your footage look brighter, although you also run the risk of making things look overexposed/ washed out if you are not careful.
If you are stuck shooting in low light conditions it is best to use a lens with a wider aperture/lower f-stop. This will make the best of the light you do have.
Richard Bennett
Richard Bennett is a writer and a lover of all things video.
Follow @Richard Bennett
Also read:
- [New] Complete Walkthrough to Grab YouTube Playlists
- [New] Elevate Your Mobile Surfing with These Top 7 Blockers
- [Updated] Crafting a YouTube Video Essential Writing Guide for 2024
- [Updated] In 2024, Unveiling Horizon-Based Approaches to Post on IGTV
- [Updated] Your Online Identity Unlocked Establishing a New YouTube Chanel Today for 2024
- 2024 Approved Ad-Based Revenue Tracking for YouTubers' Success
- In 2024, Oculus Favorites The 8 Highest-Selling Games
- In 2024, Top 9 Nokia C300 Monitoring Apps for Parental Controls | Dr.fone
- Mastering Technology with Tom's Electronic Insights
- Navigating the Art of Film Making on Facebook for 2024
- Perfecting Audio on iPhone Select the Best 6 Free Software Choices
- The Ultimate Guide to Get the Rare Candy on Pokemon Go Fire Red On Realme C33 2023 | Dr.fone
- Top 9 Innovativi Tipi Di Animation Design Da Non Perdere
- Visual Producer Hub
- Writing for Impact A Compreenas Guide to YouTube Video Storytelling
- Title: [Updated] Essential Free Tools Convert YouTube Audio to MP3 on iPhone
- Author: Kevin
- Created at : 2024-11-11 19:07:51
- Updated at : 2024-11-15 13:21:44
- Link: https://youtube-videos.techidaily.com/updated-essential-free-tools-convert-youtube-audio-to-mp3-on-iphone/
- License: This work is licensed under CC BY-NC-SA 4.0.