![[Updated] Enhancing YouTube Visibility with TubeBuddy](https://thmb.techidaily.com/d28e7047daab181b2a6cda74108f4cb993066496eb332810c3bf1138a8452ea4.jpg)
[Updated] Enhancing YouTube Visibility with TubeBuddy
Enhancing YouTube Visibility with TubeBuddy
The Benefits of TubeBuddy | Manage Your YouTube Channel More Easily

Richard Bennett
Nov 01, 2022• Proven solutions
TubeBuddy is a YouTube certified extension for your Google Chrome browser. When you visit YouTube after installing TubeBuddy a whole new set of useful tools becomes available.
TubeBuddy’s tools were designed to save you time and effort when performing some of the more mundane tasks involved in running a YouTube channel, like adding cards. Many of TubeBuddy’s tools are completely free to use, but others might require a paid license. There are three levels of licensing: $9, $19, or $39 per month.
The Benefits of Using TubeBuddy for YouTube
- Increased Productivity
- Bulk Tools for Annotations, Cards, Thumbnails and More
- Quick Optimization for Your Video’s Tags
- Useful Data
Benefits of TubeBuddy
YouTubers who use TubeBuddy are able to spend less time on busy-work and more time on coming up with creative video ideas. Here are some of the ways TubeBuddy can help you, especially if you have a large or mid-sized channel:
1. Increased Productivity
Most of TubeBuddy’s Productivity Tools are available for free, but some require a $9 per month Pro license.
You can use these tools to get your videos ready for posting faster, embed them off-YouTube more easily, and save time by creating canned responses or templates for cards and annotations.
For example, you might find yourself creating the same YouTube Card over and over again to include it in every video you make. Creating a template through TubeBuddy will save you this effort.
Another great productivity tool is the Video Topic Planner. You can save video ideas you come up with, or ideas viewers have suggested to you, and arrange them in a queue so you never forget what you are planning to make next.
2. Bulk Tools for Annotations, Cards, Thumbnails and More
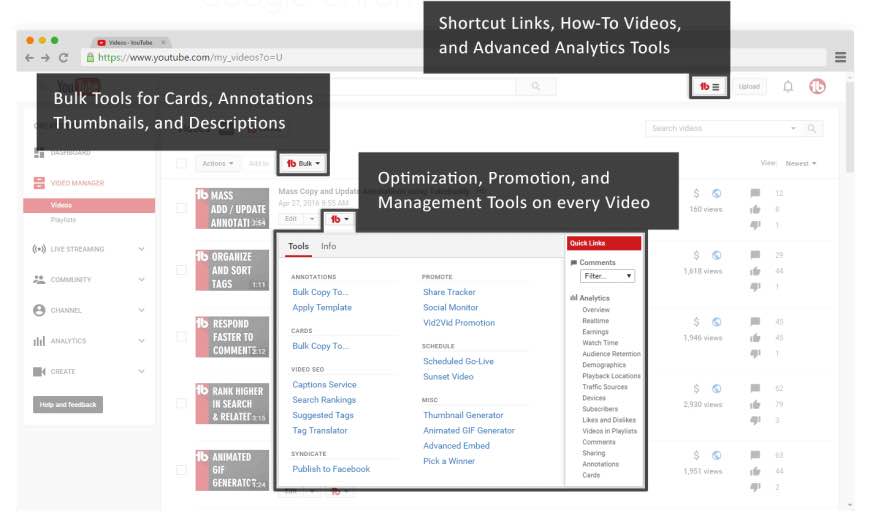
Most of TubeBuddy’s bulk processing tools require a $19 per month Star license.
Two of the most time-saving tools in this section are the Bulk Copy tools for cards and annotations. They will save you from having to recreate the same ones over and over. Then, using the Bulk Update tools, you will be able to make changes to all of your cards or annotations at once.
For example: if you use a YouTube Card to link to your personal website and include it in every video, and then you change your website, you change the link in all of your existing cards at once.
Another useful Bulk tool is Bulk Thumbnail Overlays, which will allow you to add a logo to all of your existing video thumbnails at once.
3. Quick Optimization for Your Video’s Tags
The SEO Tools in TubeBuddy will help you find the best tags for your videos and suggest tags you might want to target. Many of these tools are free, but others require a $19 Star license.
One of the best free tools in this category is View and Copy Video Tags. It allows you to see and copy the tags of other people’s videos. You will be able to see which keywords your competitors are targeting (and look for opportunities to target them more effectively). This can also save you a lot of time writing out tags that should really be the same as the ones on an existing video.
4. Useful Data
The most useful piece of data under Data and Research Tools is the Best Time to Publish. How many views you get on a video could vary greatly depending on when you post, and the best times to post vary depending on the demographics of your audience. This free tool from TubeBuddy will show you when you should be uploading.
Another interesting tool, which is unfortunately only available with $39 licenses, is the Competitor Scoreboard. It allows creators to compare their channels stats to those of their rival channels.
Have you ever tried TubeBuddy for YouTube?
Richard Bennett
Richard Bennett is a writer and a lover of all things video.
Follow @Richard Bennett
Richard Bennett
Nov 01, 2022• Proven solutions
TubeBuddy is a YouTube certified extension for your Google Chrome browser. When you visit YouTube after installing TubeBuddy a whole new set of useful tools becomes available.
TubeBuddy’s tools were designed to save you time and effort when performing some of the more mundane tasks involved in running a YouTube channel, like adding cards. Many of TubeBuddy’s tools are completely free to use, but others might require a paid license. There are three levels of licensing: $9, $19, or $39 per month.
The Benefits of Using TubeBuddy for YouTube
- Increased Productivity
- Bulk Tools for Annotations, Cards, Thumbnails and More
- Quick Optimization for Your Video’s Tags
- Useful Data
Benefits of TubeBuddy
YouTubers who use TubeBuddy are able to spend less time on busy-work and more time on coming up with creative video ideas. Here are some of the ways TubeBuddy can help you, especially if you have a large or mid-sized channel:
1. Increased Productivity
Most of TubeBuddy’s Productivity Tools are available for free, but some require a $9 per month Pro license.
You can use these tools to get your videos ready for posting faster, embed them off-YouTube more easily, and save time by creating canned responses or templates for cards and annotations.
For example, you might find yourself creating the same YouTube Card over and over again to include it in every video you make. Creating a template through TubeBuddy will save you this effort.
Another great productivity tool is the Video Topic Planner. You can save video ideas you come up with, or ideas viewers have suggested to you, and arrange them in a queue so you never forget what you are planning to make next.
2. Bulk Tools for Annotations, Cards, Thumbnails and More
Most of TubeBuddy’s bulk processing tools require a $19 per month Star license.
Two of the most time-saving tools in this section are the Bulk Copy tools for cards and annotations. They will save you from having to recreate the same ones over and over. Then, using the Bulk Update tools, you will be able to make changes to all of your cards or annotations at once.
For example: if you use a YouTube Card to link to your personal website and include it in every video, and then you change your website, you change the link in all of your existing cards at once.
Another useful Bulk tool is Bulk Thumbnail Overlays, which will allow you to add a logo to all of your existing video thumbnails at once.
3. Quick Optimization for Your Video’s Tags
The SEO Tools in TubeBuddy will help you find the best tags for your videos and suggest tags you might want to target. Many of these tools are free, but others require a $19 Star license.
One of the best free tools in this category is View and Copy Video Tags. It allows you to see and copy the tags of other people’s videos. You will be able to see which keywords your competitors are targeting (and look for opportunities to target them more effectively). This can also save you a lot of time writing out tags that should really be the same as the ones on an existing video.
4. Useful Data
The most useful piece of data under Data and Research Tools is the Best Time to Publish. How many views you get on a video could vary greatly depending on when you post, and the best times to post vary depending on the demographics of your audience. This free tool from TubeBuddy will show you when you should be uploading.
Another interesting tool, which is unfortunately only available with $39 licenses, is the Competitor Scoreboard. It allows creators to compare their channels stats to those of their rival channels.
Have you ever tried TubeBuddy for YouTube?
Richard Bennett
Richard Bennett is a writer and a lover of all things video.
Follow @Richard Bennett
Cutting-Edge Tips: Designing Immersive Educational Videos for Online Learning
Easy Ways to Make a Great Educational Video for YouTube

Marion Dubois
Oct 26, 2023• Proven solutions
YouTube is an app that makes it easy for teachers to carry out their work efficiently and conveniently. A teacher should start a YouTube channel because it is beneficial to their students and themselves. The materials or content dished on these channels helps give lessons and instructions in the absence of the teacher, give a detailed explanation and trigger the students’ interest.
Also, it archives all the lessons for a long time and makes them easily accessible by both the present, past, and future students. Students can quickly go back for a review for upcoming exams. Through feedbacks or comments, teachers can provide answers to students with the problem of clarity.
A teacher needs to know what an educational video is, what makes an excellent educational video, and how to make an educational video for YouTube before opening a YouTube channel. Now, let’s delve into it!
Part 1. What’s an Educational Video?
From the name “educational video,” you can coin out that it is a video made for the sole purpose of educating or passing out knowledge for the sake of learning. The primary purpose of these videos is to teach an audience about a particular problem or important topics they want to learn about.
Sometimes brands use this method to advertise their brand while being a source of information.

Part 2. What Makes a Good Educational Video?
An excellent educational video aids the learning process. It triggers learners in analyzing and evaluating concepts provided by the video. Videos are great educational tools that most teachers must adopt due to their role in facilitating the learning process.
To make a good educational video, you should keep the following points in mind:
- Keep your students engaged
An excellent educational video should be eye catchy and exciting to get your student’s undivided attention. You can achieve it in any way, one of which is that you need to put yourself into the teaching mode, which means that you should give out the impression of your excitement for the course content you are talking about. Ask them questions, let them feel involved in the process. Please don’t go ahead talking with a cold tune. It makes them tired of listening or seeing the video.
- Be sure to maintain a right-size of video length
It’s better shorter than longer. Have you ever seen a boring, long movie? It’s almost the same feeling you get seeing a long educational video.
The video should be straightforward to leverage the advantage of this form of learning. One needs to make this video of the right size for easy assimilation by the learner. Depending on the course topic, your video can be between 2 - 20 minutes long.
Most importantly, don’t try to do much and use more straightforward, understandable concepts.
- Stay focused
Making your videos focused and not running around many things helps it pass the information that plays a good role in video length management and engagement. Videos that try to divert from the topic may end up not hitting the nail on the head and not accomplishing their purpose.
- Center your interest on the student’s needs
Any educational content should be centered to meet the needs of the students. That goes beyond creating content, but covers the entirety of satisfying the needs of your learners.
Part 3. How to Make a Great Educational Video for YouTube?
The best and most recommendable video maker for making a great educational video is Wondershare Filmora.It is a video maker that enables you to create videos with effects like transition, filters, motion elements, and titles on your video.
Color grading and speed control of each clip on your video are possible using Filmora. You can apply other features like screen record, split-screen options, audio ducking, keyframing, motion tracking and more with an easy-to-use interface to fit the student’s interest.


To make a great educational video for YouTube, you can achieve this using Filmora. Follow the steps below.
Step 1. Launch Filmora and select the aspect ratio
Launch Filmora by double-clicking on the icon, and start working on a new project by selecting project aspect ratio.
Step 2. Create a new project and import footage
Click the “New Project” icon on the program’s welcome screen and wait for some time for the editor to load.
Then, move to choose your desired aspect ratio and click on the import footage icon located at the left corner of the video editor.
Step 3. Organize your project material
At the bottom of the “My Project” tab, click on “add a new folder”. In that new folder, arrange the footage alphabetically. This reduces time spent browsing files and increases efficiency.
Step 4. Preview and edit your video
Press the play icon to preview the video clip. Trim your video clip to the desired video size by dragging the end of the video clip left or right.
Then add customized text and add effects to the video if needed. An amazing effect can be added to each clip of the video to create an outstanding video.
Step 5. Export and share the video
When you’re okay with the already made video, click the Export button. Choose the YouTube option to upload it easily from the Filmora program.
Conclusion
Without a doubt, the process of creating an educational video requires that you pay attention to some things to create an excellent educational video that achieves the learning goal. Once you’ve learned what it means to make an educational video, how to go about it wouldn’t be something to worry about.
Thus, with the steps mentioned above, how to make a great educational video for YouTube has been answered. Now, you can go ahead and make amazing educational videos by yourself.
Marion Dubois
Marion Dubois is a writer and a lover of all things video.
Follow @Marion Dubois
Marion Dubois
Oct 26, 2023• Proven solutions
YouTube is an app that makes it easy for teachers to carry out their work efficiently and conveniently. A teacher should start a YouTube channel because it is beneficial to their students and themselves. The materials or content dished on these channels helps give lessons and instructions in the absence of the teacher, give a detailed explanation and trigger the students’ interest.
Also, it archives all the lessons for a long time and makes them easily accessible by both the present, past, and future students. Students can quickly go back for a review for upcoming exams. Through feedbacks or comments, teachers can provide answers to students with the problem of clarity.
A teacher needs to know what an educational video is, what makes an excellent educational video, and how to make an educational video for YouTube before opening a YouTube channel. Now, let’s delve into it!
Part 1. What’s an Educational Video?
From the name “educational video,” you can coin out that it is a video made for the sole purpose of educating or passing out knowledge for the sake of learning. The primary purpose of these videos is to teach an audience about a particular problem or important topics they want to learn about.
Sometimes brands use this method to advertise their brand while being a source of information.
Part 2. What Makes a Good Educational Video?
An excellent educational video aids the learning process. It triggers learners in analyzing and evaluating concepts provided by the video. Videos are great educational tools that most teachers must adopt due to their role in facilitating the learning process.
To make a good educational video, you should keep the following points in mind:
- Keep your students engaged
An excellent educational video should be eye catchy and exciting to get your student’s undivided attention. You can achieve it in any way, one of which is that you need to put yourself into the teaching mode, which means that you should give out the impression of your excitement for the course content you are talking about. Ask them questions, let them feel involved in the process. Please don’t go ahead talking with a cold tune. It makes them tired of listening or seeing the video.
- Be sure to maintain a right-size of video length
It’s better shorter than longer. Have you ever seen a boring, long movie? It’s almost the same feeling you get seeing a long educational video.
The video should be straightforward to leverage the advantage of this form of learning. One needs to make this video of the right size for easy assimilation by the learner. Depending on the course topic, your video can be between 2 - 20 minutes long.
Most importantly, don’t try to do much and use more straightforward, understandable concepts.
- Stay focused
Making your videos focused and not running around many things helps it pass the information that plays a good role in video length management and engagement. Videos that try to divert from the topic may end up not hitting the nail on the head and not accomplishing their purpose.
- Center your interest on the student’s needs
Any educational content should be centered to meet the needs of the students. That goes beyond creating content, but covers the entirety of satisfying the needs of your learners.
Part 3. How to Make a Great Educational Video for YouTube?
The best and most recommendable video maker for making a great educational video is Wondershare Filmora.It is a video maker that enables you to create videos with effects like transition, filters, motion elements, and titles on your video.
Color grading and speed control of each clip on your video are possible using Filmora. You can apply other features like screen record, split-screen options, audio ducking, keyframing, motion tracking and more with an easy-to-use interface to fit the student’s interest.
To make a great educational video for YouTube, you can achieve this using Filmora. Follow the steps below.
Step 1. Launch Filmora and select the aspect ratio
Launch Filmora by double-clicking on the icon, and start working on a new project by selecting project aspect ratio.
Step 2. Create a new project and import footage
Click the “New Project” icon on the program’s welcome screen and wait for some time for the editor to load.
Then, move to choose your desired aspect ratio and click on the import footage icon located at the left corner of the video editor.
Step 3. Organize your project material
At the bottom of the “My Project” tab, click on “add a new folder”. In that new folder, arrange the footage alphabetically. This reduces time spent browsing files and increases efficiency.
Step 4. Preview and edit your video
Press the play icon to preview the video clip. Trim your video clip to the desired video size by dragging the end of the video clip left or right.
Then add customized text and add effects to the video if needed. An amazing effect can be added to each clip of the video to create an outstanding video.
Step 5. Export and share the video
When you’re okay with the already made video, click the Export button. Choose the YouTube option to upload it easily from the Filmora program.
Conclusion
Without a doubt, the process of creating an educational video requires that you pay attention to some things to create an excellent educational video that achieves the learning goal. Once you’ve learned what it means to make an educational video, how to go about it wouldn’t be something to worry about.
Thus, with the steps mentioned above, how to make a great educational video for YouTube has been answered. Now, you can go ahead and make amazing educational videos by yourself.
Marion Dubois
Marion Dubois is a writer and a lover of all things video.
Follow @Marion Dubois
Also read:
- [New] Behind-the-Scenes Filmmaking Tips From YouTube Experts
- [New] Creating Engaging Stream Content Shorts
- [New] Discover the 7 Most Wanted Apps to Boost Your YouTube LIVE Quality
- [Updated] In 2024, Exploring Remote-Piloted Vehicles Their Inner Workings
- Advanced Techniques for YouTube Card Use for 2024
- Best Microphones Ranked Perfect Companions for 4K Cinematography
- Decoding YouTube Stats Efficiency with Social Blade's Advanced Analysis for 2024
- Fixing the Issue: Improper Installation of Ryzen Master Drivers
- In 2024, The 6 Best SIM Unlock Services That Actually Work On Your Motorola Razr 40 Ultra Device
- In 2024, Understanding IP in Instagram Rhythms
- In 2024, Unlocking High-Quality Video Sequences via GoPro's Burst
- Kickstart Your Earnings with Periscope Strategies
- YouTube Enhancement The Art of Background Blur
- Title: [Updated] Enhancing YouTube Visibility with TubeBuddy
- Author: Kevin
- Created at : 2024-11-12 00:13:53
- Updated at : 2024-11-15 04:37:32
- Link: https://youtube-videos.techidaily.com/updated-enhancing-youtube-visibility-with-tubebuddy/
- License: This work is licensed under CC BY-NC-SA 4.0.