![[Updated] Enhancing Video Quality Editing Tips for Published Content](https://thmb.techidaily.com/1da8846cbd836d9712f7b59a73630f863ec9ad2fa528ea4ddf23335f3fc8b9a6.png)
"[Updated] Enhancing Video Quality Editing Tips for Published Content"
Enhancing Video Quality: Editing Tips for Published Content
How to Edit Uploaded/ Published YouTube Videos

Richard Bennett
Mar 27, 2024• Proven solutions
YouTube Video Editor gives you the capacity to edit your video straight from the YouTube platform; these include videos that has already been published or shared. In the first part, we’re going to teach you how to edit your published YouTube videos without losing video ID and URL, in the second part, we offer an advanced video editing tips for edit published videos.
Note: From 20th September 2017 users will no longer be able to use the complimentary editing suite. Check the best YouTube video editor alternatives from this complete guide.
If you want to hide or remove some videos of your or other people’s YouTube channel, you can check this article.
Simply want to do all the stuff on your phone? check this out.
Advanced Tips to Edit Uploaded/ Published YouTube Videos
It is true that YouTube Editor provides us a handy platform that allows us to edit existing YouTube videos in an efficient ways. However, the tools they provide are too basic. If you want to perform a more complex editing, you will need an offline editor such as Windows Movie Maker, iMovei or Adobe Premiere. But if you are looking for an simple while powerful tool, we highly recommend Wondershare Filmora . It is highly compatible with different image, audio, and video format. It is just as simple as importing the video and editing them.
The downside, however, is that you will lose the original ID of the video. This may serve as a problem if you have already shared the video before since the views may disappear. A good solution to this problem is to place an annotation to the old video telling your followers that you have created a better quality of the video then direct them to the link.
Check how to engage your audience to stay tuned from this video below:


Edit Existing YouTube Videos
Let me walk you through a familiar situation, you spend all night trying to make your video perfect, uploaded it on your YouTube channel and shred it to your social media accounts. Then you noticed that you need to repair something. The normal approach back then is to delete the video, re-edit using offline tools and then re-upload it again. Clearly, this process takes too much time. Furthermore, it changes the ID of your video which means that the previous embed will no longer work.
Note: Under this situation, you can’t add more footage or effects to the existing videos.
1. Sigin in
The first thing you need to do to edit uploaded/published YouTube videos is to sign-in with your Google account.

2. Locate the video you want to edit
After signing-in, you now have the option to view all your uploaded videos. Go My Channel > Choose YouTube Studio (it’s a beta version right now).

Click the “Videos” button, and you will see all your uploaded videos here. Choose the one you want to edit

3. Edit YouTube videos
Click on the video you want to edit, and you can see all the info about this video, including title, description, visibility, etc. Choose “Editor” at the left side of the interface, and you will be led to the YouTube video editor’s interface, You can now trim the existing YouTube video by dragging the sliders on the timeline.

4. Save
After you are happy with your edited video, you can now click save.
Note: In case you are not happy with the video that you edited, you can always revert back to your original video. Videos with more than 1,000 views will be saved as a new video after the editing. You may also add notes and annotation to your Videos. This annotation may appear alongside with the video depending on the time that you want it to appear.
Related article: How to add annotation to your YouTube video
Richard Bennett
Richard Bennett is a writer and a lover of all things video.
Follow @Richard Bennett
Richard Bennett
Mar 27, 2024• Proven solutions
YouTube Video Editor gives you the capacity to edit your video straight from the YouTube platform; these include videos that has already been published or shared. In the first part, we’re going to teach you how to edit your published YouTube videos without losing video ID and URL, in the second part, we offer an advanced video editing tips for edit published videos.
Note: From 20th September 2017 users will no longer be able to use the complimentary editing suite. Check the best YouTube video editor alternatives from this complete guide.
If you want to hide or remove some videos of your or other people’s YouTube channel, you can check this article.
Simply want to do all the stuff on your phone? check this out.
Advanced Tips to Edit Uploaded/ Published YouTube Videos
It is true that YouTube Editor provides us a handy platform that allows us to edit existing YouTube videos in an efficient ways. However, the tools they provide are too basic. If you want to perform a more complex editing, you will need an offline editor such as Windows Movie Maker, iMovei or Adobe Premiere. But if you are looking for an simple while powerful tool, we highly recommend Wondershare Filmora . It is highly compatible with different image, audio, and video format. It is just as simple as importing the video and editing them.
The downside, however, is that you will lose the original ID of the video. This may serve as a problem if you have already shared the video before since the views may disappear. A good solution to this problem is to place an annotation to the old video telling your followers that you have created a better quality of the video then direct them to the link.
Check how to engage your audience to stay tuned from this video below:
Edit Existing YouTube Videos
Let me walk you through a familiar situation, you spend all night trying to make your video perfect, uploaded it on your YouTube channel and shred it to your social media accounts. Then you noticed that you need to repair something. The normal approach back then is to delete the video, re-edit using offline tools and then re-upload it again. Clearly, this process takes too much time. Furthermore, it changes the ID of your video which means that the previous embed will no longer work.
Note: Under this situation, you can’t add more footage or effects to the existing videos.
1. Sigin in
The first thing you need to do to edit uploaded/published YouTube videos is to sign-in with your Google account.
2. Locate the video you want to edit
After signing-in, you now have the option to view all your uploaded videos. Go My Channel > Choose YouTube Studio (it’s a beta version right now).
Click the “Videos” button, and you will see all your uploaded videos here. Choose the one you want to edit
3. Edit YouTube videos
Click on the video you want to edit, and you can see all the info about this video, including title, description, visibility, etc. Choose “Editor” at the left side of the interface, and you will be led to the YouTube video editor’s interface, You can now trim the existing YouTube video by dragging the sliders on the timeline.
4. Save
After you are happy with your edited video, you can now click save.
Note: In case you are not happy with the video that you edited, you can always revert back to your original video. Videos with more than 1,000 views will be saved as a new video after the editing. You may also add notes and annotation to your Videos. This annotation may appear alongside with the video depending on the time that you want it to appear.
Related article: How to add annotation to your YouTube video
Richard Bennett
Richard Bennett is a writer and a lover of all things video.
Follow @Richard Bennett
Richard Bennett
Mar 27, 2024• Proven solutions
YouTube Video Editor gives you the capacity to edit your video straight from the YouTube platform; these include videos that has already been published or shared. In the first part, we’re going to teach you how to edit your published YouTube videos without losing video ID and URL, in the second part, we offer an advanced video editing tips for edit published videos.
Note: From 20th September 2017 users will no longer be able to use the complimentary editing suite. Check the best YouTube video editor alternatives from this complete guide.
If you want to hide or remove some videos of your or other people’s YouTube channel, you can check this article.
Simply want to do all the stuff on your phone? check this out.
Advanced Tips to Edit Uploaded/ Published YouTube Videos
It is true that YouTube Editor provides us a handy platform that allows us to edit existing YouTube videos in an efficient ways. However, the tools they provide are too basic. If you want to perform a more complex editing, you will need an offline editor such as Windows Movie Maker, iMovei or Adobe Premiere. But if you are looking for an simple while powerful tool, we highly recommend Wondershare Filmora . It is highly compatible with different image, audio, and video format. It is just as simple as importing the video and editing them.
The downside, however, is that you will lose the original ID of the video. This may serve as a problem if you have already shared the video before since the views may disappear. A good solution to this problem is to place an annotation to the old video telling your followers that you have created a better quality of the video then direct them to the link.
Check how to engage your audience to stay tuned from this video below:
Edit Existing YouTube Videos
Let me walk you through a familiar situation, you spend all night trying to make your video perfect, uploaded it on your YouTube channel and shred it to your social media accounts. Then you noticed that you need to repair something. The normal approach back then is to delete the video, re-edit using offline tools and then re-upload it again. Clearly, this process takes too much time. Furthermore, it changes the ID of your video which means that the previous embed will no longer work.
Note: Under this situation, you can’t add more footage or effects to the existing videos.
1. Sigin in
The first thing you need to do to edit uploaded/published YouTube videos is to sign-in with your Google account.
2. Locate the video you want to edit
After signing-in, you now have the option to view all your uploaded videos. Go My Channel > Choose YouTube Studio (it’s a beta version right now).
Click the “Videos” button, and you will see all your uploaded videos here. Choose the one you want to edit
3. Edit YouTube videos
Click on the video you want to edit, and you can see all the info about this video, including title, description, visibility, etc. Choose “Editor” at the left side of the interface, and you will be led to the YouTube video editor’s interface, You can now trim the existing YouTube video by dragging the sliders on the timeline.
4. Save
After you are happy with your edited video, you can now click save.
Note: In case you are not happy with the video that you edited, you can always revert back to your original video. Videos with more than 1,000 views will be saved as a new video after the editing. You may also add notes and annotation to your Videos. This annotation may appear alongside with the video depending on the time that you want it to appear.
Related article: How to add annotation to your YouTube video
Richard Bennett
Richard Bennett is a writer and a lover of all things video.
Follow @Richard Bennett
The Art of Multi-Platform Broadcasting in the Digital Age
How to Stream to YouTube, Facebook, Twitch and Over 30 Platforms
Richard Bennett
Mar 27, 2024• Proven solutions
- Part1.How to Stream to YouTube, Twitch, Hitbox and other Platforms at the same time?
- Part2.How to Stream to YouTube and Facebook at the same time Without Restream Platform?
- Part3.About Restream.io
How to Stream to YouTube, Twitch, Hitbox and other Platforms at the same time?
Step 1: To begin with the process, first of all you need to go to <https://restream.io/ >. Sign up here and login with your account.
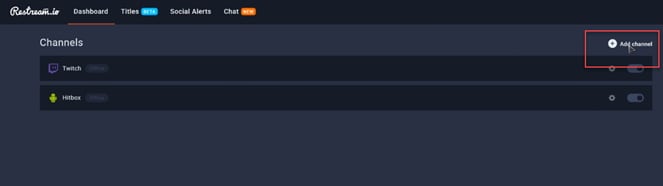
Step 2: Now go to the dashboard and simply add your channel.
Step 3: Here you will find so many streaming platforms like YouTube, uStream, Dailymotion, HitBox etc.
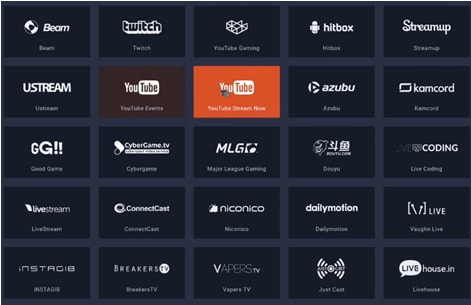
Step 4: Select your desired platform out of this wide list and then sign in.

Step 5: The screen will proceed with simple to follow steps; go with specified instructions and sign in to your desired streaming platform.
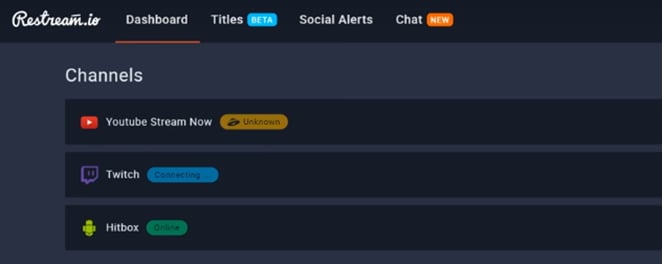
Step 6: Now you can easily turn On-Off your channels for streaming.
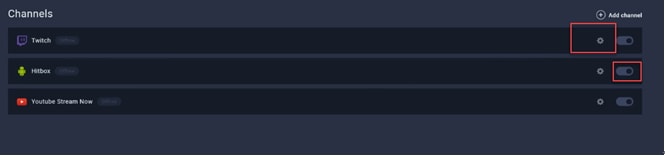
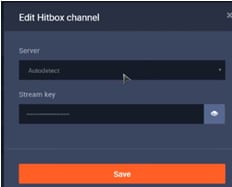
Step 7: It is time to edit your channel.
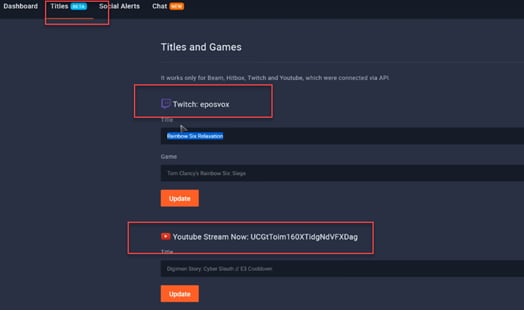
Step 8: Now put eye catching title for your live stream.
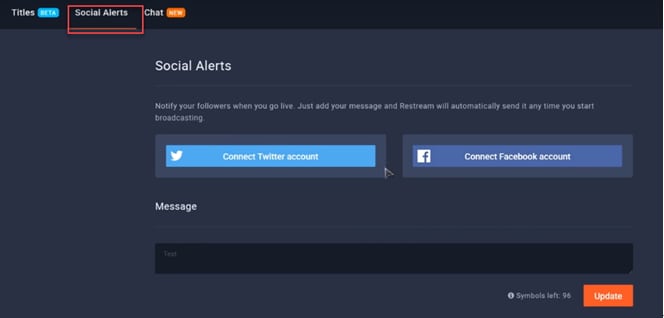
Step 9: This platform also allow users to get connected to their SNS account for the social alerts.
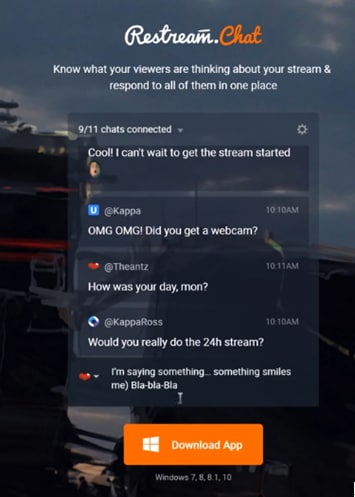
Step 10: Users can also manage their chats using interactive chat tools.
Step 11: Once you are done with all above settings on restream.io then it is time to start with streaming software. Professionals recommend using OBS, Wirecast or xSplit for best results and easy interface.

Step 12: Let us considered OBS for current restream.io services.
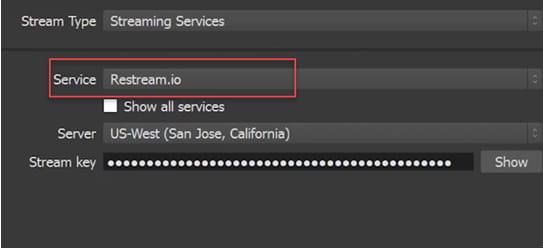
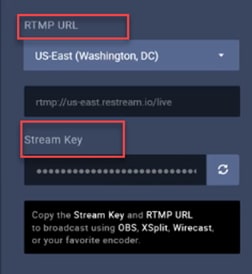
Step 13: Now simply copy your RTMP URL as well as the stream key from restream.io platform and paste it in the specified field on streaming software.
Step 14: As soon as you finished these settings then hit the Stream Button. Soon you will be able to find your videos on selected live stream platforms.
How to Stream to YouTube and Facebook at the same time Without Restream Platform?
Step 1: First of all you need to download Wirecast software tool on your device. Choose anyone from Wirecast Studio and Wirecast Pro as per your budget and needs. Get it installed.
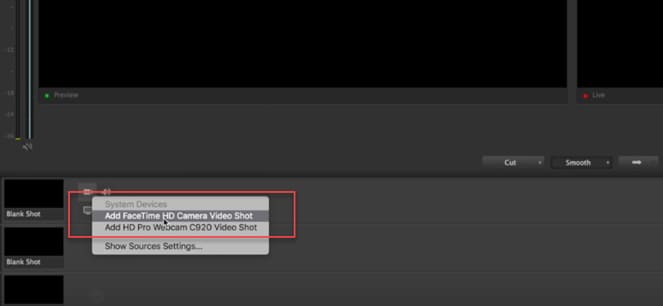
Step 2: Launch wirecast on your system and then add your camera.
Step 3: Once you have added your camera to this tool then simply hit the Go Live button.
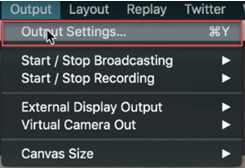
Step 4: Move to Output and adjust settings.
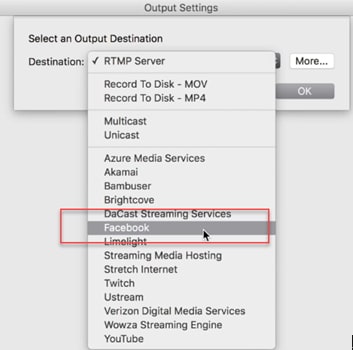
Step 5: From the drop down menu appearing on screen, choose Facebook as your destination.
Step 6: It is time to enter name and then click on Authenticate.
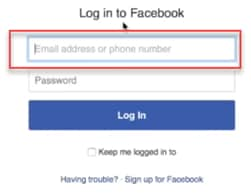
Step 7: You need to login to facebook now.

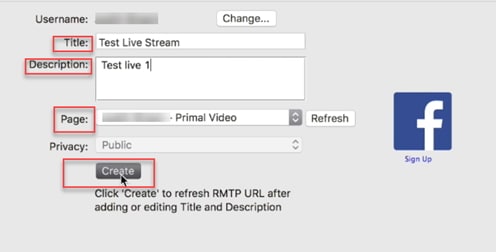
Step 8: Add your live stream title and an eye catching description.
Step 9: Select page for streaming and then hit the Create button.
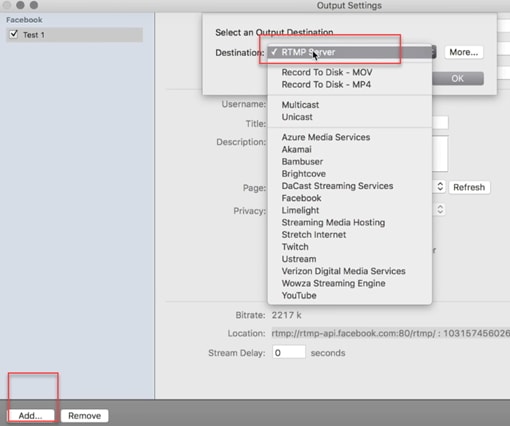
Step 10: As soon as your facebook stream is developed, then go to bottom left corner of your screen and then click add. Create another live stream but instead of choosing YouTube as your preferences, select RTMP.
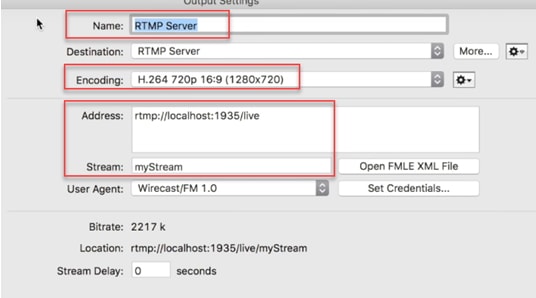
Step 11: Now add name for your YouTube stream and adjust the encoding quality to 720p. After this you need to move to YouTube and get your stream name as well as address from this platform.
Step 12: Move to YouTube creator studio and then select live streaming. Choose live stream now option and then find encoder setup.

Step 13: It is time to copy the server URL and paste it on Wirecast address. Also copy the stream name and paste it on Wirecast platform.
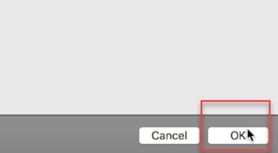
Step 14: Once all these settings are complete then hit OK.
Step 15: Now click Stream button on Wirecast platform.

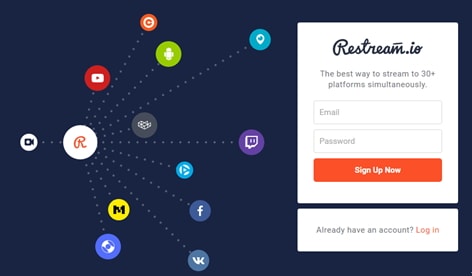
About Restream.io
Restream.io allows streaming over 30 plus platforms with easy processing and intuitive interface. The best thing to know about this platform is that it never creates watermarks or pre-roll ads and there is no specific limit or restriction for stream duration. It not even forces users on specific bitrate limits. In simple words, here users can work with freedom and enjoy streaming with best results.
Restream Chats are highly interactive where users can add interesting imojies to grab more attention. It can be accessed on Window platform with all interactive features.
Richard Bennett
Richard Bennett is a writer and a lover of all things video.
Follow @Richard Bennett
Richard Bennett
Mar 27, 2024• Proven solutions
- Part1.How to Stream to YouTube, Twitch, Hitbox and other Platforms at the same time?
- Part2.How to Stream to YouTube and Facebook at the same time Without Restream Platform?
- Part3.About Restream.io
How to Stream to YouTube, Twitch, Hitbox and other Platforms at the same time?
Step 1: To begin with the process, first of all you need to go to <https://restream.io/ >. Sign up here and login with your account.
Step 2: Now go to the dashboard and simply add your channel.
Step 3: Here you will find so many streaming platforms like YouTube, uStream, Dailymotion, HitBox etc.
Step 4: Select your desired platform out of this wide list and then sign in.
Step 5: The screen will proceed with simple to follow steps; go with specified instructions and sign in to your desired streaming platform.
Step 6: Now you can easily turn On-Off your channels for streaming.
Step 7: It is time to edit your channel.
Step 8: Now put eye catching title for your live stream.
Step 9: This platform also allow users to get connected to their SNS account for the social alerts.
Step 10: Users can also manage their chats using interactive chat tools.
Step 11: Once you are done with all above settings on restream.io then it is time to start with streaming software. Professionals recommend using OBS, Wirecast or xSplit for best results and easy interface.
Step 12: Let us considered OBS for current restream.io services.
Step 13: Now simply copy your RTMP URL as well as the stream key from restream.io platform and paste it in the specified field on streaming software.
Step 14: As soon as you finished these settings then hit the Stream Button. Soon you will be able to find your videos on selected live stream platforms.
How to Stream to YouTube and Facebook at the same time Without Restream Platform?
Step 1: First of all you need to download Wirecast software tool on your device. Choose anyone from Wirecast Studio and Wirecast Pro as per your budget and needs. Get it installed.
Step 2: Launch wirecast on your system and then add your camera.
Step 3: Once you have added your camera to this tool then simply hit the Go Live button.
Step 4: Move to Output and adjust settings.
Step 5: From the drop down menu appearing on screen, choose Facebook as your destination.
Step 6: It is time to enter name and then click on Authenticate.
Step 7: You need to login to facebook now.
Step 8: Add your live stream title and an eye catching description.
Step 9: Select page for streaming and then hit the Create button.
Step 10: As soon as your facebook stream is developed, then go to bottom left corner of your screen and then click add. Create another live stream but instead of choosing YouTube as your preferences, select RTMP.
Step 11: Now add name for your YouTube stream and adjust the encoding quality to 720p. After this you need to move to YouTube and get your stream name as well as address from this platform.
Step 12: Move to YouTube creator studio and then select live streaming. Choose live stream now option and then find encoder setup.
Step 13: It is time to copy the server URL and paste it on Wirecast address. Also copy the stream name and paste it on Wirecast platform.
Step 14: Once all these settings are complete then hit OK.
Step 15: Now click Stream button on Wirecast platform.
About Restream.io
Restream.io allows streaming over 30 plus platforms with easy processing and intuitive interface. The best thing to know about this platform is that it never creates watermarks or pre-roll ads and there is no specific limit or restriction for stream duration. It not even forces users on specific bitrate limits. In simple words, here users can work with freedom and enjoy streaming with best results.
Restream Chats are highly interactive where users can add interesting imojies to grab more attention. It can be accessed on Window platform with all interactive features.
Richard Bennett
Richard Bennett is a writer and a lover of all things video.
Follow @Richard Bennett
Also read:
- [New] Amplify Your Channel Effortless Tactics for More Views
- [New] Perfecting Windows 11 Photos Implement Filters and Playlist Features for 2024
- [New] YouTube Monetization Does YouTube Pay Monthly?
- 2024 Approved Assessing Photoshop Sway Reduction A Necessity Debate?
- Customize Video Speed to Match Your Desired Watch Time
- De Beste Methoden Om Standaard Pakketten Uptade Te Ontsnappen in Windows 11
- Elevate Your Video's Impact with Customizable YouTube Thumbnails for 2024
- Expedite YouTube Video Submission Rapid Rendering Secrets
- In 2024, How to Migrate Android Data From Nokia G22 to New Android Phone? | Dr.fone
- In 2024, Pokemon Go Error 12 Failed to Detect Location On Google Pixel 8 Pro? | Dr.fone
- Insights Into YouTube's Visionary Studio Platform
- Repair damaged, unplayable video files of Vivo Y100i Power 5G on Windows
- Seamless Method for Sending Files From Printer to Desktop
- Simplify Your Spreadsheet Skills on Android & iOS with This Excel Tables Walkthrough
- Snapshot Surprises Yearly YT Stats & Trends in Graphics
- Unveiling the Facets of ChatGPT 2024: Detailed Examination of Features and Strategies for Server Glitches
- YouTube Star-Level Stabilization Tools Listed
- Title: [Updated] Enhancing Video Quality Editing Tips for Published Content
- Author: Kevin
- Created at : 2024-11-08 14:09:43
- Updated at : 2024-11-14 20:36:19
- Link: https://youtube-videos.techidaily.com/updated-enhancing-video-quality-editing-tips-for-published-content/
- License: This work is licensed under CC BY-NC-SA 4.0.