
![[Updated] Enhancing Engagement with Solutions to Common Shorts Challenges](https://www.lifewire.com/thmb/t5WmI-P-259DHHwiqqcfb217ZK8=/400x300/filters:no_upscale():max_bytes(150000):strip_icc()/martin-sanchez-kiocDlMgxmk-unsplash-b9a3ba7266a7423493d2c1371af7d789.jpg)
[Updated] Enhancing Engagement with Solutions to Common Shorts Challenges
Enhancing Engagement with Solutions to Common Shorts Challenges
Create High Quality YouTube Video - Wondershare Filmora
An easy and powerful YouTube video editor
Numerous video and audio effects to choose from
Detailed tutorials provided by the official channel
YouTube streaming service has kept online users glued to their screens. You can access and share videos and music from any part of the world. Users resolve to YouTube for personal and business affairs. You can use it for a tutorial, promotional event, or just share the fun with other users. Several avenues are available for users to post and share their minds worldwide. So far, it has rolled out a short-form video service, Shorts, which was initially inspired by TikTok.
With Shorts, you can shoot videos, edit, and upload them for your audience. However, YouTube shorts not showing is a common issue for those wishing to share their videos in regular channel feed. You might be wondering how to solve such issues when pushed to the wall. Check out possible solutions in the next section. But first, let’s find out what really are YouTube Shorts.
In this article
02 Where can I find YouTube Shorts?
03 Here are the solutions for YouTube Common Issues
What is YouTube Shorts?
YouTube Shorts is an app that you can use to shoot and share short-form videos using your mobile phone. Furthermore, you can record and edit your videos as well as music overlays and video segmenting abilities. Viewers will access the videos for 60 seconds or less but will remain on your channel, unlike Stories that disappear after a short while. It was first released in September 2020, having started in the US and India. It has so far encroached many countries and is currently accessed by 6 billion users in over 100 countries.
Where can I find YouTube Shorts?
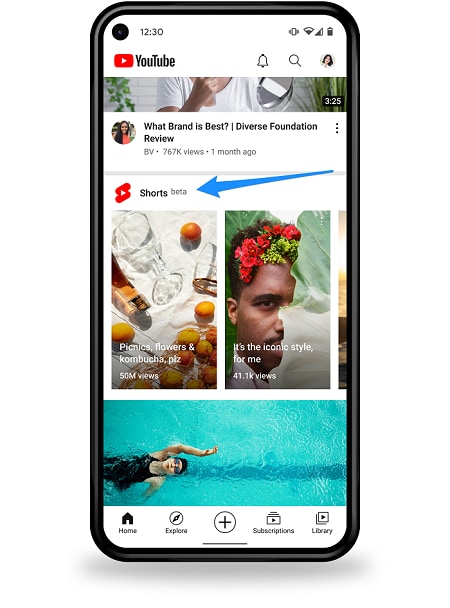
Many users are curious about how to make full use of YouTube Shorts. You can get the Short at the bottom of the YouTube app on either the homepage or on their channel page.
Is YouTube Shorts available on Google Play or App Store?
No. Unlike other streaming apps, you can’t find YouTube app on Google Play or App Store as it is not a standalone service. YouTube Shorts are found within the service’s main mobile app. It is, therefore, accessible from the YouTube app on your computer or phone at the bottom of the screen.
How to access YouTube Shorts on YouTube app
- First, go to the YouTube app at the bottom of the screen to find the “Shorts” button.
- You’ll then see a selection of thumbnails that harbors popular Shorts.
- Choose any video then click on it to bring you into the vertical video player.
- You can then watch the clip and like or dislike the video as it plays. Just use the “thumbs up” or “down” icon. Likewise, you can share and subscribe to the “Short creator’s” channel.
How to create YouTube Shorts
Do you wish to create YouTube Shorts but you don’t know how to? Here’s the kicker!
Step 1. You first need to install the YouTube app on your device then sign in to your account.
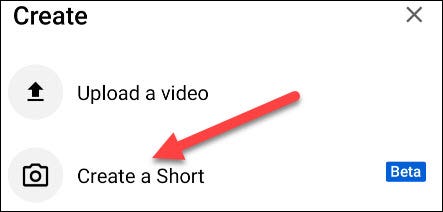
Step 2. Now, tap on the “Create” button. The icon is a “+” symbol in the bottom center of the screen.
Step 3. A pop-up window will open. Tap the “Create a Short” tab. If prompted, allow YouTube to use your phone’s camera and microphone.
Step 4. You’ll then land on the “YouTube Shorts” recording page.
Step 5. Set the length to 60 seconds and bellow. You have the option to slow down or speed up the recording by tapping the “Speed” icon on the right.
Step 6. Likewise, set a time for the camera to start recording automatically. Check below the “Speed” for the “Timer” for setting.
Step 7. Go ahead to edit your Short before posting. You can use “Filters” to apply visual effects.
Step 8. When your camera is set, hit the “Record” button. You can stop the recording by tapping on the Record button, then resume as you wish.

Step 9. Tap on the “Checkmark” when you are done recording. You can add some music and text as well. Then tap on the “Next” button to finish the recording.
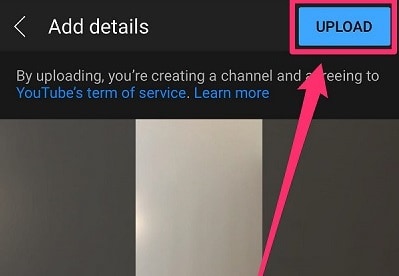
Step 10. Then add a title and adjust “Sharing” settings. Also, add the “#shorts” to the title to make it promotional together with other Shorts videos.
Step 11. Finally, tap the “Upload” tab to add your “Shorts” to YouTube.
Here are the solutions for YouTube Common Issues
Since YouTube Shorts is still in the “Beta” mode, users are likely to experience issues while using it. Below are some fixes for YouTube shorts common issues like YouTube Shorts not showing up, unable to post video to YouTube Shorts and etc.
Solution 1. Update YouTube app
Remember apps are ever on the upgrade mode. You are likely to face some connection issues if you are operating on an older version. Here’s is how to update the YouTube app on your Android or iPhone device.
On Android device
- Launch Google Play Store.
- Next, tap on the “three diagonal lines” at the top section of your screen.
- Then select the “My Apps & Games” option.
- Search for YouTube app and tap on the “Update” button.
On iOS device
- Open the “App Store”
- Tap on your “Profile” icon.
- Then tap on the “Update” tab to fix the issue.
On your computer
- Search for YouTube streaming app from the Google Play Store.
- Here, you’ll see an update button in case your app needs an update.
- Next, click on the “Update” button and wait for the update to complete.
- Launch YouTube once more and see whether the YouTube Shorts not showing issue is resolved.
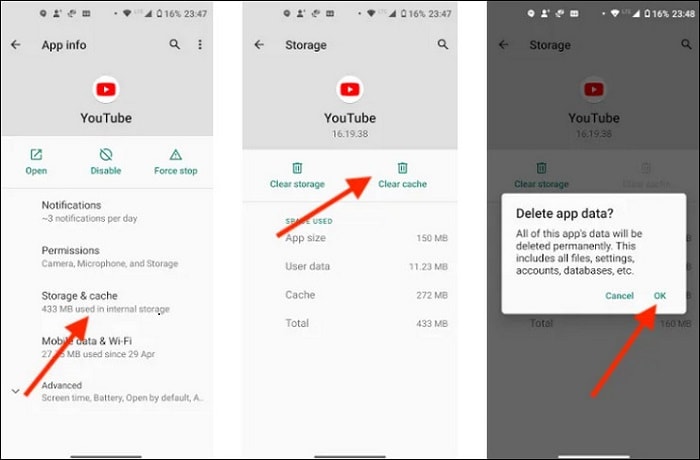
Solution 2. Clear Cache
A corrupt system may also cause issues with the normal operation of your application.
- Go to the “Settings” button on your phone.
- Then go to the “Apps” section and tap on “All Apps”
- Select the “YouTube” app from the list.
- Next, go to the “App Settings” and click on the “Storage” section.
- Tap on the “Clear cache and data” option.
- Finally, relaunch the YouTube app and check whether the issue is resolved.
Solution 3. Check if Shorts is available in your country
Remember that “Shorts” isn’t available in all the countries yet. So, you can confirm whether it is already in your country. If not, you can bypass GEO restrictions by using free VPNs.
- First, download and install a VPN app.
- Next, select the USA or India server location to fake a GPS location.
- Then clear the cache from the YouTube app and click it open.
- You should now find the option to view and even upload Shorts from your device.
Solution 4. Ensure your video is set as YouTube Shorts
Your video should be set as YouTube Shorts before posting.
- Identify the video that you wish to post.
- Add the “#shorts” in your title and description.
- See that each video is up to 60 seconds only.
- Post the video and see whether the issue isn’t reoccurring.
Conclusion
It’s a nice feeling to learn how to upload YouTube Shorts and share the fun with others worldwide. However, you may experience YouTube Shorts not showing due to restrictions in your country or other issues. We have tackled adequate solutions to solve such scenarios and make your Shorts go online. Nonetheless, check out the steps to access and create YouTube Shorts in just a few steps.
YouTube streaming service has kept online users glued to their screens. You can access and share videos and music from any part of the world. Users resolve to YouTube for personal and business affairs. You can use it for a tutorial, promotional event, or just share the fun with other users. Several avenues are available for users to post and share their minds worldwide. So far, it has rolled out a short-form video service, Shorts, which was initially inspired by TikTok.
With Shorts, you can shoot videos, edit, and upload them for your audience. However, YouTube shorts not showing is a common issue for those wishing to share their videos in regular channel feed. You might be wondering how to solve such issues when pushed to the wall. Check out possible solutions in the next section. But first, let’s find out what really are YouTube Shorts.
In this article
02 Where can I find YouTube Shorts?
03 Here are the solutions for YouTube Common Issues
What is YouTube Shorts?
YouTube Shorts is an app that you can use to shoot and share short-form videos using your mobile phone. Furthermore, you can record and edit your videos as well as music overlays and video segmenting abilities. Viewers will access the videos for 60 seconds or less but will remain on your channel, unlike Stories that disappear after a short while. It was first released in September 2020, having started in the US and India. It has so far encroached many countries and is currently accessed by 6 billion users in over 100 countries.
Where can I find YouTube Shorts?
Many users are curious about how to make full use of YouTube Shorts. You can get the Short at the bottom of the YouTube app on either the homepage or on their channel page.
Is YouTube Shorts available on Google Play or App Store?
No. Unlike other streaming apps, you can’t find YouTube app on Google Play or App Store as it is not a standalone service. YouTube Shorts are found within the service’s main mobile app. It is, therefore, accessible from the YouTube app on your computer or phone at the bottom of the screen.
How to access YouTube Shorts on YouTube app
- First, go to the YouTube app at the bottom of the screen to find the “Shorts” button.
- You’ll then see a selection of thumbnails that harbors popular Shorts.
- Choose any video then click on it to bring you into the vertical video player.
- You can then watch the clip and like or dislike the video as it plays. Just use the “thumbs up” or “down” icon. Likewise, you can share and subscribe to the “Short creator’s” channel.
How to create YouTube Shorts
Do you wish to create YouTube Shorts but you don’t know how to? Here’s the kicker!
Step 1. You first need to install the YouTube app on your device then sign in to your account.
Step 2. Now, tap on the “Create” button. The icon is a “+” symbol in the bottom center of the screen.
Step 3. A pop-up window will open. Tap the “Create a Short” tab. If prompted, allow YouTube to use your phone’s camera and microphone.
Step 4. You’ll then land on the “YouTube Shorts” recording page.
Step 5. Set the length to 60 seconds and bellow. You have the option to slow down or speed up the recording by tapping the “Speed” icon on the right.
Step 6. Likewise, set a time for the camera to start recording automatically. Check below the “Speed” for the “Timer” for setting.
Step 7. Go ahead to edit your Short before posting. You can use “Filters” to apply visual effects.
Step 8. When your camera is set, hit the “Record” button. You can stop the recording by tapping on the Record button, then resume as you wish.
Step 9. Tap on the “Checkmark” when you are done recording. You can add some music and text as well. Then tap on the “Next” button to finish the recording.
Step 10. Then add a title and adjust “Sharing” settings. Also, add the “#shorts” to the title to make it promotional together with other Shorts videos.
Step 11. Finally, tap the “Upload” tab to add your “Shorts” to YouTube.
Here are the solutions for YouTube Common Issues
Since YouTube Shorts is still in the “Beta” mode, users are likely to experience issues while using it. Below are some fixes for YouTube shorts common issues like YouTube Shorts not showing up, unable to post video to YouTube Shorts and etc.
Solution 1. Update YouTube app
Remember apps are ever on the upgrade mode. You are likely to face some connection issues if you are operating on an older version. Here’s is how to update the YouTube app on your Android or iPhone device.
On Android device
- Launch Google Play Store.
- Next, tap on the “three diagonal lines” at the top section of your screen.
- Then select the “My Apps & Games” option.
- Search for YouTube app and tap on the “Update” button.
On iOS device
- Open the “App Store”
- Tap on your “Profile” icon.
- Then tap on the “Update” tab to fix the issue.
On your computer
- Search for YouTube streaming app from the Google Play Store.
- Here, you’ll see an update button in case your app needs an update.
- Next, click on the “Update” button and wait for the update to complete.
- Launch YouTube once more and see whether the YouTube Shorts not showing issue is resolved.
Solution 2. Clear Cache
A corrupt system may also cause issues with the normal operation of your application.
- Go to the “Settings” button on your phone.
- Then go to the “Apps” section and tap on “All Apps”
- Select the “YouTube” app from the list.
- Next, go to the “App Settings” and click on the “Storage” section.
- Tap on the “Clear cache and data” option.
- Finally, relaunch the YouTube app and check whether the issue is resolved.
Solution 3. Check if Shorts is available in your country
Remember that “Shorts” isn’t available in all the countries yet. So, you can confirm whether it is already in your country. If not, you can bypass GEO restrictions by using free VPNs.
- First, download and install a VPN app.
- Next, select the USA or India server location to fake a GPS location.
- Then clear the cache from the YouTube app and click it open.
- You should now find the option to view and even upload Shorts from your device.
Solution 4. Ensure your video is set as YouTube Shorts
Your video should be set as YouTube Shorts before posting.
- Identify the video that you wish to post.
- Add the “#shorts” in your title and description.
- See that each video is up to 60 seconds only.
- Post the video and see whether the issue isn’t reoccurring.
Conclusion
It’s a nice feeling to learn how to upload YouTube Shorts and share the fun with others worldwide. However, you may experience YouTube Shorts not showing due to restrictions in your country or other issues. We have tackled adequate solutions to solve such scenarios and make your Shorts go online. Nonetheless, check out the steps to access and create YouTube Shorts in just a few steps.
Premiere’s Role in Your YouTube Creation Process
How Do I Use Adobe Premiere To Upload YouTube Videos?

Benjamin Arango
Mar 27, 2024• Proven solutions
Whilst getting the editing and post work just right on any project is what we all aim for, the ultimate aim is for other people to see our creations, and the most popular way to achieve that is YouTube . Chances are, if you are producing video, you will be putting some of it on YouTube at some point, so let’s have a look at the most efficient way to get your work from Premiere to YouTube.
Check if your computer meet the Premiere System Requirements >>
This is a basic tutorial about Adobe Premiere, professional video editing software. However, if video editing is new to you, consider Wondershare Filmora , which is a powerful but easy-to-use tool for users just starting out. Download the free trial version below.
 Download Mac Version ](https://tools.techidaily.com/wondershare/filmora/download/ )
How Do I Use Adobe Premiere To Upload YouTube Videos
1. Master Copy
Before exporting your work, it is important to first create a master copy of your project that is ‘as is’, in that it reflects the settings and codecs used in the original footage.
To do this you simply select the sequence within the Timeline or in the Project Panel, and go through the menu tree via File > Export > Media to bring up the export dialogue.

To create your Master Copy, simply select the first option of ‘Match Sequence Settings’, this exports a file that is of the same quality as your original footage, essentially producing a digital copy of the work for archiving before anything else is done.
With you work safe and secure it is now time to look at ensuring the project is suitable for YouTube. With our sequence selected in the Timeline or Project Panel again, we go through the same File > Export > Media path to bring up the media export dialogue as before.
2. Container
The first option we have to consider is the file format that our finished video needs to be in. Here you should refer to YouTube for its guidelines, whilst they do accept a number of file formats, digging through the YouTube help system to find the settings for highest quality we find that they recommend MPEG4 as the container, using the codec.

We can also see further recommended settings in this screenshot that will be covered later.
The good news is that Premiere automatically selects the appropriate container for us when we select our codec, however it is worth knowing the file type YouTube is expecting just to check yourself.
3. Video Codec
So having established that YouTube recommends the MPEG4 container using the codec, the first option we need to look for in the media export dialogue is to select the appropriate Format.
This is the first drop down in the dialogue box, and in this case we simply select from the list.

Once you select you can check the ‘output name’ field and see that premiere is automatically set the output file to .mp4 which is exactly what we need.
4. Preset
The next field we come to is the ‘Preset’ dropdown menu. This is a major help to most people, as Adobe have very kindly included large numbers of presets to quickly adapt video settings to suit specific uses. They vary depending on the exact version of Premiere you are using, and each format type does have its own list of presets, as we can see has a large number for YouTube, but also has many presets for specific devices (presets for iPad, Kindle, Nook, various other tablets and phones, Vimeo and a host of others) to make getting the right settings that bit easier for us.

It is important here to select the correct preset from the various YouTube options. You want to select the resolution and frame rate that match your source file, for the best results. So, if your source file is 1080p with a frame rate of 29.97 fps then that is the YouTube setting you would select.
Once a preset is selected a summary of the settings is displayed below, normally these will be well suited to your project, however you can fine tune anything you wish by selecting the video or audio tabs at the bottom which give you the chance to adjust each parameter individually. If you do this, you can save these changes as a custom preset by clicking the button at the side of the Preset dropdown menu and simply use it on later projects by selecting it from the list the same as any other, a great time saving tool.

5. Rendering
Once you are satisfied with the settings, either from the Preset alone or if you have adjusted anything yourself, you are nearly ready to render the file and export it.
For YouTube it is recommended you select the ‘Use Maximum Render Quality’ option to maintain the best output you can, it does add time to the render process but if you value the quality of your work it is worthwhile.
Finally you can choose a suitable filename and the destination of the file by clicking on the ‘Output Name’ field.
I normally use a filename that includes the destination medium so I can differentiate between different versions of a project and know which one to upload where, in this case I include ‘youtube’, but if I were planning on uploading clips of the project to vimeo as well for instance there may be a cut of the project with ‘vimeo’ in the name too. The destination is personal preference, because I do use filenames to differentiate versions I can put the various iterations into a single project file, others have folder structures for each type of file , so all YouTube output goes into a single folder and so on, how you organize is entirely dependent on how you work.

Once those are selected clicking ‘Export’ starts the rendering process, and eventually (how long depends on the speed of your computer and the size and type of file involved), you will end up with your YouTube optimized video in the location you chose.
Here I created 4 key frames that let the ‘Animation’ object move around the ‘Demo Text’ Object and finally come to rest below it. Whilst this type of effect does look very effective on screen, such is the ease of use of After Effects it really is just a few minutes work to achieve.
Learn more details about How to add text in Premiere >>
6. Uploading
Now you have your file, the next step is to go to your YouTube account and log in if you need to.
On the top of your homepage on the right is the upload button, selecting that brings up the select file menu as below.

You can either drag your file into the window or click on it to open a standard file browser to locate the desired file, click and the upload will begin. The dropdown underneath allows you to set the video as Public, Unlisted or Private. You can change this at any time once the video is uploaded as well.
This opens the upload progress window, where you can add in a name, description and tags as well as add the video to a playlist or adjust the privacy settings as the video is uploading.

Once the upload as finished, you can do final adjustments to settings and choose a thumbnail for the video. The final step is to click the ‘Publish’ button and your video will be processed and go live.

Benjamin Arango
Benjamin Arango is a writer and a lover of all things video.
Follow @Benjamin Arango
Benjamin Arango
Mar 27, 2024• Proven solutions
Whilst getting the editing and post work just right on any project is what we all aim for, the ultimate aim is for other people to see our creations, and the most popular way to achieve that is YouTube . Chances are, if you are producing video, you will be putting some of it on YouTube at some point, so let’s have a look at the most efficient way to get your work from Premiere to YouTube.
Check if your computer meet the Premiere System Requirements >>
This is a basic tutorial about Adobe Premiere, professional video editing software. However, if video editing is new to you, consider Wondershare Filmora , which is a powerful but easy-to-use tool for users just starting out. Download the free trial version below.
Download Mac Version ](https://tools.techidaily.com/wondershare/filmora/download/ )
How Do I Use Adobe Premiere To Upload YouTube Videos
1. Master Copy
Before exporting your work, it is important to first create a master copy of your project that is ‘as is’, in that it reflects the settings and codecs used in the original footage.
To do this you simply select the sequence within the Timeline or in the Project Panel, and go through the menu tree via File > Export > Media to bring up the export dialogue.
To create your Master Copy, simply select the first option of ‘Match Sequence Settings’, this exports a file that is of the same quality as your original footage, essentially producing a digital copy of the work for archiving before anything else is done.
With you work safe and secure it is now time to look at ensuring the project is suitable for YouTube. With our sequence selected in the Timeline or Project Panel again, we go through the same File > Export > Media path to bring up the media export dialogue as before.
2. Container
The first option we have to consider is the file format that our finished video needs to be in. Here you should refer to YouTube for its guidelines, whilst they do accept a number of file formats, digging through the YouTube help system to find the settings for highest quality we find that they recommend MPEG4 as the container, using the codec.
We can also see further recommended settings in this screenshot that will be covered later.
The good news is that Premiere automatically selects the appropriate container for us when we select our codec, however it is worth knowing the file type YouTube is expecting just to check yourself.
3. Video Codec
So having established that YouTube recommends the MPEG4 container using the codec, the first option we need to look for in the media export dialogue is to select the appropriate Format.
This is the first drop down in the dialogue box, and in this case we simply select from the list.
Once you select you can check the ‘output name’ field and see that premiere is automatically set the output file to .mp4 which is exactly what we need.
4. Preset
The next field we come to is the ‘Preset’ dropdown menu. This is a major help to most people, as Adobe have very kindly included large numbers of presets to quickly adapt video settings to suit specific uses. They vary depending on the exact version of Premiere you are using, and each format type does have its own list of presets, as we can see has a large number for YouTube, but also has many presets for specific devices (presets for iPad, Kindle, Nook, various other tablets and phones, Vimeo and a host of others) to make getting the right settings that bit easier for us.
It is important here to select the correct preset from the various YouTube options. You want to select the resolution and frame rate that match your source file, for the best results. So, if your source file is 1080p with a frame rate of 29.97 fps then that is the YouTube setting you would select.
Once a preset is selected a summary of the settings is displayed below, normally these will be well suited to your project, however you can fine tune anything you wish by selecting the video or audio tabs at the bottom which give you the chance to adjust each parameter individually. If you do this, you can save these changes as a custom preset by clicking the button at the side of the Preset dropdown menu and simply use it on later projects by selecting it from the list the same as any other, a great time saving tool.
5. Rendering
Once you are satisfied with the settings, either from the Preset alone or if you have adjusted anything yourself, you are nearly ready to render the file and export it.
For YouTube it is recommended you select the ‘Use Maximum Render Quality’ option to maintain the best output you can, it does add time to the render process but if you value the quality of your work it is worthwhile.
Finally you can choose a suitable filename and the destination of the file by clicking on the ‘Output Name’ field.
I normally use a filename that includes the destination medium so I can differentiate between different versions of a project and know which one to upload where, in this case I include ‘youtube’, but if I were planning on uploading clips of the project to vimeo as well for instance there may be a cut of the project with ‘vimeo’ in the name too. The destination is personal preference, because I do use filenames to differentiate versions I can put the various iterations into a single project file, others have folder structures for each type of file , so all YouTube output goes into a single folder and so on, how you organize is entirely dependent on how you work.
Once those are selected clicking ‘Export’ starts the rendering process, and eventually (how long depends on the speed of your computer and the size and type of file involved), you will end up with your YouTube optimized video in the location you chose.
Here I created 4 key frames that let the ‘Animation’ object move around the ‘Demo Text’ Object and finally come to rest below it. Whilst this type of effect does look very effective on screen, such is the ease of use of After Effects it really is just a few minutes work to achieve.
Learn more details about How to add text in Premiere >>
6. Uploading
Now you have your file, the next step is to go to your YouTube account and log in if you need to.
On the top of your homepage on the right is the upload button, selecting that brings up the select file menu as below.
You can either drag your file into the window or click on it to open a standard file browser to locate the desired file, click and the upload will begin. The dropdown underneath allows you to set the video as Public, Unlisted or Private. You can change this at any time once the video is uploaded as well.
This opens the upload progress window, where you can add in a name, description and tags as well as add the video to a playlist or adjust the privacy settings as the video is uploading.
Once the upload as finished, you can do final adjustments to settings and choose a thumbnail for the video. The final step is to click the ‘Publish’ button and your video will be processed and go live.
Benjamin Arango
Benjamin Arango is a writer and a lover of all things video.
Follow @Benjamin Arango
Also read:
- In 2024, Elevating Success Channel Ideas to Spark Momentum
- In 2024, Control YouTube Audio Mobile/Desktop Approach
- In 2024, Deciphering the Language of YouTube Thumbnails Effectiveness
- Top 16 YouTube Beginnings for Higher Engagement
- Alternative Cinema Highlights Audiences
- High-Level Behavior Tips for YouTube Users
- Apex Chart Seeker Monitor Most Viewed Videos
- Navigating Ad-Blocking in Chrome, Firefox, Android, & iOS for YouTube
- [Updated] Dive Into the World of Enhanced YouTube Content with Premium Subscription
- Expert Strategies on Calculating Your YouTube Audience Impact and Revenue
- ASMR Content Deep Dive 101
- [Updated] Boosting YouTube Ad Revenue Keeping CC Active
- Mastering YouTube Live Thumbnails Essentials
- Effortless Estimation of Digital Gains for 2024
- In 2024, Complete Guidebook to Evaluating Your Video's Impact and Earning Power
- Cutting-Edge Tech Meets Creativity Top 12 Camera Picks for Vloggers
- [New] Discovering the Speedy Scaling Channels Among YouTube Titans
- Capturing Life in Motion Top 9 Smartphone Props for Dynamic Cinematography
- 2024 Approved Download Mastery 11 Key YouTube Extractors
- 9 Solutions to Fix Realme Narzo N53 System Crash Issue | Dr.fone
- In 2024, Top 10 Password Cracking Tools For ZTE Nubia Z60 Ultra
- 2024 Approved New Essential Details of Making Perfect Talking Face
- In 2024, Free Music Production Software The Top 11 Options
- How to Fix Samsung Galaxy A25 5G Find My Friends No Location Found? | Dr.fone
- In 2024, A Complete Guide To OEM Unlocking on Samsung Galaxy S24 Ultra
- In 2024, A Guide on Starting Private Live Streams on YouTube
- 2024 Approved Elevate Your Gaming Experience with FBX Recording Tips
- [Updated] 2024 Approved Mastering Trends Top 10 Instagram Tags to Elevate Your Presence
- GIF Hacks for iPhone Users Storage Tips and Playtime Tricks
- [New] 2024 Approved Leaders in Likeability The Best App List on Android/iPhone
- How to restore wiped call history on Nokia 105 Classic?
- 2024 Approved Navigating the Complexities of Facebook's Copyright Enforcement
- In 2024, 5 Ways to Transfer Music from Vivo X Flip to Other Android Devices Easily | Dr.fone
- Updated In 2024, If You Want to Record Video Streams on Windows or Mac Using FFmpeg, Read Our Guide and Learn How to Do This with Easy Step-by-Step Instructions
- Realme 10T 5G Stuck on Screen – Finding Solutions For Stuck on Boot | Dr.fone
- Title: [Updated] Enhancing Engagement with Solutions to Common Shorts Challenges
- Author: Kevin
- Created at : 2024-05-25 16:51:46
- Updated at : 2024-05-26 16:51:46
- Link: https://youtube-videos.techidaily.com/updated-enhancing-engagement-with-solutions-to-common-shorts-challenges/
- License: This work is licensed under CC BY-NC-SA 4.0.
