
!["[Updated] Elevate Your YouTube Presence Banners for Gamers"](https://www.lifewire.com/thmb/L9CRzM0BFR4bTnY9IulGvi9fmEA=/400x300/filters:no_upscale():max_bytes(150000):strip_icc()/kids-ipad-580f65635f9b58564cc0fc91-5c5cbb6ac9e77c0001d92aa4.jpg)
"[Updated] Elevate Your YouTube Presence Banners for Gamers"
Elevate Your YouTube Presence: Banners for Gamers
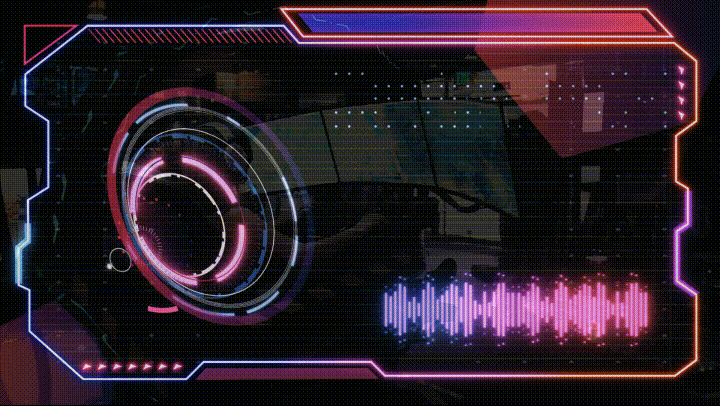
Gaming videos have become increasingly popular on YouTube, especially among young people. It is not uncommon for older folk to enjoy this type of content, especially if they want to unwind after a long day. However, the industry is becoming pretty crowded, making it harder for content creators to stand out from the crowd.
An excellent way to get your target audience to notice you would be to design a killer YouTube banner that will immediately cause anyone scrolling past to click on your video. Stick around to learn how to create a great gaming YouTube banner with templates.
Importance of a Banner for Your YouTube Gaming Channel
Imagine a scenario where you want to open a brick-and-mortar store. One of the most important things you need to get out of the way is the business name. Once you have settled on a fitting name, you will then move on to create a sign to place outside your shop.
For example, a banner for your YouTube gaming channel plays a similar role to signage for a brick-and-mortar shop.
- An excellent banner helps you make a solid first impression on your viewers, some of who is viewing your content for the first time.
- Secondly, a well-designed banner reflects positively on your brand and helps you grow your audience at a steady rate.
- Thirdly, you can use your banner to give your viewers a rough idea of what your video is about without them clicking to watch. A suitable banner can cause anticipation to build within your viewers. Once the video is over, they won’t resist visiting your channel to see what else you offer.
Guide to YouTube Gaming Banner Size
We can liken a banner for your YouTube video to a book cover to a novel you have been dying to read. Therefore, it would be wise to get the size right if you want to create an excellent first impression for yourself. Ideally, the best size for a YouTube banner is 2560*1440 pixels or an aspect ratio of 16:9.
We urge you not to upload a banner smaller than 2048*1152 pixels, or else the image will appear cropped. Keep your banner within 1235*338 pixels and centered on the screen to be on the safe side.
This YouTube banner dimension is ideal for viewing on any device since your audience might use their smartphones or laptop to watch your videos on YouTube. Lastly, ensure you keep the file to a maximum of 6MB. We believe this file size is pretty generous.
Tips for Designing an Attractive Gaming YouTube Banner
Below are some tips that will help you create beautiful YouTube banners.
Simplicity is key: Contrary to popular belief, a simple banner looks more polished than a complex one. If your YouTube banner has too many elements, your viewers using their mobile phones might have a challenge viewing the image.
Ensure the graphics are high-quality : Nothing is as frustrating to your viewers as seeing a blurry or pixelated YouTube banner. However, high-quality graphics with a resolution of at least 1920*1080 pixels make your work look polished and attract more viewers to your channel.
Leverage the grid system: Some of your viewers might watch your videos from their smartphones, and others on their laptops or tablets. The grid system allows you to ensure the full banner will be visible no matter what device your audience will use to watch your gaming videos.
Add a CTA: At the end of the day, you are trying to grow your audience on your YouTube channel. You might also have other social media platforms where you post content. Since your banner is one of the first things your audience will see, you could include a short, easy-to-read, and understandable call to action. For instance, you could encourage them to “Subscribe Now!”
Incorporate your unique color scheme: By now, you already have a theme for your YouTube channel that your existing subscribers associate with you. As you design your YouTube banner, ensure you incorporate your theme colors, so new visitors know what colors to look out for as they scroll on the platform.
Why Use Templates To Create Gaming YouTube Banners?
First and foremost, a gaming youtube banner template takes the tedium out of creating a design from scratch. They are also systematized, meaning you can download a template specifically for YouTube that comes in the correct dimensions. Most importantly, templates designed for gaming YouTube banners are optimized to help you generate more organic traffic to your channel.
You probably have other expenses breathing down your neck. No need to add your YouTube banner to the list. A youtube gaming channel banner template a budget-friendly way to create stunning designs for your banner that actually look good. If you are lucky, you might find free programs to help you create gorgeous YouTube banners for your gaming channel.
Make YouTube Gaming Banners With Templates in Filmora
Now that you understand why a gaming channel banner template is essential for your YouTube channel, you might wonder where you can find some good ones to incorporate into your videos. Don’t worry because Filmora is precisely what you need.
Wondershare Filmora has a fantastic template feature that helps you make creative videos effortlessly. You can use the preset templates in the platform, saving you lots of time you would have spent designing your template from scratch. We guarantee you cannot exhaust the 1000+ templates this platform offers, meaning you are spoilt for choice!
If you want to customize your video, you can replace the stock videos that come with the preset templates with footage from your internal storage. In addition, Wondershare Filmora lets you share your favorite templates with other content creators who would also like to try making their own cool videos.
Free Download For Win 7 or later(64-bit)
Free Download For macOS 10.14 or later
Below is a detailed step-by-step guide on how to make a gaming YouTuber banner template with Wondershare Filmora.
Step 1. After creating a project with Filmora, click on the “File” tab, wait for a drop-down menu to appear, and select “Project Settings.”
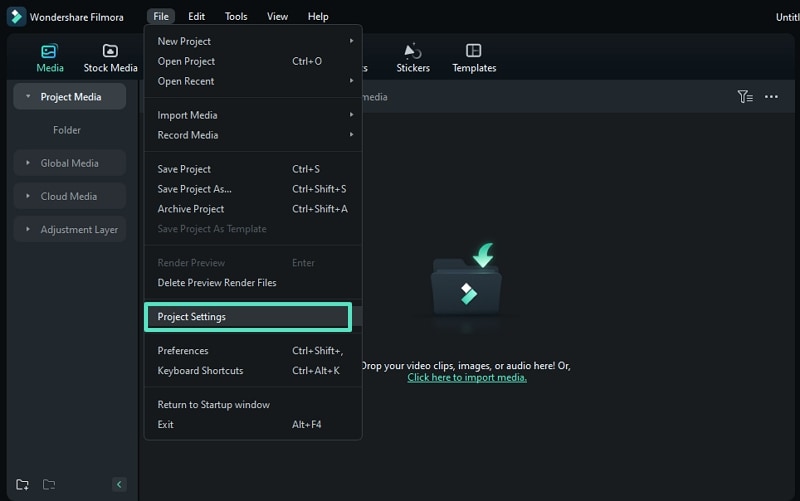
Step 2. Once a dialogue box appears, go to the “Resolution” tab and adjust the resolution to 2560*1140.
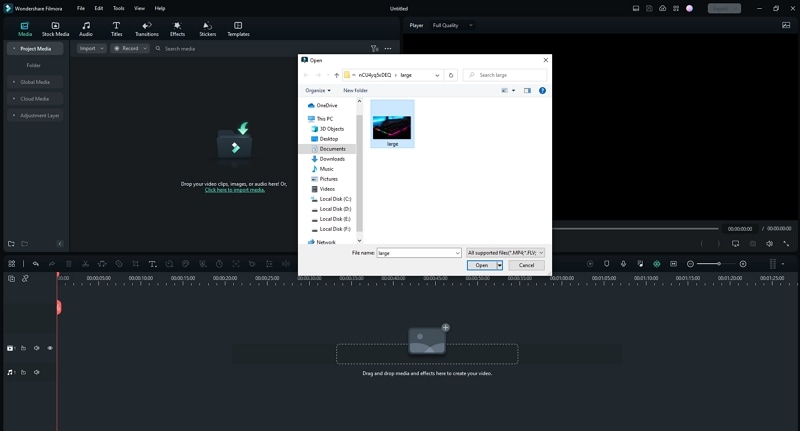
Step 3. Upload your footage or photo from your internal storage by clicking on the logo below.
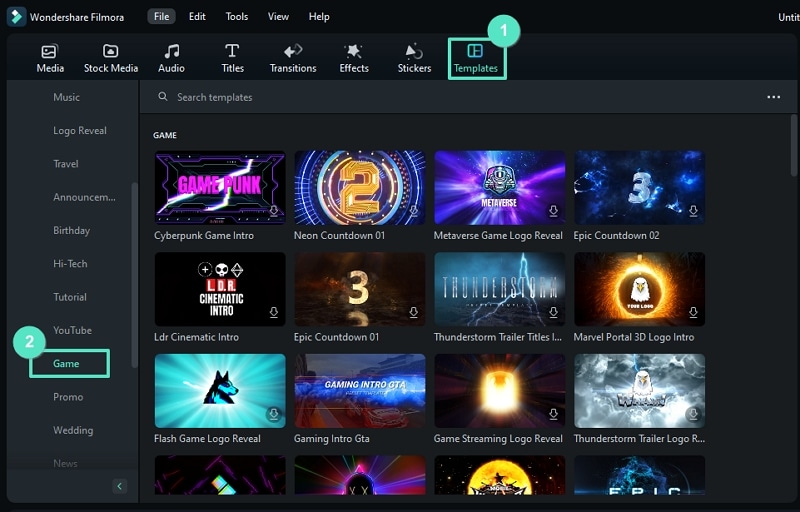
Step 4. Click on the “Template” tab at the top of the page and click “Game.” Browse the available templates till you see one you like.
Step 5. Drag and drop the template you have chosen to the timeline as shown below.
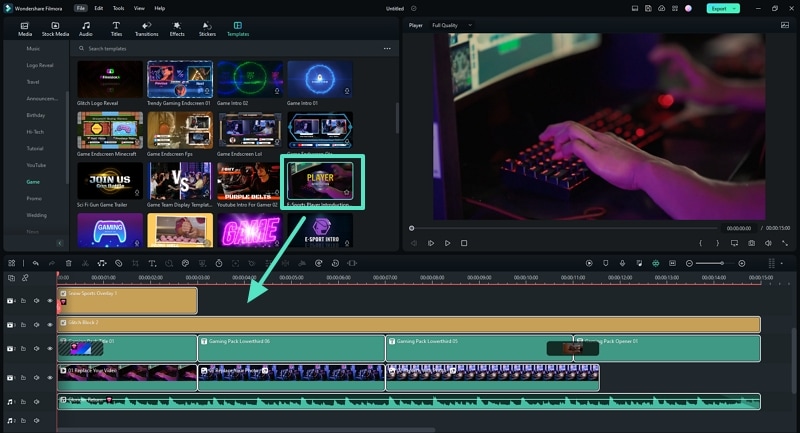
Step 6. Replace the sample footage in the template by dragging and dropping your own footage into the timeline.

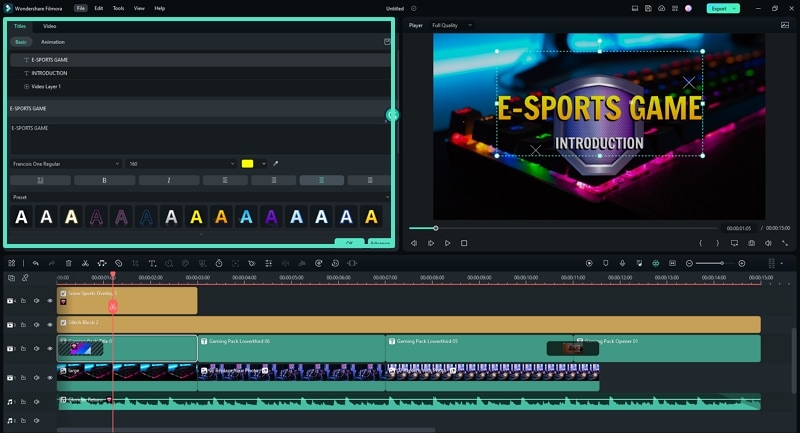
Step 7. Customize the footage and change the settings until you are happy with the outcome. Edit the text using the tools provided in the platform.
Step 8. Take a screenshot of the final result.

Step 9. Specify the snapshot format and choose the storage location before saving a copy to your device.

Step 10. Once the snapshot appears in the Media Panel, right-click on it to open. Select “Reveal in Explorer” to locate the picture in your internal storage. You can now use the photo as your YouTube gaming banner.

5 Websites for Gaming Banner Templates Your YouTube
Wondershare Filmora is not the only platform you can use to create banner templates for your YouTube channel. Here is a list of 5 more websites you can try and a detailed breakdown of the remarkable features you are bound to enjoy.
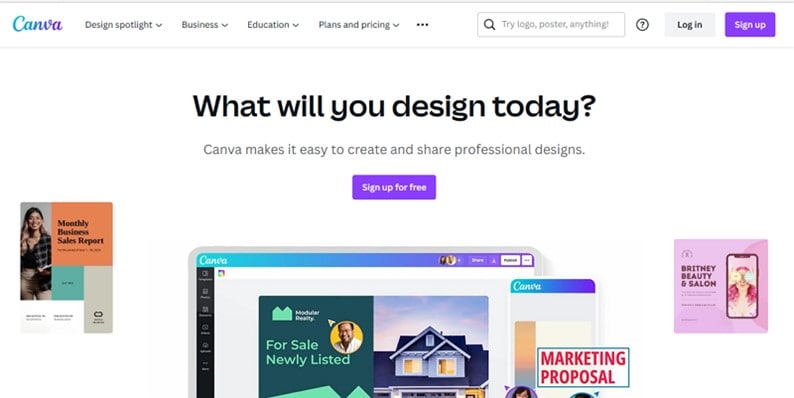
1. Canva
The first alternative to Filmora on our list is Canva, which has thousands of professional, ready-made designs to wow your audience. You can work alone or with a dedicated team to ensure you design only the best banner for your channel to attract the masses to the kind of content you create.
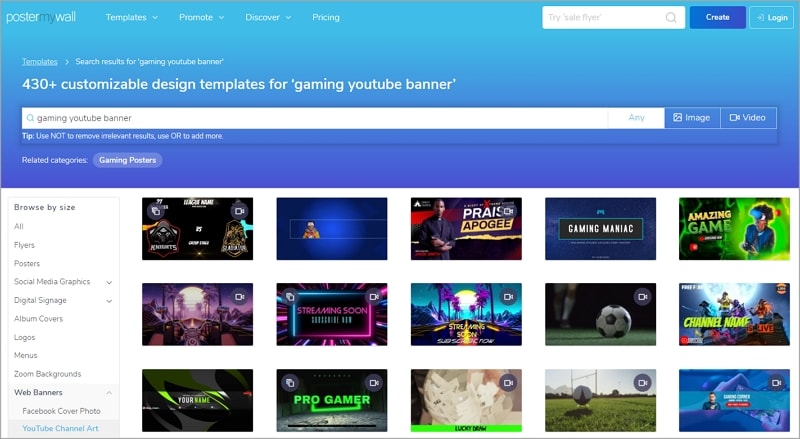
2. PosterMyWall
We couldn’t forget to include PosterMyWall to our list, which has pre-made templates you can customize to suit your needs. With PosterMyWall, you can save the time you could have used to design a banner from scratch to think of more content for your channel. The developers suggest various templates you might like, not to mention that you can sign up for free!
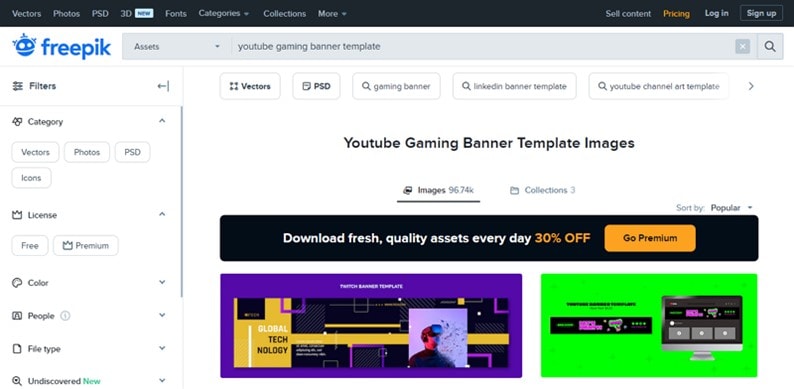
3. Freepik
Another suitable alternative to Filmora is Freepik. We guarantee you cannot exhaust all the numerous templates this platform offers. Each template is unique, with different color combinations and fonts to cater to the theme colors on your YouTube channel. You could opt for the free version or sign up for a Premium account and get 30% off.
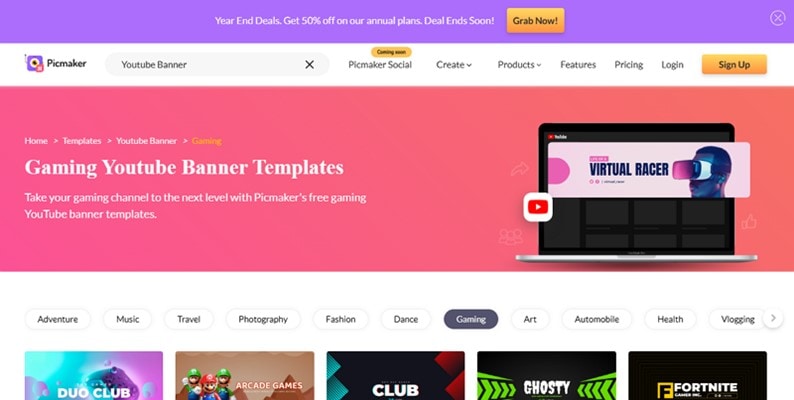
4. Pickmaker
The fourth alternative on our list is Pickmaker, a sure way to take your gaming channel to the next level. The templates are arranged in broad categories to help you pick the best one based on the type of content you post. In addition, you don’t have to part with your precious monies to start designing YouTube banners with Pickmaker.
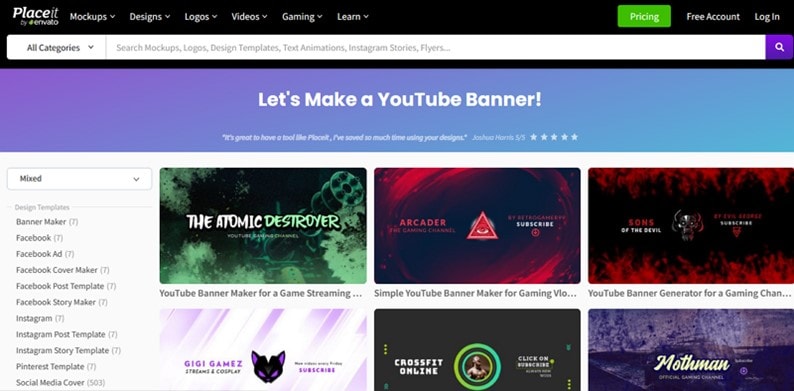
5. Placeit
Last but definitely not least is Placeit, which contains picturesque templates fitting for a gaming YouTube channel. We guarantee your audience won’t resist clicking on your videos once you use any of the templates within this platform. All you need to do is create a free account to enjoy the perks. Placeit makes your work easier by allowing you to indicate your favorite templates for use later.
Conclusion
Gaming content is far from boring, and neither should your banner. Remember, your audience will judge you based on your banner, the first content they interact with before they click to watch your video.
The better you can design your banner, the higher your chances of growing an audience that supports you by watching your content regularly. Once you have created an enticing banner, all that’s left is to ensure you have the content to match.
Free Download For macOS 10.14 or later
Below is a detailed step-by-step guide on how to make a gaming YouTuber banner template with Wondershare Filmora.
Step 1. After creating a project with Filmora, click on the “File” tab, wait for a drop-down menu to appear, and select “Project Settings.”
Step 2. Once a dialogue box appears, go to the “Resolution” tab and adjust the resolution to 2560*1140.
Step 3. Upload your footage or photo from your internal storage by clicking on the logo below.
Step 4. Click on the “Template” tab at the top of the page and click “Game.” Browse the available templates till you see one you like.
Step 5. Drag and drop the template you have chosen to the timeline as shown below.
Step 6. Replace the sample footage in the template by dragging and dropping your own footage into the timeline.
Step 7. Customize the footage and change the settings until you are happy with the outcome. Edit the text using the tools provided in the platform.
Step 8. Take a screenshot of the final result.
Step 9. Specify the snapshot format and choose the storage location before saving a copy to your device.
Step 10. Once the snapshot appears in the Media Panel, right-click on it to open. Select “Reveal in Explorer” to locate the picture in your internal storage. You can now use the photo as your YouTube gaming banner.
5 Websites for Gaming Banner Templates Your YouTube
Wondershare Filmora is not the only platform you can use to create banner templates for your YouTube channel. Here is a list of 5 more websites you can try and a detailed breakdown of the remarkable features you are bound to enjoy.
1. Canva
The first alternative to Filmora on our list is Canva, which has thousands of professional, ready-made designs to wow your audience. You can work alone or with a dedicated team to ensure you design only the best banner for your channel to attract the masses to the kind of content you create.
2. PosterMyWall
We couldn’t forget to include PosterMyWall to our list, which has pre-made templates you can customize to suit your needs. With PosterMyWall, you can save the time you could have used to design a banner from scratch to think of more content for your channel. The developers suggest various templates you might like, not to mention that you can sign up for free!
3. Freepik
Another suitable alternative to Filmora is Freepik. We guarantee you cannot exhaust all the numerous templates this platform offers. Each template is unique, with different color combinations and fonts to cater to the theme colors on your YouTube channel. You could opt for the free version or sign up for a Premium account and get 30% off.
4. Pickmaker
The fourth alternative on our list is Pickmaker, a sure way to take your gaming channel to the next level. The templates are arranged in broad categories to help you pick the best one based on the type of content you post. In addition, you don’t have to part with your precious monies to start designing YouTube banners with Pickmaker.
5. Placeit
Last but definitely not least is Placeit, which contains picturesque templates fitting for a gaming YouTube channel. We guarantee your audience won’t resist clicking on your videos once you use any of the templates within this platform. All you need to do is create a free account to enjoy the perks. Placeit makes your work easier by allowing you to indicate your favorite templates for use later.
Conclusion
Gaming content is far from boring, and neither should your banner. Remember, your audience will judge you based on your banner, the first content they interact with before they click to watch your video.
The better you can design your banner, the higher your chances of growing an audience that supports you by watching your content regularly. Once you have created an enticing banner, all that’s left is to ensure you have the content to match.
Seamless Twitch-to-YouTube Streaming Techniques
Create High-Quality Video - Wondershare Filmora
An easy and powerful YouTube video editor
Numerous video and audio effects to choose from
Detailed tutorials provided by the official channel
Amidst many online applications is Twitch. This live streaming platform takes your experience to another level. You can use it to make crafts, play games, attract broadcasters, and many more. Twitch was launched in 2011, and since then, it has attracted millions of users, managing a database of about 4 million broadcasters by early 2020. With it, users can stream their activities as others watch in real-time. Just browse a category to find a stream.
You can also follow streamers that you like on the platform and get updates and notifications immediately after they are posted. But how do you start a career on a platform like Twitch? You need to broadcast and gather a large following. You can use built-in audiences from other platforms like Facebook. Let’s dive into the core of the matter and look at how to upload Twitch streams to YouTube and build your platform.

In this article
02 What is the benefit of uploading your Twitch Streams to YouTube
03 How to upload your Twitch Streams to YouTube
What is Twitch VOD?
Twitch Video on Demand (VOD) is a recording of previously streamed content. It provides briefings if you missed catching the Twitch live stream. Just watch the VOD from your favorite streamer and be engaged the best way possible. However, VODs don’t last forever. They are removed after two weeks of broadcast. But streamers with Partner Status can have their VODs last up to 60 days.
- How to enable Twitch VOD?
VODs are the best form to archive streams that your fans missed. Even though they are not enabled by default, you can manually enable them and not let your fans miss any important event from your channel. They’ll find it under the “Videos” tab on any Twitch channel. Follow these steps to enable VOD on your channel.
Step 1. Go to your profile icon in the top right corner of Twitch
Check in the “Channel & Video” section and locate the “Stream Key & Preferences” menu.

Step 2. Click on “Creator Dashboard”
Remember, you can enable VODs from your creator dashboard. Just go under the “Settings” tab and click on the “Stream section” of the creator dashboard. Check under the subtitle “VOD Settings” and get the option to store past broadcasts. You can also toggle the slider to store your past broadcasts.

Step 3 Click on the “Settings” tab on the left-hand side and go to Stream
You’ll get various drop-down menu options. Click on the “Settings” tab and choose the “Stream” option. The system will navigate to a new page, thus setting your preferences for VODs and clips.
Step 4. Go to “VOD Settings” and toggle on the “Store Past Broadcast.”
Ensure you have the toggle option turned ON under the “VOD Settings.” If it’s “ON,” you’ll realize the toggle will be purple, with a checkmark in it. Twitch will be confirmed to be enabled if it’s purple.

- Frequently Asked Question about Twitch VOD
These are some questions frequently asked by Twitch users.
1. How long will Twitch store my VOD
Your Twitch can either be stored for 14 or 60 days, depending on your level. For Twitch Prime, Twitch Partner or a Twitch Turbo user has their past broadcasts automatically saved for 60 days before deletion. But if you are not connected to these three options, your past broadcasts will be saved for only 14 days before deletion.
Since your past broadcasts cannot be live for more than 60 days, you have the option to download the video to your computer before the validity days expire and Twitch deletes it. You can use an External Hard drive to save the past broadcast content. Likewise, it is possible to turn your past broadcast content into Highlight and, in turn, permanently store them on Twitch.
2. What is the difference between Twitch VOD, Highlights, and Clips
Twitch VOD is a previously saved video of your live stream content. You choose to save either part or the entire content of your previously streamed content. More so, you don’t need any additional requirements to use VOD.
Highlights are short videos that have been edited from your past broadcast content. You can save them on Twitch permanently. Streamers majorly use highlights to save video game achievements. Unlike VOD Twitch that can be saved up to 60 days, Highlights usually lasts no more than 3 minutes.
- To make Highlights on Twitch, first, navigate to your Dashboard.
- Then scroll down and click on “Content” > “Video Producer.
- Next, press on “All Videos” to change them to “Past Broadcasts.”
- Now press the “Highlight” button, and Twitch will immediately open a new tab for “Twitch Highlighter Tool.”
- Then select the video part to include as “Highlight” and press the “Create Highlights” button.
- Wait a while for the process to be completed, and Voila! You have your Highlights created.
When it comes to Twitch Clip, you can capture special moments in a stream you are currently watching. On the same note, you can share clips with friends and other users on social media platforms. Such shared clips contain a link where others view the source or video from.
The clips you create will automatically be saved on the streamer’s channel on the “Clips” page, where other viewers can see them too. Nonetheless, you can download “clips” to your computer and, in turn, upload them whenever you want to. And note that you can help your stream grow via “Clips” by letting your viewers clip and share your stream moments.
- To create “Clips” on Twitch, identify which Streamers channel you wish to create a clip from.
- Then click on the “Clapper board” icon. Next, edit your clip between 5 and 60 seconds long.
- Finally, create a title and publish your Clip. You’ll also enjoy the privilege to share your clip’s link to other social media networks.
What is the benefit of uploading your Twitch Streams to YouTube
You stand to gain a lot when you upload your Twitch Streams to YouTube.
1) To enlighten your followers
Your followers will see your streams and make the best decisions. Viewers can check out your recordings and other highlights from past streams. It will help them decide whether they like what they see and probably join your live streams.
2) Twitch provides content for you to share and monetize on YouTube
Since Twitch streaming is more popular nowadays, many people throng it for content. It is not wise to rely entirely on Twitch to discover as a Twitch Streamer. Posting to YouTube will make it known within a short time. You would have announced your streams most nobly and kept your followers up to date, attracting new ones as well.
3) To keep your followers engaged even when you are offline
Even though live streaming is important, some viewers may not attend the live sessions due to different time zones or other commitments. In this regard, when uploaded to YouTube, Twitch will give them a chance to watch your content just whenever they log in. They, therefore, have the option to watch a Twitch VOD of the live stream they missed.
How to upload your Twitch Streams to YouTube
Check how to upload Twitch streams to YouTube from the Twitch website.
Step 1. Identify the little arrow next to your name on the Twitch website and click on it. Then click on the “Video Producer” to take you to a list of your Twitch videos.

Step 2. Check out and click on the “three-dots” on the video you wish to upload to YouTube. Click on the “Export” tab.
Step 3. A menu will then pop up. Here, you can fill in the description, title, and tags that you would like to appear on the YouTube video. There is an option for Twitch to split your video automatically. If you wish so, then tick the “Checkbox” to enable it. Then click on the “Start Export” option to export your Twitch streams to YouTube.

Bouns! Edit Your Twitch Video with Filmora
The quality of your video matters when it comes to uploading Twitch Streams to YouTube. Using a third-party tool to edit your video is the first step in ensuring your videos communicate meaningful content. Filmora comes in handy to bring your imaginations to life. Use it for simple creation without limits, even for beginners.
- Use it to track moving objects in video clips
- Easily match any image of the selected clip
- Its powerful tools let you edit your video by cropping, splitting, adjusting speed, etc
- The video keyframe easily indicates the beginning and end of the parameters
For Win 7 or later (64-bit)
For macOS 10.12 or later
Conclusion
● Don’t just focus on how to upload Twitch streams to YouTube but also consider the quality of video you are posting to YouTube. Remember, your video quality will speak much more of you than any other description. So, strive to produce quality videos using the best tool, Filmora. The app is easy to use and will elevate your views and imaginations through your video in the most impactful way.
Amidst many online applications is Twitch. This live streaming platform takes your experience to another level. You can use it to make crafts, play games, attract broadcasters, and many more. Twitch was launched in 2011, and since then, it has attracted millions of users, managing a database of about 4 million broadcasters by early 2020. With it, users can stream their activities as others watch in real-time. Just browse a category to find a stream.
You can also follow streamers that you like on the platform and get updates and notifications immediately after they are posted. But how do you start a career on a platform like Twitch? You need to broadcast and gather a large following. You can use built-in audiences from other platforms like Facebook. Let’s dive into the core of the matter and look at how to upload Twitch streams to YouTube and build your platform.
In this article
02 What is the benefit of uploading your Twitch Streams to YouTube
03 How to upload your Twitch Streams to YouTube
What is Twitch VOD?
Twitch Video on Demand (VOD) is a recording of previously streamed content. It provides briefings if you missed catching the Twitch live stream. Just watch the VOD from your favorite streamer and be engaged the best way possible. However, VODs don’t last forever. They are removed after two weeks of broadcast. But streamers with Partner Status can have their VODs last up to 60 days.
- How to enable Twitch VOD?
VODs are the best form to archive streams that your fans missed. Even though they are not enabled by default, you can manually enable them and not let your fans miss any important event from your channel. They’ll find it under the “Videos” tab on any Twitch channel. Follow these steps to enable VOD on your channel.
Step 1. Go to your profile icon in the top right corner of Twitch
Check in the “Channel & Video” section and locate the “Stream Key & Preferences” menu.
Step 2. Click on “Creator Dashboard”
Remember, you can enable VODs from your creator dashboard. Just go under the “Settings” tab and click on the “Stream section” of the creator dashboard. Check under the subtitle “VOD Settings” and get the option to store past broadcasts. You can also toggle the slider to store your past broadcasts.
Step 3 Click on the “Settings” tab on the left-hand side and go to Stream
You’ll get various drop-down menu options. Click on the “Settings” tab and choose the “Stream” option. The system will navigate to a new page, thus setting your preferences for VODs and clips.
Step 4. Go to “VOD Settings” and toggle on the “Store Past Broadcast.”
Ensure you have the toggle option turned ON under the “VOD Settings.” If it’s “ON,” you’ll realize the toggle will be purple, with a checkmark in it. Twitch will be confirmed to be enabled if it’s purple.
- Frequently Asked Question about Twitch VOD
These are some questions frequently asked by Twitch users.
1. How long will Twitch store my VOD
Your Twitch can either be stored for 14 or 60 days, depending on your level. For Twitch Prime, Twitch Partner or a Twitch Turbo user has their past broadcasts automatically saved for 60 days before deletion. But if you are not connected to these three options, your past broadcasts will be saved for only 14 days before deletion.
Since your past broadcasts cannot be live for more than 60 days, you have the option to download the video to your computer before the validity days expire and Twitch deletes it. You can use an External Hard drive to save the past broadcast content. Likewise, it is possible to turn your past broadcast content into Highlight and, in turn, permanently store them on Twitch.
2. What is the difference between Twitch VOD, Highlights, and Clips
Twitch VOD is a previously saved video of your live stream content. You choose to save either part or the entire content of your previously streamed content. More so, you don’t need any additional requirements to use VOD.
Highlights are short videos that have been edited from your past broadcast content. You can save them on Twitch permanently. Streamers majorly use highlights to save video game achievements. Unlike VOD Twitch that can be saved up to 60 days, Highlights usually lasts no more than 3 minutes.
- To make Highlights on Twitch, first, navigate to your Dashboard.
- Then scroll down and click on “Content” > “Video Producer.
- Next, press on “All Videos” to change them to “Past Broadcasts.”
- Now press the “Highlight” button, and Twitch will immediately open a new tab for “Twitch Highlighter Tool.”
- Then select the video part to include as “Highlight” and press the “Create Highlights” button.
- Wait a while for the process to be completed, and Voila! You have your Highlights created.
When it comes to Twitch Clip, you can capture special moments in a stream you are currently watching. On the same note, you can share clips with friends and other users on social media platforms. Such shared clips contain a link where others view the source or video from.
The clips you create will automatically be saved on the streamer’s channel on the “Clips” page, where other viewers can see them too. Nonetheless, you can download “clips” to your computer and, in turn, upload them whenever you want to. And note that you can help your stream grow via “Clips” by letting your viewers clip and share your stream moments.
- To create “Clips” on Twitch, identify which Streamers channel you wish to create a clip from.
- Then click on the “Clapper board” icon. Next, edit your clip between 5 and 60 seconds long.
- Finally, create a title and publish your Clip. You’ll also enjoy the privilege to share your clip’s link to other social media networks.
What is the benefit of uploading your Twitch Streams to YouTube
You stand to gain a lot when you upload your Twitch Streams to YouTube.
1) To enlighten your followers
Your followers will see your streams and make the best decisions. Viewers can check out your recordings and other highlights from past streams. It will help them decide whether they like what they see and probably join your live streams.
2) Twitch provides content for you to share and monetize on YouTube
Since Twitch streaming is more popular nowadays, many people throng it for content. It is not wise to rely entirely on Twitch to discover as a Twitch Streamer. Posting to YouTube will make it known within a short time. You would have announced your streams most nobly and kept your followers up to date, attracting new ones as well.
3) To keep your followers engaged even when you are offline
Even though live streaming is important, some viewers may not attend the live sessions due to different time zones or other commitments. In this regard, when uploaded to YouTube, Twitch will give them a chance to watch your content just whenever they log in. They, therefore, have the option to watch a Twitch VOD of the live stream they missed.
How to upload your Twitch Streams to YouTube
Check how to upload Twitch streams to YouTube from the Twitch website.
Step 1. Identify the little arrow next to your name on the Twitch website and click on it. Then click on the “Video Producer” to take you to a list of your Twitch videos.
Step 2. Check out and click on the “three-dots” on the video you wish to upload to YouTube. Click on the “Export” tab.
Step 3. A menu will then pop up. Here, you can fill in the description, title, and tags that you would like to appear on the YouTube video. There is an option for Twitch to split your video automatically. If you wish so, then tick the “Checkbox” to enable it. Then click on the “Start Export” option to export your Twitch streams to YouTube.
Bouns! Edit Your Twitch Video with Filmora
The quality of your video matters when it comes to uploading Twitch Streams to YouTube. Using a third-party tool to edit your video is the first step in ensuring your videos communicate meaningful content. Filmora comes in handy to bring your imaginations to life. Use it for simple creation without limits, even for beginners.
- Use it to track moving objects in video clips
- Easily match any image of the selected clip
- Its powerful tools let you edit your video by cropping, splitting, adjusting speed, etc
- The video keyframe easily indicates the beginning and end of the parameters
For Win 7 or later (64-bit)
For macOS 10.12 or later
Conclusion
● Don’t just focus on how to upload Twitch streams to YouTube but also consider the quality of video you are posting to YouTube. Remember, your video quality will speak much more of you than any other description. So, strive to produce quality videos using the best tool, Filmora. The app is easy to use and will elevate your views and imaginations through your video in the most impactful way.
Also read:
- [Updated] Curated List of Top 10 YouTube Video Cutting Apps
- How to Safeguard Your Videos in the Age of YouTube
- In 2024, Debugging Techniques Identifying and Resolving Common JavaScript Errors
- Navigating Industry Titans A Creator's Guide to MNC Deals
- In 2024, DIY Guide Screen Capture & Sound From YouTube
- Guidelines to Frame Your YouTube Creation Flow
- 2024 Approved Elite 7 DSLR Options Superior for Professional Videography
- Strategic Thumbnail Design Maximizing Online Exposure
- Leveraging YouTube Top 5 Digital Strategies for Brand Success
- [New] Chuckle Collective Top 15 Hilarious YouTubers for Boredom Beaters
- Elevate Engagement, Amplify Audience (YouTube Marketing) for 2024
- Soundtrack Sovereignty A Guide to the Top 20 YouTube Music Kingdoms
- Inside Look Comprehensive Analysis of V-Tubers
- Total Disconnect From YouTube Shorts Made Simple
- Ace Search Engine Rankings on YouTube 11 Proven SEO Methods
- [New] Enhancing Viewers' Staying Power Top 6 Strategies for YouTube Success
- Enjoy Your Favorite Songs Anytime Convert YouTube to MP3 Now
- YouTube Stream Mastery Top-Rated Tech & Devices Guide for Creators
- [New] Dissecting Top-Viewed Video Dynamics on YouTube
- In 2024, Elevate Your Video with Smart End Screen Techniques
- 2024 Approved Essential Guide Top 10 Steps for Instructors on YouTube Channels
- 2024 Approved Building Inspiring Lifestyle Content for Viewers
- In 2024, Constructing YouTube Playlists Made Simple
- 2024 Approved Clear Youtube's Obscured Visual Field
- Merging Text & Vision on a Limited Budget
- Effortlessly Transform YouTube Tunes to MP3 with Mac
- Effortless Conversion Youtube Videos to Mac Ratio for 2024
- A Review of YouTube's Integration with iPhone & Android Devices
- In 2024, 10 Top Zero-Charge Web Tools to Craft Videos
- Hack the YouTube Timeline Increase or Decrease Sound
- Earnings Explorer What You Get for Watching One Million Videos?
- 2024 Approved Dive Deep Into Designing Dynamic YouTube Live Thumbnails
- 2024 Approved Engaging Stories, Expanding Audiences Top Three Methods
- [New] 5 Leading 3D Video Entrance Design Tools
- In 2024, Is Fake GPS Location Spoofer a Good Choice On Infinix Hot 40i? | Dr.fone
- New In 2024, A Comprehensive Selection of Free, Must-Hear Game Sounds
- Updated In 2024, From Pixels to Perfection Finding the Ideal Picture Ratio
- In 2024, 3uTools Virtual Location Not Working On Apple iPhone 13 Pro Max? Fix Now | Dr.fone
- In 2024, Easiest Guide How to Clone Vivo V29e Phone? | Dr.fone
- [Updated] In 2024, Mastering Profile Design A Discord Enthusiast’s Primer
- [New] 2024 Approved Cutting the Clutter Stopping Instagram Followers
- Tips and Tricks for Setting Up your Motorola Moto G24 Phone Pattern Lock
- Updated 2024 Approved The 15 Best Apps to Turn Photos Into Cartoons and Sketches
- In 2024, How to Mirror Tecno Spark 10C to Mac? | Dr.fone
- New 2024 Approved Best Facebook to MP3 Converter Websites Ranked
- In 2024, How to Get and Use Pokemon Go Promo Codes On Nubia Red Magic 9 Pro+ | Dr.fone
- [New] In 2024, Virtual Presentations Expert Screen-Share Tips for Social Media
- [Updated] 2024 Approved Unleash Collaborative Power in Virtual Settings - The Top 10 Free Recorders
- Step-by-Step Techniques for Sharing Videos on Instagram
- [New] Aligning with Audience Habits in Podcast Releases
- In 2024, 5 Easy Ways to Copy Contacts from Tecno Pova 5 Pro to iPhone 14 and 15 | Dr.fone
- In 2024, Instant-On Maximizing Your Video Playback Time
- 2024 Approved Innovative Auditory Experiences Mastering Vocal Changes in TikTok Videos
- Instagram's Abandoned Followers Map for 2024
- In 2024, Enhance Your Memories Download Free MP3s Onto Images
- How To Enable USB Debugging on a Locked Vivo V30 Phone
- 2024 Approved Shine a Light Best Video Brightening and Enhancement Apps
- How to Flash Dead Vivo T2 Pro 5G Safely | Dr.fone
- Top Tech Reviews with a Focus on Alternatives
- Title: "[Updated] Elevate Your YouTube Presence Banners for Gamers"
- Author: Kevin
- Created at : 2024-05-25 16:50:25
- Updated at : 2024-05-26 16:50:25
- Link: https://youtube-videos.techidaily.com/updated-elevate-your-youtube-presence-banners-for-gamers/
- License: This work is licensed under CC BY-NC-SA 4.0.
