![[Updated] Dissecting YouTube’s Features and Mechanisms After Uploading Content](https://thmb.techidaily.com/f47c079fa1fce90a8221b9c2c003a393b4231e2fbb42dbd4e99eb8971ba63ab6.jpg)
[Updated] Dissecting YouTube’s Features and Mechanisms After Uploading Content
Dissecting YouTube’s Features and Mechanisms After Uploading Content
How Does YouTube Work After a Video Is Uploaded

Richard Bennett
Mar 27, 2024• Proven solutions
You use YouTube to watch videos, post your own content, and build up a following. That is how YouTube works for you. This article is about how YouTube works technically. There are a lot of steps which occur between you clicking ‘upload’ and a viewer clicking ‘play’. Understanding this process can be useful to YouTubers because it can help shed light on where problems may be occurring when you have issues uploading or watching videos. Generally when there is a problem it is on your end and there are multiple simple things you can do to fix it.
This article will explain what goes on behind the scenes when you upload a video, where that video really goes, and what happens when somebody clicks play.
How Does YouTube Work
1. What Happens When You Upload?
When you upload a video your computer or device packages it into IP packets. Packets are fragments of information containing both data from your video and the address you are sending it to, in this case YouTube. The packets are encoded into radio signals which are sent through a wifi or cellular network. Your video travels through switches and routers on the internet until they reach YouTube’s servers. Your video is then reassembled and stored.
If uploading takes a long time for you it probably has nothing to do with YouTube; there is a lot that needs to happen for your video to even get there. How long the upload process takes depends on a number of factors including how many devices share your internet connection, how strong your wifi signal is, and the age of your router. If your uploads are taking too long consider compressing your videos before you upload them. You can also try uploading from your college campus or public libraries as institutions like these tend to have fast internet speeds.
2. Where is Your Video Stored?

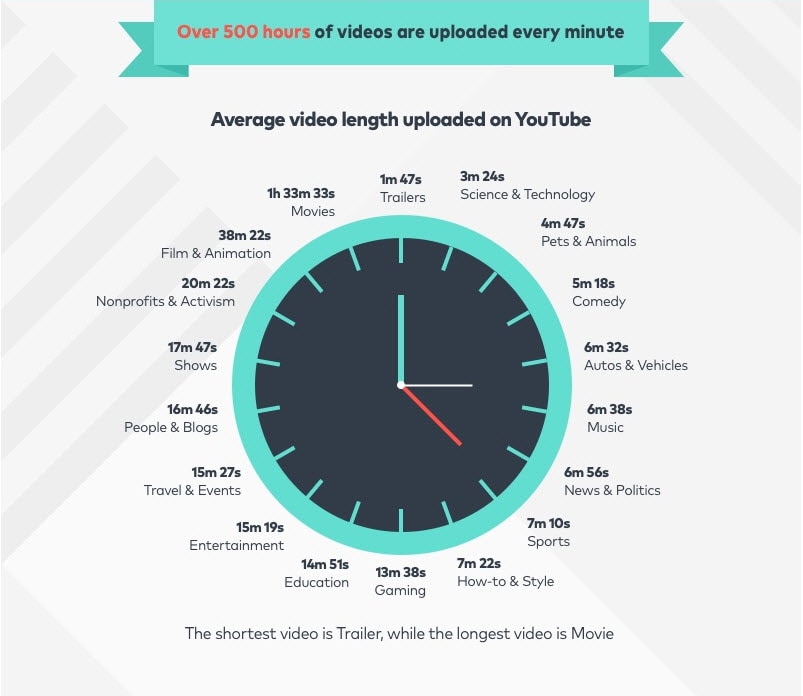
As it is owned by Google YouTube uses Google’s ‘Bigtable’, a compressed data storage system which allows it to store the 500+ hours of video uploaded to its servers every minute. Bigtable is software, though, not hardware. YouTube and Google both have massive amounts of data and it needs to be physically housed somewhere.
Google has Modular Data Centers all over the world where it keeps its servers. These centers could cost as much as $600 million dollars each and consume huge amounts of electricity. There are six of them in the United States, three in Europe, two in Asia, and one is South America.
3. What Happens When Someone Watches Your Video?
When a viewer clicks on your video their computer sends an encoded request through the internet to YouTube’s servers. After YouTube receives the play request it chooses which format to play the video in based on the viewer’s browser. Your video is again turned into packets, which are again sent as radio signals over the internet to your viewer. Your viewer’s computer or device reforms the packets into your video and their browser plays it.
If videos take a long time to load for you then there are a few things you can do to speed them up. First, consider changing the channel of your wifi router. Most people stay on the channel their router was set to when they first got it and so there is a good chance you and your neighbors are all on the same channel. This causes your networks to interfere with each other. You can also delete the temporary files on your computer. Besides helping you stream video faster this will free up storage space. Another thing you can do is make sure there are as few devices connected to your network as possible while you are watching videos. Besides mobile phones and laptops you may have appliances, like coffee machines and refrigerators, which are wifi enabled. Disconnect them temporarily and it will help your videos to load faster.
Richard Bennett
Richard Bennett is a writer and a lover of all things video.
Follow @Richard Bennett
Richard Bennett
Mar 27, 2024• Proven solutions
You use YouTube to watch videos, post your own content, and build up a following. That is how YouTube works for you. This article is about how YouTube works technically. There are a lot of steps which occur between you clicking ‘upload’ and a viewer clicking ‘play’. Understanding this process can be useful to YouTubers because it can help shed light on where problems may be occurring when you have issues uploading or watching videos. Generally when there is a problem it is on your end and there are multiple simple things you can do to fix it.
This article will explain what goes on behind the scenes when you upload a video, where that video really goes, and what happens when somebody clicks play.
How Does YouTube Work
1. What Happens When You Upload?
When you upload a video your computer or device packages it into IP packets. Packets are fragments of information containing both data from your video and the address you are sending it to, in this case YouTube. The packets are encoded into radio signals which are sent through a wifi or cellular network. Your video travels through switches and routers on the internet until they reach YouTube’s servers. Your video is then reassembled and stored.
If uploading takes a long time for you it probably has nothing to do with YouTube; there is a lot that needs to happen for your video to even get there. How long the upload process takes depends on a number of factors including how many devices share your internet connection, how strong your wifi signal is, and the age of your router. If your uploads are taking too long consider compressing your videos before you upload them. You can also try uploading from your college campus or public libraries as institutions like these tend to have fast internet speeds.
2. Where is Your Video Stored?
As it is owned by Google YouTube uses Google’s ‘Bigtable’, a compressed data storage system which allows it to store the 500+ hours of video uploaded to its servers every minute. Bigtable is software, though, not hardware. YouTube and Google both have massive amounts of data and it needs to be physically housed somewhere.
Google has Modular Data Centers all over the world where it keeps its servers. These centers could cost as much as $600 million dollars each and consume huge amounts of electricity. There are six of them in the United States, three in Europe, two in Asia, and one is South America.
3. What Happens When Someone Watches Your Video?
When a viewer clicks on your video their computer sends an encoded request through the internet to YouTube’s servers. After YouTube receives the play request it chooses which format to play the video in based on the viewer’s browser. Your video is again turned into packets, which are again sent as radio signals over the internet to your viewer. Your viewer’s computer or device reforms the packets into your video and their browser plays it.
If videos take a long time to load for you then there are a few things you can do to speed them up. First, consider changing the channel of your wifi router. Most people stay on the channel their router was set to when they first got it and so there is a good chance you and your neighbors are all on the same channel. This causes your networks to interfere with each other. You can also delete the temporary files on your computer. Besides helping you stream video faster this will free up storage space. Another thing you can do is make sure there are as few devices connected to your network as possible while you are watching videos. Besides mobile phones and laptops you may have appliances, like coffee machines and refrigerators, which are wifi enabled. Disconnect them temporarily and it will help your videos to load faster.
Richard Bennett
Richard Bennett is a writer and a lover of all things video.
Follow @Richard Bennett
Video Perfection: Streamlined Subtitle/CC Implementation on YouTube
How to Easily Add Subtitles and Closed Captions to YouTube Video
Richard Bennett
Mar 27, 2024• Proven solutions
In this article, we are going to show you how important it is to add subtitle and closed captions in your YouTube video, and how to add them.
The best video editor for YouTubers - Wondershare Filmora , not only allows you to cut, crop, rotate, reverse videos, but also offers your advanced features like PIP, Green Screen, or audio mixing. What’s more, you can find lots of effects for Fashion, gaming, education, tutorial, sports, etc. Check this article to know more.


Why subtitle and closed captions are important for YouTube videos?
- Forced closed captions and subtitles actually help the viewers to understand the content in your video if the audio quality of your video is bad, muffled or barely audible. Reading makes it easier for them to understand.
- This also helps people with hearing impairments. People with troubled ears can still watch and understand your content.
- It’s a great aid to such videos which have been recorded in other foreign languages that you don’t understand. Hence it will increase the number of viewers all around the world.
- They both are generally added for easy accessibility to the viewers who wish to watch in sound sensitive environments.
So, here we are going to show you two ways to add subtittles to video: directly or uploading caption or transcript files
Adding subtitles and closed captions manually
To add subtitles and closed captions to your YouTube video, fisrt, you should sign in to your YouTube account. On left right below ‘Home’ you will find ‘My Channel’. It will direct you to your personal YouTube page. On the top, right next to your subscribers lays the ‘Video manager’, giving you the list of your uploaded videos.
Select the video and click on edit to get a drop down menu. Click on subtitles and CC. This will take you to the subtitling interface. To the right of video select ‘add new subtitles’ and then ‘create new subtitles’. Select the subtitle language. Play the video to listen to the content and type down in the box. Click on ‘+’ button once you are done.
This will create a subtitle timeline right beneath the video. You can manage by dragging and expanding the subtitle duration according to the audio of the video. The subtitle will appear at the bottom of the video screen. Click ‘publish’ once done.
An interruption might occur with appearing of subtitles in accordance with video. Hence a lot precision is required while doing so.
Uploading Caption or Transcript Files automatically
To upload Caption or Transcript Files to YouTube Videos you first need to create a format on a text editor. For windows use Notepad and for Mac you may use TextEdit. Create a format of putting the number of subtitle first, time stamp and then text of the subtitle. For example
1\
00:02:34:12 using a format of (hour : minute : second : millisecond)
2. *text*
This is the sample text for first subtitle at zero hours, two minutes, thirty four seconds and twelve milliseconds. Once done with this. Go to file, select ‘save as’. Write the file name with an extension of .srt and select ‘All files’ for type of file. Click encoding menu and select UTF-8. Once saved, sign in to your YouTube account.
On left right below ‘Home’ you will find ‘My Channel’. It will direct you to your personal YouTube page. On the top, right next to your subscribers lays the ‘Video manager’, giving you the list of your uploaded videos.
Select the video and click on edit to get a drop down menu. Click on subtitles and CC. Go to ‘add subtitles’ and then ‘upload a file’. A pop-up menu will appear select ‘subtitles file’. Click upload. The file will send subtitles to your video.
This will create a subtitle timeline right beneath the video. You can manage by dragging and expanding the subtitle duration according to the audio of the video. The subtitle will appear at the bottom of the video screen. Click ‘publish’ once done.
3 Best Tools for add/managing video Subtitles/CC
1. Amara
Amara is a smart video editor which helps insert captions and subtitles to videos. It also helps in transcribing the videos. It takes help of crowd sourcing to subtitle any YouTube video. They take help from viewers to subtitle the videos. By making crowd subtitling available for any YouTube creator, they are allowing them to reach more viewers in more languages
2. DIY Captions
DIY captions help you to transcribe the YouTube videos, if not in most accurate manner, then in a little easier way. All you have to do is just paste the URL of the YouTube video and it will provide you all the subtitles. These may not be accurate but will provide you major base material which can be tweaked a bit here and there and is far better than making all the subtitles starting from scratch.
3 Subtitles for YouTube
Subtitles for YouTube is a Google Chrome extension which provides subtitles for YouTube videos. For this you will have to provide a subtitle file with .srt extension. The attractive feature of this is that you won’t have to download the video and still run the subtitles on it. This is very much helpful for people who work on YouTube or watch movies without subtitles.
Richard Bennett
Richard Bennett is a writer and a lover of all things video.
Follow @Richard Bennett
Richard Bennett
Mar 27, 2024• Proven solutions
In this article, we are going to show you how important it is to add subtitle and closed captions in your YouTube video, and how to add them.
The best video editor for YouTubers - Wondershare Filmora , not only allows you to cut, crop, rotate, reverse videos, but also offers your advanced features like PIP, Green Screen, or audio mixing. What’s more, you can find lots of effects for Fashion, gaming, education, tutorial, sports, etc. Check this article to know more.
Why subtitle and closed captions are important for YouTube videos?
- Forced closed captions and subtitles actually help the viewers to understand the content in your video if the audio quality of your video is bad, muffled or barely audible. Reading makes it easier for them to understand.
- This also helps people with hearing impairments. People with troubled ears can still watch and understand your content.
- It’s a great aid to such videos which have been recorded in other foreign languages that you don’t understand. Hence it will increase the number of viewers all around the world.
- They both are generally added for easy accessibility to the viewers who wish to watch in sound sensitive environments.
So, here we are going to show you two ways to add subtittles to video: directly or uploading caption or transcript files
Adding subtitles and closed captions manually
To add subtitles and closed captions to your YouTube video, fisrt, you should sign in to your YouTube account. On left right below ‘Home’ you will find ‘My Channel’. It will direct you to your personal YouTube page. On the top, right next to your subscribers lays the ‘Video manager’, giving you the list of your uploaded videos.
Select the video and click on edit to get a drop down menu. Click on subtitles and CC. This will take you to the subtitling interface. To the right of video select ‘add new subtitles’ and then ‘create new subtitles’. Select the subtitle language. Play the video to listen to the content and type down in the box. Click on ‘+’ button once you are done.
This will create a subtitle timeline right beneath the video. You can manage by dragging and expanding the subtitle duration according to the audio of the video. The subtitle will appear at the bottom of the video screen. Click ‘publish’ once done.
An interruption might occur with appearing of subtitles in accordance with video. Hence a lot precision is required while doing so.
Uploading Caption or Transcript Files automatically
To upload Caption or Transcript Files to YouTube Videos you first need to create a format on a text editor. For windows use Notepad and for Mac you may use TextEdit. Create a format of putting the number of subtitle first, time stamp and then text of the subtitle. For example
1\
00:02:34:12 using a format of (hour : minute : second : millisecond)
2. *text*
This is the sample text for first subtitle at zero hours, two minutes, thirty four seconds and twelve milliseconds. Once done with this. Go to file, select ‘save as’. Write the file name with an extension of .srt and select ‘All files’ for type of file. Click encoding menu and select UTF-8. Once saved, sign in to your YouTube account.
On left right below ‘Home’ you will find ‘My Channel’. It will direct you to your personal YouTube page. On the top, right next to your subscribers lays the ‘Video manager’, giving you the list of your uploaded videos.
Select the video and click on edit to get a drop down menu. Click on subtitles and CC. Go to ‘add subtitles’ and then ‘upload a file’. A pop-up menu will appear select ‘subtitles file’. Click upload. The file will send subtitles to your video.
This will create a subtitle timeline right beneath the video. You can manage by dragging and expanding the subtitle duration according to the audio of the video. The subtitle will appear at the bottom of the video screen. Click ‘publish’ once done.
3 Best Tools for add/managing video Subtitles/CC
1. Amara
Amara is a smart video editor which helps insert captions and subtitles to videos. It also helps in transcribing the videos. It takes help of crowd sourcing to subtitle any YouTube video. They take help from viewers to subtitle the videos. By making crowd subtitling available for any YouTube creator, they are allowing them to reach more viewers in more languages
2. DIY Captions
DIY captions help you to transcribe the YouTube videos, if not in most accurate manner, then in a little easier way. All you have to do is just paste the URL of the YouTube video and it will provide you all the subtitles. These may not be accurate but will provide you major base material which can be tweaked a bit here and there and is far better than making all the subtitles starting from scratch.
3 Subtitles for YouTube
Subtitles for YouTube is a Google Chrome extension which provides subtitles for YouTube videos. For this you will have to provide a subtitle file with .srt extension. The attractive feature of this is that you won’t have to download the video and still run the subtitles on it. This is very much helpful for people who work on YouTube or watch movies without subtitles.
Richard Bennett
Richard Bennett is a writer and a lover of all things video.
Follow @Richard Bennett
Also read:
- [New] In 2024, How to Change the Destination Where Screenshots Are Saved on Your Mac
- [Updated] 5 Innovative YT Tales Share Your Life Journey
- [Updated] In 2024, Gamer-Centric Streaming Tool Selection
- [Updated] In 2024, Picture-to-Motion Transformation with Music Elements
- [Updated] In 2024, The Essential Guide for Perfecting Crossfade Artistry with Audacity
- Creating a Lasting Impression The Ultimate YouTube Live Thumbnail Guide for 2024
- Event Ensemble Curating Best DJ Templates
- Everything You Need to Know about Lock Screen Settings on your Google Pixel 8
- How to Add YouTube End Screen and Cards Effectively
- How to Use Your Recordings for a Seamless Live Experience on FB for 2024
- In 2024, A Compreenas Guide to Auto and Advanced Camera Exposure Methods
- Title: [Updated] Dissecting YouTube’s Features and Mechanisms After Uploading Content
- Author: Kevin
- Created at : 2024-11-13 02:15:20
- Updated at : 2024-11-15 12:59:28
- Link: https://youtube-videos.techidaily.com/updated-dissecting-youtubes-features-and-mechanisms-after-uploading-content/
- License: This work is licensed under CC BY-NC-SA 4.0.