
!["[Updated] Digital Recorder Snap Your Screen, Upload to YouTube Online/PC/Mac"](https://www.lifewire.com/thmb/x3esfFmI2Y55OmmlRvMWAY3TioM=/400x300/filters:no_upscale():max_bytes(150000):strip_icc():format(webp)/GettyImages-98471373-56a9ff935f9b58b7d0006b1a.jpg)
"[Updated] Digital Recorder Snap Your Screen, Upload to YouTube Online/PC/Mac"
Digital Recorder: Snap Your Screen, Upload to YouTube Online/PC/Mac
10 Record Screen and Upload to YouTube Tools [PC, Mac, Online]

Richard Bennett
Mar 27, 2024• Proven solutions
Recording the screen, including the audio, can help you introduce your gaming flow, show how to perform a task on the computer, or create a presentation. You can also upload the screen record to YouTube for free. There are several solutions if you want to record your screen and upload it to YouTube. You can record the screen with some screen recording software on your Mac or your Windows PC or with some online screen recording software or the screen recording feature built-in YouTube itself. In this article, we will show you how to to record screens and upload to YouTube on Windows and Mac with some screen recorders , some of which are free to use, or freemium, which are built in your computer. Check it out now.
- Part 1: Record Screen and Upload to YouTube Directly on PC
- Part 2: Record Screen and Upload to YouTube Online
- Part 3: Record Screen and Upload it to YouTube on Mac
Recommended YouTube Screen Recorders to Record Screen and Upload to YouTube Directly [Windows & Mac]
The following YouTube screen recording software can be used on both Windows and Mac computers. You can record the entire screen or a particular portion of the screen, record your own voiceover or add music to the recorded video and then upload it to YouTube directly.
Using Wondershare Filmora
Filmora is an easy-to-use yet powerful enough video editing software which features the Recording tools. Using Filmora, you can record the desktop screen , audio and webcam simultaneously. But compared with Filmora, the highest frame rates that Filmora can capture at 1 second is 60FPS.

Launch Wondershare Filmora and choose Full Feature mode to begin a project. Go to the Record tab and choose Record PC Screen. There are three types of screen recording to choose from – Target Window, Full Screen and Custom. You can also choose to record computer system audio or record from microphone. Click the icons to turn them off or on accordingly. Click Settings to see if there’s anything you need to adjust before recording.
 Download Mac Version ](https://tools.techidaily.com/wondershare/filmora/download/ )
The recorded footage will be loaded to the Media panel directly, you can then cut out imperfect frames, add some texts and titles, or apply transitions and filters to it. To upload the recorded screen video, click the Export in the main interface, and then switch to YouTube tab in the Export window.

Sign in your YouTube account and complete the video info accordingly and then click the Export button to upload the recorded video to YouTube directly.
If you are looking for more screen recorders which can run on Windows, Mac, Linux, Android, iOS or online for different purposes, you can check our picks of the best screen recorders for all platforms based on different purposes.
Part 1: How to Record Screen on Windows PC and Upload to YouTube Directly
1. Bandicam
To record screen using Bandicam, select “Screen Recording” and a green-edged rectangle window will appear. Adjust the rectangle window on the video then play the video.
Clicking the REC button will change the green-edged line of the rectangle window to red. Click the stop button to stop recording. To watch the recorded video, go to the “General” tab and click “Open.”
You can also upload your desired videos to YouTube from Bandicam by clicking the “Upload” button found under Bandicam’s “Output” tab.

2. Using Microsoft Expression Encoder 4
You can download Microsoft Expression Encoder 4 to record the screen of your device and upload it to YouTube. The software has a screen capture tool and encoder. Install the software as you would usually do. There’ll be 2 shortcuts in the start menu – Microsoft Expression Encoder 4 Screen Capture (used to capture the screen) and Microsoft Expression Encoder 4 (converts the screen into a video that can be uploaded to YouTube).
3. Using Ezvid
Ezvid can record screen and audio simultaneously. It can also capture the whole area of the screen, making it perfect for tutorial videos. Ezvid also has speech synthesis that translates text captions into artificial human language, so it can easily produce human sound with only a click of a button.
4. Using Smartpixel
Smartpixel is a screen recorder for Android and Windows. It has a user-friendly interface and different editing as well as recording functions. Smartpixel can export various video formats such as 3gp, MP4, wmv, avi and flv. It also allows you to upload videos to different online platforms like GoPlay and YouTube.
Part 2: How to Record Screen Online
1. Using YouTube
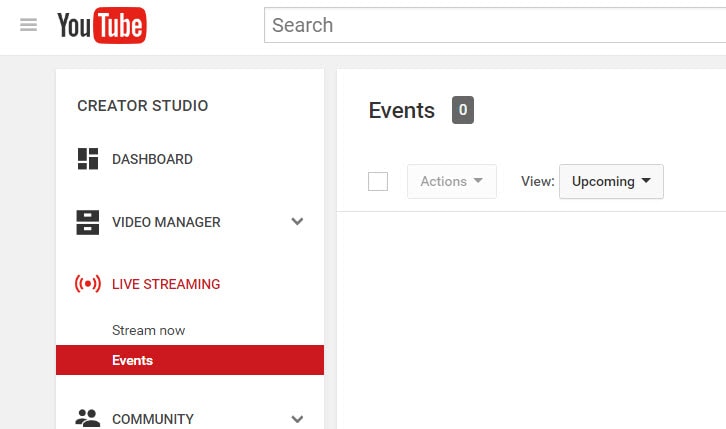
You can now also record desktop screen with the features in YouTube. To start recording the screen using YouTube, you just need to sign-in to the website using your Google Account. Click “Creator Studio”. Go to Live Streaming and choose “Events”. You’ll be directed to the “Create Event” page. Provide the title for your screencast video, set the video’s privacy to either Private or Unlisted.
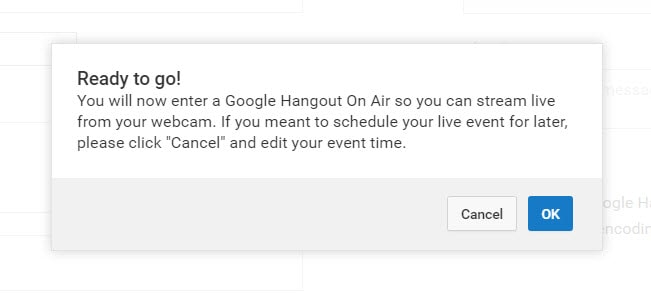
Click “Go Live Now” The Hangouts on Air page will open. Start the webcam from recording by clicking the camera icon. If you don’t want to record audio, you can just click the microphone icon.
Click “Screenshare” and choose a desktop window that you want to record for the screencast. Click “Start Screenshare” to share the screen then click the “Start Broadcast” button to begin recording the screen. When you’re done recording, just “Stop Broadcast” and go to the YouTube website. The new screencast video is stored in your YouTube video dashboard. You can share the video or download it to your Google Drive.
For more details, you can check How to record YouTube videos . If you’re looking for more online screen recorders for YouTube, you can check our picks of the 10 Best Free Online Screen Recorders .
2. Using FlexClip - Free Online Screen Recorder
FlexClip is a complete bundle of creativity. Why so? It is because it’s a web-based tool that helps you with image and video editing and post-production. It also offers a free online screen recording option.
FlexClip lets you record your webcam, screen, and audio with a simple click. Contrarily, you can also record simultaneous screens without a hitch! It can record almost anything that is being displayed on your computer screen. So be it gameplays, seminars, courses, presentations, or anything, you can always use this program to save your recording.
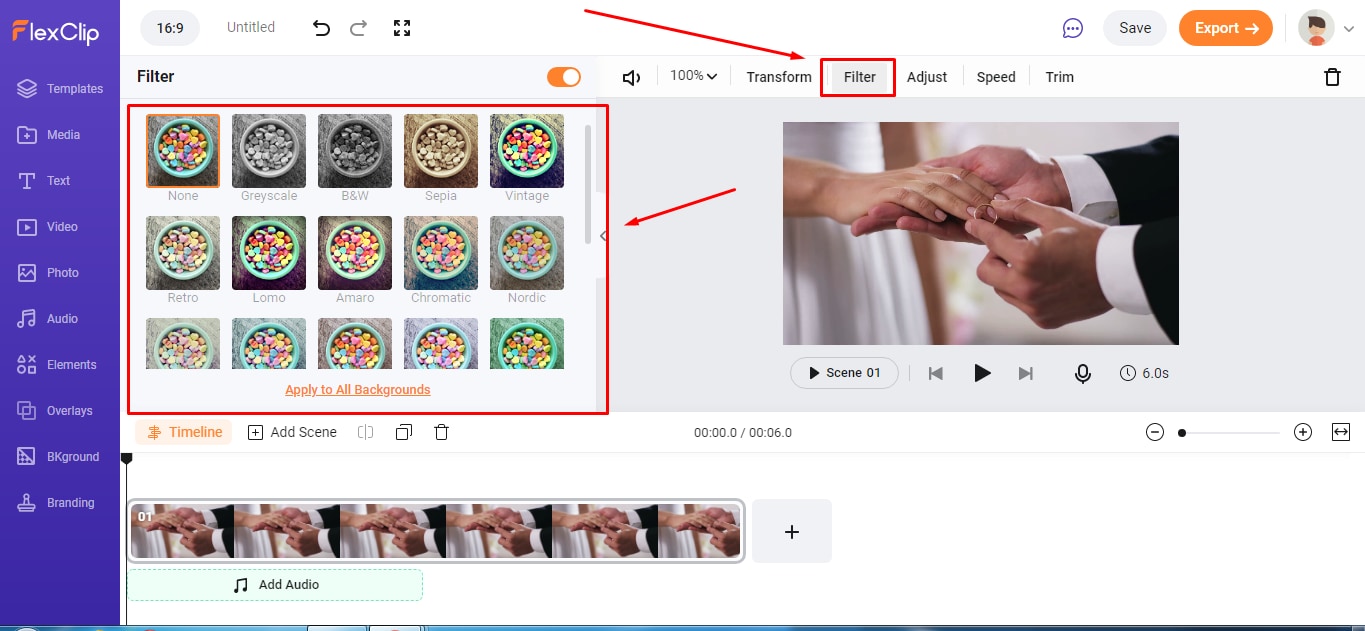
And once you’re done capturing the screen, FlexClip also allows you to edit your recording. You can add subtitles, highlights, overlays, and annotations to increase your video’s worth. So no wonder why FlexClip is one of the leading web-based software for free online screen capturing, especially if you want to make great YouTube videos.
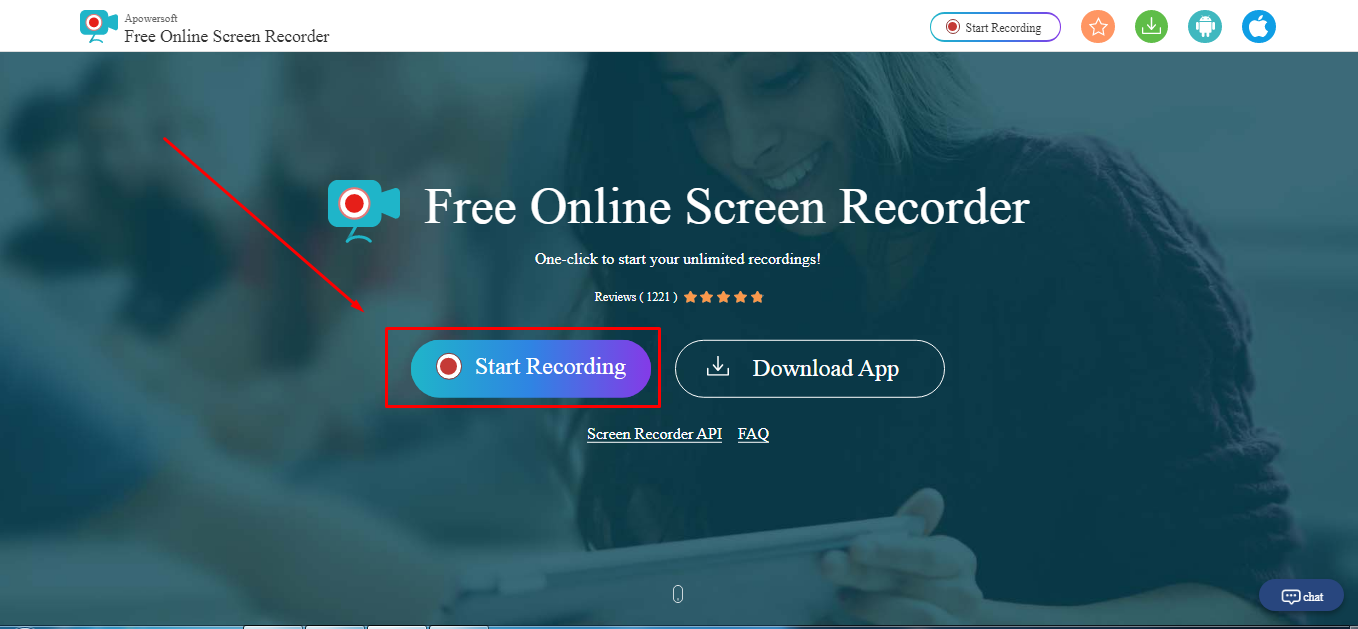
The recording process is easy. All you need to do is visit the website and click the “Start Recording” button.
Then, choose your layout to start recording the screen and audio. When you’re finished, just hit the “Stop” button to end recording to edit the video in FlexClip’s built-in video editor. Lastly, download the screencast to upload it to your YouTube channel.
3. Using Apowersoft - Online Screen Recorder (Free)
Apowersoft is a renowned company that creates digital products, including file compressors, watermark removers, and more. Since there’s a growing demand for screen recorders for YouTube, the Apowersoft creators have also launched a “Free Online Screen Recorder.” Yup! You’re reading the right name.
Apowersoft – Free Online Screen Recorder eases the screen recording process. While it’s an online tool, you can also download the app on your Mac or Windows OS.
It’s a free program with simple features, such as a screen and webcam recording with audio. So if your YouTube content doesn’t require overlays, subtitles, or other editing stuff, this software is ideal due to its simplicity.
You can click the “Start Recording” button to get started.
.
Then, select the screen you wish to record, and save the captured screen to your local disk or cloud so you can upload the videos later to your YouTube channel.
Part 3: How to Record Screen for YouTube with Free Screen Recorder on Mac
1. Using QuickTime Player
QuickTime Player can be used to record movies from your camera or the screen of your iPad, iPod touch or iPhone. It can also record your Mac’s screen or record audio from your microphone. To record the screen of your Pad, iPod touch or iPhone, you should use the movie-recording function. You can use it to record the screen for YouTube video, or you can also record the YouTube video and empower it with your creativity.
For more details of using QuickTime Player to record YouTube videos, check our guide: How to record videos with Quicktime.
2. Using Screen Flow
Screen Flow is our second pick for Mac. Although it’s paid software, you can still enjoy the blessings of this screen recorder through the trial version. It’s a very handy tool that allows Mac screen recording and all iOS devices, such as iPhones and iPad.
Okay! So what’s good about screen flow? Let’s uncover. Firstly, it’s an editor + screen recorder specifically made for YouTube. You can capture the screen and edit the footage before uploading it to your channel.
Secondly, this software allows you to record simultaneous screens and your webcam. Plus, you can also record your voice through its mic recording option.
Another great thing about Screen Flow is that it has numerous video filters and a customizable title library. It also permits you to save screen recordings on your Mac or directly share them to your YouTube channel, other social media accounts, websites, or cloud storage in a few clicks.
Here’s a video to help you get started with screen recording on your Mac using Screen Flow:
3. Using Vmaker
Vmaker is another authentic software to record screens for your YouTube videos. It’s a free program, but you can buy premium versions to unlock more features.
The tool is trusted by many software review websites, such as “crozdesk.” It is available on both Mac and Windows OS. However, it seems like this software performs well on Mac operating systems.
Vmaker allows you to record your screen, your favorite YouTube videos, and the audio – all together! You can record the entire Mac screen or a specific portion in HD quality. Moreover, the software allows you to pick resolutions up to 4K to record the media.
This program also offers editing features like adding subtitles, music, flip, blur, trim, and more to create an awesome video. All videos are saved to your cloud workspace once you finish recording. Then, you can share the recorded video screens on your YouTube.
The tool is ideal for making tutorials, courses, demos, and product review videos. All you need to do is download Vmaker on your Mac. Choose a webcam, screen, or both with audio for recording. Start recording in the highest quality. Edit your video and share it on your YouTube channel.
Conclusion
Above are some screen recorders that you can use to record YouTube videos or record the screen and webcam simultaneously to make a video and upload it it to YouTube. If you want to record a screen video and edit it further, you should try Wondershare Filmora video editor.
Download Mac Version ](https://tools.techidaily.com/wondershare/filmora/download/ )
FAQs
Q1. How do you record your screen on a Mac for YouTube?
There are some great tools for screen recording on Mac for YouTube. The most loved and enjoyed program is Filmora by Wondershare. It’s a professional tool for screen recording and video editing. Most importantly, it has a user-friendly interface and records your screen in high quality.
Another option is the Quick Time Player. This program also allows screen recording. Likewise, Screen Flow is also a great program for screen capturing for YouTube on Mac.
Q2. Can I screen-record and upload it to YouTube?
There are two ways to do it. First, you can download the free or paid screen recording software on your Windows or macOS. Second, you can look for online screen recorders like FlexClip or the built-in YouTube recorder and directly share the recorded video to your channel.
Some tools, like Apowersoft and Vmaker, save screen recordings to the cloud or local disk. And there’s no direct sharing of the recorded screens to your YouTube channel. So if you’re using such programs, you will need to sign in to your YouTube channel and upload the file from your computer hard drive.
Q3. How do I record my computer screen for 2022?
Some of the greatest video editing and screen recording tools like Filmora, Bandicam, and FlexClip allow you to record your computer screen. Depending on the software, you can directly share the video to your YouTube channel. Or, save the video on your computer and then upload it on your channel.
Richard Bennett
Richard Bennett is a writer and a lover of all things video.
Follow @Richard Bennett
Richard Bennett
Mar 27, 2024• Proven solutions
Recording the screen, including the audio, can help you introduce your gaming flow, show how to perform a task on the computer, or create a presentation. You can also upload the screen record to YouTube for free. There are several solutions if you want to record your screen and upload it to YouTube. You can record the screen with some screen recording software on your Mac or your Windows PC or with some online screen recording software or the screen recording feature built-in YouTube itself. In this article, we will show you how to to record screens and upload to YouTube on Windows and Mac with some screen recorders , some of which are free to use, or freemium, which are built in your computer. Check it out now.
- Part 1: Record Screen and Upload to YouTube Directly on PC
- Part 2: Record Screen and Upload to YouTube Online
- Part 3: Record Screen and Upload it to YouTube on Mac
Recommended YouTube Screen Recorders to Record Screen and Upload to YouTube Directly [Windows & Mac]
The following YouTube screen recording software can be used on both Windows and Mac computers. You can record the entire screen or a particular portion of the screen, record your own voiceover or add music to the recorded video and then upload it to YouTube directly.
Using Wondershare Filmora
Filmora is an easy-to-use yet powerful enough video editing software which features the Recording tools. Using Filmora, you can record the desktop screen , audio and webcam simultaneously. But compared with Filmora, the highest frame rates that Filmora can capture at 1 second is 60FPS.
Launch Wondershare Filmora and choose Full Feature mode to begin a project. Go to the Record tab and choose Record PC Screen. There are three types of screen recording to choose from – Target Window, Full Screen and Custom. You can also choose to record computer system audio or record from microphone. Click the icons to turn them off or on accordingly. Click Settings to see if there’s anything you need to adjust before recording.
Download Mac Version ](https://tools.techidaily.com/wondershare/filmora/download/ )
The recorded footage will be loaded to the Media panel directly, you can then cut out imperfect frames, add some texts and titles, or apply transitions and filters to it. To upload the recorded screen video, click the Export in the main interface, and then switch to YouTube tab in the Export window.
Sign in your YouTube account and complete the video info accordingly and then click the Export button to upload the recorded video to YouTube directly.
If you are looking for more screen recorders which can run on Windows, Mac, Linux, Android, iOS or online for different purposes, you can check our picks of the best screen recorders for all platforms based on different purposes.
Part 1: How to Record Screen on Windows PC and Upload to YouTube Directly
1. Bandicam
To record screen using Bandicam, select “Screen Recording” and a green-edged rectangle window will appear. Adjust the rectangle window on the video then play the video.
Clicking the REC button will change the green-edged line of the rectangle window to red. Click the stop button to stop recording. To watch the recorded video, go to the “General” tab and click “Open.”
You can also upload your desired videos to YouTube from Bandicam by clicking the “Upload” button found under Bandicam’s “Output” tab.
2. Using Microsoft Expression Encoder 4
You can download Microsoft Expression Encoder 4 to record the screen of your device and upload it to YouTube. The software has a screen capture tool and encoder. Install the software as you would usually do. There’ll be 2 shortcuts in the start menu – Microsoft Expression Encoder 4 Screen Capture (used to capture the screen) and Microsoft Expression Encoder 4 (converts the screen into a video that can be uploaded to YouTube).
3. Using Ezvid
Ezvid can record screen and audio simultaneously. It can also capture the whole area of the screen, making it perfect for tutorial videos. Ezvid also has speech synthesis that translates text captions into artificial human language, so it can easily produce human sound with only a click of a button.
4. Using Smartpixel
Smartpixel is a screen recorder for Android and Windows. It has a user-friendly interface and different editing as well as recording functions. Smartpixel can export various video formats such as 3gp, MP4, wmv, avi and flv. It also allows you to upload videos to different online platforms like GoPlay and YouTube.
Part 2: How to Record Screen Online
1. Using YouTube
You can now also record desktop screen with the features in YouTube. To start recording the screen using YouTube, you just need to sign-in to the website using your Google Account. Click “Creator Studio”. Go to Live Streaming and choose “Events”. You’ll be directed to the “Create Event” page. Provide the title for your screencast video, set the video’s privacy to either Private or Unlisted.
Click “Go Live Now” The Hangouts on Air page will open. Start the webcam from recording by clicking the camera icon. If you don’t want to record audio, you can just click the microphone icon.
Click “Screenshare” and choose a desktop window that you want to record for the screencast. Click “Start Screenshare” to share the screen then click the “Start Broadcast” button to begin recording the screen. When you’re done recording, just “Stop Broadcast” and go to the YouTube website. The new screencast video is stored in your YouTube video dashboard. You can share the video or download it to your Google Drive.
For more details, you can check How to record YouTube videos . If you’re looking for more online screen recorders for YouTube, you can check our picks of the 10 Best Free Online Screen Recorders .
2. Using FlexClip - Free Online Screen Recorder
FlexClip is a complete bundle of creativity. Why so? It is because it’s a web-based tool that helps you with image and video editing and post-production. It also offers a free online screen recording option.
FlexClip lets you record your webcam, screen, and audio with a simple click. Contrarily, you can also record simultaneous screens without a hitch! It can record almost anything that is being displayed on your computer screen. So be it gameplays, seminars, courses, presentations, or anything, you can always use this program to save your recording.
And once you’re done capturing the screen, FlexClip also allows you to edit your recording. You can add subtitles, highlights, overlays, and annotations to increase your video’s worth. So no wonder why FlexClip is one of the leading web-based software for free online screen capturing, especially if you want to make great YouTube videos.
The recording process is easy. All you need to do is visit the website and click the “Start Recording” button.
Then, choose your layout to start recording the screen and audio. When you’re finished, just hit the “Stop” button to end recording to edit the video in FlexClip’s built-in video editor. Lastly, download the screencast to upload it to your YouTube channel.
3. Using Apowersoft - Online Screen Recorder (Free)
Apowersoft is a renowned company that creates digital products, including file compressors, watermark removers, and more. Since there’s a growing demand for screen recorders for YouTube, the Apowersoft creators have also launched a “Free Online Screen Recorder.” Yup! You’re reading the right name.
Apowersoft – Free Online Screen Recorder eases the screen recording process. While it’s an online tool, you can also download the app on your Mac or Windows OS.
It’s a free program with simple features, such as a screen and webcam recording with audio. So if your YouTube content doesn’t require overlays, subtitles, or other editing stuff, this software is ideal due to its simplicity.
You can click the “Start Recording” button to get started.
.
Then, select the screen you wish to record, and save the captured screen to your local disk or cloud so you can upload the videos later to your YouTube channel.
Part 3: How to Record Screen for YouTube with Free Screen Recorder on Mac
1. Using QuickTime Player
QuickTime Player can be used to record movies from your camera or the screen of your iPad, iPod touch or iPhone. It can also record your Mac’s screen or record audio from your microphone. To record the screen of your Pad, iPod touch or iPhone, you should use the movie-recording function. You can use it to record the screen for YouTube video, or you can also record the YouTube video and empower it with your creativity.
For more details of using QuickTime Player to record YouTube videos, check our guide: How to record videos with Quicktime.
2. Using Screen Flow
Screen Flow is our second pick for Mac. Although it’s paid software, you can still enjoy the blessings of this screen recorder through the trial version. It’s a very handy tool that allows Mac screen recording and all iOS devices, such as iPhones and iPad.
Okay! So what’s good about screen flow? Let’s uncover. Firstly, it’s an editor + screen recorder specifically made for YouTube. You can capture the screen and edit the footage before uploading it to your channel.
Secondly, this software allows you to record simultaneous screens and your webcam. Plus, you can also record your voice through its mic recording option.
Another great thing about Screen Flow is that it has numerous video filters and a customizable title library. It also permits you to save screen recordings on your Mac or directly share them to your YouTube channel, other social media accounts, websites, or cloud storage in a few clicks.
Here’s a video to help you get started with screen recording on your Mac using Screen Flow:
3. Using Vmaker
Vmaker is another authentic software to record screens for your YouTube videos. It’s a free program, but you can buy premium versions to unlock more features.
The tool is trusted by many software review websites, such as “crozdesk.” It is available on both Mac and Windows OS. However, it seems like this software performs well on Mac operating systems.
Vmaker allows you to record your screen, your favorite YouTube videos, and the audio – all together! You can record the entire Mac screen or a specific portion in HD quality. Moreover, the software allows you to pick resolutions up to 4K to record the media.
This program also offers editing features like adding subtitles, music, flip, blur, trim, and more to create an awesome video. All videos are saved to your cloud workspace once you finish recording. Then, you can share the recorded video screens on your YouTube.
The tool is ideal for making tutorials, courses, demos, and product review videos. All you need to do is download Vmaker on your Mac. Choose a webcam, screen, or both with audio for recording. Start recording in the highest quality. Edit your video and share it on your YouTube channel.
Conclusion
Above are some screen recorders that you can use to record YouTube videos or record the screen and webcam simultaneously to make a video and upload it it to YouTube. If you want to record a screen video and edit it further, you should try Wondershare Filmora video editor.
Download Mac Version ](https://tools.techidaily.com/wondershare/filmora/download/ )
FAQs
Q1. How do you record your screen on a Mac for YouTube?
There are some great tools for screen recording on Mac for YouTube. The most loved and enjoyed program is Filmora by Wondershare. It’s a professional tool for screen recording and video editing. Most importantly, it has a user-friendly interface and records your screen in high quality.
Another option is the Quick Time Player. This program also allows screen recording. Likewise, Screen Flow is also a great program for screen capturing for YouTube on Mac.
Q2. Can I screen-record and upload it to YouTube?
There are two ways to do it. First, you can download the free or paid screen recording software on your Windows or macOS. Second, you can look for online screen recorders like FlexClip or the built-in YouTube recorder and directly share the recorded video to your channel.
Some tools, like Apowersoft and Vmaker, save screen recordings to the cloud or local disk. And there’s no direct sharing of the recorded screens to your YouTube channel. So if you’re using such programs, you will need to sign in to your YouTube channel and upload the file from your computer hard drive.
Q3. How do I record my computer screen for 2022?
Some of the greatest video editing and screen recording tools like Filmora, Bandicam, and FlexClip allow you to record your computer screen. Depending on the software, you can directly share the video to your YouTube channel. Or, save the video on your computer and then upload it on your channel.
Richard Bennett
Richard Bennett is a writer and a lover of all things video.
Follow @Richard Bennett
Makeup Mastery Manual: Starting an Engaging Aesthetic Vlog
How To Be A Beauty Guru on YouTube: Beauty Vlogger Set Up
Richard Bennett
Mar 27, 2024• Proven solutions
Beauty Vlogs are some of the most popular channels on YouTube. These vlogs are all about aesthetics, so it is important that the videos themselves are beautiful. When you are giving out tips on makeup or hair you want to use a setup that will make your results look their very best.
YouTube Beauty Vlogger Set Up
It’s easy to put together your own Beauty Vlog setup. There are four main elements; lighting, beauty supplies, backgrounds, and audio. Here are some tips on building your beauty guru set:
1. Light It Up

Beauty Vlogs need to have great lighting so that everyone can clearly see what you are doing and how amazing it looks. Make sure you have even light over your whole face by ‘front lighting’ your vlog. Front lighting means having a light source right in front of you.
Depending on your budget, you can either use a window as a front light or buy a diva ring light.
Using a Window: Face the window while you vlog and be careful that the camera’s shadow is not visible in your shot. Avoid using a window the sun is shining directly into. You want softer, more diffused, light for a beauty vlog.
Using a Ring Light: Mount your camera either inside the ring or right behind it on a tripod. Ring lights are powerful options for illuminating your entire face, and they are very popular with makeup vloggers.
Front lighting can make you appear flat against your background, so it is also a good idea to set up a backlight behind you to make you pop out. Setting up lights on either side of you can also help add dimension to your shot.
Check this tutorial to know more details:
2. Organize Your Makeup
Having to search for makeup or reach across to where you are storing your curling iron will kill your vlogging momentum. Creating a great look is the fun part of beauty vlogging, and probably the part you want to focus on. Not looking for your missing brush. The best way to set yourself up for a beauty vlog is at a desk or table where you can lay everything out neatly right in front of you.
3. Alter Your Background
Making your vlog look more professional can be as easy as dressing up your background. You do not want there to be a lot of clutter behind you, but you don’t want to shoot with your back to a plain beige wall either. One simple way to keep your background beautiful, but not distracting, is to use a backdrop. Just hang a sheet or other piece of fabric behind you. You can even use patterns and change your backdrop to match your makeup in different videos.
Another great way to disguise the room you are vlogging in, and make sure nothing behind you distracts your viewers, is to blur your background. You really stand out when your background is blurry and you are in perfect focus.
4. Be Audible
You have a lot to say, so make sure people can hear you. Most cameras do not have great microphones, so you will need to use an external mic. To see what kinds of options you have make sure to read and watch “Best Microphone for YouTube - Top 5 Mics for YouTube Videos ”.
If you do not have access to an external mic then you may be able to get by without one for a while using software. Make sure there is no background noise competing with your voice, and download a free audio editing program called Audacity from Audacityteam.org. Using Audacity you will be able to improve a mediocre audio recording from your camera and make it usable. This is a popular option among YouTube gamers who record both video and audio from their webcams, but there is no reason it should not be useful for beauty gurus too.
Richard Bennett
Richard Bennett is a writer and a lover of all things video.
Follow @Richard Bennett
Richard Bennett
Mar 27, 2024• Proven solutions
Beauty Vlogs are some of the most popular channels on YouTube. These vlogs are all about aesthetics, so it is important that the videos themselves are beautiful. When you are giving out tips on makeup or hair you want to use a setup that will make your results look their very best.
YouTube Beauty Vlogger Set Up
It’s easy to put together your own Beauty Vlog setup. There are four main elements; lighting, beauty supplies, backgrounds, and audio. Here are some tips on building your beauty guru set:
1. Light It Up
Beauty Vlogs need to have great lighting so that everyone can clearly see what you are doing and how amazing it looks. Make sure you have even light over your whole face by ‘front lighting’ your vlog. Front lighting means having a light source right in front of you.
Depending on your budget, you can either use a window as a front light or buy a diva ring light.
Using a Window: Face the window while you vlog and be careful that the camera’s shadow is not visible in your shot. Avoid using a window the sun is shining directly into. You want softer, more diffused, light for a beauty vlog.
Using a Ring Light: Mount your camera either inside the ring or right behind it on a tripod. Ring lights are powerful options for illuminating your entire face, and they are very popular with makeup vloggers.
Front lighting can make you appear flat against your background, so it is also a good idea to set up a backlight behind you to make you pop out. Setting up lights on either side of you can also help add dimension to your shot.
Check this tutorial to know more details:
2. Organize Your Makeup
Having to search for makeup or reach across to where you are storing your curling iron will kill your vlogging momentum. Creating a great look is the fun part of beauty vlogging, and probably the part you want to focus on. Not looking for your missing brush. The best way to set yourself up for a beauty vlog is at a desk or table where you can lay everything out neatly right in front of you.
3. Alter Your Background
Making your vlog look more professional can be as easy as dressing up your background. You do not want there to be a lot of clutter behind you, but you don’t want to shoot with your back to a plain beige wall either. One simple way to keep your background beautiful, but not distracting, is to use a backdrop. Just hang a sheet or other piece of fabric behind you. You can even use patterns and change your backdrop to match your makeup in different videos.
Another great way to disguise the room you are vlogging in, and make sure nothing behind you distracts your viewers, is to blur your background. You really stand out when your background is blurry and you are in perfect focus.
4. Be Audible
You have a lot to say, so make sure people can hear you. Most cameras do not have great microphones, so you will need to use an external mic. To see what kinds of options you have make sure to read and watch “Best Microphone for YouTube - Top 5 Mics for YouTube Videos ”.
If you do not have access to an external mic then you may be able to get by without one for a while using software. Make sure there is no background noise competing with your voice, and download a free audio editing program called Audacity from Audacityteam.org. Using Audacity you will be able to improve a mediocre audio recording from your camera and make it usable. This is a popular option among YouTube gamers who record both video and audio from their webcams, but there is no reason it should not be useful for beauty gurus too.
Richard Bennett
Richard Bennett is a writer and a lover of all things video.
Follow @Richard Bennett
Also read:
- Navigating YouTube Triumphs An In-Depth Guide to Creator Studio
- Affordable Acoustic Amps and Mics for Video Voyagers
- The Ultimate Guide Selecting the Top 7 YouTube Live Streaming Apps for iOS/Android Users
- 2024 Approved Behind-the-Camera Glory Spotlight on Top 10 Female YouTubers
- Rapid Growth Tactics Hit and Maintain a Stellar 10,000 Views Mark
- Infographic Spotlight on Emerging '23 Trends
- 2024 Approved Discover 10 Swift-Growing YouTube Sources for Inspiration
- Safe Techniques for Extracting and Converting YouTube Audio Into MP3
- In 2024, Craft Stellar Channels Best 10 Apps for Artistic Banner Design
- Seamless Integration Tailor-Made YouTube Shorts Images Made Easy
- 2024 Approved Elevate Your Video Game Top Unboxer Techniques
- Stream Like Never Before Turning On YouTube's AV1
- Livestream Platforms at Play FB Vs. YT Live & TWITSpaces
- NanoFilm Whiz
- Dispelling Darkness, Enhancing Youtube Views for 2024
- [New] Tips & Tricks to Add Tags to YouTube Video
- Premium Opening Scenes Top 16 YouTube Intros for Popularity
- 2024 Approved Boost Channels and Views Through Savvy YouTube Analysis
- Cut Down to Size Ranking the Best YouTube Video Editors
- Innovative Brainstroming Techniques for Channels' Names
- IOS Video Posting Made Easy Step-by-Step Guide
- [New] Decoding Hashtags' Role in Elevating Your YouTube Gaming Experience
- 2024 Approved A Vlogger's Dream Exploring the Best 12 Video Capture Devices
- Apex Artists Among Online Video Titans
- [Updated] Entry Level Landing Low-Cost, Profitable YouTube Platforms
- [New] A Quick Dive Into Video Ratios The Aspect Ratio Essentials for YouTubers
- 2024 Approved 12 Best Sites for Downloading YT Template Videos
- Strategic Timestamp Use for Increased YouTube Traction
- 2024 Approved A Quick Guide to Chroma Key Background
- New Nikon Video Editing Software How to Edit Nikon Video Files
- New The Ultimate Guide to 3D Animation Software Free and Paid for 2024
- In 2024, Free and Fantastic The Best AVI Video Editors
- [Updated] In 2024, Navigating the World of Phone-Based Video Recording
- [New] In 2024, Understanding Facebook Reels and Their Production Techniques
- [New] In 2024, Best Screen Recorders for Schedule Recording & How-To
- [New] In 2024, Essential Tips to Avoid OBS Framing Errors
- In 2024, For People Wanting to Mock GPS on Samsung Galaxy XCover 6 Pro Tactical Edition Devices | Dr.fone
- TikTok Navigation Hack How to Fast-Forward Flawlessly
- Your Complete Guide To Reset ZTE Axon 40 Lite | Dr.fone
- [New] Quintessential Quiet Gaming on the Go for 2024
- [Updated] 2024 Approved Comprehensive Analysis Free2X Cam Recording Apps
- [New] Free & Fun Capture and Convert Skype Calls (MP3)
- [New] Watch Over Instagram's Friendship Shifts for 2024
- In 2024, Top 15 Augmented Reality Games Like Pokémon GO To Play On Vivo V29 | Dr.fone
- New 8 Valuable Image Ratio Changer Online for 2024
- What is Geo-Blocking and How to Bypass it On Infinix Smart 8? | Dr.fone
- Unlock the Potential of Your Phone Individual Ringtone Creation on Android
- Updated 2024 Approved A Closer Look at VN Video Editor APK Features, Pricing, and More
- 2024 Approved The Path to Success Integrating Past Recordings in Real Time on Social Media
- Title: "[Updated] Digital Recorder Snap Your Screen, Upload to YouTube Online/PC/Mac"
- Author: Kevin
- Created at : 2024-05-25 16:46:24
- Updated at : 2024-05-26 16:46:24
- Link: https://youtube-videos.techidaily.com/updated-digital-recorder-snap-your-screen-upload-to-youtube-onlinepcmac/
- License: This work is licensed under CC BY-NC-SA 4.0.
