![[Updated] Channel Upgrade Made Simple - Embrace TubeBuddy Techniques](https://www.lifewire.com/thmb/vOtdxq2XZSwA1Qf_IHXR3tZxNcM=/210x138/filters:no_upscale():max_bytes(150000):strip_icc()/googleaskphotosai-dc323a4a137549d59c5ac6ff0f98eb7b.png)
"[Updated] Channel Upgrade Made Simple - Embrace TubeBuddy Techniques"
Channel Upgrade Made Simple - Embrace TubeBuddy Techniques
The Benefits of TubeBuddy | Manage Your YouTube Channel More Easily

Richard Bennett
Nov 01, 2022• Proven solutions
TubeBuddy is a YouTube certified extension for your Google Chrome browser. When you visit YouTube after installing TubeBuddy a whole new set of useful tools becomes available.
TubeBuddy’s tools were designed to save you time and effort when performing some of the more mundane tasks involved in running a YouTube channel, like adding cards. Many of TubeBuddy’s tools are completely free to use, but others might require a paid license. There are three levels of licensing: $9, $19, or $39 per month.
The Benefits of Using TubeBuddy for YouTube
- Increased Productivity
- Bulk Tools for Annotations, Cards, Thumbnails and More
- Quick Optimization for Your Video’s Tags
- Useful Data
Benefits of TubeBuddy
YouTubers who use TubeBuddy are able to spend less time on busy-work and more time on coming up with creative video ideas. Here are some of the ways TubeBuddy can help you, especially if you have a large or mid-sized channel:
1. Increased Productivity
Most of TubeBuddy’s Productivity Tools are available for free, but some require a $9 per month Pro license.
You can use these tools to get your videos ready for posting faster, embed them off-YouTube more easily, and save time by creating canned responses or templates for cards and annotations.
For example, you might find yourself creating the same YouTube Card over and over again to include it in every video you make. Creating a template through TubeBuddy will save you this effort.
Another great productivity tool is the Video Topic Planner. You can save video ideas you come up with, or ideas viewers have suggested to you, and arrange them in a queue so you never forget what you are planning to make next.
2. Bulk Tools for Annotations, Cards, Thumbnails and More
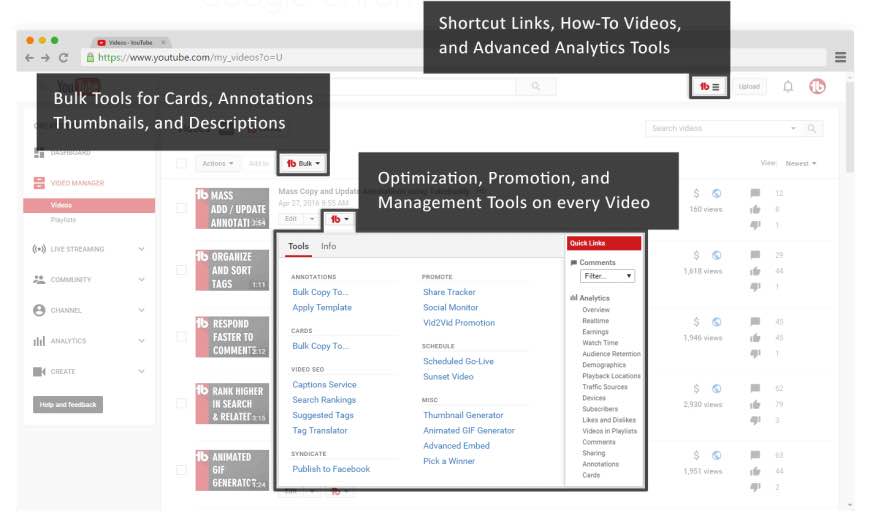
Most of TubeBuddy’s bulk processing tools require a $19 per month Star license.
Two of the most time-saving tools in this section are the Bulk Copy tools for cards and annotations. They will save you from having to recreate the same ones over and over. Then, using the Bulk Update tools, you will be able to make changes to all of your cards or annotations at once.
For example: if you use a YouTube Card to link to your personal website and include it in every video, and then you change your website, you change the link in all of your existing cards at once.
Another useful Bulk tool is Bulk Thumbnail Overlays, which will allow you to add a logo to all of your existing video thumbnails at once.
3. Quick Optimization for Your Video’s Tags
The SEO Tools in TubeBuddy will help you find the best tags for your videos and suggest tags you might want to target. Many of these tools are free, but others require a $19 Star license.
One of the best free tools in this category is View and Copy Video Tags. It allows you to see and copy the tags of other people’s videos. You will be able to see which keywords your competitors are targeting (and look for opportunities to target them more effectively). This can also save you a lot of time writing out tags that should really be the same as the ones on an existing video.
4. Useful Data
The most useful piece of data under Data and Research Tools is the Best Time to Publish. How many views you get on a video could vary greatly depending on when you post, and the best times to post vary depending on the demographics of your audience. This free tool from TubeBuddy will show you when you should be uploading.
Another interesting tool, which is unfortunately only available with $39 licenses, is the Competitor Scoreboard. It allows creators to compare their channels stats to those of their rival channels.
Have you ever tried TubeBuddy for YouTube?
Richard Bennett
Richard Bennett is a writer and a lover of all things video.
Follow @Richard Bennett
Richard Bennett
Nov 01, 2022• Proven solutions
TubeBuddy is a YouTube certified extension for your Google Chrome browser. When you visit YouTube after installing TubeBuddy a whole new set of useful tools becomes available.
TubeBuddy’s tools were designed to save you time and effort when performing some of the more mundane tasks involved in running a YouTube channel, like adding cards. Many of TubeBuddy’s tools are completely free to use, but others might require a paid license. There are three levels of licensing: $9, $19, or $39 per month.
The Benefits of Using TubeBuddy for YouTube
- Increased Productivity
- Bulk Tools for Annotations, Cards, Thumbnails and More
- Quick Optimization for Your Video’s Tags
- Useful Data
Benefits of TubeBuddy
YouTubers who use TubeBuddy are able to spend less time on busy-work and more time on coming up with creative video ideas. Here are some of the ways TubeBuddy can help you, especially if you have a large or mid-sized channel:
1. Increased Productivity
Most of TubeBuddy’s Productivity Tools are available for free, but some require a $9 per month Pro license.
You can use these tools to get your videos ready for posting faster, embed them off-YouTube more easily, and save time by creating canned responses or templates for cards and annotations.
For example, you might find yourself creating the same YouTube Card over and over again to include it in every video you make. Creating a template through TubeBuddy will save you this effort.
Another great productivity tool is the Video Topic Planner. You can save video ideas you come up with, or ideas viewers have suggested to you, and arrange them in a queue so you never forget what you are planning to make next.
2. Bulk Tools for Annotations, Cards, Thumbnails and More
Most of TubeBuddy’s bulk processing tools require a $19 per month Star license.
Two of the most time-saving tools in this section are the Bulk Copy tools for cards and annotations. They will save you from having to recreate the same ones over and over. Then, using the Bulk Update tools, you will be able to make changes to all of your cards or annotations at once.
For example: if you use a YouTube Card to link to your personal website and include it in every video, and then you change your website, you change the link in all of your existing cards at once.
Another useful Bulk tool is Bulk Thumbnail Overlays, which will allow you to add a logo to all of your existing video thumbnails at once.
3. Quick Optimization for Your Video’s Tags
The SEO Tools in TubeBuddy will help you find the best tags for your videos and suggest tags you might want to target. Many of these tools are free, but others require a $19 Star license.
One of the best free tools in this category is View and Copy Video Tags. It allows you to see and copy the tags of other people’s videos. You will be able to see which keywords your competitors are targeting (and look for opportunities to target them more effectively). This can also save you a lot of time writing out tags that should really be the same as the ones on an existing video.
4. Useful Data
The most useful piece of data under Data and Research Tools is the Best Time to Publish. How many views you get on a video could vary greatly depending on when you post, and the best times to post vary depending on the demographics of your audience. This free tool from TubeBuddy will show you when you should be uploading.
Another interesting tool, which is unfortunately only available with $39 licenses, is the Competitor Scoreboard. It allows creators to compare their channels stats to those of their rival channels.
Have you ever tried TubeBuddy for YouTube?
Richard Bennett
Richard Bennett is a writer and a lover of all things video.
Follow @Richard Bennett
Master the Art of Budget-Friendly YouTubes Intros and Ends
How to Create YouTube Intros & End Cards - Free and Easy

Shanoon Cox
Oct 26, 2023• Proven solutions
Part1: Intros
Elements of an Intro
Intros should only last about five seconds, and that can be cut down to two or three if you have a larger following.
When your intro video is longer than five seconds viewers are more likely to click away. The first 15 seconds of a video is when viewers are most likely to decide to click on one of the recommended videos, or go back to their search results and choose something else. The odds of them leaving within these first 15 seconds are greater if you do not get right to the main point of your video. That is why long intro sequences are bad for your watch time.
Whether it is better to put your intro at the very beginning of your video, or after you introduce your topic, will depend on your viewers. You may want to try it both ways and then look at your retention report (found in your YouTube Creator Studio under Analytics) to see which works best for you.
Top Intro Sites
There are a few different sites where you can download animated intros, customized to include your username or logo. Here are two of the best:
FlixPress.com
This is probably the most popular intro site. There are a lot of great animated intros available for under $5, or even for free.
IntroMaker.net
This is another site with really professional looking intros for $5. They only have two free options, though.
Creating an Intro in Filmora
You can create a simple intro card in Filmora.


- Choose your background. You may want to use a short clip as your intro, or you may just want a colored background.
- Drag your clip or background into the video track of your timeline and trim it down to five seconds.
- If you have a logo, import it into Filmora and drag it into your picture-in-picture track.
- With your logo selected, click on the Green Screen icon. In the pop-up, select the background of your logo to make it transparent. For this to work your logo cannot be the same color as its background.
- Click on the editing icon with your logo selected and choose an animation.
- Go to the Text/Titles menu and choose an animated title that suits your channel. Drag it into your text track and edit it to include your name.
- The last piece of your intro is sound. You can choose a song from Filmora’s library and cut it down to five seconds, or import your sound effect.
- Export your video and save it for use in all of your other videos.
Part 2: End Cards
When your video ends, YouTube will recommend a selection of videos users may want to watch next. Often, these recommendations will not include more of your videos.
To keep viewers on your channel, you can create your End Card which recommends other content you have created.
Elements of an End Card
An end card includes clips from two or three of your videos, muted, and shrunk down to thumbnail-size. Using spotlight annotations you can make these thumbnails click-able.
It is also important that your end card includes multiple calls to action. A call to action is meant to spur a viewer to some kind of action. Writing ‘Check out this video’ above one of your thumbnails is a call to action.
You should also have a subscribe link somewhere in your end card, ideally a very noticeable button with a proven call to action like ‘Subscribe Now!’.
Some creators will leave their end cards at that and play music overtop, but it can be even more effective to include a voiceover where you ask viewers to subscribe and watch your other videos.
How To Make an End Card
- Choose a static background. You may want to download an end card template or create one in a drawing program. If you do, make sure to include calls to action like ‘Watch more!’ and ‘Subscribe’.
- Drag your background into your timeline at the end of your video.
- Import two or three of your previous videos and drag them into your picture in picture tracks. Each clip should be on its track.
- Trim the clips in your picture in picture track down to the same length as your end card.
- Shrink your clips down to thumbnail-size by dragging their corners in the preview window.
- Position your clips so they are spaced evenly by dragging them in the preview screen.
- Mute your clips.
- If your background does not include any calls to action, choose a title from the Text/Titles menu in Filmora and create at least two – one asking viewers to subscribe, and one asking them to watch your suggested videos.
- Export your video from Filmora and upload it to YouTube.
- Go to your Video Manager and select Annotations in the drop-down menu next to your video.
- Go to your end card in the previewer, as that is where you want to add your annotations.
- Click Add Annotation and add a spotlight annotation to your video. Stretch it over one of your thumbnails and then check the Link box under your Annotation’s timing. Insert a link to the video you are previewing.
- Repeat for any other thumbnails. For your subscribe button, change where it said ‘Video’ to ‘Subscribe’ and enter your channel URL.
- Click Apply Changes.
Shanoon Cox
Shanoon Cox is a writer and a lover of all things video.
Follow @Shanoon Cox
Shanoon Cox
Oct 26, 2023• Proven solutions
Part1: Intros
Elements of an Intro
Intros should only last about five seconds, and that can be cut down to two or three if you have a larger following.
When your intro video is longer than five seconds viewers are more likely to click away. The first 15 seconds of a video is when viewers are most likely to decide to click on one of the recommended videos, or go back to their search results and choose something else. The odds of them leaving within these first 15 seconds are greater if you do not get right to the main point of your video. That is why long intro sequences are bad for your watch time.
Whether it is better to put your intro at the very beginning of your video, or after you introduce your topic, will depend on your viewers. You may want to try it both ways and then look at your retention report (found in your YouTube Creator Studio under Analytics) to see which works best for you.
Top Intro Sites
There are a few different sites where you can download animated intros, customized to include your username or logo. Here are two of the best:
FlixPress.com
This is probably the most popular intro site. There are a lot of great animated intros available for under $5, or even for free.
IntroMaker.net
This is another site with really professional looking intros for $5. They only have two free options, though.
Creating an Intro in Filmora
You can create a simple intro card in Filmora.
- Choose your background. You may want to use a short clip as your intro, or you may just want a colored background.
- Drag your clip or background into the video track of your timeline and trim it down to five seconds.
- If you have a logo, import it into Filmora and drag it into your picture-in-picture track.
- With your logo selected, click on the Green Screen icon. In the pop-up, select the background of your logo to make it transparent. For this to work your logo cannot be the same color as its background.
- Click on the editing icon with your logo selected and choose an animation.
- Go to the Text/Titles menu and choose an animated title that suits your channel. Drag it into your text track and edit it to include your name.
- The last piece of your intro is sound. You can choose a song from Filmora’s library and cut it down to five seconds, or import your sound effect.
- Export your video and save it for use in all of your other videos.
Part 2: End Cards
When your video ends, YouTube will recommend a selection of videos users may want to watch next. Often, these recommendations will not include more of your videos.
To keep viewers on your channel, you can create your End Card which recommends other content you have created.
Elements of an End Card
An end card includes clips from two or three of your videos, muted, and shrunk down to thumbnail-size. Using spotlight annotations you can make these thumbnails click-able.
It is also important that your end card includes multiple calls to action. A call to action is meant to spur a viewer to some kind of action. Writing ‘Check out this video’ above one of your thumbnails is a call to action.
You should also have a subscribe link somewhere in your end card, ideally a very noticeable button with a proven call to action like ‘Subscribe Now!’.
Some creators will leave their end cards at that and play music overtop, but it can be even more effective to include a voiceover where you ask viewers to subscribe and watch your other videos.
How To Make an End Card
- Choose a static background. You may want to download an end card template or create one in a drawing program. If you do, make sure to include calls to action like ‘Watch more!’ and ‘Subscribe’.
- Drag your background into your timeline at the end of your video.
- Import two or three of your previous videos and drag them into your picture in picture tracks. Each clip should be on its track.
- Trim the clips in your picture in picture track down to the same length as your end card.
- Shrink your clips down to thumbnail-size by dragging their corners in the preview window.
- Position your clips so they are spaced evenly by dragging them in the preview screen.
- Mute your clips.
- If your background does not include any calls to action, choose a title from the Text/Titles menu in Filmora and create at least two – one asking viewers to subscribe, and one asking them to watch your suggested videos.
- Export your video from Filmora and upload it to YouTube.
- Go to your Video Manager and select Annotations in the drop-down menu next to your video.
- Go to your end card in the previewer, as that is where you want to add your annotations.
- Click Add Annotation and add a spotlight annotation to your video. Stretch it over one of your thumbnails and then check the Link box under your Annotation’s timing. Insert a link to the video you are previewing.
- Repeat for any other thumbnails. For your subscribe button, change where it said ‘Video’ to ‘Subscribe’ and enter your channel URL.
- Click Apply Changes.
Shanoon Cox
Shanoon Cox is a writer and a lover of all things video.
Follow @Shanoon Cox
Also read:
- [New] In 2024, Hashtags Hack Skyrocket Your Video Popularity
- [New] Leveraging Likeability Strategies for Going Viral on Facebook
- [Updated] Best Free WebM Players
- Best Practices in Choosing the Perfect Format for YouTube Videos
- Capture & Store Videos Effortlessly with Our Top List for 2024
- Cr2 Image to JPG: A Step-by-Step Windows Tutorial
- Cultivating Commitment Gentle Subscription Strategies
- Cut Costs and Boost Creativity 8 Online Spots Offering Free Eco-Backdrops for 2024
- Download & Install HP LaserJet P3015 Printer Drivers on Windows: Step-by-Step Guide
- Download & Update HP Printer Drivers on Windows 10/11 - Get the Latest Versions Now!
- Earning Stream Start Small, See Big on YouTube
- Elevating Engagement Best Video Ideas for Channels
- How to Fix PS5 Wi-Fi Issues: A Troubleshooting Guide
- In 2024, YouTube Tycoons Earning the Most
- Mini Masterpieces Top 6 Coolest Mini-Houses in MC for 2024
- Title: [Updated] Channel Upgrade Made Simple - Embrace TubeBuddy Techniques
- Author: Kevin
- Created at : 2024-11-17 22:17:19
- Updated at : 2024-11-24 18:33:58
- Link: https://youtube-videos.techidaily.com/updated-channel-upgrade-made-simple-embrace-tubebuddy-techniques/
- License: This work is licensed under CC BY-NC-SA 4.0.