
!["[Updated] Capture Clarity High-Quality Screen Recordings for YouTubers (PC/Mac)"](https://www.lifewire.com/thmb/W4WRTJiI80qWQugtfcrcauwLImY=/400x300/filters:no_upscale():max_bytes(150000):strip_icc():format(webp)/Rearviewofboywithlaptoponsofa-31ba45dfa7fb4553a257c133b352ef64.jpg)
"[Updated] Capture Clarity High-Quality Screen Recordings for YouTubers (PC/Mac)"
Capture Clarity: High-Quality Screen Recordings for YouTubers (PC/Mac)
10 Record Screen and Upload to YouTube Tools [PC, Mac, Online]

Richard Bennett
Mar 27, 2024• Proven solutions
Recording the screen, including the audio, can help you introduce your gaming flow, show how to perform a task on the computer, or create a presentation. You can also upload the screen record to YouTube for free. There are several solutions if you want to record your screen and upload it to YouTube. You can record the screen with some screen recording software on your Mac or your Windows PC or with some online screen recording software or the screen recording feature built-in YouTube itself. In this article, we will show you how to to record screens and upload to YouTube on Windows and Mac with some screen recorders , some of which are free to use, or freemium, which are built in your computer. Check it out now.
- Part 1: Record Screen and Upload to YouTube Directly on PC
- Part 2: Record Screen and Upload to YouTube Online
- Part 3: Record Screen and Upload it to YouTube on Mac
Recommended YouTube Screen Recorders to Record Screen and Upload to YouTube Directly [Windows & Mac]
The following YouTube screen recording software can be used on both Windows and Mac computers. You can record the entire screen or a particular portion of the screen, record your own voiceover or add music to the recorded video and then upload it to YouTube directly.
Using Wondershare Filmora
Filmora is an easy-to-use yet powerful enough video editing software which features the Recording tools. Using Filmora, you can record the desktop screen , audio and webcam simultaneously. But compared with Filmora, the highest frame rates that Filmora can capture at 1 second is 60FPS.

Launch Wondershare Filmora and choose Full Feature mode to begin a project. Go to the Record tab and choose Record PC Screen. There are three types of screen recording to choose from – Target Window, Full Screen and Custom. You can also choose to record computer system audio or record from microphone. Click the icons to turn them off or on accordingly. Click Settings to see if there’s anything you need to adjust before recording.
 Download Mac Version ](https://tools.techidaily.com/wondershare/filmora/download/ )
The recorded footage will be loaded to the Media panel directly, you can then cut out imperfect frames, add some texts and titles, or apply transitions and filters to it. To upload the recorded screen video, click the Export in the main interface, and then switch to YouTube tab in the Export window.

Sign in your YouTube account and complete the video info accordingly and then click the Export button to upload the recorded video to YouTube directly.
If you are looking for more screen recorders which can run on Windows, Mac, Linux, Android, iOS or online for different purposes, you can check our picks of the best screen recorders for all platforms based on different purposes.
Part 1: How to Record Screen on Windows PC and Upload to YouTube Directly
1. Bandicam
To record screen using Bandicam, select “Screen Recording” and a green-edged rectangle window will appear. Adjust the rectangle window on the video then play the video.
Clicking the REC button will change the green-edged line of the rectangle window to red. Click the stop button to stop recording. To watch the recorded video, go to the “General” tab and click “Open.”
You can also upload your desired videos to YouTube from Bandicam by clicking the “Upload” button found under Bandicam’s “Output” tab.

2. Using Microsoft Expression Encoder 4
You can download Microsoft Expression Encoder 4 to record the screen of your device and upload it to YouTube. The software has a screen capture tool and encoder. Install the software as you would usually do. There’ll be 2 shortcuts in the start menu – Microsoft Expression Encoder 4 Screen Capture (used to capture the screen) and Microsoft Expression Encoder 4 (converts the screen into a video that can be uploaded to YouTube).
3. Using Ezvid
Ezvid can record screen and audio simultaneously. It can also capture the whole area of the screen, making it perfect for tutorial videos. Ezvid also has speech synthesis that translates text captions into artificial human language, so it can easily produce human sound with only a click of a button.
4. Using Smartpixel
Smartpixel is a screen recorder for Android and Windows. It has a user-friendly interface and different editing as well as recording functions. Smartpixel can export various video formats such as 3gp, MP4, wmv, avi and flv. It also allows you to upload videos to different online platforms like GoPlay and YouTube.
Part 2: How to Record Screen Online
1. Using YouTube
You can now also record desktop screen with the features in YouTube. To start recording the screen using YouTube, you just need to sign-in to the website using your Google Account. Click “Creator Studio”. Go to Live Streaming and choose “Events”. You’ll be directed to the “Create Event” page. Provide the title for your screencast video, set the video’s privacy to either Private or Unlisted.
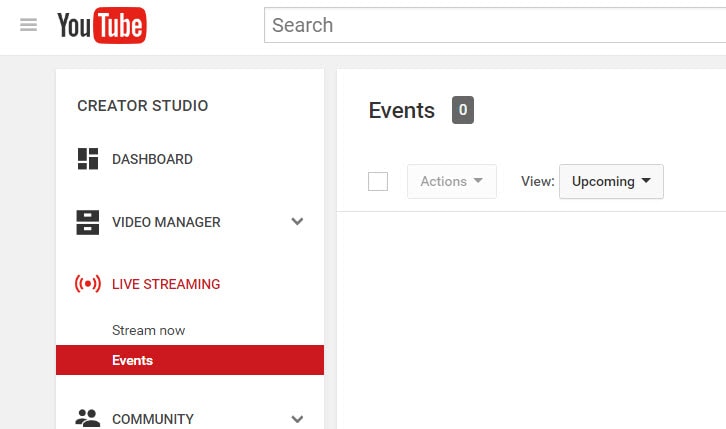
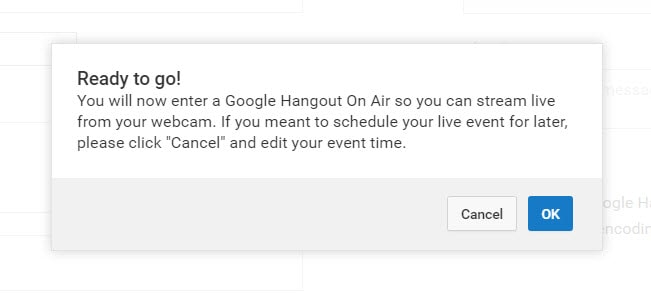
Click “Go Live Now” The Hangouts on Air page will open. Start the webcam from recording by clicking the camera icon. If you don’t want to record audio, you can just click the microphone icon.
Click “Screenshare” and choose a desktop window that you want to record for the screencast. Click “Start Screenshare” to share the screen then click the “Start Broadcast” button to begin recording the screen. When you’re done recording, just “Stop Broadcast” and go to the YouTube website. The new screencast video is stored in your YouTube video dashboard. You can share the video or download it to your Google Drive.
For more details, you can check How to record YouTube videos . If you’re looking for more online screen recorders for YouTube, you can check our picks of the 10 Best Free Online Screen Recorders .
2. Using FlexClip - Free Online Screen Recorder
FlexClip is a complete bundle of creativity. Why so? It is because it’s a web-based tool that helps you with image and video editing and post-production. It also offers a free online screen recording option.
FlexClip lets you record your webcam, screen, and audio with a simple click. Contrarily, you can also record simultaneous screens without a hitch! It can record almost anything that is being displayed on your computer screen. So be it gameplays, seminars, courses, presentations, or anything, you can always use this program to save your recording.
And once you’re done capturing the screen, FlexClip also allows you to edit your recording. You can add subtitles, highlights, overlays, and annotations to increase your video’s worth. So no wonder why FlexClip is one of the leading web-based software for free online screen capturing, especially if you want to make great YouTube videos.
The recording process is easy. All you need to do is visit the website and click the “Start Recording” button.
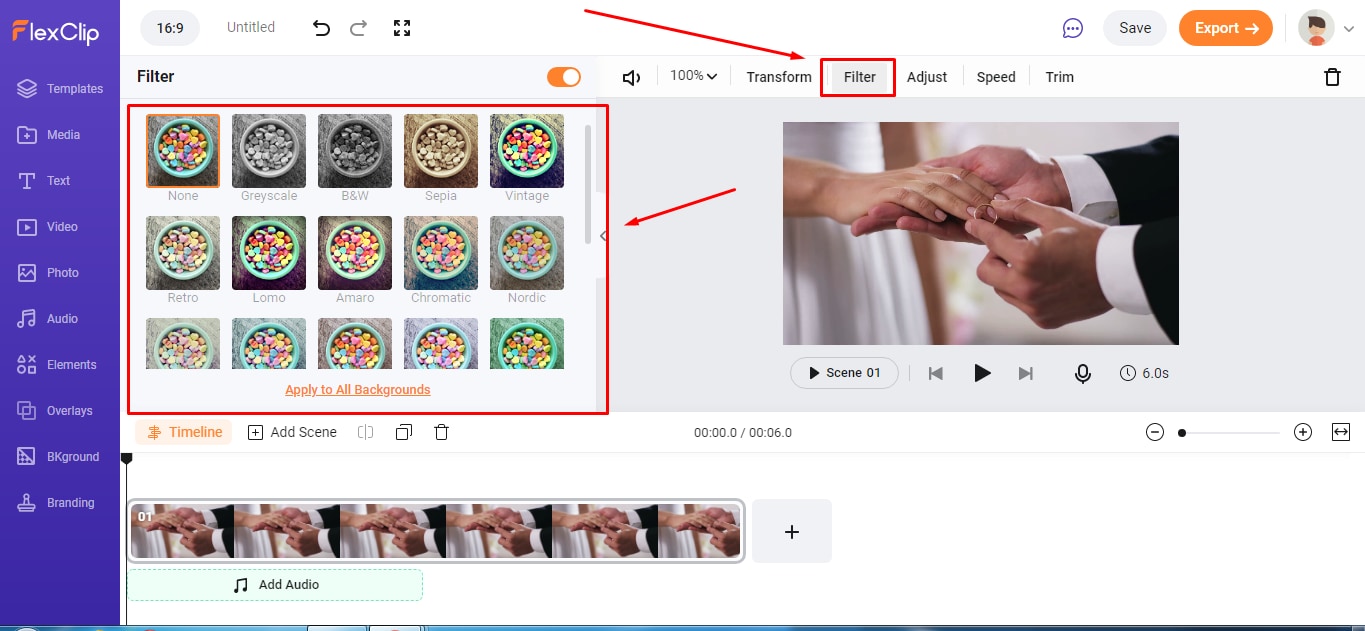
Then, choose your layout to start recording the screen and audio. When you’re finished, just hit the “Stop” button to end recording to edit the video in FlexClip’s built-in video editor. Lastly, download the screencast to upload it to your YouTube channel.
3. Using Apowersoft - Online Screen Recorder (Free)
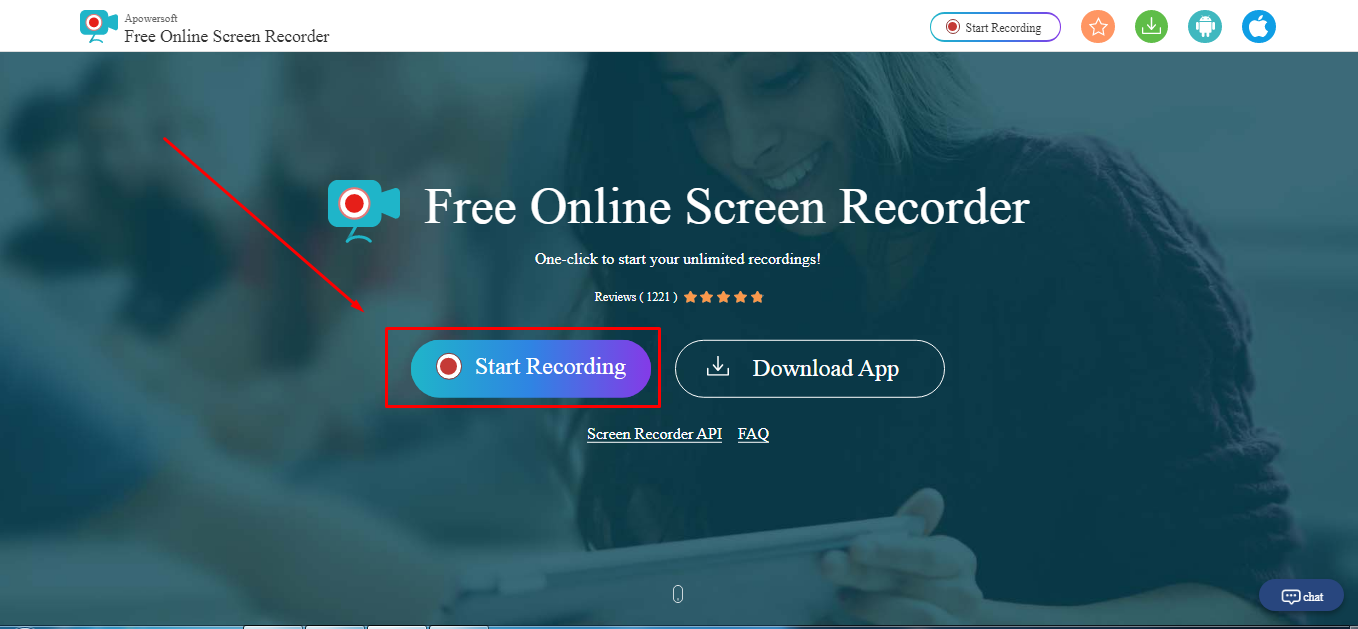
Apowersoft is a renowned company that creates digital products, including file compressors, watermark removers, and more. Since there’s a growing demand for screen recorders for YouTube, the Apowersoft creators have also launched a “Free Online Screen Recorder.” Yup! You’re reading the right name.
Apowersoft – Free Online Screen Recorder eases the screen recording process. While it’s an online tool, you can also download the app on your Mac or Windows OS.
It’s a free program with simple features, such as a screen and webcam recording with audio. So if your YouTube content doesn’t require overlays, subtitles, or other editing stuff, this software is ideal due to its simplicity.
You can click the “Start Recording” button to get started.
.
Then, select the screen you wish to record, and save the captured screen to your local disk or cloud so you can upload the videos later to your YouTube channel.
Part 3: How to Record Screen for YouTube with Free Screen Recorder on Mac
1. Using QuickTime Player
QuickTime Player can be used to record movies from your camera or the screen of your iPad, iPod touch or iPhone. It can also record your Mac’s screen or record audio from your microphone. To record the screen of your Pad, iPod touch or iPhone, you should use the movie-recording function. You can use it to record the screen for YouTube video, or you can also record the YouTube video and empower it with your creativity.
For more details of using QuickTime Player to record YouTube videos, check our guide: How to record videos with Quicktime.
2. Using Screen Flow
Screen Flow is our second pick for Mac. Although it’s paid software, you can still enjoy the blessings of this screen recorder through the trial version. It’s a very handy tool that allows Mac screen recording and all iOS devices, such as iPhones and iPad.
Okay! So what’s good about screen flow? Let’s uncover. Firstly, it’s an editor + screen recorder specifically made for YouTube. You can capture the screen and edit the footage before uploading it to your channel.
Secondly, this software allows you to record simultaneous screens and your webcam. Plus, you can also record your voice through its mic recording option.
Another great thing about Screen Flow is that it has numerous video filters and a customizable title library. It also permits you to save screen recordings on your Mac or directly share them to your YouTube channel, other social media accounts, websites, or cloud storage in a few clicks.
Here’s a video to help you get started with screen recording on your Mac using Screen Flow:
3. Using Vmaker
Vmaker is another authentic software to record screens for your YouTube videos. It’s a free program, but you can buy premium versions to unlock more features.
The tool is trusted by many software review websites, such as “crozdesk.” It is available on both Mac and Windows OS. However, it seems like this software performs well on Mac operating systems.
Vmaker allows you to record your screen, your favorite YouTube videos, and the audio – all together! You can record the entire Mac screen or a specific portion in HD quality. Moreover, the software allows you to pick resolutions up to 4K to record the media.
This program also offers editing features like adding subtitles, music, flip, blur, trim, and more to create an awesome video. All videos are saved to your cloud workspace once you finish recording. Then, you can share the recorded video screens on your YouTube.
The tool is ideal for making tutorials, courses, demos, and product review videos. All you need to do is download Vmaker on your Mac. Choose a webcam, screen, or both with audio for recording. Start recording in the highest quality. Edit your video and share it on your YouTube channel.
Conclusion
Above are some screen recorders that you can use to record YouTube videos or record the screen and webcam simultaneously to make a video and upload it it to YouTube. If you want to record a screen video and edit it further, you should try Wondershare Filmora video editor.
Download Mac Version ](https://tools.techidaily.com/wondershare/filmora/download/ )
FAQs
Q1. How do you record your screen on a Mac for YouTube?
There are some great tools for screen recording on Mac for YouTube. The most loved and enjoyed program is Filmora by Wondershare. It’s a professional tool for screen recording and video editing. Most importantly, it has a user-friendly interface and records your screen in high quality.
Another option is the Quick Time Player. This program also allows screen recording. Likewise, Screen Flow is also a great program for screen capturing for YouTube on Mac.
Q2. Can I screen-record and upload it to YouTube?
There are two ways to do it. First, you can download the free or paid screen recording software on your Windows or macOS. Second, you can look for online screen recorders like FlexClip or the built-in YouTube recorder and directly share the recorded video to your channel.
Some tools, like Apowersoft and Vmaker, save screen recordings to the cloud or local disk. And there’s no direct sharing of the recorded screens to your YouTube channel. So if you’re using such programs, you will need to sign in to your YouTube channel and upload the file from your computer hard drive.
Q3. How do I record my computer screen for 2022?
Some of the greatest video editing and screen recording tools like Filmora, Bandicam, and FlexClip allow you to record your computer screen. Depending on the software, you can directly share the video to your YouTube channel. Or, save the video on your computer and then upload it on your channel.
Richard Bennett
Richard Bennett is a writer and a lover of all things video.
Follow @Richard Bennett
Richard Bennett
Mar 27, 2024• Proven solutions
Recording the screen, including the audio, can help you introduce your gaming flow, show how to perform a task on the computer, or create a presentation. You can also upload the screen record to YouTube for free. There are several solutions if you want to record your screen and upload it to YouTube. You can record the screen with some screen recording software on your Mac or your Windows PC or with some online screen recording software or the screen recording feature built-in YouTube itself. In this article, we will show you how to to record screens and upload to YouTube on Windows and Mac with some screen recorders , some of which are free to use, or freemium, which are built in your computer. Check it out now.
- Part 1: Record Screen and Upload to YouTube Directly on PC
- Part 2: Record Screen and Upload to YouTube Online
- Part 3: Record Screen and Upload it to YouTube on Mac
Recommended YouTube Screen Recorders to Record Screen and Upload to YouTube Directly [Windows & Mac]
The following YouTube screen recording software can be used on both Windows and Mac computers. You can record the entire screen or a particular portion of the screen, record your own voiceover or add music to the recorded video and then upload it to YouTube directly.
Using Wondershare Filmora
Filmora is an easy-to-use yet powerful enough video editing software which features the Recording tools. Using Filmora, you can record the desktop screen , audio and webcam simultaneously. But compared with Filmora, the highest frame rates that Filmora can capture at 1 second is 60FPS.
Launch Wondershare Filmora and choose Full Feature mode to begin a project. Go to the Record tab and choose Record PC Screen. There are three types of screen recording to choose from – Target Window, Full Screen and Custom. You can also choose to record computer system audio or record from microphone. Click the icons to turn them off or on accordingly. Click Settings to see if there’s anything you need to adjust before recording.
Download Mac Version ](https://tools.techidaily.com/wondershare/filmora/download/ )
The recorded footage will be loaded to the Media panel directly, you can then cut out imperfect frames, add some texts and titles, or apply transitions and filters to it. To upload the recorded screen video, click the Export in the main interface, and then switch to YouTube tab in the Export window.
Sign in your YouTube account and complete the video info accordingly and then click the Export button to upload the recorded video to YouTube directly.
If you are looking for more screen recorders which can run on Windows, Mac, Linux, Android, iOS or online for different purposes, you can check our picks of the best screen recorders for all platforms based on different purposes.
Part 1: How to Record Screen on Windows PC and Upload to YouTube Directly
1. Bandicam
To record screen using Bandicam, select “Screen Recording” and a green-edged rectangle window will appear. Adjust the rectangle window on the video then play the video.
Clicking the REC button will change the green-edged line of the rectangle window to red. Click the stop button to stop recording. To watch the recorded video, go to the “General” tab and click “Open.”
You can also upload your desired videos to YouTube from Bandicam by clicking the “Upload” button found under Bandicam’s “Output” tab.
2. Using Microsoft Expression Encoder 4
You can download Microsoft Expression Encoder 4 to record the screen of your device and upload it to YouTube. The software has a screen capture tool and encoder. Install the software as you would usually do. There’ll be 2 shortcuts in the start menu – Microsoft Expression Encoder 4 Screen Capture (used to capture the screen) and Microsoft Expression Encoder 4 (converts the screen into a video that can be uploaded to YouTube).
3. Using Ezvid
Ezvid can record screen and audio simultaneously. It can also capture the whole area of the screen, making it perfect for tutorial videos. Ezvid also has speech synthesis that translates text captions into artificial human language, so it can easily produce human sound with only a click of a button.
4. Using Smartpixel
Smartpixel is a screen recorder for Android and Windows. It has a user-friendly interface and different editing as well as recording functions. Smartpixel can export various video formats such as 3gp, MP4, wmv, avi and flv. It also allows you to upload videos to different online platforms like GoPlay and YouTube.
Part 2: How to Record Screen Online
1. Using YouTube
You can now also record desktop screen with the features in YouTube. To start recording the screen using YouTube, you just need to sign-in to the website using your Google Account. Click “Creator Studio”. Go to Live Streaming and choose “Events”. You’ll be directed to the “Create Event” page. Provide the title for your screencast video, set the video’s privacy to either Private or Unlisted.
Click “Go Live Now” The Hangouts on Air page will open. Start the webcam from recording by clicking the camera icon. If you don’t want to record audio, you can just click the microphone icon.
Click “Screenshare” and choose a desktop window that you want to record for the screencast. Click “Start Screenshare” to share the screen then click the “Start Broadcast” button to begin recording the screen. When you’re done recording, just “Stop Broadcast” and go to the YouTube website. The new screencast video is stored in your YouTube video dashboard. You can share the video or download it to your Google Drive.
For more details, you can check How to record YouTube videos . If you’re looking for more online screen recorders for YouTube, you can check our picks of the 10 Best Free Online Screen Recorders .
2. Using FlexClip - Free Online Screen Recorder
FlexClip is a complete bundle of creativity. Why so? It is because it’s a web-based tool that helps you with image and video editing and post-production. It also offers a free online screen recording option.
FlexClip lets you record your webcam, screen, and audio with a simple click. Contrarily, you can also record simultaneous screens without a hitch! It can record almost anything that is being displayed on your computer screen. So be it gameplays, seminars, courses, presentations, or anything, you can always use this program to save your recording.
And once you’re done capturing the screen, FlexClip also allows you to edit your recording. You can add subtitles, highlights, overlays, and annotations to increase your video’s worth. So no wonder why FlexClip is one of the leading web-based software for free online screen capturing, especially if you want to make great YouTube videos.
The recording process is easy. All you need to do is visit the website and click the “Start Recording” button.
Then, choose your layout to start recording the screen and audio. When you’re finished, just hit the “Stop” button to end recording to edit the video in FlexClip’s built-in video editor. Lastly, download the screencast to upload it to your YouTube channel.
3. Using Apowersoft - Online Screen Recorder (Free)
Apowersoft is a renowned company that creates digital products, including file compressors, watermark removers, and more. Since there’s a growing demand for screen recorders for YouTube, the Apowersoft creators have also launched a “Free Online Screen Recorder.” Yup! You’re reading the right name.
Apowersoft – Free Online Screen Recorder eases the screen recording process. While it’s an online tool, you can also download the app on your Mac or Windows OS.
It’s a free program with simple features, such as a screen and webcam recording with audio. So if your YouTube content doesn’t require overlays, subtitles, or other editing stuff, this software is ideal due to its simplicity.
You can click the “Start Recording” button to get started.
.
Then, select the screen you wish to record, and save the captured screen to your local disk or cloud so you can upload the videos later to your YouTube channel.
Part 3: How to Record Screen for YouTube with Free Screen Recorder on Mac
1. Using QuickTime Player
QuickTime Player can be used to record movies from your camera or the screen of your iPad, iPod touch or iPhone. It can also record your Mac’s screen or record audio from your microphone. To record the screen of your Pad, iPod touch or iPhone, you should use the movie-recording function. You can use it to record the screen for YouTube video, or you can also record the YouTube video and empower it with your creativity.
For more details of using QuickTime Player to record YouTube videos, check our guide: How to record videos with Quicktime.
2. Using Screen Flow
Screen Flow is our second pick for Mac. Although it’s paid software, you can still enjoy the blessings of this screen recorder through the trial version. It’s a very handy tool that allows Mac screen recording and all iOS devices, such as iPhones and iPad.
Okay! So what’s good about screen flow? Let’s uncover. Firstly, it’s an editor + screen recorder specifically made for YouTube. You can capture the screen and edit the footage before uploading it to your channel.
Secondly, this software allows you to record simultaneous screens and your webcam. Plus, you can also record your voice through its mic recording option.
Another great thing about Screen Flow is that it has numerous video filters and a customizable title library. It also permits you to save screen recordings on your Mac or directly share them to your YouTube channel, other social media accounts, websites, or cloud storage in a few clicks.
Here’s a video to help you get started with screen recording on your Mac using Screen Flow:
3. Using Vmaker
Vmaker is another authentic software to record screens for your YouTube videos. It’s a free program, but you can buy premium versions to unlock more features.
The tool is trusted by many software review websites, such as “crozdesk.” It is available on both Mac and Windows OS. However, it seems like this software performs well on Mac operating systems.
Vmaker allows you to record your screen, your favorite YouTube videos, and the audio – all together! You can record the entire Mac screen or a specific portion in HD quality. Moreover, the software allows you to pick resolutions up to 4K to record the media.
This program also offers editing features like adding subtitles, music, flip, blur, trim, and more to create an awesome video. All videos are saved to your cloud workspace once you finish recording. Then, you can share the recorded video screens on your YouTube.
The tool is ideal for making tutorials, courses, demos, and product review videos. All you need to do is download Vmaker on your Mac. Choose a webcam, screen, or both with audio for recording. Start recording in the highest quality. Edit your video and share it on your YouTube channel.
Conclusion
Above are some screen recorders that you can use to record YouTube videos or record the screen and webcam simultaneously to make a video and upload it it to YouTube. If you want to record a screen video and edit it further, you should try Wondershare Filmora video editor.
Download Mac Version ](https://tools.techidaily.com/wondershare/filmora/download/ )
FAQs
Q1. How do you record your screen on a Mac for YouTube?
There are some great tools for screen recording on Mac for YouTube. The most loved and enjoyed program is Filmora by Wondershare. It’s a professional tool for screen recording and video editing. Most importantly, it has a user-friendly interface and records your screen in high quality.
Another option is the Quick Time Player. This program also allows screen recording. Likewise, Screen Flow is also a great program for screen capturing for YouTube on Mac.
Q2. Can I screen-record and upload it to YouTube?
There are two ways to do it. First, you can download the free or paid screen recording software on your Windows or macOS. Second, you can look for online screen recorders like FlexClip or the built-in YouTube recorder and directly share the recorded video to your channel.
Some tools, like Apowersoft and Vmaker, save screen recordings to the cloud or local disk. And there’s no direct sharing of the recorded screens to your YouTube channel. So if you’re using such programs, you will need to sign in to your YouTube channel and upload the file from your computer hard drive.
Q3. How do I record my computer screen for 2022?
Some of the greatest video editing and screen recording tools like Filmora, Bandicam, and FlexClip allow you to record your computer screen. Depending on the software, you can directly share the video to your YouTube channel. Or, save the video on your computer and then upload it on your channel.
Richard Bennett
Richard Bennett is a writer and a lover of all things video.
Follow @Richard Bennett
Audio Aesthetics: High-Quality DJ Template Videos Downloaded
Most think music is the most important thing in a professional DJ set. It might be the most important, but it’s not the only important element. The visuals are also essential. There are several reasons why the right DJ template video download can significantly improve your set.
Read below and you’ll open your eyes to how a simple template and a bit of video editing can change your whole career as a DJ.
YouTube Video Background Creating realistic video scenes at your will is easy to complete with Filmora green screen removal.
Create Video Backgrounds Create Video Backgroundss Learn Green Screen

What Is a DJ Template Video Download?
DJ template video downloads are basically video templates with pre-recorded clips and effect presets that sync with your music. So, regardless of what tempo, genre, or style your DJ set is, this template will sync with it perfectly and make everything look more professional, modern, funky, or whatever result you prefer.
There are three main characteristics of DJ template videos, including:
- Pre-Designed Visuals: These templates are ready-made visuals that can be used as-is or customized further. They range from abstract patterns and pulsating geometries to thematic scenes and rhythmic animations.
- Customizable Elements: You can personally customize many of these templates. This might include integrating logos and text or tweaking the color scheme to match the event’s theme.
- Format and Compatibility: They are usually available in formats compatible with common VJing and DJing software, ensuring seamless integration into the DJ’s setup.
Why Choosing the Right Template Matters?
Every DJ out there has their own unique style. This can be displayed by the music they play, the events they attend, the style of clothing they wear, and so on. Well, the same style can be represented by their videos as well.
With that said, it’s crucial that you make your video in such a way that your style is kept and immediately recognized by your fans. That can easily be achieved with a background template video for your set.
After all, your goal is to create an unforgettable experience that truly impresses everyone. You can do the same for live events as well as for your pre-recorded DJ sets.
Sources for DJ Template Video Downloads
So, it’s finally time to look at the best places online where you can find the perfect DJ template video for you.
Let’s have a quick look at the top five.
Motion Elements

Motion Elements has a massive directory of royalty-free elements creators can use. This list, of course, includes tons of video templates for DJs.
Main Benefits:
- Huge variety
- You can customize your templates
- Free and paid downloads available
Video Hive

This platform is a part of Envato Market. If the prices are suitable for you, then there’s nothing you can’t find here.
Main Benefits:
- Massive selection
- Community-driven elements
- Good pricing
Pond5

With Pond5, you can even browse music and various sound effects on top of your template video background full-screen downloads.
Main Benefits:
- Royalty-free options
- Very easy to find what you need
- Global community and creators
Filmora
Free Download For Win 7 or later(64-bit)
Free Download For macOS 10.14 or later
Filmora is a video-editing software that directly offers tons of DJ video templates to insert into your video. No need to download anything separately. Just click and try them all.
Main Benefits:
- Seamless integration:
- Perfect for beginners
- Exceptional customization options
Mixkit

Last but not least, Mixkit is an ideal choice if you are exclusively looking for free templates that are also royalty-free. You’re safe to use anything here and you don’t have to pay a dime.
Main Benefits:
- Free to use for all
- Receives regular updates and new elements
- No need to credit the creator
How to Customize Templates for a Unique Experience?
The way you customize these templates is by editing them in a video editor of your choice after downloading them. However, not all templates are customizable.
In order for a template to be customizable, it has to be available in a format for tools such as Premiere Pro, Filmora, or many others. If it isn’t, then you are very limited with the editing if it’s an MP4 file, for example.
This is why using a DJ template video background on a full screen directly from a video editing tool like Filmora is the easiest solution for editing it. Any template you click from the tool will be fully editable, adjustable, and customizable.
You can control its colors, speed, animations, and so on.
Technical Considerations
Now, if you want the best possible results with your video templates, you must put technical considerations into account. It’s not the most fun process but it is crucial. Luckily, this guide will make it easier.
So, consider the following:
1. Video Resolution and Quality
Try to find high-definition or 4K templates. They will give the best visuals and be more flexible in editing or customization.
Also, choose templates that match your display setup’s aspect ratio, whether standard (16:9) or widescreen formats.
2. Format Compatibility
Common video formats like MP4, AVI, or MOV are widely supported by most DJ software and hardware. Ensure the template format is compatible with your equipment.
Additionally, think about the video codec you are using. Some codecs might not be supported by your playback system, or they might be too resource-intensive.
3. Performance and Playback
The frame rate of the video should match that of your DJ software to avoid any sync issues. Common frame rates include 30fps and 60fps.
If your set is fairly long, make sure you’ve set the video template to loop seamlessly if you don’t want to look unprofessional.
4. Audio Sync
Some templates are designed to sync with the beat of the music. Check if the template has features that allow easy synchronization with your tracks.
You might also want to consider reactive templates. These are templates that change with the music and can add an engaging dynamic element to your performance.
Legal Aspects and Copyright
This part concerns most of us when using creative elements like these. So, it’s always a good idea to read the licenses and agreements before using anything.
Here are a couple of things you should always keep in mind:
- Read the Fine Print: Always read the licensing agreement of a template before using it. This agreement specifies how you can legally use the template, including any restrictions.
- Commercial vs. Non-Commercial Use: Some templates are only licensed for non-commercial use. If you’re using it for commercial purposes, ensure the template is cleared for such use.
- Attribution Requirements: Some licenses require you to credit the creator of the template. Make sure to follow these requirements where applicable.
- Modifications and Derivative Works: Be aware of any restrictions on modifying the template or creating derivative works based on it.
Summary
Hopefully, the information in this guide will be useful when you’re looking for the perfect DJ video template download. Remember what you learned here, and make sure you use the tools we suggested to find the best templates. The rest is up to you!
Create Video Backgrounds Create Video Backgroundss Learn Green Screen
What Is a DJ Template Video Download?
DJ template video downloads are basically video templates with pre-recorded clips and effect presets that sync with your music. So, regardless of what tempo, genre, or style your DJ set is, this template will sync with it perfectly and make everything look more professional, modern, funky, or whatever result you prefer.
There are three main characteristics of DJ template videos, including:
- Pre-Designed Visuals: These templates are ready-made visuals that can be used as-is or customized further. They range from abstract patterns and pulsating geometries to thematic scenes and rhythmic animations.
- Customizable Elements: You can personally customize many of these templates. This might include integrating logos and text or tweaking the color scheme to match the event’s theme.
- Format and Compatibility: They are usually available in formats compatible with common VJing and DJing software, ensuring seamless integration into the DJ’s setup.
Why Choosing the Right Template Matters?
Every DJ out there has their own unique style. This can be displayed by the music they play, the events they attend, the style of clothing they wear, and so on. Well, the same style can be represented by their videos as well.
With that said, it’s crucial that you make your video in such a way that your style is kept and immediately recognized by your fans. That can easily be achieved with a background template video for your set.
After all, your goal is to create an unforgettable experience that truly impresses everyone. You can do the same for live events as well as for your pre-recorded DJ sets.
Sources for DJ Template Video Downloads
So, it’s finally time to look at the best places online where you can find the perfect DJ template video for you.
Let’s have a quick look at the top five.
Motion Elements
Motion Elements has a massive directory of royalty-free elements creators can use. This list, of course, includes tons of video templates for DJs.
Main Benefits:
- Huge variety
- You can customize your templates
- Free and paid downloads available
Video Hive
This platform is a part of Envato Market. If the prices are suitable for you, then there’s nothing you can’t find here.
Main Benefits:
- Massive selection
- Community-driven elements
- Good pricing
Pond5
With Pond5, you can even browse music and various sound effects on top of your template video background full-screen downloads.
Main Benefits:
- Royalty-free options
- Very easy to find what you need
- Global community and creators
Filmora
Free Download For Win 7 or later(64-bit)
Free Download For macOS 10.14 or later
Filmora is a video-editing software that directly offers tons of DJ video templates to insert into your video. No need to download anything separately. Just click and try them all.
Main Benefits:
- Seamless integration:
- Perfect for beginners
- Exceptional customization options
Mixkit
Last but not least, Mixkit is an ideal choice if you are exclusively looking for free templates that are also royalty-free. You’re safe to use anything here and you don’t have to pay a dime.
Main Benefits:
- Free to use for all
- Receives regular updates and new elements
- No need to credit the creator
How to Customize Templates for a Unique Experience?
The way you customize these templates is by editing them in a video editor of your choice after downloading them. However, not all templates are customizable.
In order for a template to be customizable, it has to be available in a format for tools such as Premiere Pro, Filmora, or many others. If it isn’t, then you are very limited with the editing if it’s an MP4 file, for example.
This is why using a DJ template video background on a full screen directly from a video editing tool like Filmora is the easiest solution for editing it. Any template you click from the tool will be fully editable, adjustable, and customizable.
You can control its colors, speed, animations, and so on.
Technical Considerations
Now, if you want the best possible results with your video templates, you must put technical considerations into account. It’s not the most fun process but it is crucial. Luckily, this guide will make it easier.
So, consider the following:
1. Video Resolution and Quality
Try to find high-definition or 4K templates. They will give the best visuals and be more flexible in editing or customization.
Also, choose templates that match your display setup’s aspect ratio, whether standard (16:9) or widescreen formats.
2. Format Compatibility
Common video formats like MP4, AVI, or MOV are widely supported by most DJ software and hardware. Ensure the template format is compatible with your equipment.
Additionally, think about the video codec you are using. Some codecs might not be supported by your playback system, or they might be too resource-intensive.
3. Performance and Playback
The frame rate of the video should match that of your DJ software to avoid any sync issues. Common frame rates include 30fps and 60fps.
If your set is fairly long, make sure you’ve set the video template to loop seamlessly if you don’t want to look unprofessional.
4. Audio Sync
Some templates are designed to sync with the beat of the music. Check if the template has features that allow easy synchronization with your tracks.
You might also want to consider reactive templates. These are templates that change with the music and can add an engaging dynamic element to your performance.
Legal Aspects and Copyright
This part concerns most of us when using creative elements like these. So, it’s always a good idea to read the licenses and agreements before using anything.
Here are a couple of things you should always keep in mind:
- Read the Fine Print: Always read the licensing agreement of a template before using it. This agreement specifies how you can legally use the template, including any restrictions.
- Commercial vs. Non-Commercial Use: Some templates are only licensed for non-commercial use. If you’re using it for commercial purposes, ensure the template is cleared for such use.
- Attribution Requirements: Some licenses require you to credit the creator of the template. Make sure to follow these requirements where applicable.
- Modifications and Derivative Works: Be aware of any restrictions on modifying the template or creating derivative works based on it.
Summary
Hopefully, the information in this guide will be useful when you’re looking for the perfect DJ video template download. Remember what you learned here, and make sure you use the tools we suggested to find the best templates. The rest is up to you!
Also read:
- How to Edit Youtube Videos by the YouTube Video Editor
- The Entrepreneur's Handbook Quick Channel Creation on the Go with Mobile Devices
- [Updated] Demystifying YouTube Shorts Template Design Principles
- Enhance Audio-Visual Fidelity Use AV1 on YouTube for 2024
- In 2024, Designing Effective Video Previews for Channels
- In 2024, Captivating Audiences with Cross-Platform Multistreaming on Youtube and Twitch
- Curtail Unexpected YouTube Recommendations
- 2024 Approved Elevate Engagement on YouTube Fending Off Automated Audiences
- [New] Bypass Youtube and Shine with These 5 Next-Gen Editing Software
- Influencer Tip Crafting Irresistible Templated Content in YouTube Descriptions
- Ultimate Camera Picks for Aspiring YouTubers
- Youtube Earnings Unveiled Average AdSense Payments Per Thousand Views
- [New] A Decade of YouTube Dominance Breakthrough Videos Hitting a Billion Views
- In 2024, Achieve the Perfect Look YouTube's Guide to Video Aspect Ratios
- Editing Workshop Portal for 2024
- Sound Fidelity at Home Mastering Quality Recordings
- Craftsmanship in Marvellous Marvel Creation
- Tips for Effortless Sharing of Musical Selections
- [New] Android Advantage 5 Unique Playlist Downloaders Reviewed
- Jumpstart Your Professional Filmmaking Exclusive, Cost-Free Green Screen Training From Top YouTube Educators
- Enhancing Your Spotify Collection with YouTube Music Integration
- 2024 Approved Creator Payment Frequency on YouTube Platform
- 2024 Approved 5 Frosty Yet Inviting Backdrops for Your Vids
- Rapid Share Tactics for YouTube Lists
- Unplug From YouTube Top 10 Video Apps for Smartphones
- [Updated] Beginner's Steps to Broadcast on Youtube via OBS
- Best Android Apps YouTube Video Downloads Compared
- [New] Behind the Scenes of YouTube Income Generation
- 2024 Approved Earnings Epicenter Tech Gaming on YouTube
- The Role of Youtube Images in Video Promotion and Discovery
- [New] Edu-Topic 10 Selective Learning Channels Online
- Your Guide to Iconic Fonts Boosting Video Engagement
- Secrets of Saving Youtube Thumbnails in Various Formats
- In 2024, Become a YouTube Earning Expert Universal Device Strategies
- Crafting the Perfect Harmony Fusing Lyrics & Images with Lyric Video Maker for 2024
- Streamlining the Process of Finding Your Own Musical Compilation on Youtube
- Navigating Backwards YouTube’s Way to Rearrange Watch Queue
- [Updated] Creating a Fortified MC Homebase
- [New] 10 Free Web Conferencing Software for Online Meeting for 2024
- [Updated] In 2024, Understanding Permissions The Key to Saving Google Meets
- [Updated] 2024 Approved Mental Marathons in Elite Escapade Venues
- [New] In 2024, Cooking Craze Hot TikTok Recipes Worth Sharing
- [Updated] Mastering the Art of Saving Twitter Jokes (GIFs)
- 5 Ways to Restart Honor Magic 6 Lite Without Power Button | Dr.fone
- The Ultimate Cheatsheet to 15 Adobe Animate Alternatives for 2024
- [New] Calls Recorded & Saved IPhone '24 Sound Guide
- In 2024, Android's Superior HD Vids Discover the Best Apps
- [Updated] The Art of Engagement Mastering TikTok's Language Through 5 Essential Caption Techniques
- New Tutorials to Make Animated Images for 2024
- [New] How to Screen Record on iPad More Easily?
- Reliable User Guide to Fix Realme 11 Pro Running Slow and Freezing | Dr.fone
- [New] Mastering Voice Modification on TikTok A Step-by-Step Guide
- [New] Overcome YouTube Tweet Buffer in Chromebook for 2024
- [New] 2024 Approved Transitioning Gaming Sessions Xbox Live to FB Live
- 2024 Approved Find Dog Sound Effects
- 2024 Approved Ready, Set, Resize Transformative Techniques for Mac's Instagram Content
- Navigating the World of Zoom Audio to Text Tools for 2024
- In 2024, How to Unlock Apple iPhone 13 Pro Passcode Screen? | Dr.fone
- 2024 Approved Affordable Overseas VR Headsets (China)
- [Updated] Maximize Your Content with These Top 5 OBS Tips
- How To Unlock Realme Narzo N53 Phone Without Password?
- Revolutionizing Sounds Five Key Digital Audio-Alteration Tools for 2024
- Optimal Platforms for YouTube Video Exposure
- How Do I Stop Someone From Tracking My Sony Xperia 10 V? | Dr.fone
- Title: "[Updated] Capture Clarity High-Quality Screen Recordings for YouTubers (PC/Mac)"
- Author: Kevin
- Created at : 2024-05-25 16:40:59
- Updated at : 2024-05-26 16:40:59
- Link: https://youtube-videos.techidaily.com/updated-capture-clarity-high-quality-screen-recordings-for-youtubers-pcmac/
- License: This work is licensed under CC BY-NC-SA 4.0.
