![[Updated] Captioning Techniques for Professional YouTube Content](https://thmb.techidaily.com/109f8e41f016b710f8a0ad598776af950e5e0ec716fb01a083b32b51c83dd241.jpg)
[Updated] Captioning Techniques for Professional YouTube Content
Captioning Techniques for Professional YouTube Content
How To Add Captions to YouTube Videos

Richard Bennett
Mar 27, 2024• Proven solutions
By captioning your YouTube videos you help to make them accessible to more potential viewers. Subtitles are useful to viewers who have hearing impairments, whose first language is different from yours, or who are unable to watch your video with sound. Closed captioning can also be useful for you as a YouTuber because it helps with your SEO, or search engine optimization. Practicing better SEO can get your videos ranked higher in search results. Google and YouTube both index subtitles and transcripts much like they do your video’s description, unless you use automated captions.
This article will first explain how you can turn on subtitles for the videos you watch and then walk you through adding captions to your own videos.
How To Turn On Captions on YouTube
In order for you to be able to view subtitles for a YouTube video the uploader of the video will need to have added them, unless you change your account settings to display automatic captions.

To toggle subtitles on and off click on the Closed Captioning icon in the bottom right of your video player.
If the creator of the video has not added captions then you can enable automatic captions by going into your Account Settings and selecting Playback. Check the box next to Always Show Captions, and then check Show Automatic Captions by Speech Recognition. These captions may be flawed, but you will still be able to see the more accurate user submitted captions on videos that have them. The Always Show Captions feature may be useful not only to the hearing impaired, but to users who do not speak the same language as the video producer.
If you want to change the language of the subtitles click on the settings icon (the one that looks like a gear) next to the closed captioning icon and choose your language next to Subtitles/CC . If the language you want is not there select Auto-Translate and then pick a language. Google Translate will be used to generate subtitles in your chosen language.
Adding YouTube Captions in 4 Steps
1. Go to Video Manager in your Creator Studio and then look at your videos. Decide which one you want to add captions to.
2. Click on the drop-down menu next to the video you want to add captions to and choose Subtitles and CC.
3. Select Add New Subtitles or CC.
4. Choose whether to create your captions, upload a file that has them, transcribe your video, use automatic captioning, or use captioning software.
Create Subtitles or Closed Captions will allow you to create your subtitles on YouTube.
Upload A File allows you to upload a pre-made subtitle file from your computer. Supported file types include SubRip (.srt) and SubViewer (.sbv). You cannot use a word or PDF document for your subtitles.
Transcribe and Set Timings is where you can type a transcript of your video and set timings to sync it to your video. This differs from Create Subtitles or Closed Captions in that your transcript is all typed in to one text field.
Use Automatic Captioning will automatically use speech recognition technology to create captions. You can edit these auto-generated captions later if there are mistakes.
Use Captioning Software or Services is what you choose if you want to use a program or service to create the subtitles for your video.
The easiest way to add subtitles to your videos is to use Automatic Captioning. However, Automatic Captioning is imperfect and may result in your viewers getting a sloppy, skewed, interpretation of your video. Automatic captions are also not indexed by YouTube and Google the way subtitles you create or upload are. This means that they will not have any value to your SEO strategy. If you do not input your own captions or transcript you are missing out on an opportunity for better search engine rankings. Automatic Captions are great if you do not have time to input subtitles and need a temporary solution, though.
Richard Bennett
Richard Bennett is a writer and a lover of all things video.
Follow @Richard Bennett
Richard Bennett
Mar 27, 2024• Proven solutions
By captioning your YouTube videos you help to make them accessible to more potential viewers. Subtitles are useful to viewers who have hearing impairments, whose first language is different from yours, or who are unable to watch your video with sound. Closed captioning can also be useful for you as a YouTuber because it helps with your SEO, or search engine optimization. Practicing better SEO can get your videos ranked higher in search results. Google and YouTube both index subtitles and transcripts much like they do your video’s description, unless you use automated captions.
This article will first explain how you can turn on subtitles for the videos you watch and then walk you through adding captions to your own videos.
How To Turn On Captions on YouTube
In order for you to be able to view subtitles for a YouTube video the uploader of the video will need to have added them, unless you change your account settings to display automatic captions.
To toggle subtitles on and off click on the Closed Captioning icon in the bottom right of your video player.
If the creator of the video has not added captions then you can enable automatic captions by going into your Account Settings and selecting Playback. Check the box next to Always Show Captions, and then check Show Automatic Captions by Speech Recognition. These captions may be flawed, but you will still be able to see the more accurate user submitted captions on videos that have them. The Always Show Captions feature may be useful not only to the hearing impaired, but to users who do not speak the same language as the video producer.
If you want to change the language of the subtitles click on the settings icon (the one that looks like a gear) next to the closed captioning icon and choose your language next to Subtitles/CC . If the language you want is not there select Auto-Translate and then pick a language. Google Translate will be used to generate subtitles in your chosen language.
Adding YouTube Captions in 4 Steps
1. Go to Video Manager in your Creator Studio and then look at your videos. Decide which one you want to add captions to.
2. Click on the drop-down menu next to the video you want to add captions to and choose Subtitles and CC.
3. Select Add New Subtitles or CC.
4. Choose whether to create your captions, upload a file that has them, transcribe your video, use automatic captioning, or use captioning software.
Create Subtitles or Closed Captions will allow you to create your subtitles on YouTube.
Upload A File allows you to upload a pre-made subtitle file from your computer. Supported file types include SubRip (.srt) and SubViewer (.sbv). You cannot use a word or PDF document for your subtitles.
Transcribe and Set Timings is where you can type a transcript of your video and set timings to sync it to your video. This differs from Create Subtitles or Closed Captions in that your transcript is all typed in to one text field.
Use Automatic Captioning will automatically use speech recognition technology to create captions. You can edit these auto-generated captions later if there are mistakes.
Use Captioning Software or Services is what you choose if you want to use a program or service to create the subtitles for your video.
The easiest way to add subtitles to your videos is to use Automatic Captioning. However, Automatic Captioning is imperfect and may result in your viewers getting a sloppy, skewed, interpretation of your video. Automatic captions are also not indexed by YouTube and Google the way subtitles you create or upload are. This means that they will not have any value to your SEO strategy. If you do not input your own captions or transcript you are missing out on an opportunity for better search engine rankings. Automatic Captions are great if you do not have time to input subtitles and need a temporary solution, though.
Richard Bennett
Richard Bennett is a writer and a lover of all things video.
Follow @Richard Bennett
Decoding Video Potential: DSLR vs Mirrorless Innovation
Mirrorless vs. DSLR Cameras: Which is Better for Videos?
Richard Bennett
Oct 26, 2023• Proven solutions
If you’re looking to shoot your videos with interchangeable lenses, your camera set up will either have to have a mirrorless camera body or a DSLR camera body. In this post, I’ll be comparing the two camera body types for recording video.
- Part 1: What is a DSLR Camera?
- Part 2: What is a Mirrorless Camera?
- Part 3: Mirrorless vs. DSLR - a Complete Comparison
- Part 4: Mirrorless vs. DSLR - Which One is Better for Video?
What is a DSLR Camera?
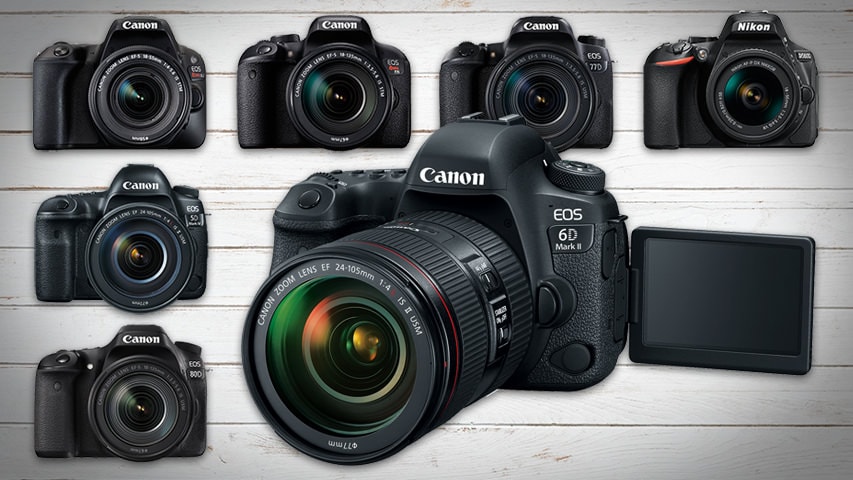
DSLR cameras are digital single-lens reflex cameras. Like 35mm film cameras of the past, DSLR cameras are built with an angled mirror inside its camera body. This mirror allows you to look into your camera’s optical viewfinder and see exactly what your camera sees.
The mirror inside a DSLR camera flips up out of the way when you open the shutter to allow light to reach the camera’s image sensor.
Check out our list of the 7 Best DSLR Cameras For Vlogging .
What is a Mirrorless Camera?
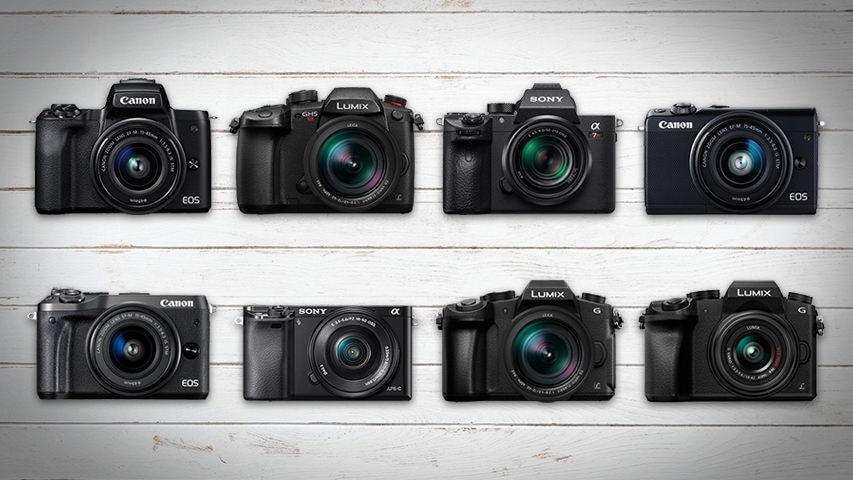
Mirrorless cameras are interchangeable lens cameras without a mirror inside the camera body. With nothing to reflect your image, you won’t find any optical viewfinder to look through to see exactly what your camera sees.
Light passes through the lens of a mirrorless camera and lands directly onto the camera’s sensor.
Check out our list of the 8 Best Mirrorless Cameras For Vlogging .
Mirrorless vs. DSLR - a Complete Comparison
Size and Weight
DSLR cameras are larger and heavier than mirrorless cameras because there are more parts that go into their camera bodies. DSLR cameras require enough space inside for an angled mirror to flip up out of the way.
If your video shooting style is more on-the-go, like that of a daily vlogger or travel vlogger, the smaller size and lighter weight of a mirrorless camera may be more suitable for you.
Previewing Images
When you’re using a DSLR camera, your optical viewfinder will show you exactly what your camera sees as opposed to a digital preview of what your image sensor picks up. No matter how bright or dark your scene actually is, through the optical viewfinder, you’ll be able to clearly see what your camera sees with the power of your eye.
Mirrorless cameras, on the other hand, display on your camera’s screen or electronic viewfinder a digital preview of what your camera is looking at. You will notice a lag, especially in low light, between actions that are taking place in front of the camera and the same actions being displayed in your live preview.
Lenses and Accessories
Having been around much longer, there are plenty more options for lenses and accessories when it comes to shooting with DSLR cameras. You can choose from all kinds of different quality levels and price ranges.
Video Resolution
4K video recording is more readily available in mirrorless cameras than DSLR cameras. At a much more affordable budget, you can get your hands on a 4K mirrorless camera. If you want to shoot 4K video on a DSLR camera, though, you will have to pay for some of the most expensive DSLR cameras on the market.
Image Stabilization
Up until quite recently, you needed to get the right lens with built-in optical image stabilization if you wanted to shoot stabilized photos and videos with an interchangeable lens camera. Image stabilization had not been readily available in the bodies of these cameras.
In recent years, however, mirrorless cameras have been much more active in their development of camera bodies equipped with shifting image sensors. Your shots can be even more stabilized when the optical image stabilization of your lens is combined with your camera’s in-body sensor-shift image stabilization.
Battery Life
When it comes to shooting video, DSLR cameras and mirrorless cameras consume about the same amount of power. It’s still safe to say, though, that DSLR cameras, for the most part, have better battery life than mirrorless cameras because their bigger batteries are packed with more power.
Mirrorless vs. DSLR - Which One is Better for Video?
In my opinion, when it comes to filming a video, mirrorless cameras are the way to go. In such a short time, mirrorless cameras have made huge leaps in their capabilities. It won’t be long before the ultimate vlogging camera comes out on the mirrorless market.
In the end, if you need to edit videos futhermore, try Filmora video editor . It’s a video editor which has significantly improved overall performance, making the product faster, and more powerful, and taking the user editing experience to a new level.
It is perfect for helping beginners, and intermediate users create stylish videos by providing an intuitive user interface and built-in effects.
![]()
Richard Bennett
Richard Bennett is a writer and a lover of all things video.
Follow @Richard Bennett
Richard Bennett
Oct 26, 2023• Proven solutions
If you’re looking to shoot your videos with interchangeable lenses, your camera set up will either have to have a mirrorless camera body or a DSLR camera body. In this post, I’ll be comparing the two camera body types for recording video.
- Part 1: What is a DSLR Camera?
- Part 2: What is a Mirrorless Camera?
- Part 3: Mirrorless vs. DSLR - a Complete Comparison
- Part 4: Mirrorless vs. DSLR - Which One is Better for Video?
What is a DSLR Camera?
DSLR cameras are digital single-lens reflex cameras. Like 35mm film cameras of the past, DSLR cameras are built with an angled mirror inside its camera body. This mirror allows you to look into your camera’s optical viewfinder and see exactly what your camera sees.
The mirror inside a DSLR camera flips up out of the way when you open the shutter to allow light to reach the camera’s image sensor.
Check out our list of the 7 Best DSLR Cameras For Vlogging .
What is a Mirrorless Camera?
Mirrorless cameras are interchangeable lens cameras without a mirror inside the camera body. With nothing to reflect your image, you won’t find any optical viewfinder to look through to see exactly what your camera sees.
Light passes through the lens of a mirrorless camera and lands directly onto the camera’s sensor.
Check out our list of the 8 Best Mirrorless Cameras For Vlogging .
Mirrorless vs. DSLR - a Complete Comparison
Size and Weight
DSLR cameras are larger and heavier than mirrorless cameras because there are more parts that go into their camera bodies. DSLR cameras require enough space inside for an angled mirror to flip up out of the way.
If your video shooting style is more on-the-go, like that of a daily vlogger or travel vlogger, the smaller size and lighter weight of a mirrorless camera may be more suitable for you.
Previewing Images
When you’re using a DSLR camera, your optical viewfinder will show you exactly what your camera sees as opposed to a digital preview of what your image sensor picks up. No matter how bright or dark your scene actually is, through the optical viewfinder, you’ll be able to clearly see what your camera sees with the power of your eye.
Mirrorless cameras, on the other hand, display on your camera’s screen or electronic viewfinder a digital preview of what your camera is looking at. You will notice a lag, especially in low light, between actions that are taking place in front of the camera and the same actions being displayed in your live preview.
Lenses and Accessories
Having been around much longer, there are plenty more options for lenses and accessories when it comes to shooting with DSLR cameras. You can choose from all kinds of different quality levels and price ranges.
Video Resolution
4K video recording is more readily available in mirrorless cameras than DSLR cameras. At a much more affordable budget, you can get your hands on a 4K mirrorless camera. If you want to shoot 4K video on a DSLR camera, though, you will have to pay for some of the most expensive DSLR cameras on the market.
Image Stabilization
Up until quite recently, you needed to get the right lens with built-in optical image stabilization if you wanted to shoot stabilized photos and videos with an interchangeable lens camera. Image stabilization had not been readily available in the bodies of these cameras.
In recent years, however, mirrorless cameras have been much more active in their development of camera bodies equipped with shifting image sensors. Your shots can be even more stabilized when the optical image stabilization of your lens is combined with your camera’s in-body sensor-shift image stabilization.
Battery Life
When it comes to shooting video, DSLR cameras and mirrorless cameras consume about the same amount of power. It’s still safe to say, though, that DSLR cameras, for the most part, have better battery life than mirrorless cameras because their bigger batteries are packed with more power.
Mirrorless vs. DSLR - Which One is Better for Video?
In my opinion, when it comes to filming a video, mirrorless cameras are the way to go. In such a short time, mirrorless cameras have made huge leaps in their capabilities. It won’t be long before the ultimate vlogging camera comes out on the mirrorless market.
In the end, if you need to edit videos futhermore, try Filmora video editor . It’s a video editor which has significantly improved overall performance, making the product faster, and more powerful, and taking the user editing experience to a new level.
It is perfect for helping beginners, and intermediate users create stylish videos by providing an intuitive user interface and built-in effects.
![]()
Richard Bennett
Richard Bennett is a writer and a lover of all things video.
Follow @Richard Bennett
Also read:
- [New] In 2024, Craft Your Creative Identity Mastering Instagram Photowatermarking
- [New] Pre-Upload Best Practices to Maintain TikTok's Integrity for 2024
- 2024 Approved Enhance Viewer Engagement The Top 6 Methods for Higher YouTube Audience Retention
- 7 Critical Aspects to Assess Prior to Acquiring Your New Smart Television
- Best Practices Selecting Among Top 9 Free Logo Designers
- Bottom Line Gear Collect All These Trendsetting Tools to Win in Business for 2024
- Breaking Into Livestrances A Gamers' Guide to YouTube Success for 2024
- Building a YouTubing Brand From Scratch with These 8 Courses for 2024
- Charting the Unknown Visual Facts From 2017'S Youtube World for 2024
- Elevate Your Videos with Effective YouTube Thumbnails
- Get Started with Your Brother HL-L2340DW Printer on Windows - Free Downloads Available
- Harness the Power of Speech: 5 Techniques for Directing ChatGPT by Voice
- The Ultimate Youtube Editing Guide for Content Creators of All Levels for 2024
- Title: [Updated] Captioning Techniques for Professional YouTube Content
- Author: Kevin
- Created at : 2024-11-21 16:28:00
- Updated at : 2024-11-24 22:06:34
- Link: https://youtube-videos.techidaily.com/updated-captioning-techniques-for-professional-youtube-content/
- License: This work is licensed under CC BY-NC-SA 4.0.