![[Updated] Building Wealth Through Video Content Revenue](https://thmb.techidaily.com/c7f6e1d56c05b1571f57a7f9b04e195b30e35f1ef9fbc6554b9991ddbdbae23c.png)
[Updated] Building Wealth Through Video Content Revenue
Building Wealth Through Video Content Revenue
YouTube Affiliate Marketing: How to Make Money with It

Richard Bennett
Mar 27, 2024• Proven solutions
Many people are finding it harder to make money online today. However, there are always avenues to explore that can help you increase your revenue. If you’ve never considered YouTube affiliate marketing before, or you are considering to step into it, now could be the perfect time to find out more about this valuable opportunity.
In this article, we will explain how you can make money via YouTube affiliate marketing, so read on to find out more.
- Part1: What is YouTube affiliate marketing
- Part2: Steps to start your YouTube affiliate marketing project
- Part2: 3 Tips before you begin
Want to join the Filmora affiliate program but don’t have the media kit? Visit the Filmora Marketing Kit to download banners, logos and demo videos from Filmora.
Part 1: What is YouTube affiliate marketing?
In YouTube affiliate marketing, videos are made to encourage customers to purchase products from third-party sites including Amazon.
When users buy products via your links, you can receive commission, which can be up to 10% depending on the category of the product and how much you are selling.
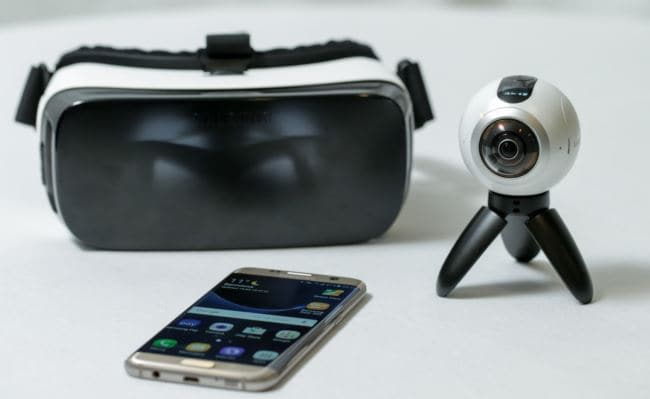
Examples of YouTube affiliate marketing videos include reviews, how-to guides, un-boxing videos and more. Videos are designed to show off what products can do and explain why customers should go on to make a purchase.
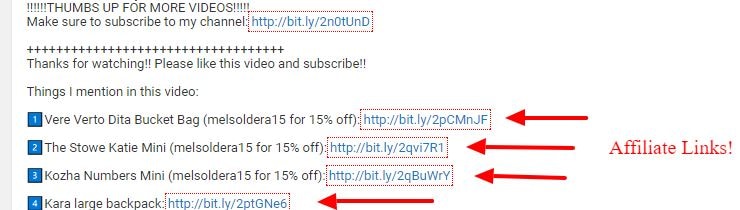
When you have completed your video, you can register for an affiliate marketing program and then add links to your video. The links can be placed either in the video description or as annotations in the clip itself.
Amazon affiliate marketers don’t always just produce videos – they can also promote products via articles, written reviews and more. To make your marketing program successful, you must ensure people know about your video and encourage them to click on the links and buy the products.
Though this can seem daunting at first, the more experience you gain, the more revenue you can generate.
Part 2: Steps to start your YouTube affiliate marketing project
Step 1: build affiliate relationship
One of the first steps you should take when getting your project off the ground is to establish relationships with brands that you love. If you do have a genuine love for the product, this should be reflected in the content and encourage others to make purchases.
Viewers can often tell when your enthusiasm is not genuine, which is why it’s so important to identify products that really do appeal to you. Make a list of the products or programs you use in your daily life and search online to see if there is an affiliate program for it.
If this is the case, you simply need to apply to join it. You may find that the product, program or service that you love does not have a program. Should this be the situation, contact partners to tell them about your love for the product or service and see if they can set something up. Chances are they will be more than happy to do so, as it could be very beneficial for them.

Step 2: Create your product video
The next step is to actually produce your video. Viewers love honesty, so don’t be afraid to say so if there is a way you feel the product or service could be improved.
Remember to include calls to action. Un-boxing videos are very popular and show viewers everything inside a package, whilst review videos can also provide valuable insights.
Top 10 lists also generate high views. You must also remember to include a disclosure that informs viewers that you are being paid via an affiliate marketing scheme. This is a legal obligation.
Step 3: Promote your content
There are many things you can do to ensure your product is seen. Share your video on all your social media channels, respond to as many questions from viewers as possible and add links to online environments where the product is already being discussed.
Set up a channel that can be found when relevant search terms are used and make sure your titles are optimized for search too.

Part 3: 3 Tips before you begin
1. Commission Rate
All brands have different commission rates, with some offering up to 50% and others providing around 5%. Make sure you know what the rates are before you proceed and read the terms and conditions carefully. You may well wish to create a dedicated channel or channels to bring everything together. If you’re passionate about other people’s products, it makes perfect sense to get paid to talk about them.

2. Where affiliate links appear
Affiliate links are placed below the YouTube video in the description. One issue for YouTube affiliate marketers is that buyers tend to exit YouTube once they have clicked on your link, whether they go on to buy the product or not.
It is important to try and get as many views as possible to boost exposure for your video, whilst achieving as many sales as you can. Try to strike the ideal balance between encouraging viewers to make a purchase and to watch as much of your content as possible. The more views you receive, the more favorably your content will be treated by YouTube.
3. Know your product well
It is really essential to know your product inside out when you are marketing it to viewers. YouTube viewers expect you to be an expert when it comes to the products you are showcasing, so take as much time as you need to gain an in-depth understanding of how it works and what its features are.
You must also be able to explain why it makes so much sense to choose the specific product or service over its competitors. Try not to be repetitive, use HD footage and a quality mic, avoid link spamming, choose the best kind of video for the product and plan out the video before you start creating it. Again, engage with your audience as much as you can.

Conclusion
There are various great reasons for getting involved in YouTube affiliate marketing. You may be amazed to see just how much cash you can generate when you follow the above steps and create inspiring videos that showcase products in the best possible light. Just remember to be honest and talk about the cons as well as the pros if they are any. Doing this will help you become a trusted, authentic YouTube affiliate marketer. Why wait any longer to get started?


Richard Bennett
Richard Bennett is a writer and a lover of all things video.
Follow @Richard Bennett
Richard Bennett
Mar 27, 2024• Proven solutions
Many people are finding it harder to make money online today. However, there are always avenues to explore that can help you increase your revenue. If you’ve never considered YouTube affiliate marketing before, or you are considering to step into it, now could be the perfect time to find out more about this valuable opportunity.
In this article, we will explain how you can make money via YouTube affiliate marketing, so read on to find out more.
- Part1: What is YouTube affiliate marketing
- Part2: Steps to start your YouTube affiliate marketing project
- Part2: 3 Tips before you begin
Want to join the Filmora affiliate program but don’t have the media kit? Visit the Filmora Marketing Kit to download banners, logos and demo videos from Filmora.
Part 1: What is YouTube affiliate marketing?
In YouTube affiliate marketing, videos are made to encourage customers to purchase products from third-party sites including Amazon.
When users buy products via your links, you can receive commission, which can be up to 10% depending on the category of the product and how much you are selling.
Examples of YouTube affiliate marketing videos include reviews, how-to guides, un-boxing videos and more. Videos are designed to show off what products can do and explain why customers should go on to make a purchase.
When you have completed your video, you can register for an affiliate marketing program and then add links to your video. The links can be placed either in the video description or as annotations in the clip itself.
Amazon affiliate marketers don’t always just produce videos – they can also promote products via articles, written reviews and more. To make your marketing program successful, you must ensure people know about your video and encourage them to click on the links and buy the products.
Though this can seem daunting at first, the more experience you gain, the more revenue you can generate.
Part 2: Steps to start your YouTube affiliate marketing project
Step 1: build affiliate relationship
One of the first steps you should take when getting your project off the ground is to establish relationships with brands that you love. If you do have a genuine love for the product, this should be reflected in the content and encourage others to make purchases.
Viewers can often tell when your enthusiasm is not genuine, which is why it’s so important to identify products that really do appeal to you. Make a list of the products or programs you use in your daily life and search online to see if there is an affiliate program for it.
If this is the case, you simply need to apply to join it. You may find that the product, program or service that you love does not have a program. Should this be the situation, contact partners to tell them about your love for the product or service and see if they can set something up. Chances are they will be more than happy to do so, as it could be very beneficial for them.
Step 2: Create your product video
The next step is to actually produce your video. Viewers love honesty, so don’t be afraid to say so if there is a way you feel the product or service could be improved.
Remember to include calls to action. Un-boxing videos are very popular and show viewers everything inside a package, whilst review videos can also provide valuable insights.
Top 10 lists also generate high views. You must also remember to include a disclosure that informs viewers that you are being paid via an affiliate marketing scheme. This is a legal obligation.
Step 3: Promote your content
There are many things you can do to ensure your product is seen. Share your video on all your social media channels, respond to as many questions from viewers as possible and add links to online environments where the product is already being discussed.
Set up a channel that can be found when relevant search terms are used and make sure your titles are optimized for search too.
Part 3: 3 Tips before you begin
1. Commission Rate
All brands have different commission rates, with some offering up to 50% and others providing around 5%. Make sure you know what the rates are before you proceed and read the terms and conditions carefully. You may well wish to create a dedicated channel or channels to bring everything together. If you’re passionate about other people’s products, it makes perfect sense to get paid to talk about them.
2. Where affiliate links appear
Affiliate links are placed below the YouTube video in the description. One issue for YouTube affiliate marketers is that buyers tend to exit YouTube once they have clicked on your link, whether they go on to buy the product or not.
It is important to try and get as many views as possible to boost exposure for your video, whilst achieving as many sales as you can. Try to strike the ideal balance between encouraging viewers to make a purchase and to watch as much of your content as possible. The more views you receive, the more favorably your content will be treated by YouTube.
3. Know your product well
It is really essential to know your product inside out when you are marketing it to viewers. YouTube viewers expect you to be an expert when it comes to the products you are showcasing, so take as much time as you need to gain an in-depth understanding of how it works and what its features are.
You must also be able to explain why it makes so much sense to choose the specific product or service over its competitors. Try not to be repetitive, use HD footage and a quality mic, avoid link spamming, choose the best kind of video for the product and plan out the video before you start creating it. Again, engage with your audience as much as you can.
Conclusion
There are various great reasons for getting involved in YouTube affiliate marketing. You may be amazed to see just how much cash you can generate when you follow the above steps and create inspiring videos that showcase products in the best possible light. Just remember to be honest and talk about the cons as well as the pros if they are any. Doing this will help you become a trusted, authentic YouTube affiliate marketer. Why wait any longer to get started?
Richard Bennett
Richard Bennett is a writer and a lover of all things video.
Follow @Richard Bennett
Unlocking Your Videos: The Pathway to Streamlined CC & Subtitling on YouTube
How to Easily Add Subtitles and Closed Captions to YouTube Video
Richard Bennett
Mar 27, 2024• Proven solutions
In this article, we are going to show you how important it is to add subtitle and closed captions in your YouTube video, and how to add them.
The best video editor for YouTubers - Wondershare Filmora , not only allows you to cut, crop, rotate, reverse videos, but also offers your advanced features like PIP, Green Screen, or audio mixing. What’s more, you can find lots of effects for Fashion, gaming, education, tutorial, sports, etc. Check this article to know more.
Why subtitle and closed captions are important for YouTube videos?
- Forced closed captions and subtitles actually help the viewers to understand the content in your video if the audio quality of your video is bad, muffled or barely audible. Reading makes it easier for them to understand.
- This also helps people with hearing impairments. People with troubled ears can still watch and understand your content.
- It’s a great aid to such videos which have been recorded in other foreign languages that you don’t understand. Hence it will increase the number of viewers all around the world.
- They both are generally added for easy accessibility to the viewers who wish to watch in sound sensitive environments.
So, here we are going to show you two ways to add subtittles to video: directly or uploading caption or transcript files
Adding subtitles and closed captions manually
To add subtitles and closed captions to your YouTube video, fisrt, you should sign in to your YouTube account. On left right below ‘Home’ you will find ‘My Channel’. It will direct you to your personal YouTube page. On the top, right next to your subscribers lays the ‘Video manager’, giving you the list of your uploaded videos.
Select the video and click on edit to get a drop down menu. Click on subtitles and CC. This will take you to the subtitling interface. To the right of video select ‘add new subtitles’ and then ‘create new subtitles’. Select the subtitle language. Play the video to listen to the content and type down in the box. Click on ‘+’ button once you are done.
This will create a subtitle timeline right beneath the video. You can manage by dragging and expanding the subtitle duration according to the audio of the video. The subtitle will appear at the bottom of the video screen. Click ‘publish’ once done.
An interruption might occur with appearing of subtitles in accordance with video. Hence a lot precision is required while doing so.
Uploading Caption or Transcript Files automatically
To upload Caption or Transcript Files to YouTube Videos you first need to create a format on a text editor. For windows use Notepad and for Mac you may use TextEdit. Create a format of putting the number of subtitle first, time stamp and then text of the subtitle. For example
1\
00:02:34:12 using a format of (hour : minute : second : millisecond)
2. *text*
This is the sample text for first subtitle at zero hours, two minutes, thirty four seconds and twelve milliseconds. Once done with this. Go to file, select ‘save as’. Write the file name with an extension of .srt and select ‘All files’ for type of file. Click encoding menu and select UTF-8. Once saved, sign in to your YouTube account.
On left right below ‘Home’ you will find ‘My Channel’. It will direct you to your personal YouTube page. On the top, right next to your subscribers lays the ‘Video manager’, giving you the list of your uploaded videos.
Select the video and click on edit to get a drop down menu. Click on subtitles and CC. Go to ‘add subtitles’ and then ‘upload a file’. A pop-up menu will appear select ‘subtitles file’. Click upload. The file will send subtitles to your video.
This will create a subtitle timeline right beneath the video. You can manage by dragging and expanding the subtitle duration according to the audio of the video. The subtitle will appear at the bottom of the video screen. Click ‘publish’ once done.
3 Best Tools for add/managing video Subtitles/CC
1. Amara
Amara is a smart video editor which helps insert captions and subtitles to videos. It also helps in transcribing the videos. It takes help of crowd sourcing to subtitle any YouTube video. They take help from viewers to subtitle the videos. By making crowd subtitling available for any YouTube creator, they are allowing them to reach more viewers in more languages
2. DIY Captions
DIY captions help you to transcribe the YouTube videos, if not in most accurate manner, then in a little easier way. All you have to do is just paste the URL of the YouTube video and it will provide you all the subtitles. These may not be accurate but will provide you major base material which can be tweaked a bit here and there and is far better than making all the subtitles starting from scratch.
3 Subtitles for YouTube
Subtitles for YouTube is a Google Chrome extension which provides subtitles for YouTube videos. For this you will have to provide a subtitle file with .srt extension. The attractive feature of this is that you won’t have to download the video and still run the subtitles on it. This is very much helpful for people who work on YouTube or watch movies without subtitles.
Richard Bennett
Richard Bennett is a writer and a lover of all things video.
Follow @Richard Bennett
Richard Bennett
Mar 27, 2024• Proven solutions
In this article, we are going to show you how important it is to add subtitle and closed captions in your YouTube video, and how to add them.
The best video editor for YouTubers - Wondershare Filmora , not only allows you to cut, crop, rotate, reverse videos, but also offers your advanced features like PIP, Green Screen, or audio mixing. What’s more, you can find lots of effects for Fashion, gaming, education, tutorial, sports, etc. Check this article to know more.
Why subtitle and closed captions are important for YouTube videos?
- Forced closed captions and subtitles actually help the viewers to understand the content in your video if the audio quality of your video is bad, muffled or barely audible. Reading makes it easier for them to understand.
- This also helps people with hearing impairments. People with troubled ears can still watch and understand your content.
- It’s a great aid to such videos which have been recorded in other foreign languages that you don’t understand. Hence it will increase the number of viewers all around the world.
- They both are generally added for easy accessibility to the viewers who wish to watch in sound sensitive environments.
So, here we are going to show you two ways to add subtittles to video: directly or uploading caption or transcript files
Adding subtitles and closed captions manually
To add subtitles and closed captions to your YouTube video, fisrt, you should sign in to your YouTube account. On left right below ‘Home’ you will find ‘My Channel’. It will direct you to your personal YouTube page. On the top, right next to your subscribers lays the ‘Video manager’, giving you the list of your uploaded videos.
Select the video and click on edit to get a drop down menu. Click on subtitles and CC. This will take you to the subtitling interface. To the right of video select ‘add new subtitles’ and then ‘create new subtitles’. Select the subtitle language. Play the video to listen to the content and type down in the box. Click on ‘+’ button once you are done.
This will create a subtitle timeline right beneath the video. You can manage by dragging and expanding the subtitle duration according to the audio of the video. The subtitle will appear at the bottom of the video screen. Click ‘publish’ once done.
An interruption might occur with appearing of subtitles in accordance with video. Hence a lot precision is required while doing so.
Uploading Caption or Transcript Files automatically
To upload Caption or Transcript Files to YouTube Videos you first need to create a format on a text editor. For windows use Notepad and for Mac you may use TextEdit. Create a format of putting the number of subtitle first, time stamp and then text of the subtitle. For example
1\
00:02:34:12 using a format of (hour : minute : second : millisecond)
2. *text*
This is the sample text for first subtitle at zero hours, two minutes, thirty four seconds and twelve milliseconds. Once done with this. Go to file, select ‘save as’. Write the file name with an extension of .srt and select ‘All files’ for type of file. Click encoding menu and select UTF-8. Once saved, sign in to your YouTube account.
On left right below ‘Home’ you will find ‘My Channel’. It will direct you to your personal YouTube page. On the top, right next to your subscribers lays the ‘Video manager’, giving you the list of your uploaded videos.
Select the video and click on edit to get a drop down menu. Click on subtitles and CC. Go to ‘add subtitles’ and then ‘upload a file’. A pop-up menu will appear select ‘subtitles file’. Click upload. The file will send subtitles to your video.
This will create a subtitle timeline right beneath the video. You can manage by dragging and expanding the subtitle duration according to the audio of the video. The subtitle will appear at the bottom of the video screen. Click ‘publish’ once done.
3 Best Tools for add/managing video Subtitles/CC
1. Amara
Amara is a smart video editor which helps insert captions and subtitles to videos. It also helps in transcribing the videos. It takes help of crowd sourcing to subtitle any YouTube video. They take help from viewers to subtitle the videos. By making crowd subtitling available for any YouTube creator, they are allowing them to reach more viewers in more languages
2. DIY Captions
DIY captions help you to transcribe the YouTube videos, if not in most accurate manner, then in a little easier way. All you have to do is just paste the URL of the YouTube video and it will provide you all the subtitles. These may not be accurate but will provide you major base material which can be tweaked a bit here and there and is far better than making all the subtitles starting from scratch.
3 Subtitles for YouTube
Subtitles for YouTube is a Google Chrome extension which provides subtitles for YouTube videos. For this you will have to provide a subtitle file with .srt extension. The attractive feature of this is that you won’t have to download the video and still run the subtitles on it. This is very much helpful for people who work on YouTube or watch movies without subtitles.
Richard Bennett
Richard Bennett is a writer and a lover of all things video.
Follow @Richard Bennett
Also read:
- 2024 Approved A Step-by-Step Approach to YT Channel Descriptors
- 2024 Approved Efficiently Downloading YouTube Sections in Minutes
- 2024 Approved Epic Soundscape Trending Audio for Cutting-Edge YouTube Short Videos
- 2024 Approved Real-Time Broadcasts at Your Fingertips Roku and FB Live
- 2024 Approved Unravel Enigmas Your Guide to Elite Escape Spaces
- 2024 Approved Zoom Audio Excellence Balance and Clarity Tactics
- 7 Best Online YouTube Tag Extractors
- A Working Guide For Pachirisu Pokemon Go Map On Itel S23 | Dr.fone
- Boosting Clickthrough Rates with Attention-Grabbing YouTube Thumbnails for 2024
- Confirmation Procedures for YouTube Users
- Conversion Gratuite D'APE À MP3 Sur Internet Avec Movavi - Transformez Vos Fichiers Audio
- Elevating Your YouTube Presence with Effective Tags for 2024
- Highlight Exclusivity and Uniqueness: The Use of Words Like 'Exclusive', 'Unique', 'One-of-a-Kind', Etc., Adds Value to the Magic Tricks by Making Customers Believe They Are Accessing Something Special that Not Many Have Experienced Before.
- In 2024, 10 Free Location Spoofers to Fake GPS Location on your Realme 11 Pro+ | Dr.fone
- In 2024, Best Vivo Y200e 5G Pattern Lock Removal Tools Remove Android Pattern Lock Without Losing Data
- Title: [Updated] Building Wealth Through Video Content Revenue
- Author: Kevin
- Created at : 2024-11-19 21:13:06
- Updated at : 2024-11-24 16:25:21
- Link: https://youtube-videos.techidaily.com/updated-building-wealth-through-video-content-revenue/
- License: This work is licensed under CC BY-NC-SA 4.0.