
!["[Updated] Budget-Friendly Recorder Choices for YouTube Vloggers"](https://www.lifewire.com/thmb/HPANbAemZhl50CLJNEqH0zHeTrI=/400x300/filters:no_upscale():max_bytes(150000):strip_icc()/Samsung-S24-Series-14a268a53c3742229c06a7eb76ad5052.jpg)
"[Updated] Budget-Friendly Recorder Choices for YouTube Vloggers"
Budget-Friendly Recorder Choices for YouTube Vloggers
Top 11 Cheap Vlogging Cameras

Shanoon Cox
Oct 26, 2023• Proven solutions
Is the most expensive camera always the best for you? No. It depends. If you are a determined and ambitious beginner, it’s a good decision to invest in advanced cameras when you have an adequate budget. However, if you are not sure whether your enthusiasm for vlogging or photography will last or not, starting with an entry-level camera could be much wiser. As camera technology continues to advance, prices on cameras are coming down. Now, as a vlogger/YouTuber, you can get your hands on some decent vlogging cameras with a small budget. Before you get into the recommendation, please keep in mind that these budget camera still allows you to shoot fantastic videos and photos. Below, I have prepared a list of the top eleven cheap vlogging cameras, all of which can record at least full HD 1080p videos, that you can get for under $600.
If you have a bigger budget, you may prefer to check out my other posts on:
- 12 Best Vlogging Cameras
- 7 Best DSLR Cameras For Vlogging
- 8 Best Mirrorless Cameras For Vlogging
- 12 Best Vlogging Cameras With A Flip Screen
TOP 11 CHEAP VLOGGING CAMERAS
| Camera | Camera Type | Flip Screen | 4K | Price | |
|---|---|---|---|---|---|
| GoPro Hero5 |  |
Action Camera | No | No | Check on Amazon |
| Canon EOS M100 |  |
Mirrorless | Flip Up | No | Check on Amazon |
| Canon PowerShot SX730 HS |  |
Ultra Compact | Flip Up | No | Check on Amazon |
| Panasonic Lumix DC-ZS70 |  |
Compact | Flip Up | Yes | Check on Amazon |
| Yi 4K Action Camera |  |
Action Camera | No | Yes | Check on Amazon |
| Sony Cybershot DSC-HX80 |  |
Ultra Compact | Flip Up | No | Check on Amazon |
| Nikon Coolpix A900 |  |
Compact | Flip Up | Yes | Check on Amazon |
 |
Best Cheap Vlogging Camera Under $100: Polaroid Cube+ Recording outdoor action videos for your vlog with a DSLR camera is impractical. They’re heavy and bulky, getting in the way of whatever you’re doing. Action cameras like the GoPro and Polaroid Cube are much better for these occasions because they’re small enough to be mounted on a bike or a helmet. The Polaroid Cube also has built-in magnets on the top and bottom of the camera, giving you the ability to attach them to most metal surfaces. The camera’s 1.4-inch rubber body is resistant to water, shock, and all types of weather and it is capable of capturing footage even under the most extreme weather conditions. The Cube action camera can record full HD 1080p videos at 60 fps and it has a 124-degree wide-angle lens that performs best when it is used for exterior shots. The camera is compatible with microSDHC memory cards that can store up to 128GB of footage. The Cube’s battery can record up to 107 minutes before it needs another charge. With the Polaroid Cube+, you can preview or control your camera from your phone because it comes with Wi-Fi connectivity. PROS - Cheap vlogging camera for outdoor videos - Multiple mounting options CONS - Low-quality built-in microphone - No preview screen |
|---|---|
 |
Best Cheap Vlogging Camera Under $200: Yi 4K If you are looking for an affordable vlogging camera that costs less than $200, then currently the best option for you is the Yi 4K Action Camera. Its 2.19” LCD Gorilla Glass retina touchscreen is resistant to scratches and mild impacts. Much like a lot of action cameras, this camera is equipped with a wide-angle lens, 160-degree to be exact. The camera, however, is not waterproof, and you need to buy additional accessories so you can protect the camera from accidental damage. You can record 120 minutes of 4K footage at 60 fps without having to recharge the camera’s 4.35V lithium-ion battery. All the footage you record with the Yi 4K action camera can easily be transferred to a computer or broadcasted live on Facebook, YouTube, and other live streaming platforms using the camera’s high-speed 5GHz Wi-Fi feature. The built-in EIS (electronic image stabilization) contains a 3-axis gyroscope and 3-axis accelerometer that reduces the camera shakes caused by movements and enables you to produce smooth recordings of your wildest adventures. The Yi 4K action camera has two built-in microphones that can capture audio recordings, but there is no audio jack input for recording audio from an external microphone. PROS - Weighs only 3.4 Oz - Powerful electronic image stabilization CONS - Limited mounting capabilities - The camera’s fisheye lens can distort footage |
 |
Best Cheap Vlogging Camera Under $300: Nikon B500 Unlike the action cams that can capture ultra-wide-angle shots, the Nikon’s Coolpix B500 model is designed to also help you zoom in closer. The camera has a built-in 40X optical zoom NIKKOR lens that can be extended to 80X when used with the Dynamic Fine Zoom feature, which means you can easily record things that are further away. The Nikon Coolpix B500’s ISO can only go up to ISO 3200, despite the camera’s 16 MP BSI-CMOS sensor that supports full HD 1080p recording at 30 or 25 fps. The 3-inch 920K-dot LCD screen is fully adjustable but it doesn’t have touchscreen functionality, and the camera doesn’t have a viewfinder, which can slightly complicate the process of composing shots for your vlogs. The Nikon Coolpix B500 is conveniently powered by 4 AA batteries. This cheap vlogging camera offers more features than similar cameras in its price range. PROS - Great connectivity features - 80x optical zoom CONS - No manual exposure controls - Limited ISO sensitivity |
 |
Best Cheap Vlogging Camera Under $400: Nikon A900 This Coolpix series digital camera model is much more powerful than the Nikon B500 because it is a 20.3 MP camera that can record videos in UHD 4K quality. The non-interchangeable 35X optical zoom NIKKOR f/3.4-6.9 lens performs well in capturing footage of both closeup and faraway objects. Like the B500, the A900’s ISO sensitivity goes up to a maximum of 3200. Consequently, this camera won’t be ideal for filming in poorly lit conditions. The Nikon Coolpix A900 features a variety of handy modes, including creative, super lapse, and multiple exposure modes, to mention a few. The SnapBridge app allows you to connect the camera to a smartphone or a tablet via the built-in Wi-Fi NFC so you can transfer and edit the footage immediately after you stop recording. The A900 is a small and light digital camera, which makes it a great companion on your daily vlogging adventures. PROS - 4K and Full HD video recording options - Manual exposure control CONS - Limited audio recording features - No viewfinder |
 |
Best Cheap Vlogging Camera Under $500: Sony a5100 Sony’s a5100 is the successor of the NEX-5 series. Four years after its initial release in 2014, it is still considered the best vlogging camera under $500. The 24.3 MP Exmor APS-C CMOS sensor and the BIONZ X image processor reduce image noise and increase the level of detail in your vlogs. This mirrorless camera ships with the standard 16-50 mm lens, but it is compatible with all of Sony’s E-mount lenses. The Sony a5100 can record up to 1080p videos at 60 fps. Its HVAC S codec support enables you to produce videos that have 50Mbps bit rates. The Hybrid AF system featuring both a 179 phase-detect points as well as 25 contrast-detect points guarantees that all videos you record with the Sony a5100 will be sharp and in focus. Wi-Fi with NFC feature enables you to easily transfer or share your recorded footage. PROS - AF speeds exceed all expectations - The camera body is resistant to moderate impact CONS - Can’t record 4K videos - Fake shutter sounds |
Wondershare Filmora supports most video formats that you can find. If you have no idea about which software can edit the video filmed by your camera, try Filmora. It provides special effects, stock photo & video, sound library, etc., which will definitely enhance your productivity and helps to make money by making videos much easier


Shanoon Cox
Shanoon Cox is a writer and a lover of all things video.
Follow @Shanoon Cox
Shanoon Cox
Oct 26, 2023• Proven solutions
Is the most expensive camera always the best for you? No. It depends. If you are a determined and ambitious beginner, it’s a good decision to invest in advanced cameras when you have an adequate budget. However, if you are not sure whether your enthusiasm for vlogging or photography will last or not, starting with an entry-level camera could be much wiser. As camera technology continues to advance, prices on cameras are coming down. Now, as a vlogger/YouTuber, you can get your hands on some decent vlogging cameras with a small budget. Before you get into the recommendation, please keep in mind that these budget camera still allows you to shoot fantastic videos and photos. Below, I have prepared a list of the top eleven cheap vlogging cameras, all of which can record at least full HD 1080p videos, that you can get for under $600.
If you have a bigger budget, you may prefer to check out my other posts on:
- 12 Best Vlogging Cameras
- 7 Best DSLR Cameras For Vlogging
- 8 Best Mirrorless Cameras For Vlogging
- 12 Best Vlogging Cameras With A Flip Screen
TOP 11 CHEAP VLOGGING CAMERAS
| Camera | Camera Type | Flip Screen | 4K | Price | |
|---|---|---|---|---|---|
| GoPro Hero5 | |
Action Camera | No | No | Check on Amazon |
| Canon EOS M100 | |
Mirrorless | Flip Up | No | Check on Amazon |
| Canon PowerShot SX730 HS | |
Ultra Compact | Flip Up | No | Check on Amazon |
| Panasonic Lumix DC-ZS70 | |
Compact | Flip Up | Yes | Check on Amazon |
| Yi 4K Action Camera | |
Action Camera | No | Yes | Check on Amazon |
| Sony Cybershot DSC-HX80 | |
Ultra Compact | Flip Up | No | Check on Amazon |
| Nikon Coolpix A900 | |
Compact | Flip Up | Yes | Check on Amazon |
|
Best Cheap Vlogging Camera Under $100: Polaroid Cube+ Recording outdoor action videos for your vlog with a DSLR camera is impractical. They’re heavy and bulky, getting in the way of whatever you’re doing. Action cameras like the GoPro and Polaroid Cube are much better for these occasions because they’re small enough to be mounted on a bike or a helmet. The Polaroid Cube also has built-in magnets on the top and bottom of the camera, giving you the ability to attach them to most metal surfaces. The camera’s 1.4-inch rubber body is resistant to water, shock, and all types of weather and it is capable of capturing footage even under the most extreme weather conditions. The Cube action camera can record full HD 1080p videos at 60 fps and it has a 124-degree wide-angle lens that performs best when it is used for exterior shots. The camera is compatible with microSDHC memory cards that can store up to 128GB of footage. The Cube’s battery can record up to 107 minutes before it needs another charge. With the Polaroid Cube+, you can preview or control your camera from your phone because it comes with Wi-Fi connectivity. PROS - Cheap vlogging camera for outdoor videos - Multiple mounting options CONS - Low-quality built-in microphone - No preview screen |
|---|---|
|
Best Cheap Vlogging Camera Under $200: Yi 4K If you are looking for an affordable vlogging camera that costs less than $200, then currently the best option for you is the Yi 4K Action Camera. Its 2.19” LCD Gorilla Glass retina touchscreen is resistant to scratches and mild impacts. Much like a lot of action cameras, this camera is equipped with a wide-angle lens, 160-degree to be exact. The camera, however, is not waterproof, and you need to buy additional accessories so you can protect the camera from accidental damage. You can record 120 minutes of 4K footage at 60 fps without having to recharge the camera’s 4.35V lithium-ion battery. All the footage you record with the Yi 4K action camera can easily be transferred to a computer or broadcasted live on Facebook, YouTube, and other live streaming platforms using the camera’s high-speed 5GHz Wi-Fi feature. The built-in EIS (electronic image stabilization) contains a 3-axis gyroscope and 3-axis accelerometer that reduces the camera shakes caused by movements and enables you to produce smooth recordings of your wildest adventures. The Yi 4K action camera has two built-in microphones that can capture audio recordings, but there is no audio jack input for recording audio from an external microphone. PROS - Weighs only 3.4 Oz - Powerful electronic image stabilization CONS - Limited mounting capabilities - The camera’s fisheye lens can distort footage |
|
Best Cheap Vlogging Camera Under $300: Nikon B500 Unlike the action cams that can capture ultra-wide-angle shots, the Nikon’s Coolpix B500 model is designed to also help you zoom in closer. The camera has a built-in 40X optical zoom NIKKOR lens that can be extended to 80X when used with the Dynamic Fine Zoom feature, which means you can easily record things that are further away. The Nikon Coolpix B500’s ISO can only go up to ISO 3200, despite the camera’s 16 MP BSI-CMOS sensor that supports full HD 1080p recording at 30 or 25 fps. The 3-inch 920K-dot LCD screen is fully adjustable but it doesn’t have touchscreen functionality, and the camera doesn’t have a viewfinder, which can slightly complicate the process of composing shots for your vlogs. The Nikon Coolpix B500 is conveniently powered by 4 AA batteries. This cheap vlogging camera offers more features than similar cameras in its price range. PROS - Great connectivity features - 80x optical zoom CONS - No manual exposure controls - Limited ISO sensitivity |
|
Best Cheap Vlogging Camera Under $400: Nikon A900 This Coolpix series digital camera model is much more powerful than the Nikon B500 because it is a 20.3 MP camera that can record videos in UHD 4K quality. The non-interchangeable 35X optical zoom NIKKOR f/3.4-6.9 lens performs well in capturing footage of both closeup and faraway objects. Like the B500, the A900’s ISO sensitivity goes up to a maximum of 3200. Consequently, this camera won’t be ideal for filming in poorly lit conditions. The Nikon Coolpix A900 features a variety of handy modes, including creative, super lapse, and multiple exposure modes, to mention a few. The SnapBridge app allows you to connect the camera to a smartphone or a tablet via the built-in Wi-Fi NFC so you can transfer and edit the footage immediately after you stop recording. The A900 is a small and light digital camera, which makes it a great companion on your daily vlogging adventures. PROS - 4K and Full HD video recording options - Manual exposure control CONS - Limited audio recording features - No viewfinder |
|
Best Cheap Vlogging Camera Under $500: Sony a5100 Sony’s a5100 is the successor of the NEX-5 series. Four years after its initial release in 2014, it is still considered the best vlogging camera under $500. The 24.3 MP Exmor APS-C CMOS sensor and the BIONZ X image processor reduce image noise and increase the level of detail in your vlogs. This mirrorless camera ships with the standard 16-50 mm lens, but it is compatible with all of Sony’s E-mount lenses. The Sony a5100 can record up to 1080p videos at 60 fps. Its HVAC S codec support enables you to produce videos that have 50Mbps bit rates. The Hybrid AF system featuring both a 179 phase-detect points as well as 25 contrast-detect points guarantees that all videos you record with the Sony a5100 will be sharp and in focus. Wi-Fi with NFC feature enables you to easily transfer or share your recorded footage. PROS - AF speeds exceed all expectations - The camera body is resistant to moderate impact CONS - Can’t record 4K videos - Fake shutter sounds |
Wondershare Filmora supports most video formats that you can find. If you have no idea about which software can edit the video filmed by your camera, try Filmora. It provides special effects, stock photo & video, sound library, etc., which will definitely enhance your productivity and helps to make money by making videos much easier
Shanoon Cox
Shanoon Cox is a writer and a lover of all things video.
Follow @Shanoon Cox
Strategies to Arrange Content in YouTube Media
How to structure YouTube videos

Richard Bennett
Mar 27, 2024• Proven solutions
Creating a YouTube channel and uploading video content is only one part of the key to your success. With so much competition on the platform, it’s crucial that you stand out from the crowd with efficient, professional videos that are a pleasure to watch.
Without some planning and structure in mind before you begin filming, it’s all too easy to get a bit lost and start to ramble or fumble your words. Video’s filled with ‘umm’ and ‘err’ are neither pleasant to watch nor engaging.
If you’re serious about making a great YouTube channel and developing a loyal fan base, you’re going to need a workable structure for every video to help you stay on track. Here’s what you need to know:
Quick Jump Menu
- Why is structuring your video important?
- How should you structure YouTube Video Content?
- Ready to go out and make amazing videos?
Why is structuring your video important?
The structure of your video can make all the difference between a successful YouTube channel and a big waste of time. Your objective is to get people watching more and watching all the way to the end. A great structure can:
- Build interest and engagement: By keeping something in reserve and naturally building interest as you go along, people will be compelled to watch longer and interact more with your channel.
- Helps you rank higher: Longer and higher numbers of views will demonstrate your position as an authority well. The YouTube algorithm uses these metrics as part of their ranking factor, so the more and longer views you get, the higher you’ll rank in search.
- Builds consistency and familiarity: If all your videos follow a typical structure, your fans will come to be familiar with your format. They’ll know what to expect from your content and will watch more regularly as a result.
So, now you understand why structure is so important to your channel, let’s take a look at ways in which you can create an amazing structure for every video you produce.
How should you structure YouTube video content?
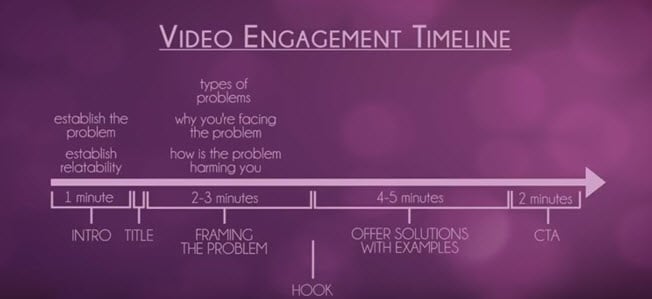
There are some key elements of a YouTube video’s structure which can make it more natural, more engaging and more fun to watch. When you’re planning your structure, you should follow a logical timeline to take the viewer from start to finish easily, and to ensure you get the actions you want at the end.
Intro
People love to be told what’s about to happen, and an intro can be a crucial step in ensuring they are going to continue watching your content. By explaining clearly what they are about to see, why it’s important to them and what problems you’re aiming to solve, you’ll keep them hooked and prevent them from browsing away to the next search result.
An introduction doesn’t need to be long or particularly involved. Remember, you don’t want to give away all your information here, as what you want is to encourage them to watch until the end. Something like “I’m going to show you … which will help you to …” is fine.
Your idea and purpose need to be conveyed fast and effectively if you’re keen to get their interest. Most viewers will decide within the first three to five seconds of a video if they want to invest their time in watching, so it’s crucial you capture their interest and engage them fast to stop them drifting away.
Main content
Once you’ve introduced your video, it’s time to start working through your content. This should be done by:
- Framing the problem
What are the types of problems that your viewers will have encountered which your video can solve? How is the problem affecting you and your viewers? Take around two to three minutes to describe the problems that you hope your video will solve, and work on being empathetic so people can relate to you and the issue you’re discussing.
- Offer solutions with examples
Move on to your solution to the problem. How did you find this solution? Is it easy to implement? Take around four to five minutes to address your solution and give examples of how it works in practice.
Now you’ve addressed the issue that your video content will solve, you’re almost ready to ask them to take the next step. Almost. There’s one more key element in your structure that you need to remember to include.
Hook
The hook can be placed anywhere in your content, although it’s most successful when placed either in the introduction or while you are framing the problem. The hook is a tidbit that aims to encourage a full viewing of your video, so don’t give away your solutions but do give them a reason to carry on watching.
If there’s a particular point where you think they might become bored or distracted, this is a great time to insert your hook. Come up with a powerful hook, for instance ‘with my solution I managed to go from ten views to two hundred in an hour’ or ‘when you hear this solution you’ll understand how I tripled my profits overnight’. Give them a reason to want to stay to the end.
Outro
Your outro shouldn’t just be about signing off in your unique way with some lovely music and visuals. This is the point at which you can ask something back from your audience, whatever that may be. We call this a ‘call to action’, and it could eb something as simple as subscribing through to something more involved like visiting your website.
Think about what you want from your audience; what should they do next? Remember to ask via a strong call to action, otherwise you’ve simply given them some free advice with very little in the way of a return for you.
Script or no script?
Many YouTubers shy away from using any sort of script, feeling that this will make them less relatable and natural. Choosing whether or not to script is entirely up to you; some people feel more comfortable with a script to hand, whereas others prefer to just wing it as they go.
If you don’t feel a script would work for you, do consider having a very rough outline of your structure and the points you want to make readily available while filming. It will help you regain control if you do happen to lose your place and will ensure you get all the information across that you’d planned to.
If you do think a full script would work better for you, make sure you are able to come across as naturally as possible while reading it. Write your script the same way you speak and run through a few times so you’re not squinting at words while you’re on camera. If you regularly wander off script, this could be a sign that a freer flowing style is more your thing.
Read More to Get : How to Loop a YouTube Video >>
Ready to go out and make amazing videos?
Having a structure to your videos might seem a little unnatural at first, but there’s plenty of evidence to show that people who take the time to plan their content get far better results than those who just improvise. If you’re unsure of the best structure for your content, watch videos made by others in your niche to see how they organize theirs.
That’s not to say you have to copy the leaders to be a success; indeed, you’ll be far more successful on YouTube if you continue to be unique. But there’s always room to learn from the best and to take inspiration from those who’ve been getting the very best results.
Richard Bennett
Richard Bennett is a writer and a lover of all things video.
Follow @Richard Bennett
Richard Bennett
Mar 27, 2024• Proven solutions
Creating a YouTube channel and uploading video content is only one part of the key to your success. With so much competition on the platform, it’s crucial that you stand out from the crowd with efficient, professional videos that are a pleasure to watch.
Without some planning and structure in mind before you begin filming, it’s all too easy to get a bit lost and start to ramble or fumble your words. Video’s filled with ‘umm’ and ‘err’ are neither pleasant to watch nor engaging.
If you’re serious about making a great YouTube channel and developing a loyal fan base, you’re going to need a workable structure for every video to help you stay on track. Here’s what you need to know:
Quick Jump Menu
- Why is structuring your video important?
- How should you structure YouTube Video Content?
- Ready to go out and make amazing videos?
Why is structuring your video important?
The structure of your video can make all the difference between a successful YouTube channel and a big waste of time. Your objective is to get people watching more and watching all the way to the end. A great structure can:
- Build interest and engagement: By keeping something in reserve and naturally building interest as you go along, people will be compelled to watch longer and interact more with your channel.
- Helps you rank higher: Longer and higher numbers of views will demonstrate your position as an authority well. The YouTube algorithm uses these metrics as part of their ranking factor, so the more and longer views you get, the higher you’ll rank in search.
- Builds consistency and familiarity: If all your videos follow a typical structure, your fans will come to be familiar with your format. They’ll know what to expect from your content and will watch more regularly as a result.
So, now you understand why structure is so important to your channel, let’s take a look at ways in which you can create an amazing structure for every video you produce.
How should you structure YouTube video content?
There are some key elements of a YouTube video’s structure which can make it more natural, more engaging and more fun to watch. When you’re planning your structure, you should follow a logical timeline to take the viewer from start to finish easily, and to ensure you get the actions you want at the end.
Intro
People love to be told what’s about to happen, and an intro can be a crucial step in ensuring they are going to continue watching your content. By explaining clearly what they are about to see, why it’s important to them and what problems you’re aiming to solve, you’ll keep them hooked and prevent them from browsing away to the next search result.
An introduction doesn’t need to be long or particularly involved. Remember, you don’t want to give away all your information here, as what you want is to encourage them to watch until the end. Something like “I’m going to show you … which will help you to …” is fine.
Your idea and purpose need to be conveyed fast and effectively if you’re keen to get their interest. Most viewers will decide within the first three to five seconds of a video if they want to invest their time in watching, so it’s crucial you capture their interest and engage them fast to stop them drifting away.
Main content
Once you’ve introduced your video, it’s time to start working through your content. This should be done by:
- Framing the problem
What are the types of problems that your viewers will have encountered which your video can solve? How is the problem affecting you and your viewers? Take around two to three minutes to describe the problems that you hope your video will solve, and work on being empathetic so people can relate to you and the issue you’re discussing.
- Offer solutions with examples
Move on to your solution to the problem. How did you find this solution? Is it easy to implement? Take around four to five minutes to address your solution and give examples of how it works in practice.
Now you’ve addressed the issue that your video content will solve, you’re almost ready to ask them to take the next step. Almost. There’s one more key element in your structure that you need to remember to include.
Hook
The hook can be placed anywhere in your content, although it’s most successful when placed either in the introduction or while you are framing the problem. The hook is a tidbit that aims to encourage a full viewing of your video, so don’t give away your solutions but do give them a reason to carry on watching.
If there’s a particular point where you think they might become bored or distracted, this is a great time to insert your hook. Come up with a powerful hook, for instance ‘with my solution I managed to go from ten views to two hundred in an hour’ or ‘when you hear this solution you’ll understand how I tripled my profits overnight’. Give them a reason to want to stay to the end.
Outro
Your outro shouldn’t just be about signing off in your unique way with some lovely music and visuals. This is the point at which you can ask something back from your audience, whatever that may be. We call this a ‘call to action’, and it could eb something as simple as subscribing through to something more involved like visiting your website.
Think about what you want from your audience; what should they do next? Remember to ask via a strong call to action, otherwise you’ve simply given them some free advice with very little in the way of a return for you.
Script or no script?
Many YouTubers shy away from using any sort of script, feeling that this will make them less relatable and natural. Choosing whether or not to script is entirely up to you; some people feel more comfortable with a script to hand, whereas others prefer to just wing it as they go.
If you don’t feel a script would work for you, do consider having a very rough outline of your structure and the points you want to make readily available while filming. It will help you regain control if you do happen to lose your place and will ensure you get all the information across that you’d planned to.
If you do think a full script would work better for you, make sure you are able to come across as naturally as possible while reading it. Write your script the same way you speak and run through a few times so you’re not squinting at words while you’re on camera. If you regularly wander off script, this could be a sign that a freer flowing style is more your thing.
Read More to Get : How to Loop a YouTube Video >>
Ready to go out and make amazing videos?
Having a structure to your videos might seem a little unnatural at first, but there’s plenty of evidence to show that people who take the time to plan their content get far better results than those who just improvise. If you’re unsure of the best structure for your content, watch videos made by others in your niche to see how they organize theirs.
That’s not to say you have to copy the leaders to be a success; indeed, you’ll be far more successful on YouTube if you continue to be unique. But there’s always room to learn from the best and to take inspiration from those who’ve been getting the very best results.
Richard Bennett
Richard Bennett is a writer and a lover of all things video.
Follow @Richard Bennett
Also read:
- Create Compelling Animation Subscribe Bars for Your YouTube Channel (Filmora) for 2024
- The Ideal YouTube Vision Top Video Suggestions to Energize Your Channel
- Boost YouTube Video Performance with Rapid Rendering Methods
- [New] Elevate Your YouTube Gaming Content With Key FreeFire Hashtags
- Words in Motion A Guide to Lively Animation Methods
- Dissecting Ajey Nagar's 2023 YouTube Economic Landscape for 2024
- In 2024, Dealing with Copyright Infringement Notices on YouTube
- Constructive Approaches to Defeating Digital Trolls
- [New] Adobe Premiere Tips YouTube Video Uploads
- Streamline Your Site Including YouTube Playlists Directly
- Elevate Your Content Game with These Powerful YouTube Shortcuts for 2024
- Unlock Your Creativity Editing and Revamping YouTube Clips in WMM
- Fast-Paced Artistry Expert Valorant Thumbnails in a Blink
- In 2024, Becoming a Wise Trader Top Video Tutorials
- In 2024, Essential Steps to Designing Exceptional YouTube Thumbnails
- Elevating Your Content's Presence Perfecting YouTube Thumbnails Size
- 5 Best Sites for Quick Templates on YouTube for 2024
- [New] Best Free YouTube Comment Finder You Should Try
- In 2024, Captivating Charm Top Magicians & Their Video Cuts
- Leading Least Expensive Stock Images Online
- In 2024, Aspect Ratios Unveiled Your Guide to Stellar YT Images
- In 2024, Engaging YouTube Summaries with Tailored Templates
- [Updated] Editing Elegance Into News Summations
- [New] Boost Your Engagement Now! - Discover These Key YouTube Shortcuts
- [New] Chrome to iPhone A Guide to Stripping YouTube Ads
- Tiny Snippets Deciphered Important Facts!
- Turning Your YouTube Views Into a Screen Capture Made Simple and Free
- [Updated] Design Strategies for Top-Tier Valorant Thumbnails on Social Media
- Optimize Your Vlogs with Smart YouTube Editing Tips
- 2024 Approved Elevate Your Online Presence with Expert Streaming Guide
- [New] Enjoy YouTube Music Anytime with These 23 Essential, No-Cost Audio Extractors
- 20 YouTube Time Savers That Will Skyrocket Engagement Rates for 2024
- Keywords that Captivate Enhancing Your Video Content
- Learn the Art of Crafting Short YouTube Videos
- Comparative Review Smartphone Usage of the Leading Video Apps for 2024
- [New] Essential Insights for Crafting YouTube Intros A+B Methods
- Ascending 8 Media Makers Dominating Viewership
- [Updated] A Guide to Crafting Engaging Videos in Adobe Premiere
- In 2024, Embarking on a YouTube Venture User Setup Essentials
- The Definitive Tutorial on YouTube Metrics and Profit
- In 2024, Chuckling Chords & Clever Cuts 10 Parody Classics
- Master the Algorithm Top YouTube SEO Tips and Techniques
- [Updated] 6 YouTuber Quizzes to Know What Type of YouTuber You Are
- Ban Unwanted YouTube Recommended Titles for 2024
- Three Solutions to Hard Reset Vivo V30? | Dr.fone
- New 2024 Approved Exploring Exceptional Voice Alterations in Popular Anime Characters
- Everything To Know About Apple ID Password Requirements For iPhone 15 Plus
- New Videopad Video Editor Is It Worth the Investment? A 2023 Review for 2024
- Next-Gen Visuals Top 5 HDMI 2.1 Gaming PC/Console Screens
- 2024 Approved Unlock TikTok's Full Potential Strategies for Popularity Surge
- How Can I Catch the Regional Pokémon without Traveling On Oppo Find X6 Pro | Dr.fone
- [New] In 2024, Optimal MP4 Transporter to FB Hub
- Teams' Top Chat Tools Is Slack Superior to Discord, In 2024
- How To Get Out of Recovery or DFU Mode on iPhone 14 Pro Max? | Dr.fone
- Updated In 2024, Split a Clip in DaVinci Resolve Step by Step
- Vimeo End Screen How to Add End Screen to Video on Vimeo for 2024
- [New] Unmasking the Innovators Who Revolutionized Discord Chat
- [New] Screen Capture Showdown Comparing Bests in Town – OBS vs Bandicam
- Full Guide to Fix iToolab AnyGO Not Working On Xiaomi 14 Pro | Dr.fone
- Title: "[Updated] Budget-Friendly Recorder Choices for YouTube Vloggers"
- Author: Kevin
- Created at : 2024-05-25 16:40:25
- Updated at : 2024-05-26 16:40:25
- Link: https://youtube-videos.techidaily.com/updated-budget-friendly-recorder-choices-for-youtube-vloggers/
- License: This work is licensed under CC BY-NC-SA 4.0.
