
!["[Updated] Boosting Video Appeal Implementing Neon Borders in Thumbnails"](https://www.lifewire.com/thmb/ir-tdkJhetInDNhHCkfbZa8f19M=/400x300/filters:no_upscale():max_bytes(150000):strip_icc():format(webp)/Flack-6b3c3167132c467db22bae39689c44ef.jpg)
"[Updated] Boosting Video Appeal Implementing Neon Borders in Thumbnails"
Boosting Video Appeal: Implementing Neon Borders in Thumbnails
Your YouTube video, or any other clip published on any forum, gets a larger number of hits if it has an attractive thumbnail. And, the fact is, a thumbnail becomes 10x more attractive when the main character that the image has have a neon border around it.
With that said, in the following sections, you will learn a couple of methods on how to add a YouTube thumbnail border around the main characters and/or objects that are significant to the clip.
In this article
01 Add Glowing Neon Border to YouTube Thumbnail with Filmora
02 Add a Glowing Neon Border in YouTube Thumbnail with Canva
03 Outline a Person in a YouTube Thumbnail with Photoshop
Part 1: How to Add Neon Border to YouTube Thumbnail for Free with Filmora
Being one of the most versatile and intuitive post-production tools available in the market today, Wondershare Filmora X allows you to add a neon border to a YouTube thumbnail quite conveniently. You can learn how to get this done on Windows or Mac by following the steps given below.
For Win 7 or later (64-bit)
For macOS 10.12 or later
Step 1: Define Project Settings and Add Image to the Timeline
Launch Wondershare Filmora X on your PC (a MacBook Pro M1 is used here), ensure that the project aspect ratio is set to 16:9 (Widescreen) on the splash screen, and click New Project. On the main interface, click the Preview quality and display settings icon from the upper-right area of the Timeline, click Change Project Aspect Ratio, click to select 1280 x 720 (HD) from the Resolution menu of the Project Settings box, and click OK to save the custom project settings.

Then select My Media from the menu bar if not already selected, click Project Media from the navigation pane, and click Import from the Media box to select and import the image of the main character or object that you want to use in the thumbnail.

Now, drag the image from the Media box to the Timeline at the bottom.

Step 2: Clear Image Background, Add Border, and Add Custom Background
Go to Effects from the menu bar, click to select the Default tab and then AI Portrait from the navigation pane, and click and drag the Human Segmentation preset from the right box, and place it over the image track in the Timeline.

Double-click the image layer, scroll down the upper-left box to the Video Effects section, and use the Edge Thickness and Edge Feather sliders to adjust the character’s edges to make them as realistic as possible. Click OK when done.

Next, click and drag the Human Border preset over the image track in the Timeline, and follow the same procedure to customize the border. This will give the character a neon border effect.

Now, use the method explained earlier to import a custom image for the background, and drag and place it under the previous track in the Timeline.

If you are running the latest version of Filmora, you will find there are some neon light effects available under AI Portrait as well.

Step 3: Add Titles to Thumbnail
Go to Titles from the menu bar, click to select the Default tab and then Lower 3rds from the navigation pane, and click and drag your preferred lower-third preset from the right window to a separate layer in the Timeline. Double-click the lower-third layer, and use the available options in the upper-left window to change the text, its color, etc., and drag the textbox to place it to your preferred position on the image as well. Click OK to save the changes.
Next, click to select Titles from the navigation pane, and drag your preferred title from the right window to the upper-most track in the Timeline. Now use the method explained earlier to edit the text, its color, position, etc. to make it look professional.

For more tips and tricks for creating YouTube thumbnail, you can check this You Tube thumbnail creating guide.
Step 4: Get the Neon Border Thumbnail
Click the Snapshot (Camera) icon from the upper-right area of the Timeline, go to My Media from the menu bar, right-click the thumbnail of the screenshot you captured, and click Reveal in Finder (on Mac) or Reveal in Explorer (on Windows) to get to the folder the YouTube thumbnail border is saved in.

Part 2: How to Add a Glowing Neon Border in Your YouTube Thumbnail with Canva
Canva is another intuitive editing program that works on the web interface rather than having you download and install an app on your PC. You can add a neon border for YouTube thumbnails using Canva by following the instructions given below:
Step 1: Define Project Settings and Add a Background
After signing in to your Canva account, click Create a design from the top-right corner of the page, click Custom size from the bottom, define 1280 and 720 in the Width and Height fields on the box that appears respectively, and click Create new design.

Now, click to select Background from the navigation bar on the left (if the Background tool is not visible, click More and then choose Background from the expanded list), and click to select a background from the images available in the center pane.

Step 2: Upload an Image and Add Effects
Click Uploads from the navigation bar, click the More icon from the right of the Upload media button present at the top of the center pane, choose your preferred method to upload the image (with the transparent background) that you want to use, upload the image, and drag it from the center pane to the Canvas.
Note: You can use any of the tools available online to remove the background from your image for free.

To add a YouTube thumbnail border, make sure that the image that you added to the Canvas is selected, click the Duplicate icon from the upper-right area, and use the scaling handles of the copy of the image to increase its size a bit. Reposition the image back to its original location as well.
Then, click Edit image from the upper-left corner of the Canvas, click Duotone from the Edit image pane at the center, if need be, click See all, choose your preferred duotone effect to apply on the image, choose your preferred highlight and shadow colors from the box that appears next, and click Back from the top of the pane.

Next, click See all next to the Adjust section from the center pane, and drag the Blur slider to the right to increase the blur effect on the image.

Step 3: Position the Layers
While keeping the duplicate image selected, click the Position button from the upper-right area of the Canvas, and click Background to send the second image behind the first one to get the neon border effect for the photo.

Part 3: How to Outline a Person in a YouTube Thumbnail with Photoshop
Because YouTube thumbnails are nothing but static images, creating YouTube thumbnail border with Adobe Photoshop is comparatively easier. The process of doing this is given below:
Step 1: Define Document Preferences and Import an Image
Launch Adobe Photoshop on your PC, click Create new, and on the New Document customization box, define the width and height values to 1280 and 720 pixels respectively. Select Transparent from the Background Contents menu as well if not already selected. Click Create from the bottom to create a new Photoshop document with the specified document settings. Next, open the folder that contains the source image, drag the photo to Photoshop, and press Enter to place the photo.

Step 2: Remove Background from the Image
Make sure that the image layer is selected in the Layers panel on the right, go to Select from the menu bar at the top, and click Subject. From the bottom of the Layers panel, click the Add a mask icon to get rid of the background, leaving only the human on the Canvas.

Step 3: Add a Custom Background and an Outline Around the Subject
Use the method explained earlier to import a background image of your choice to Photoshop. Drag the background image layer to the bottom in the Layers panel. Double-click the masked layer, click to select Stroke from the left pane of the Layer Style box, and use the options available on the right to manage the size, color, position, etc. of the stroke that has been added around the human subject. Click OK when done, and then export the image normally to use it as a YouTube thumbnail border.

Summary
It is important to know that the default resolution of a YouTube thumbnail is 1280 x 720 pixels that is usually written and referred to as 720p. While adding a YouTube thumbnail border, it is also imperative to have a good sense of color combination and fonts. Furthermore, a decent tool like Wondershare Filmora X must be used to add an appealing neon border around the main subject in the thumbnail image easily and quickly.
02 Add a Glowing Neon Border in YouTube Thumbnail with Canva
03 Outline a Person in a YouTube Thumbnail with Photoshop
Part 1: How to Add Neon Border to YouTube Thumbnail for Free with Filmora
Being one of the most versatile and intuitive post-production tools available in the market today, Wondershare Filmora X allows you to add a neon border to a YouTube thumbnail quite conveniently. You can learn how to get this done on Windows or Mac by following the steps given below.
For Win 7 or later (64-bit)
For macOS 10.12 or later
Step 1: Define Project Settings and Add Image to the Timeline
Launch Wondershare Filmora X on your PC (a MacBook Pro M1 is used here), ensure that the project aspect ratio is set to 16:9 (Widescreen) on the splash screen, and click New Project. On the main interface, click the Preview quality and display settings icon from the upper-right area of the Timeline, click Change Project Aspect Ratio, click to select 1280 x 720 (HD) from the Resolution menu of the Project Settings box, and click OK to save the custom project settings.
Then select My Media from the menu bar if not already selected, click Project Media from the navigation pane, and click Import from the Media box to select and import the image of the main character or object that you want to use in the thumbnail.
Now, drag the image from the Media box to the Timeline at the bottom.
Step 2: Clear Image Background, Add Border, and Add Custom Background
Go to Effects from the menu bar, click to select the Default tab and then AI Portrait from the navigation pane, and click and drag the Human Segmentation preset from the right box, and place it over the image track in the Timeline.
Double-click the image layer, scroll down the upper-left box to the Video Effects section, and use the Edge Thickness and Edge Feather sliders to adjust the character’s edges to make them as realistic as possible. Click OK when done.
Next, click and drag the Human Border preset over the image track in the Timeline, and follow the same procedure to customize the border. This will give the character a neon border effect.
Now, use the method explained earlier to import a custom image for the background, and drag and place it under the previous track in the Timeline.
If you are running the latest version of Filmora, you will find there are some neon light effects available under AI Portrait as well.
Step 3: Add Titles to Thumbnail
Go to Titles from the menu bar, click to select the Default tab and then Lower 3rds from the navigation pane, and click and drag your preferred lower-third preset from the right window to a separate layer in the Timeline. Double-click the lower-third layer, and use the available options in the upper-left window to change the text, its color, etc., and drag the textbox to place it to your preferred position on the image as well. Click OK to save the changes.
Next, click to select Titles from the navigation pane, and drag your preferred title from the right window to the upper-most track in the Timeline. Now use the method explained earlier to edit the text, its color, position, etc. to make it look professional.
For more tips and tricks for creating YouTube thumbnail, you can check this You Tube thumbnail creating guide.
Step 4: Get the Neon Border Thumbnail
Click the Snapshot (Camera) icon from the upper-right area of the Timeline, go to My Media from the menu bar, right-click the thumbnail of the screenshot you captured, and click Reveal in Finder (on Mac) or Reveal in Explorer (on Windows) to get to the folder the YouTube thumbnail border is saved in.
Part 2: How to Add a Glowing Neon Border in Your YouTube Thumbnail with Canva
Canva is another intuitive editing program that works on the web interface rather than having you download and install an app on your PC. You can add a neon border for YouTube thumbnails using Canva by following the instructions given below:
Step 1: Define Project Settings and Add a Background
After signing in to your Canva account, click Create a design from the top-right corner of the page, click Custom size from the bottom, define 1280 and 720 in the Width and Height fields on the box that appears respectively, and click Create new design.
Now, click to select Background from the navigation bar on the left (if the Background tool is not visible, click More and then choose Background from the expanded list), and click to select a background from the images available in the center pane.
Step 2: Upload an Image and Add Effects
Click Uploads from the navigation bar, click the More icon from the right of the Upload media button present at the top of the center pane, choose your preferred method to upload the image (with the transparent background) that you want to use, upload the image, and drag it from the center pane to the Canvas.
Note: You can use any of the tools available online to remove the background from your image for free.
To add a YouTube thumbnail border, make sure that the image that you added to the Canvas is selected, click the Duplicate icon from the upper-right area, and use the scaling handles of the copy of the image to increase its size a bit. Reposition the image back to its original location as well.
Then, click Edit image from the upper-left corner of the Canvas, click Duotone from the Edit image pane at the center, if need be, click See all, choose your preferred duotone effect to apply on the image, choose your preferred highlight and shadow colors from the box that appears next, and click Back from the top of the pane.
Next, click See all next to the Adjust section from the center pane, and drag the Blur slider to the right to increase the blur effect on the image.
Step 3: Position the Layers
While keeping the duplicate image selected, click the Position button from the upper-right area of the Canvas, and click Background to send the second image behind the first one to get the neon border effect for the photo.
Part 3: How to Outline a Person in a YouTube Thumbnail with Photoshop
Because YouTube thumbnails are nothing but static images, creating YouTube thumbnail border with Adobe Photoshop is comparatively easier. The process of doing this is given below:
Step 1: Define Document Preferences and Import an Image
Launch Adobe Photoshop on your PC, click Create new, and on the New Document customization box, define the width and height values to 1280 and 720 pixels respectively. Select Transparent from the Background Contents menu as well if not already selected. Click Create from the bottom to create a new Photoshop document with the specified document settings. Next, open the folder that contains the source image, drag the photo to Photoshop, and press Enter to place the photo.
Step 2: Remove Background from the Image
Make sure that the image layer is selected in the Layers panel on the right, go to Select from the menu bar at the top, and click Subject. From the bottom of the Layers panel, click the Add a mask icon to get rid of the background, leaving only the human on the Canvas.
Step 3: Add a Custom Background and an Outline Around the Subject
Use the method explained earlier to import a background image of your choice to Photoshop. Drag the background image layer to the bottom in the Layers panel. Double-click the masked layer, click to select Stroke from the left pane of the Layer Style box, and use the options available on the right to manage the size, color, position, etc. of the stroke that has been added around the human subject. Click OK when done, and then export the image normally to use it as a YouTube thumbnail border.
Summary
It is important to know that the default resolution of a YouTube thumbnail is 1280 x 720 pixels that is usually written and referred to as 720p. While adding a YouTube thumbnail border, it is also imperative to have a good sense of color combination and fonts. Furthermore, a decent tool like Wondershare Filmora X must be used to add an appealing neon border around the main subject in the thumbnail image easily and quickly.
Elevating Your Channels’ Profits with Impactful and Effective Trailers
How to Create a YouTube Channel Trailer to Increase Revenue

Richard Bennett
Mar 27, 2024• Proven solutions
Many YouTube content creators assume that no one checks out their channel trailer . Some may not even know about the concept of a trailer, while others are not sure how to create one. We will explain the concept of a YouTube channel trailer, how to make a great trailer, and how to get more subscribers and views through a quality trailer on your YouTube channel.
- Part1: What is a YouTube Channel Trailer
- Part2: How to Add YouTube Trailer to Channel
- Part3: Best YouTube Trailer Maker
- Part4: 5 Tips for Creating a Great Trailer
Part 1: What is a YouTube Channel Trailer?
Think of a channel trailer as an introduction to a movie or television show. You can choose to show the trailer to anyone who is not subscribe to your channel, when they land on your channel page.
The objective of a trailer is to hook the audience, promote your personality and content, and convince them it will be worth their time to check out some of your videos. And you must do all these things within 30 to 45 seconds !
Most content creators can benefit from creating a channel trailer. Unless you are a famous personality through a sports/acting/television/singing career, people who land on your channel may have no idea who you are. A proper trailer gives them an introduction to your personality and content.
Part 2: How to Add YouTube Trailer to Channel
After you know how to create a YouTube trail, why not add your new created trailer to YouTube channel right now. Here is the right steps.
Step 1: Go to channel
Log in your YouTube account. Then click your users icon to find My channel. At the top right corner, click CUSTOMIZE CHANNEL and then choose For new visitors.
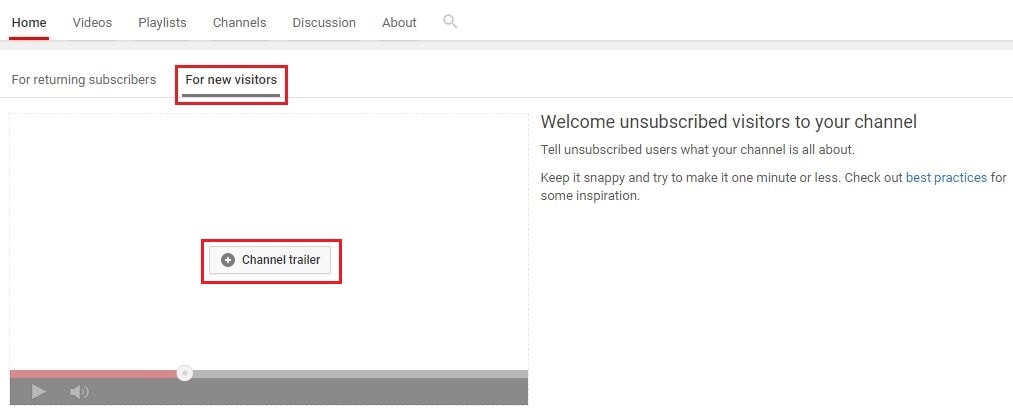
Step 2: Add trailer to YouTube
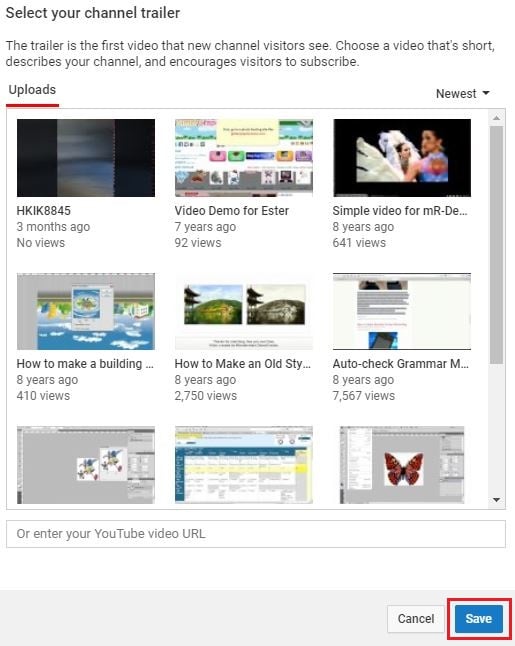
After clicking plus icon in the middle to add your amazing trailer, a playlist window will appear. Now select the trailer you want to use. Click Save. Then you will see a trailer is added. You can also change trailer or remove trailer.
Part 3: Best Channel YouTube Trailer Maker
1. Wondershare Filmora
Searching for a free and powerful video editing tool that you can use on both Windows and Mac computers? Wondershare Filmora may be the ideal program for you. It is very easy to use, even for beginners who do not have that much editing experience.
Features:
- It is free and very easy to add captions to the trailer video.
- There are many interesting options for adding video effects within the program.
- It features a modern interface that is intuitive and easy to operate. All the important controls and settings are easily accessible through the menus and submenus.
- The program operates smoothly, even on older machines.


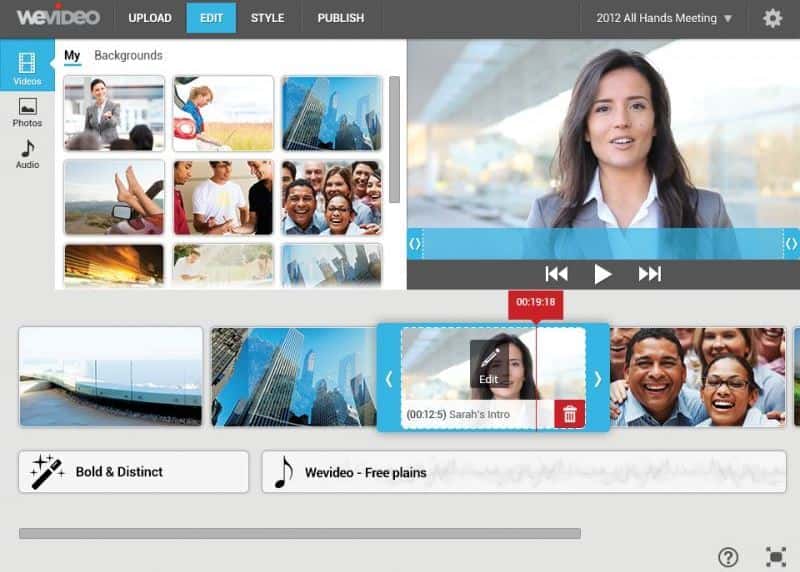
2. WeVideo
Hoping to edit content while you are on the go? By using a less powerful laptop, library computer or a friend’s device, you could edit your trailer within a couple hours. WeVideo is an online video editor that makes it so easy to edit videos in up to 4K resolution.
Features:
- The program is fast and very easy to use. It does not even require any downloads.
- As it is an online program, there are no compatibility issues with Windows, Mac or even Chromebook devices.
- It is possible to mix and match up to 600 different formats for graphics, audio, video and other effects.
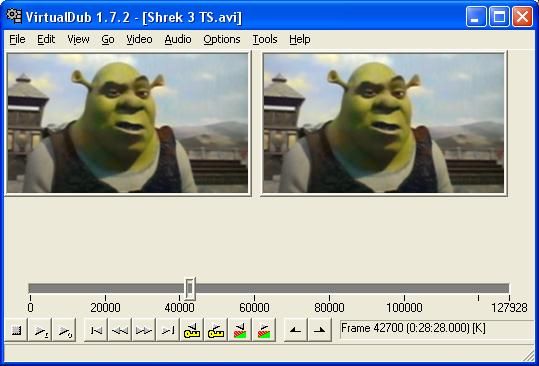
3. Virtual Dub
If you are seeking something that is open source and free, you may be interested in Virtual Dub. It is a completely free and open source program that you can use for quick capturing, encoding and editing video.
While it is not going to give you the same power and options as some of the other editors, it is a very simple tool that can be effective for specific use cases. If you are just hoping to record, encode and quickly put together a 30 second YouTube trailer, it is the ideal program.
Features:
- Offers the ability to capture videos on Windows, Mac and Linux computers.
- Works best with AVI files, but it is possible to use other video formats such as MKV and MP4 as well.
- It is possible to create video using a series of image files - or merge image files into existing video content.
Part 4: 5 Tips for Creating a Great Trailer
1. Let Viewers Know What is Coming
People appreciate routine. You can mention how many times a week you create content and the days when you publish. You can also have a brief overview of the type of videos you make, which will tell a new viewer what to expect if they subscribe to your channel!
2. Keep It Short
YouTube trailers that are more than a minute long will not succeed. People have a very short attention span. They want to be hooked immediately. 30 to 45 seconds is the sweet spot, with 30 seconds preferable! It may sound overwhelming to condense everything about your channel into 30 seconds, but that is where a great video script can help! However, sometimes both short videos and long videos work.
3. Use Some Fun Annotations
YouTube is great for having unique and helpful graphics on the screen while your video is playing. Having some fun and useful annotations, such as the days you make videos or a subscribe icon, during the intro video can be very helpful to new viewers. They also help to boost viewer engagement with your content!

4. Assume You Have New Viewers
Do not create a YouTube channel trailer with inside jokes or comments. This trailer is for people who know nothing about you or your channel. You are trying to hook them into your content, not provide a few laughs to existing subscribers.
5. Update Your Trailer Regularly
As a content creator, you may find that your brand changes every six months to a year. Maybe you change up your look, type of content, frequency of uploads or other parts of the channel. Ensure you are updating your trailer each time you make significant changes to your channel!
Conclusion
Creating a channel trailer for your YouTube page is a wonderful way to introduce a new audience to your content. They learn about you and the topics that you are passionate about. It convinces them to watch one of your videos and subscribe to your channel. And by using one of the YouTube Trailer Maker software options above, you will be creating quality trailers for your channel in no time!
Richard Bennett
Richard Bennett is a writer and a lover of all things video.
Follow @Richard Bennett
Richard Bennett
Mar 27, 2024• Proven solutions
Many YouTube content creators assume that no one checks out their channel trailer . Some may not even know about the concept of a trailer, while others are not sure how to create one. We will explain the concept of a YouTube channel trailer, how to make a great trailer, and how to get more subscribers and views through a quality trailer on your YouTube channel.
- Part1: What is a YouTube Channel Trailer
- Part2: How to Add YouTube Trailer to Channel
- Part3: Best YouTube Trailer Maker
- Part4: 5 Tips for Creating a Great Trailer
Part 1: What is a YouTube Channel Trailer?
Think of a channel trailer as an introduction to a movie or television show. You can choose to show the trailer to anyone who is not subscribe to your channel, when they land on your channel page.
The objective of a trailer is to hook the audience, promote your personality and content, and convince them it will be worth their time to check out some of your videos. And you must do all these things within 30 to 45 seconds !
Most content creators can benefit from creating a channel trailer. Unless you are a famous personality through a sports/acting/television/singing career, people who land on your channel may have no idea who you are. A proper trailer gives them an introduction to your personality and content.
Part 2: How to Add YouTube Trailer to Channel
After you know how to create a YouTube trail, why not add your new created trailer to YouTube channel right now. Here is the right steps.
Step 1: Go to channel
Log in your YouTube account. Then click your users icon to find My channel. At the top right corner, click CUSTOMIZE CHANNEL and then choose For new visitors.
Step 2: Add trailer to YouTube
After clicking plus icon in the middle to add your amazing trailer, a playlist window will appear. Now select the trailer you want to use. Click Save. Then you will see a trailer is added. You can also change trailer or remove trailer.
Part 3: Best Channel YouTube Trailer Maker
1. Wondershare Filmora
Searching for a free and powerful video editing tool that you can use on both Windows and Mac computers? Wondershare Filmora may be the ideal program for you. It is very easy to use, even for beginners who do not have that much editing experience.
Features:
- It is free and very easy to add captions to the trailer video.
- There are many interesting options for adding video effects within the program.
- It features a modern interface that is intuitive and easy to operate. All the important controls and settings are easily accessible through the menus and submenus.
- The program operates smoothly, even on older machines.
2. WeVideo
Hoping to edit content while you are on the go? By using a less powerful laptop, library computer or a friend’s device, you could edit your trailer within a couple hours. WeVideo is an online video editor that makes it so easy to edit videos in up to 4K resolution.
Features:
- The program is fast and very easy to use. It does not even require any downloads.
- As it is an online program, there are no compatibility issues with Windows, Mac or even Chromebook devices.
- It is possible to mix and match up to 600 different formats for graphics, audio, video and other effects.
3. Virtual Dub
If you are seeking something that is open source and free, you may be interested in Virtual Dub. It is a completely free and open source program that you can use for quick capturing, encoding and editing video.
While it is not going to give you the same power and options as some of the other editors, it is a very simple tool that can be effective for specific use cases. If you are just hoping to record, encode and quickly put together a 30 second YouTube trailer, it is the ideal program.
Features:
- Offers the ability to capture videos on Windows, Mac and Linux computers.
- Works best with AVI files, but it is possible to use other video formats such as MKV and MP4 as well.
- It is possible to create video using a series of image files - or merge image files into existing video content.
Part 4: 5 Tips for Creating a Great Trailer
1. Let Viewers Know What is Coming
People appreciate routine. You can mention how many times a week you create content and the days when you publish. You can also have a brief overview of the type of videos you make, which will tell a new viewer what to expect if they subscribe to your channel!
2. Keep It Short
YouTube trailers that are more than a minute long will not succeed. People have a very short attention span. They want to be hooked immediately. 30 to 45 seconds is the sweet spot, with 30 seconds preferable! It may sound overwhelming to condense everything about your channel into 30 seconds, but that is where a great video script can help! However, sometimes both short videos and long videos work.
3. Use Some Fun Annotations
YouTube is great for having unique and helpful graphics on the screen while your video is playing. Having some fun and useful annotations, such as the days you make videos or a subscribe icon, during the intro video can be very helpful to new viewers. They also help to boost viewer engagement with your content!
4. Assume You Have New Viewers
Do not create a YouTube channel trailer with inside jokes or comments. This trailer is for people who know nothing about you or your channel. You are trying to hook them into your content, not provide a few laughs to existing subscribers.
5. Update Your Trailer Regularly
As a content creator, you may find that your brand changes every six months to a year. Maybe you change up your look, type of content, frequency of uploads or other parts of the channel. Ensure you are updating your trailer each time you make significant changes to your channel!
Conclusion
Creating a channel trailer for your YouTube page is a wonderful way to introduce a new audience to your content. They learn about you and the topics that you are passionate about. It convinces them to watch one of your videos and subscribe to your channel. And by using one of the YouTube Trailer Maker software options above, you will be creating quality trailers for your channel in no time!
Richard Bennett
Richard Bennett is a writer and a lover of all things video.
Follow @Richard Bennett
Also read:
- [Updated] Choosing Superior Tools for Vocal Change in Content Making
- Smartphone Camera Accessories Vloggers Should Try to Improve Recording
- From Long-Winded to Concise The Art of YouTube Trimming
- Mastering YouTube TV A Step-by-Step Guide
- Gourmet Guide Producing Culinary Content
- Essential Audio Enhancement Apps for YouTubers' Videos for 2024
- 2024 Approved Drive Engagement Crafting an Animated Subscribe Button in Filmora's Step-by-Step Guide
- YouTube Videos Making a Statement on Instagram
- 2024 Approved Elevating Your Streaming Experience Switching Between Spotify & YouTube Music
- Elevating Profits via Celebrity Skincare Channels for 2024
- 2024 Approved Behind the Scenes How Much Creators Earn From YouTube Shorts
- Chilly Ambiance Ideal Winter BGs for Videos
- Transform Video Discoverability Essential SEO Tips for YT
- Join The Fortune-Changing Club Free 50 Banners Await
- Dream Weavers The Marvel Interactive Sculptors
- Quick Tips Incorporating Video From YouTube Into Google Presentations
- Effortless & Economical The Best Free YouTube Name Generators
- Pixel Prodigies Top 10 Gaming Ladies on YT
- In 2024, Beginner's Tutorial Composing YouTube Video Content
- [New] Dial Up the Impact with 50 FREE Branding Graphics
- Elevating Your Channels' Profits with Impactful and Effective Trailers
- The Blueprint to Establishing a Distinctive Marketing Persona
- Sub4sub Unveiled Preliminary Insights for Newcomers
- In 2024, Dial-Up Beats Easy Audio Posting to YouTubes
- The Ultimate Guide to iTunes Video Downloading for iOS Users
- Audience Engagement and Its Impact on YouTube Performance
- Channel Your Content Earning Through Evaluative Endeavors Online for 2024
- [New] Beyond the Leading Films Hidden Cinema Treasures
- In 2024, Apple's Mobile Posting Playbook for YouTube Success
- [New] Elite Recommendations Top 10 High-End Video Card Models
- In 2024, Dailymotion vs YouTube Monetization Which Is More Profitable?
- [Updated] Budget-Friendly Recorder Choices for YouTube Vloggers
- In 2024, Banish Annoying Ads Instantly with These 7 Best Android Tools
- [New] Achieve Unprecedented Image Quality via AV1 on YouTube
- [Updated] Amplify Your Online Presence Top 5 Effective YouTube Strategies
- A Vlogger's Dream Exploring the Best 12 Video Capture Devices for 2024
- 8 Best YouTube Video Promotion Services (Real)
- In 2024, The Secrets Behind Successful HD Videos on Social Networks
- Updated In 2024, The Sound of Success A Beginners Guide to YouTube Audio Downloads
- [New] Avoidance Tactics No More Recommended Podcasts on Spotify
- How to Bypass Android Lock Screen Using Emergency Call On Nokia C12 Plus?
- New In 2024, Beat Blend Benders A Curated List of Highest-Rated Audio-Synchronization Editors, 2023
- Reasons for Asus ROG Phone 7 Ultimate Stuck on Boot Screen and Ways To Fix Them | Dr.fone
- 2024 Approved From Jittery to Jerky-Free Video Stabilization Techniques in Premiere Pro
- [Updated] Crafting Self-Narratives - 100 Unique Instagram Captions
- [Updated] In 2024, Snappy Narratives on the Social Scene
- [Updated] Smooth Setup Seamless Screenshots on Dell Devices for 2024
- How To Transfer Data From Apple iPhone 13 To Other iPhone 13 Pro Max devices? | Dr.fone
- In 2024, All You Need To Know About Mega Greninja For Motorola Edge 40 | Dr.fone
- Best Music Editing Apps for Mac Devices - Ranked No. 1-4
- Essential Metaverse Laughs A Guide to Personal Memes
- [New] Crafting Captivating Reels Syncing Audio to Images
- [Updated] The Instagram Reel Formula for Unrivaled Fame
- [New] In 2024, Ultimate List Best PS5 External Storage Solutions
- [Updated] In 2024, Step-by-Step Guide to Eternal Unlinking of a TikTok ID
- 2024 Approved Overcoming Connectivity Issues in Remote Recording
- [New] Step-by-Step Guide to Revamping YouTube-Inspired Thumbnails on Twitter for 2024
- Navigating Your Way in Graphic Design Careers
- How to Share Location in Messenger On Samsung Galaxy A15 5G? | Dr.fone
- [New] Pioneering Methods to Log LOL Gaming Sessions for 2024
- In 2024, Unwind in a World of Top Stress Busters
- How to Fix My Poco F5 Pro 5G Location Is Wrong | Dr.fone
- 11 Best Location Changers for Apple iPhone 12 mini | Dr.fone
- In 2024, Uncovering If ITop Justifies Its Market Presence
- [New] In 2024, RX Graphics Retrospect & Report
- 5 Best Chrome Extensions for Vimeo Video Downloader
- FreePlayVid Seamless Recording for the Avid Player
- In 2024, Unlocking Made Easy The Best 10 Apps for Unlocking Your Realme GT Neo 5 SE Device
- In 2024, The 2023 Dive Into Apeaksoft’s Video Capture Marvels
- Title: "[Updated] Boosting Video Appeal Implementing Neon Borders in Thumbnails"
- Author: Kevin
- Created at : 2024-05-25 16:39:31
- Updated at : 2024-05-26 16:39:31
- Link: https://youtube-videos.techidaily.com/updated-boosting-video-appeal-implementing-neon-borders-in-thumbnails/
- License: This work is licensed under CC BY-NC-SA 4.0.
