![[Updated] Best 8 Linux Apps for Professional Editing](https://thmb.techidaily.com/a6cda5d3da29aa302f42489d12b2f7ee98a977d6c686fb1e190a7cb786bdcbab.jpg)
[Updated] Best 8 Linux Apps for Professional Editing
Best 8 Linux Apps for Professional Editing
Best 8 YouTube Editing Software for Linux

Richard Bennett
Mar 27, 2024• Proven solutions
It is true that the number of software available for Mac and Windows by far outnumber those available for Linux. Though Linux is still growing, it is always a difficult task to find specific software such as those for YouTube video editing. For Linux users, sometimes it becomes necessary to switch back to Windows whenever you need to edit your videos. Presented here are the best 8 YouTube editing software for Linux so that you avoid the back and forth movement whenever you want to work on your videos for YouTube-:
If you looking for a video editor simple yet powerful, here I recommend an easy-to-use video editing software - Wondershare Filmora (for Win and Mac) which not only allows you cut, crop, rotate, and split your videos in minutes, but also simplify the advanced video editing like green screen effect and PIP. You can also find over 300 video effects like Wedding, Gaming, Education, Beauty, Fashion, etc.


1. Open Shot
Open Shot is a feature rich, multiplatform video editor and one of the best you will ever find for Linux, Mac and Windows. The program is written in Python and it has support for many different video and audio formats and also, it has a drag and drop feature to make the editing process simpler and easier. The following are some of the features you can expect to find in this YouTube video editor-:
- Video cutting, trimming, scaling and resizing
- 3D animated titles
- Video effects and speed changes
- Digital zooming and video transitions
- Easy Gnome integration and also has a drag and drop feature.
2. Pitivi
Pitivi is great open source YouTube video editing software for Linux. The software uses the Gstreamer framework for the importation and exportation as well as the rendition of media. With Pitive, you can accomplish simple video editing tasks such as trimming, splitting, cutting, snapping and mixing. It also allows you to link audio and video clips into a single clip. One other thing admirable about this software is that it is available in multiple languages and it has a comprehensive documentation, easy to read, understand and follow.
3. Lightworks
This is a professional video editing tool designed for Linux and it can be used by everyone, thanks to its rich features and intuitive interface. Both its free and paid versions have all the features needed for a decent video editing experience. However, it is not only restricted to Linux, but it can also be used on Windows and Mac as well. Some of the highlights for the software include the following-:
- Trimming and a wide variety of effects
- Frame accurate capture tool
- Drag and drop feature
- Wide container support and Vimeo export
- Export and import functionalities
- Advanced multicam editing in realtime
4. Blender
Blender is advanced and professional video editing software packed with exciting features, which makes it admirable for professional YouTube video editing. Some of the features it has include-: 3D modeling, N-Gon support, animation toolset, automatic skinning and sculpting, physically accurate shaders, open shading language to help users custom shaders, grid and bridge fill among others.
5. KDEnlive
This is another open source video editing software highly recommended for those interested in YouTube video editing software for Linux. Its functioning relies on a few other projects such as MLT and FFmpeg video frameworks. The design is suited to cover the basic needs of video editing to semi professional needs. Some of the features of this software include-:
- Creating custom profiles
- Configurable keyboard shortcuts
- Mixing video, audio and image files
- Ability to export to standard formats
- Multitrack edition which comes together with a timeframe
- Supports a wide range of camcorders
6. Cinelerra
Ever since its release in 2002, Cinelerra has been downloaded millions of times making it one of the best YouTube video editing software for Linux. It is ideal for both beginners and professionals and it comes loaded with a variety of features needed for a decent video editing experience. They features include but are not limited to the following-:
- Professionally designed UI
- Deck Control
- Different special effects
- Audio editing with unlimited number of layers
- Dual link
- Built-in frame renderer
7. Shotcut
Shotcut is another YouTube video editing software for Linux and it is an interesting one because its UI looks more like a media player and not an editor. The software makes editing video very simple with the set of awesome features it has. For basic uses, it will work just fine, but if you need more powerful options, especially for advanced or professional video recording, then it may not be the best. However, with the features it has, it qualifies as a decent YouTube video editor for Linux.
8. LiVES
LiVES is a powerful yet simple to use YouTube video editing software for Linux. But it is not only designed to be used on Linux, it is expandable and can be used across other platforms via the RFX plugins. The main features of this platform include-:
- Multiple and dynamic loading of effects
- Supports variable and fixed frame rates
- A smooth playback done on variable rates
- Frame accurate cutting
- Loads and edits almost every video format through the mplayer
Installing the software is relatively easy and it will suffice for most of your needs for a YouTube video editor.
Richard Bennett
Richard Bennett is a writer and a lover of all things video.
Follow @Richard Bennett
Richard Bennett
Mar 27, 2024• Proven solutions
It is true that the number of software available for Mac and Windows by far outnumber those available for Linux. Though Linux is still growing, it is always a difficult task to find specific software such as those for YouTube video editing. For Linux users, sometimes it becomes necessary to switch back to Windows whenever you need to edit your videos. Presented here are the best 8 YouTube editing software for Linux so that you avoid the back and forth movement whenever you want to work on your videos for YouTube-:
If you looking for a video editor simple yet powerful, here I recommend an easy-to-use video editing software - Wondershare Filmora (for Win and Mac) which not only allows you cut, crop, rotate, and split your videos in minutes, but also simplify the advanced video editing like green screen effect and PIP. You can also find over 300 video effects like Wedding, Gaming, Education, Beauty, Fashion, etc.
1. Open Shot
Open Shot is a feature rich, multiplatform video editor and one of the best you will ever find for Linux, Mac and Windows. The program is written in Python and it has support for many different video and audio formats and also, it has a drag and drop feature to make the editing process simpler and easier. The following are some of the features you can expect to find in this YouTube video editor-:
- Video cutting, trimming, scaling and resizing
- 3D animated titles
- Video effects and speed changes
- Digital zooming and video transitions
- Easy Gnome integration and also has a drag and drop feature.
2. Pitivi
Pitivi is great open source YouTube video editing software for Linux. The software uses the Gstreamer framework for the importation and exportation as well as the rendition of media. With Pitive, you can accomplish simple video editing tasks such as trimming, splitting, cutting, snapping and mixing. It also allows you to link audio and video clips into a single clip. One other thing admirable about this software is that it is available in multiple languages and it has a comprehensive documentation, easy to read, understand and follow.
3. Lightworks
This is a professional video editing tool designed for Linux and it can be used by everyone, thanks to its rich features and intuitive interface. Both its free and paid versions have all the features needed for a decent video editing experience. However, it is not only restricted to Linux, but it can also be used on Windows and Mac as well. Some of the highlights for the software include the following-:
- Trimming and a wide variety of effects
- Frame accurate capture tool
- Drag and drop feature
- Wide container support and Vimeo export
- Export and import functionalities
- Advanced multicam editing in realtime
4. Blender
Blender is advanced and professional video editing software packed with exciting features, which makes it admirable for professional YouTube video editing. Some of the features it has include-: 3D modeling, N-Gon support, animation toolset, automatic skinning and sculpting, physically accurate shaders, open shading language to help users custom shaders, grid and bridge fill among others.
5. KDEnlive
This is another open source video editing software highly recommended for those interested in YouTube video editing software for Linux. Its functioning relies on a few other projects such as MLT and FFmpeg video frameworks. The design is suited to cover the basic needs of video editing to semi professional needs. Some of the features of this software include-:
- Creating custom profiles
- Configurable keyboard shortcuts
- Mixing video, audio and image files
- Ability to export to standard formats
- Multitrack edition which comes together with a timeframe
- Supports a wide range of camcorders
6. Cinelerra
Ever since its release in 2002, Cinelerra has been downloaded millions of times making it one of the best YouTube video editing software for Linux. It is ideal for both beginners and professionals and it comes loaded with a variety of features needed for a decent video editing experience. They features include but are not limited to the following-:
- Professionally designed UI
- Deck Control
- Different special effects
- Audio editing with unlimited number of layers
- Dual link
- Built-in frame renderer
7. Shotcut
Shotcut is another YouTube video editing software for Linux and it is an interesting one because its UI looks more like a media player and not an editor. The software makes editing video very simple with the set of awesome features it has. For basic uses, it will work just fine, but if you need more powerful options, especially for advanced or professional video recording, then it may not be the best. However, with the features it has, it qualifies as a decent YouTube video editor for Linux.
8. LiVES
LiVES is a powerful yet simple to use YouTube video editing software for Linux. But it is not only designed to be used on Linux, it is expandable and can be used across other platforms via the RFX plugins. The main features of this platform include-:
- Multiple and dynamic loading of effects
- Supports variable and fixed frame rates
- A smooth playback done on variable rates
- Frame accurate cutting
- Loads and edits almost every video format through the mplayer
Installing the software is relatively easy and it will suffice for most of your needs for a YouTube video editor.
Richard Bennett
Richard Bennett is a writer and a lover of all things video.
Follow @Richard Bennett
Engage Audiences on All Sides: Live 360-Degree Video Broadcasting for YouTube
How to live streaming 360 video to youtube
Richard Bennett
Mar 27, 2024• Proven solutions
- Part1.Stream 360 to Youtube via Ricoh Theta S and OBS on PC
- Part2.Live Stream from Allie 360 Camera to YouTube on Mobile
1. Stream 360 to Youtube via Ricoh Theta S and OBS on PC
Step 1: First of all you need to get ready with your Ricoh Theta S 360 camera unit.
Step 2: Now visit the official website of Theta 360 in order to download your dedicated live streaming application.
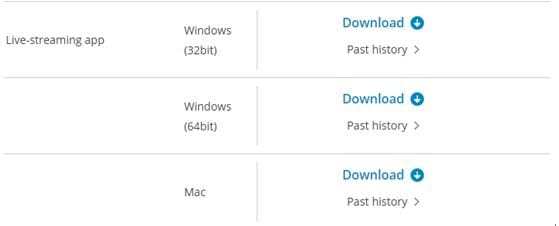
Step 3: Get your application and install it on your Mac or PC as per need.
Step 4: It is time to plug in to your Ricoh Theta S 360 camera using your PC.
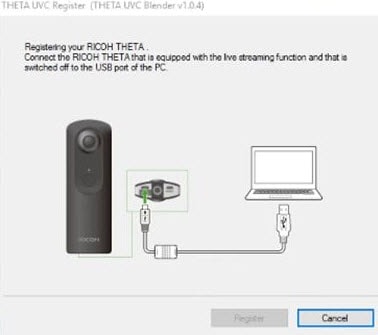
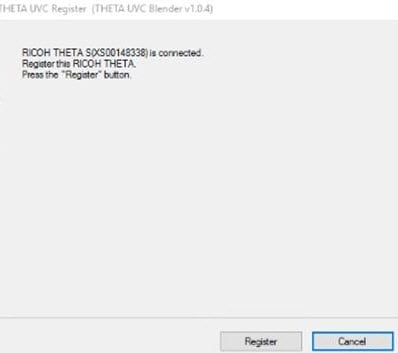
Step 5: Now select your device ‘Ricoh Theta S’ and then hit Okay.
Step 6: You will find option to register to application with your respective device. Select and hit register.
Step 7: As soon as your registration process is complete then un-plug your USB cable.
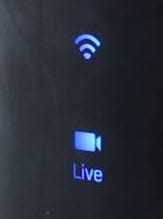
Step 8: It is time to turn the Ricoh Theta device to Live Mode; you simple need to press the top power and lower video button simultaneously to directly switch to the live mode.

Step 9: Once your device enters into Live Stream mode then a Led will start blinking on your device that represents your device is live at this moment.
Step 10: Now you need to plug in the USB cable again with your computer.
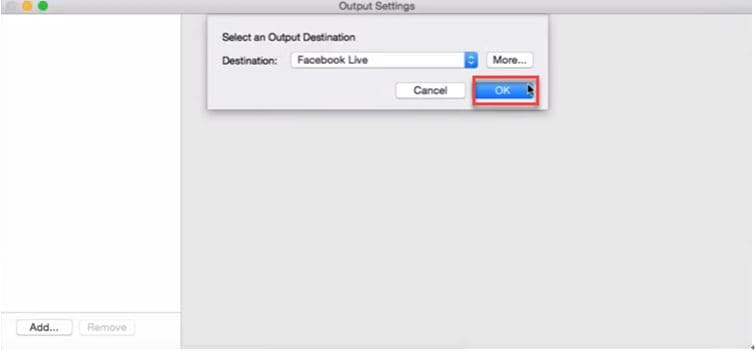
Step 11: Visit the official site of OBS and download your software; install it on your system.
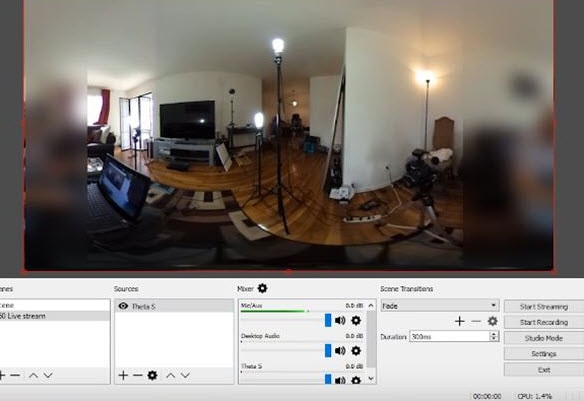
Step 12: Go to create scene option and then switch to create sources.
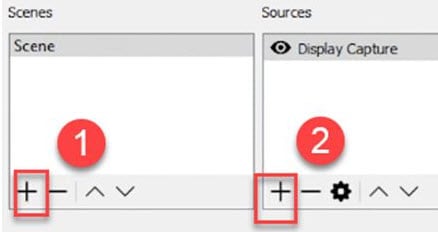
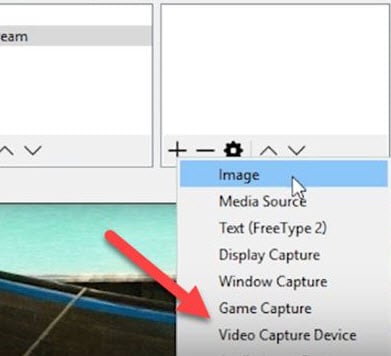
Step 13: Select video capture device as your source from drop down menu.
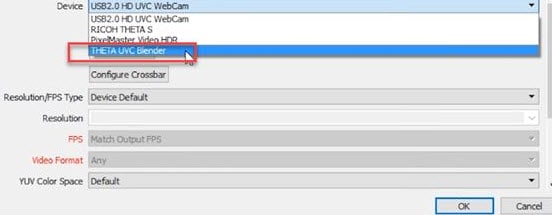
Step 14: Now from available list select Theta UVC as your active video capture source.
Step 15: You need to adjust screen as per your requirements.
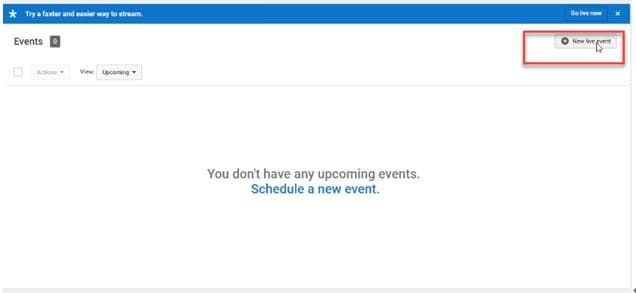
Step 16: Now move to YouTube and then hit New Live Events option.
Step 17: Complete the basic information.
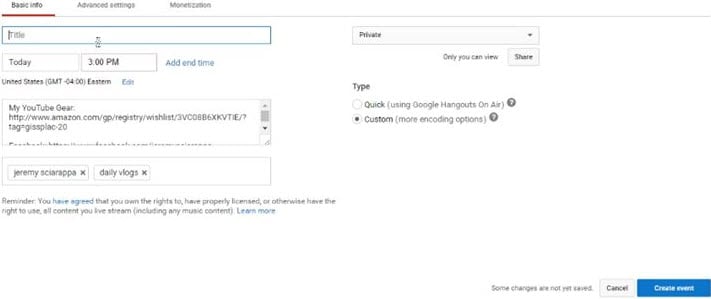
Step 18: You need to move to advanced settings now; select 360 live stream option and then create event.
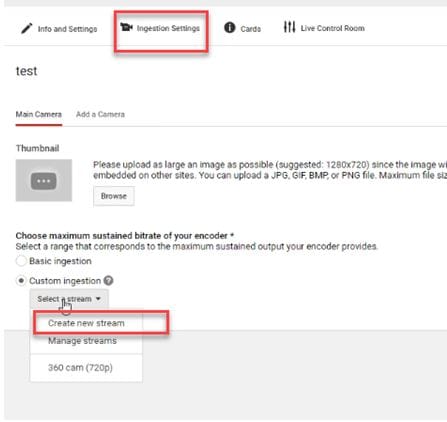
Step 19: Now complete the ingesting settings and finally select create new stream option.

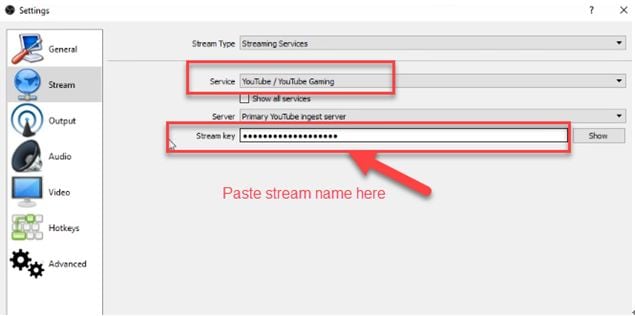
Step 20: As soon as your event is created then you will be able to find your stream name on screen, copy it and simply paste it on OBS window.
Step 21: It is time to return to OBS settings and then you need to paste that copied name on stream key option.
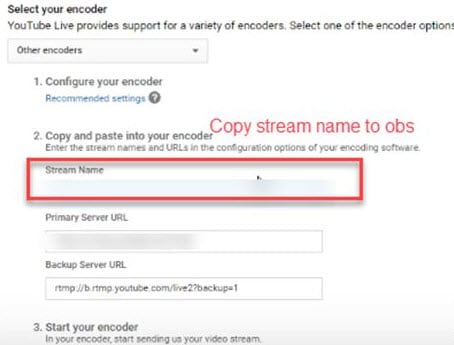
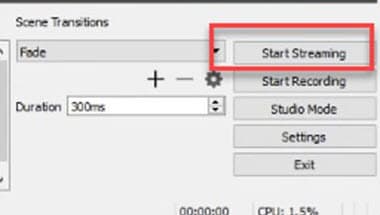
Step 22: Once all above settings are complete then click start stream option from your OBS window and you will soon be able to find your 360 live on YouTube.
2.Live Stream from Allie 360 Camera to YouTube on Mobile
Step 1: Get ready with your Allie 360 camera unit.
Step 2: Visit YouTube and then hit the option to create your live event.
Step 3: It is time to download your Allie Application and then get it installed on your device.
- Prefer to use this link if you are working on iOS: https://itunes.apple.com/app/allie-home/id1063986074
- Android users need to visit: https://play.google.com/store/apps/details?id=com.icrealtime.allie
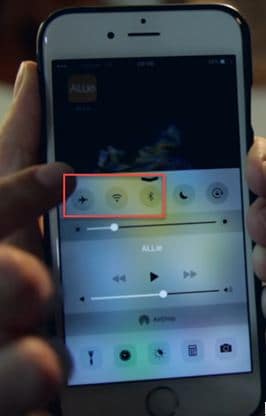
Step 4: As soon as you have downloaded your app then simply turn on the Bluetooth, Wi-Fi and air plane mode on your device.
Step 5: Simply open your Allie application and then connect your camera.

Step 6: Now users need to hit stream icon on screen.
![]()
Step 7: You will be asked to fill the necessary information about your video. It is also possible to make adjustments regarding video quality. Once you are done with all required settings then hit Submit option.

Step 8: Soon your video will become live; note that you can also share your live video via SNS platform with other viewers.

Richard Bennett
Richard Bennett is a writer and a lover of all things video.
Follow @Richard Bennett
Richard Bennett
Mar 27, 2024• Proven solutions
- Part1.Stream 360 to Youtube via Ricoh Theta S and OBS on PC
- Part2.Live Stream from Allie 360 Camera to YouTube on Mobile
1. Stream 360 to Youtube via Ricoh Theta S and OBS on PC
Step 1: First of all you need to get ready with your Ricoh Theta S 360 camera unit.
Step 2: Now visit the official website of Theta 360 in order to download your dedicated live streaming application.
Step 3: Get your application and install it on your Mac or PC as per need.
Step 4: It is time to plug in to your Ricoh Theta S 360 camera using your PC.
Step 5: Now select your device ‘Ricoh Theta S’ and then hit Okay.
Step 6: You will find option to register to application with your respective device. Select and hit register.
Step 7: As soon as your registration process is complete then un-plug your USB cable.
Step 8: It is time to turn the Ricoh Theta device to Live Mode; you simple need to press the top power and lower video button simultaneously to directly switch to the live mode.
Step 9: Once your device enters into Live Stream mode then a Led will start blinking on your device that represents your device is live at this moment.
Step 10: Now you need to plug in the USB cable again with your computer.
Step 11: Visit the official site of OBS and download your software; install it on your system.
Step 12: Go to create scene option and then switch to create sources.
Step 13: Select video capture device as your source from drop down menu.
Step 14: Now from available list select Theta UVC as your active video capture source.
Step 15: You need to adjust screen as per your requirements.
Step 16: Now move to YouTube and then hit New Live Events option.
Step 17: Complete the basic information.
Step 18: You need to move to advanced settings now; select 360 live stream option and then create event.
Step 19: Now complete the ingesting settings and finally select create new stream option.
Step 20: As soon as your event is created then you will be able to find your stream name on screen, copy it and simply paste it on OBS window.
Step 21: It is time to return to OBS settings and then you need to paste that copied name on stream key option.
Step 22: Once all above settings are complete then click start stream option from your OBS window and you will soon be able to find your 360 live on YouTube.
2.Live Stream from Allie 360 Camera to YouTube on Mobile
Step 1: Get ready with your Allie 360 camera unit.
Step 2: Visit YouTube and then hit the option to create your live event.
Step 3: It is time to download your Allie Application and then get it installed on your device.
- Prefer to use this link if you are working on iOS: https://itunes.apple.com/app/allie-home/id1063986074
- Android users need to visit: https://play.google.com/store/apps/details?id=com.icrealtime.allie
Step 4: As soon as you have downloaded your app then simply turn on the Bluetooth, Wi-Fi and air plane mode on your device.
Step 5: Simply open your Allie application and then connect your camera.
Step 6: Now users need to hit stream icon on screen.
![]()
Step 7: You will be asked to fill the necessary information about your video. It is also possible to make adjustments regarding video quality. Once you are done with all required settings then hit Submit option.
Step 8: Soon your video will become live; note that you can also share your live video via SNS platform with other viewers.
Richard Bennett
Richard Bennett is a writer and a lover of all things video.
Follow @Richard Bennett
Also read:
- [New] Highest Rated 10 Apps to Watch Golf & Soccer in the Moment
- [Updated] 18 Ways To Record Internet Radio- Comprehensive Tutorial
- [Updated] Apple M1 Pro Vs. M1 Max What's the Difference?
- [Updated] In 2024, Showcasing Contributions & Thought Leadership
- [Updated] Transitioning Smoothly The Technology Enhancer's Handbook for 2024
- 2024 Approved Acclaimed Vehicle Monitoring Systems Explained
- 2024 Approved Designing Your Musical Journey YouTube Playlist Construction Tips Web/App
- 2024 Approved Efficiently Shortening YouTube Content
- Chortle Chronicles Recording 7 Amusing Video Adventures for 2024
- Collaboration Techniques in Video Making, Viewership Up for 2024
- Elevate Your YouTube Videos Without Spending a Penny - The Best Tools for 2024
- Learn to Initiate Harmonious Group Conversations on Skype for Both PC & Mac Users
- Top 3 Cutting-Edge Innovations in the iPhone 16: Reasons to Get Pumped for an Upgrade! - ZDNet's Guide
- Update Canon MX870 to Work with Windows 8-7
- Title: [Updated] Best 8 Linux Apps for Professional Editing
- Author: Kevin
- Created at : 2024-11-20 23:33:23
- Updated at : 2024-11-24 21:16:19
- Link: https://youtube-videos.techidaily.com/updated-best-8-linux-apps-for-professional-editing/
- License: This work is licensed under CC BY-NC-SA 4.0.