
!["[Updated] Behind the Scenes IPhone Video Loops Unveiled"](https://www.lifewire.com/thmb/DjoCtc_PCQcwqqKtzrLBasNfNLQ=/400x300/filters:no_upscale():max_bytes(150000):strip_icc()/ball-958950_1920-b2d63a2acf5d438cbb65e04cba952c7e.jpg)
"[Updated] Behind the Scenes IPhone Video Loops Unveiled"
Behind the Scenes: IPhone Video Loops Unveiled
How to Loop A Video on iPhone?

Shanoon Cox
Mar 27, 2024• Proven solutions
For Win 7 or later (64-bit)
 Secure Download
For macOS 10.14 or later
Secure Download
Click here to get Filmora for PC by email
or Try Filmora App for mobile >>>
download filmora app for ios ](https://app.adjust.com/b0k9hf2%5F4bsu85t ) download filmora app for android ](https://app.adjust.com/b0k9hf2%5F4bsu85t )
Nowadays, we can see a trend of people posting looping videos on their social media. These looping videos are fascinating and fun to watch. A loop is a popular element in photography and especially music videos, the idea being that the camera appears to magically repeat itself as many times as there are photos or frames showing the action. They can also simply recur a sequence a certain number of times, then stop.
Now some people don’t know how to make looping videos, so in this article, we are going to discuss how to loop a video on iPhone videos and also how to loop YouTube videos on iPhone. Let’s get started.
- Part 1: Convert iPhone Live Photos to a Loop Video
- Part 2: Repeat Slideshow Video to Loop on iPhone
- Part 3: Loop YouTube Videos On iPhone
- Part 4: Best Apps to Loop Videos on iPhone and iPad
- Part 5: Better Way to Loop and Create Boomerang Videos in Filmora Video Editor
- Part 6: Frequently Asked Questions About Choosing Best Free Video Editor for Windows
Part 1: How to Convert iPhone Live Photos to a Loop Video
A loop video is a short video that plays in repeat/ indefinitely. Loop videos can be created with features on social media apps and third-party apps.
iPhone has a setting that allows you to edit the photos to loop or bounce videos, and it only works with a photo feature called ‘live photo’. The live photo feature records 1.5 seconds moving picture when you click on the shutter button.
The live photo feature can be edited to create a loop video, and you can do that by following these steps:
- Before creating the video, you need to have the live picture saved on your phone.
To do this, capture a live photo by opening your camera app. Then click on the live photo icon, which is located in the upper right corner. And tap on the shutter button.
- Afterward, you locate the live photo you want to convert to a loop video by going to the Photos apps. Then click on Albums > Media Types> Live photos.

- After locating and clicking on the live picture, you will see the Live tab in the upper left corner. Click on the arrow down to view other options, including Loop, Bounce, and long exposure.

- Select the effect you want to create (loop) and save the file. The loop feature plays the video in a one-way order. So, to make it more interesting, you can select the bounce effect, which makes it play back and forth.
- You can share the created loop video with the share icon at the lower-left corner.

Part 2: Repeat Slideshow to Loop Video on iPhone for Free
Slideshow videos are a very fun way to see your content. People gather around a screen to enjoy these beautiful memories of their life. Here is a step-by-step guide on how to loop a slideshow video on iPhone.
- First, go to your gallery and select a video that you want to make a slideshow of.
- Add that video to an album in your gallery under any name.
- Pause the slideshow video, and you will see Options button at the bottom. Click it and then enable the Repeat option.

Now open that video from the album and start playing the video. That video will start playing in a loop until you make it stop.
Part 3: How to Loop YouTube Videos On iPhone?
Now coming to the part that we discussed in the intro, how to loop YouTube videos on iPhone. So here, we will show you a step-by-step guide on how to loop the videos on your iPhone.
- Launch YouTube on your iPhone and log in to your account if you are not already logged in.
- Now go to the “Search” option and lookup for the desired video that you want to loop, and add it to the playlist. There are two ways you can do that. Click and hold on to the video; a small menu will appear, then click on “Add to” to make a playlist. Start the video and then scroll down a bit and on the extreme right side, click on the “Add to” option, and then name the playlist.
- After that, go back to the main menu and on the lower bottom right side of the screen, click on “Library,” and then select the new playlist.
- Start playing the video, and under the video, click on the drop-down button, and on the left side of the drop-down screen, there is a loop button, click on that, and it will start to play the loop infinitely.
Check this ultimate guide to looping YouTube videos to get more ways.
Part 4: Best Apps to Loop Videos on iPhone and iPad
1. Loopideo - Loop Videos

Loopideo is the app on our list that is an answer to how to loop a video on iPhone. It lets you import any video from your play that you want to play in a loop. This is a great tool when it comes to individual and organizational presentations. This powerful app can be very useful for you in many cases.
2. Loop Video – GIF Maker

The second app on our list is Loop Video GIF Maker. It is very fun and easy to use the tool. It allows you to make the videos loop by turning them into GIFs. Loop Video GIF Maker allows you to import any video from your gallery into your app. You can then convert into a looping GIF. You can also choose the playback speed of the GIF after you can export it to the gallery or upload it to your social media directly from the app.
3. Loopideo Pro

Loopideo Pro is a more feature-filled app on the App Store. Loopideo allows you to make the videos loop an unlimited amount of times. You can also choose the formats that you want to convert the looping video into. This app also gives you the option to choose the playback speed and then can also convert it into GIF speed so that you can save it in your gallery.
4. iMovie
iMovie is a more professional app that is available on the list. This app allows you to loop not only the video but also edit the video. This allows you to play the video in a loop for an unlimited amount of time in the built-in player, but when it comes to saving the looping video, it is not possible because you would need an unlimited amount of space to save that video.
5. Looper

The last app on our list is a looper, and it is a very fun and easy-to-use app available on this list. Choose a video from your gallery, Local Videos, or iCloud Drive. Select the times you want the video to repeat and play. You can also export your video in reverse or in GIF format.
Bonus: Record a Looping Video with Boomerang app on iPhone
To make a looping video on your iPhone, you can either download the boomerang app or use the boomerang video on Instagram.
If you are using the Boomerang app, take these steps to make a looping video:
- Launch the Boomerang from Instagram app on your iPhone, if you haven’t installed it already, click on the search bar and type in Boomerang in the App Store.
- The welcome screen will appear, swipe left and tap on Get started. Allow it to access to your camera, location, and photos. After you are done setting up, you can make the videos.
- To make a boomerang video, click and hold the shutter button. Hold the shutter for a few seconds and move the phone across the image or scene.
- A preview of the looping video will appear; tap on Done to save the video. Or click on the X symbol to make a new video.
- You can change the settings to record a selfie video by clicking on the curved arrows symbol. And you can also tap the lightning sign to put the flash on and off.
To make the video with the Instagram Boomerang feature:
- Open the Instagram app, and then swipe left as if to add a story.
- Click on the boomerang icon (infinity symbol). Press and hold the shutter to make the video.
- Preview the video, and you can add texts, songs, markups, and stickers to the video.
- And then click on the arrow-down symbol to save/ download the video. You can share the video to close friends or your story.
Part 5: What If You’d Like to Loop Videos on Computer?
Filmora is one of the most popular video editors among video creators. It gives you high-quality end product, smooth slowing down & speeding up movements, voiceovers on top of music tracks and transitions between audio & video clips. But another amazing benefit of this computer video editor is that you can produce a loop video.
![]()

The Best Video Looper on Windows and Mac
- Loop and repeat videos multiple times
- Copy and paste clips easily
- Built-in plentiful templates and effects
- Export to MP4, MOV, MKV, GIF and multiple formats
For Win 7 or later (64-bit)
Secure Download
For macOS 10.14 or later
Secure Download
Click here to get Filmora for PC by email
or Try Filmora App for mobile >>>
download filmora app for ios ](https://app.adjust.com/b0k9hf2%5F4bsu85t ) download filmora app for android ](https://app.adjust.com/b0k9hf2%5F4bsu85t )
In this part, I’m going to show you how to create looping video in Filmora video editor with the reverse effect. It’s actually really easy and doesn’t require any complicated steps. You’ll be able to create a cool, looping video in no time! So, let’s get started!
Step 1: Import Videos to Filmora video editor
Launch Filmora video editor on your Windows or Mac computer and then make a new project. Import videos as you can see it has been already imported all the media in the media library from your which you want to loop effect, and then drag the video clip to the timeline.

Step 2: Copy and Paste the Video
After drag and drop the video to the timeline, make a copy of it (Ctrl+C). Go to the last frame and paste this video again.

Step 3: Enable Reverse Speed effect
Right click on the pasted video and go to Speed and Duration option in which custom speed dialog box where you can adjust the speed.
In the Custom Speed dialog box you will find the speed, duration, reverse and ripple options. To make a video with loop effects, click the Reverse option to reverse the video play back from end to start frames automatically. Click OK to save the settings.

Now you have got a video with one looping count, if you want the video to loop several times, you can select these 2 clips and paste it based on your needs to get a continuous looping effect.

We hope you found this post helpful in learning how to create looping video with Filmora video editor. This makes them perfect for use as GIFs because they are never ending! What’s more, you can create a looping video in Filmora video editor by adding a sound that plays continuously. If you’re looking to make an endlessly repeating animated image or video clip using just one still image, look no further than Filmora video editor. It’s easy and fun to use.
For Win 7 or later (64-bit)
Secure Download
For macOS 10.14 or later
Secure Download
Click here to get Filmora for PC by email
or Try Filmora App for mobile >>>
download filmora app for ios ](https://app.adjust.com/b0k9hf2%5F4bsu85t ) download filmora app for android ](https://app.adjust.com/b0k9hf2%5F4bsu85t )
Part 6: Frequently Asked Question About Looping Videos on iPhone
- What is a looping video?
It means a video that repeats for a specific number of times or maybe an unlimited amount of times automatically. For example, a GIF.
- Can I loop videos an unlimited number of times?
Yes, it is possible to loop a video an unlimited amount of times. You can learn how to loop a video on iPhone by using the methods that we discussed above in the whole article. It is not possible to save the infinitely looping because it will take an infinite amount of memory.
- Does the view count if I play a YouTube video in a loop?
No, YouTube will not count repeated views if they all come over and over again from the same sources. This is to maintain the overall quality of YouTube and make it scam-free.
For Win 7 or later (64-bit)
Secure Download
For macOS 10.14 or later
Secure Download
Click here to get Filmora for PC by email
or Try Filmora App for mobile >>>
download filmora app for ios ](https://app.adjust.com/b0k9hf2%5F4bsu85t ) download filmora app for android ](https://app.adjust.com/b0k9hf2%5F4bsu85t )
Shanoon Cox
Shanoon Cox is a writer and a lover of all things video.
Follow @Shanoon Cox
Shanoon Cox
Mar 27, 2024• Proven solutions
For Win 7 or later (64-bit)
Secure Download
For macOS 10.14 or later
Secure Download
Click here to get Filmora for PC by email
or Try Filmora App for mobile >>>
download filmora app for ios ](https://app.adjust.com/b0k9hf2%5F4bsu85t ) download filmora app for android ](https://app.adjust.com/b0k9hf2%5F4bsu85t )
Nowadays, we can see a trend of people posting looping videos on their social media. These looping videos are fascinating and fun to watch. A loop is a popular element in photography and especially music videos, the idea being that the camera appears to magically repeat itself as many times as there are photos or frames showing the action. They can also simply recur a sequence a certain number of times, then stop.
Now some people don’t know how to make looping videos, so in this article, we are going to discuss how to loop a video on iPhone videos and also how to loop YouTube videos on iPhone. Let’s get started.
- Part 1: Convert iPhone Live Photos to a Loop Video
- Part 2: Repeat Slideshow Video to Loop on iPhone
- Part 3: Loop YouTube Videos On iPhone
- Part 4: Best Apps to Loop Videos on iPhone and iPad
- Part 5: Better Way to Loop and Create Boomerang Videos in Filmora Video Editor
- Part 6: Frequently Asked Questions About Choosing Best Free Video Editor for Windows
Part 1: How to Convert iPhone Live Photos to a Loop Video
A loop video is a short video that plays in repeat/ indefinitely. Loop videos can be created with features on social media apps and third-party apps.
iPhone has a setting that allows you to edit the photos to loop or bounce videos, and it only works with a photo feature called ‘live photo’. The live photo feature records 1.5 seconds moving picture when you click on the shutter button.
The live photo feature can be edited to create a loop video, and you can do that by following these steps:
- Before creating the video, you need to have the live picture saved on your phone.
To do this, capture a live photo by opening your camera app. Then click on the live photo icon, which is located in the upper right corner. And tap on the shutter button.
- Afterward, you locate the live photo you want to convert to a loop video by going to the Photos apps. Then click on Albums > Media Types> Live photos.
- After locating and clicking on the live picture, you will see the Live tab in the upper left corner. Click on the arrow down to view other options, including Loop, Bounce, and long exposure.
- Select the effect you want to create (loop) and save the file. The loop feature plays the video in a one-way order. So, to make it more interesting, you can select the bounce effect, which makes it play back and forth.
- You can share the created loop video with the share icon at the lower-left corner.
Part 2: Repeat Slideshow to Loop Video on iPhone for Free
Slideshow videos are a very fun way to see your content. People gather around a screen to enjoy these beautiful memories of their life. Here is a step-by-step guide on how to loop a slideshow video on iPhone.
- First, go to your gallery and select a video that you want to make a slideshow of.
- Add that video to an album in your gallery under any name.
- Pause the slideshow video, and you will see Options button at the bottom. Click it and then enable the Repeat option.
Now open that video from the album and start playing the video. That video will start playing in a loop until you make it stop.
Part 3: How to Loop YouTube Videos On iPhone?
Now coming to the part that we discussed in the intro, how to loop YouTube videos on iPhone. So here, we will show you a step-by-step guide on how to loop the videos on your iPhone.
- Launch YouTube on your iPhone and log in to your account if you are not already logged in.
- Now go to the “Search” option and lookup for the desired video that you want to loop, and add it to the playlist. There are two ways you can do that. Click and hold on to the video; a small menu will appear, then click on “Add to” to make a playlist. Start the video and then scroll down a bit and on the extreme right side, click on the “Add to” option, and then name the playlist.
- After that, go back to the main menu and on the lower bottom right side of the screen, click on “Library,” and then select the new playlist.
- Start playing the video, and under the video, click on the drop-down button, and on the left side of the drop-down screen, there is a loop button, click on that, and it will start to play the loop infinitely.
Check this ultimate guide to looping YouTube videos to get more ways.
Part 4: Best Apps to Loop Videos on iPhone and iPad
1. Loopideo - Loop Videos
Loopideo is the app on our list that is an answer to how to loop a video on iPhone. It lets you import any video from your play that you want to play in a loop. This is a great tool when it comes to individual and organizational presentations. This powerful app can be very useful for you in many cases.
2. Loop Video – GIF Maker
The second app on our list is Loop Video GIF Maker. It is very fun and easy to use the tool. It allows you to make the videos loop by turning them into GIFs. Loop Video GIF Maker allows you to import any video from your gallery into your app. You can then convert into a looping GIF. You can also choose the playback speed of the GIF after you can export it to the gallery or upload it to your social media directly from the app.
3. Loopideo Pro
Loopideo Pro is a more feature-filled app on the App Store. Loopideo allows you to make the videos loop an unlimited amount of times. You can also choose the formats that you want to convert the looping video into. This app also gives you the option to choose the playback speed and then can also convert it into GIF speed so that you can save it in your gallery.
4. iMovie
iMovie is a more professional app that is available on the list. This app allows you to loop not only the video but also edit the video. This allows you to play the video in a loop for an unlimited amount of time in the built-in player, but when it comes to saving the looping video, it is not possible because you would need an unlimited amount of space to save that video.
5. Looper
The last app on our list is a looper, and it is a very fun and easy-to-use app available on this list. Choose a video from your gallery, Local Videos, or iCloud Drive. Select the times you want the video to repeat and play. You can also export your video in reverse or in GIF format.
Bonus: Record a Looping Video with Boomerang app on iPhone
To make a looping video on your iPhone, you can either download the boomerang app or use the boomerang video on Instagram.
If you are using the Boomerang app, take these steps to make a looping video:
- Launch the Boomerang from Instagram app on your iPhone, if you haven’t installed it already, click on the search bar and type in Boomerang in the App Store.
- The welcome screen will appear, swipe left and tap on Get started. Allow it to access to your camera, location, and photos. After you are done setting up, you can make the videos.
- To make a boomerang video, click and hold the shutter button. Hold the shutter for a few seconds and move the phone across the image or scene.
- A preview of the looping video will appear; tap on Done to save the video. Or click on the X symbol to make a new video.
- You can change the settings to record a selfie video by clicking on the curved arrows symbol. And you can also tap the lightning sign to put the flash on and off.
To make the video with the Instagram Boomerang feature:
- Open the Instagram app, and then swipe left as if to add a story.
- Click on the boomerang icon (infinity symbol). Press and hold the shutter to make the video.
- Preview the video, and you can add texts, songs, markups, and stickers to the video.
- And then click on the arrow-down symbol to save/ download the video. You can share the video to close friends or your story.
Part 5: What If You’d Like to Loop Videos on Computer?
Filmora is one of the most popular video editors among video creators. It gives you high-quality end product, smooth slowing down & speeding up movements, voiceovers on top of music tracks and transitions between audio & video clips. But another amazing benefit of this computer video editor is that you can produce a loop video.
![]()
The Best Video Looper on Windows and Mac
- Loop and repeat videos multiple times
- Copy and paste clips easily
- Built-in plentiful templates and effects
- Export to MP4, MOV, MKV, GIF and multiple formats
For Win 7 or later (64-bit)
Secure Download
For macOS 10.14 or later
Secure Download
Click here to get Filmora for PC by email
or Try Filmora App for mobile >>>
download filmora app for ios ](https://app.adjust.com/b0k9hf2%5F4bsu85t ) download filmora app for android ](https://app.adjust.com/b0k9hf2%5F4bsu85t )
In this part, I’m going to show you how to create looping video in Filmora video editor with the reverse effect. It’s actually really easy and doesn’t require any complicated steps. You’ll be able to create a cool, looping video in no time! So, let’s get started!
Step 1: Import Videos to Filmora video editor
Launch Filmora video editor on your Windows or Mac computer and then make a new project. Import videos as you can see it has been already imported all the media in the media library from your which you want to loop effect, and then drag the video clip to the timeline.
Step 2: Copy and Paste the Video
After drag and drop the video to the timeline, make a copy of it (Ctrl+C). Go to the last frame and paste this video again.
Step 3: Enable Reverse Speed effect
Right click on the pasted video and go to Speed and Duration option in which custom speed dialog box where you can adjust the speed.
In the Custom Speed dialog box you will find the speed, duration, reverse and ripple options. To make a video with loop effects, click the Reverse option to reverse the video play back from end to start frames automatically. Click OK to save the settings.
Now you have got a video with one looping count, if you want the video to loop several times, you can select these 2 clips and paste it based on your needs to get a continuous looping effect.

We hope you found this post helpful in learning how to create looping video with Filmora video editor. This makes them perfect for use as GIFs because they are never ending! What’s more, you can create a looping video in Filmora video editor by adding a sound that plays continuously. If you’re looking to make an endlessly repeating animated image or video clip using just one still image, look no further than Filmora video editor. It’s easy and fun to use.
For Win 7 or later (64-bit)
Secure Download
For macOS 10.14 or later
Secure Download
Click here to get Filmora for PC by email
or Try Filmora App for mobile >>>
download filmora app for ios ](https://app.adjust.com/b0k9hf2%5F4bsu85t ) download filmora app for android ](https://app.adjust.com/b0k9hf2%5F4bsu85t )
Part 6: Frequently Asked Question About Looping Videos on iPhone
- What is a looping video?
It means a video that repeats for a specific number of times or maybe an unlimited amount of times automatically. For example, a GIF.
- Can I loop videos an unlimited number of times?
Yes, it is possible to loop a video an unlimited amount of times. You can learn how to loop a video on iPhone by using the methods that we discussed above in the whole article. It is not possible to save the infinitely looping because it will take an infinite amount of memory.
- Does the view count if I play a YouTube video in a loop?
No, YouTube will not count repeated views if they all come over and over again from the same sources. This is to maintain the overall quality of YouTube and make it scam-free.
For Win 7 or later (64-bit)
Secure Download
For macOS 10.14 or later
Secure Download
Click here to get Filmora for PC by email
or Try Filmora App for mobile >>>
download filmora app for ios ](https://app.adjust.com/b0k9hf2%5F4bsu85t ) download filmora app for android ](https://app.adjust.com/b0k9hf2%5F4bsu85t )
Shanoon Cox
Shanoon Cox is a writer and a lover of all things video.
Follow @Shanoon Cox
Professional Insights: Top 10 Capture Cards for YouTube Enthusiasts
The Top 10 Capture Cards for YouTube

Richard Bennett
Nov 04, 2022• Proven solutions
If you are like to share gameplay videos, it’s very important that you have a high-quality capture card. With the help of a capture card, you can easily get all of the in-game footage that you need to make amazing videos and grow a healthy YouTube channel . In this article we will break down the top 10 capture cards for gaming YouTubers in 2018:
- Elgato Game Capture HD 60 Pro
- Elgato Game Capture HD 60 S
- Star Tech 4 Port PCI Firewire Adaptor Card with Digital Video Editing
- Hauppage Colossus 2 PCI Express Internal 1080P HD-PVR
- Elgato Game Capture HD
- Imillet HDMI Video Capture with USB 3.0/2.0 Dongle
- HDML Cloner Box Pro
- Pyle PVRC43 Standalone Digital Video Recorder
- HDML Cloner Box Evolve
- AVerMedia AVerCapture HD
Click here for more tips on being a YouTube gamer .
1. Elgato Game Capture HD 60 Pro
Price: $204
Compatibility: Windows, Switch, 360, Xbox One, PS4
Specs: Internal PCI 4k 30fps
Highlights: Made for streaming. Improved benchmark speeds.
This capture card works with an HDMI interface as well as the ability to be plugged into any type of PC game device. The process for setting it up and recording is extremely simple and the casing has been designed for improving the performance of the system and making it easier to integrate with many different devices. With an up to 16 MB per second capture bitrate, this is a pro tool.
2. Elgato Game Capture HD 60 S
Price: $160
Compatibility: Xbox one, switch, ps4
Specs: This device does 1080p at 60 fps
Highlights: This is one of very few game capture devices that come with USB 3.0 compatibility for easy access to almost any type of gaming device.
The card itself is mind-blowingly easy to set up with its external USB. It’s made for live streaming to YouTube, Twitch, and other platforms. There’s very low latency available on this card and it is one of the highest quality tools for console players.
3. Star Tech 4 Port PCI Firewire Adaptor Card with Digital Video Editing
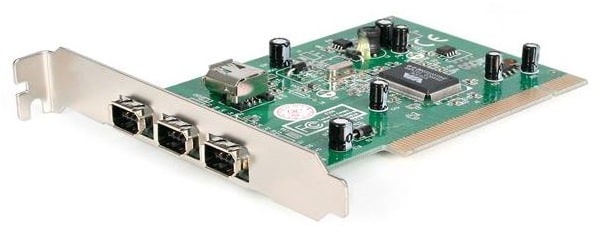
Price: $80
Compatibility: PC, Xbox, PS4
Specs: 1080p, 60 fps
Highlights: This USB 3.0 capture card can be quite easily installed almost anywhere and captures up to 60 frames per second for live streams.
This card comes with a wide range of ports including DVI, Component, HDMI, VGA, and USB. It’s tough to find a capture card that has so many different ports available and this can ensure that it’s possible to capture on almost any type of gaming system or device. A helpful tutorial is also included with this capture card to ensure that you can get the best video format from every console.
4. Hauppauge Colossus 2 PCI Express Internal Card
Price: $135
Compatibility: TV, DVR, Satellite, Xbox, PC, PlayStation
Specs: 1080p, 60 fps
Highlights: This card is an internal PCI card allowing it to remain as a consistent capture device inside a PC.
This card is perfect for recording live programs from a TV to your computer, offloading programs off of your DVR, as well as recording live game footage from PlayStation, Xbox, or your PC. Included alongside this card is the chance to use Stream EEZ for live streaming directly to platforms like Upstream, Twitch, and YouTube.
5. Elgato Game Capture HD
Price: $159
Compatibility: Xbox, PlayStation, Nintendo, PC, Mac
Specs: 1080p at 60fps
Highlights: The game capture HD offers a one-click sharing system to YouTube as well as flashback recording where you can turn back 10 or 15 minutes to record content that just happened.
Overall this is one of the easiest capture cards to set up because it comes with USB 3.0 and HDMI connections. For most modern gaming consoles, it offers the same type of features including the flashback recording solution to record retroactively. The device includes unlimited game capture at a fairly reasonable price and a creation suite so that you can do multitrack recording from your webcam. Editing footage from the card makes it very easy to quickly export clips for all of your content and publish them on social media. This game capture device is also known for its extremely compact design. It is only around the size of a mobile phone, meaning it can be quite easily carried in your pocket.
6. Imillet HDMI Capture Card with USB 3.0 Dongle
Price: $148
Compatibility: Plug and play with no drivers needed. PC, Mac, Linux, any iOS
Specs: 1080p 60 fps
Highlights: Doesn’t require any type of driver installation. This will work on any operating system or computer for quick recording.
The card itself is known for its USB 3.0 support as well as USB 2.0, and for not needing drivers. There is no more compatible card on the market right now. If you have had issues with other cards in the past or you regularly run Linux, you should consider this device to be prepared for all your recording needs. The device will detect the input and adjust output automatically to ensure a crystal-clear picture based on the type of device that you’re recording from. Imillet also offers a great warranty of six months free replacement as well as 12 months free repair on the card for anyone that is ordering it. The software that comes with the card is extremely simple but it does the job quite effectively, allowing for quick recording from multiple devices and simple detection for a video signal and output. Input formats can range from 480p to 1080p and frame rates can go as high as 60 frames per second. The device has great stats for its live capture but many people have experienced problems when trying to record from DVR specifically.
7. HDML Cloner Box Pro
Price: $135
Compatibility: Compatible with game consoles, windows, mac.
Specs: 1080p video at 60fps max
Highlights: The HDML Cloner Box comes with its own remote and the option to record using VGA, AV, YPbPr, and HDMI.
With so many different inputs available on this card it’s possible to record from almost any type of gaming device. With the hardware encoder which is on board, you can save videos as MP4 files and then instantly transfer them over to a flash drive on the device. You can get all of your saved files available without even having access to a PC. The box works as a standalone and it doesn’t have to be plugged into a computer to work. Free editing and converter software are included but with a storage memory card placed in the device and you can record a huge amount of footage and then edit it on your PC later on. With the quick connect feature, it is easy to set up recording and then perform all the functions you need for recording, stopping, and pausing on the remote as you use it. This remains one of the only cards available where it works as a standalone and allows for the chance to save videos to a flash drive or storage device without having to have a computer plugged in. The free converter software and video editing that comes with this device add extra value as well. An optional two-year warranty can make sure that you are ready for anything concerning this card.
8. Pyle PVRC43 Standalone Digital Video Recorder
Price: $80
Compatibility: TV, VCR, DVD, Digital camcorder, Laptop, PC, Mac, Game console
Specs: 480p
Highlights: This works as a standalone recorder with up to 32 GB of onboard memory. There’s no need to plug it into a computer for it to work and with the help of the memory card, you can record a wide range of output videos in AVI.
This card is designed as a standalone option and it’s extremely small with a USB 2.0 interface. Overall the quality of this card is not quite as technically advanced as some of the others on our list but it can record a video that is perfectly appropriate for the web or sharing over platforms like YouTube. The device can be set up quite easily with the help of an RCA connection cable, USB power cable, or other options. Generally, you may need access to an RCA to HDMI adapter if you want to record video off of a more modern laptop or camera. Where this device takes over on its competitors is the idea of just how simple it is to use. It weighs less than a pound and has a ‘one-button operation’ to start and pause recording. As of the completely standalone option, it doesn’t require any type of connection to a computer to record video. If you are looking for one of the simplest capture cards on the market that outputs to AVI in web quality, this is it.
9. HDML Cloner Box Evolve
Price: $121
Compatibility: HDMI input standalone mass compatibility
Specs: 4k video input, 1080p 60fps output
Highlights: This is a standalone USB capture device that comes with its remote. It also features dual HDMI slots allowing for up to two sources of video during recording (so you can also record from a facecam).
The card itself features a stream and capture function so that you can stream gameplay to any type of USB storage device. By plugging in a hard drive you can just press one button to record gaming videos and then handle the process of live streaming, editing, and more. Through two HDMI inputs supported and a very powerful remote control, you record on any device with fantastic image quality and without even having to plug it into any type of computer. While many of these standalone style capture boxes only support the use of minimal storage, this is a device that is capable of getting hooked up to any type of USB external hard drive for a chance to capture nearly unlimited video on your Cloner Box. As a bonus, the MP4 video editing software that is included will make the process of trimming, copying, and converting easier than ever. This has incredible value to the overall product. As an additional bonus, this Cloner Box also features a quick heat dissipation capability which can help to prevent lagging and other common problems that occur with many types of capture boxes when they overheat. A free microphone slot in addition to the HDMI slots makes recording professional voiceovers for any gameplay videos as easy as possible!
10. Avermedia Avercapture HD
Price: $99
Compatibility: Any console, PC, Mac
Specs: This device is capable of capture in full 1080p/60fps as well as the style encoding for quick streaming and easy video capture.
Highlights: The timeshift feature available on this device makes it simple to record retroactively as well as offer ultralow streaming and recording over time. The device makes it easy to capture and stream and it comes with a competitive two-year warranty.
This card works as a USB capture card from most any type of device, it captures through a component input or HDMI input and it has some of the lowest latency for any type of team capture. With one slot for video input as well as an audio input slot, it’s possible to record quick gameplay and voiceovers at any time with very minimal setup. Streaming and recording in full 1080p are done quite easily on this device and it’s designed to use less processing power than some of the competitors to ensure minimal game lag. RECental is included as part of this device so that you can set up live streaming to many of the top platforms available online. The timeshift function comes with a one-hour buffer ensuring if a great gameplay moment happens, you can shift back and begin recording from that time. Commentary and sharing are made easy with the software that’s included with this device. It makes sharing and recording an easy process for any avid video recorder.
Let us know what capture card you use and if you’re happy with it!
Richard Bennett
Richard Bennett is a writer and a lover of all things video.
Follow @Richard Bennett
Richard Bennett
Nov 04, 2022• Proven solutions
If you are like to share gameplay videos, it’s very important that you have a high-quality capture card. With the help of a capture card, you can easily get all of the in-game footage that you need to make amazing videos and grow a healthy YouTube channel . In this article we will break down the top 10 capture cards for gaming YouTubers in 2018:
- Elgato Game Capture HD 60 Pro
- Elgato Game Capture HD 60 S
- Star Tech 4 Port PCI Firewire Adaptor Card with Digital Video Editing
- Hauppage Colossus 2 PCI Express Internal 1080P HD-PVR
- Elgato Game Capture HD
- Imillet HDMI Video Capture with USB 3.0/2.0 Dongle
- HDML Cloner Box Pro
- Pyle PVRC43 Standalone Digital Video Recorder
- HDML Cloner Box Evolve
- AVerMedia AVerCapture HD
Click here for more tips on being a YouTube gamer .
1. Elgato Game Capture HD 60 Pro
Price: $204
Compatibility: Windows, Switch, 360, Xbox One, PS4
Specs: Internal PCI 4k 30fps
Highlights: Made for streaming. Improved benchmark speeds.
This capture card works with an HDMI interface as well as the ability to be plugged into any type of PC game device. The process for setting it up and recording is extremely simple and the casing has been designed for improving the performance of the system and making it easier to integrate with many different devices. With an up to 16 MB per second capture bitrate, this is a pro tool.
2. Elgato Game Capture HD 60 S
Price: $160
Compatibility: Xbox one, switch, ps4
Specs: This device does 1080p at 60 fps
Highlights: This is one of very few game capture devices that come with USB 3.0 compatibility for easy access to almost any type of gaming device.
The card itself is mind-blowingly easy to set up with its external USB. It’s made for live streaming to YouTube, Twitch, and other platforms. There’s very low latency available on this card and it is one of the highest quality tools for console players.
3. Star Tech 4 Port PCI Firewire Adaptor Card with Digital Video Editing
Price: $80
Compatibility: PC, Xbox, PS4
Specs: 1080p, 60 fps
Highlights: This USB 3.0 capture card can be quite easily installed almost anywhere and captures up to 60 frames per second for live streams.
This card comes with a wide range of ports including DVI, Component, HDMI, VGA, and USB. It’s tough to find a capture card that has so many different ports available and this can ensure that it’s possible to capture on almost any type of gaming system or device. A helpful tutorial is also included with this capture card to ensure that you can get the best video format from every console.
4. Hauppauge Colossus 2 PCI Express Internal Card
Price: $135
Compatibility: TV, DVR, Satellite, Xbox, PC, PlayStation
Specs: 1080p, 60 fps
Highlights: This card is an internal PCI card allowing it to remain as a consistent capture device inside a PC.
This card is perfect for recording live programs from a TV to your computer, offloading programs off of your DVR, as well as recording live game footage from PlayStation, Xbox, or your PC. Included alongside this card is the chance to use Stream EEZ for live streaming directly to platforms like Upstream, Twitch, and YouTube.
5. Elgato Game Capture HD
Price: $159
Compatibility: Xbox, PlayStation, Nintendo, PC, Mac
Specs: 1080p at 60fps
Highlights: The game capture HD offers a one-click sharing system to YouTube as well as flashback recording where you can turn back 10 or 15 minutes to record content that just happened.
Overall this is one of the easiest capture cards to set up because it comes with USB 3.0 and HDMI connections. For most modern gaming consoles, it offers the same type of features including the flashback recording solution to record retroactively. The device includes unlimited game capture at a fairly reasonable price and a creation suite so that you can do multitrack recording from your webcam. Editing footage from the card makes it very easy to quickly export clips for all of your content and publish them on social media. This game capture device is also known for its extremely compact design. It is only around the size of a mobile phone, meaning it can be quite easily carried in your pocket.
6. Imillet HDMI Capture Card with USB 3.0 Dongle
Price: $148
Compatibility: Plug and play with no drivers needed. PC, Mac, Linux, any iOS
Specs: 1080p 60 fps
Highlights: Doesn’t require any type of driver installation. This will work on any operating system or computer for quick recording.
The card itself is known for its USB 3.0 support as well as USB 2.0, and for not needing drivers. There is no more compatible card on the market right now. If you have had issues with other cards in the past or you regularly run Linux, you should consider this device to be prepared for all your recording needs. The device will detect the input and adjust output automatically to ensure a crystal-clear picture based on the type of device that you’re recording from. Imillet also offers a great warranty of six months free replacement as well as 12 months free repair on the card for anyone that is ordering it. The software that comes with the card is extremely simple but it does the job quite effectively, allowing for quick recording from multiple devices and simple detection for a video signal and output. Input formats can range from 480p to 1080p and frame rates can go as high as 60 frames per second. The device has great stats for its live capture but many people have experienced problems when trying to record from DVR specifically.
7. HDML Cloner Box Pro
Price: $135
Compatibility: Compatible with game consoles, windows, mac.
Specs: 1080p video at 60fps max
Highlights: The HDML Cloner Box comes with its own remote and the option to record using VGA, AV, YPbPr, and HDMI.
With so many different inputs available on this card it’s possible to record from almost any type of gaming device. With the hardware encoder which is on board, you can save videos as MP4 files and then instantly transfer them over to a flash drive on the device. You can get all of your saved files available without even having access to a PC. The box works as a standalone and it doesn’t have to be plugged into a computer to work. Free editing and converter software are included but with a storage memory card placed in the device and you can record a huge amount of footage and then edit it on your PC later on. With the quick connect feature, it is easy to set up recording and then perform all the functions you need for recording, stopping, and pausing on the remote as you use it. This remains one of the only cards available where it works as a standalone and allows for the chance to save videos to a flash drive or storage device without having to have a computer plugged in. The free converter software and video editing that comes with this device add extra value as well. An optional two-year warranty can make sure that you are ready for anything concerning this card.
8. Pyle PVRC43 Standalone Digital Video Recorder
Price: $80
Compatibility: TV, VCR, DVD, Digital camcorder, Laptop, PC, Mac, Game console
Specs: 480p
Highlights: This works as a standalone recorder with up to 32 GB of onboard memory. There’s no need to plug it into a computer for it to work and with the help of the memory card, you can record a wide range of output videos in AVI.
This card is designed as a standalone option and it’s extremely small with a USB 2.0 interface. Overall the quality of this card is not quite as technically advanced as some of the others on our list but it can record a video that is perfectly appropriate for the web or sharing over platforms like YouTube. The device can be set up quite easily with the help of an RCA connection cable, USB power cable, or other options. Generally, you may need access to an RCA to HDMI adapter if you want to record video off of a more modern laptop or camera. Where this device takes over on its competitors is the idea of just how simple it is to use. It weighs less than a pound and has a ‘one-button operation’ to start and pause recording. As of the completely standalone option, it doesn’t require any type of connection to a computer to record video. If you are looking for one of the simplest capture cards on the market that outputs to AVI in web quality, this is it.
9. HDML Cloner Box Evolve
Price: $121
Compatibility: HDMI input standalone mass compatibility
Specs: 4k video input, 1080p 60fps output
Highlights: This is a standalone USB capture device that comes with its remote. It also features dual HDMI slots allowing for up to two sources of video during recording (so you can also record from a facecam).
The card itself features a stream and capture function so that you can stream gameplay to any type of USB storage device. By plugging in a hard drive you can just press one button to record gaming videos and then handle the process of live streaming, editing, and more. Through two HDMI inputs supported and a very powerful remote control, you record on any device with fantastic image quality and without even having to plug it into any type of computer. While many of these standalone style capture boxes only support the use of minimal storage, this is a device that is capable of getting hooked up to any type of USB external hard drive for a chance to capture nearly unlimited video on your Cloner Box. As a bonus, the MP4 video editing software that is included will make the process of trimming, copying, and converting easier than ever. This has incredible value to the overall product. As an additional bonus, this Cloner Box also features a quick heat dissipation capability which can help to prevent lagging and other common problems that occur with many types of capture boxes when they overheat. A free microphone slot in addition to the HDMI slots makes recording professional voiceovers for any gameplay videos as easy as possible!
10. Avermedia Avercapture HD
Price: $99
Compatibility: Any console, PC, Mac
Specs: This device is capable of capture in full 1080p/60fps as well as the style encoding for quick streaming and easy video capture.
Highlights: The timeshift feature available on this device makes it simple to record retroactively as well as offer ultralow streaming and recording over time. The device makes it easy to capture and stream and it comes with a competitive two-year warranty.
This card works as a USB capture card from most any type of device, it captures through a component input or HDMI input and it has some of the lowest latency for any type of team capture. With one slot for video input as well as an audio input slot, it’s possible to record quick gameplay and voiceovers at any time with very minimal setup. Streaming and recording in full 1080p are done quite easily on this device and it’s designed to use less processing power than some of the competitors to ensure minimal game lag. RECental is included as part of this device so that you can set up live streaming to many of the top platforms available online. The timeshift function comes with a one-hour buffer ensuring if a great gameplay moment happens, you can shift back and begin recording from that time. Commentary and sharing are made easy with the software that’s included with this device. It makes sharing and recording an easy process for any avid video recorder.
Let us know what capture card you use and if you’re happy with it!
Richard Bennett
Richard Bennett is a writer and a lover of all things video.
Follow @Richard Bennett
Also read:
- In 2024, Boost Your Video Impact Expert Tips on Using WM Maker
- 2024 Approved Does YouTube Offer Regular Viewers Money?
- [New] A Filmmaker's Dream The 8 Best No-Fee Video Editors on the Market
- Permanent Shutdown Guide to YouTube Shorts Feature
- Videos That Vibe A Novice's Roadmap on a Mac and YouTube
- [New] Curate Your Playlist Dive Into These 20 Premier YouTube Sounds
- Top Flick Alternatives Indie-Worthy 2023 Releases
- Cut Costs, Boost Creativity Learn the Secrets of Green Screen Artistry From 4 Leading Educators
- Free & Easy Building Attractive YouTube Intros without Expense
- [New] Cutting-Edge Techniques for Excellent Sound, No Mic Included
- 2024 Approved Decoding the Mystery of YouTube Shorts
- Crafting & Uploading Lengthy Video Masterpieces on YouTube
- [New] Borrow Premium Image Footage via Top-Rated 4 YouTube Channels
- Best YouTube Shorts Video Editing Apps for iOS and Android for 2024
- Top Earners in YouTube Enterprises
- [Updated] Elite 7 DSLR Options Superior for Professional Videography
- Enriching Slides Video Incorporation From YouTube for 2024
- In 2024, Efficiency at Play Reducing YouTube Video Length
- In 2024, Elevate Presence by Broadcasting on YouTube + Twitch
- [Updated] Essential iOS Video Editor Apps Top 10 Best to Know
- In 2024, How to Download Part of a YouTube Videos?
- In 2024, Elevating Viewers Prime Video Ideas for Channels
- [Updated] Creating a Clickable Thumbnail Enhancing Video Visibility without Costs
- Mastering Content Visibility on YouTube Your Guide to Effective Featured Channels
- Journey to Greatness Top 10 Travel Youtubers
- 2024 Approved Boosting Income via YouTube Ads & Analytics Across Platforms
- [New] 27 Superb Non-YouTube Platforms for Your Videos
- Mastering Mobile Media The Art of Filming with a Smartphone
- 2024 Approved Directing Content Flow Uploading IMovie Films to YouTube
- YouTube Gold Strategies for Financial Flourishing
- The Professional's Handbook to Video Editing in YouTube Studio
- Efficacy of Monetized YouTube Engagement for Content Creators?
- Best Selection Turn Your Videos Into Text Fast for 2024
- Creating a Lasting Impression The Ultimate YouTube Live Thumbnail Guide for 2024
- Curate Your Learning Best 15 Science YT Experts for 2024
- Dissecting Top-Viewed Video Dynamics on YouTube
- [New] Can Genuine Growth Outpace Faux Followers' Effects?
- [New] Excellent Quality HD Screen Recorders
- 2024 Approved X-Voice Sync Studio, Windows Version
- Full Guide to Fix iToolab AnyGO Not Working On ZTE Blade A73 5G | Dr.fone
- How To Repair Apple iPhone 11 Pro System? | Dr.fone
- [New] Vigorous Voice Examination - Iteration No. 8
- Unleashing Your Potential Saving Instagram Stories Like a Pro for 2024
- Lock Your Nokia XR21 Phone in Style The Top 5 Gesture Lock Screen Apps
- Updated 2024 Approved Protect Identities The Best Face Blur Video Editing Tools
- Fix Xiaomi Redmi 13C Android System Webview Crash 2024 Issue | Dr.fone
- How to Change GPS Location on Apple iPhone XS Max Easily & Safely | Dr.fone
- [Updated] Avoid Distraction with Firm Footage Capture
- Essential Tips for Combining SRT with MP4 Video Content
- Troubleshooting Guide How to Fix an Unresponsive Motorola Moto E13 Screen | Dr.fone
- 11 Ways to Fix it When My Motorola Edge 40 Neo Wont Charge | Dr.fone
- New Premiere Pro Transition Essentials Top 10 Plugins You Need
- Top 6 Apps/Services to Trace Any Realme GT 3 Location By Mobile Number | Dr.fone
- [Updated] Rapid Progression in TikTok Videos for 2024
- [New] 2024 Approved How to Record LOL Gameplay?(3 Methods)
- [Updated] 2024 Approved Brain-Snatching Battlegrounds The Best Zombie Gaming Showdowns
- The Ultimate Software for MP4 Recording for 2024
- How to Conduct Screenshares in Zoom
- In 2024, Groundbreaking Filmmaker's First Work Insight & Alternate Films
- A Peek Behind Window's Curtain Top 30 Undisclosed Tips for Windows 11
- [Updated] In 2024, The Cutest & Most Informative IGTVs Now
- In 2024, How to Remove Activation Lock On the iPhone 12 Pro Without Previous Owner?
- Updated 2024 Approved Elevate Your Storytelling Best Photo Slideshow Video Makers
- How to Detect and Stop mSpy from Spying on Your Vivo V27 Pro | Dr.fone
- Title: "[Updated] Behind the Scenes IPhone Video Loops Unveiled"
- Author: Kevin
- Created at : 2024-05-25 16:38:15
- Updated at : 2024-05-26 16:38:15
- Link: https://youtube-videos.techidaily.com/updated-behind-the-scenes-iphone-video-loops-unveiled/
- License: This work is licensed under CC BY-NC-SA 4.0.
