
!["[Updated] Audiovisual Attraction 3 Approaches to Neon-Bordered YouTubes"](https://www.lifewire.com/thmb/ACLdGCkJybpMMfm3FCszTRQh_w8=/400x300/filters:no_upscale():max_bytes(150000):strip_icc()/twitter---illustration-1128061423-eaab82f790914b0ab4ba56e0f1f88026.jpg)
"[Updated] Audiovisual Attraction 3 Approaches to Neon-Bordered YouTubes"
Audiovisual Attraction: 3 Approaches to Neon-Bordered YouTubes
Your YouTube video, or any other clip published on any forum, gets a larger number of hits if it has an attractive thumbnail. And, the fact is, a thumbnail becomes 10x more attractive when the main character that the image has have a neon border around it.
With that said, in the following sections, you will learn a couple of methods on how to add a YouTube thumbnail border around the main characters and/or objects that are significant to the clip.
In this article
01 Add Glowing Neon Border to YouTube Thumbnail with Filmora
02 Add a Glowing Neon Border in YouTube Thumbnail with Canva
03 Outline a Person in a YouTube Thumbnail with Photoshop
Part 1: How to Add Neon Border to YouTube Thumbnail for Free with Filmora
Being one of the most versatile and intuitive post-production tools available in the market today, Wondershare Filmora X allows you to add a neon border to a YouTube thumbnail quite conveniently. You can learn how to get this done on Windows or Mac by following the steps given below.
For Win 7 or later (64-bit)
For macOS 10.12 or later
Step 1: Define Project Settings and Add Image to the Timeline
Launch Wondershare Filmora X on your PC (a MacBook Pro M1 is used here), ensure that the project aspect ratio is set to 16:9 (Widescreen) on the splash screen, and click New Project. On the main interface, click the Preview quality and display settings icon from the upper-right area of the Timeline, click Change Project Aspect Ratio, click to select 1280 x 720 (HD) from the Resolution menu of the Project Settings box, and click OK to save the custom project settings.

Then select My Media from the menu bar if not already selected, click Project Media from the navigation pane, and click Import from the Media box to select and import the image of the main character or object that you want to use in the thumbnail.

Now, drag the image from the Media box to the Timeline at the bottom.

Step 2: Clear Image Background, Add Border, and Add Custom Background
Go to Effects from the menu bar, click to select the Default tab and then AI Portrait from the navigation pane, and click and drag the Human Segmentation preset from the right box, and place it over the image track in the Timeline.

Double-click the image layer, scroll down the upper-left box to the Video Effects section, and use the Edge Thickness and Edge Feather sliders to adjust the character’s edges to make them as realistic as possible. Click OK when done.

Next, click and drag the Human Border preset over the image track in the Timeline, and follow the same procedure to customize the border. This will give the character a neon border effect.

Now, use the method explained earlier to import a custom image for the background, and drag and place it under the previous track in the Timeline.

If you are running the latest version of Filmora, you will find there are some neon light effects available under AI Portrait as well.

Step 3: Add Titles to Thumbnail
Go to Titles from the menu bar, click to select the Default tab and then Lower 3rds from the navigation pane, and click and drag your preferred lower-third preset from the right window to a separate layer in the Timeline. Double-click the lower-third layer, and use the available options in the upper-left window to change the text, its color, etc., and drag the textbox to place it to your preferred position on the image as well. Click OK to save the changes.
Next, click to select Titles from the navigation pane, and drag your preferred title from the right window to the upper-most track in the Timeline. Now use the method explained earlier to edit the text, its color, position, etc. to make it look professional.

For more tips and tricks for creating YouTube thumbnail, you can check this You Tube thumbnail creating guide.
Step 4: Get the Neon Border Thumbnail
Click the Snapshot (Camera) icon from the upper-right area of the Timeline, go to My Media from the menu bar, right-click the thumbnail of the screenshot you captured, and click Reveal in Finder (on Mac) or Reveal in Explorer (on Windows) to get to the folder the YouTube thumbnail border is saved in.

Part 2: How to Add a Glowing Neon Border in Your YouTube Thumbnail with Canva
Canva is another intuitive editing program that works on the web interface rather than having you download and install an app on your PC. You can add a neon border for YouTube thumbnails using Canva by following the instructions given below:
Step 1: Define Project Settings and Add a Background
After signing in to your Canva account, click Create a design from the top-right corner of the page, click Custom size from the bottom, define 1280 and 720 in the Width and Height fields on the box that appears respectively, and click Create new design.

Now, click to select Background from the navigation bar on the left (if the Background tool is not visible, click More and then choose Background from the expanded list), and click to select a background from the images available in the center pane.

Step 2: Upload an Image and Add Effects
Click Uploads from the navigation bar, click the More icon from the right of the Upload media button present at the top of the center pane, choose your preferred method to upload the image (with the transparent background) that you want to use, upload the image, and drag it from the center pane to the Canvas.
Note: You can use any of the tools available online to remove the background from your image for free.

To add a YouTube thumbnail border, make sure that the image that you added to the Canvas is selected, click the Duplicate icon from the upper-right area, and use the scaling handles of the copy of the image to increase its size a bit. Reposition the image back to its original location as well.
Then, click Edit image from the upper-left corner of the Canvas, click Duotone from the Edit image pane at the center, if need be, click See all, choose your preferred duotone effect to apply on the image, choose your preferred highlight and shadow colors from the box that appears next, and click Back from the top of the pane.

Next, click See all next to the Adjust section from the center pane, and drag the Blur slider to the right to increase the blur effect on the image.

Step 3: Position the Layers
While keeping the duplicate image selected, click the Position button from the upper-right area of the Canvas, and click Background to send the second image behind the first one to get the neon border effect for the photo.

Part 3: How to Outline a Person in a YouTube Thumbnail with Photoshop
Because YouTube thumbnails are nothing but static images, creating YouTube thumbnail border with Adobe Photoshop is comparatively easier. The process of doing this is given below:
Step 1: Define Document Preferences and Import an Image
Launch Adobe Photoshop on your PC, click Create new, and on the New Document customization box, define the width and height values to 1280 and 720 pixels respectively. Select Transparent from the Background Contents menu as well if not already selected. Click Create from the bottom to create a new Photoshop document with the specified document settings. Next, open the folder that contains the source image, drag the photo to Photoshop, and press Enter to place the photo.

Step 2: Remove Background from the Image
Make sure that the image layer is selected in the Layers panel on the right, go to Select from the menu bar at the top, and click Subject. From the bottom of the Layers panel, click the Add a mask icon to get rid of the background, leaving only the human on the Canvas.

Step 3: Add a Custom Background and an Outline Around the Subject
Use the method explained earlier to import a background image of your choice to Photoshop. Drag the background image layer to the bottom in the Layers panel. Double-click the masked layer, click to select Stroke from the left pane of the Layer Style box, and use the options available on the right to manage the size, color, position, etc. of the stroke that has been added around the human subject. Click OK when done, and then export the image normally to use it as a YouTube thumbnail border.

Summary
It is important to know that the default resolution of a YouTube thumbnail is 1280 x 720 pixels that is usually written and referred to as 720p. While adding a YouTube thumbnail border, it is also imperative to have a good sense of color combination and fonts. Furthermore, a decent tool like Wondershare Filmora X must be used to add an appealing neon border around the main subject in the thumbnail image easily and quickly.
02 Add a Glowing Neon Border in YouTube Thumbnail with Canva
03 Outline a Person in a YouTube Thumbnail with Photoshop
Part 1: How to Add Neon Border to YouTube Thumbnail for Free with Filmora
Being one of the most versatile and intuitive post-production tools available in the market today, Wondershare Filmora X allows you to add a neon border to a YouTube thumbnail quite conveniently. You can learn how to get this done on Windows or Mac by following the steps given below.
For Win 7 or later (64-bit)
For macOS 10.12 or later
Step 1: Define Project Settings and Add Image to the Timeline
Launch Wondershare Filmora X on your PC (a MacBook Pro M1 is used here), ensure that the project aspect ratio is set to 16:9 (Widescreen) on the splash screen, and click New Project. On the main interface, click the Preview quality and display settings icon from the upper-right area of the Timeline, click Change Project Aspect Ratio, click to select 1280 x 720 (HD) from the Resolution menu of the Project Settings box, and click OK to save the custom project settings.
Then select My Media from the menu bar if not already selected, click Project Media from the navigation pane, and click Import from the Media box to select and import the image of the main character or object that you want to use in the thumbnail.
Now, drag the image from the Media box to the Timeline at the bottom.
Step 2: Clear Image Background, Add Border, and Add Custom Background
Go to Effects from the menu bar, click to select the Default tab and then AI Portrait from the navigation pane, and click and drag the Human Segmentation preset from the right box, and place it over the image track in the Timeline.
Double-click the image layer, scroll down the upper-left box to the Video Effects section, and use the Edge Thickness and Edge Feather sliders to adjust the character’s edges to make them as realistic as possible. Click OK when done.
Next, click and drag the Human Border preset over the image track in the Timeline, and follow the same procedure to customize the border. This will give the character a neon border effect.
Now, use the method explained earlier to import a custom image for the background, and drag and place it under the previous track in the Timeline.
If you are running the latest version of Filmora, you will find there are some neon light effects available under AI Portrait as well.
Step 3: Add Titles to Thumbnail
Go to Titles from the menu bar, click to select the Default tab and then Lower 3rds from the navigation pane, and click and drag your preferred lower-third preset from the right window to a separate layer in the Timeline. Double-click the lower-third layer, and use the available options in the upper-left window to change the text, its color, etc., and drag the textbox to place it to your preferred position on the image as well. Click OK to save the changes.
Next, click to select Titles from the navigation pane, and drag your preferred title from the right window to the upper-most track in the Timeline. Now use the method explained earlier to edit the text, its color, position, etc. to make it look professional.
For more tips and tricks for creating YouTube thumbnail, you can check this You Tube thumbnail creating guide.
Step 4: Get the Neon Border Thumbnail
Click the Snapshot (Camera) icon from the upper-right area of the Timeline, go to My Media from the menu bar, right-click the thumbnail of the screenshot you captured, and click Reveal in Finder (on Mac) or Reveal in Explorer (on Windows) to get to the folder the YouTube thumbnail border is saved in.
Part 2: How to Add a Glowing Neon Border in Your YouTube Thumbnail with Canva
Canva is another intuitive editing program that works on the web interface rather than having you download and install an app on your PC. You can add a neon border for YouTube thumbnails using Canva by following the instructions given below:
Step 1: Define Project Settings and Add a Background
After signing in to your Canva account, click Create a design from the top-right corner of the page, click Custom size from the bottom, define 1280 and 720 in the Width and Height fields on the box that appears respectively, and click Create new design.
Now, click to select Background from the navigation bar on the left (if the Background tool is not visible, click More and then choose Background from the expanded list), and click to select a background from the images available in the center pane.
Step 2: Upload an Image and Add Effects
Click Uploads from the navigation bar, click the More icon from the right of the Upload media button present at the top of the center pane, choose your preferred method to upload the image (with the transparent background) that you want to use, upload the image, and drag it from the center pane to the Canvas.
Note: You can use any of the tools available online to remove the background from your image for free.
To add a YouTube thumbnail border, make sure that the image that you added to the Canvas is selected, click the Duplicate icon from the upper-right area, and use the scaling handles of the copy of the image to increase its size a bit. Reposition the image back to its original location as well.
Then, click Edit image from the upper-left corner of the Canvas, click Duotone from the Edit image pane at the center, if need be, click See all, choose your preferred duotone effect to apply on the image, choose your preferred highlight and shadow colors from the box that appears next, and click Back from the top of the pane.
Next, click See all next to the Adjust section from the center pane, and drag the Blur slider to the right to increase the blur effect on the image.
Step 3: Position the Layers
While keeping the duplicate image selected, click the Position button from the upper-right area of the Canvas, and click Background to send the second image behind the first one to get the neon border effect for the photo.
Part 3: How to Outline a Person in a YouTube Thumbnail with Photoshop
Because YouTube thumbnails are nothing but static images, creating YouTube thumbnail border with Adobe Photoshop is comparatively easier. The process of doing this is given below:
Step 1: Define Document Preferences and Import an Image
Launch Adobe Photoshop on your PC, click Create new, and on the New Document customization box, define the width and height values to 1280 and 720 pixels respectively. Select Transparent from the Background Contents menu as well if not already selected. Click Create from the bottom to create a new Photoshop document with the specified document settings. Next, open the folder that contains the source image, drag the photo to Photoshop, and press Enter to place the photo.
Step 2: Remove Background from the Image
Make sure that the image layer is selected in the Layers panel on the right, go to Select from the menu bar at the top, and click Subject. From the bottom of the Layers panel, click the Add a mask icon to get rid of the background, leaving only the human on the Canvas.
Step 3: Add a Custom Background and an Outline Around the Subject
Use the method explained earlier to import a background image of your choice to Photoshop. Drag the background image layer to the bottom in the Layers panel. Double-click the masked layer, click to select Stroke from the left pane of the Layer Style box, and use the options available on the right to manage the size, color, position, etc. of the stroke that has been added around the human subject. Click OK when done, and then export the image normally to use it as a YouTube thumbnail border.
Summary
It is important to know that the default resolution of a YouTube thumbnail is 1280 x 720 pixels that is usually written and referred to as 720p. While adding a YouTube thumbnail border, it is also imperative to have a good sense of color combination and fonts. Furthermore, a decent tool like Wondershare Filmora X must be used to add an appealing neon border around the main subject in the thumbnail image easily and quickly.
Unveiling Subscriber Lists: A YouTube Guide
How to See Your Subscribers on YouTube?

Richard Bennett
Oct 26, 2023• Proven solutions
In this article, we will show you how to simply check your list of subscribers on YouTube and how to use that information to gain more subscribers.
- How to See Your YouTube Subscribers List
- How to See Which of Your Subscribers are Most Popular
- How to See Other People’s Subscribers
A YouTube channel is like a small, or not so small, community of like-minded people who share an interest in a topic. Growing and developing your channel will require you to know who your subscribers are because when you understand who the people that support your work are you can better tailor your content to them and get more subscribers for YouTube.
Click here to learn how to subscribe on YouTube.
Part 1: How to See Your YouTube Subscribers List?
Finding out who your subscribers are on YouTube is a simple process that takes a minimum amount of time and effort.
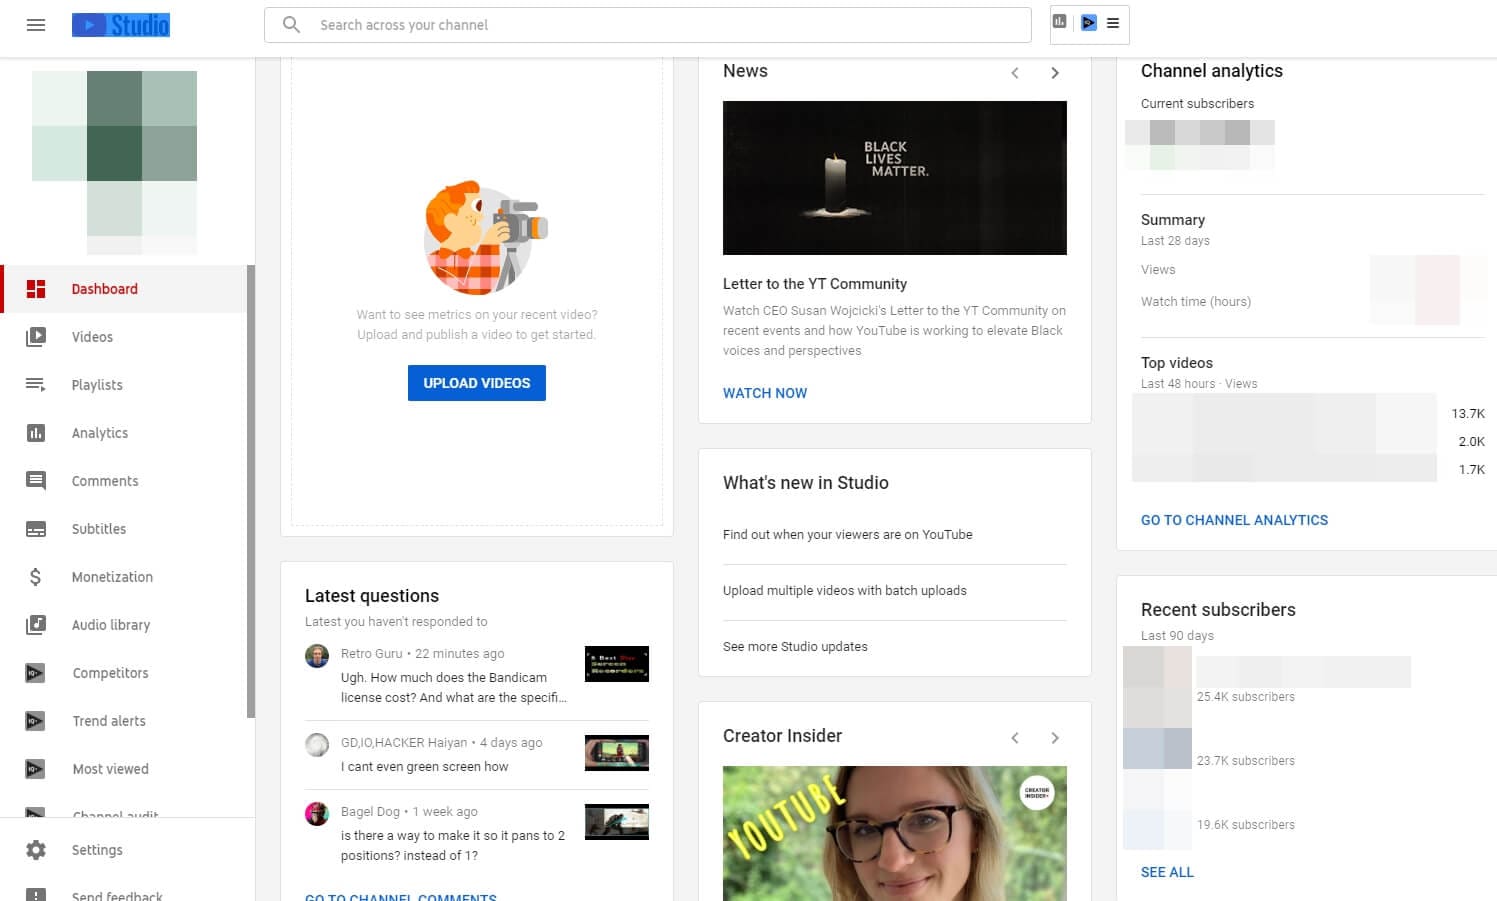
1. In order to do so, you first need to go to your channel’s home page and then click on the Creator Studio icon located in the upper right corner of the screen next to your profile picture.
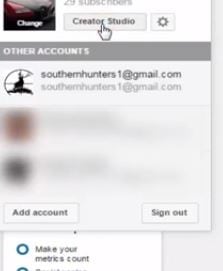
You can also access the Creator Studio by clicking on your icon in the top right corner of any screen on YouTube and selecting it from the drop-down menu.
2. Once the Creator Studio opens, you’ll be able to see different menus such as Analytics and Video Manager.
3. You’ll need to click on the Community menu, which provides insight into messages or comments among other things.
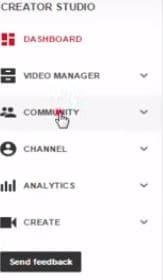
4. Select the Subscribers option from the menu and wait for the list of the subscribers to appear on your screen. You’ll be able to see a list of YouTube users that have subscribed to your channel.
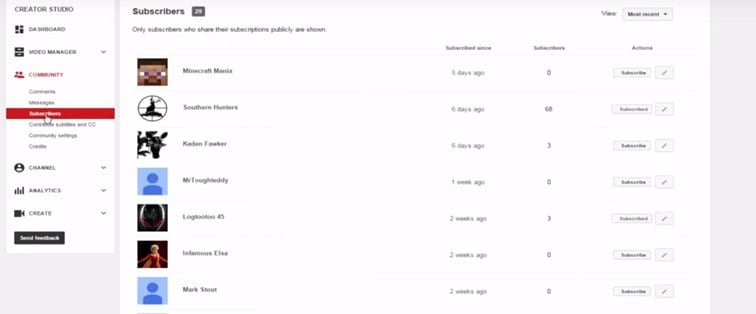
Constantly checking the list of subscribers is a great way to keep track of new subscribers to your channel, which is important if you want to know how many new subscribers you got within a day or a week.
If you would like to go through a more detailed tutorial about how to see who your subscribers are, click here and learn each step of this simple process.
If you’re using YouTube Studio, you can go to the Recent subscribers card on the Dashboard, and then click SEE ALL to check the list of the recent subscribers.
Part 2: How to See Which of Your Subscribers are the Most Popular
The list of subscribers to your channel offered by YouTube’s Creator Studio can be used for a variety of different purposes. You can compare your channel to channels with a similar number of subscribers, or you can find out how many users that have subscribed to your channel have around the same (or even more) subscribers than you do. If you are thinking about creating a collab video , your list of subscribers can be a great source of potential partners.
So in order to see which of your subscribers are the most popular, you simply need to change the settings in the Subscribers panel from most recent to most popular.
Part 3: How to See Other People’s Subscribers
Seeing the list of subscribers on other people’s channels is no longer possible on YouTube, even though it was a common feature in the past.
What you can do is select one of your subscribers from the subscriber list on your channel, and go to their channel and then click on the About option that will show you the number of subscribers and the total number of views to the channel (or use one of these tools to see the sub count of any channel in real-time ).
Unfortunately, YouTube channel owners can no longer browse through other people’s subscribers and for that reason, their interactions with potential subscribers are somewhat limited.
If you want to get more subscribers, you must consider your channel’s branding. Want to improve your branding? Click here to see examples from popular channels that have nailed their brand.
Touch Up Your YouTube Videos with Filmora
As one of the most widely used video editing software in YouTube video editing, Filmora provides lots of templates and effects, so you don’t have to look somewhere else.


Richard Bennett
Richard Bennett is a writer and a lover of all things video.
Follow @Richard Bennett
Richard Bennett
Oct 26, 2023• Proven solutions
In this article, we will show you how to simply check your list of subscribers on YouTube and how to use that information to gain more subscribers.
- How to See Your YouTube Subscribers List
- How to See Which of Your Subscribers are Most Popular
- How to See Other People’s Subscribers
A YouTube channel is like a small, or not so small, community of like-minded people who share an interest in a topic. Growing and developing your channel will require you to know who your subscribers are because when you understand who the people that support your work are you can better tailor your content to them and get more subscribers for YouTube.
Click here to learn how to subscribe on YouTube.
Part 1: How to See Your YouTube Subscribers List?
Finding out who your subscribers are on YouTube is a simple process that takes a minimum amount of time and effort.
1. In order to do so, you first need to go to your channel’s home page and then click on the Creator Studio icon located in the upper right corner of the screen next to your profile picture.
You can also access the Creator Studio by clicking on your icon in the top right corner of any screen on YouTube and selecting it from the drop-down menu.
2. Once the Creator Studio opens, you’ll be able to see different menus such as Analytics and Video Manager.
3. You’ll need to click on the Community menu, which provides insight into messages or comments among other things.
4. Select the Subscribers option from the menu and wait for the list of the subscribers to appear on your screen. You’ll be able to see a list of YouTube users that have subscribed to your channel.
Constantly checking the list of subscribers is a great way to keep track of new subscribers to your channel, which is important if you want to know how many new subscribers you got within a day or a week.
If you would like to go through a more detailed tutorial about how to see who your subscribers are, click here and learn each step of this simple process.
If you’re using YouTube Studio, you can go to the Recent subscribers card on the Dashboard, and then click SEE ALL to check the list of the recent subscribers.
Part 2: How to See Which of Your Subscribers are the Most Popular
The list of subscribers to your channel offered by YouTube’s Creator Studio can be used for a variety of different purposes. You can compare your channel to channels with a similar number of subscribers, or you can find out how many users that have subscribed to your channel have around the same (or even more) subscribers than you do. If you are thinking about creating a collab video , your list of subscribers can be a great source of potential partners.
So in order to see which of your subscribers are the most popular, you simply need to change the settings in the Subscribers panel from most recent to most popular.
Part 3: How to See Other People’s Subscribers
Seeing the list of subscribers on other people’s channels is no longer possible on YouTube, even though it was a common feature in the past.
What you can do is select one of your subscribers from the subscriber list on your channel, and go to their channel and then click on the About option that will show you the number of subscribers and the total number of views to the channel (or use one of these tools to see the sub count of any channel in real-time ).
Unfortunately, YouTube channel owners can no longer browse through other people’s subscribers and for that reason, their interactions with potential subscribers are somewhat limited.
If you want to get more subscribers, you must consider your channel’s branding. Want to improve your branding? Click here to see examples from popular channels that have nailed their brand.
Touch Up Your YouTube Videos with Filmora
As one of the most widely used video editing software in YouTube video editing, Filmora provides lots of templates and effects, so you don’t have to look somewhere else.
Richard Bennett
Richard Bennett is a writer and a lover of all things video.
Follow @Richard Bennett
Also read:
- Top 8 YouTube Rank Tracker to Track Your Video
- Crafting Impact The Quintessential Five YouTube Marketing Approaches
- In 2024, A Comprehensive Look at Youtuber Snippets
- Enhance Visibility A Comprehensive Guide to Video Tagging
- [Updated] 11 FREE YouTube Playlist Downloaders [Online/PC/Android/iOS]
- Making YT Thumbnails Pop A Mac-Centric Approach
- Voyage to Viral Fame Crafting High-Quality Content as a Travel Vlogger
- From Long-Winded to Concise The Art of YouTube Trimming
- 2024 Approved Best Budget Cameras for Creating Quality Vlogs
- [Updated] Amplify Your Online Influence with These Best 5 YouTube Marketing Techniques
- [Updated] Can You Lawfully Archive YouTube Content?
- [New] Best YouTube-to-WebM Tools A Compreenasive Review & Ranking
- [Updated] Beginner's Steps to Broadcast on Youtube via OBS
- [Updated] Digital Dollars Crafting an Online Wealth Journey
- [New] Channel Honor Roll - Play Button & Follower Awards
- Essential Illumination Products for Video Creators for 2024
- Free Video Credits Expertise - Top 6 Maker Guide!
- Inspiration Boost with Leading HR Tapes
- [New] Deciphering User Insights in YouTube Comments
- Branding Excellence YouTube Naming Masterclass
- Free Online Offer Enjoy a Gallery of 50 YouTube Banners Now
- Captivate Viewers The Art of Crafting Short Videos for 2024
- 2024 Approved Are Annual Payments for YouTube Premium Better Than Monthly?
- Get Your Stream on Point with These Top Webcams for YouTube
- Digital Deception Steering Clear From Buying Non-Existent Followers
- Must-Have Filmmaking Tools for Aspiring YouTubers
- In 2024, Captivating Content with a Click Phones & YouTube
- Social Blade's Role in Deciphering the Dynamics of YouTube Statistics
- In 2024, Elevate Your Brand with These Biz Channel Standouts
- Growth Hacks for YouTuber's Short Form Content Boosting View Counts Effectively
- [Updated] 8 Mistakes People Should Avoid as a New YouTuber
- Choosing the Best Cameras & Lenses for Vloggers for 2024
- Unlock YouTube's End Screens Easy Template Ideas & Tutorials
- Unearthing 8 YouTube Platforms with Stellar Rapid Rise
- [New] Brightening Up Your YouTube Pixels
- How to Turn Off Google Location to Stop Tracking You on Xiaomi Redmi A2+ | Dr.fone
- In 2024, Mastering Image Cropping in Final Cut Pro X 2023 Edition
- How to Restore Deleted Find N3 Contacts An Easy Method Explained.
- Updated In 2024, The Best of the Best Top 10 2D Animation Software (Free & Paid)
- [Updated] In 2024, Step-by-Step Drawing Faces on Snapchat
- [New] Ignite Dialogue Innovative Questions in IG Story Lives for 2024
- Quickly Remove Google FRP Lock on Nubia Red Magic 8S Pro+
- [Updated] Mastering Your Marketing Edge Establishing a Biz Page on Instagram
- 3 Things You Must Know about Fake Snapchat Location On Samsung Galaxy Z Fold 5 | Dr.fone
- Updated This Article Introduce Tips on How to Stream Local Video to Chromecast From Windows/Mac/Android/iOS
- In 2024, 360 Camera Buying Guide How to Choose a Suitable 360 Camera -2023 Update
- In 2024, How to Change Google Play Location On Itel P55+ | Dr.fone
- [Updated] 2024 Approved Mastering Emoji Integration for a More Engaging Discord Statue
- Streamlining Your Podcast Journey The Easy-to-Follow Path to Professional Audio
- In 2024, How to Track a Lost Lava Yuva 3 for Free? | Dr.fone
- 3 Effective Ways to Bypass Activation Lock from iPhone 12
- How to Bypass FRP on Xiaomi Redmi 13C 5G?
- Infinix GT 10 Pro Screen Unresponsive? Heres How to Fix It | Dr.fone
- New In 2024, Audio Creation at Your Fingertips A Comprehensive Look Into Adobes Audio Editor Features
- How to Cast Apple iPhone 14 to Chromecast? | Dr.fone
- [Updated] In 2024, Flavorful Journeys on TikTok's Culinary Map
- [Updated] In 2024, The Power of Pop Culture Top TikTok Response Videos
- [Updated] The Essential iOS Strategy for Instagram Saving
- The Ultimate Guide to Finding Instagram Filters for No Cost for 2024
- Apply These Techniques to Improve How to Detect Fake GPS Location On Realme C55 | Dr.fone
- Title: "[Updated] Audiovisual Attraction 3 Approaches to Neon-Bordered YouTubes"
- Author: Kevin
- Created at : 2024-05-25 16:37:25
- Updated at : 2024-05-26 16:37:25
- Link: https://youtube-videos.techidaily.com/updated-audiovisual-attraction-3-approaches-to-neon-bordered-youtubes/
- License: This work is licensed under CC BY-NC-SA 4.0.
