
![[Updated] A Beginner's Roadmap to Professional Sports Edits](https://www.lifewire.com/thmb/HtO_S_YLPOH6ciuxB9GmRVSYbzU=/400x300/filters:no_upscale():max_bytes(150000):strip_icc()/redditdown-7f62c5d189d64501949d4646f65aa39e.jpg)
[Updated] A Beginner's Roadmap to Professional Sports Edits
A Beginner’s Roadmap to Professional Sports Edits
How to Create a Sports Highlight Video

Richard Bennett
Mar 27, 2024• Proven solutions
“I want to make a sports highlight video, but I don’t know how to edit it or what kind of tools I need to use. Can someone tell me how to work on a sports video?”
As I read this query posted on a popular online forum, I realized that so many people out there find it hard to create a sports video. Well, unlike a standard video, working on a sports highlight video can be tough. This is because it needs a lot of editing and we need to handpick the right moments from hours of footage. Though, if you use the right tools, then you can easily work on highlight videos like a pro. In this guide, I will let you know how to create sports videos in a step by step manner.
- Part 1: Why is a sports highlight video and why important?
- Part 2: Highlight Video vs. Skills Video
- Part 3: Use Excellent Video Editor to Make a Sports Highlight Video
- Part 4: How to Create a Sports Highlight Video?
- Part 5: Expert Tips for Creating Highlight Videos
Why is a sports highlight video and why important?
As the name suggests, a highlight video basically includes all the vital events of a game in a short duration of time. You can include the details of some players at the start or focus on a particular player as well. Besides that, a sports highlight video would have fast-forward, slow motion, and frozen clips to skip or focus on certain details.
A lot of times, people don’t have the time to watch the entire game, which can span for a couple of hours. Therefore, they can watch a sports highlight video that would include all the major events of the game and will let them enjoy their thrill in a few moments.

Besides that, if you are applying for a college/academy or just want to showcase your skills, then you can consider making a sports video of an impressive game of yours. You can simply showcase a player and try to highlight their skills in the video.
Highlight Videos vs. Skills Videos: the Major Differences
While making a sports video, you might encounter two different types of content – a highlight video and a skills video. As I have mentioned above, a sports highlight video would include the shots of an actual game. You can either focus on the event of a single game or include clips from multiple games that were played in a genuine setup. If you want, you can highlight a particular player while making the video as well.
On the other hand, a skills video is mostly made to demonstrate the skills of a player and is not focused on the game. In fact, most of the skills videos are made outside of a real game setting. For instance, if you have mastered a skill or would like to demonstrate your game-related actions, then you can make a skills video. Some of these videos are also tutorial game-plays to teach others about a particular skill that they can master.
Use Excellent Video Editor to Make a Sports Highlight Video
If you want to come up with engaging and visually appealing highlight videos, then consider using a versatile video editor like Filmora. Equipped with several video editing tools, it will let you create a sports highlight video in no time. Since the tool has so many features, you can save your time in editing and come up with a new sports video in minutes.


- Filmora is extremely easy to use and runs on all the leading Windows and macOS versions without any issue.
- Using its inbuilt tools, you can clip out the most important events from a sports video or include them in your highlights.
- There are also features to change the motion and pace of the video (like fast forward or slow motion).
- You can also focus on any athlete and freeze a frame on a particular skill or action.
- Besides that, you can also add voiceovers in your sports highlight video, add media layers, use its inbuilt transitions, and fine-tune the overall aesthetics of your videos.
- There are also tons of filters and presets in Filmora that you can use to save your time in editing. You can work on videos of almost every format with seamless 4K support.
Why we picked it
- Options to import/export files in different formats
- Tons of features in one place (extremely easy to use)
- Split-screen support to include multiple events in a highlight video
How to Create a Sports Highlight Video with Filmora?
With the help of Filmora , anyone can create a sports video without even prior editing/designing experience. Firstly, you can install Filmora on your Windows or Mac by visiting its website and have the footage you wish to edit. Now, you can just follow these steps to work on your next sports highlight video.
Filmstock Stock Media Library ](https://filmstock.wondershare.com/creative-theme-sports?spm=rs.filmora%5Fweb&source%5Fchannel=seo%5Farticle )
Step 1: Add a video to Filmora
To start with, just launch Filmora on your computer and add the video that you wish to work on. You can just drag and drop the video to its interface or go to its Menu > File > Import Media to browse and load the file.

Step 2: Edit the Sports Video
In order to create a sports highlight video, the first thing that people do is trim any unwanted part. Once the video is loaded, you can view it on the timeline of the interface. Now, go to the timeline and get the trim tool to manually select the part of the video you wish to trim. After selecting the desired fragment, you can trim the clip or just delete it by clicking on their respective icons.

In the same way, you can also split your video and make other changes in it. You can also include multiple videos together and include them in your timeline as well.
If you are including multiple videos, then make sure they have the same dimensions and aspect ratio. For this, you can select the video, right-click on the timeline, and click on the crop icon. Now, select the same aspect ratio for the entire video to keep it uniform.

Most of the game highlights that we see have different speeds for various sections. That is, some actions would be fast-forwarded while some would be in slow motion. To apply this, simply select the section in the timeline, right-click, and go to the Speed and Duration settings. This will open a dedicated interface from where you can change the speed of the sports video.
Apart from manually setting the speed, you can also take the assistance of the custom speed options that are available in the timeline tools.

Step 3: Make Advanced Edits in your Sports Video
With the user-friendly interface of Filmora, you can do some basic edits and make a sports highlight video in minutes. Though, if you want to focus on some parts and make more changes, then you can use its advanced options as well.
For instance, in a highlight video, we often wish to freeze certain frames. To do this, just select a frame and use the “Freeze Frame” option from the timeline tools. You can even set the duration to freeze the selected frame.
If you have included clips from different videos, then you can apply all kinds of transitions from Filmora. In the end, you can go to its edit options and choose to close gaps as well.
To give your video a uniform and aesthetically pleasing appeal, you can also add different overlays and effects on it from Filmora’s library.
Lastly, make sure that you added sound or voiceover to your video. You can add a sound from its library or import any other music file to it. Since highlight videos mostly have voiceovers, you add the same by visiting the Record > Record Voiceover option.

Step 4: Export your video in the desired format
That’s it! Once your sports highlight video is ready, you can export it in different formats. Just go to the Export option and select the location to save the video and a preferred resolution. You can save your video in formats like MP4, WMV, AVI, FLV, MKV, and so on.
Expert Tips for Creating Highlight Videos
As you can see, making a sports highlight video with a tool like Filmora is extremely easy. Although to be a pro and make better videos, you can consider the following tips:
Keep it short
Make sure that you only include the highlights of the game in your video to keep it interesting. Your aim is to have a short and crisp video without any unwanted footage.
Use freeze frames and slow motion
Some games can be pretty fast-paced and the viewers might miss out on a few key details. To showcase them, you can freeze certain frames or apply slow motion.
Include other details
A sports highlight video can also be informative. You can include details about the players or the team at the start. Also, it is recommended to have sound or a voiceover in the background to narrate the events.
Pick the best clips
When you watch a game, make a note of the best moments that you know your viewers would enjoy. You can also focus on different skills that you found impressive and include them in your sports video.
I’m sure that after reading this guide, you would be able to come up with an impressive sports highlight video as well. Since you might need to make a lot of edits on a sports video, I would recommend using a diverse tool like Filmora. With the tons of editing options that it provides, you can easily create all sorts of highlight videos while saving your time and resources.
Richard Bennett
Richard Bennett is a writer and a lover of all things video.
Follow @Richard Bennett
Richard Bennett
Mar 27, 2024• Proven solutions
“I want to make a sports highlight video, but I don’t know how to edit it or what kind of tools I need to use. Can someone tell me how to work on a sports video?”
As I read this query posted on a popular online forum, I realized that so many people out there find it hard to create a sports video. Well, unlike a standard video, working on a sports highlight video can be tough. This is because it needs a lot of editing and we need to handpick the right moments from hours of footage. Though, if you use the right tools, then you can easily work on highlight videos like a pro. In this guide, I will let you know how to create sports videos in a step by step manner.
- Part 1: Why is a sports highlight video and why important?
- Part 2: Highlight Video vs. Skills Video
- Part 3: Use Excellent Video Editor to Make a Sports Highlight Video
- Part 4: How to Create a Sports Highlight Video?
- Part 5: Expert Tips for Creating Highlight Videos
Why is a sports highlight video and why important?
As the name suggests, a highlight video basically includes all the vital events of a game in a short duration of time. You can include the details of some players at the start or focus on a particular player as well. Besides that, a sports highlight video would have fast-forward, slow motion, and frozen clips to skip or focus on certain details.
A lot of times, people don’t have the time to watch the entire game, which can span for a couple of hours. Therefore, they can watch a sports highlight video that would include all the major events of the game and will let them enjoy their thrill in a few moments.
Besides that, if you are applying for a college/academy or just want to showcase your skills, then you can consider making a sports video of an impressive game of yours. You can simply showcase a player and try to highlight their skills in the video.
Highlight Videos vs. Skills Videos: the Major Differences
While making a sports video, you might encounter two different types of content – a highlight video and a skills video. As I have mentioned above, a sports highlight video would include the shots of an actual game. You can either focus on the event of a single game or include clips from multiple games that were played in a genuine setup. If you want, you can highlight a particular player while making the video as well.
On the other hand, a skills video is mostly made to demonstrate the skills of a player and is not focused on the game. In fact, most of the skills videos are made outside of a real game setting. For instance, if you have mastered a skill or would like to demonstrate your game-related actions, then you can make a skills video. Some of these videos are also tutorial game-plays to teach others about a particular skill that they can master.
Use Excellent Video Editor to Make a Sports Highlight Video
If you want to come up with engaging and visually appealing highlight videos, then consider using a versatile video editor like Filmora. Equipped with several video editing tools, it will let you create a sports highlight video in no time. Since the tool has so many features, you can save your time in editing and come up with a new sports video in minutes.
- Filmora is extremely easy to use and runs on all the leading Windows and macOS versions without any issue.
- Using its inbuilt tools, you can clip out the most important events from a sports video or include them in your highlights.
- There are also features to change the motion and pace of the video (like fast forward or slow motion).
- You can also focus on any athlete and freeze a frame on a particular skill or action.
- Besides that, you can also add voiceovers in your sports highlight video, add media layers, use its inbuilt transitions, and fine-tune the overall aesthetics of your videos.
- There are also tons of filters and presets in Filmora that you can use to save your time in editing. You can work on videos of almost every format with seamless 4K support.
Why we picked it
- Options to import/export files in different formats
- Tons of features in one place (extremely easy to use)
- Split-screen support to include multiple events in a highlight video
How to Create a Sports Highlight Video with Filmora?
With the help of Filmora , anyone can create a sports video without even prior editing/designing experience. Firstly, you can install Filmora on your Windows or Mac by visiting its website and have the footage you wish to edit. Now, you can just follow these steps to work on your next sports highlight video.
Filmstock Stock Media Library ](https://filmstock.wondershare.com/creative-theme-sports?spm=rs.filmora%5Fweb&source%5Fchannel=seo%5Farticle )
Step 1: Add a video to Filmora
To start with, just launch Filmora on your computer and add the video that you wish to work on. You can just drag and drop the video to its interface or go to its Menu > File > Import Media to browse and load the file.
Step 2: Edit the Sports Video
In order to create a sports highlight video, the first thing that people do is trim any unwanted part. Once the video is loaded, you can view it on the timeline of the interface. Now, go to the timeline and get the trim tool to manually select the part of the video you wish to trim. After selecting the desired fragment, you can trim the clip or just delete it by clicking on their respective icons.
In the same way, you can also split your video and make other changes in it. You can also include multiple videos together and include them in your timeline as well.
If you are including multiple videos, then make sure they have the same dimensions and aspect ratio. For this, you can select the video, right-click on the timeline, and click on the crop icon. Now, select the same aspect ratio for the entire video to keep it uniform.
Most of the game highlights that we see have different speeds for various sections. That is, some actions would be fast-forwarded while some would be in slow motion. To apply this, simply select the section in the timeline, right-click, and go to the Speed and Duration settings. This will open a dedicated interface from where you can change the speed of the sports video.
Apart from manually setting the speed, you can also take the assistance of the custom speed options that are available in the timeline tools.
Step 3: Make Advanced Edits in your Sports Video
With the user-friendly interface of Filmora, you can do some basic edits and make a sports highlight video in minutes. Though, if you want to focus on some parts and make more changes, then you can use its advanced options as well.
For instance, in a highlight video, we often wish to freeze certain frames. To do this, just select a frame and use the “Freeze Frame” option from the timeline tools. You can even set the duration to freeze the selected frame.
If you have included clips from different videos, then you can apply all kinds of transitions from Filmora. In the end, you can go to its edit options and choose to close gaps as well.
To give your video a uniform and aesthetically pleasing appeal, you can also add different overlays and effects on it from Filmora’s library.
Lastly, make sure that you added sound or voiceover to your video. You can add a sound from its library or import any other music file to it. Since highlight videos mostly have voiceovers, you add the same by visiting the Record > Record Voiceover option.
Step 4: Export your video in the desired format
That’s it! Once your sports highlight video is ready, you can export it in different formats. Just go to the Export option and select the location to save the video and a preferred resolution. You can save your video in formats like MP4, WMV, AVI, FLV, MKV, and so on.
Expert Tips for Creating Highlight Videos
As you can see, making a sports highlight video with a tool like Filmora is extremely easy. Although to be a pro and make better videos, you can consider the following tips:
Keep it short
Make sure that you only include the highlights of the game in your video to keep it interesting. Your aim is to have a short and crisp video without any unwanted footage.
Use freeze frames and slow motion
Some games can be pretty fast-paced and the viewers might miss out on a few key details. To showcase them, you can freeze certain frames or apply slow motion.
Include other details
A sports highlight video can also be informative. You can include details about the players or the team at the start. Also, it is recommended to have sound or a voiceover in the background to narrate the events.
Pick the best clips
When you watch a game, make a note of the best moments that you know your viewers would enjoy. You can also focus on different skills that you found impressive and include them in your sports video.
I’m sure that after reading this guide, you would be able to come up with an impressive sports highlight video as well. Since you might need to make a lot of edits on a sports video, I would recommend using a diverse tool like Filmora. With the tons of editing options that it provides, you can easily create all sorts of highlight videos while saving your time and resources.
Richard Bennett
Richard Bennett is a writer and a lover of all things video.
Follow @Richard Bennett
How to Swiftly Excise Your Youtube Comment Spam
Deleting YouTube Comments
Richard Bennett
Mar 27, 2024• Proven solutions
YouTube is a video platform where people share informative and entertaining content. It works in the form of channels belonging to individuals or companies. People can subscribe to these channels to show support, and YouTubers create a strong sense of community with these subscribers.
But some people comment inappropriate comments that can cause the community harm and spread hatred. Many YouTubers may want to delete such remarks. There are also times when you accidentally comment on a channel’s comment section and may wish to delete it.
So how do you delete all YouTube comments? In this how-to blog, we will show you.
- Part 1: Deleting YouTube Comments from Desktop
- Part 2: Deleting All YouTube Comments from Mobile
- Part 3: How to Delete Your Comments from YouTube?
- part 4: Delete Other People’s Comments on Others’ Channels
- Part 5: Delete All Your Posted YouTube Comments
How to Delete YouTube Comments from Desktop?
In this section, we will tell you how you can do it from your desktop.
- Go tohttps://www.youtube.com/ from your desktop browser and log in.
- Once you log in, you need to go to your channel. For this, you can select the My Channel option from the upper-left side of your YouTube home page.
- From the list of your videos, select the one you need and scroll down to reach the comment you want to delete.
- When you locate the comment, click on the three vertical dots on the right-hand side of the comment. From the drop-down list, click on Remove. The process is complete, and YouTube will remove your comment.
You also have the option to report the comment or hide the user from your channel .
How to Delete All YouTube Comments from Mobile?
The steps to deleting someone else’s YouTube comments from your mobile are similar to those from your desktop.
- Log in to your account from the YouTube app on your phone.
- On the right-hand side of your YouTube homepage, there will be a profile icon. Tap on that, and from the list, select My Channel. This will direct you to all videos on your channel.
- Select the video from where you want to delete a comment. Scroll down to reach the desired comment.
- Once you reach the target comment, click on the three vertical dots at the bottom corner. There should be an option called Remove. Tap on it.
- This will create another dialog box on the mobile app where you have to click on Remove again to delete the comment.
How Do You Delete Your Comments from YouTube?
Have you accidentally posted something on a YouTuber’s channel? Are you anxious because you cannot find the comment and delete it?
Fear not. Read on to know how to delete all comments you posted on someone else’s YouTube channel from your desktop.
- Visithttps://www.youtube.com/ from your desktop and then sign in YouTube channel.
- If your YouTube account is not open, tap on Sign in and enter your email and password to log in to your account.
- Once there, you need to access your Comment History page. To do this, you can click on the three horizontal lines at the top left corner of your YouTube homepage. Click on History. On the page that opens, click Comments from the panel on the right. It will direct you to your Comment History page. You can also access the YouTube comment history fromhere .
- When you reach the Comment History page, you will be able to find all comments you have ever posted. Scroll down to the comment you want to delete.
- Click on the three vertical dots that you see beside the target comment. You will find a Delete option. Tap on it, and confirm that you want to delete the comment. That completes the process. No more embarrassing comments!
How Do You Delete Your Comments from Your Phone?
Don’t have a desktop handy? This section will tell you how you can delete your comments you posted on your or someone else’s YouTube video from your mobile.
- Go to the YouTube app on your phone. You will need to log in to your account to delete any comment you posted.
- When the login process is complete, you need to find the video where your target comment is.
If it is someone else’s video, you can search for it by clicking on the magnifying glass at the top of the homepage or check your YouTube History to find it. To access your History, you need to click on an option called Library at the bottom of the homepage. From there, you can find the History option.
If it is your video where the comment to be removed is, you can go to My Channel from the profile icon on the right-hand side of the YouTube app’s homepage.
- Once you locate the video, you need to find the comment you want to delete. On the YouTube app, you may need to scroll down for a while to do this.
- When you reach it, click on the three vertical dots at the bottom corner of your comment. You should see an option called Delete. Click on that. You need to confirm once more that you want to delete it, and the process will be complete.
Delete Other People’s Comments on Others’ Channels
Did you see a hate comment on your favorite creator’s video? Sadly, you cannot delete the comment. But, you can report it, and YouTube will hide or take it down.
You can do this both from your desktop or your phone with some easy steps.
How to report people’s comments on YouTube?
Go to https://www.youtube.com/ from your desktop or open the YouTube app from your phone. Log in to your account if it is not open.
- The next step is to find the video where the comment is. You can search for it by tapping on the search button at the top of the YouTube homepage. Or you can locate it from your YouTube History.
To find your History from your desktop, you need to click on the three horizontal lines at the top left corner of the homepage. You will find the History option from the list. To access it from your phone, click on the Library option at the bottom of your homepage, and it will open a list where you will find the History option.
- Open the video, and scroll down to locate the comment you want to report.
- Once you find your target comment, click on the three vertical dots that appear on its right side. You will find the Report option from the pop-up menu. Click on that.
- When you tap Report, another dialogue box will appear. From the list of options, choose the most appropriate option, tap on Report at the lower right corner of the pop-up, and complete the process. YouTube will do the rest.

How to Delete All Your Posted YouTube Comments?
You can also delete all comments you ever posted on any YouTube video by hiding your channel. When you do this, you can hide your video content temporarily. But it will irreversibly erase all your comments throughout YouTube. If you are curious, read on to know how you can do it.
- You need to go to YouTube from your desktop and sign in to your account.
- Next, you can either click on the profile icon at the top right corner or the three horizontal lines beside the YouTube logo on your homepage. From the list of options, click Settings.
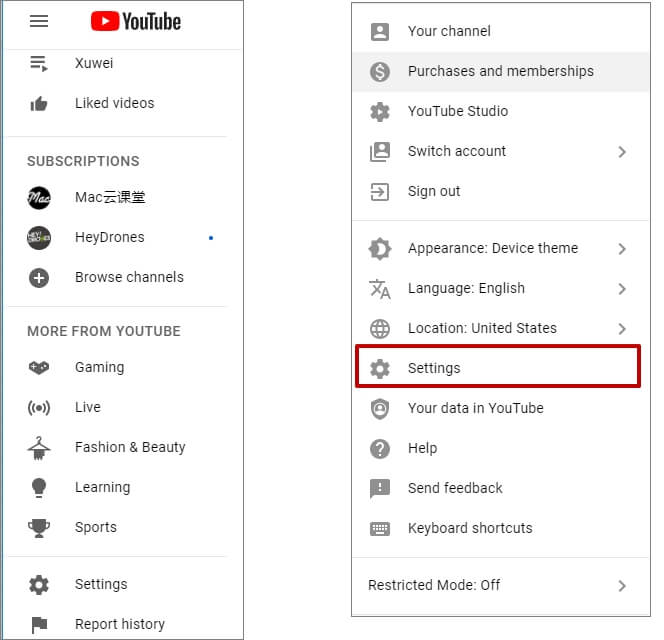
- YouTube will direct you to the Settings page of your account. Choose Advanced Settings from the list on your left. You can also access it fromhere .

- Scroll down and select Delete Channel. Clicking it will not delete your account. When you click on Delete Channel, you will get two choices – ‘I want to hide my channel’ and ‘I want to permanently delete my content’. Select the first.

- YouTube will now show you what will happen when you hide your channel. Check all the boxes to confirm that you understand, and then tap on Hide My Channel. YouTube will now delete all comments made by your account.
Final Thoughts
YouTube can be an unsafe place with unwanted comments everywhere. In this blog, we tried to show how you can get rid of comments on your and on others’ YouTube accounts. The next time you see an offensive comment or post something mistakenly, don’t forget to try our tips and make YouTube a safe platform again.
Richard Bennett
Richard Bennett is a writer and a lover of all things video.
Follow @Richard Bennett
Richard Bennett
Mar 27, 2024• Proven solutions
YouTube is a video platform where people share informative and entertaining content. It works in the form of channels belonging to individuals or companies. People can subscribe to these channels to show support, and YouTubers create a strong sense of community with these subscribers.
But some people comment inappropriate comments that can cause the community harm and spread hatred. Many YouTubers may want to delete such remarks. There are also times when you accidentally comment on a channel’s comment section and may wish to delete it.
So how do you delete all YouTube comments? In this how-to blog, we will show you.
- Part 1: Deleting YouTube Comments from Desktop
- Part 2: Deleting All YouTube Comments from Mobile
- Part 3: How to Delete Your Comments from YouTube?
- part 4: Delete Other People’s Comments on Others’ Channels
- Part 5: Delete All Your Posted YouTube Comments
How to Delete YouTube Comments from Desktop?
In this section, we will tell you how you can do it from your desktop.
- Go tohttps://www.youtube.com/ from your desktop browser and log in.
- Once you log in, you need to go to your channel. For this, you can select the My Channel option from the upper-left side of your YouTube home page.
- From the list of your videos, select the one you need and scroll down to reach the comment you want to delete.
- When you locate the comment, click on the three vertical dots on the right-hand side of the comment. From the drop-down list, click on Remove. The process is complete, and YouTube will remove your comment.
You also have the option to report the comment or hide the user from your channel .
How to Delete All YouTube Comments from Mobile?
The steps to deleting someone else’s YouTube comments from your mobile are similar to those from your desktop.
- Log in to your account from the YouTube app on your phone.
- On the right-hand side of your YouTube homepage, there will be a profile icon. Tap on that, and from the list, select My Channel. This will direct you to all videos on your channel.
- Select the video from where you want to delete a comment. Scroll down to reach the desired comment.
- Once you reach the target comment, click on the three vertical dots at the bottom corner. There should be an option called Remove. Tap on it.
- This will create another dialog box on the mobile app where you have to click on Remove again to delete the comment.
How Do You Delete Your Comments from YouTube?
Have you accidentally posted something on a YouTuber’s channel? Are you anxious because you cannot find the comment and delete it?
Fear not. Read on to know how to delete all comments you posted on someone else’s YouTube channel from your desktop.
- Visithttps://www.youtube.com/ from your desktop and then sign in YouTube channel.
- If your YouTube account is not open, tap on Sign in and enter your email and password to log in to your account.
- Once there, you need to access your Comment History page. To do this, you can click on the three horizontal lines at the top left corner of your YouTube homepage. Click on History. On the page that opens, click Comments from the panel on the right. It will direct you to your Comment History page. You can also access the YouTube comment history fromhere .
- When you reach the Comment History page, you will be able to find all comments you have ever posted. Scroll down to the comment you want to delete.
- Click on the three vertical dots that you see beside the target comment. You will find a Delete option. Tap on it, and confirm that you want to delete the comment. That completes the process. No more embarrassing comments!
How Do You Delete Your Comments from Your Phone?
Don’t have a desktop handy? This section will tell you how you can delete your comments you posted on your or someone else’s YouTube video from your mobile.
- Go to the YouTube app on your phone. You will need to log in to your account to delete any comment you posted.
- When the login process is complete, you need to find the video where your target comment is.
If it is someone else’s video, you can search for it by clicking on the magnifying glass at the top of the homepage or check your YouTube History to find it. To access your History, you need to click on an option called Library at the bottom of the homepage. From there, you can find the History option.
If it is your video where the comment to be removed is, you can go to My Channel from the profile icon on the right-hand side of the YouTube app’s homepage.
- Once you locate the video, you need to find the comment you want to delete. On the YouTube app, you may need to scroll down for a while to do this.
- When you reach it, click on the three vertical dots at the bottom corner of your comment. You should see an option called Delete. Click on that. You need to confirm once more that you want to delete it, and the process will be complete.
Delete Other People’s Comments on Others’ Channels
Did you see a hate comment on your favorite creator’s video? Sadly, you cannot delete the comment. But, you can report it, and YouTube will hide or take it down.
You can do this both from your desktop or your phone with some easy steps.
How to report people’s comments on YouTube?
Go to https://www.youtube.com/ from your desktop or open the YouTube app from your phone. Log in to your account if it is not open.
- The next step is to find the video where the comment is. You can search for it by tapping on the search button at the top of the YouTube homepage. Or you can locate it from your YouTube History.
To find your History from your desktop, you need to click on the three horizontal lines at the top left corner of the homepage. You will find the History option from the list. To access it from your phone, click on the Library option at the bottom of your homepage, and it will open a list where you will find the History option.
- Open the video, and scroll down to locate the comment you want to report.
- Once you find your target comment, click on the three vertical dots that appear on its right side. You will find the Report option from the pop-up menu. Click on that.
- When you tap Report, another dialogue box will appear. From the list of options, choose the most appropriate option, tap on Report at the lower right corner of the pop-up, and complete the process. YouTube will do the rest.
How to Delete All Your Posted YouTube Comments?
You can also delete all comments you ever posted on any YouTube video by hiding your channel. When you do this, you can hide your video content temporarily. But it will irreversibly erase all your comments throughout YouTube. If you are curious, read on to know how you can do it.
- You need to go to YouTube from your desktop and sign in to your account.
- Next, you can either click on the profile icon at the top right corner or the three horizontal lines beside the YouTube logo on your homepage. From the list of options, click Settings.
- YouTube will direct you to the Settings page of your account. Choose Advanced Settings from the list on your left. You can also access it fromhere .
- Scroll down and select Delete Channel. Clicking it will not delete your account. When you click on Delete Channel, you will get two choices – ‘I want to hide my channel’ and ‘I want to permanently delete my content’. Select the first.
- YouTube will now show you what will happen when you hide your channel. Check all the boxes to confirm that you understand, and then tap on Hide My Channel. YouTube will now delete all comments made by your account.
Final Thoughts
YouTube can be an unsafe place with unwanted comments everywhere. In this blog, we tried to show how you can get rid of comments on your and on others’ YouTube accounts. The next time you see an offensive comment or post something mistakenly, don’t forget to try our tips and make YouTube a safe platform again.
Richard Bennett
Richard Bennett is a writer and a lover of all things video.
Follow @Richard Bennett
Also read:
- 2024 Approved Boost Engagement with Creative Video Titling and Tagging Techniques
- __Warranty and Lifespan Higher Quality LED Systems May Come with a Higher Upfront Price but Can Offer Longer Lifespans and Better Performance, Which Should Be Considered in the Overall Cost Evaluation
- The Visionary Viewers' Verdict Your Channel Vs. Contenders’ Content
- [New] Beginner's Guide to Pro YouTube Tech
- The Ultimate Guide to Vlogging with 12 Best Flip-Screen Cameras
- 2024 Approved Charting Your Course From Creator to Major Label
- [New] 12 Proven Ways to Increase YouTube Views You Should Try
- In 2024, Best Practices for Adding Content Enhancements (Cards)
- Download YouTube Videos Directly
- Elevate Video Rankings Proven YouTube SEO Solutions
- Maximize Engagement with These 9 YouTube Thumbnail Creators
- In 2024, Bridging YouTube and iMovie with Seamless Audio Transfer
- Leading Free Platforms for YouTube Openings
- Navigating Ad-Blocking in Chrome, Firefox, Android, & iOS for YouTube
- Platforms Showcasing Google's Video Partner Program
- Skyrocketing Earnings Through Video Affiliates
- [New] Essential Film Techniques on YouTube by Future Visionaries
- Breakdown of Earnings How Much Does a Clicky Make?
- [Updated] Efficient Content Curation Steps Towards a Well-Organized 'Watch Later' Playlist
- [Updated] Discover the Top 30 FreeFire Hashtags for Amplifying Video Growth
- In 2024, 7 Energizing YouTube Exercise Challenges for Viewers' Participation
- Keep Your Videos Secure - YouTube-to-MP4 Downloading Safely
- [New] Discover The Very Best 10 Yoga Educational Outlets
- Ideal Screen Recorder Picks for Digital Educators
- Top Video Watch Counts YouTube's Historical List
- [Updated] Building a Channel Team-Up Videography Guide
- 2024 Approved Beginner's Guide to Budget-Friendly Webinars Using YouTube
- Choosing Android's Favorite Free/Paid Video Tile Tools #8 Ranked
- [Updated] Prime Framing Features on Mac (Max Length 156)
- In 2024, How To Create an Apple Developer Account On iPhone 13 mini
- [New] 2024 Approved Quick & Easy Conducting Instagram Stories Polls Today
- How to Turn Off Google Location to Stop Tracking You on Motorola Moto G Stylus (2023) | Dr.fone
- Updated How to Remove Audio From Videos with FFmpeg?
- [Updated] 2024 Approved Breaking Down Vimeo Streaming Giant's Secrets Revealed
- New PC Video Editing Made Easy VN Editor Review for 2024
- In 2024, Forgot iPhone 14 Backup Password? Heres What to Do
- How to Transfer Data from Infinix Zero 30 5G to BlackBerry | Dr.fone
- Three Solutions to Hard Reset Itel A60s? | Dr.fone
- In 2024, A Comprehensive Guide to Apple iPhone 8 Plus Blacklist Removal Tips and Tools
- Updated In 2024, Essential Audio Workstation Applications on Chrome OS for Aspiring Musicians
- The Ins and Outs of Firefox Picture-in-Picture
- [Updated] A Complete List Where to Find High-Quality Music Files
- [New] In 2024, Twitter Livestreaming A Comprehensive Guide
- What is Fake GPS Location Pro and Is It Good On Poco M6 5G? | Dr.fone
- 4 Most-Known Ways to Find Someone on Tinder For Samsung Galaxy A54 5G by Name | Dr.fone
- [Updated] In 2024, Culinary Crossroads Global Flavors Unleashed
- Title: [Updated] A Beginner's Roadmap to Professional Sports Edits
- Author: Kevin
- Created at : 2024-05-25 16:35:12
- Updated at : 2024-05-26 16:35:12
- Link: https://youtube-videos.techidaily.com/updated-a-beginners-roadmap-to-professional-sports-edits/
- License: This work is licensed under CC BY-NC-SA 4.0.
