
![[Updated] 5 Critical Equipment Items to Start Your Channel Right](https://www.lifewire.com/thmb/A9pTD5g1g1cUZKr7a5KggfD1txU=/400x300/filters:no_upscale():max_bytes(150000):strip_icc()/142020133-56a1048d5f9b58eba4b6aebe.jpg)
[Updated] 5 Critical Equipment Items to Start Your Channel Right
5 Critical Equipment Items to Start Your Channel Right
Essential YouTube Equipment For Starting Your Channel - What Do You Really Need?

Richard Bennett
Oct 26, 2023• Proven solutions
Check out our most updated guide on this topic: YouTube Equipment Starter Guide For Beginners .
The first thing to make sure of before starting a YouTube channel is having all that you need to record and upload high-quality videos regularly. That doesn’t mean you have to take out a loan and spend thousands to purchase a brand new camera and all other gadgets that professional filmmakers use.
The smartest way to get started is to go through a list of necessary equipment for YouTube and check whether or not you already own some of it. Once your channel starts growing, you can then start thinking about whether you want to invest in upgraded equipment. Here is a quick overview of all items that you need to start entertaining your online audience and gaining subscribers to your YouTube channel:
- Your YouTube Camera
- Microphones and Audio
- Lighting Gear for YouTube
- Tripods and Camera Stands
- Smartphone Camera Gear
YouTube Cameras
The short version: Use whatever you already have, even if it’s your phone or webcam. It’s nice to have sharp, fine-tuned, 4K footage, but viewers will forgive lower visual quality if your content is good.
The long version: You will need a camera, but there are a lot of different devices you can use including DSLRs, point and shoots, webcams, and your smartphone.
Your choice of camera will have a tremendous impact on the visual quality of your content and might drive your decisions regarding other pieces of equipment. However, you shouldn’t feel obliged to work with a top-notch camera from day one, especially since cheaper options can produce great results if used the right way.
On one end of the spectrum, you have basic smartphone cameras and web cameras, which are easy to come by and simple to operate. These days, high-end phones come equipped with quite powerful cameras that are more than sufficient for the needs of the average YouTuber. Better webcams can also do the job, although high-performance webcam models can get pretty expensive too. It is probably wise to resist the urge to start broadcasting with the built-in camera in your laptop and at least get a webcam or use your phone, but your computer’s camera is still always an option. Not having a better camera should never stop you from making YouTube videos.
If you already have a DSLR camera then it’s a good idea to familiarize yourself with it. You have far more freedom to adjust the settings and achieve a professional look for your videos with a DSLR, but that does mean it’ll take some time to become an expert at using it. Ultra-high resolution is not required for YouTube, but it certainly won’t hurt to have additional sharpness and more detail in the scene. If you’re shopping for a DSLR, look for one with a flip screen that allows you to quickly check what your viewers see.
YouTube Microphone and Audio
The short version: Audio quality is extremely important. If you can buy either a new camera or an external microphone, but not both, it might be better to go for the microphone. Click here for advice on upping your audio quality without an external microphone.
The long version: Sound capturing is every bit as important for your success as your video feed. In fact, poor audio can be even more damaging to your subscriber count than grainy video, since people won’t spend their time listening to something they have to put effort into understanding.
Again, most YouTube video makers have a limited budget at their disposal, so professional microphones are mostly off the table. However, investing in a directional microphone (‘shotgun mic’) that can pick up your voice clearly and without background noise is certainly a smart move. Such microphones can be pointed towards you while you speak, and since most YouTubers sit still while doing their shows there won’t be too much need for in-session adjustments.
If you’re not ready to invest in a shotgun mic, you can also find very inexpensive (often under $20) LAV mics. These small microphones can be pinned to your shirt, which allows them to record very clear dialogue because they’re so close to your mouth.
Lights for YouTube
The short version: You need as much light as you can get. Lighting kits can be affordable on Amazon, but you can also achieve a great look using daylight/windows and ‘daylight’ lightbulbs.
The long version: If you’ve ever tried to make a video indoors, you already know that it’s necessary to have additional light. Often just filming with the normal lights in a room will cause your footage to look dark and grainy, and possibly be tinted orange. To overcome these problems you need to increase the amount of light you have available.
Sometimes, it is enough to film near windows and/or bring more household lamps into your filming area. For any household lamps or lighting fixtures you use, make sure to put in white or ‘daylight’ lightbulbs instead of using the orange/tungsten bulbs that you might have for everyday use (this is how you avoid tinting things orange).
If you have the budget available to get some lighting equipment, you can find softbox lights or LED panel lights available fairly inexpensively online. Softbox lights are great because they provide even, diffused, light.
Another useful piece of lighting equipment to have is a reflector. A reflector is usually a piece of white, silver, or gold fabric stretched over a frame. You can use it to bounce light from one light source back towards yourself (this is a great way to fill shadows cast by your main light). Reflectors tend to be inexpensive, but you can also use white cardboard or tinfoil in place of purchasing a reflector.
Tripods and Camera Stands
The short version: You need something to hold your camera. If you mostly film in your own home that can be a desk or a stack of books, but if you make a lot of videos while you’re on the go you probably need a tripod or gimbal. Heavier cameras need heavier tripods.
The long version: While handheld cameras can deliver solid results for vloggers and casual streamers, viewers do expect reasonably stable footage. For many types of videos, the camera needs to be completely still and flatly positioned on a horizontal plane. Tripods and camera stands can cost very little, so it’s a good idea to look into getting some kind of stabilizer.
When you are choosing a tripod, pay attention to how much it weighs. If the camera that needs to be mounted on it is very heavy (like some DSLR models), you want to ensure that the structure itself weighs enough not to be easily tipped over. Too thin tripods can put your camera at risk, and that’s the last thing you want. Smaller cameras such as GoPros are more flexible in this regard and can be placed on a wider range of tripods.
Even if you are using a phone or a webcam to record YouTube videos, you should consider mounting the device on a stable stand. It is possible to find mini tripods ideal for smartphones for as little as $10. These tripods are small enough to carry in your pocket, so you will be prepared to start making a video no matter where your adventures take you. If you are using a web camera, you should attach it to the stand so that it won’t move accidentally after you touch the surface it is placed on.
Smartphone Camera Gear
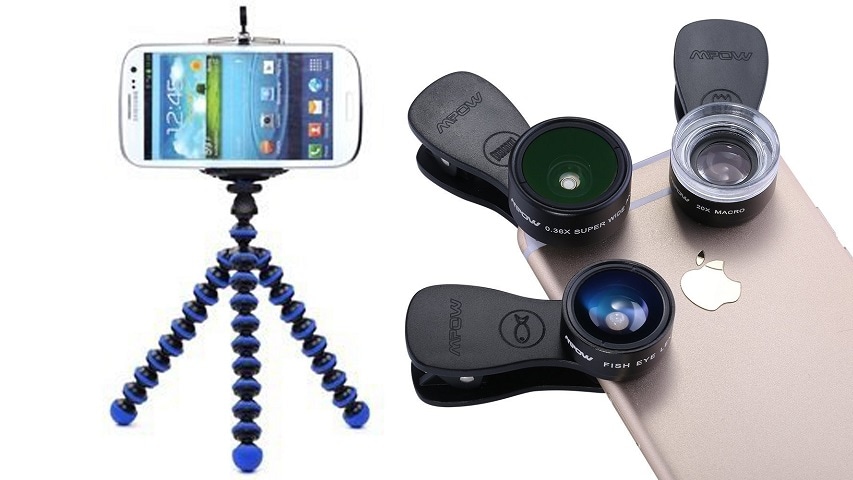
The short version: There’s a lot of gear out there designed with smartphone photos and videos in mind, including clip-on lenses, tripod mounts, phone-mounted LED lights, and inexpensive microphones that plug into the audio jack.
The long version: Recording your videos with a mobile phone can be a good decision. It all depends on the phone you have and the range of add-ons and apps that you complement it with. Almost every high-end model released in the past five years can shoot videos in 1080p or higher. Some can even produce 4K footage. If you perfect your smartphone filming technique, your YouTube videos could look as if they were made with pro equipment.
On the flip side, smartphone cameras typically perform poorly in low light. It is possible to download an app that lets you play around with settings to overcome this, but a phone-mounted LED light is probably a better solution. An external microphone might also be a necessity, but there are some good (inexpensive) options that can simply be plugged in through the headphone jack.
Another common downside of smartphone cameras is that most of them use digital zoom, which is vastly inferior to optical zoom. If you intend to shoot anything that’s further away than a few feet, you need a clip-on lens that goes on top of the built-in camera. This inexpensive device will give you a lot of freedom to work in space, and allow you to make spectacular shots even without high-end YouTube equipment.
Equipment with Easy-to-Use Video Editor


Richard Bennett
Richard Bennett is a writer and a lover of all things video.
Follow @Richard Bennett
Richard Bennett
Oct 26, 2023• Proven solutions
Check out our most updated guide on this topic: YouTube Equipment Starter Guide For Beginners .
The first thing to make sure of before starting a YouTube channel is having all that you need to record and upload high-quality videos regularly. That doesn’t mean you have to take out a loan and spend thousands to purchase a brand new camera and all other gadgets that professional filmmakers use.
The smartest way to get started is to go through a list of necessary equipment for YouTube and check whether or not you already own some of it. Once your channel starts growing, you can then start thinking about whether you want to invest in upgraded equipment. Here is a quick overview of all items that you need to start entertaining your online audience and gaining subscribers to your YouTube channel:
- Your YouTube Camera
- Microphones and Audio
- Lighting Gear for YouTube
- Tripods and Camera Stands
- Smartphone Camera Gear
YouTube Cameras
The short version: Use whatever you already have, even if it’s your phone or webcam. It’s nice to have sharp, fine-tuned, 4K footage, but viewers will forgive lower visual quality if your content is good.
The long version: You will need a camera, but there are a lot of different devices you can use including DSLRs, point and shoots, webcams, and your smartphone.
Your choice of camera will have a tremendous impact on the visual quality of your content and might drive your decisions regarding other pieces of equipment. However, you shouldn’t feel obliged to work with a top-notch camera from day one, especially since cheaper options can produce great results if used the right way.
On one end of the spectrum, you have basic smartphone cameras and web cameras, which are easy to come by and simple to operate. These days, high-end phones come equipped with quite powerful cameras that are more than sufficient for the needs of the average YouTuber. Better webcams can also do the job, although high-performance webcam models can get pretty expensive too. It is probably wise to resist the urge to start broadcasting with the built-in camera in your laptop and at least get a webcam or use your phone, but your computer’s camera is still always an option. Not having a better camera should never stop you from making YouTube videos.
If you already have a DSLR camera then it’s a good idea to familiarize yourself with it. You have far more freedom to adjust the settings and achieve a professional look for your videos with a DSLR, but that does mean it’ll take some time to become an expert at using it. Ultra-high resolution is not required for YouTube, but it certainly won’t hurt to have additional sharpness and more detail in the scene. If you’re shopping for a DSLR, look for one with a flip screen that allows you to quickly check what your viewers see.
YouTube Microphone and Audio
The short version: Audio quality is extremely important. If you can buy either a new camera or an external microphone, but not both, it might be better to go for the microphone. Click here for advice on upping your audio quality without an external microphone.
The long version: Sound capturing is every bit as important for your success as your video feed. In fact, poor audio can be even more damaging to your subscriber count than grainy video, since people won’t spend their time listening to something they have to put effort into understanding.
Again, most YouTube video makers have a limited budget at their disposal, so professional microphones are mostly off the table. However, investing in a directional microphone (‘shotgun mic’) that can pick up your voice clearly and without background noise is certainly a smart move. Such microphones can be pointed towards you while you speak, and since most YouTubers sit still while doing their shows there won’t be too much need for in-session adjustments.
If you’re not ready to invest in a shotgun mic, you can also find very inexpensive (often under $20) LAV mics. These small microphones can be pinned to your shirt, which allows them to record very clear dialogue because they’re so close to your mouth.
Lights for YouTube
The short version: You need as much light as you can get. Lighting kits can be affordable on Amazon, but you can also achieve a great look using daylight/windows and ‘daylight’ lightbulbs.
The long version: If you’ve ever tried to make a video indoors, you already know that it’s necessary to have additional light. Often just filming with the normal lights in a room will cause your footage to look dark and grainy, and possibly be tinted orange. To overcome these problems you need to increase the amount of light you have available.
Sometimes, it is enough to film near windows and/or bring more household lamps into your filming area. For any household lamps or lighting fixtures you use, make sure to put in white or ‘daylight’ lightbulbs instead of using the orange/tungsten bulbs that you might have for everyday use (this is how you avoid tinting things orange).
If you have the budget available to get some lighting equipment, you can find softbox lights or LED panel lights available fairly inexpensively online. Softbox lights are great because they provide even, diffused, light.
Another useful piece of lighting equipment to have is a reflector. A reflector is usually a piece of white, silver, or gold fabric stretched over a frame. You can use it to bounce light from one light source back towards yourself (this is a great way to fill shadows cast by your main light). Reflectors tend to be inexpensive, but you can also use white cardboard or tinfoil in place of purchasing a reflector.
Tripods and Camera Stands
The short version: You need something to hold your camera. If you mostly film in your own home that can be a desk or a stack of books, but if you make a lot of videos while you’re on the go you probably need a tripod or gimbal. Heavier cameras need heavier tripods.
The long version: While handheld cameras can deliver solid results for vloggers and casual streamers, viewers do expect reasonably stable footage. For many types of videos, the camera needs to be completely still and flatly positioned on a horizontal plane. Tripods and camera stands can cost very little, so it’s a good idea to look into getting some kind of stabilizer.
When you are choosing a tripod, pay attention to how much it weighs. If the camera that needs to be mounted on it is very heavy (like some DSLR models), you want to ensure that the structure itself weighs enough not to be easily tipped over. Too thin tripods can put your camera at risk, and that’s the last thing you want. Smaller cameras such as GoPros are more flexible in this regard and can be placed on a wider range of tripods.
Even if you are using a phone or a webcam to record YouTube videos, you should consider mounting the device on a stable stand. It is possible to find mini tripods ideal for smartphones for as little as $10. These tripods are small enough to carry in your pocket, so you will be prepared to start making a video no matter where your adventures take you. If you are using a web camera, you should attach it to the stand so that it won’t move accidentally after you touch the surface it is placed on.
Smartphone Camera Gear
The short version: There’s a lot of gear out there designed with smartphone photos and videos in mind, including clip-on lenses, tripod mounts, phone-mounted LED lights, and inexpensive microphones that plug into the audio jack.
The long version: Recording your videos with a mobile phone can be a good decision. It all depends on the phone you have and the range of add-ons and apps that you complement it with. Almost every high-end model released in the past five years can shoot videos in 1080p or higher. Some can even produce 4K footage. If you perfect your smartphone filming technique, your YouTube videos could look as if they were made with pro equipment.
On the flip side, smartphone cameras typically perform poorly in low light. It is possible to download an app that lets you play around with settings to overcome this, but a phone-mounted LED light is probably a better solution. An external microphone might also be a necessity, but there are some good (inexpensive) options that can simply be plugged in through the headphone jack.
Another common downside of smartphone cameras is that most of them use digital zoom, which is vastly inferior to optical zoom. If you intend to shoot anything that’s further away than a few feet, you need a clip-on lens that goes on top of the built-in camera. This inexpensive device will give you a lot of freedom to work in space, and allow you to make spectacular shots even without high-end YouTube equipment.
Equipment with Easy-to-Use Video Editor
Richard Bennett
Richard Bennett is a writer and a lover of all things video.
Follow @Richard Bennett
Watch What You Liked No More: Unveiling YT Deletions Online
How to Watch Deleted YouTube Videos Online in 2 Ways | Ultimate Guide
Richard Bennett
Mar 27, 2024• Proven solutions
YouTube features a wide variety of corporate and user-generated content ranging from music to DIY videos. Along with all this massive inflow, there are scenarios where the video content that you like or wanted to watch gets deleted for any reason. Either the uploading channel deleted the video, or YouTube sometimes deletes videos for violating any of the platform’s rules – showing the dismal message “We’re sorry, this video is no longer available”. You’ll be thinking it is probably impossible to access deleted YouTube videos that you wanted to watch so badly. Though it may be true to some extent, in reality, nothing gets deleted from the internet. To help you watch deleted YouTube videos, we’ll dive into the two most handy methods down below. So, let get started.
You might be interested in How to Make a Playlist of Uploaded Videos and Others’ Video on YouTube>>>
- Part 1: Watch Deleted YouTube Videos with a URL
- Part 2: Watch Deleted YouTube Videos without a URL
- Part 3: Bonus Tip—Make Your Own YouTube Video with Wondershare FilmoraX
Part 1: Watch Deleted YouTube Videos with a URL
Internet Archive(known as the Wayback Machine) is a website archival system that has been collecting and cataloging websites since 1996. This means the system has effectively saved the site’s current layout and data. This enormous world archive of the Web’s past has amassed over 100 terabytes of storage with around 10 billion web pages.
On the archive.org website, you can find many of your favorite web site’s “snapshot” at a time in the past. For our case, we need to find and watch deleted YouTube videos, so for that, all we need is the link of the video, and we can most probably find it on archive.org. The steps for finding and restoring deleted YouTube videos are simple and as follows.
1. First of all, find the URL in your YouTube email, channel account if you’re searching for your uploaded video. You can find the link in browser history, in YouTube history, or you may have shared the link on social media.
If you want to watch a deleted YouTube video using the Wayback Machine, you must find the link to the video you want to access; without the URL, you won’t be able to access the deleted YouTube video.
2. Head over to the archive.org website and paste the YouTube video URL in the search bar and press return.

3. Once you find your video on the internet archive, you can see the details of the video.
4. You won’t be able to play the video directly, but you should be able to download it. Right, click the video to find the option to download the video.

This method works mostly as the Wayback machine is pretty active and regularly crawls the web to archive the sites. But sometimes, this method may not work and would require a more sophisticated way to watch deleted YouTube videos.
Part 2: Watch Deleted YouTube Videos without a URL
But what if you don’t have a URL for the deleted YouTube video? The internet is a global village network. Everything on the internet is connected, and that connection makes it more useful for example, even though a YouTube video might be deleted, you can somehow access and watch the deleted YouTube videos without a URL because people always replicate videos and share them on other YouTube channels or social media platforms. To make sure you get to watch your favorite YouTube video again, we will dive into the vast internet and find the deleted YouTube videos.
This method can be a bit complicated and would require you to give full attention to find the video you want to watch that badly that you’ve landed on this article.
1. Open a new tab in your browser and go to the Google search bar. We’re going to employ a technique from the SEO expert’s toolbox – Google Search Operators.
2. In the search bar, type “site:www.youtube.com + name Of TheVideo”
3. This way Google will crawl all the name relevant videos only from the YouTube databases and move us closer to finding our deleted YouTube video.
4. If you know the video was shared by someone on Facebook or any other social media platform, you can change the site URL in the search bar, replacing YouTube with Facebook, for example.
5. Once you find the video URL, you can simply go back to the first method that we discussed and paste the URL into the internet archive. The archive will give you the video and you can enjoy watching a deleted YouTube video.
Note: If you still cannot find the video using this method, I’m sorry to tell you the video may be completely deleted from the server, and you cannot access it anymore.
Part 3: Bonus Tip—Make Your Own YouTube Video with Wondershare Filmora
Want to make a YouTube video again? Wondershare Filmora is a relatively lightweight and powerful platform you get an intuitive interface and the power to create wonderful, unique content. To help you make your own YouTube video with Filmora, we’ll go through a short introduction of the flow and features first:
- Organize media with folders and projects
- Cutting and trimming raw footage
- Unlimited Layering
- Visual effects and filters
- Attach/detach audio and music
- Add creative text and icons with a wide range of templates to choose from
- Advanced color correction tools
- Export videos to YouTube directly and support various output formats
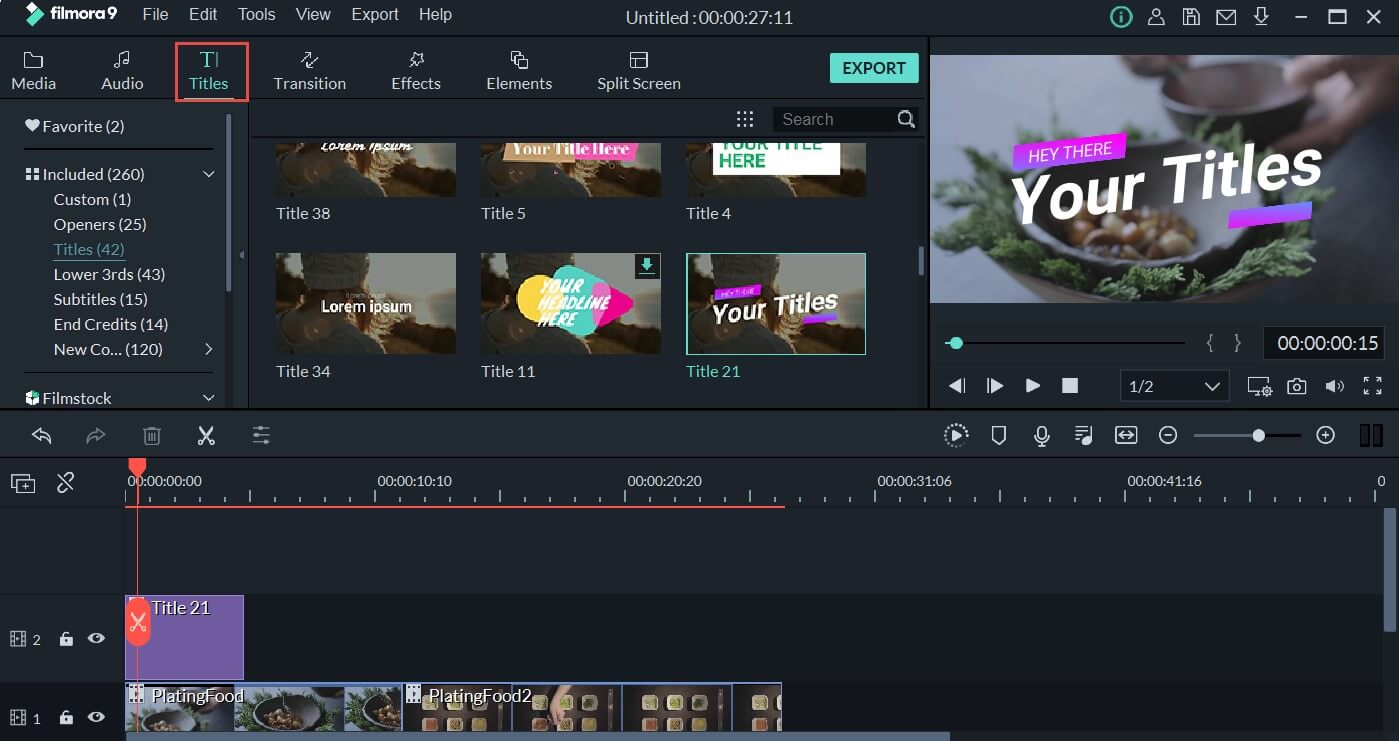
Make a YouTube video with several clicks using Wondershare Filmora:
1. Download and install Wondershare Filmora on your computer by tapping the download wizard below. Remember to join the Wondershare Video Community to connect with other video creators.
2. Launch Wondershare Filmora, add your videos to the Media Library. And you’ll also be greeted with a sleek and simple interface with controls for everything such as transitions, titles, layering clips, soundtrack, and more.

3. Add your video to the timeline, then go to the Titles tab, and you will see hundreds of titles and text templates. Select the template you love and add it to the video.
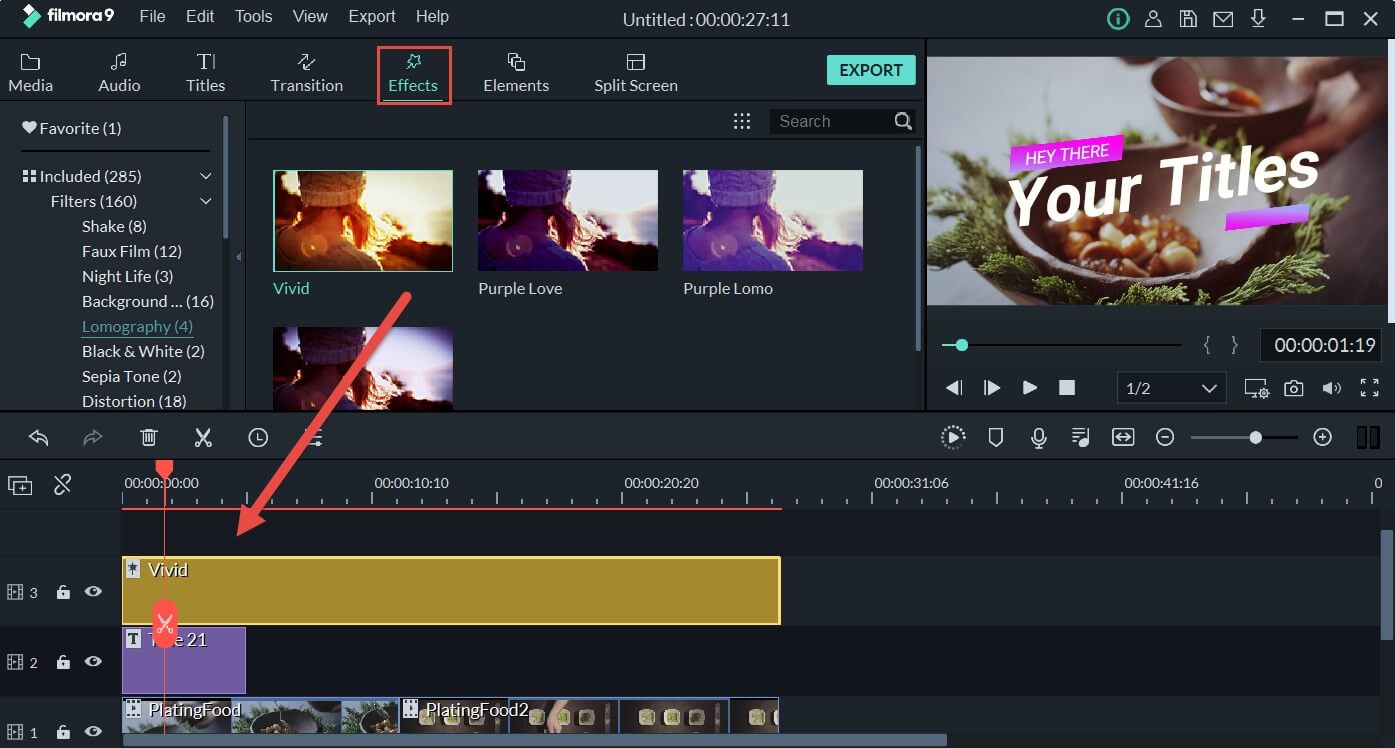
4. Then you can also go to the Effects tab and apply astonishing filters to the video
5. Once you’re done, you can click Export and upload your video to YouTube directly.
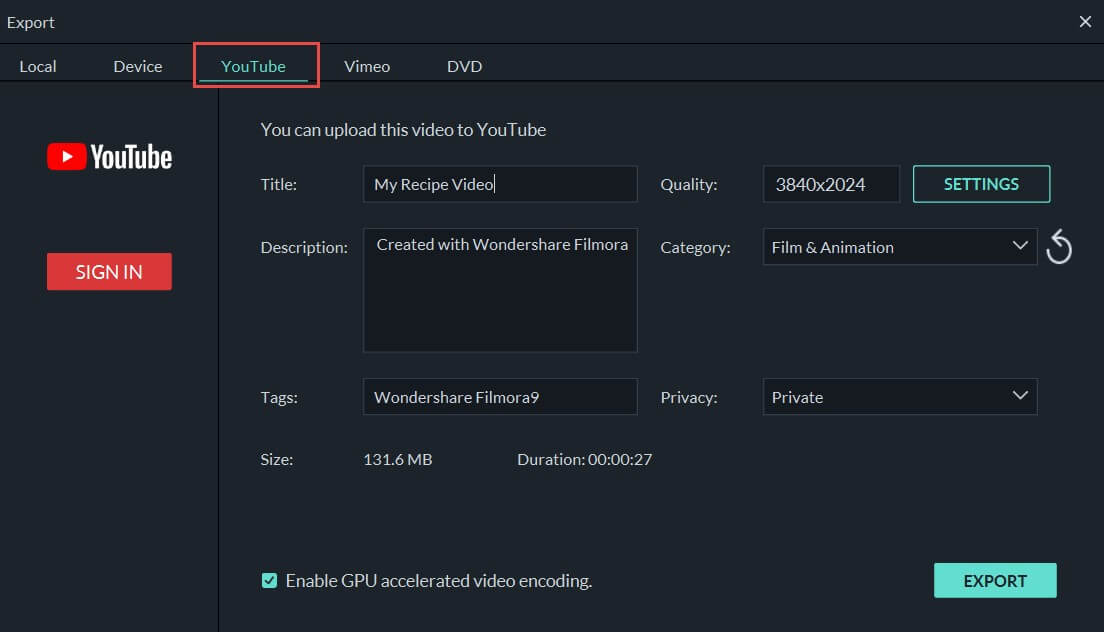
The free version will have a watermark on the exported video.
There’s nothing more delightful than to put your skills to work and save time by using Filmora. The time you save can be put into making more content and editing videos to boast of your creativity to friends.
Conclusion
YouTube has immersed so much in our day-to-day life that on average a mobile viewing session lasts more than 40 mins. To satiate our thirst for video content, YouTube has become the sole free platform. But even if your favorite song or movie gets deleted, you don’t have to worry as I’ve compiled the best solution to watch deleted YouTube videos and even be able to restore deleted YouTube videos to relish watching them with your friends and family. Leave your comments below if you love this article.
Richard Bennett
Richard Bennett is a writer and a lover of all things video.
Follow @Richard Bennett
Richard Bennett
Mar 27, 2024• Proven solutions
YouTube features a wide variety of corporate and user-generated content ranging from music to DIY videos. Along with all this massive inflow, there are scenarios where the video content that you like or wanted to watch gets deleted for any reason. Either the uploading channel deleted the video, or YouTube sometimes deletes videos for violating any of the platform’s rules – showing the dismal message “We’re sorry, this video is no longer available”. You’ll be thinking it is probably impossible to access deleted YouTube videos that you wanted to watch so badly. Though it may be true to some extent, in reality, nothing gets deleted from the internet. To help you watch deleted YouTube videos, we’ll dive into the two most handy methods down below. So, let get started.
You might be interested in How to Make a Playlist of Uploaded Videos and Others’ Video on YouTube>>>
- Part 1: Watch Deleted YouTube Videos with a URL
- Part 2: Watch Deleted YouTube Videos without a URL
- Part 3: Bonus Tip—Make Your Own YouTube Video with Wondershare FilmoraX
Part 1: Watch Deleted YouTube Videos with a URL
Internet Archive(known as the Wayback Machine) is a website archival system that has been collecting and cataloging websites since 1996. This means the system has effectively saved the site’s current layout and data. This enormous world archive of the Web’s past has amassed over 100 terabytes of storage with around 10 billion web pages.
On the archive.org website, you can find many of your favorite web site’s “snapshot” at a time in the past. For our case, we need to find and watch deleted YouTube videos, so for that, all we need is the link of the video, and we can most probably find it on archive.org. The steps for finding and restoring deleted YouTube videos are simple and as follows.
1. First of all, find the URL in your YouTube email, channel account if you’re searching for your uploaded video. You can find the link in browser history, in YouTube history, or you may have shared the link on social media.
If you want to watch a deleted YouTube video using the Wayback Machine, you must find the link to the video you want to access; without the URL, you won’t be able to access the deleted YouTube video.
2. Head over to the archive.org website and paste the YouTube video URL in the search bar and press return.
3. Once you find your video on the internet archive, you can see the details of the video.
4. You won’t be able to play the video directly, but you should be able to download it. Right, click the video to find the option to download the video.
This method works mostly as the Wayback machine is pretty active and regularly crawls the web to archive the sites. But sometimes, this method may not work and would require a more sophisticated way to watch deleted YouTube videos.
Part 2: Watch Deleted YouTube Videos without a URL
But what if you don’t have a URL for the deleted YouTube video? The internet is a global village network. Everything on the internet is connected, and that connection makes it more useful for example, even though a YouTube video might be deleted, you can somehow access and watch the deleted YouTube videos without a URL because people always replicate videos and share them on other YouTube channels or social media platforms. To make sure you get to watch your favorite YouTube video again, we will dive into the vast internet and find the deleted YouTube videos.
This method can be a bit complicated and would require you to give full attention to find the video you want to watch that badly that you’ve landed on this article.
1. Open a new tab in your browser and go to the Google search bar. We’re going to employ a technique from the SEO expert’s toolbox – Google Search Operators.
2. In the search bar, type “site:www.youtube.com + name Of TheVideo”
3. This way Google will crawl all the name relevant videos only from the YouTube databases and move us closer to finding our deleted YouTube video.
4. If you know the video was shared by someone on Facebook or any other social media platform, you can change the site URL in the search bar, replacing YouTube with Facebook, for example.
5. Once you find the video URL, you can simply go back to the first method that we discussed and paste the URL into the internet archive. The archive will give you the video and you can enjoy watching a deleted YouTube video.
Note: If you still cannot find the video using this method, I’m sorry to tell you the video may be completely deleted from the server, and you cannot access it anymore.
Part 3: Bonus Tip—Make Your Own YouTube Video with Wondershare Filmora
Want to make a YouTube video again? Wondershare Filmora is a relatively lightweight and powerful platform you get an intuitive interface and the power to create wonderful, unique content. To help you make your own YouTube video with Filmora, we’ll go through a short introduction of the flow and features first:
- Organize media with folders and projects
- Cutting and trimming raw footage
- Unlimited Layering
- Visual effects and filters
- Attach/detach audio and music
- Add creative text and icons with a wide range of templates to choose from
- Advanced color correction tools
- Export videos to YouTube directly and support various output formats
Make a YouTube video with several clicks using Wondershare Filmora:
1. Download and install Wondershare Filmora on your computer by tapping the download wizard below. Remember to join the Wondershare Video Community to connect with other video creators.
2. Launch Wondershare Filmora, add your videos to the Media Library. And you’ll also be greeted with a sleek and simple interface with controls for everything such as transitions, titles, layering clips, soundtrack, and more.
3. Add your video to the timeline, then go to the Titles tab, and you will see hundreds of titles and text templates. Select the template you love and add it to the video.
4. Then you can also go to the Effects tab and apply astonishing filters to the video
5. Once you’re done, you can click Export and upload your video to YouTube directly.
The free version will have a watermark on the exported video.
There’s nothing more delightful than to put your skills to work and save time by using Filmora. The time you save can be put into making more content and editing videos to boast of your creativity to friends.
Conclusion
YouTube has immersed so much in our day-to-day life that on average a mobile viewing session lasts more than 40 mins. To satiate our thirst for video content, YouTube has become the sole free platform. But even if your favorite song or movie gets deleted, you don’t have to worry as I’ve compiled the best solution to watch deleted YouTube videos and even be able to restore deleted YouTube videos to relish watching them with your friends and family. Leave your comments below if you love this article.
Richard Bennett
Richard Bennett is a writer and a lover of all things video.
Follow @Richard Bennett
Also read:
- Instantaneous Video Downloader Selection Guide
- [New] Control YouTube Audio Mobile/Desktop Approach
- Charting the Course From AdSense Income to Savings for 2024
- Leveraging YouTube for Dynamic Instagram Stories
- Navigating Youtube's Partnership Opportunities in CP2024
- Earning on YouTube A Step-by-Step Guide for Newbies for 2024
- [New] Beyond the Leading Films Hidden Cinema Treasures
- Start a Stream, Reap Riches Vlog Money Secrets
- Audience Engagement Where to Captivate Viewers for 2024
- Digital Dominance The Top Global YouTube Creators for 2024
- Adapting Spotify Playlists Into a YouTube Music Format
- Mirrorless vs DSLR in the Realm of Video Filmmaking
- [New] Breaking the Cycle of Zero Video Views on YouTube
- [Updated] Enhancing YouTube Content with Text Overlays
- [New] Curated List DJ Video Sources at Your Fingertips
- Swift Strategies Randomize Your Video Playlist Quickly
- The Essential Guide to Sports Highlight Video Creation
- The Mystery of YouTube's Viewer Count Puzzle
- Crafting the Perfect YouTube Channel Url A Quick Guide for 2024
- [New] Discover Movie Substitutes, #7 Recommended
- Reviewing Video Comment Trails on YouTube
- 2024 Approved Ad-Based Revenue Tracking for YouTubers' Success
- Cutting Edge Editors Scouting the Ultimate Tools for YouTube Shorts
- 2024 Approved Amazing Alchemy YouTube's Most Magical Editing Feats
- Tips for Successfully Posting 4K Content to YouTube
- 2024 Approved Diving Deep The Intricacies of the Mukbang Phenomenon
- Alternative Film Choices Ranked #7-1
- [New] Alluring Backgrounds for Engaging Videos
- Streaming Success Monetization Unlocked with 500 Subscribers
- Unified YouTube Behavior Manual
- Time-Reversal Tactics Unique YouTube Video Experiences
- 2024 Approved Download YouTube Icons Quickly Web, OS-Specific Options Explained
- 2024 Approved Channel-Changing Ideas Inspiring Videos to Enhance Creativity
- Access Exclusive Stock Images Through Vital 4 YouTube Sources
- In 2024, Discovering Your Customized YouTube Playlist
- In 2024, Elevating the Chilly Selecting Five Warm Video Backgrounds
- In 2024, Unlock Your Disabled Apple iPhone 14 Plus Without iTunes in 5 Ways
- Which Pokémon can Evolve with a Moon Stone For Honor X50i? | Dr.fone
- [New] 2024 Approved The Soundtrack Strategy Elevating Facebook Videos with Music
- Above-Average Cloud Service Selections for 2024
- Updated Discover the Leading 7 Android Apps for Improved Voice Clarity and Quality for 2024
- New 2024 Approved Mastering the 16X9 Ratio 5 Expert Calculator Hacks
- AVCHD on Samsung Galaxy S24-convert MTS for Samsung Galaxy S24
- In 2024, Top IMEI Unlokers for Your Motorola Razr 40 Phone
- Hassle-Free Ways to Remove FRP Lock from Realme C67 5G Phones with/without a PC
- Preparation to Beat Giovani in Pokemon Go For Realme 11 Pro | Dr.fone
- Updated Edit Like a Pro Video Editing in OS X Mavericks Made Easy for 2024
- VibeVault Download and Spin Professional DJ Music for 2024
- [New] Professional Screen Snapshot Tool, Windows 10
- [Updated] A Step-by-Step Approach to Saving Your Screen While Streaming
- In 2024, Top 5 Nokia C12 Bypass FRP Tools for PC That Actually Work
- Beyond Liberty City Best Games Resembling GTA V for 2024
- Complete Tutorial for Samsung Galaxy S23 Hard Reset | Dr.fone
- Top 4 Free 3D Intro Maker to Use
- [Updated] Mastering TikTok Update Your Video Framing
- [New] In 2024, Gastronomy Goals Leading TikTok Foodies
- Ways To Find Unlocking Codes For Meizu 21 Pro Phones
- The Impact of Visual Storytelling Maximizing ROI Through FB Ad Animation
- [Updated] In 2024, From the Field Expertly Chosen 5 Gamer-Friendly Webcams
- [Updated] Social Media Streamlining IPhone/Android Tips for Effective Feeds for 2024
- In 2024, Full Guide to Bypass Vivo Y56 5G FRP
- Unleash Potential Essential Windows 10 Skills Review
- In 2024, Chime Into Chats WhatsApp Status Soundtracks
- [New] In 2024, Budget Video Editing Made Simple with Vimeo Free Service
- [New] 2024 Approved Expert Advice on Logging Google Voice Chats
- New In 2024, 10 Essential Android Video Editor Apps for Chromebook
- Unlock Crystal-Clear Facebook Video on Android for 2024
- In 2024, Insta Live with OBS Broadcast
- Gmail Not Working on Google Pixel Fold 7 Common Problems & Fixes | Dr.fone
- Master Racing Must-Try Bicycle Titles
- New 2024 Approved Navigating Through Music Tech Top 7 DAWs for Fostering Exceptional Guitar Recordings (Updated )
- Title: [Updated] 5 Critical Equipment Items to Start Your Channel Right
- Author: Kevin
- Created at : 2024-05-25 16:34:56
- Updated at : 2024-05-26 16:34:56
- Link: https://youtube-videos.techidaily.com/updated-5-critical-equipment-items-to-start-your-channel-right/
- License: This work is licensed under CC BY-NC-SA 4.0.
