
!["[Updated] 3 Easy YouTube Audio Extraction Methods Free & Secure"](https://www.lifewire.com/thmb/Z7WR5pj7JeS2G3gY9MhbX9bStss=/400x300/filters:no_upscale():max_bytes(150000):strip_icc()/FKT0RM1QHWManholdingiPhoneincar-70a24007f8334257888bbd13c76fdcbc.jpg)
"[Updated] 3 Easy YouTube Audio Extraction Methods Free & Secure"
3 Easy YouTube Audio Extraction Methods: Free & Secure
How to Rip Audio from YouTube in 3 Ways [Free and Safe]

Shanoon Cox
Mar 27, 2024• Proven solutions
Top lectures, top debates, and top music are present on YouTube. But watching them is time-consuming. This is where people want to rip audio from YouTube videos. The ability to extract audio from YouTube will allow them to listen to these audios anywhere, anytime.
Many online websites are famous for extracting audio from YouTubevideos. They let you choose the available audio formats like MP3, WAV, etc. Then, you can download the converted file on your device. And the best part is that it is completely free.
Here, we will show you 3 ways of how to rip audio from YouTubeusing ‘free and secure’ websites:
- Method 1: Rip Audio from YouTube Online with Ytmp3
- Method 2: Extract Audio from YouTube Using Desktop Software
- Method 3: Record YouTube Screen and Extract Audio from YouTube - [Video Tutorial]
- A Legal Warning for Ripping Audio from YouTube
- Bonus: How to Edit the Audio to Your Own Video
For Win 7 or later (64-bit)
 Secure Download
For macOS 10.14 or later
Secure Download
Note: We resolutely oppose all forms of copyright-infringing downloads. This tutorial is only for downloading YouTube videos/audio materials from your own channel.
Method 1: Rip Audio from YouTube Online with Ytmp3
Another easy program to rip audio from YouTube is Ytmp3. This tool is ‘free and safe’ and easy to use. You can convert YouTube videos into mp3 and mp4 formats. A simple step-by-step guide is provided for your convenience:
Step 1: Copy YouTube video URL and Paste into Ytmp3
Firstly, copy the URL of the YouTube video you wish to convert. Then, go to the Ytmp3 website and paste the URL into the box shown on the home page.
Step 2: Choose the format and convert
Secondly, you can choose the available formats. The website offers two formats; mp3 (audio) and mp4 (video). As you want to rip audio from YouTube, choose the mp3 format. Afterward, click the convert button to start the process.
Step 3: Download the converted file
Lastly, you can click on the Download or Dropbox button. Clicking on the button will get your file downloaded. Additionally, you can choose to convert more. Otherwise, you can access the downloaded file.
Method 2: Extract Audio from YouTube Using Desktop Software
Sometimes you watch a YouTube video and happen to like the audio but not the video. To just listen to the audio in the video, you need torip audio from the YouTube video. For this purpose, the 4K Video Downloader is the best desktop software for ripping audios. The software can extract audio from YouTube videos and convert it into an mp3 file. This software is available both free and paid. A step-by-step guide is provided for your convenience:
Step 1: Launch 4K Video Downloader and paste the URL
Firstly, launch the software. Then, copy the YouTube URL. Now, click the Paste Link option on the top left corner. Then, a pop-up will appear where you have to select Extract Audiooption.
Step 2: Choose the quality
After that, you have to choose the quality for the to-be-extracted file.
Step 3: Choose the format and extract
Lastly, choose the format (MP3, M4A, OGG) of your file. Afterward, hit the Extract button to extract audio from the YouTube video. After the process is complete, you can access the file.
Method 3: Record YouTube Screen and Extract Audio from YouTube
Here is another way to extract audio files from any videos included YouTube.
Step 1: First Download Filmora Video Editor from the button below and use the ‘Screen Recorder‘ feature to record the YouTube video that you want to rip to audio.
Step 2: Import the recorded video to Filmora and right click on the video track, select ‘Detach Audio‘ to extract audio track. Then choose the audio track and click the ‘Export‘ button to save ripped audio files.
Here are more features of Filmora Video Editor:
- Edit screen recorded video and audio with various tools.
- Record screen with high quality.
- Export video and audio with multiple formats.
- Offers cool effects, filters and stickers to make your video professional.
A Legal Warning for Ripping Audio from YouTube
Is the downloading of YouTube videos, including ripping audio from YouTube videos, legal? Here, we’ll have a brief discussion regarding the legality of downloading and converting YouTube videos.
According to YouTube’s Terms of Service , it is completely illegal to download, convert, or share the video without getting the appropriate permission from the owner.
However, there are some types of videos that are legal to download, and you can extract audio from YouTube videos falling into these categories:
- Public Domain: These videos’ copyright is either expired or abandoned. So, there is no owner, and the public can use the video for any purpose.
- Creative Commons: These videos are owned by the artists, but they have allowed the public to reproduce and share the content.
- Copyleft: These videos are granted free rights to change, share, and reproduce as long as the same rights apply to derivative content.
Bonus: How to Edit the Audio to Your Own Video
Usually, the audio of your video is not clear. Sometimes the background music is irritating, and you want to replace it. In short, the point is to edit and enhance the audio track of your video. All these changes can be achieved by using Filmora.
Wondershare Filmora is a video editing tool equipped with many features. Along with video editing options, this tool is perfect for audio editing. This software allows you to trim, add effects, or replace the audio track of your video. A simple step-by-step guide is provided for your convenience:
Step 1: Import the media

Firstly, after downloading and installing the software. Click on Files, then select import media files.
Step 2: Add Audio from the Audio Tab

Then, click the Audio tab to add audio or background music to your video.
Step 3: Set the Speed and Duration

To set the speed and the duration, right-click on the audio timeline or press CTRL+R. Now you can modify the settings.
Step 4: Adjusting the audio

The next step is to adjust the audio setting by double-clicking on the audio timeline. You can modify Pitch, Fade in/Fade out, etc.
Step 5: Add your own voice via Voiceover
You can add your own voice too. Just click on the voiceover icon on the right side to record your audio.
Step 6: Export the media
Lastly, click on the Export button to save your project where you want.
![]()
A cross-platform for making videos anywhere for all creators

Why your video editing isn’t good enough? How about some creative inspo?
- 100 Million+ Users
- 150+ Countries and Regions
- 4 Million+ Social Media Followers
- 5 Million+ Stock Media for Use
* Secure Download

Shanoon Cox
Shanoon Cox is a writer and a lover of all things video.
Follow @Shanoon Cox
Shanoon Cox
Mar 27, 2024• Proven solutions
Top lectures, top debates, and top music are present on YouTube. But watching them is time-consuming. This is where people want to rip audio from YouTube videos. The ability to extract audio from YouTube will allow them to listen to these audios anywhere, anytime.
Many online websites are famous for extracting audio from YouTubevideos. They let you choose the available audio formats like MP3, WAV, etc. Then, you can download the converted file on your device. And the best part is that it is completely free.
Here, we will show you 3 ways of how to rip audio from YouTubeusing ‘free and secure’ websites:
- Method 1: Rip Audio from YouTube Online with Ytmp3
- Method 2: Extract Audio from YouTube Using Desktop Software
- Method 3: Record YouTube Screen and Extract Audio from YouTube - [Video Tutorial]
- A Legal Warning for Ripping Audio from YouTube
- Bonus: How to Edit the Audio to Your Own Video
For Win 7 or later (64-bit)
Secure Download
For macOS 10.14 or later
Secure Download
Note: We resolutely oppose all forms of copyright-infringing downloads. This tutorial is only for downloading YouTube videos/audio materials from your own channel.
Method 1: Rip Audio from YouTube Online with Ytmp3
Another easy program to rip audio from YouTube is Ytmp3. This tool is ‘free and safe’ and easy to use. You can convert YouTube videos into mp3 and mp4 formats. A simple step-by-step guide is provided for your convenience:
Step 1: Copy YouTube video URL and Paste into Ytmp3
Firstly, copy the URL of the YouTube video you wish to convert. Then, go to the Ytmp3 website and paste the URL into the box shown on the home page.
Step 2: Choose the format and convert
Secondly, you can choose the available formats. The website offers two formats; mp3 (audio) and mp4 (video). As you want to rip audio from YouTube, choose the mp3 format. Afterward, click the convert button to start the process.
Step 3: Download the converted file
Lastly, you can click on the Download or Dropbox button. Clicking on the button will get your file downloaded. Additionally, you can choose to convert more. Otherwise, you can access the downloaded file.
Method 2: Extract Audio from YouTube Using Desktop Software
Sometimes you watch a YouTube video and happen to like the audio but not the video. To just listen to the audio in the video, you need torip audio from the YouTube video. For this purpose, the 4K Video Downloader is the best desktop software for ripping audios. The software can extract audio from YouTube videos and convert it into an mp3 file. This software is available both free and paid. A step-by-step guide is provided for your convenience:
Step 1: Launch 4K Video Downloader and paste the URL
Firstly, launch the software. Then, copy the YouTube URL. Now, click the Paste Link option on the top left corner. Then, a pop-up will appear where you have to select Extract Audiooption.
Step 2: Choose the quality
After that, you have to choose the quality for the to-be-extracted file.
Step 3: Choose the format and extract
Lastly, choose the format (MP3, M4A, OGG) of your file. Afterward, hit the Extract button to extract audio from the YouTube video. After the process is complete, you can access the file.
Method 3: Record YouTube Screen and Extract Audio from YouTube
Here is another way to extract audio files from any videos included YouTube.
Step 1: First Download Filmora Video Editor from the button below and use the ‘Screen Recorder‘ feature to record the YouTube video that you want to rip to audio.
Step 2: Import the recorded video to Filmora and right click on the video track, select ‘Detach Audio‘ to extract audio track. Then choose the audio track and click the ‘Export‘ button to save ripped audio files.
Here are more features of Filmora Video Editor:
- Edit screen recorded video and audio with various tools.
- Record screen with high quality.
- Export video and audio with multiple formats.
- Offers cool effects, filters and stickers to make your video professional.
A Legal Warning for Ripping Audio from YouTube
Is the downloading of YouTube videos, including ripping audio from YouTube videos, legal? Here, we’ll have a brief discussion regarding the legality of downloading and converting YouTube videos.
According to YouTube’s Terms of Service , it is completely illegal to download, convert, or share the video without getting the appropriate permission from the owner.
However, there are some types of videos that are legal to download, and you can extract audio from YouTube videos falling into these categories:
- Public Domain: These videos’ copyright is either expired or abandoned. So, there is no owner, and the public can use the video for any purpose.
- Creative Commons: These videos are owned by the artists, but they have allowed the public to reproduce and share the content.
- Copyleft: These videos are granted free rights to change, share, and reproduce as long as the same rights apply to derivative content.
Bonus: How to Edit the Audio to Your Own Video
Usually, the audio of your video is not clear. Sometimes the background music is irritating, and you want to replace it. In short, the point is to edit and enhance the audio track of your video. All these changes can be achieved by using Filmora.
Wondershare Filmora is a video editing tool equipped with many features. Along with video editing options, this tool is perfect for audio editing. This software allows you to trim, add effects, or replace the audio track of your video. A simple step-by-step guide is provided for your convenience:
Step 1: Import the media
Firstly, after downloading and installing the software. Click on Files, then select import media files.
Step 2: Add Audio from the Audio Tab
Then, click the Audio tab to add audio or background music to your video.
Step 3: Set the Speed and Duration
To set the speed and the duration, right-click on the audio timeline or press CTRL+R. Now you can modify the settings.
Step 4: Adjusting the audio
The next step is to adjust the audio setting by double-clicking on the audio timeline. You can modify Pitch, Fade in/Fade out, etc.
Step 5: Add your own voice via Voiceover
You can add your own voice too. Just click on the voiceover icon on the right side to record your audio.
Step 6: Export the media
Lastly, click on the Export button to save your project where you want.
![]()
A cross-platform for making videos anywhere for all creators
Why your video editing isn’t good enough? How about some creative inspo?
- 100 Million+ Users
- 150+ Countries and Regions
- 4 Million+ Social Media Followers
- 5 Million+ Stock Media for Use
* Secure Download
Shanoon Cox
Shanoon Cox is a writer and a lover of all things video.
Follow @Shanoon Cox
Free Method to Record Your YouTube Watching Experience
How To Record Screencast From YouTube For Free

Max Wales
Mar 27, 2024• Proven solutions
Screencasting is a simple task anyone can do it with ease. All that you need to do is download a software program, press the record button and soon all movements on your device screen video will be recorded. Crazy video gamers do the same thing to share their interesting game videos on YouTube channels.
There is a wide range of software tools that can assists you with screencasting needs. Even YouTube itself has the ability to capture device screens without the need for additional software tool. If you are interested to know how it can be done, simply go through the details below.
Note: We resolutely oppose all forms of copyright-infringing downloads. This tutorial is only for downloading YouTube videos/audio materials from your own channel.
![]()

The All-in-One Screen Recorder & Video Editor
- Record desktop screen, voiceover, and webcam simultaneously
- Edit recorded clips quickly with a wide range of professional tools
- Built-in plentiful templates and effects
- Export to MP4, MOV, MKV, GIF and multiple formats
For Win 7 or later (64-bit)
For macOS 10.12 or later
 Secure Download
Recording Screencast Video with YouTube
Step 1: Open YouTube on your computer and sign by using your Google Account. On the top left corner, you will find the Upload button, press it and go to live streaming section and choose events from the drop-down menu. When you are doing this for the very first time, YouTube will ask your phone number to verify the streaming process. You can also click here to get to the Livestreaming page directly.
Step 2: On the create an event page, add a title for your screencast video; set privacy terms and then hit “Go Live Now” option.

Step 3: The Hangout on Air page will get opened. It will allow you to select-deselect webcam recording as well as mic recording.
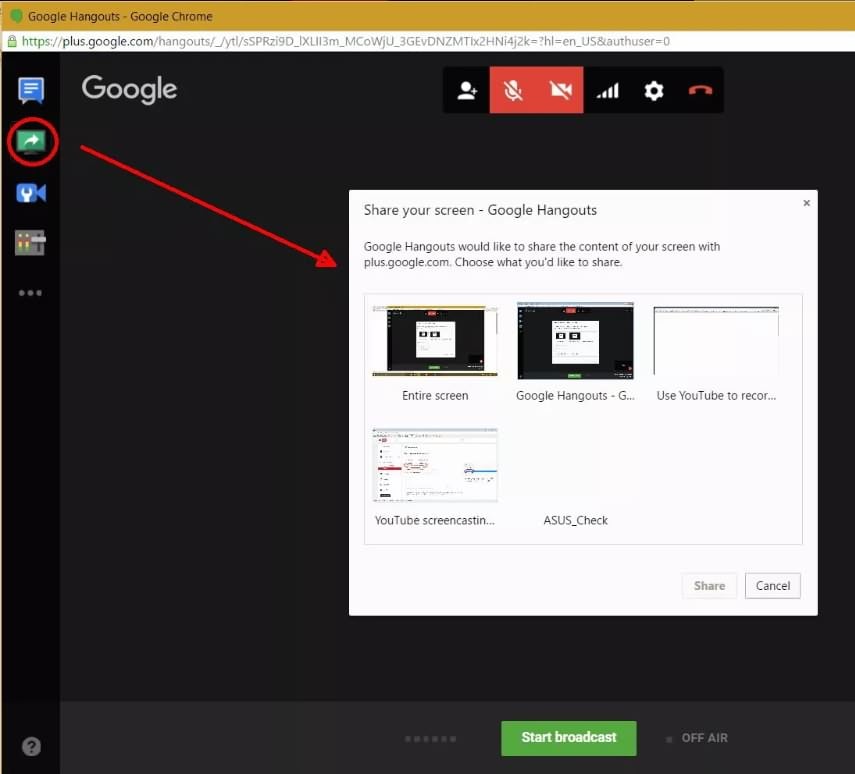
Step 4: Hit the screen share button from the left toolbox and choose the desktop window that you wish to record. Now press start the Broadcast button to start screen recording. Note that it is a private session that cannot be watched by anyone else.
Step 5: When your video is ready to go to YouTube video dashboard and choose your recent screencast video. Download it to Google Drive and share it with the world.
A better way to record Screencast and Upload to YouTube
For those who are interested in capturing screencast with high-quality videos and need an easy to use the built-in editor to customize these videos; it is good to look for some dedicated screencast tools. Experts recommend using Wondershare Filmora due to its advanced features and interactive software platform.


Top Features
- Filmora is one of the most interactive software tools that works perfectly on Windows and Mac platforms.
- It supports more than 50 media file formats.
- Filmora allows users to record with Webcam and PC simultaneously.
- It is possible to record audio from mic input and internal computer audio as well.
- With Filmora users can record high paced videos at 120fps.
- Add markers to important frames during recording.
There are so many benefits of using Filmora for YouTube screencast video recordings. The biggest trouble with YouTube based recording is that when you try it for the very first time, YouTube will take 24 hours to verify your account for the live streaming. But by using Filmora, you can do this task instantly at any hour of the day. Another great news is that Fillmore Scrn comes with a built-in video editor that allows users to customize videos with ease. Once your videos are ready, you can share them directly to social media platforms including YouTube, Facebook, Twitch, and Vimeo etc.
Let’s watch the video below to check how to record your screen with Filmora and upload the recorded video to YouTube.
Conclusion
With all impressive features, there is no doubt to say that Filmora can serve your screencasting needs in the best possible manner. Whether you are a crazy gamer interested to share your adventure videos with the world or want to create useful tutorials for your audience, Filmora is your best companion for all your needs.
Max Wales
Max Wales is a writer and a lover of all things video.
Follow @Max Wales
Max Wales
Mar 27, 2024• Proven solutions
Screencasting is a simple task anyone can do it with ease. All that you need to do is download a software program, press the record button and soon all movements on your device screen video will be recorded. Crazy video gamers do the same thing to share their interesting game videos on YouTube channels.
There is a wide range of software tools that can assists you with screencasting needs. Even YouTube itself has the ability to capture device screens without the need for additional software tool. If you are interested to know how it can be done, simply go through the details below.
Note: We resolutely oppose all forms of copyright-infringing downloads. This tutorial is only for downloading YouTube videos/audio materials from your own channel.
![]()
The All-in-One Screen Recorder & Video Editor
- Record desktop screen, voiceover, and webcam simultaneously
- Edit recorded clips quickly with a wide range of professional tools
- Built-in plentiful templates and effects
- Export to MP4, MOV, MKV, GIF and multiple formats
For Win 7 or later (64-bit)
For macOS 10.12 or later
Secure Download
Recording Screencast Video with YouTube
Step 1: Open YouTube on your computer and sign by using your Google Account. On the top left corner, you will find the Upload button, press it and go to live streaming section and choose events from the drop-down menu. When you are doing this for the very first time, YouTube will ask your phone number to verify the streaming process. You can also click here to get to the Livestreaming page directly.
Step 2: On the create an event page, add a title for your screencast video; set privacy terms and then hit “Go Live Now” option.
Step 3: The Hangout on Air page will get opened. It will allow you to select-deselect webcam recording as well as mic recording.
Step 4: Hit the screen share button from the left toolbox and choose the desktop window that you wish to record. Now press start the Broadcast button to start screen recording. Note that it is a private session that cannot be watched by anyone else.
Step 5: When your video is ready to go to YouTube video dashboard and choose your recent screencast video. Download it to Google Drive and share it with the world.
A better way to record Screencast and Upload to YouTube
For those who are interested in capturing screencast with high-quality videos and need an easy to use the built-in editor to customize these videos; it is good to look for some dedicated screencast tools. Experts recommend using Wondershare Filmora due to its advanced features and interactive software platform.
Top Features
- Filmora is one of the most interactive software tools that works perfectly on Windows and Mac platforms.
- It supports more than 50 media file formats.
- Filmora allows users to record with Webcam and PC simultaneously.
- It is possible to record audio from mic input and internal computer audio as well.
- With Filmora users can record high paced videos at 120fps.
- Add markers to important frames during recording.
There are so many benefits of using Filmora for YouTube screencast video recordings. The biggest trouble with YouTube based recording is that when you try it for the very first time, YouTube will take 24 hours to verify your account for the live streaming. But by using Filmora, you can do this task instantly at any hour of the day. Another great news is that Fillmore Scrn comes with a built-in video editor that allows users to customize videos with ease. Once your videos are ready, you can share them directly to social media platforms including YouTube, Facebook, Twitch, and Vimeo etc.
Let’s watch the video below to check how to record your screen with Filmora and upload the recorded video to YouTube.
Conclusion
With all impressive features, there is no doubt to say that Filmora can serve your screencasting needs in the best possible manner. Whether you are a crazy gamer interested to share your adventure videos with the world or want to create useful tutorials for your audience, Filmora is your best companion for all your needs.
Max Wales
Max Wales is a writer and a lover of all things video.
Follow @Max Wales
Also read:
- [Updated] Early Bird's Youtube Strategies for Channel and Revenue
- [Updated] Dive Into Filmora’s Certified Creative Program
- In 2024, Charting Updates YouTube Money Standards
- Simplified Steps for YouTube Shorts Thumbnails Setup
- [Updated] Cerebral Channels Top Educational YT Networks
- In 2024, Embrace Serenity The 10 Best Online Yoga Masters Today
- 2024 Approved Architecting Authoritative Adjuncts
- Become a YT Hub Pro Complete Guide Revealed for 2024
- Pinpoint Pioneering Podium Places
- In 2024, Accessing Global Hitters The #1-#6 Short Video Downloaders
- Fixing the No-Thumbnail Issue in YouTubes Shorts Videos
- The Latest on YouTube Ad Income Guidelines
- Top Ten Historical Educational Video Streams (For Students)
- 2024 Approved 10 Best Video Streaming Alternatives to YouTube for Smartphone Users
- Elevate Your YouTube Presence with These 8 Free Courses for 2024
- Elevate Your Channel'enas Expensive? Check Out Our 11 Free Name Generators Guide for 2024
- [New] Decoding Earnings for Content Producers on Short-Form Platform
- Unleash Video Magic Top 7 Royalty-Free Sounds for Editors
- The Ultimate Youtube Strategy for Simultaneous Synchronization
- [New] A Comprehensive Guide to Using YouTube's CC Licensing
- Building a Professional Online Brand as a Game Vlogger
- [New] Channel Character A Comprehensive Guide to Templates
- Versatile Online Creations Simple and Inclusive Ideas for Your First Videos
- Your First Youtubian Venture Building a Brand, Bringing in Bucks
- 2024 Approved Budget-Friendly Broadcaster Gear for Video Voyeurs
- [New] Embrace 9 Festive Feasts Watch Holiday Epics at Zero Cost Online
- In 2024, Cutting Edge Top 8 Free Online Video Tools
- Elevate Storytelling - Free Soundtrack Options Available!
- Combat Common YouTube Short Obstacles for 2024
- 2024 Approved Boosting Your YouTube Presence Key Tips for Popularity
- 2024 Approved How to Easily Add Subtitles and Closed Captions to YouTube Video
- Essential Guide 9 Cost-Free Editing Tools for Creatives for 2024
- [Updated] How to Create GIFs From YouTube Videos on Desktop and Mobile Devices
- What's In Your Wallet From One Million YouTube Sights?
- [New] Best Practices in Extracting YouTube Media
- [Updated] 5 Leading Tools for Crafting Superior Video Titles and Tags
- 2024 Approved Amplify Your Storytelling Seamlessly Insert Music Into YouTube Videos
- [New] Boost Engagement and Traffic with These Top Video Marketing Moves
- In 2024, Effortless Guide Never See YouTube Shorts Again
- In 2024, Edit Like a Pro with Any of These Top 7 Free Options
- [Updated] DIY Movie Making on YouTube & Comparable Creative Tools
- 2024 Approved Capture Creativity with Smartphones' Best Apps
- 2024 Approved International Eats Iconic Recipes for the Palate
- 3 Solutions to Find Your Honor X8b Current Location of a Mobile Number | Dr.fone
- [Updated] How to Enrich Social Media Content with Auto-Generated Speech
- [New] In 2024, Seamless Social Streams Link Instagram & Facebook
- [New] Creating Comedy Gold Top 8 Techniques That Shape Meme Artistry
- In 2024, How To Enable USB Debugging on a Locked Itel P55 Phone
- Visual Victory AMD Radeon Evolution for 2024
- In 2024, 15 Best Strongest Pokémon To Use in Pokémon GO PvP Leagues For Xiaomi Redmi Note 12 5G | Dr.fone
- In 2024, Easy Fixes How To Recover Forgotten iCloud Password On your iPhone 6 Plus
- In 2024, Elevate Your Brand's Instagram Presence with These Hacks
- In 2024, The Ultimate Guide How to Bypass Swipe Screen to Unlock on Nubia Z50S Pro Device
- Does Vivo V27 Have Find My Friends? | Dr.fone
- [New] Download and Utilize the Full Power of EZ Grabber Quickly
- [Updated] In 2024, Download Friends, Share & Connect Effortlessly Online
- [Updated] The Epitome of HD Recording Curated List Unveiled
- 2024 Approved Best Free Video Editing Software IMovie Alternatives
- [Updated] Mastering Your Digital Footprint Facebook Lives Made Easy for 2024
- Updated 2024 Approved Create Epic Gaming Intros Top 10 Tools for Windows and Mac Free & Paid
- [New] Mastering Angular Adjustments in VLC Player for 2024
- What can you do with Face ID on iPhone 15 Pro Max?
- [Updated] Dive Into Screen Recording Expert Insights on Top OBS Software for 2024
- 2024 Approved Capture & Create First Edits in LunaPic Photo Editor
- In 2024, Capture Live Camera Feed in VLC Media Player
- [New] In 2024, No-Nonsense Tips for Game Recording
- [Updated] 2024 Approved Prime Mac GIF Cutter
- [New] Facebook ID Video Overview Length, Aspect Ratio, Frame Rate
- In 2024, How Sony Xperia 5 V Mirror Screen to PC? | Dr.fone
- iPogo will be the new iSpoofer On Asus ROG Phone 8? | Dr.fone
- Updated Top 6 Windows Video Editors to Replace Win Movie Maker
- In 2024, Perfect Picture Spotlights How to Zoom in & Out on Insta Stories
- New Sonic Exploration A Deep Dive Into Sound Forges Functionality
- With the Help of FCP You Can Easily Create Various Changes to Audio File with Time, One Can Adjust Volume Fading and Apply Audio Enhancement as per Need for 2024
- New 2024 Approved A Guide to Effective Video Marketing
- Broadcasting Wisdom Share Screen Seamlessly on FB Live for 2024
- In 2024, Easy Guide How To Bypass Meizu FRP Android 10/11/12/13
- Unlock the Secrets of Stellar Snaps and Snapchat Boomers for 2024
- [New] In 2024, Premier Picks 12 Personal Replay Applications
- In 2024, How to Mirror Motorola Edge 40 Pro to Mac? | Dr.fone
- Title: "[Updated] 3 Easy YouTube Audio Extraction Methods Free & Secure"
- Author: Kevin
- Created at : 2024-05-25 16:34:52
- Updated at : 2024-05-26 16:34:52
- Link: https://youtube-videos.techidaily.com/updated-3-easy-youtube-audio-extraction-methods-free-and-secure/
- License: This work is licensed under CC BY-NC-SA 4.0.
