
![[Updated] 15 Essential Gaming Capture Programs](https://www.lifewire.com/thmb/d0mGdrqxpsdprUs6Uuc2MTsWHRg=/400x300/filters:no_upscale():max_bytes(150000):strip_icc()/transportation--two-car-accident--wreck-with-people-still-inside-red-vehicle--173056956-5a39d819beba33003715b346.jpg)
[Updated] 15 Essential Gaming Capture Programs
15 Essential Gaming Capture Programs
15 Best Game Recording Software for YouTuber in 2024

Richard Bennett
Mar 27, 2024• Proven solutions
There is no doubt that gaming is one of the largest entertainment sources for most of people. The advanced technology has led to the development of game recorders by which you can record the video of your favorite game and share it with your friends and viewers on YouTube.
Wondershare Filmstock Gaming Video Editing Skils ](https://filmstock.wondershare.com/creative-theme-game?source%5Fchannel=seo%5Farticle&spm=rs.filmora%5Fweb )
You might be interested in:
If you are looking for a screen recorder that allows you to capture your gameplay, add markers to the important point during playing, and edit the recorded gameplay video easily, then we recommend you to try Wondershare DemoCreator.
With DemoCreator, you can:
- Add Markers to important points during recording
- Record high paced games at up to 120 fps
- Capture video, system audio, webcam, and mic at the same time
- Record the entire screen or just a part of your screen
- Change video speed and add fade in and fade out with a simple drag
- Detach audio and record voice narration during editing and reduce the noise
- Use the Blur effect to blur the private info or remove the watermark
- Share videos to Vimeo, YouTube, Facebook, and Twitch directly


However, if you are looking for a video editing software that provides various gameplay elements, I want to recommend - Wondershare Filmora , an easy to use while powerful video editor that allows you not only cut, split, crop, resize, reverse your videos, but also offers you multiple video effects specially designed for Fashion, Beauty, Gaming, Travel, Education, etc. Check the video to know more fantastic features, and keep reading the article to know why Filmora is still one of the best options when it comes to gameplay recording.
Download Mac Version ](https://tools.techidaily.com/wondershare/filmora/download/ )
15 Best Game Screen Recorders for Recording Game Videos
1. ShadowPlay
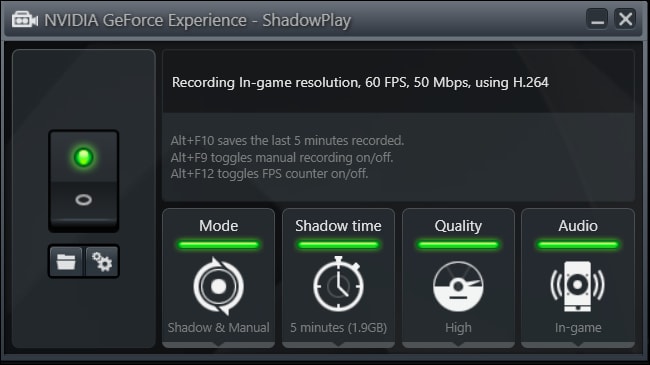
It is free game video capture software created by Nvidia GeForce for streaming game videos. There are two modes of this video recording tool i.e. Manual mode and Shadow mode.
Features:
- Instant replay and record
- Excellent hardware i.e. a GPU-accelerated video encoder
- It has a minimal performance impact
- Records up to 4K resolution at the speed of 130 Mbps
Compatibility: Windows XP, 7, 8, 8.1 and 10
Pros:
- Unlimited recording time in manual mode
- Allow it users to capture full desktop screen
Cons:
- Geforce GTX 600 and above is required to operate this software.
Price: It is available free of cost.
We have researched about how to record gameplay with Nvidia ShadowPlay, check this article How to Use Nvidia Share or ShadowPlay to Record Gameplay for the detailed information.
2. Camtasia

It is one of the best game recorders for recording professional videos on your PC. You can also import HD videos from an external source. The interactive videos can also be created by using this software.
Features:
- Stunning graphics
- Direct link to social media
- Effective recording option
- Drag and drop editing
- Google Drive integration
Compatibility: Windows 10, 8 and 7 SP1
Pros:
- You can easily include animated items
- Video, audio and cursor tracks can be edited individually
- Provides panning and zooming options
- Incorporates webcam
- You can also use the green screen effect
Cons:
- Free trial for only 30 days.
- The users cannot record videos for commercial use in the free version
- Very expensive
- Works slowly on large projects
Price: $299.00 USD but it can be reduced if you buy 5-9 licenses
3. Open Broadcast Software
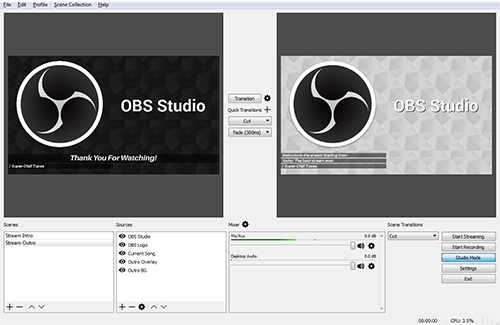
It is an open-source game recording tool having unlimited customization options. You can get idea about this software by its name i.e. the game streams can be broadcasted on various websites such as Twitch, YouTube, Hitbox etc.
Features:
- Simple interface
- Limitless scenes and sources
- It has file output to FLV or MP4
- GPU-based video game capture
Compatibility: Windows 10, 8, 8.1, Vista and 7, Version for Linux and Mac OS X is also in the pipeline
Pros:
- Easy to use
- High-speed performance
- Keyboard shortcuts
Cons:
- A sharp learning curve
- Difficult to construct scenes
Price: Free
4.Bandicam
It is a perfect choice for beginners as it is easy to understand. You can also record a video game that utilizes the Direct X or OpenGL technology and share on YouTube with a single click. The size of the window can also be adjusted according to your need.
Features:
- Built-in compression feature ensuring high-quality videos
- Recording can be done for more than 24 hours
- You can record videos at 4k Ultra HD resolution
Compatibility: Windows XP, 10, 8.1, 8, and 7
Pros:
- Maximum frame rate i.e. 120 fps
- Two different audio inputs can be recorded at the same time
Cons:
- It does not proffer live streaming
Price: Free trial, $59 for two licenses, $39 for one license
5. EpicRewind

This software is developed recently introducing a unique feature i.e. RAM Rolling Buffer mode. It enables the user to replay the recording instantly. The buffer contents can also be saved by pressing a hotkey.
Features:
- You can conveniently capture screenshot and video from browser games or flash games.
- Direct-To-Disk capture mode
- Video Output Format and Codec can be configured with great ease.
Compatibility: It does not support windows
Pros:
- Videos are not encoded all the time.
Cons:
- It cannot be run on the Windows operating system.
Price: Free trial of the base version
6.D3DGear
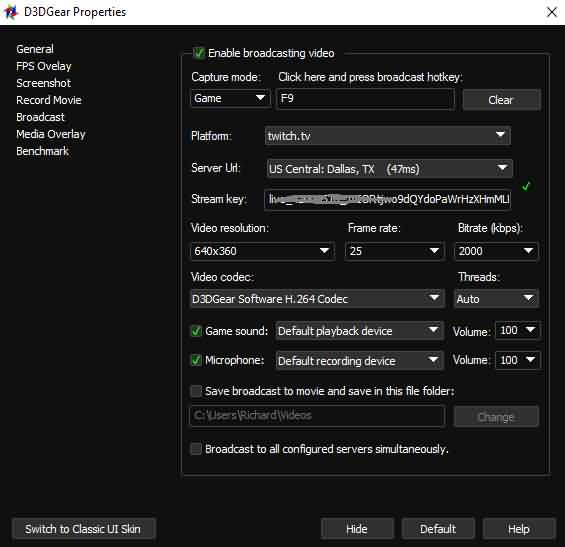
It is a very simple and light recorder. This software compresses the recorded files in real-time mode i.e. you are able to record screen activity even if there is less space in your storage drive. The videos can be shared over any social networking website.
Features:
- User-friendly interface
- Built-in compression system
Compatibility: Windows XP, 7, 10, 8, 8.1 and Vista
Pros:
- You can do live video streaming
- The audio files can be saved separately.
Cons:
- Pro version is very costly
Price: 15-day free trial otherwise it costs $34.95.
7.Fraps
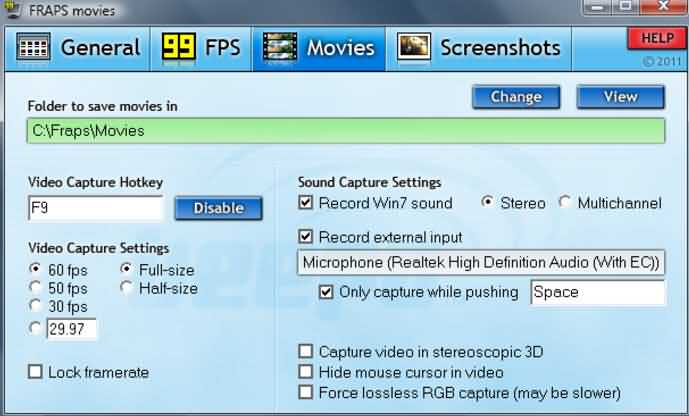
It is one of the most famous game screen recorders having superb features. The average performance rate can also be measured by using this recorder. You can also save these statistics in a different file. It is also very light software similar to D3DGear.
Features:
- It can be used as a benchmark tool.
- Capture high-quality footage
Compatibility: Windows Vista, XP, 7, 10, 8.1 and 8
Pros:
- You can record videos at 7680×4800 resolution
- Frames can be adjusted up to 120fps
Cons:
- It does not have streaming options
Price: Free version with few features, full version at $37
8.Microsoft Screen Encoder 4
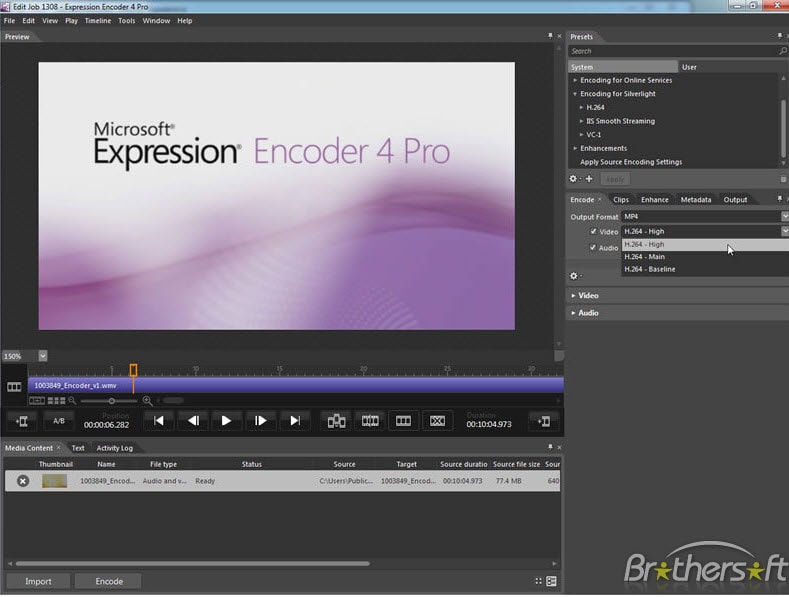
It is an advanced version of Microsoft screen encoder 3. It has wonderful graphics and live IIS (Internet Information Services) smooth streaming options. The Windows Media video, as well as audio files, can be produced with the help of this software.
Features:
- Screen capture
- GUI interface
- Live template support
Compatibility: Windows 7, Vista, Windows XP service pack2
Pros:
- High-quality playback
- Enables encoding using H.261Intuitive interface
Cons:
- Less editing tools in comparison to other software
- You cannot export your recordings to Sony Vegas11
Price: Pro version costs $199.95 while the standard version is free having limited features
9.Tinytake
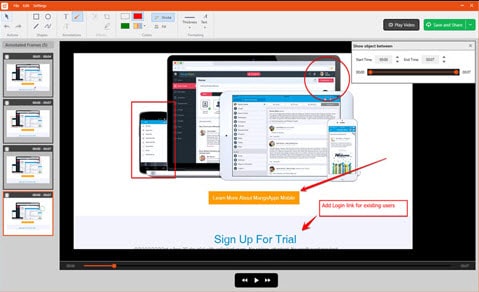
This game recorder is an ideal choice for making commercial presentations. This software allows its users to capture video from the selected region and upload it directly on YouTube or any other social media.
Features:
- Drag and drop option
- You can conveniently annotate the videos
- Inbuilt online file viewer
Compatibility: It can work with Windows as well as Mac operating system
Pros:
- You can develop custom shortcut keys
- Bulk files sharing
- You can run this software on mobile devices
Cons:
- Files are saved only in MP4 format
- Video recording can be done up to 2 hours
- No free version is available for business purposes
Price: It ranges between $29.95 and $199.95 for a yearly plan. You will also get storage memory space up to 2TB with a business plan.
10.Ezvid
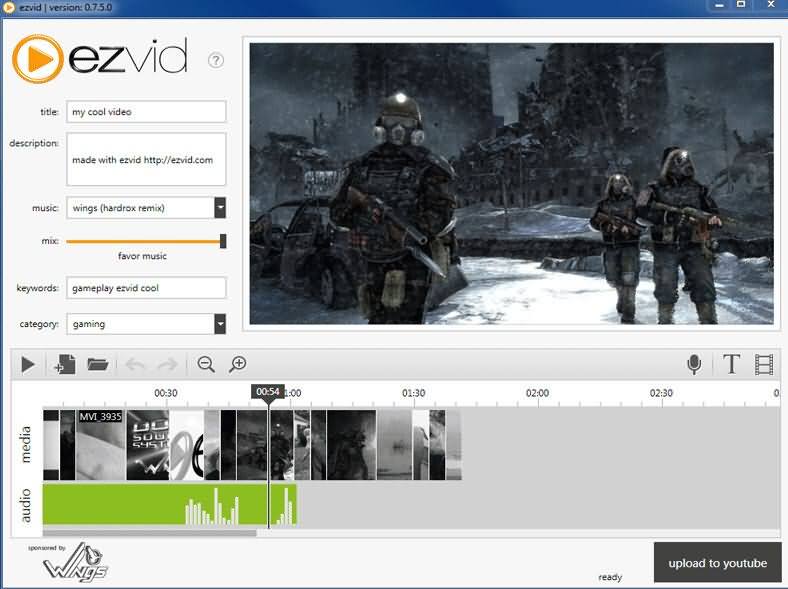
This screen software is specially designed for saving the time of the users. It also increases the recording speed and video editing capabilities. You can also add text and watermark to the videos.
Features:-
- Videos are uploaded on YouTube in a fast manner.
- It provides computer speech for narrative purposes.
- Modern and sleek interface
Compatibility: Windows XP SP3, 7 and Vista
Pros:
- High-quality video resolution
- You can also select the most popular music tracks
- It also has a facecam and a video editor
- You can also drag and drop videos
- Professional videos can be created in a few minutes
Cons:
- It is glitch and leggy.
- It requires 10GB free space
- Fewer features as compared to Camtasia software
Price: Free
11. Gecata
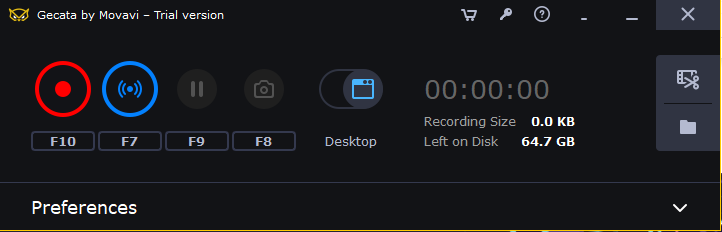
Gecata by Movavi is a lightweight video recording tool designed to capture gameplays. Screen recording with this program is easy without needing external hardware. You can capture all screen activities and save recordings in major video formats, including .MOV, .MP4, .AVI, and GIF.
Features:
- One-click screenshots
- Game mode for automatic recording
- Screen and audio recording simultaneously and separately
- Graphics hardware integration option (NVIDIA or Intel) for 400% faster encoding
Compatibility: Windows 7/8/10
Pros:
- Simple interface
- Speedy capturing
- Tested on dozens of games
- Game recording up to 120fps
Cons:
- The free version pastes a watermark on the recording
- Lagging
Price: $30.95 for a lifetime
12. EaseUS RecExperts

RecExperts by EaseUS is a premium screen recorder with many exciting features. For instance, you can record a particular part of the screen by making a selection through your mouse. Likewise, you can also record multiple screens side by side.
While RecExperts is made for gamers and YouTubers, you can use this tool for a wide range of purposes. Such as recording an online meeting, video tutorial, and more.
Features:
- Sound recording and extracting
- Web camera capturing
- Saving captured video into GIF
- Screenshots
- Schedule recording with automatic stop and split options
Compatibility: Windows 7/8.1/10/11 and macOS 10.13 or later
Pros:
- Simple software design
- Allows editing on the captured screen
- Supports different video and formats, including MP4, MKV, MOV, AVI
Cons:
- Limited editing, such as trimming and cutting
Price: $19.95 per month, $39.95 per year, and $79.95 for a lifetime
13. Flashback Express (Free Version)
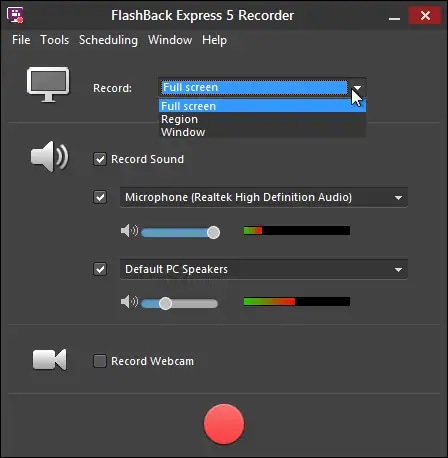
Flashback Express is a screen recording and editing software. It is a powerful tool for recording desktop screens simultaneously with mic sounds. You can also add webcam recordings to recorded gameplays as most YouTubers do.
Besides, there’s no time limit on the recording. So whether you want to capture a small portion of your video or screen record several hours of gameplay, feel free to do it.
Features:
- Video trimming
- Multi-screen recording
- Webcam overlay
- Direct YouTube uploading option
Compatibility: Windows 7/8.1/10/11
Pros:
- Easy interface
- No watermark
- Voice over during screen capturing
- Selected and full-screen recording
- You can save the recordings in MP4
Cons:
- Difficult export settings
- Unable to export audio in the free version
- You need to convert the video using other programs if you want your recording in different video formats
Price: Free
14. Snagit
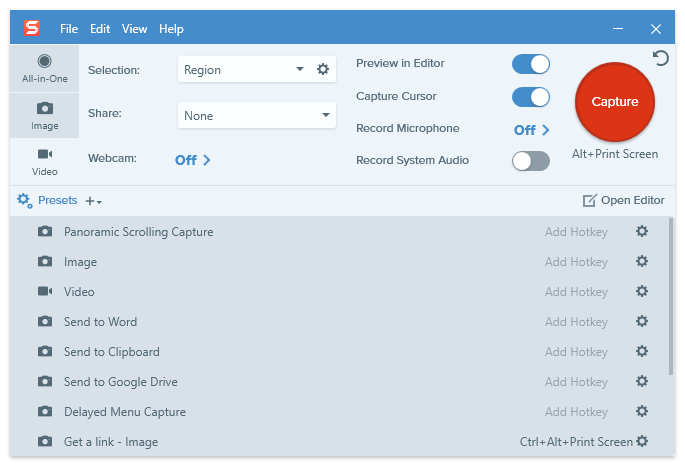
Snagit is another product by TechSmith (the developers of Camtasia). It’s a super easy tool to take screenshots and record screens.
You can save the captured video in MP4 and directly send the file through email. You can also upload files on different platforms and applications, including YouTube, Twitter, Slack, Google Drive, and more.
Features:
- Screen and audio recording
- Annotations
- Video trimming
- Webcam recording
- Cloud library
- Video conversion to GIFs
- Panoramic screen capturing
Compatibility: Windows 10/11 and Mac 11 or later
Pros:
- Simple user interface
- Fast video uploading to various platforms
Cons:
- Saved videos are only available in MP4 format
Price:$62.99 for a lifetime, including first-year maintenance (regular maintenance charges are $12.6 per year applicable after completing the first year)
15. Filmora
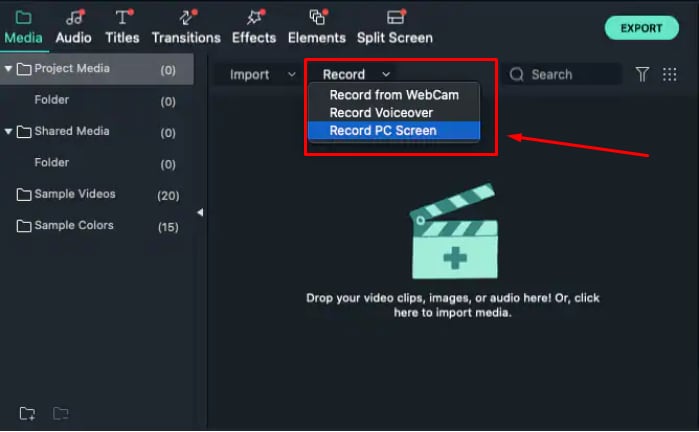
Filmora is an all-in-one program and is one of the top video editing tools cherished by all types of users – beginners and professionals. But what makes this software super cool for gamers and YouTubers is its screen recording option. With comprehensive features, you can record your gameplay and edit your screen recordings by using a wide range of features.
Features:
- Support 4K editing
- Noise removal
- Advanced text editor
- Color tuning
- Audio mixing
Compatibility: Windows 7/8/10/11 (64-bit) and macOS V10.1/V10.13/V10.14/V10.15/V11/V12
Pros:
- User-friendly interface
- Huge effects library
- Affordable perpetual licensing
- Wide range of features
- Support various video formats
- High-quality results
Cons:
- The free version includes a watermark
- You need to purchase the product to use some important features, such as keyframing
Price: $29.99 per month, $69.99 per year, and $79.99 for a perpetual
What to look for game screen recorder
There are many people who do not have any knowledge regarding game capture software. You must look for the following things before choosing a game screen recorder.
- The option of personalizing the hotkeys
- Number of built-in tools
- How to begin and pause recording
- Number of codes offered by it
- Recording time
- Editing features like cut and paste
- Custom-made Recording Resolution
- Adjustable video frames
In addition to this, some game recorders also affect your in-game fps (Frame per second). You should also check whether it is compatible with large-sized files or not. The quality of the video also depends upon the file size. The larger is file size, the higher is video quality. However, you can face problems while uploading huge-sized videos as online content distributors hardly support such files. So you must compress your video before sharing anywhere. There are also some recorders that provide a direct link to social networking sites. Thus you should consider these factors also before purchasing the game recording software.
You can easily run this recorder on your computer if it is updated and has 8GB of RAM. PC should also have two storage drives so as to install gaming software on one drive and record videos on another drive. It is also advisable to use computers than laptops for recording screen activities because laptops rarely have two storage drives.
You can easily run this recorder on your computer if it is updated and has 8GB of RAM. PC should also have two storage drives so as to install gaming software on one drive and record videos on another drive. It is also advisable to use computers than laptops for recording screen activities because laptops rarely have two storage drives.
FAQs
Q1. What software do YouTubers use to record gameplay?
Most gamers on YouTube use Open Broadcast System (OBS) and Bandicam to record their gameplays. However, there are a few more authentic screen recording tools for high-quality video recording, such as Filmora.
Using Filmora to record your gameplay will help you save the video in all major video formats. Moreover, the tool is also compatible with Mac and Windows operating systems.
Q2. How do I record my screen smoothly?
You should do a couple of things to avoid lagging while screen recording your gameplay. For example, do not use your built-in microphone to record your voice during screen recording. Instead, use an external microphone.
Only record what is important. Use high RAM and have a good graphics card. And most importantly, get screen recorders with at least 60fps.
Q3. Does screen recording decrease FPS?
Yes, it does affect your overall gaming performance. However, it depends on several factors. For instance, the fps won’t be affected much if you’re playing a less CPU-intensive game. The only way to sustain FPS is to have a high-quality screen recorder, such as OBS, Filmora, Bandicam, and Fraps.
Richard Bennett
Richard Bennett is a writer and a lover of all things video.
Follow @Richard Bennett
Richard Bennett
Mar 27, 2024• Proven solutions
There is no doubt that gaming is one of the largest entertainment sources for most of people. The advanced technology has led to the development of game recorders by which you can record the video of your favorite game and share it with your friends and viewers on YouTube.
Wondershare Filmstock Gaming Video Editing Skils ](https://filmstock.wondershare.com/creative-theme-game?source%5Fchannel=seo%5Farticle&spm=rs.filmora%5Fweb )
You might be interested in:
If you are looking for a screen recorder that allows you to capture your gameplay, add markers to the important point during playing, and edit the recorded gameplay video easily, then we recommend you to try Wondershare DemoCreator.
With DemoCreator, you can:
- Add Markers to important points during recording
- Record high paced games at up to 120 fps
- Capture video, system audio, webcam, and mic at the same time
- Record the entire screen or just a part of your screen
- Change video speed and add fade in and fade out with a simple drag
- Detach audio and record voice narration during editing and reduce the noise
- Use the Blur effect to blur the private info or remove the watermark
- Share videos to Vimeo, YouTube, Facebook, and Twitch directly
However, if you are looking for a video editing software that provides various gameplay elements, I want to recommend - Wondershare Filmora , an easy to use while powerful video editor that allows you not only cut, split, crop, resize, reverse your videos, but also offers you multiple video effects specially designed for Fashion, Beauty, Gaming, Travel, Education, etc. Check the video to know more fantastic features, and keep reading the article to know why Filmora is still one of the best options when it comes to gameplay recording.
Download Mac Version ](https://tools.techidaily.com/wondershare/filmora/download/ )
15 Best Game Screen Recorders for Recording Game Videos
1. ShadowPlay
It is free game video capture software created by Nvidia GeForce for streaming game videos. There are two modes of this video recording tool i.e. Manual mode and Shadow mode.
Features:
- Instant replay and record
- Excellent hardware i.e. a GPU-accelerated video encoder
- It has a minimal performance impact
- Records up to 4K resolution at the speed of 130 Mbps
Compatibility: Windows XP, 7, 8, 8.1 and 10
Pros:
- Unlimited recording time in manual mode
- Allow it users to capture full desktop screen
Cons:
- Geforce GTX 600 and above is required to operate this software.
Price: It is available free of cost.
We have researched about how to record gameplay with Nvidia ShadowPlay, check this article How to Use Nvidia Share or ShadowPlay to Record Gameplay for the detailed information.
2. Camtasia
It is one of the best game recorders for recording professional videos on your PC. You can also import HD videos from an external source. The interactive videos can also be created by using this software.
Features:
- Stunning graphics
- Direct link to social media
- Effective recording option
- Drag and drop editing
- Google Drive integration
Compatibility: Windows 10, 8 and 7 SP1
Pros:
- You can easily include animated items
- Video, audio and cursor tracks can be edited individually
- Provides panning and zooming options
- Incorporates webcam
- You can also use the green screen effect
Cons:
- Free trial for only 30 days.
- The users cannot record videos for commercial use in the free version
- Very expensive
- Works slowly on large projects
Price: $299.00 USD but it can be reduced if you buy 5-9 licenses
3. Open Broadcast Software
It is an open-source game recording tool having unlimited customization options. You can get idea about this software by its name i.e. the game streams can be broadcasted on various websites such as Twitch, YouTube, Hitbox etc.
Features:
- Simple interface
- Limitless scenes and sources
- It has file output to FLV or MP4
- GPU-based video game capture
Compatibility: Windows 10, 8, 8.1, Vista and 7, Version for Linux and Mac OS X is also in the pipeline
Pros:
- Easy to use
- High-speed performance
- Keyboard shortcuts
Cons:
- A sharp learning curve
- Difficult to construct scenes
Price: Free
4.Bandicam
It is a perfect choice for beginners as it is easy to understand. You can also record a video game that utilizes the Direct X or OpenGL technology and share on YouTube with a single click. The size of the window can also be adjusted according to your need.
Features:
- Built-in compression feature ensuring high-quality videos
- Recording can be done for more than 24 hours
- You can record videos at 4k Ultra HD resolution
Compatibility: Windows XP, 10, 8.1, 8, and 7
Pros:
- Maximum frame rate i.e. 120 fps
- Two different audio inputs can be recorded at the same time
Cons:
- It does not proffer live streaming
Price: Free trial, $59 for two licenses, $39 for one license
5. EpicRewind
This software is developed recently introducing a unique feature i.e. RAM Rolling Buffer mode. It enables the user to replay the recording instantly. The buffer contents can also be saved by pressing a hotkey.
Features:
- You can conveniently capture screenshot and video from browser games or flash games.
- Direct-To-Disk capture mode
- Video Output Format and Codec can be configured with great ease.
Compatibility: It does not support windows
Pros:
- Videos are not encoded all the time.
Cons:
- It cannot be run on the Windows operating system.
Price: Free trial of the base version
6.D3DGear
It is a very simple and light recorder. This software compresses the recorded files in real-time mode i.e. you are able to record screen activity even if there is less space in your storage drive. The videos can be shared over any social networking website.
Features:
- User-friendly interface
- Built-in compression system
Compatibility: Windows XP, 7, 10, 8, 8.1 and Vista
Pros:
- You can do live video streaming
- The audio files can be saved separately.
Cons:
- Pro version is very costly
Price: 15-day free trial otherwise it costs $34.95.
7.Fraps
It is one of the most famous game screen recorders having superb features. The average performance rate can also be measured by using this recorder. You can also save these statistics in a different file. It is also very light software similar to D3DGear.
Features:
- It can be used as a benchmark tool.
- Capture high-quality footage
Compatibility: Windows Vista, XP, 7, 10, 8.1 and 8
Pros:
- You can record videos at 7680×4800 resolution
- Frames can be adjusted up to 120fps
Cons:
- It does not have streaming options
Price: Free version with few features, full version at $37
8.Microsoft Screen Encoder 4
It is an advanced version of Microsoft screen encoder 3. It has wonderful graphics and live IIS (Internet Information Services) smooth streaming options. The Windows Media video, as well as audio files, can be produced with the help of this software.
Features:
- Screen capture
- GUI interface
- Live template support
Compatibility: Windows 7, Vista, Windows XP service pack2
Pros:
- High-quality playback
- Enables encoding using H.261Intuitive interface
Cons:
- Less editing tools in comparison to other software
- You cannot export your recordings to Sony Vegas11
Price: Pro version costs $199.95 while the standard version is free having limited features
9.Tinytake
This game recorder is an ideal choice for making commercial presentations. This software allows its users to capture video from the selected region and upload it directly on YouTube or any other social media.
Features:
- Drag and drop option
- You can conveniently annotate the videos
- Inbuilt online file viewer
Compatibility: It can work with Windows as well as Mac operating system
Pros:
- You can develop custom shortcut keys
- Bulk files sharing
- You can run this software on mobile devices
Cons:
- Files are saved only in MP4 format
- Video recording can be done up to 2 hours
- No free version is available for business purposes
Price: It ranges between $29.95 and $199.95 for a yearly plan. You will also get storage memory space up to 2TB with a business plan.
10.Ezvid
This screen software is specially designed for saving the time of the users. It also increases the recording speed and video editing capabilities. You can also add text and watermark to the videos.
Features:-
- Videos are uploaded on YouTube in a fast manner.
- It provides computer speech for narrative purposes.
- Modern and sleek interface
Compatibility: Windows XP SP3, 7 and Vista
Pros:
- High-quality video resolution
- You can also select the most popular music tracks
- It also has a facecam and a video editor
- You can also drag and drop videos
- Professional videos can be created in a few minutes
Cons:
- It is glitch and leggy.
- It requires 10GB free space
- Fewer features as compared to Camtasia software
Price: Free
11. Gecata
Gecata by Movavi is a lightweight video recording tool designed to capture gameplays. Screen recording with this program is easy without needing external hardware. You can capture all screen activities and save recordings in major video formats, including .MOV, .MP4, .AVI, and GIF.
Features:
- One-click screenshots
- Game mode for automatic recording
- Screen and audio recording simultaneously and separately
- Graphics hardware integration option (NVIDIA or Intel) for 400% faster encoding
Compatibility: Windows 7/8/10
Pros:
- Simple interface
- Speedy capturing
- Tested on dozens of games
- Game recording up to 120fps
Cons:
- The free version pastes a watermark on the recording
- Lagging
Price: $30.95 for a lifetime
12. EaseUS RecExperts
RecExperts by EaseUS is a premium screen recorder with many exciting features. For instance, you can record a particular part of the screen by making a selection through your mouse. Likewise, you can also record multiple screens side by side.
While RecExperts is made for gamers and YouTubers, you can use this tool for a wide range of purposes. Such as recording an online meeting, video tutorial, and more.
Features:
- Sound recording and extracting
- Web camera capturing
- Saving captured video into GIF
- Screenshots
- Schedule recording with automatic stop and split options
Compatibility: Windows 7/8.1/10/11 and macOS 10.13 or later
Pros:
- Simple software design
- Allows editing on the captured screen
- Supports different video and formats, including MP4, MKV, MOV, AVI
Cons:
- Limited editing, such as trimming and cutting
Price: $19.95 per month, $39.95 per year, and $79.95 for a lifetime
13. Flashback Express (Free Version)
Flashback Express is a screen recording and editing software. It is a powerful tool for recording desktop screens simultaneously with mic sounds. You can also add webcam recordings to recorded gameplays as most YouTubers do.
Besides, there’s no time limit on the recording. So whether you want to capture a small portion of your video or screen record several hours of gameplay, feel free to do it.
Features:
- Video trimming
- Multi-screen recording
- Webcam overlay
- Direct YouTube uploading option
Compatibility: Windows 7/8.1/10/11
Pros:
- Easy interface
- No watermark
- Voice over during screen capturing
- Selected and full-screen recording
- You can save the recordings in MP4
Cons:
- Difficult export settings
- Unable to export audio in the free version
- You need to convert the video using other programs if you want your recording in different video formats
Price: Free
14. Snagit
Snagit is another product by TechSmith (the developers of Camtasia). It’s a super easy tool to take screenshots and record screens.
You can save the captured video in MP4 and directly send the file through email. You can also upload files on different platforms and applications, including YouTube, Twitter, Slack, Google Drive, and more.
Features:
- Screen and audio recording
- Annotations
- Video trimming
- Webcam recording
- Cloud library
- Video conversion to GIFs
- Panoramic screen capturing
Compatibility: Windows 10/11 and Mac 11 or later
Pros:
- Simple user interface
- Fast video uploading to various platforms
Cons:
- Saved videos are only available in MP4 format
Price:$62.99 for a lifetime, including first-year maintenance (regular maintenance charges are $12.6 per year applicable after completing the first year)
15. Filmora
Filmora is an all-in-one program and is one of the top video editing tools cherished by all types of users – beginners and professionals. But what makes this software super cool for gamers and YouTubers is its screen recording option. With comprehensive features, you can record your gameplay and edit your screen recordings by using a wide range of features.
Features:
- Support 4K editing
- Noise removal
- Advanced text editor
- Color tuning
- Audio mixing
Compatibility: Windows 7/8/10/11 (64-bit) and macOS V10.1/V10.13/V10.14/V10.15/V11/V12
Pros:
- User-friendly interface
- Huge effects library
- Affordable perpetual licensing
- Wide range of features
- Support various video formats
- High-quality results
Cons:
- The free version includes a watermark
- You need to purchase the product to use some important features, such as keyframing
Price: $29.99 per month, $69.99 per year, and $79.99 for a perpetual
What to look for game screen recorder
There are many people who do not have any knowledge regarding game capture software. You must look for the following things before choosing a game screen recorder.
- The option of personalizing the hotkeys
- Number of built-in tools
- How to begin and pause recording
- Number of codes offered by it
- Recording time
- Editing features like cut and paste
- Custom-made Recording Resolution
- Adjustable video frames
In addition to this, some game recorders also affect your in-game fps (Frame per second). You should also check whether it is compatible with large-sized files or not. The quality of the video also depends upon the file size. The larger is file size, the higher is video quality. However, you can face problems while uploading huge-sized videos as online content distributors hardly support such files. So you must compress your video before sharing anywhere. There are also some recorders that provide a direct link to social networking sites. Thus you should consider these factors also before purchasing the game recording software.
You can easily run this recorder on your computer if it is updated and has 8GB of RAM. PC should also have two storage drives so as to install gaming software on one drive and record videos on another drive. It is also advisable to use computers than laptops for recording screen activities because laptops rarely have two storage drives.
You can easily run this recorder on your computer if it is updated and has 8GB of RAM. PC should also have two storage drives so as to install gaming software on one drive and record videos on another drive. It is also advisable to use computers than laptops for recording screen activities because laptops rarely have two storage drives.
FAQs
Q1. What software do YouTubers use to record gameplay?
Most gamers on YouTube use Open Broadcast System (OBS) and Bandicam to record their gameplays. However, there are a few more authentic screen recording tools for high-quality video recording, such as Filmora.
Using Filmora to record your gameplay will help you save the video in all major video formats. Moreover, the tool is also compatible with Mac and Windows operating systems.
Q2. How do I record my screen smoothly?
You should do a couple of things to avoid lagging while screen recording your gameplay. For example, do not use your built-in microphone to record your voice during screen recording. Instead, use an external microphone.
Only record what is important. Use high RAM and have a good graphics card. And most importantly, get screen recorders with at least 60fps.
Q3. Does screen recording decrease FPS?
Yes, it does affect your overall gaming performance. However, it depends on several factors. For instance, the fps won’t be affected much if you’re playing a less CPU-intensive game. The only way to sustain FPS is to have a high-quality screen recorder, such as OBS, Filmora, Bandicam, and Fraps.
Richard Bennett
Richard Bennett is a writer and a lover of all things video.
Follow @Richard Bennett
Transform Video Summaries with Vibrant Neon Borders on Thumbnails
Your YouTube video, or any other clip published on any forum, gets a larger number of hits if it has an attractive thumbnail. And, the fact is, a thumbnail becomes 10x more attractive when the main character that the image has have a neon border around it.
With that said, in the following sections, you will learn a couple of methods on how to add a YouTube thumbnail border around the main characters and/or objects that are significant to the clip.
In this article
01 Add Glowing Neon Border to YouTube Thumbnail with Filmora
02 Add a Glowing Neon Border in YouTube Thumbnail with Canva
03 Outline a Person in a YouTube Thumbnail with Photoshop
Part 1: How to Add Neon Border to YouTube Thumbnail for Free with Filmora
Being one of the most versatile and intuitive post-production tools available in the market today, Wondershare Filmora X allows you to add a neon border to a YouTube thumbnail quite conveniently. You can learn how to get this done on Windows or Mac by following the steps given below.
For Win 7 or later (64-bit)
For macOS 10.12 or later
Step 1: Define Project Settings and Add Image to the Timeline
Launch Wondershare Filmora X on your PC (a MacBook Pro M1 is used here), ensure that the project aspect ratio is set to 16:9 (Widescreen) on the splash screen, and click New Project. On the main interface, click the Preview quality and display settings icon from the upper-right area of the Timeline, click Change Project Aspect Ratio, click to select 1280 x 720 (HD) from the Resolution menu of the Project Settings box, and click OK to save the custom project settings.

Then select My Media from the menu bar if not already selected, click Project Media from the navigation pane, and click Import from the Media box to select and import the image of the main character or object that you want to use in the thumbnail.

Now, drag the image from the Media box to the Timeline at the bottom.

Step 2: Clear Image Background, Add Border, and Add Custom Background
Go to Effects from the menu bar, click to select the Default tab and then AI Portrait from the navigation pane, and click and drag the Human Segmentation preset from the right box, and place it over the image track in the Timeline.

Double-click the image layer, scroll down the upper-left box to the Video Effects section, and use the Edge Thickness and Edge Feather sliders to adjust the character’s edges to make them as realistic as possible. Click OK when done.

Next, click and drag the Human Border preset over the image track in the Timeline, and follow the same procedure to customize the border. This will give the character a neon border effect.

Now, use the method explained earlier to import a custom image for the background, and drag and place it under the previous track in the Timeline.

If you are running the latest version of Filmora, you will find there are some neon light effects available under AI Portrait as well.

Step 3: Add Titles to Thumbnail
Go to Titles from the menu bar, click to select the Default tab and then Lower 3rds from the navigation pane, and click and drag your preferred lower-third preset from the right window to a separate layer in the Timeline. Double-click the lower-third layer, and use the available options in the upper-left window to change the text, its color, etc., and drag the textbox to place it to your preferred position on the image as well. Click OK to save the changes.
Next, click to select Titles from the navigation pane, and drag your preferred title from the right window to the upper-most track in the Timeline. Now use the method explained earlier to edit the text, its color, position, etc. to make it look professional.

For more tips and tricks for creating YouTube thumbnail, you can check this You Tube thumbnail creating guide.
Step 4: Get the Neon Border Thumbnail
Click the Snapshot (Camera) icon from the upper-right area of the Timeline, go to My Media from the menu bar, right-click the thumbnail of the screenshot you captured, and click Reveal in Finder (on Mac) or Reveal in Explorer (on Windows) to get to the folder the YouTube thumbnail border is saved in.

Part 2: How to Add a Glowing Neon Border in Your YouTube Thumbnail with Canva
Canva is another intuitive editing program that works on the web interface rather than having you download and install an app on your PC. You can add a neon border for YouTube thumbnails using Canva by following the instructions given below:
Step 1: Define Project Settings and Add a Background
After signing in to your Canva account, click Create a design from the top-right corner of the page, click Custom size from the bottom, define 1280 and 720 in the Width and Height fields on the box that appears respectively, and click Create new design.

Now, click to select Background from the navigation bar on the left (if the Background tool is not visible, click More and then choose Background from the expanded list), and click to select a background from the images available in the center pane.

Step 2: Upload an Image and Add Effects
Click Uploads from the navigation bar, click the More icon from the right of the Upload media button present at the top of the center pane, choose your preferred method to upload the image (with the transparent background) that you want to use, upload the image, and drag it from the center pane to the Canvas.
Note: You can use any of the tools available online to remove the background from your image for free.

To add a YouTube thumbnail border, make sure that the image that you added to the Canvas is selected, click the Duplicate icon from the upper-right area, and use the scaling handles of the copy of the image to increase its size a bit. Reposition the image back to its original location as well.
Then, click Edit image from the upper-left corner of the Canvas, click Duotone from the Edit image pane at the center, if need be, click See all, choose your preferred duotone effect to apply on the image, choose your preferred highlight and shadow colors from the box that appears next, and click Back from the top of the pane.

Next, click See all next to the Adjust section from the center pane, and drag the Blur slider to the right to increase the blur effect on the image.

Step 3: Position the Layers
While keeping the duplicate image selected, click the Position button from the upper-right area of the Canvas, and click Background to send the second image behind the first one to get the neon border effect for the photo.

Part 3: How to Outline a Person in a YouTube Thumbnail with Photoshop
Because YouTube thumbnails are nothing but static images, creating YouTube thumbnail border with Adobe Photoshop is comparatively easier. The process of doing this is given below:
Step 1: Define Document Preferences and Import an Image
Launch Adobe Photoshop on your PC, click Create new, and on the New Document customization box, define the width and height values to 1280 and 720 pixels respectively. Select Transparent from the Background Contents menu as well if not already selected. Click Create from the bottom to create a new Photoshop document with the specified document settings. Next, open the folder that contains the source image, drag the photo to Photoshop, and press Enter to place the photo.

Step 2: Remove Background from the Image
Make sure that the image layer is selected in the Layers panel on the right, go to Select from the menu bar at the top, and click Subject. From the bottom of the Layers panel, click the Add a mask icon to get rid of the background, leaving only the human on the Canvas.

Step 3: Add a Custom Background and an Outline Around the Subject
Use the method explained earlier to import a background image of your choice to Photoshop. Drag the background image layer to the bottom in the Layers panel. Double-click the masked layer, click to select Stroke from the left pane of the Layer Style box, and use the options available on the right to manage the size, color, position, etc. of the stroke that has been added around the human subject. Click OK when done, and then export the image normally to use it as a YouTube thumbnail border.

Summary
It is important to know that the default resolution of a YouTube thumbnail is 1280 x 720 pixels that is usually written and referred to as 720p. While adding a YouTube thumbnail border, it is also imperative to have a good sense of color combination and fonts. Furthermore, a decent tool like Wondershare Filmora X must be used to add an appealing neon border around the main subject in the thumbnail image easily and quickly.
02 Add a Glowing Neon Border in YouTube Thumbnail with Canva
03 Outline a Person in a YouTube Thumbnail with Photoshop
Part 1: How to Add Neon Border to YouTube Thumbnail for Free with Filmora
Being one of the most versatile and intuitive post-production tools available in the market today, Wondershare Filmora X allows you to add a neon border to a YouTube thumbnail quite conveniently. You can learn how to get this done on Windows or Mac by following the steps given below.
For Win 7 or later (64-bit)
For macOS 10.12 or later
Step 1: Define Project Settings and Add Image to the Timeline
Launch Wondershare Filmora X on your PC (a MacBook Pro M1 is used here), ensure that the project aspect ratio is set to 16:9 (Widescreen) on the splash screen, and click New Project. On the main interface, click the Preview quality and display settings icon from the upper-right area of the Timeline, click Change Project Aspect Ratio, click to select 1280 x 720 (HD) from the Resolution menu of the Project Settings box, and click OK to save the custom project settings.
Then select My Media from the menu bar if not already selected, click Project Media from the navigation pane, and click Import from the Media box to select and import the image of the main character or object that you want to use in the thumbnail.
Now, drag the image from the Media box to the Timeline at the bottom.
Step 2: Clear Image Background, Add Border, and Add Custom Background
Go to Effects from the menu bar, click to select the Default tab and then AI Portrait from the navigation pane, and click and drag the Human Segmentation preset from the right box, and place it over the image track in the Timeline.
Double-click the image layer, scroll down the upper-left box to the Video Effects section, and use the Edge Thickness and Edge Feather sliders to adjust the character’s edges to make them as realistic as possible. Click OK when done.
Next, click and drag the Human Border preset over the image track in the Timeline, and follow the same procedure to customize the border. This will give the character a neon border effect.
Now, use the method explained earlier to import a custom image for the background, and drag and place it under the previous track in the Timeline.
If you are running the latest version of Filmora, you will find there are some neon light effects available under AI Portrait as well.
Step 3: Add Titles to Thumbnail
Go to Titles from the menu bar, click to select the Default tab and then Lower 3rds from the navigation pane, and click and drag your preferred lower-third preset from the right window to a separate layer in the Timeline. Double-click the lower-third layer, and use the available options in the upper-left window to change the text, its color, etc., and drag the textbox to place it to your preferred position on the image as well. Click OK to save the changes.
Next, click to select Titles from the navigation pane, and drag your preferred title from the right window to the upper-most track in the Timeline. Now use the method explained earlier to edit the text, its color, position, etc. to make it look professional.
For more tips and tricks for creating YouTube thumbnail, you can check this You Tube thumbnail creating guide.
Step 4: Get the Neon Border Thumbnail
Click the Snapshot (Camera) icon from the upper-right area of the Timeline, go to My Media from the menu bar, right-click the thumbnail of the screenshot you captured, and click Reveal in Finder (on Mac) or Reveal in Explorer (on Windows) to get to the folder the YouTube thumbnail border is saved in.
Part 2: How to Add a Glowing Neon Border in Your YouTube Thumbnail with Canva
Canva is another intuitive editing program that works on the web interface rather than having you download and install an app on your PC. You can add a neon border for YouTube thumbnails using Canva by following the instructions given below:
Step 1: Define Project Settings and Add a Background
After signing in to your Canva account, click Create a design from the top-right corner of the page, click Custom size from the bottom, define 1280 and 720 in the Width and Height fields on the box that appears respectively, and click Create new design.
Now, click to select Background from the navigation bar on the left (if the Background tool is not visible, click More and then choose Background from the expanded list), and click to select a background from the images available in the center pane.
Step 2: Upload an Image and Add Effects
Click Uploads from the navigation bar, click the More icon from the right of the Upload media button present at the top of the center pane, choose your preferred method to upload the image (with the transparent background) that you want to use, upload the image, and drag it from the center pane to the Canvas.
Note: You can use any of the tools available online to remove the background from your image for free.
To add a YouTube thumbnail border, make sure that the image that you added to the Canvas is selected, click the Duplicate icon from the upper-right area, and use the scaling handles of the copy of the image to increase its size a bit. Reposition the image back to its original location as well.
Then, click Edit image from the upper-left corner of the Canvas, click Duotone from the Edit image pane at the center, if need be, click See all, choose your preferred duotone effect to apply on the image, choose your preferred highlight and shadow colors from the box that appears next, and click Back from the top of the pane.
Next, click See all next to the Adjust section from the center pane, and drag the Blur slider to the right to increase the blur effect on the image.
Step 3: Position the Layers
While keeping the duplicate image selected, click the Position button from the upper-right area of the Canvas, and click Background to send the second image behind the first one to get the neon border effect for the photo.
Part 3: How to Outline a Person in a YouTube Thumbnail with Photoshop
Because YouTube thumbnails are nothing but static images, creating YouTube thumbnail border with Adobe Photoshop is comparatively easier. The process of doing this is given below:
Step 1: Define Document Preferences and Import an Image
Launch Adobe Photoshop on your PC, click Create new, and on the New Document customization box, define the width and height values to 1280 and 720 pixels respectively. Select Transparent from the Background Contents menu as well if not already selected. Click Create from the bottom to create a new Photoshop document with the specified document settings. Next, open the folder that contains the source image, drag the photo to Photoshop, and press Enter to place the photo.
Step 2: Remove Background from the Image
Make sure that the image layer is selected in the Layers panel on the right, go to Select from the menu bar at the top, and click Subject. From the bottom of the Layers panel, click the Add a mask icon to get rid of the background, leaving only the human on the Canvas.
Step 3: Add a Custom Background and an Outline Around the Subject
Use the method explained earlier to import a background image of your choice to Photoshop. Drag the background image layer to the bottom in the Layers panel. Double-click the masked layer, click to select Stroke from the left pane of the Layer Style box, and use the options available on the right to manage the size, color, position, etc. of the stroke that has been added around the human subject. Click OK when done, and then export the image normally to use it as a YouTube thumbnail border.
Summary
It is important to know that the default resolution of a YouTube thumbnail is 1280 x 720 pixels that is usually written and referred to as 720p. While adding a YouTube thumbnail border, it is also imperative to have a good sense of color combination and fonts. Furthermore, a decent tool like Wondershare Filmora X must be used to add an appealing neon border around the main subject in the thumbnail image easily and quickly.
Also read:
- Mobile Creativity Boost Identifying the Best Video Editing Tools
- [New] Elevate Your Mobile Surfing with These Top 7 Blockers
- [New] Design Principles for Eye-Catching YT Previews
- Boost Production Value with Free SFX Libraries for 2024
- In 2024, Enhance Video Appeal with Filmmaker-Friendly Subscribe Button Tutorials (Filmora)
- A Comprehensible Explanation of YouTube's Viewership Puzzle
- 9 Ultimate Free Online Editors for Content Creators for 2024
- [New] Dive Into Video Production Mastering Green Screens on YT
- 2024 Approved Boosting Bank Balance Effective Tactics for Mobile Video Money-Making
- [Updated] Essentials for Professionals Advanced Strategies in Video Tagging
- Essential Leaderboard Scratcher YouTube Trending Analysis for 2024
- Free YouTube Spotlight with Two Key Approaches
- How to Create YouTube Channel in Mobile [Personal & Business]
- Debunking YouTube Premium Benefits Vs. Costs
- Understanding the Key of YouTube Aspect Ratios for Success
- [New] Apex Producer Syncing Shots & Songs
- [Updated] Bites of Wisdom YouTube TV's Unique Selling Points
- [Updated] Broadcast Your Curated Playlist with Ease
- Explore Free YouTube Channel Imagery Tools
- 2024 Approved Elevating Video Quality Sharing iMovie Work via YouTube
- [Updated] Adding Richness YouTube Videos in Slideshows
- Top Sounds for Video Creators Royalty-Free Options
- In 2024, Beginner's Ultimate List of Must-Have Video Tech
- [New] Comparative Content Crusade Analyzing Your Videos Against Others'
- 2024 Approved Elevate Your Game Strategies for Stellar Gaming YouTube Banners
- [New] Direct Streaming From Apple Devices to YouTube
- 2024 Approved A Guide to the Best Tools for Shortening Video Content Online
- In 2024, Capture & Store Videos Effortlessly with Our Top List
- 2024 Approved Bright Beginnings on YouTube Launching and Revenue Strategies
- Audience-Centric Video Structure Chapter Addition for Maximum Viewership on YouTube
- 2024 Approved Daily Dose Your Go-To Anime Video Streams Online
- Jumpstart Success with Top 30 YouTube Intra Designers' Insights
- 2024 Approved Download YouTube Icons Quickly Web, OS-Specific Options Explained
- A Step-by-Step Guide to YouTube Shorts Excellence
- Elevate Your Vids Top YouTube SEO Gadgets
- Master the Art of Streaming Pick From the Leading 6 Cost-Free & On-Demand Short Video Downloads
- From Zero to YouTube Pros Creating an Account Rightly
- Premium Selection 10 Affordable Captions From YouTube
- [Updated] Become a YouTube Star Essential Skills Training
- 2024 Approved Diving Into the World of YouTube Search Engine Rankings
- In 2024, Compiling Leading Short-Form Video Editors IOS/Android Edition
- Direct Twitch Stream Transfer to YouTube Playback for 2024
- [New] Essential Illumination Products for Video Creators
- Masterful SEO Approaches for Soaring in YouTube Video Popularity
- Seamless Search for Your YouTube Comments Across Platforms
- 2024 Approved The Ultimate M4R Conversion Guide Tips and Tricks to Begin With
- [Updated] 2024 Approved How to Seamlessly Convert Vimeo Media to MP3
- Updated Top Mobile Apps for Tracking Your Moves for 2024
- In 2024, How to Bypass iPhone 11 Pro Max Passcode Easily Video Inside
- Audio-Visual Vanguard Evaluating the Best Classroom Recorders for 2024
- [Updated] Growth in the Grove Top 7 Stardew Valley Addons
- 2024 Approved Efficient Edits Encapsulating PowerPoint Talks
- [Updated] In 2024, From Facebook to WhatsApp A Guide for Video Sharing
- 2024 Approved Instagram to MP4 Perfection Uncover 2 Most Effective Techniques
- Why Instagram Story Highlights Matter A Primer for 2024
- Gauging Influence Tracking Metrics that Predict IGTV Performance
- In 2024, Digital Illustration Turning Your Favorite Vimeo Videos Into GIFs
- [New] 2024 Approved Unveiling the Art of Screencasting Orderly Tutorial Series
- [Updated] Secrets to Successful Live Broadcasts From iPhones/Androids for 2024
- Slow It Down on iPhone Filming & Modifying Motion Content
- [New] Tweeting with Videos A Quick Tutorial for 2024
- Step-by-Step to Superior Image Clarity by Removing Backgrounds Using Affinity
- [Updated] Facebook Video Acquisition Made Easy Best Android Downloader Apps Ranked
- In 2024, How To Bypass Activation Lock On Apple Watch Or Apple iPhone SE (2022)?
- [New] 2024 Approved Perfect Your Titles & Descriptions for Top-Ranked IGTV Videos
- In 2024, Sync Up with TikTok Live The Strategy for Participation
- New In 2024, Premiere Pairing Programs Ultimate Beat Match Video Editor Companion, 2023
- How to Track a Lost Samsung Galaxy F15 5G for Free? | Dr.fone
- How to Remove Forgotten PIN Of Your Xiaomi 13T
- New Exploring the Top 11 Voice-Altering Technologies to Watch for 2024
- How to Cut Off and Terminate Your TikTok Identity for 2024
- 3 Effective Ways to Unlock iCloud Account Without Password On Apple iPhone 15 Plus
- Navigating Fee-Free Discord Videos Download Handheld & Workstation Guide for 2024
- In 2024, 4 solution to get rid of pokemon fail to detect location On Motorola Moto G14 | Dr.fone
- Complete guide for recovering pictures files on Vivo S17t.
- [New] In 2024, Efficient Video Editing Techniques for Instagram, Mac Edition
- The Easiest Methods to Hard Reset Vivo Y36 | Dr.fone
- [Updated] 2024 Approved Undercover Instagram Story Experience, Top 5 Tools
- 2024 Approved Personalizing Teams Windows for Effective Calls
- [Updated] E-Identity Evolution Crafting an Animated Persona for 2024
- Is Insta360 X3 Superior to DJI and GoPro in Capturing Life’s Moments?
- Window’s Top-Notch Tunes
- In 2024, Capture the Crash - Expert Surfer Cameras Review
- Proven Ways in How To Hide Location on Life360 For Oppo K11 5G | Dr.fone
- New In 2024, Simplifying the Art of Audiobook Making A Complete, Step-by-Step Tutorial for Aspiring Authors
- Leading TikTok Talents Top 15 for Motivation
- In 2024, How To Bypass Activation Lock On Apple Watch Or iPhone 14 Plus?
- Everything You Need to Know about Lock Screen Settings on your Samsung Galaxy F54 5G
- [New] In 2024, Hot Takes Highlight Twitter's Trending Topics
- Title: [Updated] 15 Essential Gaming Capture Programs
- Author: Kevin
- Created at : 2024-05-25 16:34:43
- Updated at : 2024-05-26 16:34:43
- Link: https://youtube-videos.techidaily.com/updated-15-essential-gaming-capture-programs/
- License: This work is licensed under CC BY-NC-SA 4.0.
