
:max_bytes(150000):strip_icc():format(webp)/the_room-56cc7f225f9b5879cc590941.png)
"Unlocking the Power of Revenue Streams YouTubers' AdSense Manual"
Unlocking the Power of Revenue Streams: YouTubers’ AdSense Manual
How to Use AdSense for YouTube

Richard Bennett
Mar 27, 2024• Proven solutions
Now, since your YouTube channel has a large of subscribers and views, you start thinking to make money by using YouTube AdSense. However, do you really know YouTube AdSense very well? Or even, do you even know what it is exactly. In order to let you better understand it and make money, we have rounded up all information here to explain the basic knowledge of AdSense to you. Keeping reading to learn more!
- Part1: What is Adsense
- Part2: How to Link YouTube Account to Adsense
- Part3: How to Use AdSense for YouTube
Part 1: What is Adsense?
You might have noticed several ads displayed on the videos on various social platforms. AdSense is a part of Google that is responsible for placing such ads in the videos. You can sign in from YouTube account directly.
When you wish to place an ad, you may publish it on various media through Adsense. As an advertiser, you may publish anything in videos, images or texts on the websites and pay per impression or per click or per conversion.
Having a YouTube Adsense account or your website connected to Adsense account can help you earn money when Google places ads to your channel.
Do not worry, creating a Google Adsense account is free and when you create one, your YouTube channel or your website gets free eligibility for Google Ads. You just need to copy a code and paste it to start. The AdSense returns calculation is on pay per click or on a per-impression basis. However, if you want to receive the payment, you need to set up AdSense account first.
Part 2: How to Link YouTube Account to Adsense
Step 1: Link YouTube Account To Adsense
- Click on Setup YouTube AdSense or from monetization option, click on Setup Adsense option for your channel. Press Next. You are directed to Adsense sign up page.
- Select your email account, you wish to sign up with. You may also sign up with existing id or create a new one

- In case, you are using your existing email, sign in to YouTube Adsense with the same id. Once signed up, fill personal details form with information like address, name, etc.
- While filling your payee name be very careful and fill exactly as in your bank account name.

- Submit the form. Your application goes under review and might be under process for 2-3 hours to a few days depending on your Google Adsense and channel quality.
Step 2: Enable Monetization
- Click on My Channel from the menu option. Next, click on monetization to monetize your videos
- From monetization, click on monetize videos option for selecting the type of ads to monetize the video content or your channel.

- You may also monetize videos individually selecting the one you like from Video Manager segment if you do not wish to monetize all videos at once.
- Click monetize from the Action drop-down menu. Select ad type as per your wish. Press the monetize button.

- If you need to change monetization setting for a specific video, edit from the video manager or click on the dollar icon.
- To edit, click monetization option and select monetize with ads. Select the format of ads to monetize the particular video. Save the changes made.
Part 3: How to Use AdSense for YouTube
1. Finding Your Money in AdSense
Intuitively, many YouTube creators think that the first thing they see when they open up AdSense should be their daily earnings. This is not the case. Besides how much money you have made, AdSense keeps track of a lot of things the average YouTuber will not find useful. Getting to a report on your daily earnings actually takes a bit of navigation.
First, click on Performance Report near the top of your screen in AdSense. In the next page there will be a dropdown menu that says Days. Click on that menu and change it to Products.
In Products, scroll down until you get to a chart where there are two options: Hosted AdSense for Content and AdSense for Content. AdSense for Content relates to a personal website. For information about your YouTube channel click on Hosted AdSense for Content.

The next page is a report of how much money you have made from monetizing your YouTube channel. Your earnings will be organized by date. The money you see in this report has already had YouTube’s 45% commission deducted.
2. How are my earnings determined?
How much money you make through AdSense depends on your CPMs and EPMs. CPM is an acronym for “cost per mille” and indicates how much money and advertiser is paying for 1000 impressions of an ad. RPM is your revenue per 1000 impressions.
A lot of YouTubers new to AdSense assume that “per thousand impressions” means “per thousand views”, and that is incorrect. Besides the fact that not all views are monetized, impressions are not views. They are ad clicks. For long, skippable, video ads an “impression” is when a viewer watches the ad to the end instead of skipping it.
CPMs vary depending on the type of ad, where it is being run, and current advertising trends. Advertisers pay more for certain kinds of ads or for ad space in more popular videos. Beware of MCN scams claiming they can guarantee you a certain CPM; they cannot. Which ads are displayed in your videos is determined automatically by YouTube’s system and depends on factors like how you categorized your videos and how many views they have.
3. How do I get paid?
There are five different ways to get paid through AdSense: Check, Western Union Quick Cash, Wire Transfer, Rapida, or an Electronic Funds Transfer (EFT). Generally, AdSense will begin the process of paying you your monthly earnings on the 21st of the following month. How long it takes to get your money after that depends on your payment method.
Using Western Union Quick Cash you can pick your cash up at your Western Union branch the same day.
EFTs get your money to you within seven business days after the 21st.
Checks can take two to four weeks to arrive in the mail.
Wire Transfers and Rapida can each take up to 15 days.

In order to be paid you will have to earn enough to reach the payment threshold, which is $100. So, if you only earn $5 in a month, you should not expect to receive a payment for that month. You will receive your first payment after you earn $100.
Conclusion
Making money with YouTube Adsense is one of the best media that is reliable, easy to use, and better than any other ways of creating money. With Adsense, you can create various size and kinds of ad units to add it to your website. Those ad spaces are filled by Google with the content and traffic relevant to your site. There are also some YouTuber influencer marketing platforms such as InflueNex , which enables YouTubers to learn about their own channels, their competitors’ channels, and join the platform for establishing replationship with the brands.
Richard Bennett
Richard Bennett is a writer and a lover of all things video.
Follow @Richard Bennett
Richard Bennett
Mar 27, 2024• Proven solutions
Now, since your YouTube channel has a large of subscribers and views, you start thinking to make money by using YouTube AdSense. However, do you really know YouTube AdSense very well? Or even, do you even know what it is exactly. In order to let you better understand it and make money, we have rounded up all information here to explain the basic knowledge of AdSense to you. Keeping reading to learn more!
- Part1: What is Adsense
- Part2: How to Link YouTube Account to Adsense
- Part3: How to Use AdSense for YouTube
Part 1: What is Adsense?
You might have noticed several ads displayed on the videos on various social platforms. AdSense is a part of Google that is responsible for placing such ads in the videos. You can sign in from YouTube account directly.
When you wish to place an ad, you may publish it on various media through Adsense. As an advertiser, you may publish anything in videos, images or texts on the websites and pay per impression or per click or per conversion.
Having a YouTube Adsense account or your website connected to Adsense account can help you earn money when Google places ads to your channel.
Do not worry, creating a Google Adsense account is free and when you create one, your YouTube channel or your website gets free eligibility for Google Ads. You just need to copy a code and paste it to start. The AdSense returns calculation is on pay per click or on a per-impression basis. However, if you want to receive the payment, you need to set up AdSense account first.
Part 2: How to Link YouTube Account to Adsense
Step 1: Link YouTube Account To Adsense
- Click on Setup YouTube AdSense or from monetization option, click on Setup Adsense option for your channel. Press Next. You are directed to Adsense sign up page.
- Select your email account, you wish to sign up with. You may also sign up with existing id or create a new one
- In case, you are using your existing email, sign in to YouTube Adsense with the same id. Once signed up, fill personal details form with information like address, name, etc.
- While filling your payee name be very careful and fill exactly as in your bank account name.
- Submit the form. Your application goes under review and might be under process for 2-3 hours to a few days depending on your Google Adsense and channel quality.
Step 2: Enable Monetization
- Click on My Channel from the menu option. Next, click on monetization to monetize your videos
- From monetization, click on monetize videos option for selecting the type of ads to monetize the video content or your channel.
- You may also monetize videos individually selecting the one you like from Video Manager segment if you do not wish to monetize all videos at once.
- Click monetize from the Action drop-down menu. Select ad type as per your wish. Press the monetize button.
- If you need to change monetization setting for a specific video, edit from the video manager or click on the dollar icon.
- To edit, click monetization option and select monetize with ads. Select the format of ads to monetize the particular video. Save the changes made.
Part 3: How to Use AdSense for YouTube
1. Finding Your Money in AdSense
Intuitively, many YouTube creators think that the first thing they see when they open up AdSense should be their daily earnings. This is not the case. Besides how much money you have made, AdSense keeps track of a lot of things the average YouTuber will not find useful. Getting to a report on your daily earnings actually takes a bit of navigation.
First, click on Performance Report near the top of your screen in AdSense. In the next page there will be a dropdown menu that says Days. Click on that menu and change it to Products.
In Products, scroll down until you get to a chart where there are two options: Hosted AdSense for Content and AdSense for Content. AdSense for Content relates to a personal website. For information about your YouTube channel click on Hosted AdSense for Content.
The next page is a report of how much money you have made from monetizing your YouTube channel. Your earnings will be organized by date. The money you see in this report has already had YouTube’s 45% commission deducted.
2. How are my earnings determined?
How much money you make through AdSense depends on your CPMs and EPMs. CPM is an acronym for “cost per mille” and indicates how much money and advertiser is paying for 1000 impressions of an ad. RPM is your revenue per 1000 impressions.
A lot of YouTubers new to AdSense assume that “per thousand impressions” means “per thousand views”, and that is incorrect. Besides the fact that not all views are monetized, impressions are not views. They are ad clicks. For long, skippable, video ads an “impression” is when a viewer watches the ad to the end instead of skipping it.
CPMs vary depending on the type of ad, where it is being run, and current advertising trends. Advertisers pay more for certain kinds of ads or for ad space in more popular videos. Beware of MCN scams claiming they can guarantee you a certain CPM; they cannot. Which ads are displayed in your videos is determined automatically by YouTube’s system and depends on factors like how you categorized your videos and how many views they have.
3. How do I get paid?
There are five different ways to get paid through AdSense: Check, Western Union Quick Cash, Wire Transfer, Rapida, or an Electronic Funds Transfer (EFT). Generally, AdSense will begin the process of paying you your monthly earnings on the 21st of the following month. How long it takes to get your money after that depends on your payment method.
Using Western Union Quick Cash you can pick your cash up at your Western Union branch the same day.
EFTs get your money to you within seven business days after the 21st.
Checks can take two to four weeks to arrive in the mail.
Wire Transfers and Rapida can each take up to 15 days.
In order to be paid you will have to earn enough to reach the payment threshold, which is $100. So, if you only earn $5 in a month, you should not expect to receive a payment for that month. You will receive your first payment after you earn $100.
Conclusion
Making money with YouTube Adsense is one of the best media that is reliable, easy to use, and better than any other ways of creating money. With Adsense, you can create various size and kinds of ad units to add it to your website. Those ad spaces are filled by Google with the content and traffic relevant to your site. There are also some YouTuber influencer marketing platforms such as InflueNex , which enables YouTubers to learn about their own channels, their competitors’ channels, and join the platform for establishing replationship with the brands.
Richard Bennett
Richard Bennett is a writer and a lover of all things video.
Follow @Richard Bennett
Quick, Captivating Content? Learn with Our YouTube Shorts Guide
YouTube Shorts Ultimate Guide in 2024
Richard Bennett
Mar 27, 2024• Proven solutions
Since smartphones are cheap and easily available in the market today, and there is also a huge range of contents to view online, a majority of users prefer watching videos that are both short enough to convey the message within a few seconds, and can be seen on your phone’s screen with decent picture quality. Considering this, Google lately came up with a Tik Tok-style app calledYouTube shorts that can be accessed right from your Android or iPhone as long as you are using the YouTube app, and are signed in to your Google account.
That said, in the following sections you will learn everything about the YouTube Shorts app, and how it could help you gain more viewers for your YouTube channel.
- Part 1: What Is YouTube Shorts?
- Part 2: How to Make and Upload a YouTube Shorts Video with Shorts App?
- Part 3: Creating Vertical YouTube Shorts Video in Filmora [Step by Step Tutorial]
Part 1: What Is YouTube Shorts?
A short and quick answer to the question is, YouTube Shorts is a Tik Tok competitor developed by Google and can be accessed via the YouTube app on an Android or iOS device. In order to use the YouTube Shorts app, all you need to do is, sign in to your YouTube account on the YouTube app, and you are good to go.
1. YouTube Shorts Release History
At the time of this writing, YouTube Shorts is still in the Beta phase, and there is a lot more that the developers at Google have yet to explore and discover. However, for now, the fully functional variant of the program is available only for users in India on Android and iOS platforms.
2. YouTube Shorts Target Audience
A majority of people who can be called the target audience for YouTube Shorts are the artists and creators looking forward to getting noticed. Some of them could also be among those who wish to become an influencer, or get their YouTube channel more subscribers to be able to become eligible for YouTube Partnership Program.
And of course, the viewers and subscribers cannot be left alone when talking about the target audiences of YouTube Shorts as without them, there’s no point in creating short videos in the first place.
The type of contents that the viewers expect to see as YouTube Shorts could include:
- Entertainment – While movies are of longer duration, roasting the characters in it, or explaining some other stuff to the subscribers could be one of the things that could keep the viewers engaged
- Gaming – Some extraordinary gaming tips, tricks, and skills can be demonstrated in a short video
- How-To – A couple of brief how-to illustrations can yet be another attraction for DIY-loving viewers
- Science and Technology – A short introduction of upcoming gadgets or applications along with their usability can be explained within the timeframe of 60 seconds as well
In addition to the above, a few other categories could be People and Places, Music, Domestic and Wild Animals, Education, etc.
3. YouTube Shorts Content Requirements
While creating YouTube Shorts, there are certain guidelines that must be followed. These points include:
- YouTube Shorts videos must not be more than 60 seconds long
- The videos must be vertically shot, and must not be in the landscape orientation
- You can have multiple short videos clubbed together. However, the total length of the final video must not exceed 60 seconds in duration
- While posting YouTube Shorts videos, the title or the description must contain ‘#shorts’ in it
Certain things that you must keep in mind while creating YouTube Shorts include:
- YouTube Shorts cannot be monetized. However, they can serve as a good medium to attract and redirect the audiences to your main YouTube channel which may contain several videos that are eligible for monetization.
- The number of views and the total playtime of the YouTube Shorts videos DO affect your YouTube channel statistics
4. Where People Can Find YouTube Shorts
As mentioned earlier, YouTube Shorts can be accessed by launching the YouTube app on your Android or iOS device. You can use YouTube Shorts by clicking the + (Add) icon present at the bottom. Once the YouTube Shorts app is initialized, you can easily create and publish short videos by following the simple on-screen instructions.
Part 2: How to Make and Upload a YouTube Shorts Video with Shorts App?
You can follow the instructions given below to make and upload a YouTube Shorts video using the YouTube Shorts app:
Step 1: Record a Video with YouTube Shorts

Launch the YouTube app on your Android or iOS smart device (Samsung Galaxy Note 10+ is used here for demonstration), make sure that you are signed in to your Google account, tap the + (Add) button present at the bottom of the screen, tap Create a Short on the popup box that appears next, tap the Record button on the next window to start the recording. Once you are done, tap the Stop button to stop the recording.
Step 2: Edit the Video
Tap Music from the bottom of the screen to add background music to the video. The music that you can use in your short videos must be either created by you, or you should have permission to use them. However, the audio files that the Music library contains is made available by Google, is royalty-free, and can be used throughout the platform.

Likewise, you can tap Text to add captions as well. As for the text type, the app offers various formatting options such as alignment (left, center, and right), text highlighter, font changer, and even color selector. Further, the Speed and Timer icons at the top-right area allow you to manage the playback speed anywhere between 0.3x to 3x, and automatically stop the recording after the set time limit respectively. Once everything is set up, tap NEXT from the top-right corner to proceed to the next step.
Step 3: Pick Target Audience Type
On the Add details window, tap Select audience, and on the Select audience window, tap to select the appropriate radio button to define whether the video is suitable for kids. Tap the Back button once the target audience is selected.

Step 4: Add Details and Upload the Video
Enter a title for the video in the Title field. Make sure to include #shorts to help YouTube understand that you are preparing a YouTube Shorts video. Next, tap UPLOAD from the upper-right corner of the screen to submit the video for review. Once YouTube reviews the recording and finds it appropriate, it will be published on the portal, and will be visible throughout and even under the Shorts category of the main page.

Part 3: How to Create a Vertical YouTube Shorts Video in Filmora?
The YouTube Shorts app is pretty convenient to access and use alright. However, it doesn’t allow you to fine edit the videos. The app doesn’t even have many filtering options such as Effects, Elements, etc. to make your videos more engaging.
With that said, you can always use an efficient third-party program like Wondershare Filmora to create professionally-looking YouTube Shorts videos to attract your viewers.
When talking about Wondershare Filmora, it is a production and post-production app available for both Windows and Mac computers, and gives tough competition to some of the globally accepted similar programs like Adobe Premiere Pro, Final Cut Pro X, etc. Furthermore, Filmora has its own built-in screen, webcam, and voice recording features that can be used to prepare interactive videos, game walkthroughs, and voiceovers as needed.
For Win 7 or later (64-bit)
 Secure Download
For macOS 10.12 or later
Secure Download
The following step-by-step guide teaches you how to use Wondershare Filmora to create a vertical YouTube Shorts video:
Note: Before proceeding to the instructions, make sure that you have already recorded a vertical video using your cellphone, and that it has been transferred to your PC.
Step 1: Add the Video to Timeline
Launch Wondershare Filmora on your Windows or Mac PC (a Windows 10 computer is used here for demonstration), go to File > New Project, and click 9:16 (Portrait). Click anywhere inside the Media box, and select and import the source vertical video from your PC to Filmora.
Next, hover the mouse over the clip in the Media box, click the + button that appears at the bottom-right corner of the thumbnail, and in the resolution confirmation box that comes up next, click the button under the Match to Media section to add the video in the correct orientation to the Timeline at the bottom.
Step 2: Edit the Video
Select the clip in the Timeline, and use the Split, Crop, Speed, etc. buttons above the Timeline itself to remove the unwanted portions from the clip, manage its playback speed, and do other fine-tuning tasks.

You can even click the Edit button, and use the available editing features like Motion Tracking and Stabilization to add text or objects to a moving body in the video and stabilize the clip if the camera shook during the recording session respectively. Click OK to save the changes when done.

Note: To be able to remain compliant with the YouTube Shorts policies, make sure that the video length is no longer than 60 seconds.
Step 3: Beautify the Video

Click Titles from the standard toolbox at the top, choose your preferred text category from the list in the left, hover the mouse over a decent preset in the right window, and click the + button at the bottom-right corner of the thumbnail to add the preset on top of the media track in the Timeline. Next, you can double-click the preset track in the Timeline to modify the text and make granular modifications to it as needed. Click OK to save the changes.
Similarly, you can select the Effects and Elements tools to add effects and elements to the video as needed. To add background music, you can go to the Audio tool, and pick your preferred preset from the available options. A custom music can be added by going to the Media tool, and importing an audio file from your PC using the method explained in Step 1.

After this, optionally, you can go to Split Screen from the standard toolbar at the top, and use your preferred Split Screen preset to club multiple video clips into one screen. In Filmora, you can add as many as 6 screens in a video.
For Win 7 or later (64-bit)
Secure Download
For macOS 10.12 or later
Secure Download
Step 4: Render the Final Output
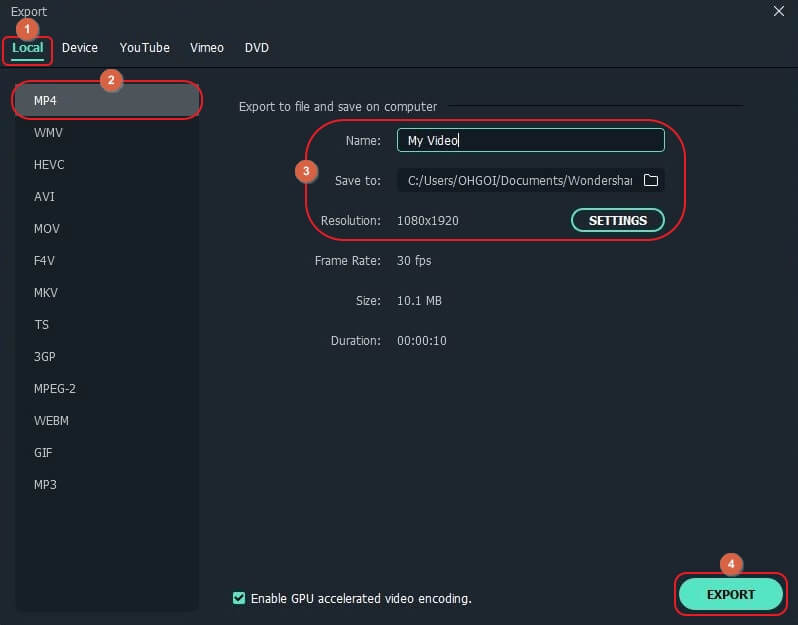
Once everything is set up, click EXPORT from the top of the window, go to the Local tab on the Export window, select MP4 from the formats list in the left, give a name and configure other settings from the available options in the right, and click EXPORT from the bottom-right corner to create a YouTube Shorts video. Once the clip is generated, you can upload the video to YouTube using #Shorts in the title or description to publish the video under the YouTube Shorts section.
FAQs About YouTube Shorts
- Where to download the YouTube Shorts app?
The YouTube Shorts app is already present in the YouTube app that your Android or iOS smartphone has. All you need to do to access it is, sign in to your Google account, tap the + button at the bottom, and tap Create a Short in the popup box that comes up.
- What if YouTube Shorts is not showing on my YouTube app?
Make sure that your YouTube app is updated to its latest version. If the app is already updated, and YouTube Shorts is still unavailable, the chances are that Google hasn’t rolled the app in your region. Since YouTube Shorts is still in its Beta phase, only the region of India can use all the functions of the app at the time of this writing. In such a case, you are suggested to wait until the YouTube Shorts app is made available for your location.
- What’s the YouTube Shorts video duration?
A YouTube Shorts video can be of only up to 60 seconds.
- What’s the YouTube Shorts size limitation?
YouTube hasn’t provided any information related to this as of now. However, you can rest assure that a 60 seconds long video file wouldn’t be too large for YouTube to handle.
- How many subs do you need to access Shorts?
YouTube Shorts is available for everyone regardless of the number of subscribers the channel has.
- Can you make money on Shorts?
Unfortunately, NO. Although you cannot monetize the recordings published as YouTube Shorts, they can be a good source to drive subscribers to your main YouTube channel that may have the videos that can be monetized.
Richard Bennett
Richard Bennett is a writer and a lover of all things video.
Follow @Richard Bennett
Richard Bennett
Mar 27, 2024• Proven solutions
Since smartphones are cheap and easily available in the market today, and there is also a huge range of contents to view online, a majority of users prefer watching videos that are both short enough to convey the message within a few seconds, and can be seen on your phone’s screen with decent picture quality. Considering this, Google lately came up with a Tik Tok-style app calledYouTube shorts that can be accessed right from your Android or iPhone as long as you are using the YouTube app, and are signed in to your Google account.
That said, in the following sections you will learn everything about the YouTube Shorts app, and how it could help you gain more viewers for your YouTube channel.
- Part 1: What Is YouTube Shorts?
- Part 2: How to Make and Upload a YouTube Shorts Video with Shorts App?
- Part 3: Creating Vertical YouTube Shorts Video in Filmora [Step by Step Tutorial]
Part 1: What Is YouTube Shorts?
A short and quick answer to the question is, YouTube Shorts is a Tik Tok competitor developed by Google and can be accessed via the YouTube app on an Android or iOS device. In order to use the YouTube Shorts app, all you need to do is, sign in to your YouTube account on the YouTube app, and you are good to go.
1. YouTube Shorts Release History
At the time of this writing, YouTube Shorts is still in the Beta phase, and there is a lot more that the developers at Google have yet to explore and discover. However, for now, the fully functional variant of the program is available only for users in India on Android and iOS platforms.
2. YouTube Shorts Target Audience
A majority of people who can be called the target audience for YouTube Shorts are the artists and creators looking forward to getting noticed. Some of them could also be among those who wish to become an influencer, or get their YouTube channel more subscribers to be able to become eligible for YouTube Partnership Program.
And of course, the viewers and subscribers cannot be left alone when talking about the target audiences of YouTube Shorts as without them, there’s no point in creating short videos in the first place.
The type of contents that the viewers expect to see as YouTube Shorts could include:
- Entertainment – While movies are of longer duration, roasting the characters in it, or explaining some other stuff to the subscribers could be one of the things that could keep the viewers engaged
- Gaming – Some extraordinary gaming tips, tricks, and skills can be demonstrated in a short video
- How-To – A couple of brief how-to illustrations can yet be another attraction for DIY-loving viewers
- Science and Technology – A short introduction of upcoming gadgets or applications along with their usability can be explained within the timeframe of 60 seconds as well
In addition to the above, a few other categories could be People and Places, Music, Domestic and Wild Animals, Education, etc.
3. YouTube Shorts Content Requirements
While creating YouTube Shorts, there are certain guidelines that must be followed. These points include:
- YouTube Shorts videos must not be more than 60 seconds long
- The videos must be vertically shot, and must not be in the landscape orientation
- You can have multiple short videos clubbed together. However, the total length of the final video must not exceed 60 seconds in duration
- While posting YouTube Shorts videos, the title or the description must contain ‘#shorts’ in it
Certain things that you must keep in mind while creating YouTube Shorts include:
- YouTube Shorts cannot be monetized. However, they can serve as a good medium to attract and redirect the audiences to your main YouTube channel which may contain several videos that are eligible for monetization.
- The number of views and the total playtime of the YouTube Shorts videos DO affect your YouTube channel statistics
4. Where People Can Find YouTube Shorts
As mentioned earlier, YouTube Shorts can be accessed by launching the YouTube app on your Android or iOS device. You can use YouTube Shorts by clicking the + (Add) icon present at the bottom. Once the YouTube Shorts app is initialized, you can easily create and publish short videos by following the simple on-screen instructions.
Part 2: How to Make and Upload a YouTube Shorts Video with Shorts App?
You can follow the instructions given below to make and upload a YouTube Shorts video using the YouTube Shorts app:
Step 1: Record a Video with YouTube Shorts
Launch the YouTube app on your Android or iOS smart device (Samsung Galaxy Note 10+ is used here for demonstration), make sure that you are signed in to your Google account, tap the + (Add) button present at the bottom of the screen, tap Create a Short on the popup box that appears next, tap the Record button on the next window to start the recording. Once you are done, tap the Stop button to stop the recording.
Step 2: Edit the Video
Tap Music from the bottom of the screen to add background music to the video. The music that you can use in your short videos must be either created by you, or you should have permission to use them. However, the audio files that the Music library contains is made available by Google, is royalty-free, and can be used throughout the platform.
Likewise, you can tap Text to add captions as well. As for the text type, the app offers various formatting options such as alignment (left, center, and right), text highlighter, font changer, and even color selector. Further, the Speed and Timer icons at the top-right area allow you to manage the playback speed anywhere between 0.3x to 3x, and automatically stop the recording after the set time limit respectively. Once everything is set up, tap NEXT from the top-right corner to proceed to the next step.
Step 3: Pick Target Audience Type
On the Add details window, tap Select audience, and on the Select audience window, tap to select the appropriate radio button to define whether the video is suitable for kids. Tap the Back button once the target audience is selected.
Step 4: Add Details and Upload the Video
Enter a title for the video in the Title field. Make sure to include #shorts to help YouTube understand that you are preparing a YouTube Shorts video. Next, tap UPLOAD from the upper-right corner of the screen to submit the video for review. Once YouTube reviews the recording and finds it appropriate, it will be published on the portal, and will be visible throughout and even under the Shorts category of the main page.
Part 3: How to Create a Vertical YouTube Shorts Video in Filmora?
The YouTube Shorts app is pretty convenient to access and use alright. However, it doesn’t allow you to fine edit the videos. The app doesn’t even have many filtering options such as Effects, Elements, etc. to make your videos more engaging.
With that said, you can always use an efficient third-party program like Wondershare Filmora to create professionally-looking YouTube Shorts videos to attract your viewers.
When talking about Wondershare Filmora, it is a production and post-production app available for both Windows and Mac computers, and gives tough competition to some of the globally accepted similar programs like Adobe Premiere Pro, Final Cut Pro X, etc. Furthermore, Filmora has its own built-in screen, webcam, and voice recording features that can be used to prepare interactive videos, game walkthroughs, and voiceovers as needed.
For Win 7 or later (64-bit)
Secure Download
For macOS 10.12 or later
Secure Download
The following step-by-step guide teaches you how to use Wondershare Filmora to create a vertical YouTube Shorts video:
Note: Before proceeding to the instructions, make sure that you have already recorded a vertical video using your cellphone, and that it has been transferred to your PC.
Step 1: Add the Video to Timeline
Launch Wondershare Filmora on your Windows or Mac PC (a Windows 10 computer is used here for demonstration), go to File > New Project, and click 9:16 (Portrait). Click anywhere inside the Media box, and select and import the source vertical video from your PC to Filmora.
Next, hover the mouse over the clip in the Media box, click the + button that appears at the bottom-right corner of the thumbnail, and in the resolution confirmation box that comes up next, click the button under the Match to Media section to add the video in the correct orientation to the Timeline at the bottom.
Step 2: Edit the Video
Select the clip in the Timeline, and use the Split, Crop, Speed, etc. buttons above the Timeline itself to remove the unwanted portions from the clip, manage its playback speed, and do other fine-tuning tasks.
You can even click the Edit button, and use the available editing features like Motion Tracking and Stabilization to add text or objects to a moving body in the video and stabilize the clip if the camera shook during the recording session respectively. Click OK to save the changes when done.
Note: To be able to remain compliant with the YouTube Shorts policies, make sure that the video length is no longer than 60 seconds.
Step 3: Beautify the Video
Click Titles from the standard toolbox at the top, choose your preferred text category from the list in the left, hover the mouse over a decent preset in the right window, and click the + button at the bottom-right corner of the thumbnail to add the preset on top of the media track in the Timeline. Next, you can double-click the preset track in the Timeline to modify the text and make granular modifications to it as needed. Click OK to save the changes.
Similarly, you can select the Effects and Elements tools to add effects and elements to the video as needed. To add background music, you can go to the Audio tool, and pick your preferred preset from the available options. A custom music can be added by going to the Media tool, and importing an audio file from your PC using the method explained in Step 1.
After this, optionally, you can go to Split Screen from the standard toolbar at the top, and use your preferred Split Screen preset to club multiple video clips into one screen. In Filmora, you can add as many as 6 screens in a video.
For Win 7 or later (64-bit)
Secure Download
For macOS 10.12 or later
Secure Download
Step 4: Render the Final Output
Once everything is set up, click EXPORT from the top of the window, go to the Local tab on the Export window, select MP4 from the formats list in the left, give a name and configure other settings from the available options in the right, and click EXPORT from the bottom-right corner to create a YouTube Shorts video. Once the clip is generated, you can upload the video to YouTube using #Shorts in the title or description to publish the video under the YouTube Shorts section.
FAQs About YouTube Shorts
- Where to download the YouTube Shorts app?
The YouTube Shorts app is already present in the YouTube app that your Android or iOS smartphone has. All you need to do to access it is, sign in to your Google account, tap the + button at the bottom, and tap Create a Short in the popup box that comes up.
- What if YouTube Shorts is not showing on my YouTube app?
Make sure that your YouTube app is updated to its latest version. If the app is already updated, and YouTube Shorts is still unavailable, the chances are that Google hasn’t rolled the app in your region. Since YouTube Shorts is still in its Beta phase, only the region of India can use all the functions of the app at the time of this writing. In such a case, you are suggested to wait until the YouTube Shorts app is made available for your location.
- What’s the YouTube Shorts video duration?
A YouTube Shorts video can be of only up to 60 seconds.
- What’s the YouTube Shorts size limitation?
YouTube hasn’t provided any information related to this as of now. However, you can rest assure that a 60 seconds long video file wouldn’t be too large for YouTube to handle.
- How many subs do you need to access Shorts?
YouTube Shorts is available for everyone regardless of the number of subscribers the channel has.
- Can you make money on Shorts?
Unfortunately, NO. Although you cannot monetize the recordings published as YouTube Shorts, they can be a good source to drive subscribers to your main YouTube channel that may have the videos that can be monetized.
Richard Bennett
Richard Bennett is a writer and a lover of all things video.
Follow @Richard Bennett
Also read:
- 2024 Approved Charting a Path to Monthly Earnings From YouTube
- [New] Efficiently Shifting Videos YouTube to Dailymotion Strategy
- [New] Concise Content The Best URL Cutter Tools for Youtubers
- [New] Best YouTube Video Ideas to Spark Inspiration
- [New] Eco-Filmmaking Simplified YouTube's Green Screen Wonders
- In 2024, Cash Rides High with Well-Crafted YouTube Shorts
- 2024 Approved Discover the Leading Free Naming Resources - 11 Must-Have Makers
- Crafting Compelling YouTube Content Through Split-Screens
- Essential ASMR Creators to Follow for 2024
- Channel Collaboration Unified Watch Experience Across Platforms
- Unparalleled Video Grabber Suite - Your Download Delight
- [New] Cross-Media Content Flow From YouTube to Thirty+ Others
- YouTube TV Demystified Your Complete Reference
- Easy Steps for Stellar YouTube Thumbnails
- Safekeeping Your Online Space Youtube Channel Blocking Guide
- [Updated] Complete Walkthrough to Grab YouTube Playlists
- Transform Your Viewership with Immersive 360° Livestreams on YouTube
- Elevate Your YouTube Presence with Expert iDevice Screen Techniques
- Identifying Creator Types Six Intriguing YouTube Categorization Tests
- Spark Sponsorships A Guide to Easy Fundraising for Budget Channels
- Leverage Timestamps Tactics to Skyrocket Video Views
- In 2024, Audio Visual Caption Builder
- 2024 Approved Detailed Tips for Adequate Lighting in YouTube Video Production
- Becoming a Master at the Art of Engaging Thumbnails
- Detailed Guide to Convert YouTube Shorts to Mp4
- Snappy and Simple Steps for Posting Short Videos Online
- Brand Visualization Inserting Watermarks and Logos Into YouTube Media
- [New] Earning Power Up Embracing the Techniques of Sourav Joshi by 2024
- 2024 Approved 15 Best Free YouTube Introduction Tools
- 2024 Approved A Step-by-Step Approach to Mastering Free YouTube Video Transcription
- [Updated] Building a Channel Team-Up Videography Guide
- In 2024, Elevate Your Social Media Presence with These High-Impact YouTube Strategies
- [Updated] Audiovisual Alchemy Formulating Your YouTube Playlist
- Captivate and Enchant Explore the Best Creative Reactions on YT for 2024
- In 2024, Dance of Words Crafting Bouncing Text Effects
- [New] Content Strategy Unleashed - Top 8 YouTube Ranks Explored
- [Updated] Cultivate Creativity 10+ Channel-Driven Video Suggestions
- In 2024, Boosting Your Channels' Viewer Loyalty Essential Tactics Unveiled
- Building a Cross-Platform Social Media Presence
- Amplify Your Channels Evading Synthetic Watchers
- 2024 Approved Evolving Channels 8 Fastest Video Climbers
- Become a Freelance Transcriber Tips and Tricks for YouTube Content
- [New] Curate a Perfect Playlist on YouTube A Step-by-Step Guide
- [New] DIY Audio Excellence No Mic Necessary
- New In 2024, Top 10 Free Image Resources
- 4 Ways to Transfer Music from Oppo A1x 5G to iPhone | Dr.fone
- New 2024 Approved VN Video Editor for PC A Short and Sweet Review
- Updated 2024 Approved How to Extract Audio From YouTube Videos A Step-by-Step Guide
- Commanding the Crowd on IGTV 5 Tips to Gain Traction for 2024
- New Instagram Video Formatting 101 A Beginners Guide to Aspect Ratios and Dimensions for 2024
- 2024 Approved Best Sound Extractor How to Extract Sound From Video?
- Edit and Send Fake Location on Telegram For your Poco C51 in 3 Ways | Dr.fone
- Facebook Video Downloader Round-Up #1-5 Edition
- [Updated] The Ultimate Checklist for FB Cover Video Excellence
- [New] In 2024, Streamlining Presentations The Art of Screen Casting in Discord
- [New] 2024 Approved Best 5 Digital Recorder Selects
- 2024 Approved Best Practices for an Immersive Streaming Experience
- ASUS ProArt PA32U 4K HDR Professional Monitor Review for 2024
- [Updated] In 2024, Explore Next-Level TikTok Edits with Simple Background Swapping Techniques
- Effortless Crossposting YouTube Links to IG Stories
- [New] 2024 Approved Achieving Seamless Synchronization on Desktop & Mobile
- [Updated] In 2024, Top 10 TikTok Campaigns and How to Make a Successful Campaign
- [New] In 2024, The Screencast Lifeline Crucial Knowledge for Success
- How to Use Google Assistant on Your Lock Screen Of Realme GT 5 Phone
- [New] In 2024, Avoiding Common Pitfalls in Discord Video Broadcasts
- Unlock Lightning-Fast Conversions Choosing the Best YouTube to MP4 Tool for 2024
- New Essential Video Editing Tools for Newbies for 2024
- [Updated] In 2024, Seamless Online Video Sharing via Vimeo
- Warrior's Path A List of Intense Fighting Games for 2024
- Mac's Best GIF Capture Tools Ranked and Reviewed for 2024
- 2024 Approved Master the Art of Social Media Analytics Understanding IG Data
- In 2024, Complete Guide For Apple iPhone XS Max Lock Screen
- Title: "Unlocking the Power of Revenue Streams YouTubers' AdSense Manual"
- Author: Kevin
- Created at : 2024-05-25 16:32:52
- Updated at : 2024-05-26 16:32:52
- Link: https://youtube-videos.techidaily.com/unlocking-the-power-of-revenue-streams-youtubers-adsense-manual/
- License: This work is licensed under CC BY-NC-SA 4.0.
