
:max_bytes(150000):strip_icc()/GettyImages-752179111-e4cc13e6bc184d0cb0ccfca448ce9aa0.jpg)
"Unlock Higher Rankings Essential Tips to Elevate Your YT Content"
Unlock Higher Rankings: Essential Tips to Elevate Your YT Content
Improve Your YouTube Video Performance with Wondershare Filmora
An easy and powerful video editor
Numerous video and audio effects to choose from
Detailed tutorials provided by the official channel
More than 85% of businesses use YouTube videos as a marketing tool. YouTube is the second most visited website on the internet, with users uploading over 500 hours of video content every minute. Because video SEO is constantly evolving, you need to stay current on optimization best practices to rank higher on search results.
Luckily, this article offers YouTube SEO tips to help you create a solid strategy that will help you rank your videos.
In this article
11 Useful YouTube SEO Tips to Help Boost Your Video Ranking
How Does YouTube SEO Work?
YouTube SEO is an excellent way to ensure your videos get more views. The main goal of YouTube SEO is to rank high for specific keywords in search engines. As such, it is crucial to know how YouTube SEO works if you want to boost the ranking of your videos.
Whether you are a blogger, market researcher, or video marketer, you need YouTube SEO to generate traffic to your videos. YouTube SEO involves optimizing your videos, channel, descriptions, metadata, and playlists. You can optimize videos for search within and outside YouTube.
Because search engine bots can’t watch YouTube videos, they depend on accompanying text data when indexing them. So you must also know how to harness the power of text in your video, which can positively impact SEO, viewership, engagement, and user experience.
Watch Video: YouTube SEO Tips 2022: Boost Your Video Ranking
11 Useful YouTube SEO Tips to Help Boost Your Video Ranking
Want to drive more traffic and increase your video views? Here are eleven YouTube SEO tips that will help you to boost your video ranking.
1. Conduct Keyword Research First

When it comes to YouTube SEO, keywords are crucial. YouTube uses these keywords to determine the subject of your video, index the content, and then associate it with what users are searching for. As such, you must add them to certain fields, including description, tags, and title, when you are uploading the video file. YouTube will then get this information and use it to rank your video.
For this reason, you have to know the keywords that best identify your videos and have the potential to attract viewers to your channel.
2. Use a Good Video Title

The title of your video is the first thing other people see, and it’s what decides whether or not they watch it. Given how important it is, you’ll want to make sure that your title accurately reflects the content of your video and includes all relevant keywords.
3. Link Your Videos Directly to Your Website
Each time you publish a new video, make sure you embed it on your website or blog. Not only will this encourage viewers to stay on your website instead of leaving immediately, but it will also make it easier for search engines crawlers to index your website.
4. Add Tags To The Video Description

When you upload your video, remember to add tags to the “About” section of the page. You can do this by adding some relevant keywords with each tag like you would with blog posts.
When planning your strategy for YouTube keywords, you need to find 10-20 single keyword tags you want to rank for; keep in mind that this platform limits the number of tags users can include in a video. So you should first add the most relevant keyword phrases then include specific multi-word tags that will easily rank on top of search results.
5. Edit The Filename

The filename of your video, or the “video URL,” can also affect its rankings. Including keywords in this section will help the crawlers index your video faster, which will increase its chances of ranking higher.
6. Add Subtitles and Closed Captions
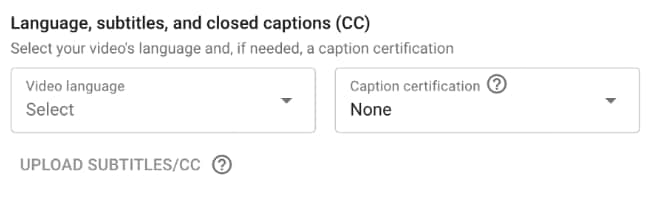
Adding subtitles and closed captions to your videos is also a good idea, especially if you want the video’s ranking and viewership to improve. Subtitles make it easier for new viewers to understand your videos, especially if your audience comes from different linguistic backgrounds.
7. Select Video Category
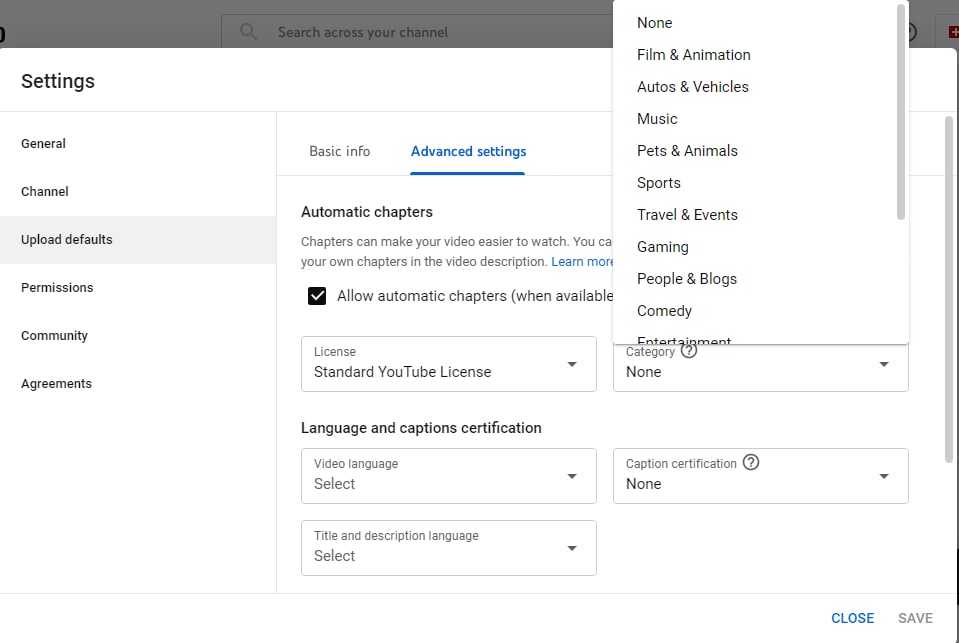
When uploading a video, be sure to select the most appropriate category for it. Essentially, this helps with SEO optimization because choosing the right category means that YouTube’s algorithm will place your video in the proper search results. In turn, viewers will easily find your video and watch it.
8. Use a Compelling Thumbnail

Make sure you use the right YouTube video thumbnail image , as this makes a big difference in the click-through rate. You might want to use high-quality, high-contrast images with a 16:9 aspect ratio. YouTube will choose which frame it will display as the video thumbnail. The platform will present three screenshots that you can choose from; however, you can upload your image or select a shot of another moment in the video.
Remember that YouTube overlays the duration of the video in the corner of your thumbnail. So make sure it does not obstruct any relevant details in your thumbnail. Google also uses image recognition to filter out specific imagery, including the YouTube logo.
Ideally, you need an image that is a perfect visual representation of the keywords you are targeting. In turn, this is going to take your presence in relevant search results even further.
9. Make High-Quality Longer
Videos that are less than 2 minutes long often rank low. The duration of most of the videos in the first five positions is usually 11 minutes 44 seconds. Therefore, you need to invest in longer videos that are around 10 minutes long. These videos meet the expectations of many users seeking complete and in-depth content. Additionally, you should create high-quality videos to ensure your viewers will keep watching.
Create High-Quality YouTube Video with Filmora
Wondershare’s Filmora program allows you to edit your video content with trim, transitions, and overlays. You can also add cool effects to your videos to make them more captivating. It also includes advanced editing features like Key Framing, Motion Tracking and more. Learn about Filmora now!
Improve Your YouTube Video Performance with Wondershare Filmora
An easy and powerful video editor
Numerous video and audio effects to choose from
Detailed tutorials provided by the official channel
10. Focus on User Engagement
Encourage your audience to like, comment, and share your videos. You should also respond to messages and comments. These engagement metrics strongly correlate with higher rankings.
Google cares about how people respond to your content because this is what keeps people on their platform.
11. Add End Screens and YouTube Cards

YouTube cards encourage viewers to take action during your video. The cards show up in the top right corner of your videos; users can click on and explore more. Using YouTube cards is an excellent way to boost your ranking. YouTube allows you to add a maximum of five cards to each video.
Conclusion
Using these YouTube SEO tips will ensure that your videos rank on top search results. That means more people will watch your videos and subscribe to your channel. Let’s start editing now!
More than 85% of businesses use YouTube videos as a marketing tool. YouTube is the second most visited website on the internet, with users uploading over 500 hours of video content every minute. Because video SEO is constantly evolving, you need to stay current on optimization best practices to rank higher on search results.
Luckily, this article offers YouTube SEO tips to help you create a solid strategy that will help you rank your videos.
In this article
11 Useful YouTube SEO Tips to Help Boost Your Video Ranking
How Does YouTube SEO Work?
YouTube SEO is an excellent way to ensure your videos get more views. The main goal of YouTube SEO is to rank high for specific keywords in search engines. As such, it is crucial to know how YouTube SEO works if you want to boost the ranking of your videos.
Whether you are a blogger, market researcher, or video marketer, you need YouTube SEO to generate traffic to your videos. YouTube SEO involves optimizing your videos, channel, descriptions, metadata, and playlists. You can optimize videos for search within and outside YouTube.
Because search engine bots can’t watch YouTube videos, they depend on accompanying text data when indexing them. So you must also know how to harness the power of text in your video, which can positively impact SEO, viewership, engagement, and user experience.
Watch Video: YouTube SEO Tips 2022: Boost Your Video Ranking
11 Useful YouTube SEO Tips to Help Boost Your Video Ranking
Want to drive more traffic and increase your video views? Here are eleven YouTube SEO tips that will help you to boost your video ranking.
1. Conduct Keyword Research First
When it comes to YouTube SEO, keywords are crucial. YouTube uses these keywords to determine the subject of your video, index the content, and then associate it with what users are searching for. As such, you must add them to certain fields, including description, tags, and title, when you are uploading the video file. YouTube will then get this information and use it to rank your video.
For this reason, you have to know the keywords that best identify your videos and have the potential to attract viewers to your channel.
2. Use a Good Video Title
The title of your video is the first thing other people see, and it’s what decides whether or not they watch it. Given how important it is, you’ll want to make sure that your title accurately reflects the content of your video and includes all relevant keywords.
3. Link Your Videos Directly to Your Website
Each time you publish a new video, make sure you embed it on your website or blog. Not only will this encourage viewers to stay on your website instead of leaving immediately, but it will also make it easier for search engines crawlers to index your website.
4. Add Tags To The Video Description
When you upload your video, remember to add tags to the “About” section of the page. You can do this by adding some relevant keywords with each tag like you would with blog posts.
When planning your strategy for YouTube keywords, you need to find 10-20 single keyword tags you want to rank for; keep in mind that this platform limits the number of tags users can include in a video. So you should first add the most relevant keyword phrases then include specific multi-word tags that will easily rank on top of search results.
5. Edit The Filename
The filename of your video, or the “video URL,” can also affect its rankings. Including keywords in this section will help the crawlers index your video faster, which will increase its chances of ranking higher.
6. Add Subtitles and Closed Captions
Adding subtitles and closed captions to your videos is also a good idea, especially if you want the video’s ranking and viewership to improve. Subtitles make it easier for new viewers to understand your videos, especially if your audience comes from different linguistic backgrounds.
7. Select Video Category
When uploading a video, be sure to select the most appropriate category for it. Essentially, this helps with SEO optimization because choosing the right category means that YouTube’s algorithm will place your video in the proper search results. In turn, viewers will easily find your video and watch it.
8. Use a Compelling Thumbnail
Make sure you use the right YouTube video thumbnail image , as this makes a big difference in the click-through rate. You might want to use high-quality, high-contrast images with a 16:9 aspect ratio. YouTube will choose which frame it will display as the video thumbnail. The platform will present three screenshots that you can choose from; however, you can upload your image or select a shot of another moment in the video.
Remember that YouTube overlays the duration of the video in the corner of your thumbnail. So make sure it does not obstruct any relevant details in your thumbnail. Google also uses image recognition to filter out specific imagery, including the YouTube logo.
Ideally, you need an image that is a perfect visual representation of the keywords you are targeting. In turn, this is going to take your presence in relevant search results even further.
9. Make High-Quality Longer
Videos that are less than 2 minutes long often rank low. The duration of most of the videos in the first five positions is usually 11 minutes 44 seconds. Therefore, you need to invest in longer videos that are around 10 minutes long. These videos meet the expectations of many users seeking complete and in-depth content. Additionally, you should create high-quality videos to ensure your viewers will keep watching.
Create High-Quality YouTube Video with Filmora
Wondershare’s Filmora program allows you to edit your video content with trim, transitions, and overlays. You can also add cool effects to your videos to make them more captivating. It also includes advanced editing features like Key Framing, Motion Tracking and more. Learn about Filmora now!
Improve Your YouTube Video Performance with Wondershare Filmora
An easy and powerful video editor
Numerous video and audio effects to choose from
Detailed tutorials provided by the official channel
10. Focus on User Engagement
Encourage your audience to like, comment, and share your videos. You should also respond to messages and comments. These engagement metrics strongly correlate with higher rankings.
Google cares about how people respond to your content because this is what keeps people on their platform.
11. Add End Screens and YouTube Cards
YouTube cards encourage viewers to take action during your video. The cards show up in the top right corner of your videos; users can click on and explore more. Using YouTube cards is an excellent way to boost your ranking. YouTube allows you to add a maximum of five cards to each video.
Conclusion
Using these YouTube SEO tips will ensure that your videos rank on top search results. That means more people will watch your videos and subscribe to your channel. Let’s start editing now!
Streamlining Creative Journey: Uploading iMovie Videos to YouTube
How to Upload a Video from iMovie to YouTube?

Liza Brown
Aug 18, 2022• Proven solutions
“Is iMovie good for YouTube?”
The iMovie is not only good for YouTube but various other social media platforms. The thing is, you have to compromise with the quality offered by Apple’s video editor iMovie. Well, iMovie is perfect for getting started for beginners. But, the professionals and ones who want a bit high features than basic ones should look elsewhere. Thus, we always recommend alternatives to a particular software for our audience. In this article, there is a mention of Wondershare Filmora to overcome the drawbacks of iMovie.
Without further ado, let’s begin with how to upload a video from iMovie to YouTube. We want to lead with the best iMovie export settings, specific troubleshooting issues, and our alternative intro section to overcome iMovie’s limitations.
Part 1: How to Upload a Video from iMovie to YouTube?
iMovie is ideal for making YouTube videos if you are too basic and are not looking for advanced features. Remember that professionalism pays in these platforms and helps you stand better among others. If you’re still interested in making introductory videos, here is a step-by-step guide on uploading a video to YouTube from iMovie on Mac first and leading with iPhone.
Step-by-Step Tutorial on how to upload a video from iMovie to YouTube on Mac
Step 1: Create a Project
On the first step, go to iMovie on Mac and click the Create New tab below.
Step 2: Import Media
Click the Import Media button and browse the files on your computer, as shown below.
Step 3: Edit Clips
It’s time to edit video footage. Drag your video to the timeline, as shown below.
Then, you can trim and drag the edges of video clips to allow editing.
Step 4: Add Titles
You can add titles by clicking the Title tab and further drag the Title’s template into the timeline.
Step 5: Export the Video
Click the Export button as follows after editing is over.
Select YouTube to upload your video over the platform directly.
Step 6: Save
After selecting the desired platform, click the Next tab to proceed with saving the file.
At last, save your video as shown below.
Step-by-Step Tutorial on how to upload iMovie to YouTube from iPhone
Step 1: Share the iMovie Project
Go to iMovie on your iPhone. Open the iMovie project on your iPhone and tap the Share button to select YouTube. Enter the information of Title, Description, Size, Tags, Privacy, and Location (optional).
Step 2: Upload iMovie Files
For ease of use, you can upload saved videos in Photo Library on your iPhone. Then, you can upload iMovie videos via the YouTube iOS app. Sign In to YouTube and click the Camera icon at the top of the Home page. Select your iPhone Photo Library file and set the video Title, Description, Size, Tags, and Privacy. Then, hit the Upload button to confirm.
Part 2: The Best iMovie Export Settings for YouTube Videos
As we all know that iMovie consists of a bit long procedure to export projects. Here are some tips on the best iMovie export settings to avoid an unnecessary headache.
- Set small resolution: Small resolution plays a more significant role, especially while uploading. Thus, you can set the smallest resolution in the Email tab of the Export button.
2. Change Export settings in the File tab: There is a File tab under the Export button. Click it and find various settings that you need to change to get the best export settings for YouTube 2021. Make the Title of the video as small as possible. Set the resolution at 1080P than 4K.
However, it isn’t going to upgrade the resolution if your video is already in the 1080P definition. Now, the last setting that will crazily offer you the best quality and lots of space-saving. You have to select Best (ProRes) in quality settings for this purpose. These settings also take less time to upload to YouTube.
3. Compress is not for speed: Various options you see in the Compresstab are not for speed. They are for how you save the video on a desktop. Thus, always choose the Better Quality tab than Faster.
- Do not export directly to YouTube: iMovie is pretty basic and doesn’t offer great settings to upload your video instantly. You may have to make changes to the uploaded video even if you do this as per our step-by-step guide mentioned above.
Part 3: How to fix the “Failed to Upload to YouTube” Error on iMovie?
The “iMovie to YouTube failed” problem occurs when you directly upload a YouTube video from iMovie. The issue will result if you upload from any third-party uploader. That is why the direct upload doesn’t work, especially in iMovie. You can opt to share your video to the desktop first and then drag it to upload to the YouTube platform.
Part 4: Upload Videos to YouTube with the Best Alternative to iMovie - Wondershare Filmora
“What can I use instead of iMovie to overcome its limitations?”
When you see that iMovie is not uploading to YouTube or iMovie upload to YouTube got stuck, go for a better alternative. In this section, we’d like to recommend Wondershare Filmora that offers the best export settings compared to iMovie. It is the go-to solution if you can’t upload video from iMovie to YouTube directly. Filmora further provides intuitive editing tools that professionally make your YouTube video projects.
Export Key Aspects of Wondershare Filmora in comparison to iMovie:
- It offers a long list of export resolutions to choose from.
- You get separate video and audio settings such as Encoder, Channel, Frame Rate, Bit Rate, Resolution, etc.
- It is further compatible with export to various devices including the iPhone, Samsung, iPod, Apple TV, iPad, Google Pixel, PSP, Smart TV, etc.
Step-by-Step Guide on how to upload a video from iMovie to YouTube via Wondershare Filmora
Step 1: Click the Export button and select resolution
After your project in Wondershare Filmora is over, click the Export tab and select video resolution from the Local tab, as shown below.
It has a list of formats. You can also edit the Name and saving location here.
Step 2: Select Quality
Select the Settings button and choose from three quality levels of Best, Better, and Good. You can also adjust video and audio parameters, including the Encoder, Frame Rate, Resolution, Bit Rate, etc.
Step 3: Select platform
Select the YouTube tab, Sign In to your YouTube account, and hit the Export button after modifying the Title and Quality if needed. Also, make sure to check the Enable GPU accelerated video encoding tab.
Select Wondershare Filmora as the ultimate solution even if iMovie upload to YouTube not showing up.
Conclusion
Hopefully, we’ve informed you of the relevant facts on how to upload a video from iMovie to YouTube. We have also examined the number of troubleshooting issues involved in the iMovie video editor. Well, you will get to face similar kinds of export difficulties in the iMovie editor. Also, the entire procedure to end the exporting task is a bit long in iMovie compared to any other video editing software. Thus, it’s crucial to check out what other alternatives the technological world has today. We can’t state to you a better beginner-friendly yet advanced editing option than Wondershare Filmora that rightly outtakes the iMovie video editor in all aspects.
Liza Brown
Liza Brown is a writer and a lover of all things video.
Follow @Liza Brown
Liza Brown
Aug 18, 2022• Proven solutions
“Is iMovie good for YouTube?”
The iMovie is not only good for YouTube but various other social media platforms. The thing is, you have to compromise with the quality offered by Apple’s video editor iMovie. Well, iMovie is perfect for getting started for beginners. But, the professionals and ones who want a bit high features than basic ones should look elsewhere. Thus, we always recommend alternatives to a particular software for our audience. In this article, there is a mention of Wondershare Filmora to overcome the drawbacks of iMovie.
Without further ado, let’s begin with how to upload a video from iMovie to YouTube. We want to lead with the best iMovie export settings, specific troubleshooting issues, and our alternative intro section to overcome iMovie’s limitations.
Part 1: How to Upload a Video from iMovie to YouTube?
iMovie is ideal for making YouTube videos if you are too basic and are not looking for advanced features. Remember that professionalism pays in these platforms and helps you stand better among others. If you’re still interested in making introductory videos, here is a step-by-step guide on uploading a video to YouTube from iMovie on Mac first and leading with iPhone.
Step-by-Step Tutorial on how to upload a video from iMovie to YouTube on Mac
Step 1: Create a Project
On the first step, go to iMovie on Mac and click the Create New tab below.
Step 2: Import Media
Click the Import Media button and browse the files on your computer, as shown below.
Step 3: Edit Clips
It’s time to edit video footage. Drag your video to the timeline, as shown below.
Then, you can trim and drag the edges of video clips to allow editing.
Step 4: Add Titles
You can add titles by clicking the Title tab and further drag the Title’s template into the timeline.
Step 5: Export the Video
Click the Export button as follows after editing is over.
Select YouTube to upload your video over the platform directly.
Step 6: Save
After selecting the desired platform, click the Next tab to proceed with saving the file.
At last, save your video as shown below.
Step-by-Step Tutorial on how to upload iMovie to YouTube from iPhone
Step 1: Share the iMovie Project
Go to iMovie on your iPhone. Open the iMovie project on your iPhone and tap the Share button to select YouTube. Enter the information of Title, Description, Size, Tags, Privacy, and Location (optional).
Step 2: Upload iMovie Files
For ease of use, you can upload saved videos in Photo Library on your iPhone. Then, you can upload iMovie videos via the YouTube iOS app. Sign In to YouTube and click the Camera icon at the top of the Home page. Select your iPhone Photo Library file and set the video Title, Description, Size, Tags, and Privacy. Then, hit the Upload button to confirm.
Part 2: The Best iMovie Export Settings for YouTube Videos
As we all know that iMovie consists of a bit long procedure to export projects. Here are some tips on the best iMovie export settings to avoid an unnecessary headache.
- Set small resolution: Small resolution plays a more significant role, especially while uploading. Thus, you can set the smallest resolution in the Email tab of the Export button.
2. Change Export settings in the File tab: There is a File tab under the Export button. Click it and find various settings that you need to change to get the best export settings for YouTube 2021. Make the Title of the video as small as possible. Set the resolution at 1080P than 4K.
However, it isn’t going to upgrade the resolution if your video is already in the 1080P definition. Now, the last setting that will crazily offer you the best quality and lots of space-saving. You have to select Best (ProRes) in quality settings for this purpose. These settings also take less time to upload to YouTube.
3. Compress is not for speed: Various options you see in the Compresstab are not for speed. They are for how you save the video on a desktop. Thus, always choose the Better Quality tab than Faster.
- Do not export directly to YouTube: iMovie is pretty basic and doesn’t offer great settings to upload your video instantly. You may have to make changes to the uploaded video even if you do this as per our step-by-step guide mentioned above.
Part 3: How to fix the “Failed to Upload to YouTube” Error on iMovie?
The “iMovie to YouTube failed” problem occurs when you directly upload a YouTube video from iMovie. The issue will result if you upload from any third-party uploader. That is why the direct upload doesn’t work, especially in iMovie. You can opt to share your video to the desktop first and then drag it to upload to the YouTube platform.
Part 4: Upload Videos to YouTube with the Best Alternative to iMovie - Wondershare Filmora
“What can I use instead of iMovie to overcome its limitations?”
When you see that iMovie is not uploading to YouTube or iMovie upload to YouTube got stuck, go for a better alternative. In this section, we’d like to recommend Wondershare Filmora that offers the best export settings compared to iMovie. It is the go-to solution if you can’t upload video from iMovie to YouTube directly. Filmora further provides intuitive editing tools that professionally make your YouTube video projects.
Export Key Aspects of Wondershare Filmora in comparison to iMovie:
- It offers a long list of export resolutions to choose from.
- You get separate video and audio settings such as Encoder, Channel, Frame Rate, Bit Rate, Resolution, etc.
- It is further compatible with export to various devices including the iPhone, Samsung, iPod, Apple TV, iPad, Google Pixel, PSP, Smart TV, etc.
Step-by-Step Guide on how to upload a video from iMovie to YouTube via Wondershare Filmora
Step 1: Click the Export button and select resolution
After your project in Wondershare Filmora is over, click the Export tab and select video resolution from the Local tab, as shown below.
It has a list of formats. You can also edit the Name and saving location here.
Step 2: Select Quality
Select the Settings button and choose from three quality levels of Best, Better, and Good. You can also adjust video and audio parameters, including the Encoder, Frame Rate, Resolution, Bit Rate, etc.
Step 3: Select platform
Select the YouTube tab, Sign In to your YouTube account, and hit the Export button after modifying the Title and Quality if needed. Also, make sure to check the Enable GPU accelerated video encoding tab.
Select Wondershare Filmora as the ultimate solution even if iMovie upload to YouTube not showing up.
Conclusion
Hopefully, we’ve informed you of the relevant facts on how to upload a video from iMovie to YouTube. We have also examined the number of troubleshooting issues involved in the iMovie video editor. Well, you will get to face similar kinds of export difficulties in the iMovie editor. Also, the entire procedure to end the exporting task is a bit long in iMovie compared to any other video editing software. Thus, it’s crucial to check out what other alternatives the technological world has today. We can’t state to you a better beginner-friendly yet advanced editing option than Wondershare Filmora that rightly outtakes the iMovie video editor in all aspects.
Liza Brown
Liza Brown is a writer and a lover of all things video.
Follow @Liza Brown
Also read:
- 2024 Approved Chart-Topping Tunes Compiling an Impressive YouTube Playlist
- Revolutionize Your Branding Strategy with Access to a Vast Library of Free YouTube Banners
- [New] Conciseness in Content Editing Your YouTube Videos Smartly
- [New] Essential 11 Zero-Cost YouTube Moniker Makers
- Jumpstart Your Professional Filmmaking Exclusive, Cost-Free Green Screen Training From Top YouTube Educators
- In 2024, Crafting Visual Stories In-Depth PC Editing Techniques for YouTube
- [Updated] Essential Tactics for YouTube Advertising with Banners
- Elevate Your Game 14 Must-See Vids for YouTube Gaming Success for 2024
- Behind the Scenes Insider Knowledge for YouTube Video Production for 2024
- 2024 Approved Channel Cashflow Effective Tactics for Monetizing on Mobile Devices
- The Ultimate YouTube Money-Making Blueprints
- In 2024, Crafting Worldly Stories Startup Guide for Future Travel Vloggers
- Delving Into YouTube's Complex Calculation of Viewer Stats for 2024
- [Updated] Elite Women Gaming Leaders Top 10 On YT
- 360 Video Editors How to Upload 360 Video to YouTube
- In 2024, Elite Recommendations Top 10 High-End Video Card Models
- A Comprehensive Walkthrough for Embedding YouTube Plays in Web Design for 2024
- Charting Earnings From YouTube AdSense What You Can Expect per 1,000 Views for 2024
- Step-by-Step Guide Enhancing YouTube Content with iOS Recording
- Capture Spectacular Video on YouTube Top Webcam Picks for 2024
- Understanding and Mastering Video Content on YT Shorts
- In 2024, Decoding YouTube's Economics How to Quantify Watches and Earnings
- How To Repair System Issues of iPhone 7 Plus? | Dr.fone
- This is how you can recover deleted pictures from Honor Play 7T.
- How to Bypass Apple iPhone XR Passcode Easily Video Inside
- [Updated] Top 10 Premium Android & PC-Compatible Video Editors for 2024
- Updated From the Heart Tips and Tricks for Making a Meaningful Valentines Day Video
- In 2024, How To Speed Up Video With Lightworks Video Editor
- Gratis Emulation Software for Nintendo Switch
- 2024 Approved Top Secrets for Converting Soundcloud Tracks to MP3 Files
- [New] Crimson Codec Update
- [New] In 2024, Essential Recording Software for Engaging Online Gatherings (Google Meet)
- [New] Webcam Techniques for Live Recording PowerPoint
- [Updated] Crafting Communication Havens in the Messaging World for 2024
- Brain-Snatching Battlegrounds The Best Zombie Gaming Showdowns for 2024
- Updated Locate the Paintbrush Acoustic Simulation for 2024
- Updated In 2024, Essential Guide to Combining Multi-Track Recordings Into a Single Clip
- 2024 Approved Secrets of Efficient Virtual Seminar Capture
- 2024 Approved Expert Strategies for Perfectly Shared Screens on Mobile/Desktop
- [New] The Blueprint to Perpetual Snapstreaks
- Mac Subtitle Editing Made Easy Top Subtitle Edit Alternatives for 2024
- Title: "Unlock Higher Rankings Essential Tips to Elevate Your YT Content"
- Author: Kevin
- Created at : 2024-05-25 16:32:01
- Updated at : 2024-05-26 16:32:01
- Link: https://youtube-videos.techidaily.com/unlock-higher-rankings-essential-tips-to-elevate-your-yt-content/
- License: This work is licensed under CC BY-NC-SA 4.0.
