Ultimate Speaker Change Tech for Internet Showbiz Pros
Ultimate Speaker Change Tech for Internet Showbiz Pros
Are you looking for the best voice-changing app for your YouTube channel?
Creating a YouTube video with professional output is straightforward, but many people find it challenging because they do not have the right vlogging tools at their disposal. There are countless vlogging tools and one of them is the voice changer.
With a voice-changing app, you can create multiple voices for one video clip with complete ease. Voice changer supports several background sound effects that you can import to spice up your content before uploading it on YouTube. The app makes your videos fun and interesting to watch that then drives traffic to your channel.
Presently, there is an array of YouTube voice-changers available online. While some are top-notch, others are nothing to write about. In this article, we will share with you some top-level YouTube voice-changers recommended by experts in the industry. Without further ado, let’s dive in.
For Win 7 or later (64-bit)
For macOS 10.12 or later
Part 1. Best Voice Changers for YouTubers
Here are the top 7 YouTube voice-changing apps available on the global market today:
1. AthTek [Online & Free]
AthTek is one the world-leading voice-changing apps suitable for Windows operating systems. This simple yet powerful app is well-customized with powerful features such as pitch and speed enhancer. The app allows you to edit your audio recordings easily and quickly.
It provides you with a comprehensive user interface that lets you switch your voice without stress. Compared to other voice-changers, AthTek stands out. The app integrates perfectly with platforms like Skype, etc.
AthTek is a fantastic voice changer, however, it isn’t without its dark sides. AthTek is not a real-time voice-changing app. Hence, you can only use it with ready-made sound recordings.
How to Use AthTek YouTube Voice Changer
Follow the procedure below to use the AthTek voice changing app on your YouTube channel:
Step1 Download AthTek from the official website. Follow the on-screen instructions to install the app, and launch it. When AthTek opens, the interface below will appear on your display screen:

Locate the Browse button beside File Path, and click on it. AthTek will automatically direct you to your local storage.

Step2 Choose your desired audio file from the list available on your computer, and tap the Open button. AthTek will immediately upload the audio file on its interface. The page below will come up on your screen:

Step3 Now move to the Change Parameter section and make the necessary adjustments. Once that’s set, click on the Play button to preview the audio file. If satisfied, tap on Export, choose a destination path and click on Save.

2. Voicechanger.io
Voicechanger.io is a cloud-based program that enables you to upload and edit audio files conveniently without distorting the quality. The program also allows you to record your voice, and add effects with complete ease. It’s an easy-to-use voice changer with no operating system limitations. Aside from voice changing, Voicechanger.io supports speech-to-text. Thus, you can convert speech to text without stress.
How to Use Voicechanger.io
Step1 With the help of an internet-enabled computer system, navigate to the official webpage for Voicechanger.io. The page below will come up if all goes well:

Step2 Choose your preferred audio input method to proceed. Should you select Upload audio, you will be directed to your local drive where your recordings are stored. Choose an audio file, and click on Open.

However, should you pick the Use microphone option, you will be prompted to grant access to the mic. Click on the appropriate key to complete this step.

3. Voxal Voice Changer
Voxal Voice Changer is another quality app mostly used by Mac owners to manipulate audio recordings. It’s also suitable for editing real-time chat audio recordings. The app provides you with several preset voices that you can select from to make your sound recordings fun to listen to.
Additionally, you have the privilege to customize the background effects that you could be used at any time. Voxal Voice Changer is a simple app with zero restrictions in the free version. It also offers paid versions with additional features for professional YouTubers. Besides editing ready-made audio, the app does allow you to create voice recordings.
How to Use Voxal Voice Changer
Here is the detailed procedure to use the Voxal Voice Changer app:
Step1 From the official website for Voxal, download and install a compatible version of the app on your computer system. Wait until the installation is successful and launch the app for usage.

When the interface above appears, locate the Menu drop-down menu at the top left corner of your display screen. Select File > Import Voice. Your local storage will automatically appear.
Step2 Choose an audio recording or voice to import on the Voxal Voice Changer interface, and tap on Open. After uploading the file, select a voice effect on the left sidebar.

Step3 Now click on the green Preview button at the top menubar. Listen to the audio file with the chosen effect. If satisfied, export the file to your preferred storage path.
4. Skype Voice Changer
As the name implies, this app is built for you to conceal your voice when using Skype social media platform. It can also serve as a voice changer for YouTube content creators. This app permits you to transform your audio recordings into interesting sounds easily and quickly.
Skype Voice Changer offers free and paid services to its end-users. However, the majority of its features are locked in the paid version. The app provides a clean voice editing interface so end-users, including those who aren’t conversant with information technology, can navigate easily.
How to Use Skype Voice Changer
Here is the set of instructions to use Skype Voice Changer:
Step1 Install the Skype Voice Changer app on your PC, and launch it for operation by clicking on the appropriate button.


A window with several easy-to-use options will come up just as below:

Click on the Effects button at the top menu bar.
Step2 Select a voice effect on the left panel of the Skype Voice Changer interface. Once that is set, click on Preview at the lower right corner of your screen.
Now speak into a microphone, and listen to your voice.
5. AV Voice Changer Diamond
AV Voice Changer Diamond is another wonderful voice-changing app with several entertaining effects that you can choose from to pimp your audio recordings or voice. The app provides you with several preset options, so you have control over your output. It’s one of the most versatile apps for YouTubers.
This voice changer offers an easy-to-manage user interface so beginners in the tech space can easily find their way without involving a third party. AV Voice Changer Diamond works perfectly with all VoIP programs and social media platforms like Skype, Viber, YouTube, and more. One challenge you may experience with this app is the very long installation process.
How to Use AV Voice Changer Diamond
Go to the AV Voice Changer Diamond website to install the latest version of the app on your computer system, and follow the steps below to use it:
Step1 Open the app on your Windows or Mac operating system. You will find the interface below on your screen:

Locate the Nickvoices at the top toolbar. Click on it, and a couple of voice effect options will pop up.

Step2 Select from the list to proceed. Alternatively, you could click on Custom on the list to customize a voice effect. However, mind you, you must subscribe to a premium package to create a voice effect.
Step3 On completing the step above, locate the Record button and click on it. A new window will come up. Follow the on-screen instructions to record your voice.

6. Voice Changer HD
If you are looking for a voice-changing app that you can use to modify your YouTube audio tracks at a zero-cost fee, Voice Changer HD is the perfect tool to use. The app allows you to turn boring audio recordings into enjoyable ones with the lovely effects it supports.
In addition to the audio editing features, Voice Changer HD lets end-users create sounds from texts. Thus, it supports text-to-speech. The app comes with an easy-to-manage user interface. It has over 25 preset voices tucked into it.
How to Use Voice Changer HD
Using Voice Changer HD isn’t difficult. Apply the stepwise guide below:
Step1 Download, install, and open Voice Changer HD on your computer. Once it opens, click on the appropriate button to record your voice.
Step2 Click on the Stop button to end the recording. Voice Changer HD will automatically load an interface with several voice effects. Select one to design your recorded file.

Step3 Next, click on Share to send the file to friends and relatives.

Part 2. Best Voice Editors for YouTubers
1. Filmora

Filmora is an industry-leading audio editing software well-designed with an interactive user interface that allows you to edit YouTube recordings before uploading them on the net. This multipurpose software is customized with endless audio editing features. It supports audio ducking, audio visualizer, auto synchronization, speech-to-text, text-to-speech, and lots more.
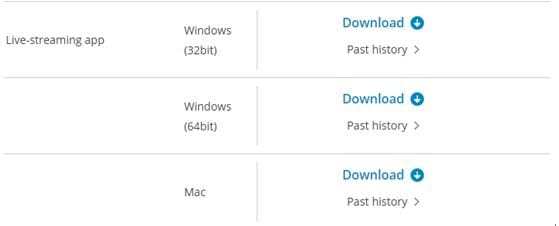
Free Download For Win 7 or later(64-bit)
Free Download For macOS 10.14 or later
Additionally, end-users can easily detect silence in an audio or video file via the Wondershare Filmora software. Besides audio editing, this software is capable of video editing. It enables you to modify/adjust videos without compromising the quality. This software permits you to add effects, transitions, detach audio, remove background, etc.
Wondershare Filmora has all you need in a video and audio editor as it integrates with several platforms, including YouTube and other social media apps. This audio editing solution is suitable for Windows and Mac operating systems.
2. Adobe Audition

Designed by the first PDF editing platform developer, Adobe Audition is another software you can count on to edit audio tracks with quality output. It edits all audio types, including MP3, WAV, and more, with zero limitations. The software sits at the second position on our list because of the rich editing features it holds. Adobe Audition allows you to mix sounds easily and quickly- a vital reason Disc Jerkers (DJs) use the software. Another feature you stand to enjoy when using this software is the freedom to design sound effects.
Part 3. FAQs
Q1. Can I change my voice for YouTube videos?
Yes!
With voice-changing apps, you can quickly change your voice for YouTube videos. These apps come with lots of incredible sound effects that you need to pimp your audio tracks on YouTube. Some of the top-rated voice changers available in the market presently have been introduced above. Check them out.
Q2. What voice changers do YouTubers use?
As earlier stated, there are countless voice-changing apps for YouTubers. Depending on the sound effect you need, you may need to try two or more. You can select one from the ones mentioned in the article.
Conclusion
Now you have the top 7 voice changers for YouTubers, select one of them and use it in your next project. All voice-changing apps are simple to use, fast and reliable. However, we advise that you consider the pricing before investing in it. If you need an audio/video editing software program, Filmora is the right tool to use. The software is well-known for excellent results.
For Win 7 or later (64-bit)
For macOS 10.12 or later
Part 1. Best Voice Changers for YouTubers
Here are the top 7 YouTube voice-changing apps available on the global market today:
1. AthTek [Online & Free]
AthTek is one the world-leading voice-changing apps suitable for Windows operating systems. This simple yet powerful app is well-customized with powerful features such as pitch and speed enhancer. The app allows you to edit your audio recordings easily and quickly.
It provides you with a comprehensive user interface that lets you switch your voice without stress. Compared to other voice-changers, AthTek stands out. The app integrates perfectly with platforms like Skype, etc.
AthTek is a fantastic voice changer, however, it isn’t without its dark sides. AthTek is not a real-time voice-changing app. Hence, you can only use it with ready-made sound recordings.
How to Use AthTek YouTube Voice Changer
Follow the procedure below to use the AthTek voice changing app on your YouTube channel:
Step1 Download AthTek from the official website. Follow the on-screen instructions to install the app, and launch it. When AthTek opens, the interface below will appear on your display screen:
Locate the Browse button beside File Path, and click on it. AthTek will automatically direct you to your local storage.
Step2 Choose your desired audio file from the list available on your computer, and tap the Open button. AthTek will immediately upload the audio file on its interface. The page below will come up on your screen:
Step3 Now move to the Change Parameter section and make the necessary adjustments. Once that’s set, click on the Play button to preview the audio file. If satisfied, tap on Export, choose a destination path and click on Save.
2. Voicechanger.io
Voicechanger.io is a cloud-based program that enables you to upload and edit audio files conveniently without distorting the quality. The program also allows you to record your voice, and add effects with complete ease. It’s an easy-to-use voice changer with no operating system limitations. Aside from voice changing, Voicechanger.io supports speech-to-text. Thus, you can convert speech to text without stress.
How to Use Voicechanger.io
Step1 With the help of an internet-enabled computer system, navigate to the official webpage for Voicechanger.io. The page below will come up if all goes well:
Step2 Choose your preferred audio input method to proceed. Should you select Upload audio, you will be directed to your local drive where your recordings are stored. Choose an audio file, and click on Open.
However, should you pick the Use microphone option, you will be prompted to grant access to the mic. Click on the appropriate key to complete this step.
3. Voxal Voice Changer
Voxal Voice Changer is another quality app mostly used by Mac owners to manipulate audio recordings. It’s also suitable for editing real-time chat audio recordings. The app provides you with several preset voices that you can select from to make your sound recordings fun to listen to.
Additionally, you have the privilege to customize the background effects that you could be used at any time. Voxal Voice Changer is a simple app with zero restrictions in the free version. It also offers paid versions with additional features for professional YouTubers. Besides editing ready-made audio, the app does allow you to create voice recordings.
How to Use Voxal Voice Changer
Here is the detailed procedure to use the Voxal Voice Changer app:
Step1 From the official website for Voxal, download and install a compatible version of the app on your computer system. Wait until the installation is successful and launch the app for usage.
When the interface above appears, locate the Menu drop-down menu at the top left corner of your display screen. Select File > Import Voice. Your local storage will automatically appear.
Step2 Choose an audio recording or voice to import on the Voxal Voice Changer interface, and tap on Open. After uploading the file, select a voice effect on the left sidebar.
Step3 Now click on the green Preview button at the top menubar. Listen to the audio file with the chosen effect. If satisfied, export the file to your preferred storage path.
4. Skype Voice Changer
As the name implies, this app is built for you to conceal your voice when using Skype social media platform. It can also serve as a voice changer for YouTube content creators. This app permits you to transform your audio recordings into interesting sounds easily and quickly.
Skype Voice Changer offers free and paid services to its end-users. However, the majority of its features are locked in the paid version. The app provides a clean voice editing interface so end-users, including those who aren’t conversant with information technology, can navigate easily.
How to Use Skype Voice Changer
Here is the set of instructions to use Skype Voice Changer:
Step1 Install the Skype Voice Changer app on your PC, and launch it for operation by clicking on the appropriate button.
A window with several easy-to-use options will come up just as below:
Click on the Effects button at the top menu bar.
Step2 Select a voice effect on the left panel of the Skype Voice Changer interface. Once that is set, click on Preview at the lower right corner of your screen.
Now speak into a microphone, and listen to your voice.
5. AV Voice Changer Diamond
AV Voice Changer Diamond is another wonderful voice-changing app with several entertaining effects that you can choose from to pimp your audio recordings or voice. The app provides you with several preset options, so you have control over your output. It’s one of the most versatile apps for YouTubers.
This voice changer offers an easy-to-manage user interface so beginners in the tech space can easily find their way without involving a third party. AV Voice Changer Diamond works perfectly with all VoIP programs and social media platforms like Skype, Viber, YouTube, and more. One challenge you may experience with this app is the very long installation process.
How to Use AV Voice Changer Diamond
Go to the AV Voice Changer Diamond website to install the latest version of the app on your computer system, and follow the steps below to use it:
Step1 Open the app on your Windows or Mac operating system. You will find the interface below on your screen:
Locate the Nickvoices at the top toolbar. Click on it, and a couple of voice effect options will pop up.
Step2 Select from the list to proceed. Alternatively, you could click on Custom on the list to customize a voice effect. However, mind you, you must subscribe to a premium package to create a voice effect.
Step3 On completing the step above, locate the Record button and click on it. A new window will come up. Follow the on-screen instructions to record your voice.
6. Voice Changer HD
If you are looking for a voice-changing app that you can use to modify your YouTube audio tracks at a zero-cost fee, Voice Changer HD is the perfect tool to use. The app allows you to turn boring audio recordings into enjoyable ones with the lovely effects it supports.
In addition to the audio editing features, Voice Changer HD lets end-users create sounds from texts. Thus, it supports text-to-speech. The app comes with an easy-to-manage user interface. It has over 25 preset voices tucked into it.
How to Use Voice Changer HD
Using Voice Changer HD isn’t difficult. Apply the stepwise guide below:
Step1 Download, install, and open Voice Changer HD on your computer. Once it opens, click on the appropriate button to record your voice.
Step2 Click on the Stop button to end the recording. Voice Changer HD will automatically load an interface with several voice effects. Select one to design your recorded file.
Step3 Next, click on Share to send the file to friends and relatives.
Part 2. Best Voice Editors for YouTubers
1. Filmora
Filmora is an industry-leading audio editing software well-designed with an interactive user interface that allows you to edit YouTube recordings before uploading them on the net. This multipurpose software is customized with endless audio editing features. It supports audio ducking, audio visualizer, auto synchronization, speech-to-text, text-to-speech, and lots more.
Free Download For Win 7 or later(64-bit)
Free Download For macOS 10.14 or later
Additionally, end-users can easily detect silence in an audio or video file via the Wondershare Filmora software. Besides audio editing, this software is capable of video editing. It enables you to modify/adjust videos without compromising the quality. This software permits you to add effects, transitions, detach audio, remove background, etc.
Wondershare Filmora has all you need in a video and audio editor as it integrates with several platforms, including YouTube and other social media apps. This audio editing solution is suitable for Windows and Mac operating systems.
2. Adobe Audition
Designed by the first PDF editing platform developer, Adobe Audition is another software you can count on to edit audio tracks with quality output. It edits all audio types, including MP3, WAV, and more, with zero limitations. The software sits at the second position on our list because of the rich editing features it holds. Adobe Audition allows you to mix sounds easily and quickly- a vital reason Disc Jerkers (DJs) use the software. Another feature you stand to enjoy when using this software is the freedom to design sound effects.
Part 3. FAQs
Q1. Can I change my voice for YouTube videos?
Yes!
With voice-changing apps, you can quickly change your voice for YouTube videos. These apps come with lots of incredible sound effects that you need to pimp your audio tracks on YouTube. Some of the top-rated voice changers available in the market presently have been introduced above. Check them out.
Q2. What voice changers do YouTubers use?
As earlier stated, there are countless voice-changing apps for YouTubers. Depending on the sound effect you need, you may need to try two or more. You can select one from the ones mentioned in the article.
Conclusion
Now you have the top 7 voice changers for YouTubers, select one of them and use it in your next project. All voice-changing apps are simple to use, fast and reliable. However, we advise that you consider the pricing before investing in it. If you need an audio/video editing software program, Filmora is the right tool to use. The software is well-known for excellent results.
Reel Them In: A Step-by-Step Approach to Livestreaming on Youtube
How to live streaming 360 video to youtube

Richard Bennett
Mar 27, 2024• Proven solutions
- Part1.Stream 360 to Youtube via Ricoh Theta S and OBS on PC
- Part2.Live Stream from Allie 360 Camera to YouTube on Mobile
1. Stream 360 to Youtube via Ricoh Theta S and OBS on PC
Step 1: First of all you need to get ready with your Ricoh Theta S 360 camera unit.
Step 2: Now visit the official website of Theta 360 in order to download your dedicated live streaming application.
Step 3: Get your application and install it on your Mac or PC as per need.
Step 4: It is time to plug in to your Ricoh Theta S 360 camera using your PC.
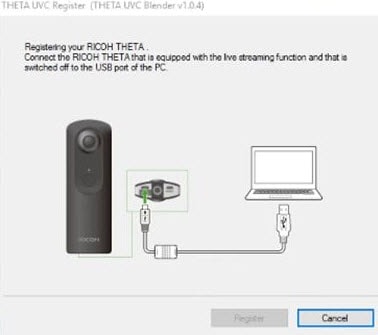
Step 5: Now select your device ‘Ricoh Theta S’ and then hit Okay.
Step 6: You will find option to register to application with your respective device. Select and hit register.
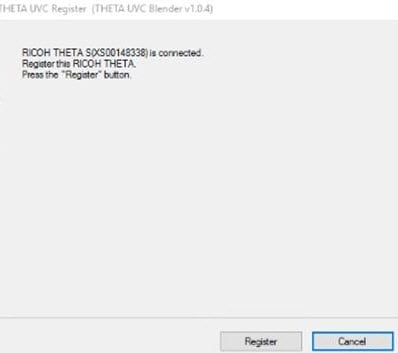
Step 7: As soon as your registration process is complete then un-plug your USB cable.
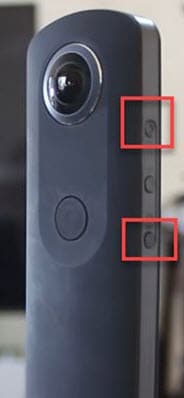
Step 8: It is time to turn the Ricoh Theta device to Live Mode; you simple need to press the top power and lower video button simultaneously to directly switch to the live mode.
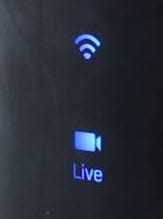
Step 9: Once your device enters into Live Stream mode then a Led will start blinking on your device that represents your device is live at this moment.
Step 10: Now you need to plug in the USB cable again with your computer.
Step 11: Visit the official site of OBS and download your software; install it on your system.
Step 12: Go to create scene option and then switch to create sources.
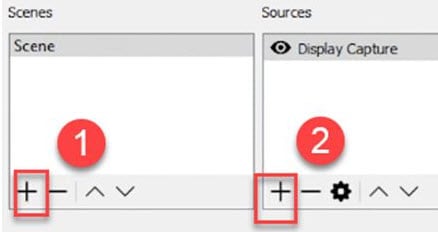
Step 13: Select video capture device as your source from drop down menu.
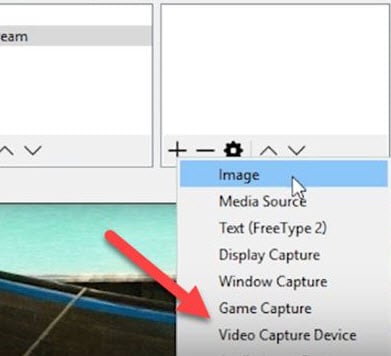
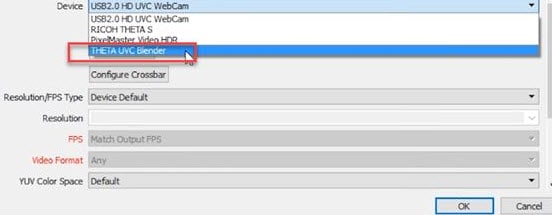
Step 14: Now from available list select Theta UVC as your active video capture source.
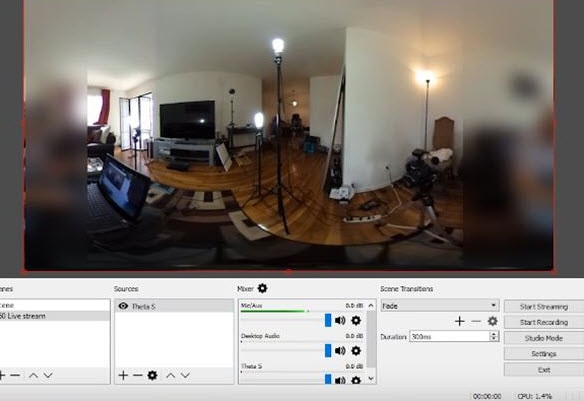
Step 15: You need to adjust screen as per your requirements.
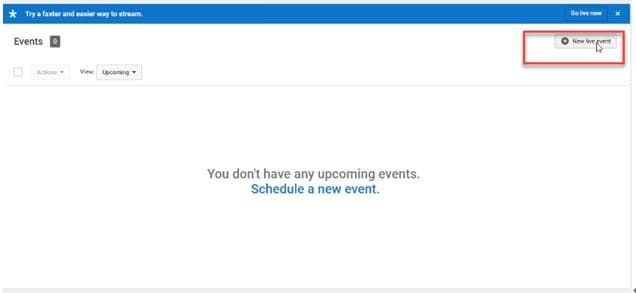
Step 16: Now move to YouTube and then hit New Live Events option.
Step 17: Complete the basic information.
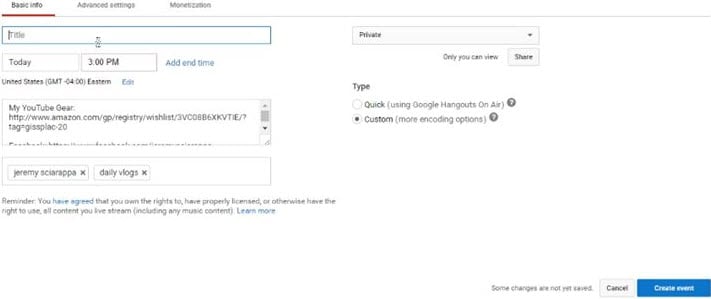
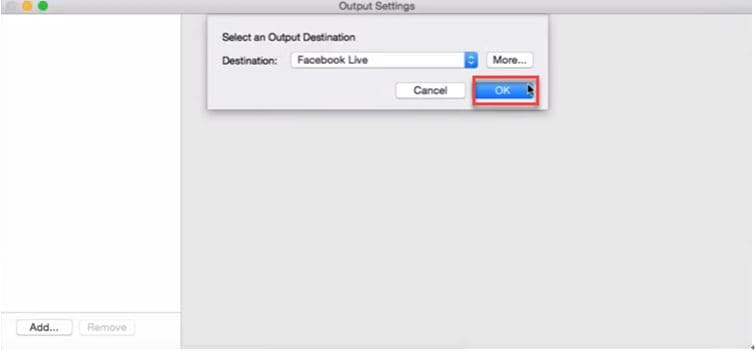
Step 18: You need to move to advanced settings now; select 360 live stream option and then create event.
Step 19: Now complete the ingesting settings and finally select create new stream option.

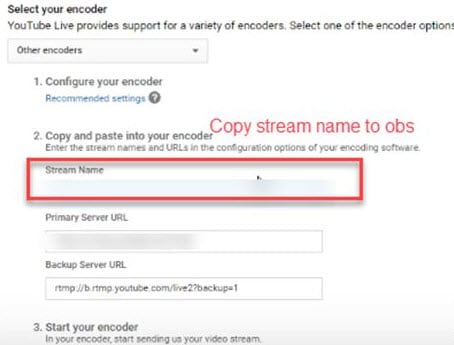
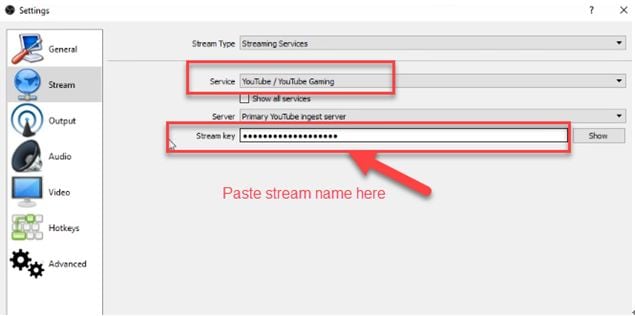
Step 20: As soon as your event is created then you will be able to find your stream name on screen, copy it and simply paste it on OBS window.
Step 21: It is time to return to OBS settings and then you need to paste that copied name on stream key option.
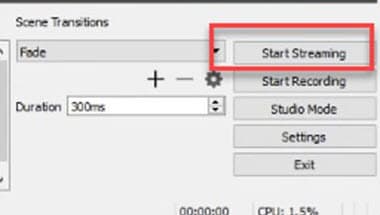
Step 22: Once all above settings are complete then click start stream option from your OBS window and you will soon be able to find your 360 live on YouTube.
2.Live Stream from Allie 360 Camera to YouTube on Mobile
Step 1: Get ready with your Allie 360 camera unit.
Step 2: Visit YouTube and then hit the option to create your live event.
Step 3: It is time to download your Allie Application and then get it installed on your device.
- Prefer to use this link if you are working on iOS: https://itunes.apple.com/app/allie-home/id1063986074
- Android users need to visit: https://play.google.com/store/apps/details?id=com.icrealtime.allie
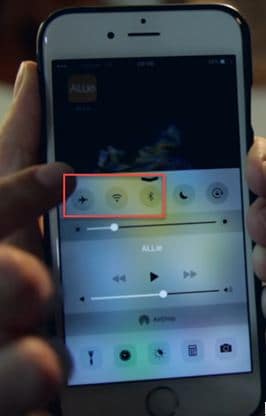
Step 4: As soon as you have downloaded your app then simply turn on the Bluetooth, Wi-Fi and air plane mode on your device.
Step 5: Simply open your Allie application and then connect your camera.

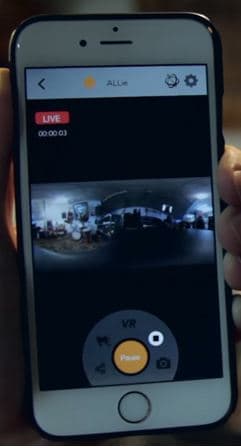
Step 6: Now users need to hit stream icon on screen.
![]()
Step 7: You will be asked to fill the necessary information about your video. It is also possible to make adjustments regarding video quality. Once you are done with all required settings then hit Submit option.

Step 8: Soon your video will become live; note that you can also share your live video via SNS platform with other viewers.
Richard Bennett
Richard Bennett is a writer and a lover of all things video.
Follow @Richard Bennett
Richard Bennett
Mar 27, 2024• Proven solutions
- Part1.Stream 360 to Youtube via Ricoh Theta S and OBS on PC
- Part2.Live Stream from Allie 360 Camera to YouTube on Mobile
1. Stream 360 to Youtube via Ricoh Theta S and OBS on PC
Step 1: First of all you need to get ready with your Ricoh Theta S 360 camera unit.
Step 2: Now visit the official website of Theta 360 in order to download your dedicated live streaming application.
Step 3: Get your application and install it on your Mac or PC as per need.
Step 4: It is time to plug in to your Ricoh Theta S 360 camera using your PC.
Step 5: Now select your device ‘Ricoh Theta S’ and then hit Okay.
Step 6: You will find option to register to application with your respective device. Select and hit register.
Step 7: As soon as your registration process is complete then un-plug your USB cable.
Step 8: It is time to turn the Ricoh Theta device to Live Mode; you simple need to press the top power and lower video button simultaneously to directly switch to the live mode.
Step 9: Once your device enters into Live Stream mode then a Led will start blinking on your device that represents your device is live at this moment.
Step 10: Now you need to plug in the USB cable again with your computer.
Step 11: Visit the official site of OBS and download your software; install it on your system.
Step 12: Go to create scene option and then switch to create sources.
Step 13: Select video capture device as your source from drop down menu.
Step 14: Now from available list select Theta UVC as your active video capture source.
Step 15: You need to adjust screen as per your requirements.
Step 16: Now move to YouTube and then hit New Live Events option.
Step 17: Complete the basic information.
Step 18: You need to move to advanced settings now; select 360 live stream option and then create event.
Step 19: Now complete the ingesting settings and finally select create new stream option.
Step 20: As soon as your event is created then you will be able to find your stream name on screen, copy it and simply paste it on OBS window.
Step 21: It is time to return to OBS settings and then you need to paste that copied name on stream key option.
Step 22: Once all above settings are complete then click start stream option from your OBS window and you will soon be able to find your 360 live on YouTube.
2.Live Stream from Allie 360 Camera to YouTube on Mobile
Step 1: Get ready with your Allie 360 camera unit.
Step 2: Visit YouTube and then hit the option to create your live event.
Step 3: It is time to download your Allie Application and then get it installed on your device.
- Prefer to use this link if you are working on iOS: https://itunes.apple.com/app/allie-home/id1063986074
- Android users need to visit: https://play.google.com/store/apps/details?id=com.icrealtime.allie
Step 4: As soon as you have downloaded your app then simply turn on the Bluetooth, Wi-Fi and air plane mode on your device.
Step 5: Simply open your Allie application and then connect your camera.
Step 6: Now users need to hit stream icon on screen.
![]()
Step 7: You will be asked to fill the necessary information about your video. It is also possible to make adjustments regarding video quality. Once you are done with all required settings then hit Submit option.
Step 8: Soon your video will become live; note that you can also share your live video via SNS platform with other viewers.
Richard Bennett
Richard Bennett is a writer and a lover of all things video.
Follow @Richard Bennett
Also read:
- [New] 10 YouTube Storytelling Techniques That Work
- [New] 2024 Approved Online Viewers Count Counter
- [New] Deciphering How to Spot Your Video Enthusiasts
- [New] Enhance Visibility YouTube Thumbnails Made Simple for 2024
- [New] Event Ensemble Curating Best DJ Templates
- [Updated] Bridging Communication Gaps Effective Use of Slack and Filmora
- [Updated] Decoding the Audience Who Viewed Your Insta Post?
- [Updated] Step-by-Step Building Time Lapse Shots on Samsung Gear
- Beauty Vlogs From Basics to Brilliance Launching a YouTube Channel
- Comprender Y Tener Conocimiento Del Tiempo en Espaňol
- In 2024, Does Airplane Mode Turn off GPS Location On Huawei P60? | Dr.fone
- Live Caption Coder
- Story 2: Believing that the Technology Would Lead to Massive Job Losses (Wrong Answer)
- The Evolution of Artifice Intelligence: Examining 5 Innovative Approaches That Might Outshine the Turing Trial.
- Title: Ultimate Speaker Change Tech for Internet Showbiz Pros
- Author: Kevin
- Created at : 2024-11-30 01:42:09
- Updated at : 2024-12-03 17:30:20
- Link: https://youtube-videos.techidaily.com/ultimate-speaker-change-tech-for-internet-showbiz-pros/
- License: This work is licensed under CC BY-NC-SA 4.0.