

"Transforming Your Live Streams for YouTube Twitch Edition"
Transforming Your Live Streams for YouTube: Twitch Edition
Create High-Quality Video - Wondershare Filmora
An easy and powerful YouTube video editor
Numerous video and audio effects to choose from
Detailed tutorials provided by the official channel
Amidst many online applications is Twitch. This live streaming platform takes your experience to another level. You can use it to make crafts, play games, attract broadcasters, and many more. Twitch was launched in 2011, and since then, it has attracted millions of users, managing a database of about 4 million broadcasters by early 2020. With it, users can stream their activities as others watch in real-time. Just browse a category to find a stream.
You can also follow streamers that you like on the platform and get updates and notifications immediately after they are posted. But how do you start a career on a platform like Twitch? You need to broadcast and gather a large following. You can use built-in audiences from other platforms like Facebook. Let’s dive into the core of the matter and look at how to upload Twitch streams to YouTube and build your platform.

In this article
02 What is the benefit of uploading your Twitch Streams to YouTube
03 How to upload your Twitch Streams to YouTube
What is Twitch VOD?
Twitch Video on Demand (VOD) is a recording of previously streamed content. It provides briefings if you missed catching the Twitch live stream. Just watch the VOD from your favorite streamer and be engaged the best way possible. However, VODs don’t last forever. They are removed after two weeks of broadcast. But streamers with Partner Status can have their VODs last up to 60 days.
- How to enable Twitch VOD?
VODs are the best form to archive streams that your fans missed. Even though they are not enabled by default, you can manually enable them and not let your fans miss any important event from your channel. They’ll find it under the “Videos” tab on any Twitch channel. Follow these steps to enable VOD on your channel.
Step 1. Go to your profile icon in the top right corner of Twitch
Check in the “Channel & Video” section and locate the “Stream Key & Preferences” menu.

Step 2. Click on “Creator Dashboard”
Remember, you can enable VODs from your creator dashboard. Just go under the “Settings” tab and click on the “Stream section” of the creator dashboard. Check under the subtitle “VOD Settings” and get the option to store past broadcasts. You can also toggle the slider to store your past broadcasts.

Step 3 Click on the “Settings” tab on the left-hand side and go to Stream
You’ll get various drop-down menu options. Click on the “Settings” tab and choose the “Stream” option. The system will navigate to a new page, thus setting your preferences for VODs and clips.
Step 4. Go to “VOD Settings” and toggle on the “Store Past Broadcast.”
Ensure you have the toggle option turned ON under the “VOD Settings.” If it’s “ON,” you’ll realize the toggle will be purple, with a checkmark in it. Twitch will be confirmed to be enabled if it’s purple.

- Frequently Asked Question about Twitch VOD
These are some questions frequently asked by Twitch users.
1. How long will Twitch store my VOD
Your Twitch can either be stored for 14 or 60 days, depending on your level. For Twitch Prime, Twitch Partner or a Twitch Turbo user has their past broadcasts automatically saved for 60 days before deletion. But if you are not connected to these three options, your past broadcasts will be saved for only 14 days before deletion.
Since your past broadcasts cannot be live for more than 60 days, you have the option to download the video to your computer before the validity days expire and Twitch deletes it. You can use an External Hard drive to save the past broadcast content. Likewise, it is possible to turn your past broadcast content into Highlight and, in turn, permanently store them on Twitch.
2. What is the difference between Twitch VOD, Highlights, and Clips
Twitch VOD is a previously saved video of your live stream content. You choose to save either part or the entire content of your previously streamed content. More so, you don’t need any additional requirements to use VOD.
Highlights are short videos that have been edited from your past broadcast content. You can save them on Twitch permanently. Streamers majorly use highlights to save video game achievements. Unlike VOD Twitch that can be saved up to 60 days, Highlights usually lasts no more than 3 minutes.
- To make Highlights on Twitch, first, navigate to your Dashboard.
- Then scroll down and click on “Content” > “Video Producer.
- Next, press on “All Videos” to change them to “Past Broadcasts.”
- Now press the “Highlight” button, and Twitch will immediately open a new tab for “Twitch Highlighter Tool.”
- Then select the video part to include as “Highlight” and press the “Create Highlights” button.
- Wait a while for the process to be completed, and Voila! You have your Highlights created.
When it comes to Twitch Clip, you can capture special moments in a stream you are currently watching. On the same note, you can share clips with friends and other users on social media platforms. Such shared clips contain a link where others view the source or video from.
The clips you create will automatically be saved on the streamer’s channel on the “Clips” page, where other viewers can see them too. Nonetheless, you can download “clips” to your computer and, in turn, upload them whenever you want to. And note that you can help your stream grow via “Clips” by letting your viewers clip and share your stream moments.
- To create “Clips” on Twitch, identify which Streamers channel you wish to create a clip from.
- Then click on the “Clapper board” icon. Next, edit your clip between 5 and 60 seconds long.
- Finally, create a title and publish your Clip. You’ll also enjoy the privilege to share your clip’s link to other social media networks.
What is the benefit of uploading your Twitch Streams to YouTube
You stand to gain a lot when you upload your Twitch Streams to YouTube.
1) To enlighten your followers
Your followers will see your streams and make the best decisions. Viewers can check out your recordings and other highlights from past streams. It will help them decide whether they like what they see and probably join your live streams.
2) Twitch provides content for you to share and monetize on YouTube
Since Twitch streaming is more popular nowadays, many people throng it for content. It is not wise to rely entirely on Twitch to discover as a Twitch Streamer. Posting to YouTube will make it known within a short time. You would have announced your streams most nobly and kept your followers up to date, attracting new ones as well.
3) To keep your followers engaged even when you are offline
Even though live streaming is important, some viewers may not attend the live sessions due to different time zones or other commitments. In this regard, when uploaded to YouTube, Twitch will give them a chance to watch your content just whenever they log in. They, therefore, have the option to watch a Twitch VOD of the live stream they missed.
How to upload your Twitch Streams to YouTube
Check how to upload Twitch streams to YouTube from the Twitch website.
Step 1. Identify the little arrow next to your name on the Twitch website and click on it. Then click on the “Video Producer” to take you to a list of your Twitch videos.

Step 2. Check out and click on the “three-dots” on the video you wish to upload to YouTube. Click on the “Export” tab.
Step 3. A menu will then pop up. Here, you can fill in the description, title, and tags that you would like to appear on the YouTube video. There is an option for Twitch to split your video automatically. If you wish so, then tick the “Checkbox” to enable it. Then click on the “Start Export” option to export your Twitch streams to YouTube.

Bouns! Edit Your Twitch Video with Filmora
The quality of your video matters when it comes to uploading Twitch Streams to YouTube. Using a third-party tool to edit your video is the first step in ensuring your videos communicate meaningful content. Filmora comes in handy to bring your imaginations to life. Use it for simple creation without limits, even for beginners.
- Use it to track moving objects in video clips
- Easily match any image of the selected clip
- Its powerful tools let you edit your video by cropping, splitting, adjusting speed, etc
- The video keyframe easily indicates the beginning and end of the parameters
For Win 7 or later (64-bit)
For macOS 10.12 or later
Conclusion
● Don’t just focus on how to upload Twitch streams to YouTube but also consider the quality of video you are posting to YouTube. Remember, your video quality will speak much more of you than any other description. So, strive to produce quality videos using the best tool, Filmora. The app is easy to use and will elevate your views and imaginations through your video in the most impactful way.
Amidst many online applications is Twitch. This live streaming platform takes your experience to another level. You can use it to make crafts, play games, attract broadcasters, and many more. Twitch was launched in 2011, and since then, it has attracted millions of users, managing a database of about 4 million broadcasters by early 2020. With it, users can stream their activities as others watch in real-time. Just browse a category to find a stream.
You can also follow streamers that you like on the platform and get updates and notifications immediately after they are posted. But how do you start a career on a platform like Twitch? You need to broadcast and gather a large following. You can use built-in audiences from other platforms like Facebook. Let’s dive into the core of the matter and look at how to upload Twitch streams to YouTube and build your platform.
In this article
02 What is the benefit of uploading your Twitch Streams to YouTube
03 How to upload your Twitch Streams to YouTube
What is Twitch VOD?
Twitch Video on Demand (VOD) is a recording of previously streamed content. It provides briefings if you missed catching the Twitch live stream. Just watch the VOD from your favorite streamer and be engaged the best way possible. However, VODs don’t last forever. They are removed after two weeks of broadcast. But streamers with Partner Status can have their VODs last up to 60 days.
- How to enable Twitch VOD?
VODs are the best form to archive streams that your fans missed. Even though they are not enabled by default, you can manually enable them and not let your fans miss any important event from your channel. They’ll find it under the “Videos” tab on any Twitch channel. Follow these steps to enable VOD on your channel.
Step 1. Go to your profile icon in the top right corner of Twitch
Check in the “Channel & Video” section and locate the “Stream Key & Preferences” menu.
Step 2. Click on “Creator Dashboard”
Remember, you can enable VODs from your creator dashboard. Just go under the “Settings” tab and click on the “Stream section” of the creator dashboard. Check under the subtitle “VOD Settings” and get the option to store past broadcasts. You can also toggle the slider to store your past broadcasts.
Step 3 Click on the “Settings” tab on the left-hand side and go to Stream
You’ll get various drop-down menu options. Click on the “Settings” tab and choose the “Stream” option. The system will navigate to a new page, thus setting your preferences for VODs and clips.
Step 4. Go to “VOD Settings” and toggle on the “Store Past Broadcast.”
Ensure you have the toggle option turned ON under the “VOD Settings.” If it’s “ON,” you’ll realize the toggle will be purple, with a checkmark in it. Twitch will be confirmed to be enabled if it’s purple.
- Frequently Asked Question about Twitch VOD
These are some questions frequently asked by Twitch users.
1. How long will Twitch store my VOD
Your Twitch can either be stored for 14 or 60 days, depending on your level. For Twitch Prime, Twitch Partner or a Twitch Turbo user has their past broadcasts automatically saved for 60 days before deletion. But if you are not connected to these three options, your past broadcasts will be saved for only 14 days before deletion.
Since your past broadcasts cannot be live for more than 60 days, you have the option to download the video to your computer before the validity days expire and Twitch deletes it. You can use an External Hard drive to save the past broadcast content. Likewise, it is possible to turn your past broadcast content into Highlight and, in turn, permanently store them on Twitch.
2. What is the difference between Twitch VOD, Highlights, and Clips
Twitch VOD is a previously saved video of your live stream content. You choose to save either part or the entire content of your previously streamed content. More so, you don’t need any additional requirements to use VOD.
Highlights are short videos that have been edited from your past broadcast content. You can save them on Twitch permanently. Streamers majorly use highlights to save video game achievements. Unlike VOD Twitch that can be saved up to 60 days, Highlights usually lasts no more than 3 minutes.
- To make Highlights on Twitch, first, navigate to your Dashboard.
- Then scroll down and click on “Content” > “Video Producer.
- Next, press on “All Videos” to change them to “Past Broadcasts.”
- Now press the “Highlight” button, and Twitch will immediately open a new tab for “Twitch Highlighter Tool.”
- Then select the video part to include as “Highlight” and press the “Create Highlights” button.
- Wait a while for the process to be completed, and Voila! You have your Highlights created.
When it comes to Twitch Clip, you can capture special moments in a stream you are currently watching. On the same note, you can share clips with friends and other users on social media platforms. Such shared clips contain a link where others view the source or video from.
The clips you create will automatically be saved on the streamer’s channel on the “Clips” page, where other viewers can see them too. Nonetheless, you can download “clips” to your computer and, in turn, upload them whenever you want to. And note that you can help your stream grow via “Clips” by letting your viewers clip and share your stream moments.
- To create “Clips” on Twitch, identify which Streamers channel you wish to create a clip from.
- Then click on the “Clapper board” icon. Next, edit your clip between 5 and 60 seconds long.
- Finally, create a title and publish your Clip. You’ll also enjoy the privilege to share your clip’s link to other social media networks.
What is the benefit of uploading your Twitch Streams to YouTube
You stand to gain a lot when you upload your Twitch Streams to YouTube.
1) To enlighten your followers
Your followers will see your streams and make the best decisions. Viewers can check out your recordings and other highlights from past streams. It will help them decide whether they like what they see and probably join your live streams.
2) Twitch provides content for you to share and monetize on YouTube
Since Twitch streaming is more popular nowadays, many people throng it for content. It is not wise to rely entirely on Twitch to discover as a Twitch Streamer. Posting to YouTube will make it known within a short time. You would have announced your streams most nobly and kept your followers up to date, attracting new ones as well.
3) To keep your followers engaged even when you are offline
Even though live streaming is important, some viewers may not attend the live sessions due to different time zones or other commitments. In this regard, when uploaded to YouTube, Twitch will give them a chance to watch your content just whenever they log in. They, therefore, have the option to watch a Twitch VOD of the live stream they missed.
How to upload your Twitch Streams to YouTube
Check how to upload Twitch streams to YouTube from the Twitch website.
Step 1. Identify the little arrow next to your name on the Twitch website and click on it. Then click on the “Video Producer” to take you to a list of your Twitch videos.
Step 2. Check out and click on the “three-dots” on the video you wish to upload to YouTube. Click on the “Export” tab.
Step 3. A menu will then pop up. Here, you can fill in the description, title, and tags that you would like to appear on the YouTube video. There is an option for Twitch to split your video automatically. If you wish so, then tick the “Checkbox” to enable it. Then click on the “Start Export” option to export your Twitch streams to YouTube.
Bouns! Edit Your Twitch Video with Filmora
The quality of your video matters when it comes to uploading Twitch Streams to YouTube. Using a third-party tool to edit your video is the first step in ensuring your videos communicate meaningful content. Filmora comes in handy to bring your imaginations to life. Use it for simple creation without limits, even for beginners.
- Use it to track moving objects in video clips
- Easily match any image of the selected clip
- Its powerful tools let you edit your video by cropping, splitting, adjusting speed, etc
- The video keyframe easily indicates the beginning and end of the parameters
For Win 7 or later (64-bit)
For macOS 10.12 or later
Conclusion
● Don’t just focus on how to upload Twitch streams to YouTube but also consider the quality of video you are posting to YouTube. Remember, your video quality will speak much more of you than any other description. So, strive to produce quality videos using the best tool, Filmora. The app is easy to use and will elevate your views and imaginations through your video in the most impactful way.
Addressed: Discrepancy in Shorts Showcase
How to Fix the YouTube Shorts Not Showing Up Issue?

Liza Brown
Oct 26, 2023• Proven solutions
Well, a YouTube Shorts is said to be YouTube’s short-form answer to TikTok. You can quickly scroll via algorithmically-driven feed, discover other similar short videos, and subscribe to your favorite creators.
Here, creators can record, share, and edit short-form video content that’s 60 seconds or less and vertically oriented. And, unlike Instagram stories, YouTube Shorts won’t disappear but will remain on your channel. So, that’s the brief intro of YouTube Shorts which we think everyone is aware of after YouTube has announced its YouTube Shorts availability globally.
However, certain factors are still there, raising the issue or concern of YouTube Shorts not showing. Thus, if you can’t find the YouTube Shorts option or videos, or YouTube Shorts disappeared, find a solution in this post.
Part 1: Why Do YouTube Shorts Not Showing Up?
There could be multiple reasons why YouTube Shorts not showing on your phone, the channel’s home page etc.
Besides, many scenarios arise with this issue, namely the YouTube Shorts option not showing up, the YouTube Shorts button missing, and YouTube Shorts videos not showing correctly.
And, there are valid reasons as well as to why these situations are happening to you. So, let’s discuss each of them separately in brief, along with the solutions in the next section.
- YouTube Shorts are not showing on the channel’s homepage
The standard and the most common reason why YouTube Shorts are not showing on the channel’s homepage is that you have not updated the YouTube app.
- YouTube Shorts option not showing up
This may be happening either because you’ve not updated the app or your internet connection is pretty slow to show you the option. There could be another reason as you may not have cleared the YouTube mobile app’s cache and data.
- YouTube Shorts button missing
Again, you may not have updated the YouTube app, or your internet connection is slow is the most common reason here. Moreover, the button of YouTube Shorts stays hidden behind the +icon.
- YouTube Shorts videos not showing correctly
The most valid reason for YouTube Shorts not showing correctly or YouTube Shorts disappearing is that you have a poor internet connection. Plus, we’ve discussed proper steps below if you’ve missed something while uploading the YouTube Shorts triggering this scenario.
Before we move on to fixing YouTube Shorts not showing the issue, here’s a quick note on which videos qualify as YouTube Shorts. Shorts are different from YouTube stories. Unlike YouTube stories, it gets displayed in your regular channel feed along with your other YouTube videos.
And, you must note that a YouTube Shorts video consists of two criteria as follows.
- The video has to be vertical (portrait-style)
- The video must be 60 seconds or less
Part 2: How to Fix YouTube Shorts Not Showing Up?
Here’s the section covering fixes on YouTube Shorts not showing. Please give it a read and resolve your issue happily!
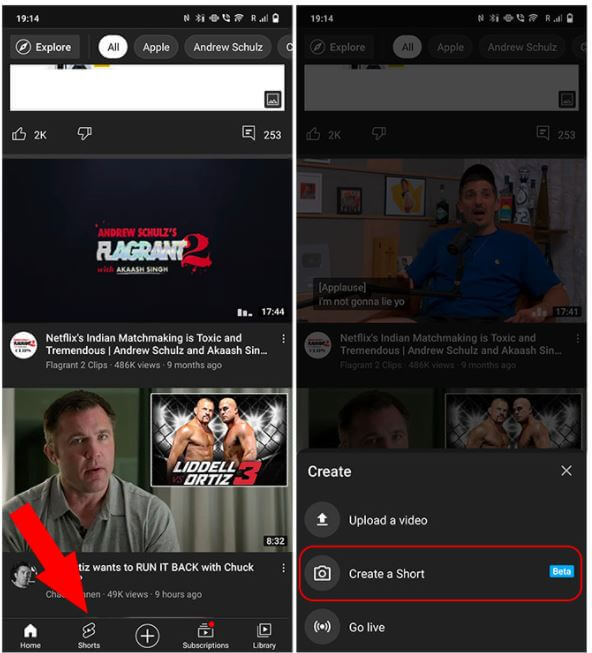
Fix 1: Update the YouTube App
As we’ve already discussed above, check if your YouTube mobile app has the latest version. The newest version of the YouTube mobile app (Version: 16.17.36) has a dedicated Shorts button at the bottom. And, it replaces the Trending button from the YouTube app.
Moreover, the option to upload Shorts is now hidden behind the + icon. Tap on the + icon and hit the Create a Short option.
Fix 2: Check If Shorts Is Available in Your Country
Now, YouTube Shorts is available globally, but there was a phase when YouTube Shorts was a beta feature. It was only available in India and the US, which could be why you could not view Shorts in the YouTube app.
Fix 3: YouTube Shorts Is Mobile-only
As of now, YouTube Shorts is only available on a smartphone because it’s still in beta version. However, you can create Shorts via smartphone and the camera option in YouTube mobile app. Hence, there’s no point in searching for Shorts on your computer.
You can upload Shorts videos from your laptop. The entire process is similar to uploading a regular video. However, you have to mention #Shorts in the title and description to differentiate it as a Shorts video.
Common Fixes to YouTube Shorts Not Working
- Update the YouTube App to the latest version.
- Clear the YouTube mobile app’s data and cache.
- Check if your internet is connected or your internet connection is strong.
- Restart your smartphone and try again.
- The YouTube server can be down, busy, or under maintenance. Wait for a while and try again.
The fixes above are also applicable if the YouTube Shorts are not showing on iPhone as well.
Or, you can try the VPN solution before contacting the YouTube team.
If Videos Are Not Visible under YouTube Shorts
Solution 1: Ensure that you’ve added #shorts in the title and description. Those who have YouTube Shorts, they can make shorts videos via the Shorts camera. Those who can’t access this camera can also upload their current vertical videos that are less than 60 seconds after adding the hashtag #Shorts in the title or description.
All in all, you must include #shorts to let the YouTube algorithm figure out the video is created for Shorts, and the issue of YouTube Shorts not showing up will also be resolved.
Solution 2: Sometimes, you may not find YouTube Shorts videos if they’re precisely 60 seconds in duration because YouTube sometimes adds 1-2 seconds to a Shorts video for some reason. So, be alert here and ensure your Shorts video is around 58 seconds or less.
Solution 3: If your YouTube Shorts is not getting views, you need to wait more here because it takes a while for YouTube to index a Shorts video and suggest them to people. So, it’s the task of the algorithm that varies from person to person. Some Shorts videos take several days while others take weeks.
If YouTube Shorts Videos Are Not Showing up Correctly
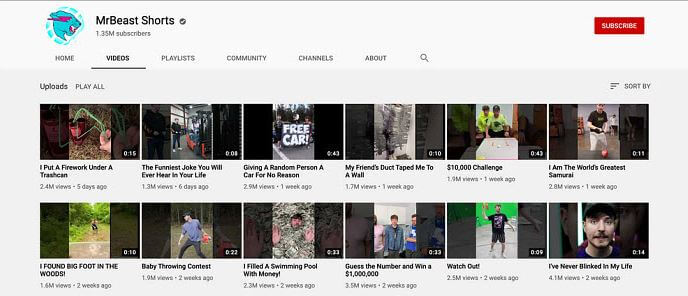
Once uploaded, the YouTube Shorts will be displayed in a vertical thumbnail on YouTube and other regular content already there in your account. Or, it’s your choice to create a new channel for the YouTube shorts videos. If the YouTube shorts not showing correctly, you can try as follows:
Step 1. Go to your channel and select the “customize channel” option.
Step 2. Hop on to the Featured section, and choose the add section.
Step 3. You’ll see shorts videos under the “videos” section. Click that, and the videos you have which are tagged in with #shorts in the title or description will automatically display here.
Bonus Tip: How to Easily Create Vertical Videos for YouTube Shorts on PC
The YouTube Shorts app is pretty convenient to use nowadays. However, it doesn’t allow you to fine-edit the videos if you’ve explored the app or specifically when you want your videos to look more professional. The app doesn’t even have many filtering options, such as Effects, Elements, etc., to make your videos more interactive.
With that said, you can always use an efficient third-party program like Wondershare Filmora to create professional-looking YouTube Shorts videos to engage your viewers highly. Even no famous YouTuber uploads their videos directly from the app without using any third-party tool.
We recommend Wondershare Filmora because it is a production and post-production app available for Windows and Mac computers. It gives tough competition to some globally renowned tools like Final Cut Pro X, Adobe Premiere Pro, etc., because of its simplicity. Furthermore, Filmora has its inbuilt screen, voice recording features, and webcam that can be useful to create game walkthroughs, interactive videos, and voiceovers as needed.


Moreover, a YouTube Shorts video can be made through Wondershare Filmora using the below-mentioned guide.
Note: We are assuming that you have already recorded a vertical video using your smartphone and that it has been transferred to your PC.
So, the signature feature to create YouTube Shorts videos on Wondershare Filmora is Auto Reframe.
Powered by AI technology, Auto Reframe automatically identifies the focal point of your video and crops it while always maintaining it within the frame. This way, the main object or action in your video never goes out of vision.
You can choose an aspect ratio that best fits YouTube Shorts which is 9:16.
How to Use Auto Reframe in Filmora?
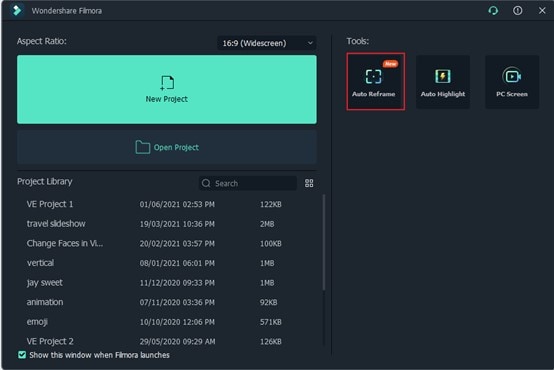
Step 1. Open Filmora and Select Auto Reframe
You can choose among three ways to open the Auto Reframe feature in Filmora.
* **Way 1:** Once you open Filmora, the main interface will display the **Auto Reframe** tab on the right-hand panel. Click it to open directly
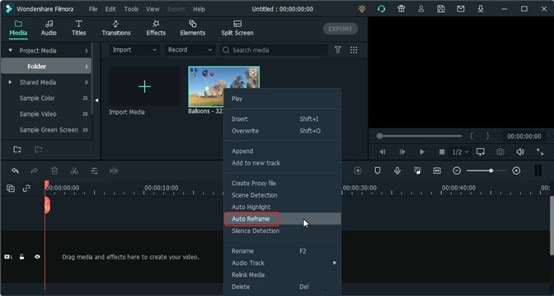
- Way 2: Import media as File > Import Media Files and select the file. After you import the media, right-click and choose the Auto Reframe.
- Way 3: Lastly, you can choose the Tools option on the top menu bar and hit the Auto Reframe.

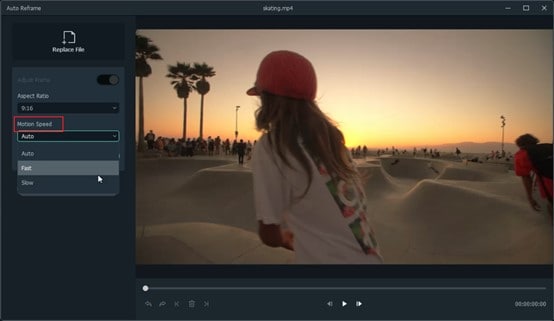
Step 2. Adjust the Aspect Ratio and Motion Speed
A separate dialog box will display once you have selected the Auto Reframe option. Now, click on Import Media and choose a single video to import. You can change the imported video by hitting the Replace File at the top menu.
There are multiple aspect ratio templates available such as square (1:1), vertical (9:16), standard (4:3), widescreen (16:9), and cinema (21:9). As you are making YouTube Shorts, so you need to select 9:16.
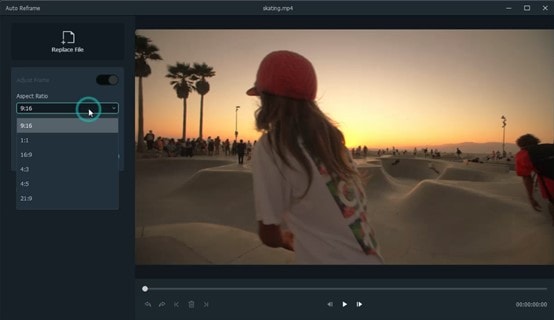
You can adjust the speed of your video in multiple options: keep it at Auto or make it Slow or Fast as per your requirements.
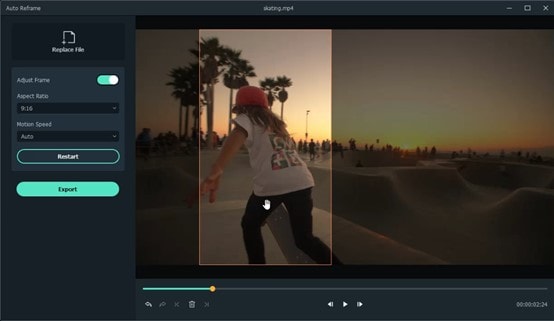
Step 3. Analyze, and Auto Reframe the Video
Once you finish the above adjustments, hit the Analysis tab. Filmora will take a few seconds to finish analyzing your video project.
Then the video will be automatically and quickly reframed to your specified speed and aspect ratio. You can modify these aspect ratios and speed options by hitting the Restart option as well.
Step 4. Preview the Reframed Video and Check
Lastly, you can preview your final video. If the video needs more work, you can also play and pause it at the point you want to adjust the frame. You can use Next Edit Point, Undo, Redo, and Previous Edit Point at the bottom panel.
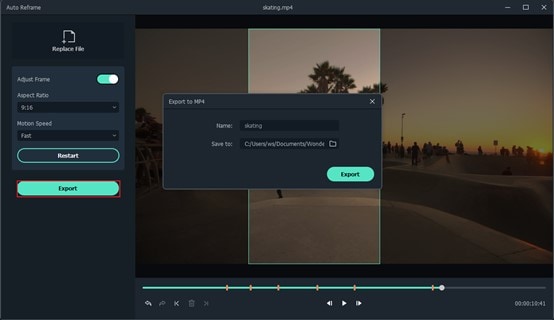
Step 5. Export the Reframed Video
Finally, after all the final adjustments, you can hit the Export tab, name your file and choose the destination folder.
Part 3: FAQs about YouTube Shorts
1. Where to download the YouTube Shorts app?
The YouTube Shorts app is currently available in the YouTube app that your iOS or Android smartphone has. To access it, sign in to your Google account, tap the + button at the bottom, and select the Create a Short option in the popup box that shows off.
2. What’s the YouTube Shorts video duration?
A YouTube Shorts video can be of only up to 60 seconds.
3. Can I Upload Shorts Video on Computer?
Yes. You can upload a Short video by following the traditional method.
- Click the Create camera icon on your PC.
- Click on Upload Videos.
- Locate the file on the PC you want to upload, and you are all done.
However, the option best works in smartphones, and still, if you are uploading through a laptop or PC, make sure to add #shorts in the title or description of the uploaded video.
4. What’s the YouTube Shorts size limitation?
YouTube hasn’t provided any information related to this as of now. However, you can rest assured that a 60 seconds long video file wouldn’t be too large for YouTube to handle.
5. How many subs do you need to access Shorts?
YouTube Shorts is available for everyone no matter how many subscribers the YouTube channel has.
6. Can you make money on Shorts?
Short-form video creators do not share revenue from advertisements played in the Shorts player right now. Instead, start the YouTube Shorts Fund, a $100M fund for creators that helps build the future of short-form video on YouTube.
Conclusion
Hopefully, you have resolved the concern of YouTube Shorts not showing. You can access your total dose of entertainment by getting the YouTube Shorts through our editing tips mentioned in the last section.
However, we’ve mainly defined the editing part of Wondershare Filmora except creating YouTube Shorts through its Auto Reframe feature. But, as you go through Filmora, you will find that editing is not a cumbersome task to follow over this platform. It’s the easiest!
Liza Brown
Liza Brown is a writer and a lover of all things video.
Follow @Liza Brown
Liza Brown
Oct 26, 2023• Proven solutions
Well, a YouTube Shorts is said to be YouTube’s short-form answer to TikTok. You can quickly scroll via algorithmically-driven feed, discover other similar short videos, and subscribe to your favorite creators.
Here, creators can record, share, and edit short-form video content that’s 60 seconds or less and vertically oriented. And, unlike Instagram stories, YouTube Shorts won’t disappear but will remain on your channel. So, that’s the brief intro of YouTube Shorts which we think everyone is aware of after YouTube has announced its YouTube Shorts availability globally.
However, certain factors are still there, raising the issue or concern of YouTube Shorts not showing. Thus, if you can’t find the YouTube Shorts option or videos, or YouTube Shorts disappeared, find a solution in this post.
Part 1: Why Do YouTube Shorts Not Showing Up?
There could be multiple reasons why YouTube Shorts not showing on your phone, the channel’s home page etc.
Besides, many scenarios arise with this issue, namely the YouTube Shorts option not showing up, the YouTube Shorts button missing, and YouTube Shorts videos not showing correctly.
And, there are valid reasons as well as to why these situations are happening to you. So, let’s discuss each of them separately in brief, along with the solutions in the next section.
- YouTube Shorts are not showing on the channel’s homepage
The standard and the most common reason why YouTube Shorts are not showing on the channel’s homepage is that you have not updated the YouTube app.
- YouTube Shorts option not showing up
This may be happening either because you’ve not updated the app or your internet connection is pretty slow to show you the option. There could be another reason as you may not have cleared the YouTube mobile app’s cache and data.
- YouTube Shorts button missing
Again, you may not have updated the YouTube app, or your internet connection is slow is the most common reason here. Moreover, the button of YouTube Shorts stays hidden behind the +icon.
- YouTube Shorts videos not showing correctly
The most valid reason for YouTube Shorts not showing correctly or YouTube Shorts disappearing is that you have a poor internet connection. Plus, we’ve discussed proper steps below if you’ve missed something while uploading the YouTube Shorts triggering this scenario.
Before we move on to fixing YouTube Shorts not showing the issue, here’s a quick note on which videos qualify as YouTube Shorts. Shorts are different from YouTube stories. Unlike YouTube stories, it gets displayed in your regular channel feed along with your other YouTube videos.
And, you must note that a YouTube Shorts video consists of two criteria as follows.
- The video has to be vertical (portrait-style)
- The video must be 60 seconds or less
Part 2: How to Fix YouTube Shorts Not Showing Up?
Here’s the section covering fixes on YouTube Shorts not showing. Please give it a read and resolve your issue happily!
Fix 1: Update the YouTube App
As we’ve already discussed above, check if your YouTube mobile app has the latest version. The newest version of the YouTube mobile app (Version: 16.17.36) has a dedicated Shorts button at the bottom. And, it replaces the Trending button from the YouTube app.
Moreover, the option to upload Shorts is now hidden behind the + icon. Tap on the + icon and hit the Create a Short option.
Fix 2: Check If Shorts Is Available in Your Country
Now, YouTube Shorts is available globally, but there was a phase when YouTube Shorts was a beta feature. It was only available in India and the US, which could be why you could not view Shorts in the YouTube app.
Fix 3: YouTube Shorts Is Mobile-only
As of now, YouTube Shorts is only available on a smartphone because it’s still in beta version. However, you can create Shorts via smartphone and the camera option in YouTube mobile app. Hence, there’s no point in searching for Shorts on your computer.
You can upload Shorts videos from your laptop. The entire process is similar to uploading a regular video. However, you have to mention #Shorts in the title and description to differentiate it as a Shorts video.
Common Fixes to YouTube Shorts Not Working
- Update the YouTube App to the latest version.
- Clear the YouTube mobile app’s data and cache.
- Check if your internet is connected or your internet connection is strong.
- Restart your smartphone and try again.
- The YouTube server can be down, busy, or under maintenance. Wait for a while and try again.
The fixes above are also applicable if the YouTube Shorts are not showing on iPhone as well.
Or, you can try the VPN solution before contacting the YouTube team.
If Videos Are Not Visible under YouTube Shorts
Solution 1: Ensure that you’ve added #shorts in the title and description. Those who have YouTube Shorts, they can make shorts videos via the Shorts camera. Those who can’t access this camera can also upload their current vertical videos that are less than 60 seconds after adding the hashtag #Shorts in the title or description.
All in all, you must include #shorts to let the YouTube algorithm figure out the video is created for Shorts, and the issue of YouTube Shorts not showing up will also be resolved.
Solution 2: Sometimes, you may not find YouTube Shorts videos if they’re precisely 60 seconds in duration because YouTube sometimes adds 1-2 seconds to a Shorts video for some reason. So, be alert here and ensure your Shorts video is around 58 seconds or less.
Solution 3: If your YouTube Shorts is not getting views, you need to wait more here because it takes a while for YouTube to index a Shorts video and suggest them to people. So, it’s the task of the algorithm that varies from person to person. Some Shorts videos take several days while others take weeks.
If YouTube Shorts Videos Are Not Showing up Correctly
Once uploaded, the YouTube Shorts will be displayed in a vertical thumbnail on YouTube and other regular content already there in your account. Or, it’s your choice to create a new channel for the YouTube shorts videos. If the YouTube shorts not showing correctly, you can try as follows:
Step 1. Go to your channel and select the “customize channel” option.
Step 2. Hop on to the Featured section, and choose the add section.
Step 3. You’ll see shorts videos under the “videos” section. Click that, and the videos you have which are tagged in with #shorts in the title or description will automatically display here.
Bonus Tip: How to Easily Create Vertical Videos for YouTube Shorts on PC
The YouTube Shorts app is pretty convenient to use nowadays. However, it doesn’t allow you to fine-edit the videos if you’ve explored the app or specifically when you want your videos to look more professional. The app doesn’t even have many filtering options, such as Effects, Elements, etc., to make your videos more interactive.
With that said, you can always use an efficient third-party program like Wondershare Filmora to create professional-looking YouTube Shorts videos to engage your viewers highly. Even no famous YouTuber uploads their videos directly from the app without using any third-party tool.
We recommend Wondershare Filmora because it is a production and post-production app available for Windows and Mac computers. It gives tough competition to some globally renowned tools like Final Cut Pro X, Adobe Premiere Pro, etc., because of its simplicity. Furthermore, Filmora has its inbuilt screen, voice recording features, and webcam that can be useful to create game walkthroughs, interactive videos, and voiceovers as needed.
Moreover, a YouTube Shorts video can be made through Wondershare Filmora using the below-mentioned guide.
Note: We are assuming that you have already recorded a vertical video using your smartphone and that it has been transferred to your PC.
So, the signature feature to create YouTube Shorts videos on Wondershare Filmora is Auto Reframe.
Powered by AI technology, Auto Reframe automatically identifies the focal point of your video and crops it while always maintaining it within the frame. This way, the main object or action in your video never goes out of vision.
You can choose an aspect ratio that best fits YouTube Shorts which is 9:16.
How to Use Auto Reframe in Filmora?
Step 1. Open Filmora and Select Auto Reframe
You can choose among three ways to open the Auto Reframe feature in Filmora.
* **Way 1:** Once you open Filmora, the main interface will display the **Auto Reframe** tab on the right-hand panel. Click it to open directly
- Way 2: Import media as File > Import Media Files and select the file. After you import the media, right-click and choose the Auto Reframe.
- Way 3: Lastly, you can choose the Tools option on the top menu bar and hit the Auto Reframe.
Step 2. Adjust the Aspect Ratio and Motion Speed
A separate dialog box will display once you have selected the Auto Reframe option. Now, click on Import Media and choose a single video to import. You can change the imported video by hitting the Replace File at the top menu.
There are multiple aspect ratio templates available such as square (1:1), vertical (9:16), standard (4:3), widescreen (16:9), and cinema (21:9). As you are making YouTube Shorts, so you need to select 9:16.
You can adjust the speed of your video in multiple options: keep it at Auto or make it Slow or Fast as per your requirements.
Step 3. Analyze, and Auto Reframe the Video
Once you finish the above adjustments, hit the Analysis tab. Filmora will take a few seconds to finish analyzing your video project.
Then the video will be automatically and quickly reframed to your specified speed and aspect ratio. You can modify these aspect ratios and speed options by hitting the Restart option as well.
Step 4. Preview the Reframed Video and Check
Lastly, you can preview your final video. If the video needs more work, you can also play and pause it at the point you want to adjust the frame. You can use Next Edit Point, Undo, Redo, and Previous Edit Point at the bottom panel.
Step 5. Export the Reframed Video
Finally, after all the final adjustments, you can hit the Export tab, name your file and choose the destination folder.
Part 3: FAQs about YouTube Shorts
1. Where to download the YouTube Shorts app?
The YouTube Shorts app is currently available in the YouTube app that your iOS or Android smartphone has. To access it, sign in to your Google account, tap the + button at the bottom, and select the Create a Short option in the popup box that shows off.
2. What’s the YouTube Shorts video duration?
A YouTube Shorts video can be of only up to 60 seconds.
3. Can I Upload Shorts Video on Computer?
Yes. You can upload a Short video by following the traditional method.
- Click the Create camera icon on your PC.
- Click on Upload Videos.
- Locate the file on the PC you want to upload, and you are all done.
However, the option best works in smartphones, and still, if you are uploading through a laptop or PC, make sure to add #shorts in the title or description of the uploaded video.
4. What’s the YouTube Shorts size limitation?
YouTube hasn’t provided any information related to this as of now. However, you can rest assured that a 60 seconds long video file wouldn’t be too large for YouTube to handle.
5. How many subs do you need to access Shorts?
YouTube Shorts is available for everyone no matter how many subscribers the YouTube channel has.
6. Can you make money on Shorts?
Short-form video creators do not share revenue from advertisements played in the Shorts player right now. Instead, start the YouTube Shorts Fund, a $100M fund for creators that helps build the future of short-form video on YouTube.
Conclusion
Hopefully, you have resolved the concern of YouTube Shorts not showing. You can access your total dose of entertainment by getting the YouTube Shorts through our editing tips mentioned in the last section.
However, we’ve mainly defined the editing part of Wondershare Filmora except creating YouTube Shorts through its Auto Reframe feature. But, as you go through Filmora, you will find that editing is not a cumbersome task to follow over this platform. It’s the easiest!
Liza Brown
Liza Brown is a writer and a lover of all things video.
Follow @Liza Brown
Also read:
- [New] Club Craft How to Download Best DJ Vids
- [New] Essential Gear Picking the Very Best Among Top 9 Free Logomakers
- Cutting-Edge Computers Optimal Machines for Media Creation for 2024
- Comprehensive List of Top 9 Free Video Channel Branding Aids
- [New] Easing Into Your YouTube Watches 3 Methods (50 Chars)
- Building a Custom Link for YouTube's Auto-Subscribe for 2024
- 2024 Approved Discovering 8 Honestly-Endorsed Promotional Strategies
- Effortless Strategy Deleting Dislikes From YouTube Discussions
- In 2024, Breaking Down the Most Influential YouTube Personalities
- [New] Demystifying the Money Behind 1M on YouTube
- Earn Big on YouTube via CP2024 Step-by-Step Approach
- Assessing the Best Platform for Individual Use TikTok vs Shorts
- [New] 15 Premier Sci-Tech Vloggers for Enlightened Learning
- 2024 Approved A Close Look at T-Series Revenue From Online Channels
- Beat Bazaar Curation of Superior DJ Video Samples for Download
- Elevate Video Rankings Proven YouTube SEO Solutions
- [Updated] Discover the Ultimate Tune Troupes on These 20 Premier YouTube Sounds
- 2024 Approved Drive Subscriptions Upward Through Effective YouTube Branding
- [New] Engaging Tactics for Increased Subscriber Count
- In 2024, Addressed Discrepancy in Shorts Showcase
- [New] Design Principles for Eye-Catching YT Previews
- 20 Must-Watch YouTube Music Bands
- In 2024, Decoding Video Thread Embellishments
- Counterclockwise Watch How to Unravel Your YouTube Sequence for 2024
- Android Beat Best Free Apps for Downloading YouTube Tunes for 2024
- In 2024, Best Cameras to Amplify Your YT Presence
- In-Depth Guide to Uploading Lengthier Content on YouTube
- Techniques to Improve Video Visibility on YouTube Platform
- [Updated] Construct the Ultimate Experience in Unveiling Videos
- Bite-Sized Tips for Aspiring Video Editors for 2024
- How Can You Choose the Best Sound Editor, In 2024
- What to Do if Google Play Services Keeps Stopping on Infinix Note 30i | Dr.fone
- In 2024, Top 10 High-Flying MOBA Games for Android Users
- [New] 2024 Approved Navigating the World of Instagram Filters A Comprehensive Guide to 2023
- [New] 2024 Approved High-Quality Capture The Best Applications Reviewed
- [Updated] In 2024, How to Make Facebook Video Ads in An Creative Way?
- In 2024, Backup Blueprint From Your Phone to Your Snap Story
- In 2024, How To Change Infinix Smart 7 Lock Screen Password?
- In 2024, Tecno Spark Go (2024) ADB Format Tool for PC vs. Other Unlocking Tools Which One is the Best?
- New In 2024, Procuring Accurate Bell Chimes and Clangs
- 2024 Approved What You Missed A Closer Look at Facebook's 2023 Upgrades
- [Updated] 2024 Approved Capturing High Fidelity Games
- 2024 Approved Streamlining Google Meet Recording with Simple Methods
- Title: "Transforming Your Live Streams for YouTube Twitch Edition"
- Author: Kevin
- Created at : 2024-06-18 20:20:27
- Updated at : 2024-06-19 20:20:27
- Link: https://youtube-videos.techidaily.com/transforming-your-live-streams-for-youtube-twitch-edition/
- License: This work is licensed under CC BY-NC-SA 4.0.
