
:max_bytes(150000):strip_icc()/0.Blogheader-96a3f7ad284a426990f8ac4de75e9d86.png)
"Transforming Viewership A Proven Guide to Implementing Youtube's Featured Listings"
Transforming Viewership: A Proven Guide to Implementing Youtube’s Featured Listings
Versatile YouTube Video Editor - Filmora
An easy yet powerful editor
Numerous effects to choose from
Detailed tutorials provided by the official channel
Since the inception of YouTube, accessing videos and content has become easy for social media users. You can get content in the comfort of your home because millions of featured channel owners feature more channels every minute across the globe. Many YouTubers have learned the importance of how to add featured channels on YouTube mobile; many audiences can access mobile that they can use to access the internet. Featured channels have many advantages for the owner because it is the easiest way to reach many audiences than other means of getting the viewers. Featured channels attract larger target audiences, which leads to more subscribers.
In this article
01 What are Featured Channels on YouTube?
02 Why does Add Feature Channels on YouTube Matter?
03 How to Add Featured Channels on YouTube?
04 Fix the Problem - Why Can’t I Feature Channels on YouTube?
05 Bonus Tip - Make YouTube Videos with Good Video Editor
Part 1: What are Featured Channels on YouTube?
YouTube featured channels displayed on YouTube have videos that YouTube considers worth watching by the audience, based on the site’s algorithms. Using featured channels expands your channel being viewed and accessed by many audiences, which leads to many subscribing to the channels recommended on your channel.
Part 2: Why does Adding Feature Channels on YouTube Matter?
Here we shall mention the importance of featured channels on YouTube:
1. Give audiences more required content
The channels with videos and YouTube featured channels have more audience because of their content. The audience always visits the channels with more informative content and even refers friends to it.
2. Source of more traffic
Many viewers visit the YouTube channels searching for information found in videos featured and knowing how to add a featured channel on YouTube in 2021 and get what they are looking for. Featured Channels with good content attract traffic and increase subscribers and referrals to the channels.
3. Personal connection
Featured Channels on YouTube matter immensely because they attract viewers to the actors or someone featured in the video. This leads to the audience is getting closer connected to the videos and information conveyed through the content. Videos increase familiarity and build a larger community where the audience identifies themselves with the channels.
4. Source of Revenue
Adding feature channels on YouTube matters because they lead to income/revenue through YouTube Ads, a course on your channels, and subscriptions to the channels by the viewers who view the channels daily.
5. Growing audience
Most audiences are visual learners worldwide, so having channels featured on YouTube matters because they attract many audiences globally. Uploading videos/content more often leads to more visitors flocking to your featured channels.
6. High credibility
Featuring channels on YouTube increases the channel’s credibility among the audience. Especially when the content answers the audiences’ questions and solves the problems they face, audiences develop trust, associate, and frequently interact with your YouTube featured channels.
Part 3: How to Add Featured Channels on YouTube?
Adding featured channels on YouTube is more accessible than most people think to follow the steps required to upload the channels and videos.
1 Login into YouTube studio
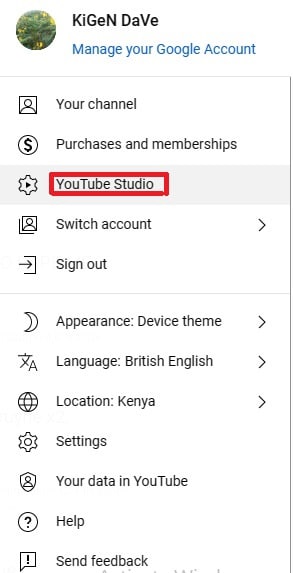
2 Go to the sidebar on the left and scroll to customization
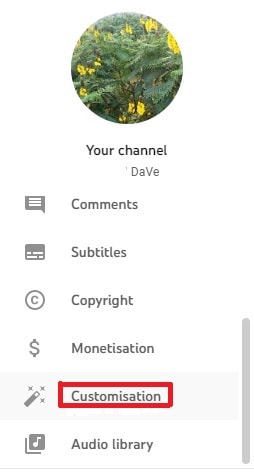
3 Click on ADD section
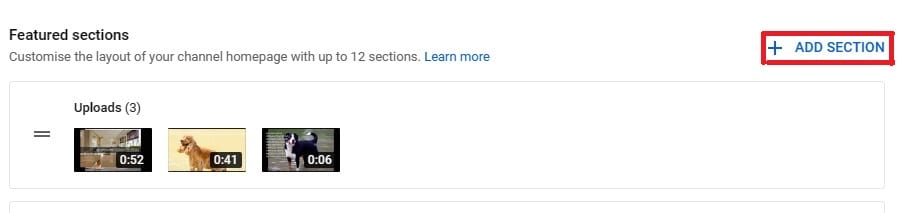
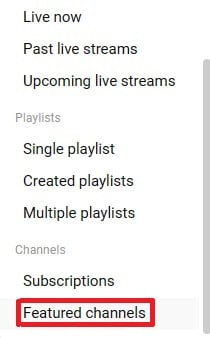
4 A small window will unroll, scroll down and click featured channels
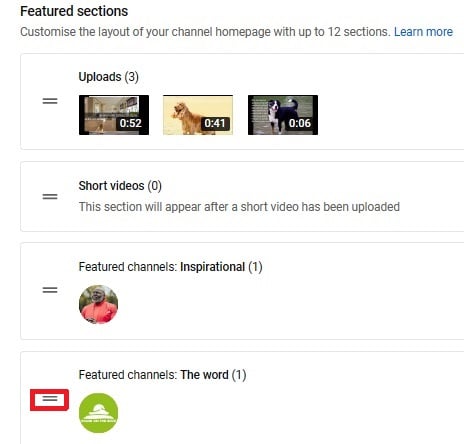
5 You can change featured channels on YouTube on the featured section, place the mouse cursor on the double lines next to the channel’s name as shown below on “featured channels name, The word,” and drag it to wherever you want.
Part 4: Fix the Problem - Why Can’t I Feature Channels on YouTube?
Many reasons can cause failure to feature your channel on YouTube that make you wonder why you can’t feature channels on YouTube.
1. Your YouTube Thumbnails
Your video thumbnail is the first thing your viewers see on their home feed when they click on your channels. The thumbnail must be catchy with accurate images showing what your video entails.
How to fix this issue?
Create relevant and exciting thumbnails that will attract viewers. It is advisable to use custom thumbnails and contrast to be catchy. This will make the viewers desire to visit your channel more often.
2. Lack of Consistency
Being inconsistent in your channels makes your viewers distrust your future work. If you take too long to feature your YouTube video/contents, viewers may decide to even unsubscribe from your channels, which may lead your traffic to drop to zero.
How to fix the inconsistency?
Be open to your viewers about when to expect the following videos on your channels, and it is good manners to keep your audience updated about what is coming. Consistently featured channels always get a good flow of viewers and even referrals.
3. Lack of content on the channels
Failing to update the channels often leads viewers not to visit your YouTube channels; viewers search for up-to-date information. If your channels lack content, audiences will quickly hop onto others in the market for the information they need.
How to fix the lack of content?
Read the minds of your audiences, primarily through comments they leave behind. You should update the channels with the required videos to satisfy your audience. Having quality content is the crucial thing here.
4. Lack of value in your videos
Before uploading videos on your channels, it’s good to ask yourself some questions, like:
What value does my video add to the audience?
How to fix it?
You are ready to value your videos if you answer these few questions. Value is the crucial thing in every product in the market. YouTube channel owners ought to know what the competitors offer to the same viewers and exceed them by posting videos that meet audiences’ needs.
It’s good manners to go back to the drawing board and research why your YouTube channels aren’t being featured.
Part 5: Bonus Tip - Make YouTube Videos with Good Video Editor
Making videos featured in the YouTube channels requires a good video editor. Although various video editors do excellent work, making videos with an exceptional video editor must be a goal. Filmora is such kind of best video editor that can handle the editing of videos very well. It is an excellent software for beginners and pros, and it is more potent than other video editors in the market.
It allows a person to make professional-looking videos because Filmora has various presets like overplays, transitions, elements, filters, and several layers of effects.
Wondershare Filmora
Get started easily with Filmora’s powerful performance, intuitive interface, and countless effects!
Try It Free Try It Free Try It Free Learn More >

Key features of Wondershare filmora
Filmora video editor comes with several features that make it the best video editor. The features include an advanced text editor, GIF support, Color tuning, noise removal, audio equalizer, stabilization of the video, and scene detection.
Conclusion
YouTube featured channels with quality informative videos/contents attract more audiences, mainly social media users, in the larger market. Before featuring channels on YouTube, one has to know what the target audiences need, test and the demography of the audiences matters a lot.
Featured channels on the YouTube platform can be an excellent source of revenue for ready, consistent, and considerate value on their videos uploaded on the channels. Inconsistency can be detrimental to the owner of the channels because the channels can end up being dormant with no one subscribing to them. The owner ought to learn how to add featured channels on YouTube by following the complete guide.
Also, making YouTube videos with a good video editor is advisable for quality videos that will attract more audiences. Value is what viewers are after on the featured channels on YouTube.
Since the inception of YouTube, accessing videos and content has become easy for social media users. You can get content in the comfort of your home because millions of featured channel owners feature more channels every minute across the globe. Many YouTubers have learned the importance of how to add featured channels on YouTube mobile; many audiences can access mobile that they can use to access the internet. Featured channels have many advantages for the owner because it is the easiest way to reach many audiences than other means of getting the viewers. Featured channels attract larger target audiences, which leads to more subscribers.
In this article
01 What are Featured Channels on YouTube?
02 Why does Add Feature Channels on YouTube Matter?
03 How to Add Featured Channels on YouTube?
04 Fix the Problem - Why Can’t I Feature Channels on YouTube?
05 Bonus Tip - Make YouTube Videos with Good Video Editor
Part 1: What are Featured Channels on YouTube?
YouTube featured channels displayed on YouTube have videos that YouTube considers worth watching by the audience, based on the site’s algorithms. Using featured channels expands your channel being viewed and accessed by many audiences, which leads to many subscribing to the channels recommended on your channel.
Part 2: Why does Adding Feature Channels on YouTube Matter?
Here we shall mention the importance of featured channels on YouTube:
1. Give audiences more required content
The channels with videos and YouTube featured channels have more audience because of their content. The audience always visits the channels with more informative content and even refers friends to it.
2. Source of more traffic
Many viewers visit the YouTube channels searching for information found in videos featured and knowing how to add a featured channel on YouTube in 2021 and get what they are looking for. Featured Channels with good content attract traffic and increase subscribers and referrals to the channels.
3. Personal connection
Featured Channels on YouTube matter immensely because they attract viewers to the actors or someone featured in the video. This leads to the audience is getting closer connected to the videos and information conveyed through the content. Videos increase familiarity and build a larger community where the audience identifies themselves with the channels.
4. Source of Revenue
Adding feature channels on YouTube matters because they lead to income/revenue through YouTube Ads, a course on your channels, and subscriptions to the channels by the viewers who view the channels daily.
5. Growing audience
Most audiences are visual learners worldwide, so having channels featured on YouTube matters because they attract many audiences globally. Uploading videos/content more often leads to more visitors flocking to your featured channels.
6. High credibility
Featuring channels on YouTube increases the channel’s credibility among the audience. Especially when the content answers the audiences’ questions and solves the problems they face, audiences develop trust, associate, and frequently interact with your YouTube featured channels.
Part 3: How to Add Featured Channels on YouTube?
Adding featured channels on YouTube is more accessible than most people think to follow the steps required to upload the channels and videos.
1 Login into YouTube studio
2 Go to the sidebar on the left and scroll to customization
3 Click on ADD section
4 A small window will unroll, scroll down and click featured channels
5 You can change featured channels on YouTube on the featured section, place the mouse cursor on the double lines next to the channel’s name as shown below on “featured channels name, The word,” and drag it to wherever you want.
Part 4: Fix the Problem - Why Can’t I Feature Channels on YouTube?
Many reasons can cause failure to feature your channel on YouTube that make you wonder why you can’t feature channels on YouTube.
1. Your YouTube Thumbnails
Your video thumbnail is the first thing your viewers see on their home feed when they click on your channels. The thumbnail must be catchy with accurate images showing what your video entails.
How to fix this issue?
Create relevant and exciting thumbnails that will attract viewers. It is advisable to use custom thumbnails and contrast to be catchy. This will make the viewers desire to visit your channel more often.
2. Lack of Consistency
Being inconsistent in your channels makes your viewers distrust your future work. If you take too long to feature your YouTube video/contents, viewers may decide to even unsubscribe from your channels, which may lead your traffic to drop to zero.
How to fix the inconsistency?
Be open to your viewers about when to expect the following videos on your channels, and it is good manners to keep your audience updated about what is coming. Consistently featured channels always get a good flow of viewers and even referrals.
3. Lack of content on the channels
Failing to update the channels often leads viewers not to visit your YouTube channels; viewers search for up-to-date information. If your channels lack content, audiences will quickly hop onto others in the market for the information they need.
How to fix the lack of content?
Read the minds of your audiences, primarily through comments they leave behind. You should update the channels with the required videos to satisfy your audience. Having quality content is the crucial thing here.
4. Lack of value in your videos
Before uploading videos on your channels, it’s good to ask yourself some questions, like:
What value does my video add to the audience?
How to fix it?
You are ready to value your videos if you answer these few questions. Value is the crucial thing in every product in the market. YouTube channel owners ought to know what the competitors offer to the same viewers and exceed them by posting videos that meet audiences’ needs.
It’s good manners to go back to the drawing board and research why your YouTube channels aren’t being featured.
Part 5: Bonus Tip - Make YouTube Videos with Good Video Editor
Making videos featured in the YouTube channels requires a good video editor. Although various video editors do excellent work, making videos with an exceptional video editor must be a goal. Filmora is such kind of best video editor that can handle the editing of videos very well. It is an excellent software for beginners and pros, and it is more potent than other video editors in the market.
It allows a person to make professional-looking videos because Filmora has various presets like overplays, transitions, elements, filters, and several layers of effects.
Wondershare Filmora
Get started easily with Filmora’s powerful performance, intuitive interface, and countless effects!
Try It Free Try It Free Try It Free Learn More >
Key features of Wondershare filmora
Filmora video editor comes with several features that make it the best video editor. The features include an advanced text editor, GIF support, Color tuning, noise removal, audio equalizer, stabilization of the video, and scene detection.
Conclusion
YouTube featured channels with quality informative videos/contents attract more audiences, mainly social media users, in the larger market. Before featuring channels on YouTube, one has to know what the target audiences need, test and the demography of the audiences matters a lot.
Featured channels on the YouTube platform can be an excellent source of revenue for ready, consistent, and considerate value on their videos uploaded on the channels. Inconsistency can be detrimental to the owner of the channels because the channels can end up being dormant with no one subscribing to them. The owner ought to learn how to add featured channels on YouTube by following the complete guide.
Also, making YouTube videos with a good video editor is advisable for quality videos that will attract more audiences. Value is what viewers are after on the featured channels on YouTube.
How to Embed YouTube in Your GSlides Presentation
Create High-Quality Video - Wondershare Filmora
An easy and powerful YouTube video editor
Numerous video and audio effects to choose from
Detailed tutorials provided by the official channel
Google Slide presentation is a powerful tool for creators to keep their audience engaged. This online platform lets you create and demonstrate your ideas. It will capture your viewers’ attention from the very beginning. It also doesn’t matter whatever learning style you engage. Adding YouTube videos to Google Slide will appeal to all levels of individuals.
More so, it is the best way to provide a break for both the audience and the creator. You can break Google Slide presentations with videos to offer some break. Viewers and the presenter get a breather in the process. The presenter can take a short break from speaking while the video plays. Let’s now dive into how to embed a YouTube video in Google Slides.

In this article
01 Why should we add a video to Google Slides?
02 How to add a YouTube video to Google Slide
03 How to choose the right video for your Slides?
Why should we add a video to Google Slides?
There is a great impact of adding video to Google Slides.
For attention
Videos will automatically awaken you, especially if your thoughts have started to sway during a presentation. A video has a direct way of showing creativity. The audience automatically connects the dots between the video and the presentation lines alike.
To stimulate discussion
A picture is worth a thousand words. There is a way that an added video will help the audience connect to the day’s topic. It will bring up several ideas and stir up discussion with the presenter.
Easy following
With videos embedded in Google Slide, viewers will find it easy to understand and digest. Videos automatically eliminate boredom and make any topic interesting.
How to add a YouTube video to Google Slide
Use these two methods to add a YouTube video to Google Slides. Via the Search and Direct link.
Method 1. Embed YouTube video to Google Slide by search and selection
Google has owned YouTube since the year 2006. You can, therefore, integrate Google’s products with YouTube easily.
Step 1. First, go to the slide where you want to embed your video.
Step 2. Then choose the “Insert” option from the menu bar and hit the “Video” option.

Step 3. It would be best if you now viewed the “YouTube” search bar to type in the video you want to embed. You can use keywords to search for the video in question and view instant search results.
Step 4. Then select the video you want to embed, and you’ll see it appear on the “Slide.”

Step 5. Format your video. Remember that the entire video will be embedded. You don’t necessarily need the whole video. It is time to select just a brief but relevant clip from the video to use. Then position your video to the right point using the axes from the exact starting point to the finished part you want the video to appear in.
Method 2. Embed YouTube video to Google Slide by direct link
You can engage this method if you want to include the entire video.
Step 1. Get the URL of the specific YouTube video that you want to use.

Step 2. Then go to your browser’s “Address bar” to copy the YouTube link.
Step 3. Next, open the “Presentation” slide to put your video to.
Step 4. Choose the “Insert” tab from the menu bar.
Step 5. Then hit on the “Video” option from the drop-down menu that appears.
Step 6. A new window will open automatically. Choose the “By URL” tab.
Step 7. Then paste the YouTube video URL in the “Paste YouTube URL Here” bar section.

Step 8. Wait for the video file to load and press the “Select” option. The video will immediately appear in the presentation slide. Just drag and drop the video in your preferred position.
Note: You can do a few edits inside the application. Set the timer when your video should start and when to stop. You can also adjust the video player size.
How to choose the right video for your Slides?
Not all videos will make an impact on your Google Slide. You need to use the best shot that adds value to your presentation. These guidelines will help you to settle on the best video.
Be Professional – choose the best video for your presentation. Remember that the video is part of the presentation and carries more weight. Settling for quality video will bring out the professionalism in you.
Relevant – how do you know that what you are showing your audience corresponds to the presentation piece? Ensure that the video you add has something to do with the Google Slide presentation topic. The two should naturally flow to make it easy to understand the whole concept.
Precise – your presentation is not about the video. The ideal length should not exceed 60 seconds. The longer the video, the greater the chance for your audience to lose track along the way.
Know every footage you are working with – this will help you pick the best shots for your presentation. So, learn every aspect of the video before settling down to use it.
Add new content – even though one content may suit several presentations, don’t rely on the same piece each time. Your audience will want to feel something fresh each time you are presenting. So, compose different videos for different scenarios to make that big impact.
Create an eye-catching video for your Slides with Filmora
The video quality matters when it comes to creating your Slides. The best video creator – Filmora – works in simple steps to give you an eye-catching video. It will create videos for all scenarios like marketing, tutorial, gaming, etc.
Key features of Filmora
- It offers you advanced video effects like filters, motion elements, etc
- You can multiply your fun with multiple screens with the Split Screen feature
- Easily change backgrounds using the Green Screen feature
- The speed control lets you fast forward or slow down a special moment
- Import your video clips to social media platforms
- You can also adjust the audio of your tracks using the Audio Mixer feature
Follow this guide to create a video for your slide with Filmora
Step 1. Launch Filmora
First, begin by downloading and installing Filmora on your computer device. Once installed, launch it and allow it to run. You can either create a new project or open an existing project to work on.
Step 2. Create a new project
Here, click on the “New Project” tab on the app’s welcome screen. The editor should load immediately. Then proceed to register the product. Just hit on the “Register” tab.
Step 3. Import video
Check the upper left corner of your screen to see the “Import” tab. Click on it and choose the “Import Media Files” option. Next, navigate to the location of your computer’s local list to select the clip or video you want to edit. Then, hit the “Import” button to add the video to the timeline for editing.
Step 4. Edit video
Drag and drop the raw footage to Filmora’s timeline to begin editing. Here, you can trim, add other video clips, merge, and add effects as you wish. Likewise, you can add opening titles, subtitles, and end credits to your video. More so, this tool offers different templates to use. Just drag and drop the templates you wish to use to a specific location on the timeline.
Step 5. Preview your file
Last but not least, you can preview your files. Click on the “Play” tab to start previewing your video clips. The main essence of this part is to allow you to make the necessary changes to your clips if there is a need.
Step 6. Export and Share
With Filmora, you can export your file to various social media platforms. But first, go to the “Output window” and select the video file format to use. This software supports several output formats to apply to any platform and device. Just click on the “Format” tab and choose the file format to use. Then also change the resolution and other parameters like frame rate and channel of your video in the “Settings” section. Finally, share your video to your YouTube channel and get ready to add the video to the Google Slide presentation.
For Win 7 or later (64-bit)
For macOS 10.12 or later
Conclusion
● You now know how to put a YouTube video in Google Slides the simple way. You can search for your YouTube videos or directly use the URL link. Whatever the case, remember that it’s the quality of your video that carries more weight. Thanks to the availability of third-party apps that you can use to create and improve the quality of your videos.
● Filmora is at your service to create high-resolution videos that you can export in any format to your YouTube channel. The tool is intuitive, and it won’t matter whether you haven’t tried it before. It is a perfect choice for both professionals and first-time users.
Google Slide presentation is a powerful tool for creators to keep their audience engaged. This online platform lets you create and demonstrate your ideas. It will capture your viewers’ attention from the very beginning. It also doesn’t matter whatever learning style you engage. Adding YouTube videos to Google Slide will appeal to all levels of individuals.
More so, it is the best way to provide a break for both the audience and the creator. You can break Google Slide presentations with videos to offer some break. Viewers and the presenter get a breather in the process. The presenter can take a short break from speaking while the video plays. Let’s now dive into how to embed a YouTube video in Google Slides.
In this article
01 Why should we add a video to Google Slides?
02 How to add a YouTube video to Google Slide
03 How to choose the right video for your Slides?
Why should we add a video to Google Slides?
There is a great impact of adding video to Google Slides.
For attention
Videos will automatically awaken you, especially if your thoughts have started to sway during a presentation. A video has a direct way of showing creativity. The audience automatically connects the dots between the video and the presentation lines alike.
To stimulate discussion
A picture is worth a thousand words. There is a way that an added video will help the audience connect to the day’s topic. It will bring up several ideas and stir up discussion with the presenter.
Easy following
With videos embedded in Google Slide, viewers will find it easy to understand and digest. Videos automatically eliminate boredom and make any topic interesting.
How to add a YouTube video to Google Slide
Use these two methods to add a YouTube video to Google Slides. Via the Search and Direct link.
Method 1. Embed YouTube video to Google Slide by search and selection
Google has owned YouTube since the year 2006. You can, therefore, integrate Google’s products with YouTube easily.
Step 1. First, go to the slide where you want to embed your video.
Step 2. Then choose the “Insert” option from the menu bar and hit the “Video” option.
Step 3. It would be best if you now viewed the “YouTube” search bar to type in the video you want to embed. You can use keywords to search for the video in question and view instant search results.
Step 4. Then select the video you want to embed, and you’ll see it appear on the “Slide.”
Step 5. Format your video. Remember that the entire video will be embedded. You don’t necessarily need the whole video. It is time to select just a brief but relevant clip from the video to use. Then position your video to the right point using the axes from the exact starting point to the finished part you want the video to appear in.
Method 2. Embed YouTube video to Google Slide by direct link
You can engage this method if you want to include the entire video.
Step 1. Get the URL of the specific YouTube video that you want to use.
Step 2. Then go to your browser’s “Address bar” to copy the YouTube link.
Step 3. Next, open the “Presentation” slide to put your video to.
Step 4. Choose the “Insert” tab from the menu bar.
Step 5. Then hit on the “Video” option from the drop-down menu that appears.
Step 6. A new window will open automatically. Choose the “By URL” tab.
Step 7. Then paste the YouTube video URL in the “Paste YouTube URL Here” bar section.
Step 8. Wait for the video file to load and press the “Select” option. The video will immediately appear in the presentation slide. Just drag and drop the video in your preferred position.
Note: You can do a few edits inside the application. Set the timer when your video should start and when to stop. You can also adjust the video player size.
How to choose the right video for your Slides?
Not all videos will make an impact on your Google Slide. You need to use the best shot that adds value to your presentation. These guidelines will help you to settle on the best video.
Be Professional – choose the best video for your presentation. Remember that the video is part of the presentation and carries more weight. Settling for quality video will bring out the professionalism in you.
Relevant – how do you know that what you are showing your audience corresponds to the presentation piece? Ensure that the video you add has something to do with the Google Slide presentation topic. The two should naturally flow to make it easy to understand the whole concept.
Precise – your presentation is not about the video. The ideal length should not exceed 60 seconds. The longer the video, the greater the chance for your audience to lose track along the way.
Know every footage you are working with – this will help you pick the best shots for your presentation. So, learn every aspect of the video before settling down to use it.
Add new content – even though one content may suit several presentations, don’t rely on the same piece each time. Your audience will want to feel something fresh each time you are presenting. So, compose different videos for different scenarios to make that big impact.
Create an eye-catching video for your Slides with Filmora
The video quality matters when it comes to creating your Slides. The best video creator – Filmora – works in simple steps to give you an eye-catching video. It will create videos for all scenarios like marketing, tutorial, gaming, etc.
Key features of Filmora
- It offers you advanced video effects like filters, motion elements, etc
- You can multiply your fun with multiple screens with the Split Screen feature
- Easily change backgrounds using the Green Screen feature
- The speed control lets you fast forward or slow down a special moment
- Import your video clips to social media platforms
- You can also adjust the audio of your tracks using the Audio Mixer feature
Follow this guide to create a video for your slide with Filmora
Step 1. Launch Filmora
First, begin by downloading and installing Filmora on your computer device. Once installed, launch it and allow it to run. You can either create a new project or open an existing project to work on.
Step 2. Create a new project
Here, click on the “New Project” tab on the app’s welcome screen. The editor should load immediately. Then proceed to register the product. Just hit on the “Register” tab.
Step 3. Import video
Check the upper left corner of your screen to see the “Import” tab. Click on it and choose the “Import Media Files” option. Next, navigate to the location of your computer’s local list to select the clip or video you want to edit. Then, hit the “Import” button to add the video to the timeline for editing.
Step 4. Edit video
Drag and drop the raw footage to Filmora’s timeline to begin editing. Here, you can trim, add other video clips, merge, and add effects as you wish. Likewise, you can add opening titles, subtitles, and end credits to your video. More so, this tool offers different templates to use. Just drag and drop the templates you wish to use to a specific location on the timeline.
Step 5. Preview your file
Last but not least, you can preview your files. Click on the “Play” tab to start previewing your video clips. The main essence of this part is to allow you to make the necessary changes to your clips if there is a need.
Step 6. Export and Share
With Filmora, you can export your file to various social media platforms. But first, go to the “Output window” and select the video file format to use. This software supports several output formats to apply to any platform and device. Just click on the “Format” tab and choose the file format to use. Then also change the resolution and other parameters like frame rate and channel of your video in the “Settings” section. Finally, share your video to your YouTube channel and get ready to add the video to the Google Slide presentation.
For Win 7 or later (64-bit)
For macOS 10.12 or later
Conclusion
● You now know how to put a YouTube video in Google Slides the simple way. You can search for your YouTube videos or directly use the URL link. Whatever the case, remember that it’s the quality of your video that carries more weight. Thanks to the availability of third-party apps that you can use to create and improve the quality of your videos.
● Filmora is at your service to create high-resolution videos that you can export in any format to your YouTube channel. The tool is intuitive, and it won’t matter whether you haven’t tried it before. It is a perfect choice for both professionals and first-time users.
Also read:
- 10-Second Teasers Explained for 2024
- In 2024, Creative Command Center Studio for YouTubers
- [New] 30 Must-Have YouTube Intros Tools for Beginners, All Free
- 2024 Approved ASMR Recommendations for Android Users
- Academic Journey Across Time Top 10 History YouTubers for 2024
- [New] EditMelodiesPC Top Video & Music Pairing Software
- Free YouTube Spotlight with Two Key Approaches
- Cut Costs, Boost Creativity Learn the Secrets of Green Screen Artistry From 4 Leading Educators
- [New] Essential Guide to Top 12 Free and Paid Gaming Introduction Creators
- Download Premium-Quality Designs at No Cost – For YouTube Creators
- How to Make Your YouTube Moments Come Alive Creating Dynamic GIFs
- Unlock Video Insights Mastering YouTube Statistics with Social Blade
- [New] Easy Process Extracting YouTube Media Directly
- Crafting a Simplified YouTube Auto-Subscribe URL for 2024
- In 2024, Creating Accessibility Your Guide to an Intuitive YouTube Signup
- Uncovering the Power Players Top 10 YouTubers with Most Subs
- Creating Captivating Life-Enriching Video Content for 2024
- 2024 Approved Designing Effective Video Previews for Channels
- [New] Community Builders Gamer YouTubers
- 2024 Approved Effortless YouTube Live with Step-by-Step OBS Guide for Beginners
- Affordable Gear Guide Choosing the Right Cam For You for 2024
- Uncover These Ten YouTube Sources with the Fastest Growth Rates
- In 2024, Building a Million Views Empire Safe and Secure Methods
- In 2024, Elevate Your Social Media Presence with These High-Impact YouTube Strategies
- [Updated] 10 Expert Suggestions to Make Your YT Shorts Stand Out
- In 2024, Beginning Your Blog Journey for Financial Gain
- The Ultimate List of World Explorers on Youtube
- In 2024, Convenient Method to Design Original Shorts Thumbnails
- 2024 Approved Crafting Engaging Life Journeys in Video Formats
- In 2024, A Stepwise Approach to Add YouTube Videos Into Slate
- Twisting the Tape YouTube Video Rotation Techniques Unveiled
- How to Make a Cool YouTube Video Intro in iMovie?
- Visual Storyteller Toolkit
- Channel Conclusion Mastery Customized Screens in Focus
- Cut Down to Size Ranking the Best YouTube Video Editors for 2024
- Harnessing HDR in Post Top 4 YouTube Guides with Complimentary Green Screen Effects
- 15 Best Free YouTube Introduction Tools for 2024
- Demystifying How TSeries Capitalizes on YouTube Audience Reach
- 2024 Approved Brevity in Action Shortening YouTube Video Content
- 2024 Approved 11 Useful YouTube SEO Tips to Rank Your Video
- Navigating the Financial Frontier of YouTube Creators
- Unleash Creativity with These 8 Free YouTube Thumbnail Builders
- [New] Compiling Leading Short-Form Video Editors IOS/Android Edition
- In 2024, Cross-Platform Titling Guidelines for Mobile & Social Apps
- Techniques to Avoid Blackout Issues on Online Video Platform
- Elevate Your Channels Selecting Prime Microphones for Every Content Category
- Enjoy Pure Browsing Our Selections of 7 Top Android AdBlockers
- The Ultimate List 6 Must-Have Voice Amplification Tools for Mobile Phones
- A Working Guide For Pachirisu Pokemon Go Map On Realme Narzo 60 5G | Dr.fone
- [Updated] 2024 Approved Spotlight on Visionary Creators Transforming Chat Visuals
- Updated 2024 Approved Perfecting Your Production Top 8 Equalizers to Achieve Professional Sound Quality in Streaming Media
- [Updated] In 2024, Enrich Your Tweeting Experience The Ultimate Toolkit Review
- New Kids in the Directors Chair A Fun and Interactive Guide to Movie Making for 2024
- Best 10 Mock Location Apps Worth Trying On Vivo V27e | Dr.fone
- [Updated] The Ultimate List of Cost-Free, Industry-Approved Video Callers for 2024
- [Updated] Effortless Captioning of Instagram Story & Video Content
- [Updated] 2024 Approved Exploring The Architects Behind Popular Discord Glyphs
- New Want to Add the Amazing Video Text Effects that You Generally See on Video Streaming Platforms? Use Filmora to Add Popular Video Text Effects Instantly
- 2024 Approved Sign Up Process for Using Google Meet
- [New] In 2024, Essential Guide Capturing Facial Content on Camera
- Fixes for Apps Keep Crashing on Nubia Red Magic 8S Pro+ | Dr.fone
- [Updated] Unlock Better Engagement on Instagram With Video Loops for 2024
- [Updated] 2024 Approved Record Everything, Pay Nothing - Screen Tools for All Users
- In 2024, How To Use Special Features - Virtual Location On Honor 90? | Dr.fone
- 2024 Approved Facebook Fumble? Get Unlocked After the Hack
- How to watch AVCHD MTS video on Samsung Galaxy F34 5G?
- Title: "Transforming Viewership A Proven Guide to Implementing Youtube's Featured Listings"
- Author: Kevin
- Created at : 2024-05-25 16:29:39
- Updated at : 2024-05-26 16:29:39
- Link: https://youtube-videos.techidaily.com/transforming-viewership-a-proven-guide-to-implementing-youtubes-featured-listings/
- License: This work is licensed under CC BY-NC-SA 4.0.
