
:max_bytes(150000):strip_icc():format(webp)/dts-play-fi-lifestyle-aaa-5a4c211daad52b00366a3575.jpg)
Top Vloggers' Dreaded Fears and Victory Strategies
Top Vloggers’ Dreaded Fears and Victory Strategies
10 Common Vlogging Fears and How To Beat Them

Richard Bennett
Oct 26, 2023• Proven solutions
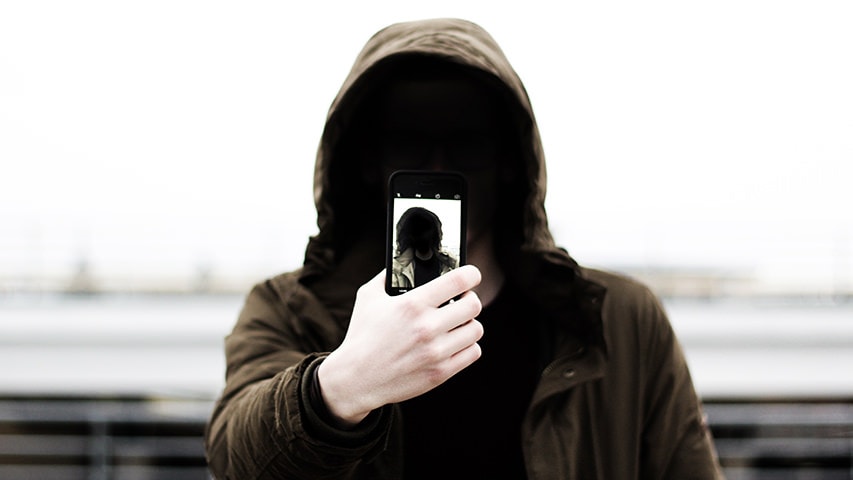
All forms of creative expression that require you to put yourself out there for the world to see can be scary. But even though other forms of creative expression, like art and writing, may reflect something about the personhood of their creator, very few forms of creative expression seem to shine as much of a spotlight on who you are as a person as vlogging.
When it comes to vlogging, it is your face, voice , thoughts, and feelings that your audience sees and hears close-up. That is why vlogging can seem even more terrifying.
Below is a list of 10 of the most common fears people have with vlogging and ways to overcome them.
1. Fear of Looking Stupid Talking To Your Camera
It can be nerve-racking to talk to your camera in public, especially if your vlog set-up attracts a lot of attention (Casey Neistat’s famous rig consisting of a DSLR camera with a GorillaPod tripod and a Rode shotgun mic attached to it definitely attracts more attention than just your everyday smartphone). Despite a lot of vloggers suggesting that people don’t care as much as you think they care, it still is an activity that stands out, gets noticed, and creates curiosity, which is plenty to feel nervous about.
My advice is to start with shorter conversations with your camera in public and gradually build your way up to longer ones or save all your longer talks for when you’re in a more private setting. Short conversations may include one simple sentence about where you are going. Then, in another separate recording, in a different setting with different people, you can explain why you’re going there. If you’ve never broken up your speech like this for your vlogs, you might wonder if this will make your vlogs look disjointed. But this is actually a technique (below) that can enhance your vlogs.
As you continue to vlog in public more, you’ll become increasingly comfortable with it.
2. Fear of Being Judged by Others
After uploading your vlog online, the next thing you might worry about is being judged and criticized by anonymous haters on the internet. No matter how perfectly you present yourself, this will happen. But you will be ok.
You just need to be strongly grounded in your intrinsic worth and not take too seriously the judgments of those who don’t even know you. You can adjust your community settings on YouTube so that you have more control over others’ comments. But I suggest you just get used to others’ disapproval because it’s something that comes with putting yourself out there on such a public platform.
3. Fear of Not Being Interesting Enough
A lot of people fear that they aren’t interesting enough to watch. This fear stops many people from vlogging. Some people get around this self-doubt by focusing their content on something other than themselves. But people are so much more interesting than the tools and objects that they test out and review on YouTube. Even if you’re unable to secure the interest of the masses, there are bound to be a handful of people from all around the world who do find you interesting.
4. Fear of Your Lifestyle Not Being Exciting Enough
When you look at the vlogs of many of the top YouTubers, their lives appear so action-packed. It’s hard not to think that all vlogs are meant to be very stimulating. But if you believe that that is the standard for vlogs, you might either be discouraged and drop vlogging altogether or you might try too hard to schedule your life around getting stimulating vlog content. Neither is a good option. Face your fear of your audience getting bored and just go ahead and vlog your lifestyle just as it is.
5. Fear of Losing Your Authenticity
When you have the ability to control what others see, you may be tempted to present yourself and your life in the most likable way to avoid disapproval and rejection. But the further away from your true self that you fabricate your story, the more inauthentic you’ll feel. Embrace disapproval and rejection and understand that, no matter how perfectly you present yourself, you just can’t avoid disapproval and rejection. It’s going to happen no matter what! So you might as well present yourself just as you are.
6. Fear of Your Production Not Being Good Enough
Fearing that your production quality won’t measure up is another common fear that holds people back from vlogging. Just get started and put something together with the equipment and skills you already have. Loosen up a bit on your rigid high standards and experience for yourself that the consequences of doing your best with what you have are not so bad. You will develop your equipment and skills as you get more and more into vlogging.
7. Fear of Failing To Get Big
Getting a lot of subscribers is a common end goal for many who go into vlogging. This goal can seem impossible to reach with how crowded the vlogosphere has become with so many ambitious vloggers who are competing for views and subscribers.
How can you know for sure that you won’t be wasting your time and effort trying? The truth is… you can’t know for sure. But dismissing all of your time and effort as a waste just because you’re not at the end yet will take away from the joy you could have with vlogging. Rather than focusing on getting big, focus on enjoying the process of vlogging.
8. Fear of Being Distracted From the Moment
Whether you’re vlogging or not, living in the present moment can already be a challenge with a smartphone. When something exhilarating happens, many of us feel compelled to pull out our phone to capture it, only to experience that fleeting moment through a small preview screen.
Vlogging appears to take that to another level, especially if you’re using complicated equipment that takes more time to set up and if you’re trying to capture enough footage to produce an entire vlog out of one day. How could all that time devoted to capturing your footage not get in the way of your present moment?
Well, like all hobbies, activities, and passions, vlogging does take time and you’re going to have to accept that it does. You may not know it now, but after giving vlogging a try, you may discover that you really enjoy it. And if you do, you won’t worry about missing out on life just as a painter who happens to be in the middle of his painting during a sunset wouldn’t worry about the sunset he’s missing out on.
If, in the end, you realize you don’t enjoy vlogging, then at least you’re left with a documented piece of a memory that you can relive again and again, which can actually help you appreciate your past moments even more.
9. Fear of Making Others Uncomfortable
Even though you might have learned to enjoy and be comfortable with vlogging, your vlogging might make others uncomfortable. You can still vlog while respecting others’ boundaries by having a conversation first, before you start vlogging, around whether or not they feel comfortable with appearing in your vlog. You can then make sure to exclude those from your vlog who are uncomfortable with appearing in your vlog.
Sometimes, though, as much as you try to exclude certain people from your vlogs, they might still end up in your footage. You might even find out after you’ve captured great footage that people do not want to be in your video. In these cases, you can always censor their faces out in editing.
10. Fear of Permanently Leaving a Bad Mark
Anything you make public over the internet, including vlogging, comes with the risk of making a permanent mark that won’t go away, even if you try to delete your original content later. That can definitely be a scary thing.
Luckily, with vlogging, you still have a lot of control. In both filming and editing, you can choose to share whatever you’re comfortable with sharing with the rest of the world.
In post-production, you can use some video editing software to delete unwanted parts from the video clip, blur the video background , or adjust the video color. Filmora is such a video editing software that has been widely used by many YouTubers; you can download it now and have a try.


Richard Bennett
Richard Bennett is a writer and a lover of all things video.
Follow @Richard Bennett
Richard Bennett
Oct 26, 2023• Proven solutions
All forms of creative expression that require you to put yourself out there for the world to see can be scary. But even though other forms of creative expression, like art and writing, may reflect something about the personhood of their creator, very few forms of creative expression seem to shine as much of a spotlight on who you are as a person as vlogging.
When it comes to vlogging, it is your face, voice , thoughts, and feelings that your audience sees and hears close-up. That is why vlogging can seem even more terrifying.
Below is a list of 10 of the most common fears people have with vlogging and ways to overcome them.
1. Fear of Looking Stupid Talking To Your Camera
It can be nerve-racking to talk to your camera in public, especially if your vlog set-up attracts a lot of attention (Casey Neistat’s famous rig consisting of a DSLR camera with a GorillaPod tripod and a Rode shotgun mic attached to it definitely attracts more attention than just your everyday smartphone). Despite a lot of vloggers suggesting that people don’t care as much as you think they care, it still is an activity that stands out, gets noticed, and creates curiosity, which is plenty to feel nervous about.
My advice is to start with shorter conversations with your camera in public and gradually build your way up to longer ones or save all your longer talks for when you’re in a more private setting. Short conversations may include one simple sentence about where you are going. Then, in another separate recording, in a different setting with different people, you can explain why you’re going there. If you’ve never broken up your speech like this for your vlogs, you might wonder if this will make your vlogs look disjointed. But this is actually a technique (below) that can enhance your vlogs.
As you continue to vlog in public more, you’ll become increasingly comfortable with it.
2. Fear of Being Judged by Others
After uploading your vlog online, the next thing you might worry about is being judged and criticized by anonymous haters on the internet. No matter how perfectly you present yourself, this will happen. But you will be ok.
You just need to be strongly grounded in your intrinsic worth and not take too seriously the judgments of those who don’t even know you. You can adjust your community settings on YouTube so that you have more control over others’ comments. But I suggest you just get used to others’ disapproval because it’s something that comes with putting yourself out there on such a public platform.
3. Fear of Not Being Interesting Enough
A lot of people fear that they aren’t interesting enough to watch. This fear stops many people from vlogging. Some people get around this self-doubt by focusing their content on something other than themselves. But people are so much more interesting than the tools and objects that they test out and review on YouTube. Even if you’re unable to secure the interest of the masses, there are bound to be a handful of people from all around the world who do find you interesting.
4. Fear of Your Lifestyle Not Being Exciting Enough
When you look at the vlogs of many of the top YouTubers, their lives appear so action-packed. It’s hard not to think that all vlogs are meant to be very stimulating. But if you believe that that is the standard for vlogs, you might either be discouraged and drop vlogging altogether or you might try too hard to schedule your life around getting stimulating vlog content. Neither is a good option. Face your fear of your audience getting bored and just go ahead and vlog your lifestyle just as it is.
5. Fear of Losing Your Authenticity
When you have the ability to control what others see, you may be tempted to present yourself and your life in the most likable way to avoid disapproval and rejection. But the further away from your true self that you fabricate your story, the more inauthentic you’ll feel. Embrace disapproval and rejection and understand that, no matter how perfectly you present yourself, you just can’t avoid disapproval and rejection. It’s going to happen no matter what! So you might as well present yourself just as you are.
6. Fear of Your Production Not Being Good Enough
Fearing that your production quality won’t measure up is another common fear that holds people back from vlogging. Just get started and put something together with the equipment and skills you already have. Loosen up a bit on your rigid high standards and experience for yourself that the consequences of doing your best with what you have are not so bad. You will develop your equipment and skills as you get more and more into vlogging.
7. Fear of Failing To Get Big
Getting a lot of subscribers is a common end goal for many who go into vlogging. This goal can seem impossible to reach with how crowded the vlogosphere has become with so many ambitious vloggers who are competing for views and subscribers.
How can you know for sure that you won’t be wasting your time and effort trying? The truth is… you can’t know for sure. But dismissing all of your time and effort as a waste just because you’re not at the end yet will take away from the joy you could have with vlogging. Rather than focusing on getting big, focus on enjoying the process of vlogging.
8. Fear of Being Distracted From the Moment
Whether you’re vlogging or not, living in the present moment can already be a challenge with a smartphone. When something exhilarating happens, many of us feel compelled to pull out our phone to capture it, only to experience that fleeting moment through a small preview screen.
Vlogging appears to take that to another level, especially if you’re using complicated equipment that takes more time to set up and if you’re trying to capture enough footage to produce an entire vlog out of one day. How could all that time devoted to capturing your footage not get in the way of your present moment?
Well, like all hobbies, activities, and passions, vlogging does take time and you’re going to have to accept that it does. You may not know it now, but after giving vlogging a try, you may discover that you really enjoy it. And if you do, you won’t worry about missing out on life just as a painter who happens to be in the middle of his painting during a sunset wouldn’t worry about the sunset he’s missing out on.
If, in the end, you realize you don’t enjoy vlogging, then at least you’re left with a documented piece of a memory that you can relive again and again, which can actually help you appreciate your past moments even more.
9. Fear of Making Others Uncomfortable
Even though you might have learned to enjoy and be comfortable with vlogging, your vlogging might make others uncomfortable. You can still vlog while respecting others’ boundaries by having a conversation first, before you start vlogging, around whether or not they feel comfortable with appearing in your vlog. You can then make sure to exclude those from your vlog who are uncomfortable with appearing in your vlog.
Sometimes, though, as much as you try to exclude certain people from your vlogs, they might still end up in your footage. You might even find out after you’ve captured great footage that people do not want to be in your video. In these cases, you can always censor their faces out in editing.
10. Fear of Permanently Leaving a Bad Mark
Anything you make public over the internet, including vlogging, comes with the risk of making a permanent mark that won’t go away, even if you try to delete your original content later. That can definitely be a scary thing.
Luckily, with vlogging, you still have a lot of control. In both filming and editing, you can choose to share whatever you’re comfortable with sharing with the rest of the world.
In post-production, you can use some video editing software to delete unwanted parts from the video clip, blur the video background , or adjust the video color. Filmora is such a video editing software that has been widely used by many YouTubers; you can download it now and have a try.
Richard Bennett
Richard Bennett is a writer and a lover of all things video.
Follow @Richard Bennett
Efficiently Broadcasting Twitch Streams to YouTube Audiences
Create High-Quality Video - Wondershare Filmora
An easy and powerful YouTube video editor
Numerous video and audio effects to choose from
Detailed tutorials provided by the official channel
Amidst many online applications is Twitch. This live streaming platform takes your experience to another level. You can use it to make crafts, play games, attract broadcasters, and many more. Twitch was launched in 2011, and since then, it has attracted millions of users, managing a database of about 4 million broadcasters by early 2020. With it, users can stream their activities as others watch in real-time. Just browse a category to find a stream.
You can also follow streamers that you like on the platform and get updates and notifications immediately after they are posted. But how do you start a career on a platform like Twitch? You need to broadcast and gather a large following. You can use built-in audiences from other platforms like Facebook. Let’s dive into the core of the matter and look at how to upload Twitch streams to YouTube and build your platform.

In this article
02 What is the benefit of uploading your Twitch Streams to YouTube
03 How to upload your Twitch Streams to YouTube
What is Twitch VOD?
Twitch Video on Demand (VOD) is a recording of previously streamed content. It provides briefings if you missed catching the Twitch live stream. Just watch the VOD from your favorite streamer and be engaged the best way possible. However, VODs don’t last forever. They are removed after two weeks of broadcast. But streamers with Partner Status can have their VODs last up to 60 days.
- How to enable Twitch VOD?
VODs are the best form to archive streams that your fans missed. Even though they are not enabled by default, you can manually enable them and not let your fans miss any important event from your channel. They’ll find it under the “Videos” tab on any Twitch channel. Follow these steps to enable VOD on your channel.
Step 1. Go to your profile icon in the top right corner of Twitch
Check in the “Channel & Video” section and locate the “Stream Key & Preferences” menu.

Step 2. Click on “Creator Dashboard”
Remember, you can enable VODs from your creator dashboard. Just go under the “Settings” tab and click on the “Stream section” of the creator dashboard. Check under the subtitle “VOD Settings” and get the option to store past broadcasts. You can also toggle the slider to store your past broadcasts.

Step 3 Click on the “Settings” tab on the left-hand side and go to Stream
You’ll get various drop-down menu options. Click on the “Settings” tab and choose the “Stream” option. The system will navigate to a new page, thus setting your preferences for VODs and clips.
Step 4. Go to “VOD Settings” and toggle on the “Store Past Broadcast.”
Ensure you have the toggle option turned ON under the “VOD Settings.” If it’s “ON,” you’ll realize the toggle will be purple, with a checkmark in it. Twitch will be confirmed to be enabled if it’s purple.

- Frequently Asked Question about Twitch VOD
These are some questions frequently asked by Twitch users.
1. How long will Twitch store my VOD
Your Twitch can either be stored for 14 or 60 days, depending on your level. For Twitch Prime, Twitch Partner or a Twitch Turbo user has their past broadcasts automatically saved for 60 days before deletion. But if you are not connected to these three options, your past broadcasts will be saved for only 14 days before deletion.
Since your past broadcasts cannot be live for more than 60 days, you have the option to download the video to your computer before the validity days expire and Twitch deletes it. You can use an External Hard drive to save the past broadcast content. Likewise, it is possible to turn your past broadcast content into Highlight and, in turn, permanently store them on Twitch.
2. What is the difference between Twitch VOD, Highlights, and Clips
Twitch VOD is a previously saved video of your live stream content. You choose to save either part or the entire content of your previously streamed content. More so, you don’t need any additional requirements to use VOD.
Highlights are short videos that have been edited from your past broadcast content. You can save them on Twitch permanently. Streamers majorly use highlights to save video game achievements. Unlike VOD Twitch that can be saved up to 60 days, Highlights usually lasts no more than 3 minutes.
- To make Highlights on Twitch, first, navigate to your Dashboard.
- Then scroll down and click on “Content” > “Video Producer.
- Next, press on “All Videos” to change them to “Past Broadcasts.”
- Now press the “Highlight” button, and Twitch will immediately open a new tab for “Twitch Highlighter Tool.”
- Then select the video part to include as “Highlight” and press the “Create Highlights” button.
- Wait a while for the process to be completed, and Voila! You have your Highlights created.
When it comes to Twitch Clip, you can capture special moments in a stream you are currently watching. On the same note, you can share clips with friends and other users on social media platforms. Such shared clips contain a link where others view the source or video from.
The clips you create will automatically be saved on the streamer’s channel on the “Clips” page, where other viewers can see them too. Nonetheless, you can download “clips” to your computer and, in turn, upload them whenever you want to. And note that you can help your stream grow via “Clips” by letting your viewers clip and share your stream moments.
- To create “Clips” on Twitch, identify which Streamers channel you wish to create a clip from.
- Then click on the “Clapper board” icon. Next, edit your clip between 5 and 60 seconds long.
- Finally, create a title and publish your Clip. You’ll also enjoy the privilege to share your clip’s link to other social media networks.
What is the benefit of uploading your Twitch Streams to YouTube
You stand to gain a lot when you upload your Twitch Streams to YouTube.
1) To enlighten your followers
Your followers will see your streams and make the best decisions. Viewers can check out your recordings and other highlights from past streams. It will help them decide whether they like what they see and probably join your live streams.
2) Twitch provides content for you to share and monetize on YouTube
Since Twitch streaming is more popular nowadays, many people throng it for content. It is not wise to rely entirely on Twitch to discover as a Twitch Streamer. Posting to YouTube will make it known within a short time. You would have announced your streams most nobly and kept your followers up to date, attracting new ones as well.
3) To keep your followers engaged even when you are offline
Even though live streaming is important, some viewers may not attend the live sessions due to different time zones or other commitments. In this regard, when uploaded to YouTube, Twitch will give them a chance to watch your content just whenever they log in. They, therefore, have the option to watch a Twitch VOD of the live stream they missed.
How to upload your Twitch Streams to YouTube
Check how to upload Twitch streams to YouTube from the Twitch website.
Step 1. Identify the little arrow next to your name on the Twitch website and click on it. Then click on the “Video Producer” to take you to a list of your Twitch videos.

Step 2. Check out and click on the “three-dots” on the video you wish to upload to YouTube. Click on the “Export” tab.
Step 3. A menu will then pop up. Here, you can fill in the description, title, and tags that you would like to appear on the YouTube video. There is an option for Twitch to split your video automatically. If you wish so, then tick the “Checkbox” to enable it. Then click on the “Start Export” option to export your Twitch streams to YouTube.

Bouns! Edit Your Twitch Video with Filmora
The quality of your video matters when it comes to uploading Twitch Streams to YouTube. Using a third-party tool to edit your video is the first step in ensuring your videos communicate meaningful content. Filmora comes in handy to bring your imaginations to life. Use it for simple creation without limits, even for beginners.
- Use it to track moving objects in video clips
- Easily match any image of the selected clip
- Its powerful tools let you edit your video by cropping, splitting, adjusting speed, etc
- The video keyframe easily indicates the beginning and end of the parameters
For Win 7 or later (64-bit)
For macOS 10.12 or later
Conclusion
● Don’t just focus on how to upload Twitch streams to YouTube but also consider the quality of video you are posting to YouTube. Remember, your video quality will speak much more of you than any other description. So, strive to produce quality videos using the best tool, Filmora. The app is easy to use and will elevate your views and imaginations through your video in the most impactful way.
Amidst many online applications is Twitch. This live streaming platform takes your experience to another level. You can use it to make crafts, play games, attract broadcasters, and many more. Twitch was launched in 2011, and since then, it has attracted millions of users, managing a database of about 4 million broadcasters by early 2020. With it, users can stream their activities as others watch in real-time. Just browse a category to find a stream.
You can also follow streamers that you like on the platform and get updates and notifications immediately after they are posted. But how do you start a career on a platform like Twitch? You need to broadcast and gather a large following. You can use built-in audiences from other platforms like Facebook. Let’s dive into the core of the matter and look at how to upload Twitch streams to YouTube and build your platform.
In this article
02 What is the benefit of uploading your Twitch Streams to YouTube
03 How to upload your Twitch Streams to YouTube
What is Twitch VOD?
Twitch Video on Demand (VOD) is a recording of previously streamed content. It provides briefings if you missed catching the Twitch live stream. Just watch the VOD from your favorite streamer and be engaged the best way possible. However, VODs don’t last forever. They are removed after two weeks of broadcast. But streamers with Partner Status can have their VODs last up to 60 days.
- How to enable Twitch VOD?
VODs are the best form to archive streams that your fans missed. Even though they are not enabled by default, you can manually enable them and not let your fans miss any important event from your channel. They’ll find it under the “Videos” tab on any Twitch channel. Follow these steps to enable VOD on your channel.
Step 1. Go to your profile icon in the top right corner of Twitch
Check in the “Channel & Video” section and locate the “Stream Key & Preferences” menu.
Step 2. Click on “Creator Dashboard”
Remember, you can enable VODs from your creator dashboard. Just go under the “Settings” tab and click on the “Stream section” of the creator dashboard. Check under the subtitle “VOD Settings” and get the option to store past broadcasts. You can also toggle the slider to store your past broadcasts.
Step 3 Click on the “Settings” tab on the left-hand side and go to Stream
You’ll get various drop-down menu options. Click on the “Settings” tab and choose the “Stream” option. The system will navigate to a new page, thus setting your preferences for VODs and clips.
Step 4. Go to “VOD Settings” and toggle on the “Store Past Broadcast.”
Ensure you have the toggle option turned ON under the “VOD Settings.” If it’s “ON,” you’ll realize the toggle will be purple, with a checkmark in it. Twitch will be confirmed to be enabled if it’s purple.
- Frequently Asked Question about Twitch VOD
These are some questions frequently asked by Twitch users.
1. How long will Twitch store my VOD
Your Twitch can either be stored for 14 or 60 days, depending on your level. For Twitch Prime, Twitch Partner or a Twitch Turbo user has their past broadcasts automatically saved for 60 days before deletion. But if you are not connected to these three options, your past broadcasts will be saved for only 14 days before deletion.
Since your past broadcasts cannot be live for more than 60 days, you have the option to download the video to your computer before the validity days expire and Twitch deletes it. You can use an External Hard drive to save the past broadcast content. Likewise, it is possible to turn your past broadcast content into Highlight and, in turn, permanently store them on Twitch.
2. What is the difference between Twitch VOD, Highlights, and Clips
Twitch VOD is a previously saved video of your live stream content. You choose to save either part or the entire content of your previously streamed content. More so, you don’t need any additional requirements to use VOD.
Highlights are short videos that have been edited from your past broadcast content. You can save them on Twitch permanently. Streamers majorly use highlights to save video game achievements. Unlike VOD Twitch that can be saved up to 60 days, Highlights usually lasts no more than 3 minutes.
- To make Highlights on Twitch, first, navigate to your Dashboard.
- Then scroll down and click on “Content” > “Video Producer.
- Next, press on “All Videos” to change them to “Past Broadcasts.”
- Now press the “Highlight” button, and Twitch will immediately open a new tab for “Twitch Highlighter Tool.”
- Then select the video part to include as “Highlight” and press the “Create Highlights” button.
- Wait a while for the process to be completed, and Voila! You have your Highlights created.
When it comes to Twitch Clip, you can capture special moments in a stream you are currently watching. On the same note, you can share clips with friends and other users on social media platforms. Such shared clips contain a link where others view the source or video from.
The clips you create will automatically be saved on the streamer’s channel on the “Clips” page, where other viewers can see them too. Nonetheless, you can download “clips” to your computer and, in turn, upload them whenever you want to. And note that you can help your stream grow via “Clips” by letting your viewers clip and share your stream moments.
- To create “Clips” on Twitch, identify which Streamers channel you wish to create a clip from.
- Then click on the “Clapper board” icon. Next, edit your clip between 5 and 60 seconds long.
- Finally, create a title and publish your Clip. You’ll also enjoy the privilege to share your clip’s link to other social media networks.
What is the benefit of uploading your Twitch Streams to YouTube
You stand to gain a lot when you upload your Twitch Streams to YouTube.
1) To enlighten your followers
Your followers will see your streams and make the best decisions. Viewers can check out your recordings and other highlights from past streams. It will help them decide whether they like what they see and probably join your live streams.
2) Twitch provides content for you to share and monetize on YouTube
Since Twitch streaming is more popular nowadays, many people throng it for content. It is not wise to rely entirely on Twitch to discover as a Twitch Streamer. Posting to YouTube will make it known within a short time. You would have announced your streams most nobly and kept your followers up to date, attracting new ones as well.
3) To keep your followers engaged even when you are offline
Even though live streaming is important, some viewers may not attend the live sessions due to different time zones or other commitments. In this regard, when uploaded to YouTube, Twitch will give them a chance to watch your content just whenever they log in. They, therefore, have the option to watch a Twitch VOD of the live stream they missed.
How to upload your Twitch Streams to YouTube
Check how to upload Twitch streams to YouTube from the Twitch website.
Step 1. Identify the little arrow next to your name on the Twitch website and click on it. Then click on the “Video Producer” to take you to a list of your Twitch videos.
Step 2. Check out and click on the “three-dots” on the video you wish to upload to YouTube. Click on the “Export” tab.
Step 3. A menu will then pop up. Here, you can fill in the description, title, and tags that you would like to appear on the YouTube video. There is an option for Twitch to split your video automatically. If you wish so, then tick the “Checkbox” to enable it. Then click on the “Start Export” option to export your Twitch streams to YouTube.
Bouns! Edit Your Twitch Video with Filmora
The quality of your video matters when it comes to uploading Twitch Streams to YouTube. Using a third-party tool to edit your video is the first step in ensuring your videos communicate meaningful content. Filmora comes in handy to bring your imaginations to life. Use it for simple creation without limits, even for beginners.
- Use it to track moving objects in video clips
- Easily match any image of the selected clip
- Its powerful tools let you edit your video by cropping, splitting, adjusting speed, etc
- The video keyframe easily indicates the beginning and end of the parameters
For Win 7 or later (64-bit)
For macOS 10.12 or later
Conclusion
● Don’t just focus on how to upload Twitch streams to YouTube but also consider the quality of video you are posting to YouTube. Remember, your video quality will speak much more of you than any other description. So, strive to produce quality videos using the best tool, Filmora. The app is easy to use and will elevate your views and imaginations through your video in the most impactful way.
Also read:
- Perfecting Your Valorant Thumbnails A Comprehensive Tutorial
- [Updated] Boost Your Buzz Factor with These 3 Dynamic Approaches to YouTube Video Reactions
- Curating Historical Wisdom The Ultimate Student-Friendly Channel List (#1-10)
- [New] Elevating Video Branding The Art and Science of Youtube Image Designs
- [New] Best Livestream Capturing Solutions for Content Makers
- Narrative Mastery Essential Tactics for YouTube Success
- [Updated] Enhancing YouTube Popularity Editing & Optimizing Content Metadata
- Conquer Common YouTube Short Setbacks for 2024
- Guffaw Generation Generating 7 Hilarious Video Moments Online
- Transform Videos Into Stories Discover the Top 10 Reactions
- [Updated] Effortless Offline Viewing How to Save YouTube Videos for iPhone/iPad
- In 2024, Digital Fortune Makers Top Earning YouTubers
- Best YouTube Video Ideas to Spark Inspiration [For YouTube Channels]
- 2024 Approved Captivating Content with a Click Phones & YouTube
- 2024 Approved DIY Movie Making on YouTube & Comparable Creative Tools
- [New] Ajey's Path to Prosperity Monetizing His Online Presence
- Download YouTube Videos Directly
- Clubbing Essentials Top-Rated DJ Template Vids
- Budget-Friendly Sponsorship Blueprint for YouTube Enthusiasts
- Understanding & Applying YouTube Markup
- Navigate Through Creating Stellar Educational Video Content for Online Platforms
- [New] Boosting Views with Captivating Intros Filmed in iMovie
- Crafting the Perfect Pitch Inviting Listeners to Join Us for 2024
- Thumbnail Artistry for Engaging YouTube Channels
- [Updated] Chuckle Campaign 7 Ingenious Ideas for Funny YouTube Videos
- Cutting-Edge Content Creation Premier Android Editors for 2024
- [New] Best 8 YouTube Thumbnail Grabbers You Should Know
- Weighing the Pros and Cons of YouTube Premium
- [New] In 2024, Conquer Video Production OBS Studio and Android
- How To Remove or Bypass Knox Enrollment Service On Honor
- In 2024, Planning to Use a Pokemon Go Joystick on OnePlus Nord N30 5G? | Dr.fone
- In 2024, 5 Ways to Send Ringtones from Apple iPhone 6 to iPhone Including iPhone 15 | Dr.fone
- How to play an MP4 on Xiaomi Redmi Note 12T Pro?
- 8 Best Apps for Screen Mirroring Samsung Galaxy F15 5G PC | Dr.fone
- Unlocking the Secrets of Silent Video Suggestions in Feed
- [New] The Art of Instagram Video Craftsmanship
- How to Transfer Videos from Vivo Y36i to iPad | Dr.fone
- 5 Exceptional 4K Gaming Screens
- Leveraging Hashtags to Enhance FB User Engagement for 2024
- In 2024, Cash Up Fast A Newbie's Guide to the 13 Best Reddit Money Hacks
- 2024 Approved Evaluation Report on Sound Forges Audio Editing Tools
- New In 2024, OS X Mavericks The Ultimate MP4 File Editor
- 2024 Approved Instagram Stylistics Swapping Videos Rightside Up
- Discover the Best Gaming Intro Makers for Windows and Mac Fee-Based and Free for 2024
- [Updated] Essential 10 Royale Confrontations for 2024
- 2024 Approved Zoom Mastering Virtual Meeting Planning
- [New] In 2024, The Art of Scaling on Screen Giant Heads for TikToks
- Unleashing Creativity with Magix Video Pro X
- Updated In 2024, Convert Your Videos Top MP4 to MP3 Converters for Any Device
- In 2024, A Comprehensive Guide to iPhone XR Blacklist Removal Tips and Tools
- Launch Strategies for FB Generosity Campaigns
- Broadcast Like a Ghost Anonymous Instagram Strategies
- [Updated] Streaming Titans Clash Streamlabs versus OBS in the Arena
- In 2024, How to Use Google Assistant on Your Lock Screen Of Nokia C32 Phone
- Want to Uninstall Google Play Service from Asus ROG Phone 8 Pro? Here is How | Dr.fone
- [New] 2024 Approved Step-by-Step Guide to Flawless Zoom Screen Sharing
- Title: Top Vloggers' Dreaded Fears and Victory Strategies
- Author: Kevin
- Created at : 2024-05-25 16:28:55
- Updated at : 2024-05-26 16:28:55
- Link: https://youtube-videos.techidaily.com/top-vloggers-dreaded-fears-and-victory-strategies/
- License: This work is licensed under CC BY-NC-SA 4.0.
