
"Top 5 Multimedia Sensation Apps IPhone/Android Showdown"
Top 5 Multimedia Sensation Apps: IPhone/Android Showdown
Best Camera Apps to Shoot and Record Videos on iPhone and Andriod Phones

Richard Bennett
Oct 26, 2023• Proven solutions
Smartphone cameras, especially the newest models, are capable of recording great videos. Depending on what kind of videos you make, you might not actually need a separate camera.
The majority of phone cameras record in full HD now, and some can even manage 4K. Where things get tricky is shooting in less than ideal conditions, i.e low light. You cannot make the same adjustments and customizations to your settings with a smartphone camera as you can with a DSLR.
You don’t have the same level of control.
But don’t worry – there are 5 camera apps that will allow you to record videos and get even more creative with how you use your phone’s camera.
- Part 1: Bonus Tip-Make Your Own Video with Wondershare Filmora
- Part 2: Best 5 Camera Apps to Record Videos on iPhone and Android
Part 1: Bonus Tip-Make Your Own Video with Wondershare Filmora
Wondershare Filmora is an amazing video editor for both professional staff and beginners. Its intuitive interface, fast timeline rendering, advanced color tuning, and surprising video effects, etc will make your video stand out! Just download it and edit your smartphone videos with Wondershare Filmora!


Part 2: Best 5 Camera Apps to Record Videos on iPhone and Android
Let’s dive!
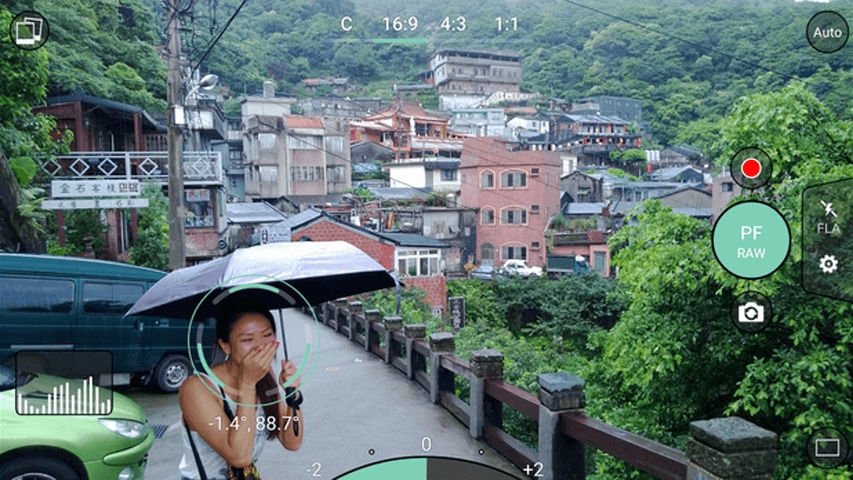
1. Open Camera – Free, Android Only

This camera app gives you control over your exposure, flash, focus, ISO, shutter speed, torch, and white balance. How much control you have is up to you. If managing all these things manually is a hassle for you, you can use its automatic or semi-manual modes instead of manual mode.
This is a great camera app to record time-lapses. It is simplistic compared to some of the other apps on this list, but it is also extremely easy to use.
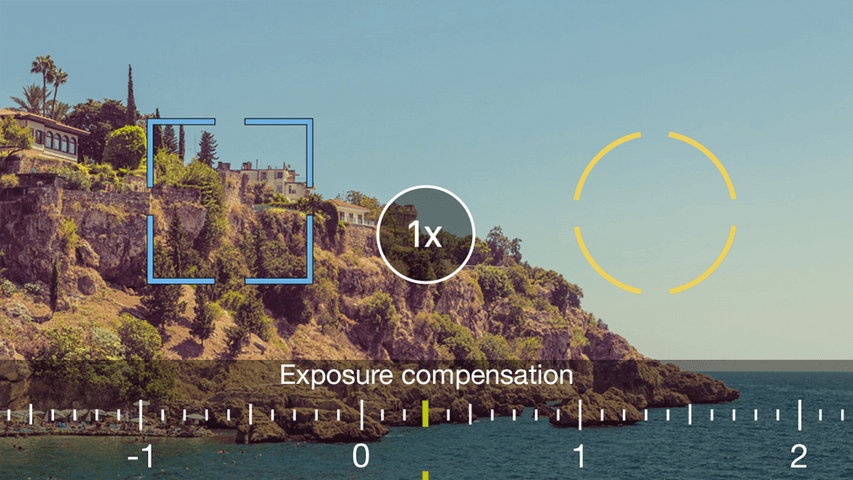
2. ProShot - $4, iOS or Android
ProShot lets you adjust your frame rate, which is important if you want to shoot slow motion or time-lapse videos. You can also adjust your brightness while filming. One of the most useful features of this camera app is that it provides a real-time audio level meter, so you won’t be surprised by a poor sound recording when you watch your videos back.
3. ProCamera - $5, iOS Only
This is one of the most frequently recommended camera apps for iPhones. It makes it easy for you to adjust your focus, iOS, and exposure. You can also play with different filters and effects right in the app. One of the only downsides of this app is that some of its most useful features, like Lowlight Plus, are in-app purchases.
4. Sun Seeker - $10, iOS or Android

A lot of the time when you’re shooting with your phone, you’re shooting outside. When you’re shooting outside, the most important thing you need to keep track of is the sun. Sun Seeker is the perfect app for figuring out where the sun will be in the sky at any given time, which will tell you the best time to go out and make your video.
For more information on making videos with natural light, check out Indoor Natural Lighting Tips .
Besides just keeping track of the sun, Sun Seeker provides an augmented reality view of its path and how it will affect specific locations.
5. FiLMiC Pro - $10, iOS or Android
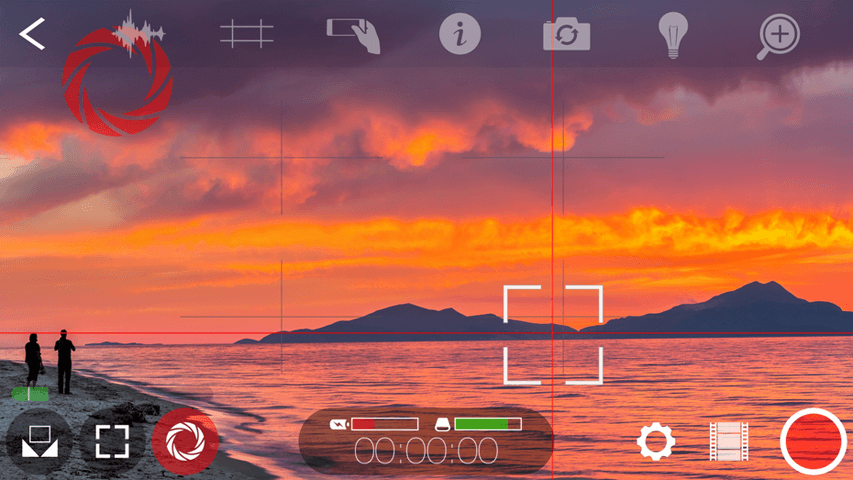
This is probably the best all-purpose camera app available. It gives you exactly the same kind of control over your smartphone camera as you would have over a DSLR. You can manually adjust your focus, exposure, ISO, shutter speed, tint, and color temperature. There are even voice processing audio filters, so you can capture better audio while you’re shooting and have less to fix in post.
Final Words
Because mobile cameras already perform so well, it can be easy to think to have more to adjust would only make things more complicated. However, there are occasions where you need to be able to make these adjustments. Are the videos you take inside at night at a lower quality than the ones you record during the day, for example? If you could set a higher ISO, you would be able to fix that.
Another example: just the other day, there was a question here about shooting green screen videos on a mobile device. One of our community members, Vivekpanwar, was having an issue with motion blur. Motion blur isn’t always distracting in normal videos, but it becomes a huge issue when you apply a Chroma key effect. The best way to avoid motion blur is to set a high shutter speed, which you can do if you download a quality camera app.
Richard Bennett
Richard Bennett is a writer and a lover of all things video.
Follow @Richard Bennett
Richard Bennett
Oct 26, 2023• Proven solutions
Smartphone cameras, especially the newest models, are capable of recording great videos. Depending on what kind of videos you make, you might not actually need a separate camera.
The majority of phone cameras record in full HD now, and some can even manage 4K. Where things get tricky is shooting in less than ideal conditions, i.e low light. You cannot make the same adjustments and customizations to your settings with a smartphone camera as you can with a DSLR.
You don’t have the same level of control.
But don’t worry – there are 5 camera apps that will allow you to record videos and get even more creative with how you use your phone’s camera.
- Part 1: Bonus Tip-Make Your Own Video with Wondershare Filmora
- Part 2: Best 5 Camera Apps to Record Videos on iPhone and Android
Part 1: Bonus Tip-Make Your Own Video with Wondershare Filmora
Wondershare Filmora is an amazing video editor for both professional staff and beginners. Its intuitive interface, fast timeline rendering, advanced color tuning, and surprising video effects, etc will make your video stand out! Just download it and edit your smartphone videos with Wondershare Filmora!
Part 2: Best 5 Camera Apps to Record Videos on iPhone and Android
Let’s dive!
1. Open Camera – Free, Android Only
This camera app gives you control over your exposure, flash, focus, ISO, shutter speed, torch, and white balance. How much control you have is up to you. If managing all these things manually is a hassle for you, you can use its automatic or semi-manual modes instead of manual mode.
This is a great camera app to record time-lapses. It is simplistic compared to some of the other apps on this list, but it is also extremely easy to use.
2. ProShot - $4, iOS or Android
ProShot lets you adjust your frame rate, which is important if you want to shoot slow motion or time-lapse videos. You can also adjust your brightness while filming. One of the most useful features of this camera app is that it provides a real-time audio level meter, so you won’t be surprised by a poor sound recording when you watch your videos back.
3. ProCamera - $5, iOS Only
This is one of the most frequently recommended camera apps for iPhones. It makes it easy for you to adjust your focus, iOS, and exposure. You can also play with different filters and effects right in the app. One of the only downsides of this app is that some of its most useful features, like Lowlight Plus, are in-app purchases.
4. Sun Seeker - $10, iOS or Android
A lot of the time when you’re shooting with your phone, you’re shooting outside. When you’re shooting outside, the most important thing you need to keep track of is the sun. Sun Seeker is the perfect app for figuring out where the sun will be in the sky at any given time, which will tell you the best time to go out and make your video.
For more information on making videos with natural light, check out Indoor Natural Lighting Tips .
Besides just keeping track of the sun, Sun Seeker provides an augmented reality view of its path and how it will affect specific locations.
5. FiLMiC Pro - $10, iOS or Android
This is probably the best all-purpose camera app available. It gives you exactly the same kind of control over your smartphone camera as you would have over a DSLR. You can manually adjust your focus, exposure, ISO, shutter speed, tint, and color temperature. There are even voice processing audio filters, so you can capture better audio while you’re shooting and have less to fix in post.
Final Words
Because mobile cameras already perform so well, it can be easy to think to have more to adjust would only make things more complicated. However, there are occasions where you need to be able to make these adjustments. Are the videos you take inside at night at a lower quality than the ones you record during the day, for example? If you could set a higher ISO, you would be able to fix that.
Another example: just the other day, there was a question here about shooting green screen videos on a mobile device. One of our community members, Vivekpanwar, was having an issue with motion blur. Motion blur isn’t always distracting in normal videos, but it becomes a huge issue when you apply a Chroma key effect. The best way to avoid motion blur is to set a high shutter speed, which you can do if you download a quality camera app.
Richard Bennett
Richard Bennett is a writer and a lover of all things video.
Follow @Richard Bennett
Pivot Your Playlists with These Straightforward Tricks
If you have ever created a playlist on YouTube, you may have noticed that the order of the videos is automatically set and based on when they were added to the list. However, it would help if you played them in reverse order.
Surprisingly, there is no built-in way to do this on YouTube. However, four simple workarounds only take a few minutes to complete.
So, keep reading to learn how to reverse a YouTube playlist so you can watch the videos in the order you want!
How to Reverse a YouTube Playlist?
Below we’ve provided four different solutions to help you reverse your YouTube playlist on your computer:
Using Chrome Web Extension
One of the most straightforward and convenient methods of reversing the YouTube playlist is to install a Chrome browser extension that will let you play any playlist in the opposite order.
The “Iridium for YouTube” and “Improve YouTube” extensions on your Google Chrome can play any YouTube video queue or playlist in reverse.
Here’s how to install the “Iridium for YouTube” extension on your Chrome browser to reverse the playlist:
Step 1: In the first step, launch a browser on your computer and click the three dots (ellipsis icon) in the top-right corner of the screen. Scroll down, select “More Tools,” and click Extensions.”

Step 2:
- Now, click the three horizontal-line”Menu”icon.
- Click the”Open Chrome Web Store”option.
- Search for theIridium for YouTubeextension using the search bar.

Step 3:
- Open the extension page.
- Click”Add to Chrome.”
- Click the”Add Extension”option in the pop-up menu.

Step 4:Open a new page, visit YouTube , and a pop-up window will appear. Select”Close”to terminate it, and clickthe”Menu”(hamburger) icon in the top left corner of the screen. Next, scroll down and open your savedPlaylistthat you want to reverse.

Step 5: Click the “Play All” option in the details section of the playlist and click the Iridium button on the right side of the screen. This will open a new tab with different settings for your playlist. Go to the Video tab, and under the “Playlist” header, toggle the button next to “Enable reverse playlist control” to change the settings.

That’s about it. You will now be able to watch a YouTube playlist in reverse order.
Using The Third Website
Several trusted and reliable third-party websites, such as “Playlist. tools,” can help you reverse your YouTube playlists quickly. The platform is free and fully dedicated to instantly changing the order of your Playlist.
Here’s how you can use the Playlist.tools to reverse your videos’ order in a playlist on YouTube:
Step 1: Launch a browser on your laptop or desktop, head to theYouTube website, and click the three-line “Menu” icon. Now, scroll down to access the playlist you want to reverse, click the “Share” icon, and click “Copy” to save the URL to your clipboard.
Step 2: In the next step, open a new tab and visit the “Playlist.Tools” website. Now, paste the copied playlist URL in the provided text box, and the platform will start retrieving it.

Step 3: Finally, click the “Sort” icon and select descending order to reverse your playlist. You can always return to the original sequence by clicking the “Original Sequence” option in the top right corner of the screen.
Changing the Ordering in Settings
If you are a content creator on YouTube and want to reverse the videos’ order in a playlist on your channel, do the following steps in sequence:
Step 1: In the first step, launch the YouTube app on your device or visit the YouTube website on a browser. Go to “Library” and open the playlist of your choice.
Step 2: Hover over the video, and you will see two horizontal lines next to it. Click/tap & hold the video and drag it to a new location to change its order.
You can also utilize the “Sort” option to reverse the playlist. To do so, click “Sort” at the top of the playlist above the videos and select “Date Published (Oldest)” to change the order.

A Bonus Tip for YouTube Creator: Make Your Own YouTube Channel Trailer
As a YouTube content creator, you need to set your videos’ order in your Playlist. Besides, the video’s trailer also influences your audiences’ browsing and watching experience. To help you with this part in case you are in need, we have prepared a video tutorial for you - How To Make Your Own YouTube Channel Trailer. If you have any interests, please don’t miss it, and see how to make a fantastic video trailer with a user-friendly video editor Wondershare Filmora :
Adding Playlist to Your Private Playlist
If you want to reverse a YouTube playlist order, you can create a new private playlist. This quick and easy method will help you get the desired results.
For this method to work, you don’t need to download any third-party app or use a website; all you have to do is open YouTube on any browser or use the YouTube app in the following way:
Step 1: In the first step, launch the YouTube app on your device or visit the YouTube website (if you are logged out, sign into your account using your credentials).
Step 2: In the next step, click your Profile at the top right of the screen and select the “Your Channel” option from the drop-down menu to access your YouTube channel.
Step 3: Scroll down on your channel’s dashboard, select a video, and click the three dots next to it. Next, click “Add to Playlist” from the drop-down list and select the “Create a New Playlist” option to make a new one.

Next, provide a name, set the privacy settings to “Private,” and click “Create.”
Step 4: In the final step, head to the Playlist tab, click “View Full Playlist” to open the new playlist, and click the “three dots” in the details area on the left. Next, select “Playlist Settings” and toggle the button next to “Add new videos to top of playlist” to enable it.
You can now add more videos to your playlist, and each one will be added to the top. This method helps you arrange the YouTube playlist as you desire.
The Bottom Line
In this article, we’ve provided four different step-by-step solutions to show you how to reverse a YouTube playlist on your PC and mobile device using Chrome extension, a third-party website, changing settings, and adding videos to a new private playlist.
Hopefully, you’ve found this article helpful and can now watch your favorite playlist in the order you like without any issues.
If you have ever created a playlist on YouTube, you may have noticed that the order of the videos is automatically set and based on when they were added to the list. However, it would help if you played them in reverse order.
Surprisingly, there is no built-in way to do this on YouTube. However, four simple workarounds only take a few minutes to complete.
So, keep reading to learn how to reverse a YouTube playlist so you can watch the videos in the order you want!
How to Reverse a YouTube Playlist?
Below we’ve provided four different solutions to help you reverse your YouTube playlist on your computer:
Using Chrome Web Extension
One of the most straightforward and convenient methods of reversing the YouTube playlist is to install a Chrome browser extension that will let you play any playlist in the opposite order.
The “Iridium for YouTube” and “Improve YouTube” extensions on your Google Chrome can play any YouTube video queue or playlist in reverse.
Here’s how to install the “Iridium for YouTube” extension on your Chrome browser to reverse the playlist:
Step 1: In the first step, launch a browser on your computer and click the three dots (ellipsis icon) in the top-right corner of the screen. Scroll down, select “More Tools,” and click Extensions.”
Step 2:
- Now, click the three horizontal-line”Menu”icon.
- Click the”Open Chrome Web Store”option.
- Search for theIridium for YouTubeextension using the search bar.
Step 3:
- Open the extension page.
- Click”Add to Chrome.”
- Click the”Add Extension”option in the pop-up menu.
Step 4:Open a new page, visit YouTube , and a pop-up window will appear. Select”Close”to terminate it, and clickthe”Menu”(hamburger) icon in the top left corner of the screen. Next, scroll down and open your savedPlaylistthat you want to reverse.
Step 5: Click the “Play All” option in the details section of the playlist and click the Iridium button on the right side of the screen. This will open a new tab with different settings for your playlist. Go to the Video tab, and under the “Playlist” header, toggle the button next to “Enable reverse playlist control” to change the settings.
That’s about it. You will now be able to watch a YouTube playlist in reverse order.
Using The Third Website
Several trusted and reliable third-party websites, such as “Playlist. tools,” can help you reverse your YouTube playlists quickly. The platform is free and fully dedicated to instantly changing the order of your Playlist.
Here’s how you can use the Playlist.tools to reverse your videos’ order in a playlist on YouTube:
Step 1: Launch a browser on your laptop or desktop, head to theYouTube website, and click the three-line “Menu” icon. Now, scroll down to access the playlist you want to reverse, click the “Share” icon, and click “Copy” to save the URL to your clipboard.
Step 2: In the next step, open a new tab and visit the “Playlist.Tools” website. Now, paste the copied playlist URL in the provided text box, and the platform will start retrieving it.
Step 3: Finally, click the “Sort” icon and select descending order to reverse your playlist. You can always return to the original sequence by clicking the “Original Sequence” option in the top right corner of the screen.
Changing the Ordering in Settings
If you are a content creator on YouTube and want to reverse the videos’ order in a playlist on your channel, do the following steps in sequence:
Step 1: In the first step, launch the YouTube app on your device or visit the YouTube website on a browser. Go to “Library” and open the playlist of your choice.
Step 2: Hover over the video, and you will see two horizontal lines next to it. Click/tap & hold the video and drag it to a new location to change its order.
You can also utilize the “Sort” option to reverse the playlist. To do so, click “Sort” at the top of the playlist above the videos and select “Date Published (Oldest)” to change the order.
A Bonus Tip for YouTube Creator: Make Your Own YouTube Channel Trailer
As a YouTube content creator, you need to set your videos’ order in your Playlist. Besides, the video’s trailer also influences your audiences’ browsing and watching experience. To help you with this part in case you are in need, we have prepared a video tutorial for you - How To Make Your Own YouTube Channel Trailer. If you have any interests, please don’t miss it, and see how to make a fantastic video trailer with a user-friendly video editor Wondershare Filmora :
Adding Playlist to Your Private Playlist
If you want to reverse a YouTube playlist order, you can create a new private playlist. This quick and easy method will help you get the desired results.
For this method to work, you don’t need to download any third-party app or use a website; all you have to do is open YouTube on any browser or use the YouTube app in the following way:
Step 1: In the first step, launch the YouTube app on your device or visit the YouTube website (if you are logged out, sign into your account using your credentials).
Step 2: In the next step, click your Profile at the top right of the screen and select the “Your Channel” option from the drop-down menu to access your YouTube channel.
Step 3: Scroll down on your channel’s dashboard, select a video, and click the three dots next to it. Next, click “Add to Playlist” from the drop-down list and select the “Create a New Playlist” option to make a new one.
Next, provide a name, set the privacy settings to “Private,” and click “Create.”
Step 4: In the final step, head to the Playlist tab, click “View Full Playlist” to open the new playlist, and click the “three dots” in the details area on the left. Next, select “Playlist Settings” and toggle the button next to “Add new videos to top of playlist” to enable it.
You can now add more videos to your playlist, and each one will be added to the top. This method helps you arrange the YouTube playlist as you desire.
The Bottom Line
In this article, we’ve provided four different step-by-step solutions to show you how to reverse a YouTube playlist on your PC and mobile device using Chrome extension, a third-party website, changing settings, and adding videos to a new private playlist.
Hopefully, you’ve found this article helpful and can now watch your favorite playlist in the order you like without any issues.
Also read:
- [New] AI-Powered Youtube Monetization Strategies - 2024 Guidebook
- [New] How Does YouTube Work After a Video Is Uploaded for 2024
- [Updated] Essential Guide to Aspect Ratios for Effective YouTube Engagement
- [Updated] Podcaster's Soundboard 10 Incredible Places to Find Your Opening Tune
- 2024 Approved Capturing Quality Video on MacBook
- 2024 Approved Premier Guidance Leading Ringtone Artisans iPhone
- A Step-by-Step Guide to YouTube Image Branding
- Astonishingly Fast Finders of Forlorn Reddit Content for 2024
- Essential Details on Creating Effective YT Shorts for 2024
- Forgot your Infinix Note 30i lock screen pattern, PIN or password? Here’s what to do
- Free and Reliable MKV Video Players for Windows OS, Best Picks for Quick Setup and Smooth Streaming
- Free, High-Quality Edits Explore These 9 Cloud Apps
- How to Tackle Missing Thumbnails on YouTube Shorts
- In 2024, Essential Video Stock Investment Guides
- In 2024, Top 5 Tracking Apps to Track Nokia C32 without Them Knowing | Dr.fone
- Strategizing for Success The Essential Guide to Online Individuality
- The Secret Ingredients for Flawless Collage Designs
- Title: Top 5 Multimedia Sensation Apps IPhone/Android Showdown
- Author: Kevin
- Created at : 2024-12-02 19:56:09
- Updated at : 2024-12-03 18:39:01
- Link: https://youtube-videos.techidaily.com/top-5-multimedia-sensation-apps-iphoneandroid-showdown/
- License: This work is licensed under CC BY-NC-SA 4.0.