
"Top 5 Alternative Editors Beyond Youtube's Limits"
Top 5 Alternative Editors: Beyond Youtube’s Limits
Best 5 YouTube Video Editor Alternatives

Richard Bennett
Mar 27, 2024• Proven solutions
YouTube provides a free tool that allows the user to create a video by putting together various clips and then publish them with a single click. All the uploads that the user has made before are added to the YouTube Video Editor. The tool allows the user to combine, trim, add music and customize. However, its functionality is limited to just that, and that’s why people are looking for the best YouTube Video Editor alternative.
Note: From 20th September 2017 users will no longer be able to use the complimentary editing suite. Check the best YouTube video editor alternatives from this complete guide.
Some of the cons of the YouTube Video Editor are:
- It doesn’t have advanced editing features.
- It requires Internet connection to use.
- It is slow.
- Users can only edit videos that were already uploaded to their YouTube account.
Best 5 YouTube Video Editor Alternatives
The good news is that there are good offline YouTube Video Editor Alternatives out there. Below are the top five:
1. Wondershare Filmora
Wondershare Filmora is one of the most popular YouTube Video Editor alternatives. It is available for both Windows and Mac platforms. The best thing about Wondershare Filmora is that it is easy to use. And at the same time, it has more features than the YouTube Video Editor.
 Download Mac Version ](https://tools.techidaily.com/wondershare/filmora/download/ )
Some of the key features of Filmora include:
- Allows the user to crop, cut, and combine video clips in just a few clicks
- Supports the addition of multiple audio and video tracks
- Choose from various overlays and filters
- Supports face off, green screen, and PIP effects
- Supports a wide range of video formats that include MP4, AVI, MOV, MKV, and WMV, just to name a few
- Burn video to DVD, or instantly upload it to YouTube, Facebook, and Vimeo
2. WeVideo
Another YouTube Video Editor alternative is WeVideo . It is a cloud-based video editor that allows the user to do the editing in any web browser. Just like the YouTube editing tool, the user must first upload the clips online in order to edit them, and create a video.
Pros:
One advantage of WeVideo is that it allows different users to collaborate in making a single video. A user can invite others to upload clips to the project, or even make different videos based on the same clips.
Cons:
And because it is a cloud-based video editor, it requires an Internet connection in order to get the clips and do the editing. Not only that, the videos must be uploaded before they can be used. And there are cases in which a five-minute video will require hours of raw footages. Users with slow upload speeds will take hours before they can start editing. And users of the free version can only export 480p videos that have a watermark. Users need to pay for the full version.
3. Loopster
Loopster is a mobile app that can be a YouTube Video Editor alternative. It is available for both the Android and iOS platforms. The tool allows the user to rotate, splice and add sound effects, zoom, and crop videos directly from one’s smartphone. It comes with advanced features that include title screens, slow motion effect, and bubble text. The app also lets the user record video and sounds directly. After editing the video, the app can export it directly to Facebook or YouTube.
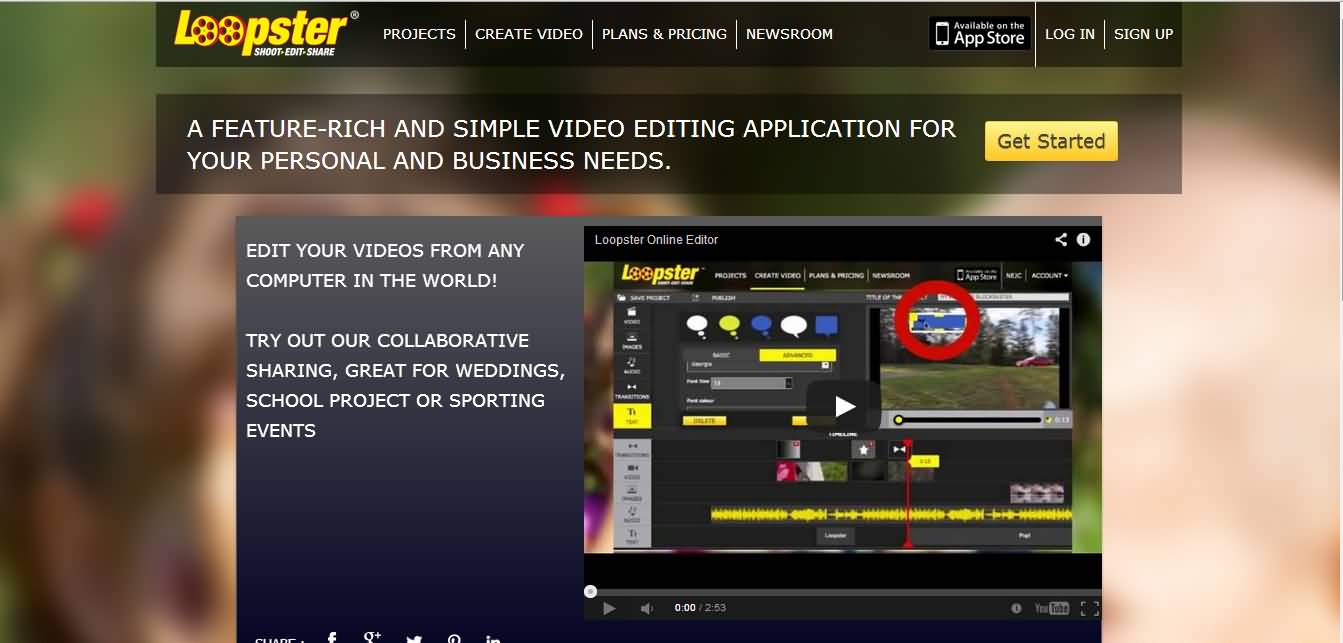
Pros:
It does what it was designed to do when it is working. It is user-friendly and comes with a tutorial. It also works even if the smartphone is not connected to the internet. Editing is done offline. And best of all, it is free.
Cons:
One the downside, it looks like the developer is no longer updating the app. Some users experience crashes and other bugs. There are also some users that stated that the slow motion effect didn’t work for them, which is why they can’t recommend it as a YouTube Video Editor alternative.
4. Tubechop
Tubechop allows the user to trim a video from any YouTube video and then share it. There are some videos that are just too long, and you want to cut it to the section that you find interesting.
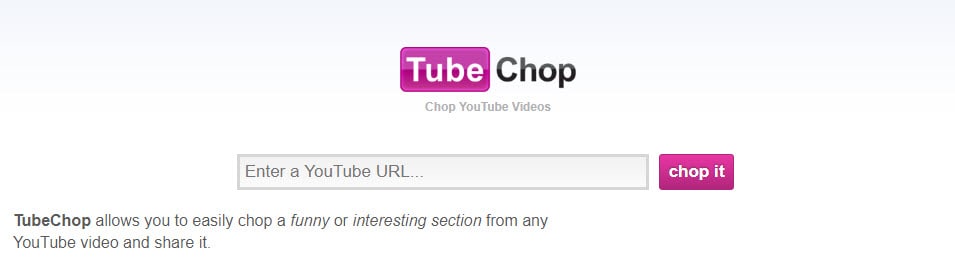
Pros:
Just like the other YouTube Video Editor alternatives, Tubechop is easy to use. The user just needs to enter the YouTube URL of the video, and then indicate the section that’s interesting, and that’s it.
Cons:
However, Tubechop doesn’t allow users to download the resulting video. Tubechop only provides a link that allows users to view the chopped video. And when the original video is deleted, the chopped version will also be deleted.
5. Viddyad
Viddyad is another cloud-based platform that lets users convert images, music, clips, and animated effects into a video. It is said to be the best way to create video ads for businesses.

Pros:
There are several templates to choose from. Users can create video ads by adding videos, text, voiceover, special effects, music, and images. The platform also provides access to millions of image and video stock.
Cons:
Viddyad is a YouTube Video Editor alternative for businesses that want to create video ads. It might not be the right video editor for individuals who just want to create and share their personal videos.
Richard Bennett
Richard Bennett is a writer and a lover of all things video.
Follow @Richard Bennett
Richard Bennett
Mar 27, 2024• Proven solutions
YouTube provides a free tool that allows the user to create a video by putting together various clips and then publish them with a single click. All the uploads that the user has made before are added to the YouTube Video Editor. The tool allows the user to combine, trim, add music and customize. However, its functionality is limited to just that, and that’s why people are looking for the best YouTube Video Editor alternative.
Note: From 20th September 2017 users will no longer be able to use the complimentary editing suite. Check the best YouTube video editor alternatives from this complete guide.
Some of the cons of the YouTube Video Editor are:
- It doesn’t have advanced editing features.
- It requires Internet connection to use.
- It is slow.
- Users can only edit videos that were already uploaded to their YouTube account.
Best 5 YouTube Video Editor Alternatives
The good news is that there are good offline YouTube Video Editor Alternatives out there. Below are the top five:
1. Wondershare Filmora
Wondershare Filmora is one of the most popular YouTube Video Editor alternatives. It is available for both Windows and Mac platforms. The best thing about Wondershare Filmora is that it is easy to use. And at the same time, it has more features than the YouTube Video Editor.
Download Mac Version ](https://tools.techidaily.com/wondershare/filmora/download/ )
Some of the key features of Filmora include:
- Allows the user to crop, cut, and combine video clips in just a few clicks
- Supports the addition of multiple audio and video tracks
- Choose from various overlays and filters
- Supports face off, green screen, and PIP effects
- Supports a wide range of video formats that include MP4, AVI, MOV, MKV, and WMV, just to name a few
- Burn video to DVD, or instantly upload it to YouTube, Facebook, and Vimeo
2. WeVideo
Another YouTube Video Editor alternative is WeVideo . It is a cloud-based video editor that allows the user to do the editing in any web browser. Just like the YouTube editing tool, the user must first upload the clips online in order to edit them, and create a video.
Pros:
One advantage of WeVideo is that it allows different users to collaborate in making a single video. A user can invite others to upload clips to the project, or even make different videos based on the same clips.
Cons:
And because it is a cloud-based video editor, it requires an Internet connection in order to get the clips and do the editing. Not only that, the videos must be uploaded before they can be used. And there are cases in which a five-minute video will require hours of raw footages. Users with slow upload speeds will take hours before they can start editing. And users of the free version can only export 480p videos that have a watermark. Users need to pay for the full version.
3. Loopster
Loopster is a mobile app that can be a YouTube Video Editor alternative. It is available for both the Android and iOS platforms. The tool allows the user to rotate, splice and add sound effects, zoom, and crop videos directly from one’s smartphone. It comes with advanced features that include title screens, slow motion effect, and bubble text. The app also lets the user record video and sounds directly. After editing the video, the app can export it directly to Facebook or YouTube.
Pros:
It does what it was designed to do when it is working. It is user-friendly and comes with a tutorial. It also works even if the smartphone is not connected to the internet. Editing is done offline. And best of all, it is free.
Cons:
One the downside, it looks like the developer is no longer updating the app. Some users experience crashes and other bugs. There are also some users that stated that the slow motion effect didn’t work for them, which is why they can’t recommend it as a YouTube Video Editor alternative.
4. Tubechop
Tubechop allows the user to trim a video from any YouTube video and then share it. There are some videos that are just too long, and you want to cut it to the section that you find interesting.
Pros:
Just like the other YouTube Video Editor alternatives, Tubechop is easy to use. The user just needs to enter the YouTube URL of the video, and then indicate the section that’s interesting, and that’s it.
Cons:
However, Tubechop doesn’t allow users to download the resulting video. Tubechop only provides a link that allows users to view the chopped video. And when the original video is deleted, the chopped version will also be deleted.
5. Viddyad
Viddyad is another cloud-based platform that lets users convert images, music, clips, and animated effects into a video. It is said to be the best way to create video ads for businesses.
Pros:
There are several templates to choose from. Users can create video ads by adding videos, text, voiceover, special effects, music, and images. The platform also provides access to millions of image and video stock.
Cons:
Viddyad is a YouTube Video Editor alternative for businesses that want to create video ads. It might not be the right video editor for individuals who just want to create and share their personal videos.
Richard Bennett
Richard Bennett is a writer and a lover of all things video.
Follow @Richard Bennett
Stream Google Meet Directly on YouTube with These Tips
Google Meet helps people to connect virtually with each other in a well-protected environment. If you have physical restrictions, Google Meet can provide an enhanced ecosystem to collaborate with your team members. With high video and audio quality, it can prevent you from any sort of disturbance. If you want to connect with a larger audience during your Google Meet sessions, you can go for live streaming.
This article will address how to conduct Google Meet live stream through the platform of YouTube. To learn more, continue reading this guide.
- Available Google Workspace Edition
- Approval of YouTube Channel for Live
- Connect your YouTube Channel to Google Meet
- How to Live Stream from Google Meet to YouTube
- Bonus Tip: Easily Record your Google Meet Live Stream
Part 1: Three Things to Check Before Starting Your Live
Before increasing your audience from Google Meet live stream on YouTube, make sure to check the below prerequisites.
1. Available Google Workspace Edition
For Google Meet YouTube live, there are some requirements. The reason is that not every ordinary user of Google Meet can go for YouTube live streaming. To do so, you should buy any of the following pricing plans:
| Google Workspace Pricing Plan | Price |
|---|---|
| Enterprise Starter | Approx. $10/User/Month |
| Enterprise Standard | Approx. $20/User/Month |
| Enterprise Plus | Approx. $30/User/Month |
| Education Plus | Approx. $5/Student/Month |
| Teaching and Learning Upgrade | Approx. $4/License/Month |
| Workspace Individual Subscriber | Approx. $9.9/Month |
| Google One Subscribers with 2 TB or More Storage Space | Approx. $10/Month |
![]()
Note: To know the exact pricing plans of Google Workspace, you have to contact Google Support.
2. Approval of YouTube Channel for Live
To conduct live streaming, you must receive approval from the YouTube channel. For this, you must access your channel’s YouTube Studio to perform the account verification. Now to activate and enable live streaming on your YouTube account, check the following steps:
Step1 Open your YouTube account and click on the “Profile” icon given at the top-right corner. After opening the Profile menu, click on the “YouTube Studio” option.

Step2 A new window will be displayed on your screen. From the left panel, select “Content” among other options. Under the section called “Live,” locate the “Get Started” option. Afterward, tap on the “Request” option and perform the verification steps for enabling live streaming. After 24 hours, you would get approval for live streaming on YouTube. Hence, you would be able to live stream Google Meet meetings through your YouTube channel.

3. Connect your YouTube Channel to Google Meet
Once you get approval for live streaming, you can connect the YouTube channel to your Google Meet account. If the Host Management option is disabled, anyone within the Google Meet session can start live streaming. Conversely, only hosts or co-hosts can begin live streaming if this option is activated. Moreover, the individual who is starting the live stream from Google Meet will get connected to his YouTube channel.
Furthermore, you should use the same email address to enter the Google Meet that is connected to your YouTube account. By using the same email address, you can ensure smooth live streaming of Google Meet sessions to your YouTube channel. Also, you can only use laptops or desktops for initiating live streaming. The reason is that the Google Meet live stream on YouTube is not currently available on mobile devices.
Part 2: How to Live Stream from Google Meet to YouTube
Once you have fulfilled all the requirements, you can start a live stream from Google Meet to YouTube. Check the following steps to execute the process:
Step1 To allow Google Meet sessions to live stream on YouTube, the Google Workspace admin must adjust some settings. To begin, log in to the “Admin Console” on the Workspace administrator account. Now go to “Apps” and access the “Google Workspace” option.
Step2 Afterward, click “Google Meet” and tap on the “Stream” option. Once done, click on the “Pencil” icon to open the Settings menu. Now enable the options “Let People Steam Their Meetings” and “Let People Use YouTube to Stream Meetings.” Once done with the changes, click on the “Save” button.
Step3 Make sure that the Google account attached to your YouTube channel is capable of live streaming. Once done, go to your YouTube channel and tap on the “Create” button. Afterward, hit the “Live” button.
Step4 Now enter your Google Meet session and click on the “Activities” option. From the Activities menu, select “Live Streaming.” Now a small menu will open for live-streaming settings. You can create a new event and add an event title. Make sure to choose the privacy options and desired language. Afterward, click on the “Start Streaming” option.
Step5 A small pop-up will appear that will tell you to remind your participants about live streaming. After reminding, click on the “Start” button. You can see the red “Live” button that will indicate to you the ongoing live-streaming session. Once you have concluded the live streaming by clicking on the “Stop Streaming” button, you can check the video analytics by visiting your YouTube channel.
Bonus Tip: Easily Record your Google Meet Live Stream
Do you want to save your Google Meet live-stream session? The best tool through which you can save your essential live-streaming sessions is Wondershare Filmora Screen Recorder . By using this efficient screen recorder, you can access your saved live streaming session and revise the important points discussed in it.
The screen recorder of Filmora is capable of capturing webcam and screen recording simultaneously. You can select a customized recording area through this tool. For example, you can choose a full screen, a specific window, or a customized area. Furthermore, this screen recording tool can also capture your microphone and system’s sounds in high quality. At the same time, as a powerful video editor, you can edit your videos with various advanced features of Filmora to bring them to the next level. Click the video below to learn more about Filmora’s new features.
Steps to Record Live Streaming Using Filmora Screen Recorder
Are you ready to capture your live-streaming session on Google Meet? Here are the simple and accurate steps to begin the process:
Step1 Open the Screen Recorder
Download Wondershare Filmora and open its interface. Click the “Screen Recorder” option given on the main homepage. By doing so, a screen recorder window will open. Here, you can select screen recording modes such as full-screen, target window, or custom. Also, make sure to choose your system’s audio and microphone to proceed.

Step2 Adjust Settings and Start Recording
From Settings, you can also select the quality, frame rate, and color of mouse clicks. Once you have adjusted all the settings properly, hit the “REC” button.

Step3 End the Recording
After the countdown, the screen recording will begin. To stop the recording, you can press the F9 button from your keyboard. After the recording ends, the file will be dropped into the media library of Filmora.

Conclusion
Google Meet is a reliable environment to connect and collaborate with people. To increase your reach and target audience, you can conduct Google Meet live streaming on YouTube. This article has discussed a detailed way through which you can live stream your Google Meet session on your YouTube channel.
To save and access your live streaming sessions later, you can try the screen recorder of Wondershare Filmora . This screen recorder can capture screen and respective audio in high quality.
Free Download For Win 7 or later(64-bit)
Free Download For macOS 10.14 or later
Part 1: Three Things to Check Before Starting Your Live
Before increasing your audience from Google Meet live stream on YouTube, make sure to check the below prerequisites.
1. Available Google Workspace Edition
For Google Meet YouTube live, there are some requirements. The reason is that not every ordinary user of Google Meet can go for YouTube live streaming. To do so, you should buy any of the following pricing plans:
| Google Workspace Pricing Plan | Price |
|---|---|
| Enterprise Starter | Approx. $10/User/Month |
| Enterprise Standard | Approx. $20/User/Month |
| Enterprise Plus | Approx. $30/User/Month |
| Education Plus | Approx. $5/Student/Month |
| Teaching and Learning Upgrade | Approx. $4/License/Month |
| Workspace Individual Subscriber | Approx. $9.9/Month |
| Google One Subscribers with 2 TB or More Storage Space | Approx. $10/Month |
![]()
Note: To know the exact pricing plans of Google Workspace, you have to contact Google Support.
2. Approval of YouTube Channel for Live
To conduct live streaming, you must receive approval from the YouTube channel. For this, you must access your channel’s YouTube Studio to perform the account verification. Now to activate and enable live streaming on your YouTube account, check the following steps:
Step1 Open your YouTube account and click on the “Profile” icon given at the top-right corner. After opening the Profile menu, click on the “YouTube Studio” option.
Step2 A new window will be displayed on your screen. From the left panel, select “Content” among other options. Under the section called “Live,” locate the “Get Started” option. Afterward, tap on the “Request” option and perform the verification steps for enabling live streaming. After 24 hours, you would get approval for live streaming on YouTube. Hence, you would be able to live stream Google Meet meetings through your YouTube channel.
3. Connect your YouTube Channel to Google Meet
Once you get approval for live streaming, you can connect the YouTube channel to your Google Meet account. If the Host Management option is disabled, anyone within the Google Meet session can start live streaming. Conversely, only hosts or co-hosts can begin live streaming if this option is activated. Moreover, the individual who is starting the live stream from Google Meet will get connected to his YouTube channel.
Furthermore, you should use the same email address to enter the Google Meet that is connected to your YouTube account. By using the same email address, you can ensure smooth live streaming of Google Meet sessions to your YouTube channel. Also, you can only use laptops or desktops for initiating live streaming. The reason is that the Google Meet live stream on YouTube is not currently available on mobile devices.
Part 2: How to Live Stream from Google Meet to YouTube
Once you have fulfilled all the requirements, you can start a live stream from Google Meet to YouTube. Check the following steps to execute the process:
Step1 To allow Google Meet sessions to live stream on YouTube, the Google Workspace admin must adjust some settings. To begin, log in to the “Admin Console” on the Workspace administrator account. Now go to “Apps” and access the “Google Workspace” option.
Step2 Afterward, click “Google Meet” and tap on the “Stream” option. Once done, click on the “Pencil” icon to open the Settings menu. Now enable the options “Let People Steam Their Meetings” and “Let People Use YouTube to Stream Meetings.” Once done with the changes, click on the “Save” button.
Step3 Make sure that the Google account attached to your YouTube channel is capable of live streaming. Once done, go to your YouTube channel and tap on the “Create” button. Afterward, hit the “Live” button.
Step4 Now enter your Google Meet session and click on the “Activities” option. From the Activities menu, select “Live Streaming.” Now a small menu will open for live-streaming settings. You can create a new event and add an event title. Make sure to choose the privacy options and desired language. Afterward, click on the “Start Streaming” option.
Step5 A small pop-up will appear that will tell you to remind your participants about live streaming. After reminding, click on the “Start” button. You can see the red “Live” button that will indicate to you the ongoing live-streaming session. Once you have concluded the live streaming by clicking on the “Stop Streaming” button, you can check the video analytics by visiting your YouTube channel.
Bonus Tip: Easily Record your Google Meet Live Stream
Do you want to save your Google Meet live-stream session? The best tool through which you can save your essential live-streaming sessions is Wondershare Filmora Screen Recorder . By using this efficient screen recorder, you can access your saved live streaming session and revise the important points discussed in it.
The screen recorder of Filmora is capable of capturing webcam and screen recording simultaneously. You can select a customized recording area through this tool. For example, you can choose a full screen, a specific window, or a customized area. Furthermore, this screen recording tool can also capture your microphone and system’s sounds in high quality. At the same time, as a powerful video editor, you can edit your videos with various advanced features of Filmora to bring them to the next level. Click the video below to learn more about Filmora’s new features.
Steps to Record Live Streaming Using Filmora Screen Recorder
Are you ready to capture your live-streaming session on Google Meet? Here are the simple and accurate steps to begin the process:
Step1 Open the Screen Recorder
Download Wondershare Filmora and open its interface. Click the “Screen Recorder” option given on the main homepage. By doing so, a screen recorder window will open. Here, you can select screen recording modes such as full-screen, target window, or custom. Also, make sure to choose your system’s audio and microphone to proceed.
Step2 Adjust Settings and Start Recording
From Settings, you can also select the quality, frame rate, and color of mouse clicks. Once you have adjusted all the settings properly, hit the “REC” button.
Step3 End the Recording
After the countdown, the screen recording will begin. To stop the recording, you can press the F9 button from your keyboard. After the recording ends, the file will be dropped into the media library of Filmora.
Conclusion
Google Meet is a reliable environment to connect and collaborate with people. To increase your reach and target audience, you can conduct Google Meet live streaming on YouTube. This article has discussed a detailed way through which you can live stream your Google Meet session on your YouTube channel.
To save and access your live streaming sessions later, you can try the screen recorder of Wondershare Filmora . This screen recorder can capture screen and respective audio in high quality.
Free Download For Win 7 or later(64-bit)
Free Download For macOS 10.14 or later
Also read:
- [Updated] Direct Streams From OBS to Insta Profile
- 2024 Approved Captivate Viewers Designing Engaging YouTube Trailers with Filmora
- 2024 Approved Dive Into 9 Premium, Uncut Full-Length Winter Wonderland Flicks
- 2024 Approved Elevate Video Playback Embrace the Power of AV1 in YouTube
- 2024 Approved Unlocking the Potential of OneStream Live Streaming
- Beat the Glitch: Uncover the Best Ways to Resolve Stray Not Launching Issues
- ChatGPT Reimagined: Build Unique and Custom GPT Models Easily With The Recent Upgrade
- Clarity and Brevity
- Exploring the 2022 Upgrade of the Titan Evo by Secretlab: Maintaining Its Reign as a Gaming Throne Contender | ZDNET Insights
- Guide to Consolidating Your YouTube Video Collection
- In 2024, Boost Your Channel's Income Understanding Critical View Thresholds
- In 2024, Clear, Distraction-Free Viewing of Old YouTube Content
- In 2024, Full Guide to Catch 100 IV Pokémon Using a Map On OnePlus 12 | Dr.fone
- In 2024, How Can You Cast Your Apple iPhone 14 Plus to Windows PC With Ease? | Dr.fone
- Navigating Through YouTube's Content ID System Issues
- Online Language Exchange Through Pearson
- The Ultimate Guide to Making Engaging YouTube Video Thumbnails with Phones
- Understanding and Correcting Windows 7 BSOD Error Code 0X0000007E: A Comprehensive Walkthrough
- Video Perfection in Progress Edits After Uploading on YouTube
- Title: Top 5 Alternative Editors Beyond Youtube's Limits
- Author: Kevin
- Created at : 2024-11-27 22:02:23
- Updated at : 2024-12-03 20:33:52
- Link: https://youtube-videos.techidaily.com/top-5-alternative-editors-beyond-youtubes-limits/
- License: This work is licensed under CC BY-NC-SA 4.0.