
:max_bytes(150000):strip_icc()/dead-ipad-5e423adff1aa49f381857b8f10a885f6.jpg)
Top 10 Most Immersive YouTube VR Films
Top 10 Most Immersive YouTube VR Films
Versatile YouTube Video Editor - Filmora
An easy yet powerful editor
Numerous effects to choose from
Detailed tutorials provided by the official channel
The pandemic in 2020 was a significant event that disrupted everyone globally. Video calls and virtual events became the run-to for most workers. This caused a lot of people to embrace the idea of virtualization.
Viewers needed new ways to experience performances and shows. Then, new virtual reality (VR) headsets entered the market, making people amazed as they did the best of what an average standalone headset could do. VR videos give real-like visual effects that will amaze and make you feel in the same surrounding as in the video background. And with the arrival of futuristic VR video Youtubers, creative videos are coming all around. Through this article, let’s look over the best YouTube VR Videos and understand how YouTube VR 360 videos differ from each other.
In this article
01 What is a VR video on YouTube?
02 10 Best VR Videos on YouTube for 2021
03 Where to Watch VR Videos besides YouTube?
04 Choose High-Quality VR Headsets
Part 1: What is a VR video on YouTube?
Firstly, it is essential to understand a VR Video on YouTube and how it differs from 360 videos?
VR Videos YouTube – For VR Videos with the YouTube mobile app, you can watch VR videos alongside cardboard. You will have an immersive feeling while watching this as you feel present in the scene actions while having your field of vision covered with a viewing device.
Though both YouTube VR and 360 give an immersive viewing experience with 360-degree coverage, still YouTube 360 videos reflect live actions with modified cameras accessible through 360-degree video-compatible devices. YouTube 360 videos are also viewable on devices such as smartphones, computers, etc., that are compatible. However, here, video progression is not under viewers’ control.
On the other hand, VR videos with VR headsets give options to control the viewing experience, such as interacting, running, walk with the video from the viewer’s end.
Part 2: 10 Best VR Videos on YouTube for 2021
You must be eager to start your voyage to VR YouTube videos. So let’s move ahead with the below-mentioned options that cover the ten best YouTuber VR Videos.
1. 360° VR GALACTUS EVENT | The End of season Fortnite Event
The production of VR videos from the 360 worlds games is becoming a live event model, making video creators keep these incredible experiences with this end-of-season Fortnite event.
2. Around the Planet in 2 Minutes
This video offers viewers a glimpse of other travel videos on the channel while leading them to various locations worldwide.
3. Ascension by David Blaine (YouTube 360 Video)
This version of the YouTube 360 video gives viewers a view of it from the first-person point of view. This video broke YouTube records with its 22+million views within a short while.
4. Beautifully Broken by Warren Haynes and Danny Louis
In this video, Warren Haynes and Danny Louis mirrored the constraints of the moment implicitly, taking their craft outdoors.
5. China, One week before Coronavirus Lockdown
This experience gives one the view of different structures like plants, people, and nature at large.
6. The Dawn of Art; AVirtual Journey inside Chauvet Cave
This animated tour is being narrated into a cave by Daisy Ridley. The video is known for holding the best figurative cave painting in the world kept for 36,000 years.
7. Guardians of the Kingdom
This video exposes the relationship between whales and humans by the incidences between two mothers; a human and a whale.
8. HowVolcanoes Affect Earth’s Climate over Millions of Years
Here, viewers get to see how volcanoes spew carbon dioxide and other gases into the air, changing the earth’s climate through that.
9. Inside NYC’s Skinniest Supertall Skyscraper
In this video, the viewers see the views of the central park and the iconic US metropolis.
10. Lockdown Around the World | National Geographic
This video is from National Geographic. It exposes a view of crowded cities in an unprecedented period like the lockdown.
Part 3: Where to Watch VR Videos besides YouTube?
You may wonder whether there are other platforms where you can watch VR videos.
The good news is: Yes! Besides YouTube, we have platforms where viewers can watch VR videos and have an immersive experience. Read on to know them.
1. Vimeo 360
This platform allows users to upload, play, and even share their VR videos with their friends on apps like Facebook and YouTube.
2. Oculus Gear VR store
Users can watch their YouTube VR Oculus videos on this platform with apps like Samsung XR, Skybox VR video player, etc. They are also allowed to download games apps.
3. Steam Powered
Steam Powered is known for VR titles and gets support from good VR headsets.
Part 4: Choose High-Quality VR Headsets
There are quite a good number of VR Headsets, but we have the option of choosing a high-quality VR headset that should be able to deliver a wonderful experience. This is what every user wants. Let’s take a good look at a few of them.
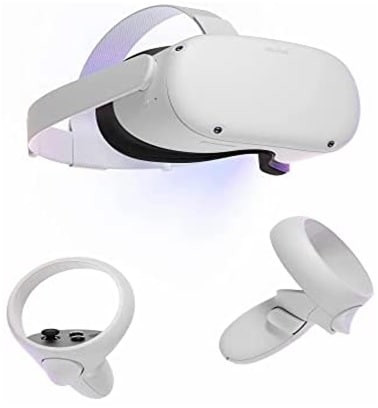
1. Oculus Quest 2
This VR headset is top-notch. Its impressive flexibility, backed by its shocking price, will make one not want to look elsewhere.
No need to worry about screen-door effects as the headset possesses a high per-eye resolution—smooth 90Hz refreshing rate just like the Rift CV1 Oculus. Based on the Qualcomm Snapdragon chipset, XR2 resulted in excellent standalone performance. It’s also capable of linking up with gaming PC for desktop experiences.
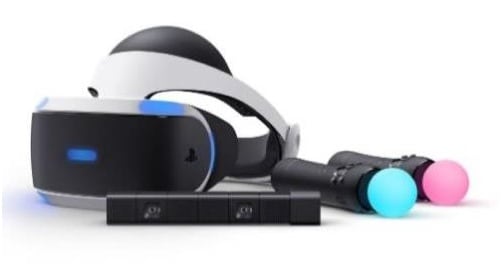
2. PlayStation VR
A lot of VR games have come out on PlayStation VR. The PlayStation VR gives PS4 users an excellent and quality experience. However, it doesn’t have the highest resolution displays and cannot go for wild, room-scale tracking.
It has a 960 x 1,080 per-eye resolution and offers a 120Hz refresh rate for quality experiences. Its 100-degree field of view, motion controllers, and separate camera are suitable for unlocking immersive gameplay. A fantastic thing about it is that although it was for the PS4 and PS4 Pro, Sony ensured it’ll also run on the PS5.
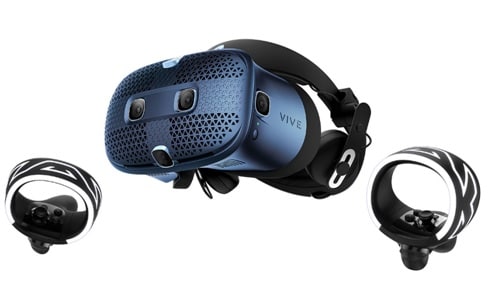
3. HTC Vive Cosmos
The HTC Vive Cosmos is the latest HTC headset in town. Overall combined 2,880 x 1,700 resolution provides optimally sharp resolution for the eyes that is 1,440 x 1,700.
This headset has an easy-to-wear halo-style headband and attached headphones for spatial audio. It’s a highly versatile headset that allows users to switch which version of the Cosmos they’re using by simply swapping out the faceplate, controllers, and any tracking base station.
Part 5: FAQs about VR Videos
Let’s take a look at some questions by VR viewers.
Who is the Most Popular VR YouTuber?
‘Nathie’ is the most popular VR YouTuber today. He is a Netherland-based content creator whose niche is VR technology. His channel has stupendous 600k subscribers.
Is VR Bad for Your Eyes?
According to research, there is evidence that wearing VR Headsets can cause the eyesight to deteriorate, causing eye strain, discomfort, and making the vision blur.
What is the Future of VR?
VR is known for giving immersive experiences in various aspects of life and career. Education, Sports events, technology, and lots more are fields where VR is in use with artificial intelligence.
Over time, it has been a lifesaver, being helpful to many in various locations worldwide and has been even more accessible than it used to be. The future of VR holds more opportunities for us as it evolves daily.
So, the end is not coming to it anytime soon.
Conclusion
In the world today, everyone has the opportunity to experience technology at its best through VR, and the good thing is that its rapid evolvement is an assurance that it’s not ending soon. Every man and business needs VR to grow as its opportunities are massive. Whether with YouTube VR Oculus or any other platform, getting the real essence of visualization creates a big difference.
The future holds more great ways and opportunities to make things easy for us with VR. Thus, through the article, you will get to know many YouTube 360 videos and VR Videos YouTube platforms so that entertainment does not end with simple videos but goes beyond expectations.
The pandemic in 2020 was a significant event that disrupted everyone globally. Video calls and virtual events became the run-to for most workers. This caused a lot of people to embrace the idea of virtualization.
Viewers needed new ways to experience performances and shows. Then, new virtual reality (VR) headsets entered the market, making people amazed as they did the best of what an average standalone headset could do. VR videos give real-like visual effects that will amaze and make you feel in the same surrounding as in the video background. And with the arrival of futuristic VR video Youtubers, creative videos are coming all around. Through this article, let’s look over the best YouTube VR Videos and understand how YouTube VR 360 videos differ from each other.
In this article
01 What is a VR video on YouTube?
02 10 Best VR Videos on YouTube for 2021
03 Where to Watch VR Videos besides YouTube?
04 Choose High-Quality VR Headsets
Part 1: What is a VR video on YouTube?
Firstly, it is essential to understand a VR Video on YouTube and how it differs from 360 videos?
VR Videos YouTube – For VR Videos with the YouTube mobile app, you can watch VR videos alongside cardboard. You will have an immersive feeling while watching this as you feel present in the scene actions while having your field of vision covered with a viewing device.
Though both YouTube VR and 360 give an immersive viewing experience with 360-degree coverage, still YouTube 360 videos reflect live actions with modified cameras accessible through 360-degree video-compatible devices. YouTube 360 videos are also viewable on devices such as smartphones, computers, etc., that are compatible. However, here, video progression is not under viewers’ control.
On the other hand, VR videos with VR headsets give options to control the viewing experience, such as interacting, running, walk with the video from the viewer’s end.
Part 2: 10 Best VR Videos on YouTube for 2021
You must be eager to start your voyage to VR YouTube videos. So let’s move ahead with the below-mentioned options that cover the ten best YouTuber VR Videos.
1. 360° VR GALACTUS EVENT | The End of season Fortnite Event
The production of VR videos from the 360 worlds games is becoming a live event model, making video creators keep these incredible experiences with this end-of-season Fortnite event.
2. Around the Planet in 2 Minutes
This video offers viewers a glimpse of other travel videos on the channel while leading them to various locations worldwide.
3. Ascension by David Blaine (YouTube 360 Video)
This version of the YouTube 360 video gives viewers a view of it from the first-person point of view. This video broke YouTube records with its 22+million views within a short while.
4. Beautifully Broken by Warren Haynes and Danny Louis
In this video, Warren Haynes and Danny Louis mirrored the constraints of the moment implicitly, taking their craft outdoors.
5. China, One week before Coronavirus Lockdown
This experience gives one the view of different structures like plants, people, and nature at large.
6. The Dawn of Art; AVirtual Journey inside Chauvet Cave
This animated tour is being narrated into a cave by Daisy Ridley. The video is known for holding the best figurative cave painting in the world kept for 36,000 years.
7. Guardians of the Kingdom
This video exposes the relationship between whales and humans by the incidences between two mothers; a human and a whale.
8. HowVolcanoes Affect Earth’s Climate over Millions of Years
Here, viewers get to see how volcanoes spew carbon dioxide and other gases into the air, changing the earth’s climate through that.
9. Inside NYC’s Skinniest Supertall Skyscraper
In this video, the viewers see the views of the central park and the iconic US metropolis.
10. Lockdown Around the World | National Geographic
This video is from National Geographic. It exposes a view of crowded cities in an unprecedented period like the lockdown.
Part 3: Where to Watch VR Videos besides YouTube?
You may wonder whether there are other platforms where you can watch VR videos.
The good news is: Yes! Besides YouTube, we have platforms where viewers can watch VR videos and have an immersive experience. Read on to know them.
1. Vimeo 360
This platform allows users to upload, play, and even share their VR videos with their friends on apps like Facebook and YouTube.
2. Oculus Gear VR store
Users can watch their YouTube VR Oculus videos on this platform with apps like Samsung XR, Skybox VR video player, etc. They are also allowed to download games apps.
3. Steam Powered
Steam Powered is known for VR titles and gets support from good VR headsets.
Part 4: Choose High-Quality VR Headsets
There are quite a good number of VR Headsets, but we have the option of choosing a high-quality VR headset that should be able to deliver a wonderful experience. This is what every user wants. Let’s take a good look at a few of them.
1. Oculus Quest 2
This VR headset is top-notch. Its impressive flexibility, backed by its shocking price, will make one not want to look elsewhere.
No need to worry about screen-door effects as the headset possesses a high per-eye resolution—smooth 90Hz refreshing rate just like the Rift CV1 Oculus. Based on the Qualcomm Snapdragon chipset, XR2 resulted in excellent standalone performance. It’s also capable of linking up with gaming PC for desktop experiences.
2. PlayStation VR
A lot of VR games have come out on PlayStation VR. The PlayStation VR gives PS4 users an excellent and quality experience. However, it doesn’t have the highest resolution displays and cannot go for wild, room-scale tracking.
It has a 960 x 1,080 per-eye resolution and offers a 120Hz refresh rate for quality experiences. Its 100-degree field of view, motion controllers, and separate camera are suitable for unlocking immersive gameplay. A fantastic thing about it is that although it was for the PS4 and PS4 Pro, Sony ensured it’ll also run on the PS5.
3. HTC Vive Cosmos
The HTC Vive Cosmos is the latest HTC headset in town. Overall combined 2,880 x 1,700 resolution provides optimally sharp resolution for the eyes that is 1,440 x 1,700.
This headset has an easy-to-wear halo-style headband and attached headphones for spatial audio. It’s a highly versatile headset that allows users to switch which version of the Cosmos they’re using by simply swapping out the faceplate, controllers, and any tracking base station.
Part 5: FAQs about VR Videos
Let’s take a look at some questions by VR viewers.
Who is the Most Popular VR YouTuber?
‘Nathie’ is the most popular VR YouTuber today. He is a Netherland-based content creator whose niche is VR technology. His channel has stupendous 600k subscribers.
Is VR Bad for Your Eyes?
According to research, there is evidence that wearing VR Headsets can cause the eyesight to deteriorate, causing eye strain, discomfort, and making the vision blur.
What is the Future of VR?
VR is known for giving immersive experiences in various aspects of life and career. Education, Sports events, technology, and lots more are fields where VR is in use with artificial intelligence.
Over time, it has been a lifesaver, being helpful to many in various locations worldwide and has been even more accessible than it used to be. The future of VR holds more opportunities for us as it evolves daily.
So, the end is not coming to it anytime soon.
Conclusion
In the world today, everyone has the opportunity to experience technology at its best through VR, and the good thing is that its rapid evolvement is an assurance that it’s not ending soon. Every man and business needs VR to grow as its opportunities are massive. Whether with YouTube VR Oculus or any other platform, getting the real essence of visualization creates a big difference.
The future holds more great ways and opportunities to make things easy for us with VR. Thus, through the article, you will get to know many YouTube 360 videos and VR Videos YouTube platforms so that entertainment does not end with simple videos but goes beyond expectations.
The Ultimate Encyclopedia to YouTube Thumbnail Mastery
The Ultimate Guide to YouTube Thumbnails that Get Views

Richard Bennett
Oct 26, 2023• Proven solutions
Search for any topic on YouTube and you’ll find thousands of videos. How do you decide which of them to watch? Thumbnails play a major role in what viewers decide to click on. They’re often more important than video titles.
Viewers click on thumbnails that both standout and feel relevant to their search. Your task when it comes to creating YouTube thumbnails is to make something that does both of those things while also maintaining your personal style.
- How to Make a YouTube Thumbnail
- How to Upload a YouTube Thumbnail
- YouTube Thumbnail Makers
- How to Make Thumbnails that Get Clicks (Without Clickbait!)
- Animated YouTube Thumbnails
Part 1: How to Make a YouTube Thumbnail
In order to create a custom video thumbnail, you’ll need a program to put it together in. You can use an image editing program like Photoshop if you have one, but if you don’t you can check out these free thumbnail makers.
Here are some examples of popular thumbnail styles.

1. The Classic Thumbnail (Photo or Screenshot)
A photo that shows what happens in your video – whether that means the finished ‘look’ from your makeup tutorial or you posing in front of the landmark you shot your travel vlog in front of – is a great way to let viewers know what to expect. While curiosity can be a big motive behind clicking on a video thumbnail (or anything online), when people have searched for a specific topic they want to be convinced that your video has what they’re looking for.
#1. Choose Your Photo
To start off, either choose a still frame from your video or take a photograph while you’re still set up from your video. A separate photograph is usually a better idea because your video editor might not be able to export a high-quality snapshot, and also because you’re able to choose your facial expression.
Aim to make this shot a close-up or medium close-up and make sure you’re either in the center of the screen or off to one side, as per the ‘rule of thirds’. Many cameras allow you to bring an optional grid up onto your viewfinder. This will divide your screen into three equal segments both vertically and horizontally. Try to make sure your eyes line up with the top line, and if you’re going to be off to one side then make sure you’re on one of the vertical lines. This will ensure your image is visually appealing.
If you want to add text later, it’s a good idea to be off to one side.
Including your face is important for most types of YouTube videos. People are attracted to eye contact and are more likely to click on thumbnails that feature a face. Gamers might choose to use a picture of a video game character instead and it will have the same effect.
Some situations where it isn’t essential to include your face include tech reviews, where viewers will be more interested in seeing the product, and cooking videos where people are looking to be tempted by a yummy food pic.
#2. Add Text and/or Images
This part isn’t essential – in some cases, a photo is enough – but a lot of the thumbnails for the videos ranked highest in YouTube’s search results include either a couple of words of text, a simple graphic (i.e. an emoji), or both.
In some cases you might use text to make it clear what type of video you’ve made, i.e. ‘review’ or ‘tutorial’. It’s best to keep any text you use brief, but you could get a bit more descriptive and write something like ‘fall makeup tutorial’. Three words is probably the most you can get away with. Remember that your text will be shrunk down with the rest of your image; you need to make it big enough to read easily once it’s shrunk, and that means you don’t have a ton of room for text.
You should also avoid fonts that are harder to read. Fonts with a lot of curves can be harder to read, and you want to make sure you choose a color that stands out from your background. Yellow might work against black, but it probably won’t work against the beige wall of your sunny bedroom. Sans serif fonts tend to be best.
Another tactic used in successful thumbnails is to add small graphics, like emojis or small images (i.e. pumpkins for a Halloween video), which are related to your video’s content. As with text, you don’t want to overload your thumbnail with images, but they’re a great way to add something eye-catching that’s a bit different from competing thumbnails.
2. The Emotional Laser (Background + Face Reacting)
One increasingly popular style of YouTube thumbnail is what we’re going to call the ‘Emotional Laser’. It’s bright (like, blindingly bright), it communicates a clear feeling, and it creates high expectations for how exciting the video’s content is going to be.
The three main elements of the Emotional Laser thumbnail are a background (usually bright), your face on the right wearing an over-pronounced expression, and either the thing your expression is in reaction to (i.e. food, a product, the topic of your video in text) or reinforcement of your emotion (i.e an emoji or question marks) on the left.


#1. Ham It Up (Take Your Reaction Photo)
Take a high-quality photograph of yourself conveying strong emotion. Generally, you want to look extremely excited, disgusted, angry, or shocked depending on the theme of the video.
If there’s an object you want to include in your thumbnail, like a product you’ll be talking about, then it’s a good idea to hold it for this photo. Hold it to one side of your head, turn towards it slightly (but not so much that the camera can only see the side of your face) and put on the expression that’s supposed to be a reaction to the object.
It can be a good idea to take this photo in front of a solid color so you can remove the background easily with chroma key.
#2. Choose Your Background
Your background might be scenery, a solid color, or even the room you filmed the video in. Light or bright colors are popular. Make sure there’s nothing that will distract from your expression. If your background is a room, or anything else where there could be things like pictures hanging, you may want to add a blur effect in the next step.
#3. Put It Together
In your thumbnail maker or a program like Photoshop, you’ll need to put your photo and your background together. This will work differently depending on what program you use. If your program has a chroma key tool and your reaction photo was taken against a solid color then you can make that solid color transparent.
What if I don’t have a separate background? If you don’t have a background you want to use, but you still want your reaction to stand out the same way it would if you did, then you can use your photo editor’s blur tool to turn the normal background of your photo into something you can pop-out from.
#4. Add Extras (Text, Emojis, etc.)
If instead of an object you plan to fill the other side of your thumbnail with text, question marks, emojis, or some other graphic element then now is the time to add it.
Part 2: How to Upload a YouTube Thumbnail
When you upload a new video to YouTube, you will see a Custom thumbnail option under Video thumbnails after your upload is complete.
If you want to add a custom thumbnail to a video that’s already up, that’s easy too.
- Go to your Video Manager in the Creator Studio.
- Find the video you want to change the thumbnail for and click Edit next to it.
- Click Custom thumbnail on the right of the preview screen.
- Upload your thumbnail and click Save changes.
Remember when you’re uploading custom thumbnails that you need to use a .JPG, .GIF, .BMP, or .PNG image with an aspect ratio of 16:9 and that your file size has to be under 2MB.
YouTube recommends that thumbnail images have a resolution of 1280x720px, and you cannot upload an image with a width of less than 640 pixels.
Make sure that all of your thumbnails adhere to YouTube’s Community guidelines. Anything sexually suggestive, violent, or otherwise graphic could result in your video being age-restricted.
Part 3: YouTube Thumbnail Makers
You don’t have to go out and buy a photo editor like Photoshop to make custom video thumbnails (although it’s a good thing to use if you already have it). Here are two free online programs you can use instead:
Canva is an intuitive option with templates for Thumbnails, Channel Art, and other social media graphics. There are stock photos and graphics provided, but not all of them are free (paid options cost $1 each). Canva’s templates do tend to include paid resources, so you may want to use them mostly for their layouts or as inspiration and replace everything they provide with your own images.
Generally, using Canva is as easy as dragging and dropping things where you want them. You’ll be able to set the dimensions for your project so the image you export is a perfect size. Adding text and changing the size, font, or color is easy too.
Adobe Spark also has templates for channel art, and it’s also very easy to use. The first time you use it helpful notes will pop up to guide you through the process. Using templates is especially simple because you just click on the elements in the pre-made thumbnail and replace them with your own photos/text.
You can make changes to the colors in your Spark thumbnail easily by selecting a new color scheme or filter. You can even toggle through layouts easily. When you choose a new layout, Spark will rearrange all the pieces of your current thumbnail to align with the new layout so you can quickly see what it looks like instead of having to rebuild.
Click to check more YouTube thumbnail makers
Part 4: How to Make Thumbnails That Get Clicks (Without Clickbait!)
Here are the top 10 best practices for creating effective YouTube thumbnails:
#1. Show What Your Video Is About
Being mysterious and clickbaity can get you views, if you’re already big. For small YouTubers, it pays off to be clear about your video’s topic. You want people to click who want to watch the actual content of your video. Even if you manage to get some clicks by being mysterious, you’ll probably end up with low viewer retention because people are clicking away when they realize your video isn’t what they were looking for. That will make YouTube’s algorithm rank your video lower, and then even fewer people will find it.
If your video is a product review, show the product in the thumbnail and maybe even write ‘review’ on it. If your video is a makeup tutorial, show your face with the finished makeup and maybe even include pictures of the products you used. People want to know what they’re clicking on before they click.
#2. Use a Consistent Layout
As you grow, you’ll want people to be able to see one of your thumbnails and instantly know it’s yours. Building a recognizable brand is about consistency. Try to stick with one basic layout for all of your videos. You can still customize every individual thumbnail by using different facial expressions and different graphics, but try to use similar backgrounds, fonts, and general layouts (i.e. you to the right of the thumbnails, text to the left) over and over.
#3. Use Your Face
Why should people want to watch your videos? If the answer is ‘because I can teach them to create delicious food’ or ‘because they want to learn about the latest iPhone’ then your thumbnail should include that food or that iPhone.
If part of the reason people want to watch your videos is you – your personality and your sense of humor – then you should be in your thumbnail.
Viewers who are on YouTube because they like seeing a creator’s personality like to feel the presence of that personality in the video thumbnail, and eye contact naturally draws attention and clicks.
#4. Add Small Graphics
Adding small graphics, like emojis or hearts, to your thumbnail can help you stand out in a couple different ways. First, if they’re being compared to thumbnails that are just screenshots from the video, your thumbnails will look a lot more polished. Second, they’ll add a splash of color which can draw eyes to your video in a search where other thumbnails are not using those same colors.
#5. Your Text Should Be Huge
Your thumbnail will end up being a fraction of the size it is while you’re creating it in your thumbnail maker, and that means that any text you use will end up being shrunk down. You could probably type a six-word sentence in a size 18 font and have it look fine while you’re making your thumbnail, but after you upload it there’s no way people will be able to read it at a glance.
Aim for a huge font size, and 3 words or less (so your thumbnail doesn’t end up looking crowded).
#6. Check Out The Competition
Type your video’s title or topic into the search engine on YouTube and look at the thumbnails for the videos that come up. These are your competition. You want to make a thumbnail that is similar enough to what comes up that viewers know it’s on the same topic, but different enough that it stands out.
Generally, if most of the thumbnails have the same layout, you’ll want to mimic that layout. Where you can break from the crowd is in the colors, fonts, and graphics you use.
Part 5: Animated YouTube Thumbnails
Whether or not you upload a custom thumbnail to YouTube, YouTube’s A.I will choose what it thinks are the 3 juiciest seconds of your video (you cannot choose for yourself) and play them as a GIF-like animation when people mouseover your video thumbnails.
As of now, this only works in the Google Chrome desktop browser. Videos have to be at least 30 seconds long to get moving thumbnails.
Alright, now that you know everything about YouTube thumbnails, go make one! Tell us in the comments what you’re going to do to make your video thumbnails stand out.
Touch Up YouTube Videos with Effects & Elements in Filmora
As one of the most widely used video editing software in YouTube video editing, Filmora provides lots of templates and effects with an intuitive interface. Download the free trial version and get started now.
Richard Bennett
Richard Bennett is a writer and a lover of all things video.
Follow @Richard Bennett
Richard Bennett
Oct 26, 2023• Proven solutions
Search for any topic on YouTube and you’ll find thousands of videos. How do you decide which of them to watch? Thumbnails play a major role in what viewers decide to click on. They’re often more important than video titles.
Viewers click on thumbnails that both standout and feel relevant to their search. Your task when it comes to creating YouTube thumbnails is to make something that does both of those things while also maintaining your personal style.
- How to Make a YouTube Thumbnail
- How to Upload a YouTube Thumbnail
- YouTube Thumbnail Makers
- How to Make Thumbnails that Get Clicks (Without Clickbait!)
- Animated YouTube Thumbnails
Part 1: How to Make a YouTube Thumbnail
In order to create a custom video thumbnail, you’ll need a program to put it together in. You can use an image editing program like Photoshop if you have one, but if you don’t you can check out these free thumbnail makers.
Here are some examples of popular thumbnail styles.
1. The Classic Thumbnail (Photo or Screenshot)
A photo that shows what happens in your video – whether that means the finished ‘look’ from your makeup tutorial or you posing in front of the landmark you shot your travel vlog in front of – is a great way to let viewers know what to expect. While curiosity can be a big motive behind clicking on a video thumbnail (or anything online), when people have searched for a specific topic they want to be convinced that your video has what they’re looking for.
#1. Choose Your Photo
To start off, either choose a still frame from your video or take a photograph while you’re still set up from your video. A separate photograph is usually a better idea because your video editor might not be able to export a high-quality snapshot, and also because you’re able to choose your facial expression.
Aim to make this shot a close-up or medium close-up and make sure you’re either in the center of the screen or off to one side, as per the ‘rule of thirds’. Many cameras allow you to bring an optional grid up onto your viewfinder. This will divide your screen into three equal segments both vertically and horizontally. Try to make sure your eyes line up with the top line, and if you’re going to be off to one side then make sure you’re on one of the vertical lines. This will ensure your image is visually appealing.
If you want to add text later, it’s a good idea to be off to one side.
Including your face is important for most types of YouTube videos. People are attracted to eye contact and are more likely to click on thumbnails that feature a face. Gamers might choose to use a picture of a video game character instead and it will have the same effect.
Some situations where it isn’t essential to include your face include tech reviews, where viewers will be more interested in seeing the product, and cooking videos where people are looking to be tempted by a yummy food pic.
#2. Add Text and/or Images
This part isn’t essential – in some cases, a photo is enough – but a lot of the thumbnails for the videos ranked highest in YouTube’s search results include either a couple of words of text, a simple graphic (i.e. an emoji), or both.
In some cases you might use text to make it clear what type of video you’ve made, i.e. ‘review’ or ‘tutorial’. It’s best to keep any text you use brief, but you could get a bit more descriptive and write something like ‘fall makeup tutorial’. Three words is probably the most you can get away with. Remember that your text will be shrunk down with the rest of your image; you need to make it big enough to read easily once it’s shrunk, and that means you don’t have a ton of room for text.
You should also avoid fonts that are harder to read. Fonts with a lot of curves can be harder to read, and you want to make sure you choose a color that stands out from your background. Yellow might work against black, but it probably won’t work against the beige wall of your sunny bedroom. Sans serif fonts tend to be best.
Another tactic used in successful thumbnails is to add small graphics, like emojis or small images (i.e. pumpkins for a Halloween video), which are related to your video’s content. As with text, you don’t want to overload your thumbnail with images, but they’re a great way to add something eye-catching that’s a bit different from competing thumbnails.
2. The Emotional Laser (Background + Face Reacting)
One increasingly popular style of YouTube thumbnail is what we’re going to call the ‘Emotional Laser’. It’s bright (like, blindingly bright), it communicates a clear feeling, and it creates high expectations for how exciting the video’s content is going to be.
The three main elements of the Emotional Laser thumbnail are a background (usually bright), your face on the right wearing an over-pronounced expression, and either the thing your expression is in reaction to (i.e. food, a product, the topic of your video in text) or reinforcement of your emotion (i.e an emoji or question marks) on the left.
#1. Ham It Up (Take Your Reaction Photo)
Take a high-quality photograph of yourself conveying strong emotion. Generally, you want to look extremely excited, disgusted, angry, or shocked depending on the theme of the video.
If there’s an object you want to include in your thumbnail, like a product you’ll be talking about, then it’s a good idea to hold it for this photo. Hold it to one side of your head, turn towards it slightly (but not so much that the camera can only see the side of your face) and put on the expression that’s supposed to be a reaction to the object.
It can be a good idea to take this photo in front of a solid color so you can remove the background easily with chroma key.
#2. Choose Your Background
Your background might be scenery, a solid color, or even the room you filmed the video in. Light or bright colors are popular. Make sure there’s nothing that will distract from your expression. If your background is a room, or anything else where there could be things like pictures hanging, you may want to add a blur effect in the next step.
#3. Put It Together
In your thumbnail maker or a program like Photoshop, you’ll need to put your photo and your background together. This will work differently depending on what program you use. If your program has a chroma key tool and your reaction photo was taken against a solid color then you can make that solid color transparent.
What if I don’t have a separate background? If you don’t have a background you want to use, but you still want your reaction to stand out the same way it would if you did, then you can use your photo editor’s blur tool to turn the normal background of your photo into something you can pop-out from.
#4. Add Extras (Text, Emojis, etc.)
If instead of an object you plan to fill the other side of your thumbnail with text, question marks, emojis, or some other graphic element then now is the time to add it.
Part 2: How to Upload a YouTube Thumbnail
When you upload a new video to YouTube, you will see a Custom thumbnail option under Video thumbnails after your upload is complete.
If you want to add a custom thumbnail to a video that’s already up, that’s easy too.
- Go to your Video Manager in the Creator Studio.
- Find the video you want to change the thumbnail for and click Edit next to it.
- Click Custom thumbnail on the right of the preview screen.
- Upload your thumbnail and click Save changes.
Remember when you’re uploading custom thumbnails that you need to use a .JPG, .GIF, .BMP, or .PNG image with an aspect ratio of 16:9 and that your file size has to be under 2MB.
YouTube recommends that thumbnail images have a resolution of 1280x720px, and you cannot upload an image with a width of less than 640 pixels.
Make sure that all of your thumbnails adhere to YouTube’s Community guidelines. Anything sexually suggestive, violent, or otherwise graphic could result in your video being age-restricted.
Part 3: YouTube Thumbnail Makers
You don’t have to go out and buy a photo editor like Photoshop to make custom video thumbnails (although it’s a good thing to use if you already have it). Here are two free online programs you can use instead:
Canva is an intuitive option with templates for Thumbnails, Channel Art, and other social media graphics. There are stock photos and graphics provided, but not all of them are free (paid options cost $1 each). Canva’s templates do tend to include paid resources, so you may want to use them mostly for their layouts or as inspiration and replace everything they provide with your own images.
Generally, using Canva is as easy as dragging and dropping things where you want them. You’ll be able to set the dimensions for your project so the image you export is a perfect size. Adding text and changing the size, font, or color is easy too.
Adobe Spark also has templates for channel art, and it’s also very easy to use. The first time you use it helpful notes will pop up to guide you through the process. Using templates is especially simple because you just click on the elements in the pre-made thumbnail and replace them with your own photos/text.
You can make changes to the colors in your Spark thumbnail easily by selecting a new color scheme or filter. You can even toggle through layouts easily. When you choose a new layout, Spark will rearrange all the pieces of your current thumbnail to align with the new layout so you can quickly see what it looks like instead of having to rebuild.
Click to check more YouTube thumbnail makers
Part 4: How to Make Thumbnails That Get Clicks (Without Clickbait!)
Here are the top 10 best practices for creating effective YouTube thumbnails:
#1. Show What Your Video Is About
Being mysterious and clickbaity can get you views, if you’re already big. For small YouTubers, it pays off to be clear about your video’s topic. You want people to click who want to watch the actual content of your video. Even if you manage to get some clicks by being mysterious, you’ll probably end up with low viewer retention because people are clicking away when they realize your video isn’t what they were looking for. That will make YouTube’s algorithm rank your video lower, and then even fewer people will find it.
If your video is a product review, show the product in the thumbnail and maybe even write ‘review’ on it. If your video is a makeup tutorial, show your face with the finished makeup and maybe even include pictures of the products you used. People want to know what they’re clicking on before they click.
#2. Use a Consistent Layout
As you grow, you’ll want people to be able to see one of your thumbnails and instantly know it’s yours. Building a recognizable brand is about consistency. Try to stick with one basic layout for all of your videos. You can still customize every individual thumbnail by using different facial expressions and different graphics, but try to use similar backgrounds, fonts, and general layouts (i.e. you to the right of the thumbnails, text to the left) over and over.
#3. Use Your Face
Why should people want to watch your videos? If the answer is ‘because I can teach them to create delicious food’ or ‘because they want to learn about the latest iPhone’ then your thumbnail should include that food or that iPhone.
If part of the reason people want to watch your videos is you – your personality and your sense of humor – then you should be in your thumbnail.
Viewers who are on YouTube because they like seeing a creator’s personality like to feel the presence of that personality in the video thumbnail, and eye contact naturally draws attention and clicks.
#4. Add Small Graphics
Adding small graphics, like emojis or hearts, to your thumbnail can help you stand out in a couple different ways. First, if they’re being compared to thumbnails that are just screenshots from the video, your thumbnails will look a lot more polished. Second, they’ll add a splash of color which can draw eyes to your video in a search where other thumbnails are not using those same colors.
#5. Your Text Should Be Huge
Your thumbnail will end up being a fraction of the size it is while you’re creating it in your thumbnail maker, and that means that any text you use will end up being shrunk down. You could probably type a six-word sentence in a size 18 font and have it look fine while you’re making your thumbnail, but after you upload it there’s no way people will be able to read it at a glance.
Aim for a huge font size, and 3 words or less (so your thumbnail doesn’t end up looking crowded).
#6. Check Out The Competition
Type your video’s title or topic into the search engine on YouTube and look at the thumbnails for the videos that come up. These are your competition. You want to make a thumbnail that is similar enough to what comes up that viewers know it’s on the same topic, but different enough that it stands out.
Generally, if most of the thumbnails have the same layout, you’ll want to mimic that layout. Where you can break from the crowd is in the colors, fonts, and graphics you use.
Part 5: Animated YouTube Thumbnails
Whether or not you upload a custom thumbnail to YouTube, YouTube’s A.I will choose what it thinks are the 3 juiciest seconds of your video (you cannot choose for yourself) and play them as a GIF-like animation when people mouseover your video thumbnails.
As of now, this only works in the Google Chrome desktop browser. Videos have to be at least 30 seconds long to get moving thumbnails.
Alright, now that you know everything about YouTube thumbnails, go make one! Tell us in the comments what you’re going to do to make your video thumbnails stand out.
Touch Up YouTube Videos with Effects & Elements in Filmora
As one of the most widely used video editing software in YouTube video editing, Filmora provides lots of templates and effects with an intuitive interface. Download the free trial version and get started now.
Richard Bennett
Richard Bennett is a writer and a lover of all things video.
Follow @Richard Bennett
Also read:
- Navigating Youtube's Partnership Opportunities in CP2024
- Surge Viral Traction via YouTube Short Content
- Revenue Realization Strategies for Successful Monetization on YouTube Mobile
- In 2024, Behind the Curtain How YouTube Tally's Its Views
- Captivating Your Audience YouTube Intro Excellence with iMovie for 2024
- [New] Elevate Your Video Game Select Top 20 Thumbnail Fonts
- [Updated] Avoid Common Mistakes - Mastering YouTube Tags Wisely
- Cracking the Code Calculating Your Income From YouTube's CPM
- Utilizing Jump Cuts to Amplify Your Vlog Impact
- 2024 Approved Analyzing Video Platforms Vimeo and YouTube
- In 2024, Angular Adjustments on YouTube Videos - The Ultimate 2023 Guide
- 6 Completely Different Places to Get Icons and Logos for YouTube Videos for 2024
- [Updated] Accelerate Engagement - Implementing the Top 12 Video Growth Strategies
- Youtube's Rapid Rise Top 10 in a Flash
- Maximizing Impact Strategies for Overcoming Video Short Snags
- Top-Rated ASMR Mic Picks for Quality Sound
- A Guide for Mobile Filmmakers on Crafting YouTube Thumbnails
- 2024 Approved Chronic Removal Method for YouTube's Bite-Sized Videos
- [New] Channel Flair Free Download Templates
- Top 10 Causes for Zero Video Views Strategies for Revival
- [Updated] Economical Options Best 11 Vlogging Gear
- 2024 Approved Direct Twitch Stream Transfer to YouTube Playback
- 2024 Approved Concluding Your Channel on YouTube - Expert Guides & Templates
- Enhance Videos Naturally - Free 9 YouTube Thumbnail Crafting Tips for 2024
- [Updated] Comedy in Catchy Notes Best Parody Songs List
- In 2024, Combining YouTube and iMovie for Professional Results
- From Zero to Hero Boosting YouTube View Count Quickly
- [New] Elevate Your Content Strategies to Climb YouTube Ranks
- Cutting-Edge Tips Designing Immersive Educational Videos for Online Learning for 2024
- [Updated] Elevate Your Content Selecting Top Thumbnail Fonts
- In 2024, Boost Views Strategic Partnerships on YouTube for Rapid Growth
- Including YouTube Playlist Content A Step-by-Step Tutorial
- 2024 Approved Create Standout Videos with These Top 7 Free Thumbnail Builders
- Enhance Video Playback with AV1 on YouTube for 2024
- [New] Boosting Your YT Subs A Complete Strategy Guide
- Meditative Movement YouTube's Finest Yogis
- 2024 Approved Bridging the Gap Transitioning YouTube to Televisions Smoothly
- Countdown in Forward The Counterintuitive Playlist Method
- 2024 Approved Creating Impressive Video Tracks with a Newbie Mac User
- [New] In 2024, Tweet Treasure Trove Discovering the Day's Hot Videos
- New Top Free MOV Video Editors with Rotation Feature
- [Updated] In 2024, Best Practices for Engaging with Facebook Live Content
- 2024 Approved Hottest Chrome Extensions Audio Recording Experts List
- In 2024, How to Fake GPS on Android without Mock Location For your Samsung Galaxy A05s | Dr.fone
- Apex Screen Capture Tools The Elite Line-Up for 2024
- Updated 2024 Approved IMovie on Windows? Try These 10+ Alternatives Instead
- In 2024, The Complete Laptop Recording Manual Dell Edition
- [New] 2024 Approved Revolutionizing Virtual Meetings Hacks for Effective Zoom Chats
- [Updated] 2024 Approved Upgrade Your Experience #10 High-Performance Drives
- How To Repair Apple iPhone 13 Pro iOS? | Dr.fone
- [Updated] In 2024, Take Screenshots with Precision on a Mac
- [Updated] Perfect Plays in a Minute TikTok Templates for Stellar Videos
- [New] Expert Picks Top 12 Screen Recording Software, No Time Limit for 2024
- Updated In 2024, Doable Ways to Create Transparent Background in Procreate
- In 2024, 3 Easy Methods to Unlock iCloud Locked Apple iPhone XS Max/iPad/iPod
- The Pace Adjuster How to Modify Musical Velocity While Upholding Original Frequencies for 2024
- In 2024, Overview of the Best Motorola Moto G73 5G Screen Mirroring App | Dr.fone
- Scouting the Best Screenshot & Recorders of Today for 2024
- Fixes for Apps Keep Crashing on Realme C51 | Dr.fone
- 2024 Approved Seamlessly Mix Melodies in Social Media Posts
- Title: Top 10 Most Immersive YouTube VR Films
- Author: Kevin
- Created at : 2024-05-25 16:27:42
- Updated at : 2024-05-26 16:27:42
- Link: https://youtube-videos.techidaily.com/top-10-most-immersive-youtube-vr-films/
- License: This work is licensed under CC BY-NC-SA 4.0.
