
:max_bytes(150000):strip_icc()/Childlearningonline_WillieBThomas_Getty-3e51600a64d742a0b5db4fadacead069.jpg)
"Time Travel for Video Views YouTube Upside-Down Guide"
Time Travel for Video Views: YouTube Upside-Down Guide
Best YouTube Video Reverser Online

Richard Bennett
Mar 27, 2024• Proven solutions
While working on the movies in a professional post-production environment, there might be instances where you want to reverse YouTube video to show flashback effect, or to replay a sequence so the audience can experience more thrills while watching.
With that said, not every media player or video editing application is capable enough to reverse a movie clip, not at least with merely a few mouse clicks. Therefore, the following sections suggest some such programs that can help you play YouTube video backward.
Part 1: Best Free YouTube Video Reversers Online
There are a few online web programs that are capable of reversing YouTube videos with efficiency. However, some of them may have certain restrictions like file size limit, number of supported formats, fewer or absolutely no editing options, etc.
Nevertheless, the best five online solutions to reverse YouTube video along with the process of using them are discussed below:
1. Clideo
Clideo is not merely a video reverser, but can also convert media files to your preferred format. You can paste the URL of a YouTube video to upload or import the videos from your computer, Dropbox or Google Drive storage. At the time of this writing, Clideo allows only up to 500MB videos to be uploaded to reverse or convert. As for the acceptability, the portal supports almost all the commonly used formats.

To play YouTube video backward with Clideo:
- Visit Clideo’s online reverse tool page: https://clideo.com/reverse-video ;
- Hover mouse over the down arrow icon next to the Choose file button and paste the URL of the YouTube video that you want to reverse;
- After Clideo fetches the video and opens the next page, choose your preferred speed from the right section
- Leave the Mute video box checked, or uncheck it if required and then click Reverse button to reverse YouTube video. The maximum reverse speed that you can apply is 2X.
2. Kapwing
This web solution also supports almost all types of video formats including 3GPP, AVI, MP4, etc. When talking about the limitations of a free user, you can only upload the videos that are up to 7 minutes long. At the time of this writing, Kapwing can accept the source files from your computer, and from the YouTube URL.

To reverse YouTube video with Kapwing:
- Go to Kapwing’s online video reverser page: https://www.kapwing.com/tools/reverse-video ;
- Paste the URL of the YouTube video in the Paste a URL field;
- Select your preferred playback speed of the reversed video from the Reverse speed section in the left pane;
- Choose whether or not Kapwing should mute the output video;
- Optionally, click Trim video from the upper-left corner of the right window to edit the footage if needed;
- Click CREATE from the bottom-left corner to play YouTube video backward. The maximum reverse speed that you can apply on Kapwing is also 2X.
3. EZGIF
With the ability to support almost all major video formats, and the capability to accept the media files of up to 100MB, Ezgif allows you to upload the footages from your PC, or paste their URL if they are published on YouTube. Even though the landing page has a few distracting adverts, the overall process to play YouTube video backward and save it to your PC is simple.

To reverse YouTube video with Ezgif:
- Go to the reverser tool page: https://ezgif.com/reverse-video and then paste the URL of the YouTube video in the available field;
- Click Upload video and optionally click the speed icon from the toolbar at the top;
- Use the checkboxes and input fields to mute the audio and adjust the playback speed as needed;
- Choose your preferred encoding method from the Output format and encoding drop-down list and then click Reverse video to reverse the video.
Note: It seems that you can’t customize the reverse speed on EZGif but you can choose to mute the reversed audio or not.
4. VideoReverser
Although this web solution has an extremely simple interface, the files that you can upload must not exceed 10MB in size. The portal supports formats like MPG, MPEG, MP4, AVI, M4V, 3GP, etc. for reversing. In addition to uploading the clips from your PC, VideoReverser also allows you to paste the URL of the footages if they are published on YouTube.

To play YouTube video backward with VideoReverser:
- Launch your favorite Internet browser, and then visit https://www.videoreverser.com/ ;
- Paste the URL of the YouTube video in the available text field;
- Choose your preferred output format from the Select output format drop-down list;
- Use the Remove audio track checkbox to get rid of the acoustics or leave the sound enabled;
- Click Start to reverse YouTube video.
5. Pixiko
With almost all formats’ support, Pixiko is yet another web-based media editor that can also reverse YouTube video with a few mouse clicks. At the time of this writing, Pixiko only accepts the source files from your PC, which means you can’t paste the YouTube link to it directly. At first, you need to download or save the YouTube video on computer and then either drag those clips from your local hard drive to the portal.

To play YouTube video backward with Pixiko:
- On the page https://pixiko.com/editor/video-reverse , click anywhere inside the Blue rectangle;
- Locate, select, and upload the downloaded YouTube source video from your PC;
- Click Reverse from the lower-right section of the video player window;
- Follow the on-screen instructions from there to manage and reverse YouTube video as needed;
Bonus: Reversing YouTube Video with Wondershare Filmora
With easily reachable editing options and self-explanatory buttons, Wondershare Filmora has gained a decent amount of popularity in the recent years. The program is available for both Windows and Mac platforms, and gives tough competition to other leading tools of the industry such as Adobe Premiere Pro, Final Cut Pro X, etc.
 Download Mac Version ](https://tools.techidaily.com/wondershare/filmora/download/ )
When talking about the playback speed, with the help of available presets, it can be increased or decreased by 100x or 0.01x respectively. One of the presets also enables you to reverse the direction of the playback quite easily, i.e. while keeping the speed intact. In addition, the ‘Custom Speed’ option lets you control the preferences more granularly.
You can follow the simple instructions given below to reverse YouTube video with Wondershare Filmora:
Note: To remain compliant with the terms and conditions, and to respect the copyright policies, Wondershare Filmora doesn’t allow you to download other people’s videos from YouTube. However, once you have a footage on your PC, you can jump to the following step-by-step process to reverse its playback.
1. Import the Source Video to the Timeline
Launch Wondershare Filmora on your Windows or Mac computer (Windows 10 here), making sure that the Media button in the standard toolbar at the top is selected, click inside the Media window, and select and import the YouTube source video to the program. Next, drag the YouTube video clip to the Timeline, and when the confirmation box appears, click the Match to Media or Keep Project Settings button as needed to get the footage to the Timeline.

2. Reverse the Video (Using the Preset)
Click and select the media clip in the Timeline, click the Speed icon present above the Timeline itself, and click the Reverse option from the menu that appears to reverse the video playback.
![]()
3. Reverse the Video (Manual Control)

Select the media clip in the Timeline and click the Speed icon as explained in the previous step. From the menu that appears, click Custom Speed this time. When the Custom Speed box appears, use the Speed slider to adjust the playback speed of the media clip, and check the Reverse box to reverse YouTube video. Optionally, you can also modify the Duration and Ripple options to customize the preferences. Finally, click OK to save the changes.
4. Export the Video or Upload to YouTube Directly
Back on the main window, click EXPORT from the top. Filmora provides several ways to saving and sharing the video.

You can select the Local tab, choose your preferred output format from the list in the left, in the right window, define a name and location for the file that you are about to export, and click EXPORT from the bottom-right corner to export the video with the reverse playback.

Or, go to the YouTube tab and sign in your YouTube account to upload the reversed video to YouTube directly. In the YouTube upload interface, you can optimize the YouTube SEO elements and revise the video title, description, category and tags.
Download Mac Version ](https://tools.techidaily.com/wondershare/filmora/download/ )
Conclusion
Even though the online video reversers are free and offer simple process to get the job done, the desktop programs like Wondershare Filmora offer more flexibility when it comes to making changes to the media clips, controlling the playback speed, adding effects, applying the modifications only to certain sections of the footage, selecting output preferences, etc. before you can reverse YouTube video.
Richard Bennett
Richard Bennett is a writer and a lover of all things video.
Follow @Richard Bennett
Richard Bennett
Mar 27, 2024• Proven solutions
While working on the movies in a professional post-production environment, there might be instances where you want to reverse YouTube video to show flashback effect, or to replay a sequence so the audience can experience more thrills while watching.
With that said, not every media player or video editing application is capable enough to reverse a movie clip, not at least with merely a few mouse clicks. Therefore, the following sections suggest some such programs that can help you play YouTube video backward.
Part 1: Best Free YouTube Video Reversers Online
There are a few online web programs that are capable of reversing YouTube videos with efficiency. However, some of them may have certain restrictions like file size limit, number of supported formats, fewer or absolutely no editing options, etc.
Nevertheless, the best five online solutions to reverse YouTube video along with the process of using them are discussed below:
1. Clideo
Clideo is not merely a video reverser, but can also convert media files to your preferred format. You can paste the URL of a YouTube video to upload or import the videos from your computer, Dropbox or Google Drive storage. At the time of this writing, Clideo allows only up to 500MB videos to be uploaded to reverse or convert. As for the acceptability, the portal supports almost all the commonly used formats.
To play YouTube video backward with Clideo:
- Visit Clideo’s online reverse tool page: https://clideo.com/reverse-video ;
- Hover mouse over the down arrow icon next to the Choose file button and paste the URL of the YouTube video that you want to reverse;
- After Clideo fetches the video and opens the next page, choose your preferred speed from the right section
- Leave the Mute video box checked, or uncheck it if required and then click Reverse button to reverse YouTube video. The maximum reverse speed that you can apply is 2X.
2. Kapwing
This web solution also supports almost all types of video formats including 3GPP, AVI, MP4, etc. When talking about the limitations of a free user, you can only upload the videos that are up to 7 minutes long. At the time of this writing, Kapwing can accept the source files from your computer, and from the YouTube URL.
To reverse YouTube video with Kapwing:
- Go to Kapwing’s online video reverser page: https://www.kapwing.com/tools/reverse-video ;
- Paste the URL of the YouTube video in the Paste a URL field;
- Select your preferred playback speed of the reversed video from the Reverse speed section in the left pane;
- Choose whether or not Kapwing should mute the output video;
- Optionally, click Trim video from the upper-left corner of the right window to edit the footage if needed;
- Click CREATE from the bottom-left corner to play YouTube video backward. The maximum reverse speed that you can apply on Kapwing is also 2X.
3. EZGIF
With the ability to support almost all major video formats, and the capability to accept the media files of up to 100MB, Ezgif allows you to upload the footages from your PC, or paste their URL if they are published on YouTube. Even though the landing page has a few distracting adverts, the overall process to play YouTube video backward and save it to your PC is simple.
To reverse YouTube video with Ezgif:
- Go to the reverser tool page: https://ezgif.com/reverse-video and then paste the URL of the YouTube video in the available field;
- Click Upload video and optionally click the speed icon from the toolbar at the top;
- Use the checkboxes and input fields to mute the audio and adjust the playback speed as needed;
- Choose your preferred encoding method from the Output format and encoding drop-down list and then click Reverse video to reverse the video.
Note: It seems that you can’t customize the reverse speed on EZGif but you can choose to mute the reversed audio or not.
4. VideoReverser
Although this web solution has an extremely simple interface, the files that you can upload must not exceed 10MB in size. The portal supports formats like MPG, MPEG, MP4, AVI, M4V, 3GP, etc. for reversing. In addition to uploading the clips from your PC, VideoReverser also allows you to paste the URL of the footages if they are published on YouTube.
To play YouTube video backward with VideoReverser:
- Launch your favorite Internet browser, and then visit https://www.videoreverser.com/ ;
- Paste the URL of the YouTube video in the available text field;
- Choose your preferred output format from the Select output format drop-down list;
- Use the Remove audio track checkbox to get rid of the acoustics or leave the sound enabled;
- Click Start to reverse YouTube video.
5. Pixiko
With almost all formats’ support, Pixiko is yet another web-based media editor that can also reverse YouTube video with a few mouse clicks. At the time of this writing, Pixiko only accepts the source files from your PC, which means you can’t paste the YouTube link to it directly. At first, you need to download or save the YouTube video on computer and then either drag those clips from your local hard drive to the portal.
To play YouTube video backward with Pixiko:
- On the page https://pixiko.com/editor/video-reverse , click anywhere inside the Blue rectangle;
- Locate, select, and upload the downloaded YouTube source video from your PC;
- Click Reverse from the lower-right section of the video player window;
- Follow the on-screen instructions from there to manage and reverse YouTube video as needed;
Bonus: Reversing YouTube Video with Wondershare Filmora
With easily reachable editing options and self-explanatory buttons, Wondershare Filmora has gained a decent amount of popularity in the recent years. The program is available for both Windows and Mac platforms, and gives tough competition to other leading tools of the industry such as Adobe Premiere Pro, Final Cut Pro X, etc.
Download Mac Version ](https://tools.techidaily.com/wondershare/filmora/download/ )
When talking about the playback speed, with the help of available presets, it can be increased or decreased by 100x or 0.01x respectively. One of the presets also enables you to reverse the direction of the playback quite easily, i.e. while keeping the speed intact. In addition, the ‘Custom Speed’ option lets you control the preferences more granularly.
You can follow the simple instructions given below to reverse YouTube video with Wondershare Filmora:
Note: To remain compliant with the terms and conditions, and to respect the copyright policies, Wondershare Filmora doesn’t allow you to download other people’s videos from YouTube. However, once you have a footage on your PC, you can jump to the following step-by-step process to reverse its playback.
1. Import the Source Video to the Timeline
Launch Wondershare Filmora on your Windows or Mac computer (Windows 10 here), making sure that the Media button in the standard toolbar at the top is selected, click inside the Media window, and select and import the YouTube source video to the program. Next, drag the YouTube video clip to the Timeline, and when the confirmation box appears, click the Match to Media or Keep Project Settings button as needed to get the footage to the Timeline.
2. Reverse the Video (Using the Preset)
Click and select the media clip in the Timeline, click the Speed icon present above the Timeline itself, and click the Reverse option from the menu that appears to reverse the video playback.
![]()
3. Reverse the Video (Manual Control)
Select the media clip in the Timeline and click the Speed icon as explained in the previous step. From the menu that appears, click Custom Speed this time. When the Custom Speed box appears, use the Speed slider to adjust the playback speed of the media clip, and check the Reverse box to reverse YouTube video. Optionally, you can also modify the Duration and Ripple options to customize the preferences. Finally, click OK to save the changes.
4. Export the Video or Upload to YouTube Directly
Back on the main window, click EXPORT from the top. Filmora provides several ways to saving and sharing the video.
You can select the Local tab, choose your preferred output format from the list in the left, in the right window, define a name and location for the file that you are about to export, and click EXPORT from the bottom-right corner to export the video with the reverse playback.
Or, go to the YouTube tab and sign in your YouTube account to upload the reversed video to YouTube directly. In the YouTube upload interface, you can optimize the YouTube SEO elements and revise the video title, description, category and tags.
Download Mac Version ](https://tools.techidaily.com/wondershare/filmora/download/ )
Conclusion
Even though the online video reversers are free and offer simple process to get the job done, the desktop programs like Wondershare Filmora offer more flexibility when it comes to making changes to the media clips, controlling the playback speed, adding effects, applying the modifications only to certain sections of the footage, selecting output preferences, etc. before you can reverse YouTube video.
Richard Bennett
Richard Bennett is a writer and a lover of all things video.
Follow @Richard Bennett
Building a Broad-Spectrum Audience with Multichannel Strategy
How to Stream to YouTube, Facebook, Twitch and Over 30 Platforms
Richard Bennett
Mar 27, 2024• Proven solutions
- Part1.How to Stream to YouTube, Twitch, Hitbox and other Platforms at the same time?
- Part2.How to Stream to YouTube and Facebook at the same time Without Restream Platform?
- Part3.About Restream.io
How to Stream to YouTube, Twitch, Hitbox and other Platforms at the same time?
Step 1: To begin with the process, first of all you need to go to <https://restream.io/ >. Sign up here and login with your account.
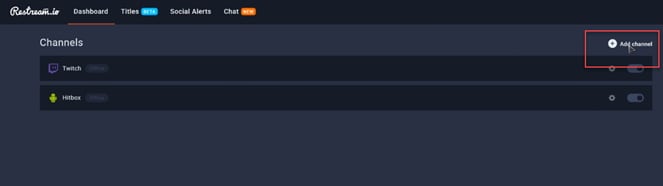
Step 2: Now go to the dashboard and simply add your channel.
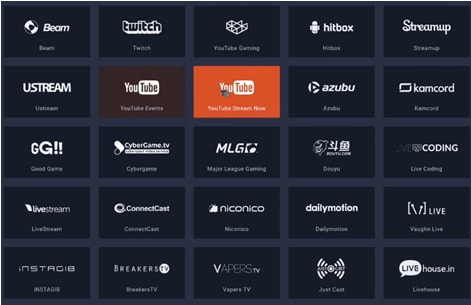
Step 3: Here you will find so many streaming platforms like YouTube, uStream, Dailymotion, HitBox etc.
Step 4: Select your desired platform out of this wide list and then sign in.

Step 5: The screen will proceed with simple to follow steps; go with specified instructions and sign in to your desired streaming platform.
Step 6: Now you can easily turn On-Off your channels for streaming.
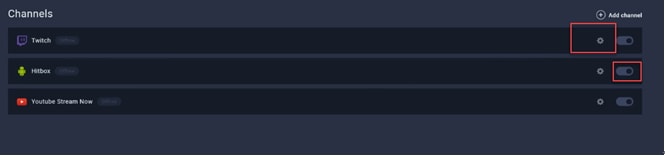
Step 7: It is time to edit your channel.
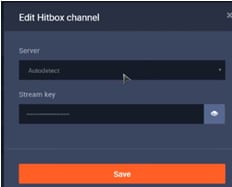
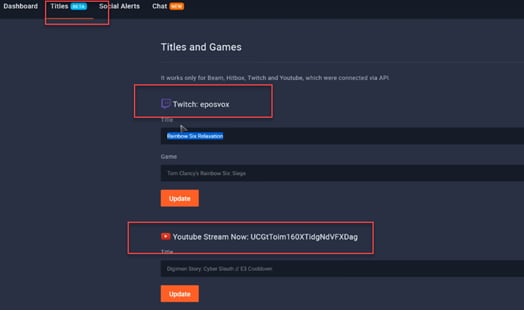
Step 8: Now put eye catching title for your live stream.
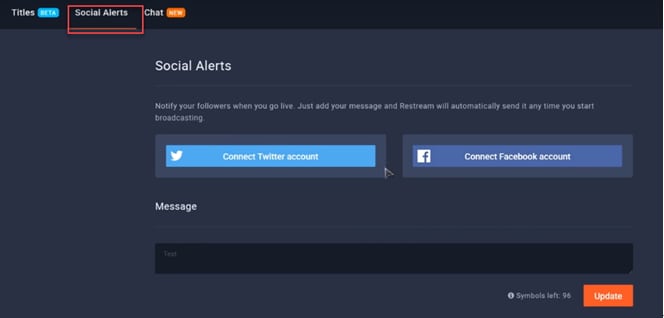
Step 9: This platform also allow users to get connected to their SNS account for the social alerts.
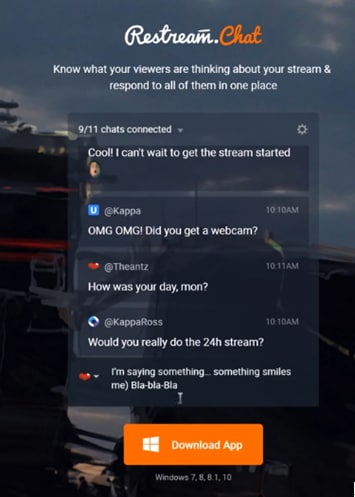
Step 10: Users can also manage their chats using interactive chat tools.
Step 11: Once you are done with all above settings on restream.io then it is time to start with streaming software. Professionals recommend using OBS, Wirecast or xSplit for best results and easy interface.

Step 12: Let us considered OBS for current restream.io services.
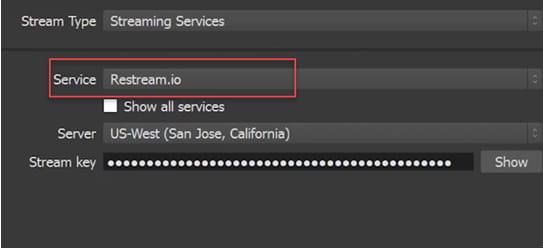
Step 13: Now simply copy your RTMP URL as well as the stream key from restream.io platform and paste it in the specified field on streaming software.
Step 14: As soon as you finished these settings then hit the Stream Button. Soon you will be able to find your videos on selected live stream platforms.
How to Stream to YouTube and Facebook at the same time Without Restream Platform?
Step 1: First of all you need to download Wirecast software tool on your device. Choose anyone from Wirecast Studio and Wirecast Pro as per your budget and needs. Get it installed.
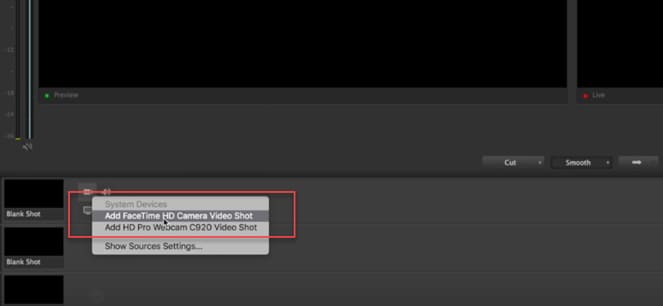
Step 2: Launch wirecast on your system and then add your camera.
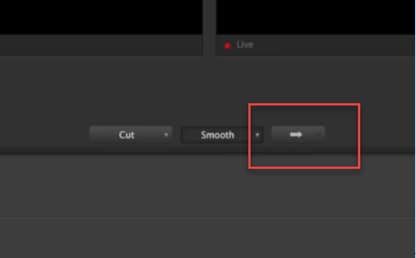
Step 3: Once you have added your camera to this tool then simply hit the Go Live button.
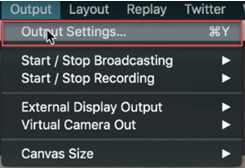
Step 4: Move to Output and adjust settings.
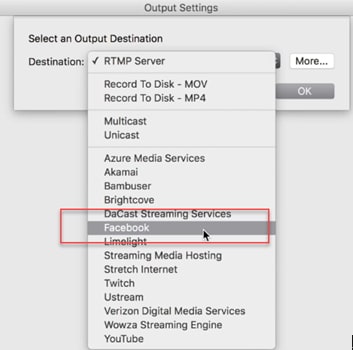
Step 5: From the drop down menu appearing on screen, choose Facebook as your destination.
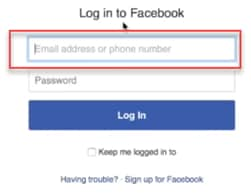
Step 6: It is time to enter name and then click on Authenticate.
Step 7: You need to login to facebook now.

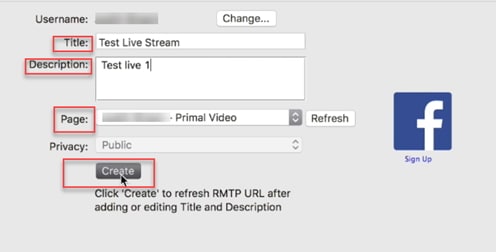
Step 8: Add your live stream title and an eye catching description.
Step 9: Select page for streaming and then hit the Create button.
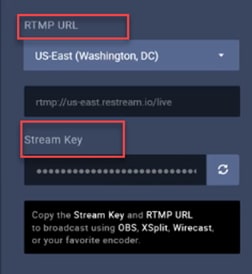
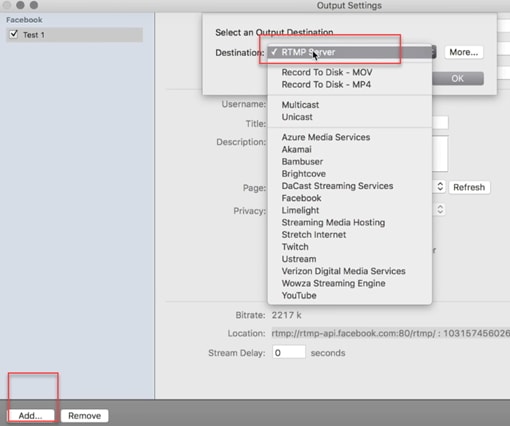
Step 10: As soon as your facebook stream is developed, then go to bottom left corner of your screen and then click add. Create another live stream but instead of choosing YouTube as your preferences, select RTMP.
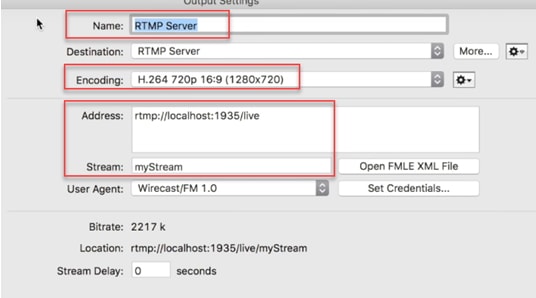
Step 11: Now add name for your YouTube stream and adjust the encoding quality to 720p. After this you need to move to YouTube and get your stream name as well as address from this platform.
Step 12: Move to YouTube creator studio and then select live streaming. Choose live stream now option and then find encoder setup.

Step 13: It is time to copy the server URL and paste it on Wirecast address. Also copy the stream name and paste it on Wirecast platform.
Step 14: Once all these settings are complete then hit OK.
Step 15: Now click Stream button on Wirecast platform.

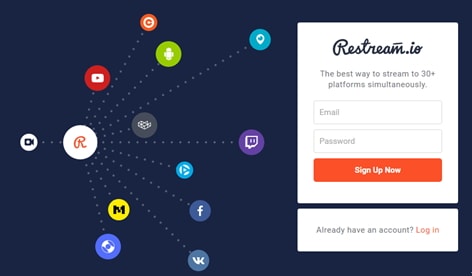
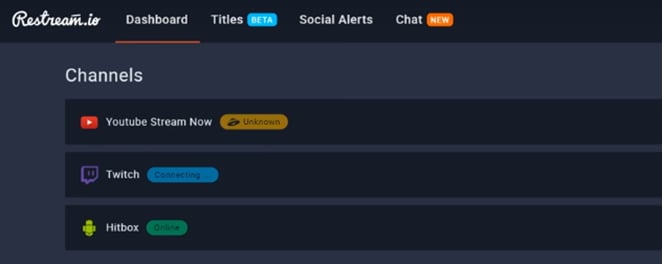
About Restream.io
Restream.io allows streaming over 30 plus platforms with easy processing and intuitive interface. The best thing to know about this platform is that it never creates watermarks or pre-roll ads and there is no specific limit or restriction for stream duration. It not even forces users on specific bitrate limits. In simple words, here users can work with freedom and enjoy streaming with best results.
Restream Chats are highly interactive where users can add interesting imojies to grab more attention. It can be accessed on Window platform with all interactive features.
Richard Bennett
Richard Bennett is a writer and a lover of all things video.
Follow @Richard Bennett
Richard Bennett
Mar 27, 2024• Proven solutions
- Part1.How to Stream to YouTube, Twitch, Hitbox and other Platforms at the same time?
- Part2.How to Stream to YouTube and Facebook at the same time Without Restream Platform?
- Part3.About Restream.io
How to Stream to YouTube, Twitch, Hitbox and other Platforms at the same time?
Step 1: To begin with the process, first of all you need to go to <https://restream.io/ >. Sign up here and login with your account.
Step 2: Now go to the dashboard and simply add your channel.
Step 3: Here you will find so many streaming platforms like YouTube, uStream, Dailymotion, HitBox etc.
Step 4: Select your desired platform out of this wide list and then sign in.
Step 5: The screen will proceed with simple to follow steps; go with specified instructions and sign in to your desired streaming platform.
Step 6: Now you can easily turn On-Off your channels for streaming.
Step 7: It is time to edit your channel.
Step 8: Now put eye catching title for your live stream.
Step 9: This platform also allow users to get connected to their SNS account for the social alerts.
Step 10: Users can also manage their chats using interactive chat tools.
Step 11: Once you are done with all above settings on restream.io then it is time to start with streaming software. Professionals recommend using OBS, Wirecast or xSplit for best results and easy interface.
Step 12: Let us considered OBS for current restream.io services.
Step 13: Now simply copy your RTMP URL as well as the stream key from restream.io platform and paste it in the specified field on streaming software.
Step 14: As soon as you finished these settings then hit the Stream Button. Soon you will be able to find your videos on selected live stream platforms.
How to Stream to YouTube and Facebook at the same time Without Restream Platform?
Step 1: First of all you need to download Wirecast software tool on your device. Choose anyone from Wirecast Studio and Wirecast Pro as per your budget and needs. Get it installed.
Step 2: Launch wirecast on your system and then add your camera.
Step 3: Once you have added your camera to this tool then simply hit the Go Live button.
Step 4: Move to Output and adjust settings.
Step 5: From the drop down menu appearing on screen, choose Facebook as your destination.
Step 6: It is time to enter name and then click on Authenticate.
Step 7: You need to login to facebook now.
Step 8: Add your live stream title and an eye catching description.
Step 9: Select page for streaming and then hit the Create button.
Step 10: As soon as your facebook stream is developed, then go to bottom left corner of your screen and then click add. Create another live stream but instead of choosing YouTube as your preferences, select RTMP.
Step 11: Now add name for your YouTube stream and adjust the encoding quality to 720p. After this you need to move to YouTube and get your stream name as well as address from this platform.
Step 12: Move to YouTube creator studio and then select live streaming. Choose live stream now option and then find encoder setup.
Step 13: It is time to copy the server URL and paste it on Wirecast address. Also copy the stream name and paste it on Wirecast platform.
Step 14: Once all these settings are complete then hit OK.
Step 15: Now click Stream button on Wirecast platform.
About Restream.io
Restream.io allows streaming over 30 plus platforms with easy processing and intuitive interface. The best thing to know about this platform is that it never creates watermarks or pre-roll ads and there is no specific limit or restriction for stream duration. It not even forces users on specific bitrate limits. In simple words, here users can work with freedom and enjoy streaming with best results.
Restream Chats are highly interactive where users can add interesting imojies to grab more attention. It can be accessed on Window platform with all interactive features.
Richard Bennett
Richard Bennett is a writer and a lover of all things video.
Follow @Richard Bennett
Also read:
- 2024 Approved Capturing Youtube Icons Browser Extension, Command Line & Software Trio
- Top 7 DSLR Cameras Enhancing Real-Time Online Interactions
- Customize and Upload Longer YouTube Content
- Step-by-Step Guide to Cutting-Edge Unboxing
- [New] Download YouTube Snippets with Perfection
- [Updated] Can Subtle Strategies Trump Directly Buying Views for Content Creators?
- Unraveling YouTube's Vision for a Thriving Ecosystem of Short-Form Video
- Ensuring Copyright Compliance in Youtube-to-MP4 for 2024
- From Individualist to Institutional Influence in the YouTube Universe
- Conceal, Don't Reveal How to Blur Faces Online for 2024
- GraphicGenius Suite
- [New] Download All YouTube Images for Free
- Catch a Wider Net via Concurrent Streams to Youtube + Twitch
- Cohesive Title Blueprint for Social & Mobile Platforms
- Mastering YouTube Video Edits with iMovie A Step-by-Step Guide
- YouTube in the Classroom Best Practices and Tips for Educators
- Simplified Methods to Validate Your YouTube Status
- Unlocking a World of Talent with the Top 10 Low-Cost YouTube Creators
- Analyzing Youtube AdRevenue Average Payments by Thousands of Views
- [New] Engage, Entertain and Captivate – Adopting Two-Point of View in Your Next YouTube Reaction Video (2 POV Method)
- In 2024, Backwards Viewing A New Lens for Analyzing YouTube Content
- Strategies for Elevating Your Content with Featured Channels on YouTube
- [New] Charting a Course for Wealth Ajey's YouTube Income Blueprint
- Top 10 Hashtags to Boost Your Youtube Views Beyond Six Figures
- Maker Milestones Subscriber & Interactive Feature Prizes
- The Complete WM Maker Playbook for YouTube Clips Perfection
- Quick Start to YouTube Success Creating Business & Personal Channels on Phone
- 2024 Approved Disseminating Data-Driven Insights You Vs. Others on Video Markets
- In 2024, Enhancing Your YouTube Projects A Compreayer of Visual Improvement
- 2024 Approved Ensuring Thumbnails Show Shorts Video Troubleshooting
- In 2024, Digital Domain Your Playground for 1,000 Titles
- Perfect Sound Placement Adding Music Seamlessly to YouTube Videos
- [New] Digital Dollars in Motion A Side-by-Side of Vids Vs. Videos
- Elevate Your Content With These 20 Pro Video Shortcuts
- Seamlessly Transition Media Formats with Free Downloader
- 5 Leading Apps to Create Professional YouTube Intros for 2024
- Affordable Cameras for Effective Vloggers for 2024
- Crafting Quick-Cut Channel Sequences for 2024
- The Ultimate Battle for Ephemeral Content YouTube Shorts Versus TikTok
- [Updated] Behind the Scenes of Carminati’s YouTube Earnings
- [Updated] Access Exclusive Stock Images Through Vital 4 YouTube Sources
- [Updated] Dive Into the World of Youtuber Shorts
- Best 10 Free YouTube Subtitle Extractors & Downloaders
- In 2024, Blueprint Making Inspiring Lifestyle Broadcasts
- [New] Enhancing User Interaction with Well-Sized Thumbnails
- Boost YouTube Videos' Appeal - 3 Ways to Incorporate Neon Borders
- Interactive Prototyping of Online Stores
- 5 Ways to Reset Xiaomi Redmi 13C 5G Without Volume Buttons | Dr.fone
- [Updated] In 2024, Unique Expression Modifying Voices on Instagram Media Features
- [Updated] In 2024, Recording Tech Evaluation Blueprint
- How To Unlock Any Nubia Phone Password Using Emergency Call
- Premium Mac Programming Solutions Excluded From Bandicam
- [Updated] A Visual Extravaganza Detailed Examination of LG UD88-UHD TV
- [New] Efficient Tools Seamless Extraction of Vimeo Media
- 4 Solutions to Fix Unfortunately Your App Has Stopped Error on Infinix Smart 8 HD | Dr.fone
- [Updated] In 2024, The Ultimate List of Powerful Instagram Hashtags
- Ultimate Guide on Xiaomi Redmi K70 Pro FRP Bypass
- In 2024, Accurate Screen Shots at Lightning Speed
- Resolve Google Chrome Video Troubles (FB)
- Virtual Venues Clash OBS/Twitch Live for 2024
- How to use Snapchat Location Spoofer to Protect Your Privacy On Nubia Red Magic 9 Pro+? | Dr.fone
- Updated In 2024, How To Generate Speech From Text | The Top Text-to-Speech Converters
- [New] In 2024, Mini Marvels' Ultimate Game Hunt
- [New] 2024 Approved The Instagram Elite Discover the Leading 25 Influential Souls
- New Bring Photos to Life 8 Essential Animation Software for 2024
- In 2024, Mastering Lock Screen Settings How to Enable and Disable on Xiaomi Redmi 13C 5G
- [New] Comprehensive Manual Mastering Mobizen Recorders for 2024
- [Updated] In 2024, The Key to Authenticity on Discord A Verification Roadmap
- Overcoming Facebook Message App Video Send Errors for 2024
- The Comprehensive Analysis of the Cambridge Auditory Experience CXU Device for 2024
- Unearth These Quirky, Overlooked Facebook Pages
- [Updated] 2024 Approved ProScreenCapture Ultimate Edition
- [Updated] Pinpoint Success with These 10 Key TikTok Analysis Tools for 2024
- Streamlining Your Video Calls How to Utilize Zoom on Win10 PCs
- In 2024, Unlock Your Creative Potential Best Free Software to Produce Music on PC & Mac, 2023 Edition
- 2024 Approved How to Create Sports Intro and YouTube Endscreen?
- A Working Guide For Pachirisu Pokemon Go Map On Poco M6 Pro 5G | Dr.fone
- Updated In 2024, Say Goodbye to Windows Movie Maker 10 Free Alternatives Youll Love
- [Updated] In 2024, Roku Meets Social Media Watching Facebook Live Effortlessly
- Complete Fixes To Solve iPhone 15 Pro Max Randomly Asking for Apple ID Password
- [New] In 2024, Secrets Unveiled Attending Friends’ TikTok Lives
- Dose Life360 Notify Me When Someone Checks My Location On OnePlus Nord CE 3 5G? | Dr.fone
- Title: "Time Travel for Video Views YouTube Upside-Down Guide"
- Author: Kevin
- Created at : 2024-05-25 16:27:19
- Updated at : 2024-05-26 16:27:19
- Link: https://youtube-videos.techidaily.com/time-travel-for-video-views-youtube-upside-down-guide/
- License: This work is licensed under CC BY-NC-SA 4.0.
