
:max_bytes(150000):strip_icc()/003_how-to-turn-on-airplay-on-a-mac-5188718-69fe4c2832ec436b87d513c4ff042e27.jpg)
"The Visionary Viewers' Verdict Your Channel Vs. Contenders’ Content"
The Visionary Viewers’ Verdict: Your Channel Vs. Contenders’ Content
YouTube Analytics – How to analyze your and Competitor’s YouTube Video

Richard Bennett
Mar 27, 2024• Proven solutions
Tracking your brand’s YouTube metrics is not enough to ensure success in YouTube. Unless you garner deep insights of your competitors. You must be thinking how can you gauge their company insights using YouTube and track the data movement as well. There is nothing to worry about, we have got you covered. We will show you how to analyze your own channel as well as that of your competitors’ YouTube analytics. Let’s now explore about it!
How to analyze your own YouTube channel/video?
It is important to have reliable YouTube analytics tools for your brand, as videos on YouTube are searchable through Google. They contribute to generate organic traffic for you using both Google and YouTube as a medium. YouTube has a default dedicated analytics mechanism to measure how the video fares in YouTube to gain the most out of it.
Here we have collated the broadly used YouTube insights to ensure that your highly equipped, SEO compatible video engages more audience and performs well. The matrix sums up the most essential parts of YouTube analytics. Let’s go through them.
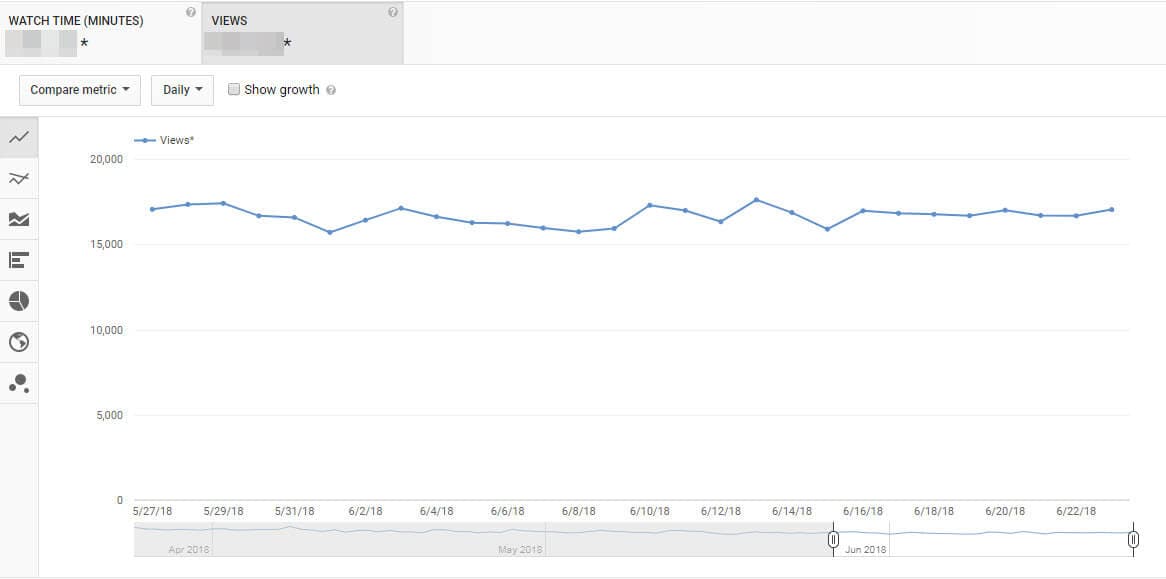
1. Views
Though, views determine the number of people clicked on a certain video on YouTube, it’s impossible to figure out whether the video has been watched till the end or not. Moreover, they can be altered through clickbait tricks and hence YouTube doesn’t solely put much value on them.
Views along with watch time turn out to be the best bet. Watch time sums up the total amount of time spent (in terms of minutes) on your brand’ videos. With the updated dashboard it becomes easy to get the YouTube analytics and gauge the video’s performance. Using the average view duration, you can know whether your video is being watched till the end or not.
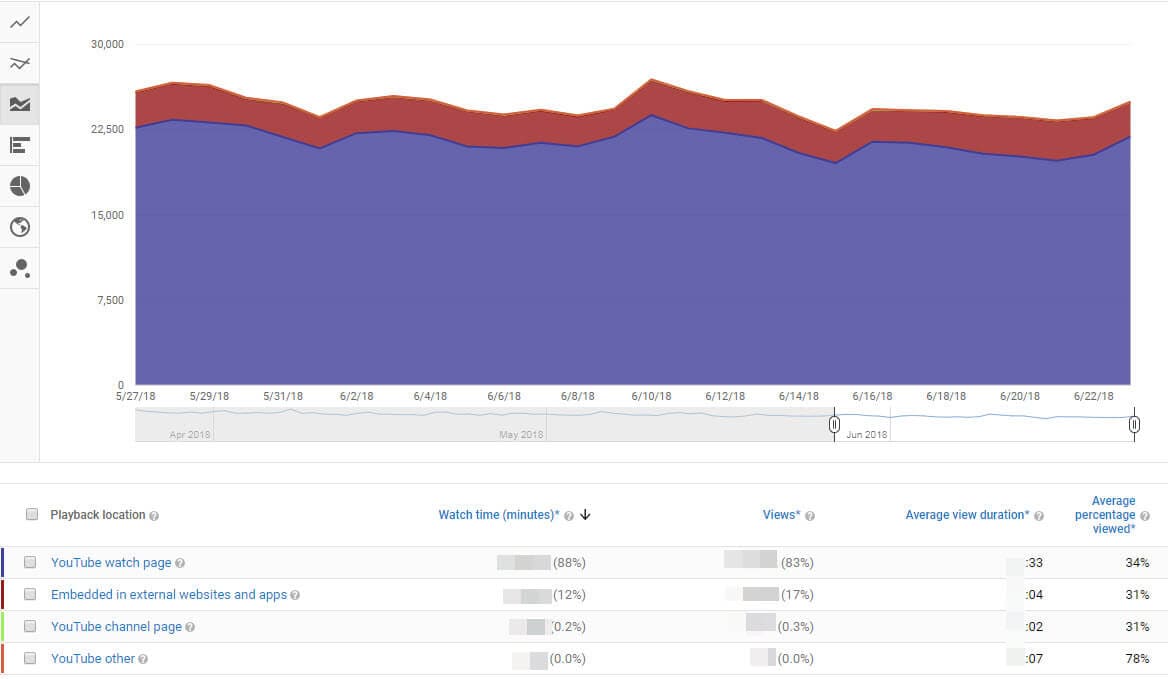
2. Playback Location
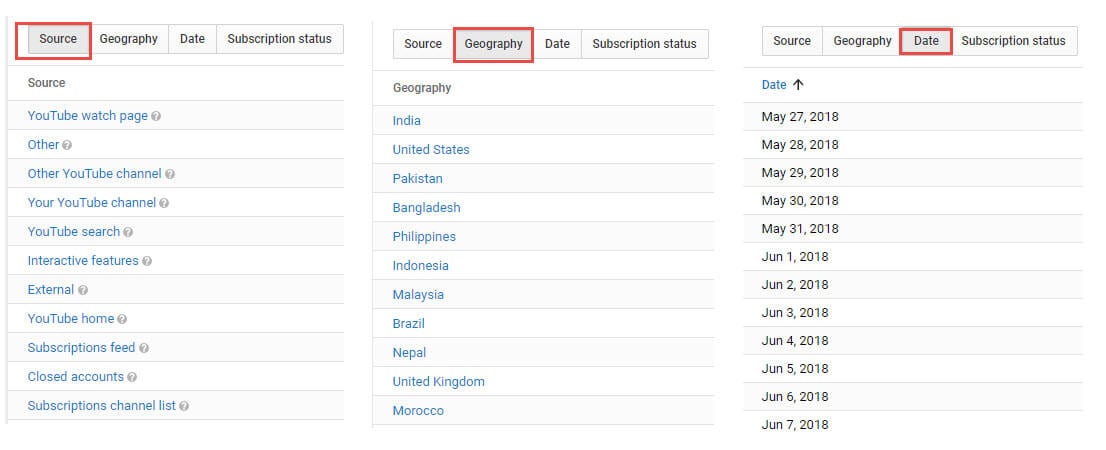
As ‘Playback locations’ of YouTube videos can reveal where does all the traffic come from, it would help your channel figure out for which location the video has fared well. It will guide you to reach the backlinks locations/sites. Knowing the popular locations for your YouTube video being played, you can know whether YouTube is the search engine or they have been diverted from somewhere else. Depending on the video playing locations, the views will be segregated in to embedded video, YouTube watch page, mobile devices, and YouTube channel page. Understanding location specific views would help you decide where should you focus to enhance the performance of your video.
3. Demographics
The demographics page helps you get YouTube insights, using them you can know the audience in a gender and location specific manner. For local businesses targeting a certain region, YouTube analytics would prove to be a boon. You can also know the geography and device used by the viewers with this feature. Understanding the gender and location of people will help you create dedicated product videos that would be helpful to them.

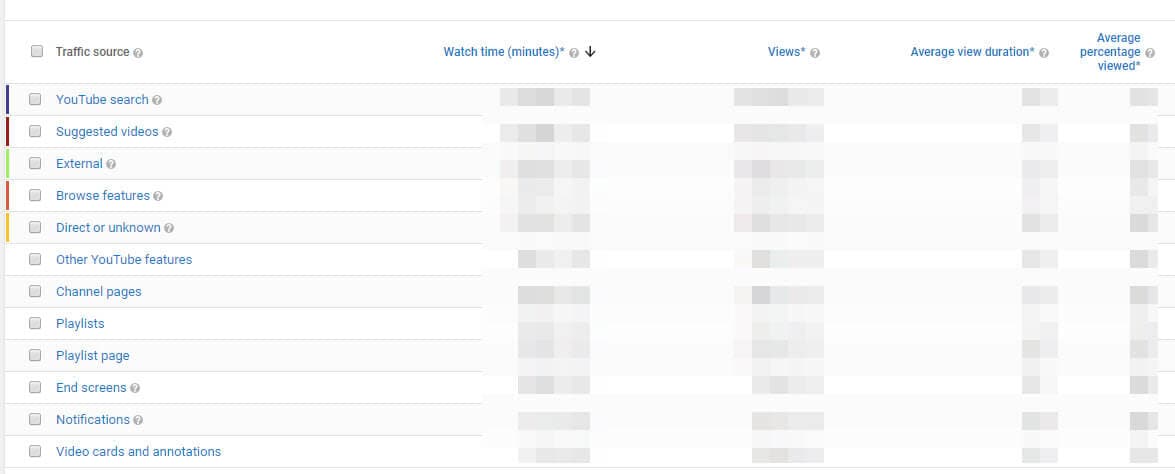
4. Traffic sources
Understanding the source of your YouTube video’s traffic would help you track the prominent keywords that viewers use for landing at your YouTube video. You can figure out their choice and their search patterns this way. The YouTube insights will show you whether the viewers found your video by searching YouTube, a channel on YouTube, through suggested videos, or an external link. The YouTube Analytics tool’s panel would assist you in finalizing the most beneficial traffic source for your brand. You can optimize your video and keyword strategy with this.
5. Audience Retention
This data explains how far your video has engaged your audience. Along with views, the duration that a viewer is on your video weighs too. From the audience retention page, you can find out the specific time that a viewer has exited your video and see what made them do so. There are 2 types of audience retention features – absolute audience retention and relative audience retention.
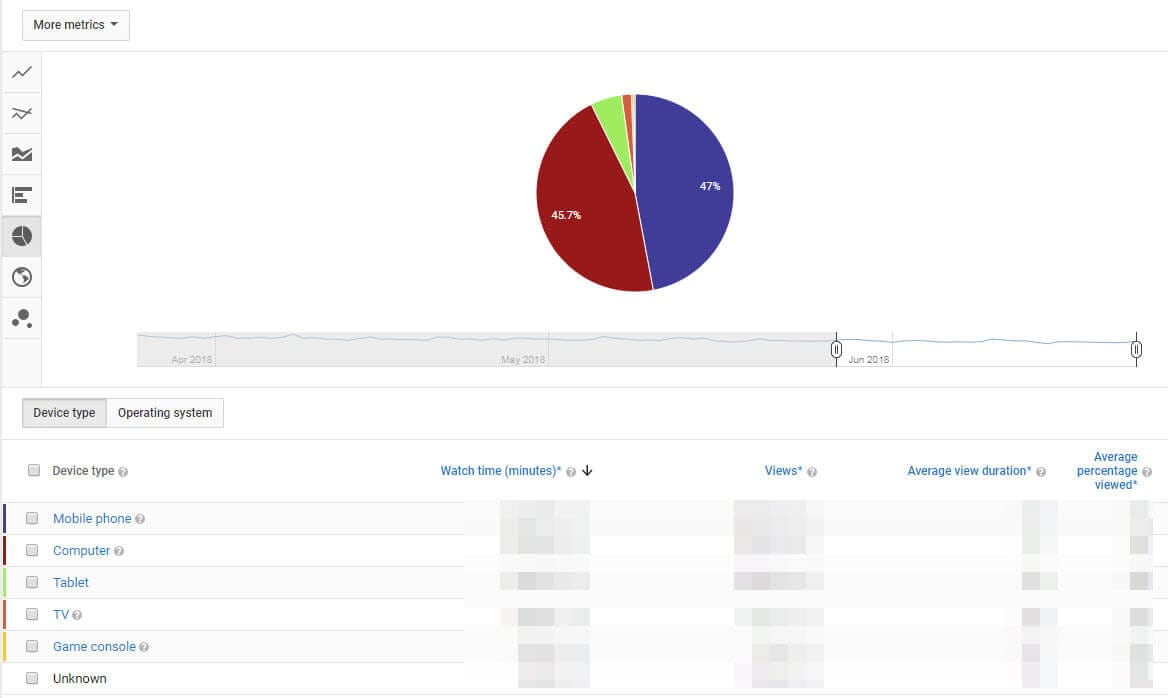
6. Devices
It is important to know which device is being used to watch the video. The metrics is distributed among mobile phones, computer, TV, tablet etc. you will be able to understand whether your video needs to be optimized for a certain video or not.
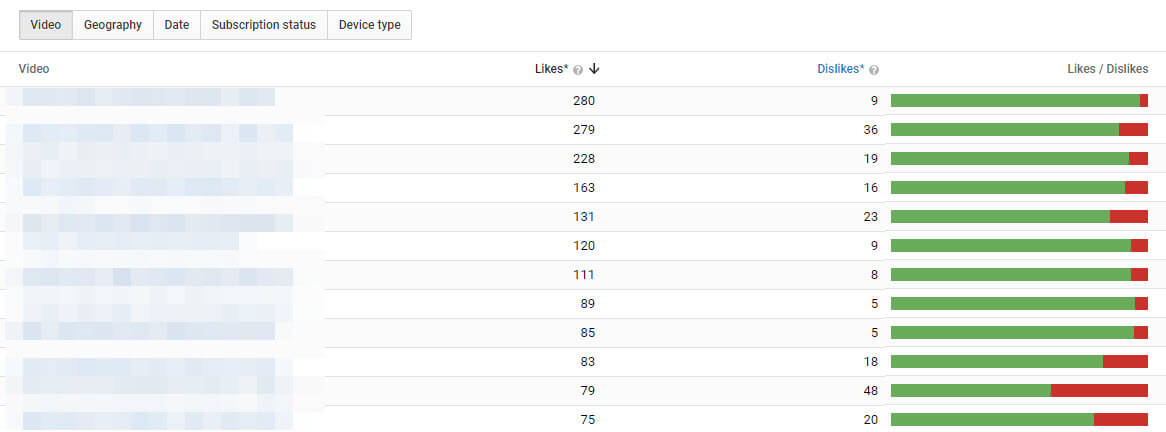
7. Likes and dislikes
YouTube insights gauge the audience acceptance for your video by the number of likes and dislikes. Videos with a huge number of like implies that it is loved by people, though, the quality of video can’t exactly be defined by the number of likes or dislikes. Even the best quality video created for asking opinions about a certain situation/issue might be good enough but still get dislikes.
8. Subscribers
YouTube analytics help you determine the engagement metrics to explain the origin of your subscribers. It includes both their geo-location, the date of subscription, and the source/medium they used to land with your video on YouTube. You can observe the number of people subscribing and unsubscribing from your YouTube channel.
The subscription stream enables your audience to get suggestions for new videos from your channel and offer better exposure to the service and products you offer.
You May Also Like : How to Get More Subscribers
9. Annotations
While considering YouTube Analytics, it is essential to understand that there are annotations to guide viewers to your business site for more content. It is not necessary that the content is video only, it might include a blog post as well. This will let you understand the click through rate and ‘close’ rates for every annotation. This in turn will assist you in optimizing how to reach your audience and where to place the annotations.

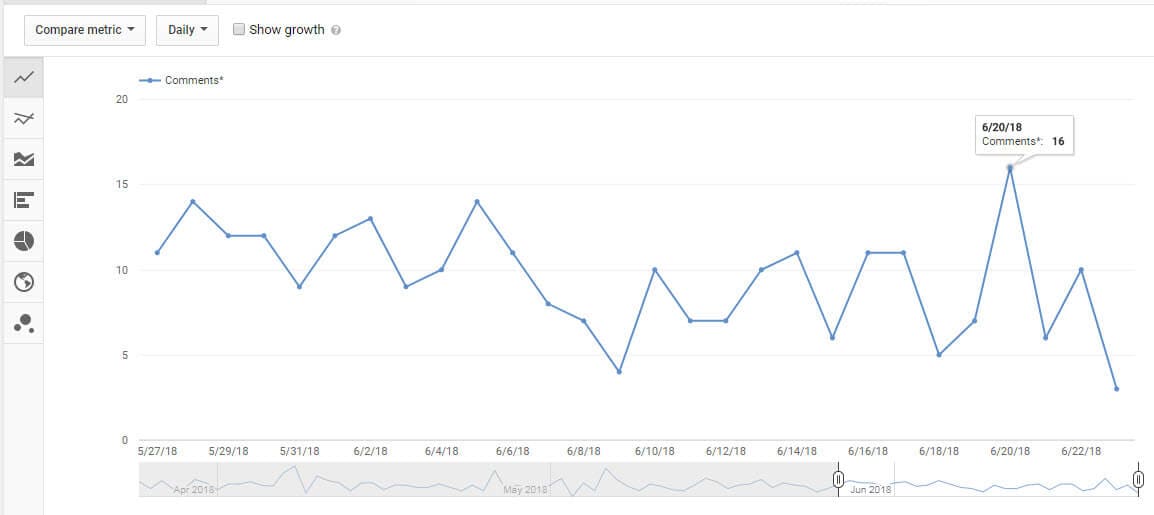
10. Comments
Audience engagement on any YouTube video can easily be gauged by using the vital aspect known as comments. Either it touched a chord in their heart, inspired or motivated them, or simply made them smile, the comments will say it all. Sometimes the audience simply taps ‘Like’ in place of commenting at their convenient.
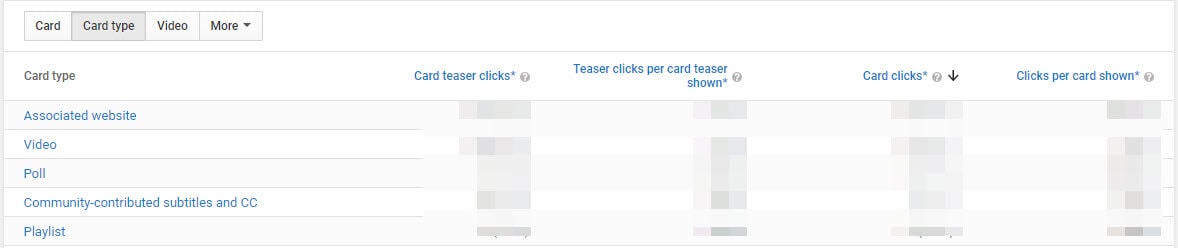
11. Cards
Cards is a new feature in YouTube analytics and aimed at replacing annotations. This will improve user interactivity of any video and accelerate the engagement. They will act as call to action for informing visitors regarding playlists, videos, merchandising, fan funding, and associated website etc.
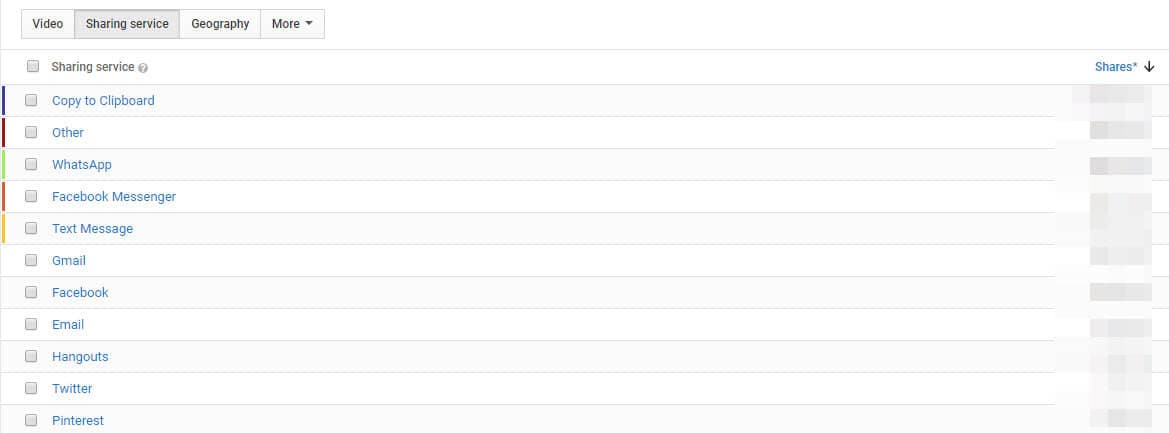
12. Sharing
This aspect sums up the amount of shares of the YouTube video across different social networks along with the share date. Google ranking is influenced with the share numbers, as higher the number more the chances of unique backlinks for your videos.
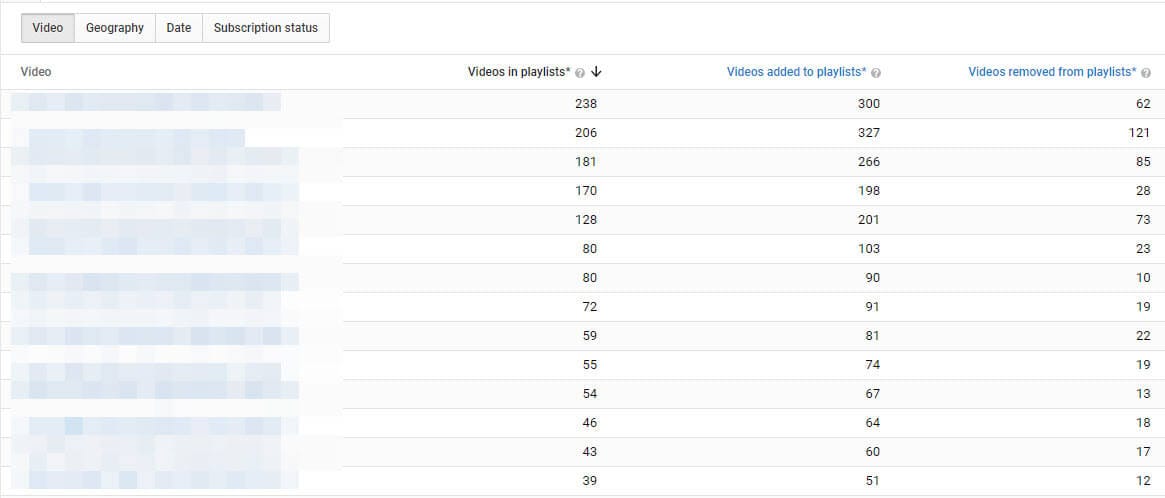
13. Videos in playlists
Favorites has been renamed to ‘Videos in playlists’. Your reach broadens as people keep marking your videos as favorites on their playlist. This is visible to the public on the YouTube channel itself.
How to analyze your competitors
Although, you can’t see the dashboard data of your competitor, there are still some ways to observe and study your competitors’ successful videos and from their views, favorites, ratings, and comments find out the driving force behind it.
For example, reading the comments and see what they are saying. Notice both the positive and negative ones so that you can incorporate the ideas in your videos. You can also make a better video by understanding what a specific demographic region is fond of watching in the said niche.
Or you can use those analyzing tools below to discover the more stats of your competitors.
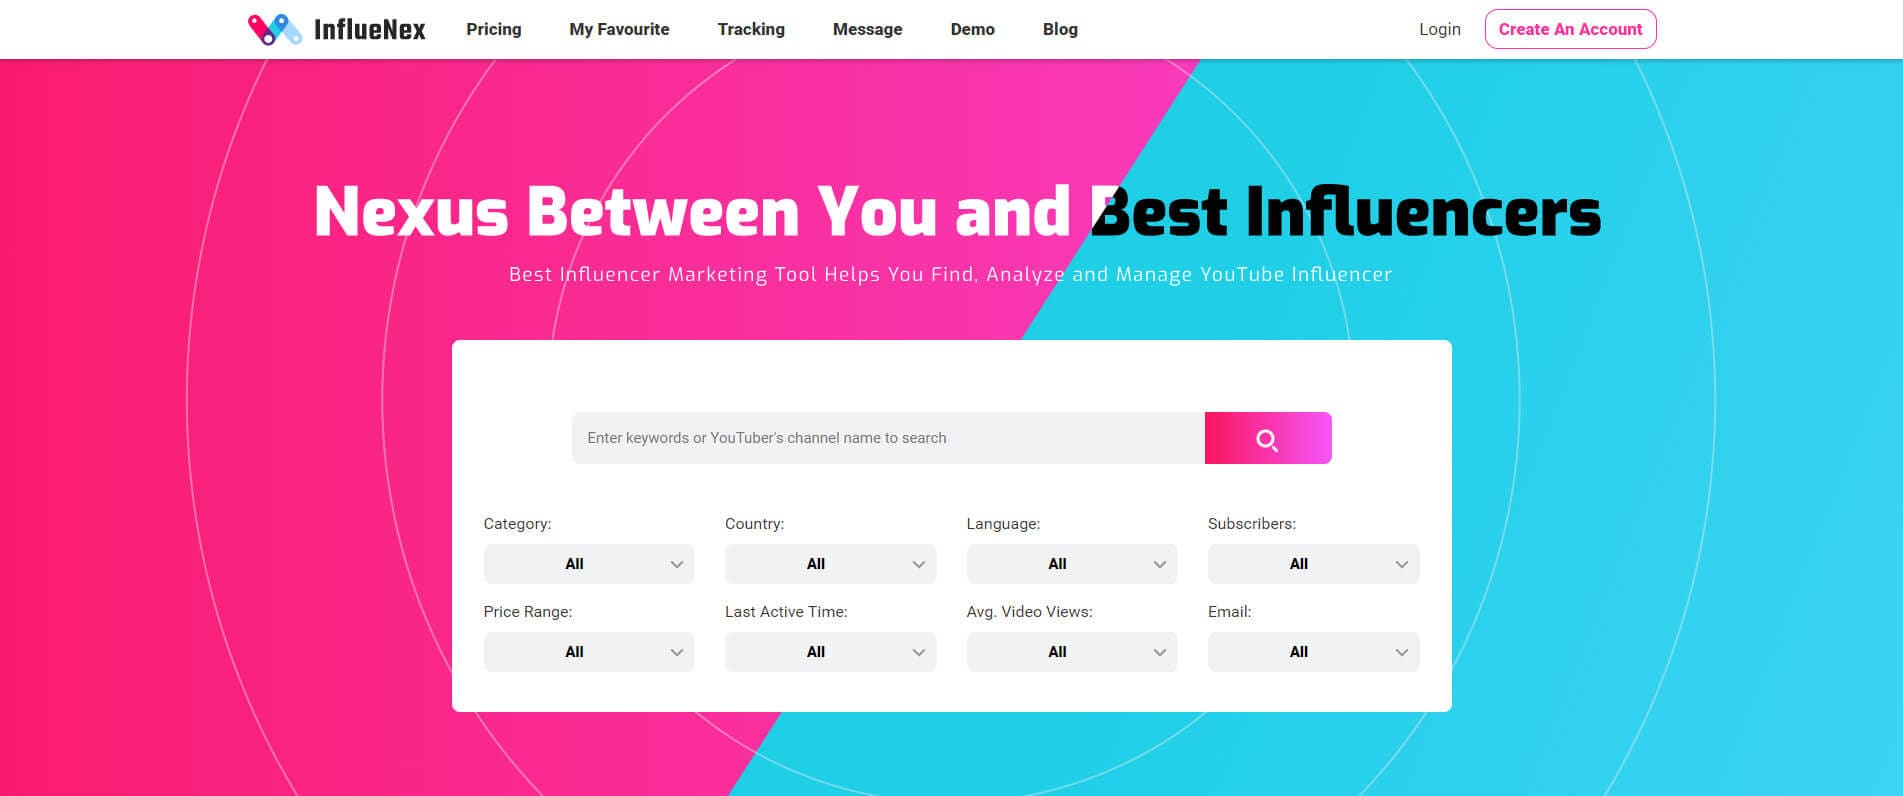
1. InflueNex
InflueNex is a helpful influencer marketing tool for Analyzing, searching, and managing YouTubers. With the help of this YouTube analytics tool, you’re able to learn your competitors’ channels and videos with detailed information.
2. Rival IQ
This YouTube analytics tool helps you increase social media engagement, conduct competitive analysis to track competition, discovers new content ideas for your target audience. You can use it to leverage your foothold in YouTube.
3. SocialBlade
SocialBlade helps you gain YouTube insights and enables you to understand how your rival brands fare. You can learn from them and enhance your own strategy to beat them.
Read More to Get: 5 Methods to Go Frame by Frame on YouTube Video >>
Richard Bennett
Richard Bennett is a writer and a lover of all things video.
Follow @Richard Bennett
Richard Bennett
Mar 27, 2024• Proven solutions
Tracking your brand’s YouTube metrics is not enough to ensure success in YouTube. Unless you garner deep insights of your competitors. You must be thinking how can you gauge their company insights using YouTube and track the data movement as well. There is nothing to worry about, we have got you covered. We will show you how to analyze your own channel as well as that of your competitors’ YouTube analytics. Let’s now explore about it!
How to analyze your own YouTube channel/video?
It is important to have reliable YouTube analytics tools for your brand, as videos on YouTube are searchable through Google. They contribute to generate organic traffic for you using both Google and YouTube as a medium. YouTube has a default dedicated analytics mechanism to measure how the video fares in YouTube to gain the most out of it.
Here we have collated the broadly used YouTube insights to ensure that your highly equipped, SEO compatible video engages more audience and performs well. The matrix sums up the most essential parts of YouTube analytics. Let’s go through them.
1. Views
Though, views determine the number of people clicked on a certain video on YouTube, it’s impossible to figure out whether the video has been watched till the end or not. Moreover, they can be altered through clickbait tricks and hence YouTube doesn’t solely put much value on them.
Views along with watch time turn out to be the best bet. Watch time sums up the total amount of time spent (in terms of minutes) on your brand’ videos. With the updated dashboard it becomes easy to get the YouTube analytics and gauge the video’s performance. Using the average view duration, you can know whether your video is being watched till the end or not.
2. Playback Location
As ‘Playback locations’ of YouTube videos can reveal where does all the traffic come from, it would help your channel figure out for which location the video has fared well. It will guide you to reach the backlinks locations/sites. Knowing the popular locations for your YouTube video being played, you can know whether YouTube is the search engine or they have been diverted from somewhere else. Depending on the video playing locations, the views will be segregated in to embedded video, YouTube watch page, mobile devices, and YouTube channel page. Understanding location specific views would help you decide where should you focus to enhance the performance of your video.
3. Demographics
The demographics page helps you get YouTube insights, using them you can know the audience in a gender and location specific manner. For local businesses targeting a certain region, YouTube analytics would prove to be a boon. You can also know the geography and device used by the viewers with this feature. Understanding the gender and location of people will help you create dedicated product videos that would be helpful to them.
4. Traffic sources
Understanding the source of your YouTube video’s traffic would help you track the prominent keywords that viewers use for landing at your YouTube video. You can figure out their choice and their search patterns this way. The YouTube insights will show you whether the viewers found your video by searching YouTube, a channel on YouTube, through suggested videos, or an external link. The YouTube Analytics tool’s panel would assist you in finalizing the most beneficial traffic source for your brand. You can optimize your video and keyword strategy with this.
5. Audience Retention
This data explains how far your video has engaged your audience. Along with views, the duration that a viewer is on your video weighs too. From the audience retention page, you can find out the specific time that a viewer has exited your video and see what made them do so. There are 2 types of audience retention features – absolute audience retention and relative audience retention.
6. Devices
It is important to know which device is being used to watch the video. The metrics is distributed among mobile phones, computer, TV, tablet etc. you will be able to understand whether your video needs to be optimized for a certain video or not.
7. Likes and dislikes
YouTube insights gauge the audience acceptance for your video by the number of likes and dislikes. Videos with a huge number of like implies that it is loved by people, though, the quality of video can’t exactly be defined by the number of likes or dislikes. Even the best quality video created for asking opinions about a certain situation/issue might be good enough but still get dislikes.
8. Subscribers
YouTube analytics help you determine the engagement metrics to explain the origin of your subscribers. It includes both their geo-location, the date of subscription, and the source/medium they used to land with your video on YouTube. You can observe the number of people subscribing and unsubscribing from your YouTube channel.
The subscription stream enables your audience to get suggestions for new videos from your channel and offer better exposure to the service and products you offer.
You May Also Like : How to Get More Subscribers
9. Annotations
While considering YouTube Analytics, it is essential to understand that there are annotations to guide viewers to your business site for more content. It is not necessary that the content is video only, it might include a blog post as well. This will let you understand the click through rate and ‘close’ rates for every annotation. This in turn will assist you in optimizing how to reach your audience and where to place the annotations.
10. Comments
Audience engagement on any YouTube video can easily be gauged by using the vital aspect known as comments. Either it touched a chord in their heart, inspired or motivated them, or simply made them smile, the comments will say it all. Sometimes the audience simply taps ‘Like’ in place of commenting at their convenient.
11. Cards
Cards is a new feature in YouTube analytics and aimed at replacing annotations. This will improve user interactivity of any video and accelerate the engagement. They will act as call to action for informing visitors regarding playlists, videos, merchandising, fan funding, and associated website etc.
12. Sharing
This aspect sums up the amount of shares of the YouTube video across different social networks along with the share date. Google ranking is influenced with the share numbers, as higher the number more the chances of unique backlinks for your videos.
13. Videos in playlists
Favorites has been renamed to ‘Videos in playlists’. Your reach broadens as people keep marking your videos as favorites on their playlist. This is visible to the public on the YouTube channel itself.
How to analyze your competitors
Although, you can’t see the dashboard data of your competitor, there are still some ways to observe and study your competitors’ successful videos and from their views, favorites, ratings, and comments find out the driving force behind it.
For example, reading the comments and see what they are saying. Notice both the positive and negative ones so that you can incorporate the ideas in your videos. You can also make a better video by understanding what a specific demographic region is fond of watching in the said niche.
Or you can use those analyzing tools below to discover the more stats of your competitors.
1. InflueNex
InflueNex is a helpful influencer marketing tool for Analyzing, searching, and managing YouTubers. With the help of this YouTube analytics tool, you’re able to learn your competitors’ channels and videos with detailed information.
2. Rival IQ
This YouTube analytics tool helps you increase social media engagement, conduct competitive analysis to track competition, discovers new content ideas for your target audience. You can use it to leverage your foothold in YouTube.
3. SocialBlade
SocialBlade helps you gain YouTube insights and enables you to understand how your rival brands fare. You can learn from them and enhance your own strategy to beat them.
Read More to Get: 5 Methods to Go Frame by Frame on YouTube Video >>
Richard Bennett
Richard Bennett is a writer and a lover of all things video.
Follow @Richard Bennett
Time Travel for Video Views: YouTube Upside-Down Guide
Best YouTube Video Reverser Online
Richard Bennett
Mar 27, 2024• Proven solutions
While working on the movies in a professional post-production environment, there might be instances where you want to reverse YouTube video to show flashback effect, or to replay a sequence so the audience can experience more thrills while watching.
With that said, not every media player or video editing application is capable enough to reverse a movie clip, not at least with merely a few mouse clicks. Therefore, the following sections suggest some such programs that can help you play YouTube video backward.
Part 1: Best Free YouTube Video Reversers Online
There are a few online web programs that are capable of reversing YouTube videos with efficiency. However, some of them may have certain restrictions like file size limit, number of supported formats, fewer or absolutely no editing options, etc.
Nevertheless, the best five online solutions to reverse YouTube video along with the process of using them are discussed below:
1. Clideo
Clideo is not merely a video reverser, but can also convert media files to your preferred format. You can paste the URL of a YouTube video to upload or import the videos from your computer, Dropbox or Google Drive storage. At the time of this writing, Clideo allows only up to 500MB videos to be uploaded to reverse or convert. As for the acceptability, the portal supports almost all the commonly used formats.

To play YouTube video backward with Clideo:
- Visit Clideo’s online reverse tool page: https://clideo.com/reverse-video ;
- Hover mouse over the down arrow icon next to the Choose file button and paste the URL of the YouTube video that you want to reverse;
- After Clideo fetches the video and opens the next page, choose your preferred speed from the right section
- Leave the Mute video box checked, or uncheck it if required and then click Reverse button to reverse YouTube video. The maximum reverse speed that you can apply is 2X.
2. Kapwing
This web solution also supports almost all types of video formats including 3GPP, AVI, MP4, etc. When talking about the limitations of a free user, you can only upload the videos that are up to 7 minutes long. At the time of this writing, Kapwing can accept the source files from your computer, and from the YouTube URL.

To reverse YouTube video with Kapwing:
- Go to Kapwing’s online video reverser page: https://www.kapwing.com/tools/reverse-video ;
- Paste the URL of the YouTube video in the Paste a URL field;
- Select your preferred playback speed of the reversed video from the Reverse speed section in the left pane;
- Choose whether or not Kapwing should mute the output video;
- Optionally, click Trim video from the upper-left corner of the right window to edit the footage if needed;
- Click CREATE from the bottom-left corner to play YouTube video backward. The maximum reverse speed that you can apply on Kapwing is also 2X.
3. EZGIF
With the ability to support almost all major video formats, and the capability to accept the media files of up to 100MB, Ezgif allows you to upload the footages from your PC, or paste their URL if they are published on YouTube. Even though the landing page has a few distracting adverts, the overall process to play YouTube video backward and save it to your PC is simple.

To reverse YouTube video with Ezgif:
- Go to the reverser tool page: https://ezgif.com/reverse-video and then paste the URL of the YouTube video in the available field;
- Click Upload video and optionally click the speed icon from the toolbar at the top;
- Use the checkboxes and input fields to mute the audio and adjust the playback speed as needed;
- Choose your preferred encoding method from the Output format and encoding drop-down list and then click Reverse video to reverse the video.
Note: It seems that you can’t customize the reverse speed on EZGif but you can choose to mute the reversed audio or not.
4. VideoReverser
Although this web solution has an extremely simple interface, the files that you can upload must not exceed 10MB in size. The portal supports formats like MPG, MPEG, MP4, AVI, M4V, 3GP, etc. for reversing. In addition to uploading the clips from your PC, VideoReverser also allows you to paste the URL of the footages if they are published on YouTube.

To play YouTube video backward with VideoReverser:
- Launch your favorite Internet browser, and then visit https://www.videoreverser.com/ ;
- Paste the URL of the YouTube video in the available text field;
- Choose your preferred output format from the Select output format drop-down list;
- Use the Remove audio track checkbox to get rid of the acoustics or leave the sound enabled;
- Click Start to reverse YouTube video.
5. Pixiko
With almost all formats’ support, Pixiko is yet another web-based media editor that can also reverse YouTube video with a few mouse clicks. At the time of this writing, Pixiko only accepts the source files from your PC, which means you can’t paste the YouTube link to it directly. At first, you need to download or save the YouTube video on computer and then either drag those clips from your local hard drive to the portal.

To play YouTube video backward with Pixiko:
- On the page https://pixiko.com/editor/video-reverse , click anywhere inside the Blue rectangle;
- Locate, select, and upload the downloaded YouTube source video from your PC;
- Click Reverse from the lower-right section of the video player window;
- Follow the on-screen instructions from there to manage and reverse YouTube video as needed;
Bonus: Reversing YouTube Video with Wondershare Filmora
With easily reachable editing options and self-explanatory buttons, Wondershare Filmora has gained a decent amount of popularity in the recent years. The program is available for both Windows and Mac platforms, and gives tough competition to other leading tools of the industry such as Adobe Premiere Pro, Final Cut Pro X, etc.
 Download Mac Version ](https://tools.techidaily.com/wondershare/filmora/download/ )
When talking about the playback speed, with the help of available presets, it can be increased or decreased by 100x or 0.01x respectively. One of the presets also enables you to reverse the direction of the playback quite easily, i.e. while keeping the speed intact. In addition, the ‘Custom Speed’ option lets you control the preferences more granularly.
You can follow the simple instructions given below to reverse YouTube video with Wondershare Filmora:
Note: To remain compliant with the terms and conditions, and to respect the copyright policies, Wondershare Filmora doesn’t allow you to download other people’s videos from YouTube. However, once you have a footage on your PC, you can jump to the following step-by-step process to reverse its playback.
1. Import the Source Video to the Timeline
Launch Wondershare Filmora on your Windows or Mac computer (Windows 10 here), making sure that the Media button in the standard toolbar at the top is selected, click inside the Media window, and select and import the YouTube source video to the program. Next, drag the YouTube video clip to the Timeline, and when the confirmation box appears, click the Match to Media or Keep Project Settings button as needed to get the footage to the Timeline.

2. Reverse the Video (Using the Preset)
Click and select the media clip in the Timeline, click the Speed icon present above the Timeline itself, and click the Reverse option from the menu that appears to reverse the video playback.
![]()
3. Reverse the Video (Manual Control)

Select the media clip in the Timeline and click the Speed icon as explained in the previous step. From the menu that appears, click Custom Speed this time. When the Custom Speed box appears, use the Speed slider to adjust the playback speed of the media clip, and check the Reverse box to reverse YouTube video. Optionally, you can also modify the Duration and Ripple options to customize the preferences. Finally, click OK to save the changes.
4. Export the Video or Upload to YouTube Directly
Back on the main window, click EXPORT from the top. Filmora provides several ways to saving and sharing the video.

You can select the Local tab, choose your preferred output format from the list in the left, in the right window, define a name and location for the file that you are about to export, and click EXPORT from the bottom-right corner to export the video with the reverse playback.

Or, go to the YouTube tab and sign in your YouTube account to upload the reversed video to YouTube directly. In the YouTube upload interface, you can optimize the YouTube SEO elements and revise the video title, description, category and tags.
Download Mac Version ](https://tools.techidaily.com/wondershare/filmora/download/ )
Conclusion
Even though the online video reversers are free and offer simple process to get the job done, the desktop programs like Wondershare Filmora offer more flexibility when it comes to making changes to the media clips, controlling the playback speed, adding effects, applying the modifications only to certain sections of the footage, selecting output preferences, etc. before you can reverse YouTube video.
Richard Bennett
Richard Bennett is a writer and a lover of all things video.
Follow @Richard Bennett
Richard Bennett
Mar 27, 2024• Proven solutions
While working on the movies in a professional post-production environment, there might be instances where you want to reverse YouTube video to show flashback effect, or to replay a sequence so the audience can experience more thrills while watching.
With that said, not every media player or video editing application is capable enough to reverse a movie clip, not at least with merely a few mouse clicks. Therefore, the following sections suggest some such programs that can help you play YouTube video backward.
Part 1: Best Free YouTube Video Reversers Online
There are a few online web programs that are capable of reversing YouTube videos with efficiency. However, some of them may have certain restrictions like file size limit, number of supported formats, fewer or absolutely no editing options, etc.
Nevertheless, the best five online solutions to reverse YouTube video along with the process of using them are discussed below:
1. Clideo
Clideo is not merely a video reverser, but can also convert media files to your preferred format. You can paste the URL of a YouTube video to upload or import the videos from your computer, Dropbox or Google Drive storage. At the time of this writing, Clideo allows only up to 500MB videos to be uploaded to reverse or convert. As for the acceptability, the portal supports almost all the commonly used formats.
To play YouTube video backward with Clideo:
- Visit Clideo’s online reverse tool page: https://clideo.com/reverse-video ;
- Hover mouse over the down arrow icon next to the Choose file button and paste the URL of the YouTube video that you want to reverse;
- After Clideo fetches the video and opens the next page, choose your preferred speed from the right section
- Leave the Mute video box checked, or uncheck it if required and then click Reverse button to reverse YouTube video. The maximum reverse speed that you can apply is 2X.
2. Kapwing
This web solution also supports almost all types of video formats including 3GPP, AVI, MP4, etc. When talking about the limitations of a free user, you can only upload the videos that are up to 7 minutes long. At the time of this writing, Kapwing can accept the source files from your computer, and from the YouTube URL.
To reverse YouTube video with Kapwing:
- Go to Kapwing’s online video reverser page: https://www.kapwing.com/tools/reverse-video ;
- Paste the URL of the YouTube video in the Paste a URL field;
- Select your preferred playback speed of the reversed video from the Reverse speed section in the left pane;
- Choose whether or not Kapwing should mute the output video;
- Optionally, click Trim video from the upper-left corner of the right window to edit the footage if needed;
- Click CREATE from the bottom-left corner to play YouTube video backward. The maximum reverse speed that you can apply on Kapwing is also 2X.
3. EZGIF
With the ability to support almost all major video formats, and the capability to accept the media files of up to 100MB, Ezgif allows you to upload the footages from your PC, or paste their URL if they are published on YouTube. Even though the landing page has a few distracting adverts, the overall process to play YouTube video backward and save it to your PC is simple.
To reverse YouTube video with Ezgif:
- Go to the reverser tool page: https://ezgif.com/reverse-video and then paste the URL of the YouTube video in the available field;
- Click Upload video and optionally click the speed icon from the toolbar at the top;
- Use the checkboxes and input fields to mute the audio and adjust the playback speed as needed;
- Choose your preferred encoding method from the Output format and encoding drop-down list and then click Reverse video to reverse the video.
Note: It seems that you can’t customize the reverse speed on EZGif but you can choose to mute the reversed audio or not.
4. VideoReverser
Although this web solution has an extremely simple interface, the files that you can upload must not exceed 10MB in size. The portal supports formats like MPG, MPEG, MP4, AVI, M4V, 3GP, etc. for reversing. In addition to uploading the clips from your PC, VideoReverser also allows you to paste the URL of the footages if they are published on YouTube.
To play YouTube video backward with VideoReverser:
- Launch your favorite Internet browser, and then visit https://www.videoreverser.com/ ;
- Paste the URL of the YouTube video in the available text field;
- Choose your preferred output format from the Select output format drop-down list;
- Use the Remove audio track checkbox to get rid of the acoustics or leave the sound enabled;
- Click Start to reverse YouTube video.
5. Pixiko
With almost all formats’ support, Pixiko is yet another web-based media editor that can also reverse YouTube video with a few mouse clicks. At the time of this writing, Pixiko only accepts the source files from your PC, which means you can’t paste the YouTube link to it directly. At first, you need to download or save the YouTube video on computer and then either drag those clips from your local hard drive to the portal.
To play YouTube video backward with Pixiko:
- On the page https://pixiko.com/editor/video-reverse , click anywhere inside the Blue rectangle;
- Locate, select, and upload the downloaded YouTube source video from your PC;
- Click Reverse from the lower-right section of the video player window;
- Follow the on-screen instructions from there to manage and reverse YouTube video as needed;
Bonus: Reversing YouTube Video with Wondershare Filmora
With easily reachable editing options and self-explanatory buttons, Wondershare Filmora has gained a decent amount of popularity in the recent years. The program is available for both Windows and Mac platforms, and gives tough competition to other leading tools of the industry such as Adobe Premiere Pro, Final Cut Pro X, etc.
Download Mac Version ](https://tools.techidaily.com/wondershare/filmora/download/ )
When talking about the playback speed, with the help of available presets, it can be increased or decreased by 100x or 0.01x respectively. One of the presets also enables you to reverse the direction of the playback quite easily, i.e. while keeping the speed intact. In addition, the ‘Custom Speed’ option lets you control the preferences more granularly.
You can follow the simple instructions given below to reverse YouTube video with Wondershare Filmora:
Note: To remain compliant with the terms and conditions, and to respect the copyright policies, Wondershare Filmora doesn’t allow you to download other people’s videos from YouTube. However, once you have a footage on your PC, you can jump to the following step-by-step process to reverse its playback.
1. Import the Source Video to the Timeline
Launch Wondershare Filmora on your Windows or Mac computer (Windows 10 here), making sure that the Media button in the standard toolbar at the top is selected, click inside the Media window, and select and import the YouTube source video to the program. Next, drag the YouTube video clip to the Timeline, and when the confirmation box appears, click the Match to Media or Keep Project Settings button as needed to get the footage to the Timeline.
2. Reverse the Video (Using the Preset)
Click and select the media clip in the Timeline, click the Speed icon present above the Timeline itself, and click the Reverse option from the menu that appears to reverse the video playback.
![]()
3. Reverse the Video (Manual Control)
Select the media clip in the Timeline and click the Speed icon as explained in the previous step. From the menu that appears, click Custom Speed this time. When the Custom Speed box appears, use the Speed slider to adjust the playback speed of the media clip, and check the Reverse box to reverse YouTube video. Optionally, you can also modify the Duration and Ripple options to customize the preferences. Finally, click OK to save the changes.
4. Export the Video or Upload to YouTube Directly
Back on the main window, click EXPORT from the top. Filmora provides several ways to saving and sharing the video.
You can select the Local tab, choose your preferred output format from the list in the left, in the right window, define a name and location for the file that you are about to export, and click EXPORT from the bottom-right corner to export the video with the reverse playback.
Or, go to the YouTube tab and sign in your YouTube account to upload the reversed video to YouTube directly. In the YouTube upload interface, you can optimize the YouTube SEO elements and revise the video title, description, category and tags.
Download Mac Version ](https://tools.techidaily.com/wondershare/filmora/download/ )
Conclusion
Even though the online video reversers are free and offer simple process to get the job done, the desktop programs like Wondershare Filmora offer more flexibility when it comes to making changes to the media clips, controlling the playback speed, adding effects, applying the modifications only to certain sections of the footage, selecting output preferences, etc. before you can reverse YouTube video.
Richard Bennett
Richard Bennett is a writer and a lover of all things video.
Follow @Richard Bennett
Also read:
- [Updated] Enable Quiet YouTube BGPlay for iPhone & Android
- Top 6 Free, Online Tools for Downloading YouTube Shorts
- In 2024, Elevate Your YouTube Presence Filmmaking with Filmora
- Find Your Way The Insider Guide to YouTube Video Management Hub
- Methodology Creating Life-Changing Video Guides
- [New] Discovering 2024'S Best Science Youtubers for Knowledge Boost
- Essential MP4 Software Elevate Your Mac Productions
- Enhance Visibility Essential YouTube SEO Strategies Revealed for 2024
- Does Immediate Subscription Enhance User Engagement on Youtube, In 2024
- Channel Roundup Students' Best Picks for Historical Insights Online for 2024
- In 2024, Eluding YouTube Ban Protective Measures
- Dominate Views Smarter Youtube Timing Strategies for 2024
- Channeling Creativity Get Green Screen Tips From YouTube
- [New] Behind the Scenes What Does an 'Unlisted' Video Mean?
- [Updated] Earning at Age Ten The Extraordinary Financial Rise of Ryan Kaji
- Are YouTube Engagement Strategies Justifiable?
- Elevate Video Consumption Constructing an Ideal 'Watch Later' List on YouTube
- 2024 Approved Elevate Your Video Voyage Navigating the World of YouTube Links
- 2024 Approved Discovering the Best YouTube MP3 Transformers
- [Updated] Defining Your Digital DNA A Guide to YouTubing Personal Branding
- 2024 Approved Convert YouTube Videos Smoothly Into Professional WebM Files
- Elevate YouTube Content Advanced Editing Using WM Maker for 2024
- Maximizing Video Channels Earning with New Policies
- Maximizing Your YouTube Income Through Understanding CPM
- The Filmmaker's Pathway to YouTube Success with Professional 360 Video Edits
- Quick-Response Guide Adding YouTube's Closed Captions and Subtitles
- 2024 Approved How to Add YouTube Annotations and Cards?
- [New] Echoes of Amusement Comical Tune Transformations
- Viral Hits YouTube's Expedited Path to 100MM Viewers by '24
- [New] Adobe's Toolset Perfecting Your YouTube Uploads
- Earnings in the Virtual Playground
- Updated Maximize Productivity Best Free Mac Apps for Converting Speech to Text (No Downloads or Costs)
- In 2024, AddROM Bypass An Android Tool to Unlock FRP Lock Screen For your Google
- Updated In This Article I Will Share to You My Tips and Experiences on How to Become a YouTube Vlogger and Things You Need to Consider Being a Vlogger
- In 2024, Top 15 Augmented Reality Games Like Pokémon GO To Play On Honor X50 | Dr.fone
- [New] In 2024, Enhance VFX Quality Best TikTok Watermark Removers
- Best Pokemons for PVP Matches in Pokemon Go For Nokia C12 Pro | Dr.fone
- In 2024, How to Fix iPhone SE (2022) Passcode not Working? | Dr.fone
- In 2024, What is the best Pokemon for pokemon pvp ranking On Vivo Y100t? | Dr.fone
- [New] Meme March Unstoppable Videos Hit the Tweetsphere
- iSpoofer is not working On Poco F5 5G? Fixed | Dr.fone
- Prank Your Friends! Easy Ways to Fake and Share Google Maps Location On Vivo Y28 5G | Dr.fone
- How to use Snapchat Location Spoofer to Protect Your Privacy On Realme GT 3? | Dr.fone
- How To Simulate GPS Movement With Location Spoofer On Vivo V30? | Dr.fone
- [Updated] 2024 Approved Oops, TikTok Refresh – How to Retrieve Videos?
- New 2024 Approved The Smartest Spots to Download Trendy Whoosh Sounds Online
- Collage Geniuses Discover Top 12 Projects
- Updated Unlocking Your Computers Potential Leading Free Voice Recording Applications for 2024
- [New] In 2024, The Ultimate Ninja Techniques for Instagram Reels
- Title: "The Visionary Viewers' Verdict Your Channel Vs. Contenders’ Content"
- Author: Kevin
- Created at : 2024-05-25 16:26:52
- Updated at : 2024-05-26 16:26:52
- Link: https://youtube-videos.techidaily.com/the-visionary-viewers-verdict-your-channel-vs-contenders-content/
- License: This work is licensed under CC BY-NC-SA 4.0.
