
The Art of Tweaking Soundtracks in YouTube Videos
The Art of Tweaking Soundtracks in YouTube Videos
How to Edit Audio on YouTube

Richard Bennett
Mar 27, 2024• Proven solutions
In this article, we are going to show you how to edit audio with YouTube Video Editor, and the tips on adding your own audio file to YouTube.
- Part 1: Add your Own Audio File to YouTube Video
- Part 2: How to Edit Audio with YouTube Video Editor
Part 1: Add your Own Audio File to YouTube Video
Tools You Are Going to Need
YouTube video editor is far from meeting the needs of people who want to have more control on their audio. On the bright side, if you are interested in learning how to edit audio on YouTube, there is a solution. There are many video editors in the market that allow you to add your own music or audio files to a video. Windows Movie Maker, iMovie, Adobe Premiere, and Magisto are some of the video editors available for you to choose from. In this guide, we recommend the Wondershare Filmora video editor. Below is a quick tutorial about how to edit audio in Filmora.
 Download Mac Version ](https://tools.techidaily.com/wondershare/filmora/download/ )
Why Should You Choose Wondershare Filmora?
There are many advantages associated with the use of Wondershare Filmora. You will see that it allows you to fully edit any audio file and gain 100% control over your files. It is an integrated solution that lacks nothing in terms of efficiency and quality standards. To be more specific, Filmora offers the following unique features:
- Built-in audio editing tools that allow you to gain full control of your audio in an easy way
- Exclusive audio track that enables you to mute, detach or even de-noise the audio from video
- All audio effects can easily be adjusted with one click only
- The built-in Equalizer is capable enough to create amazing audio effects
- Directly upload your video to YouTube, Facebook or Vimeo from Wondershare Filmora
How to add audio files to YouTube video with Wondershare Filmora
Do you want to know more about audio editing? Please read this article: How to add audio to video.
Step 1 Import Video Clips into Filmora
Filmora supports a wide range of video formats, such as MKV, MOV, AVI, WebM and MP4, you can import the video clip shot with Camera, smartphone or camcorder easily to it.
Step 2 Detach Audio
If you want to edit the original audio of the video, you can choose to split the audio file from the video by using the Audio Detach option on Wondershare Filmora. Then, the audio file will be shown in the audio track, and you can cut or trim it.

Note: If you do not want to keep the original audio file in the video, you can delete it from the audio track directly.
Step 3Add Audio Files
Wondershare Filmora offers you multiple royalty free audio effects and music in its rich audio library. What is more, you can also import your own music or audio file from your computer or iTunes. Of course, you should know that the audio should be royalty free for you to make use of. In a different situation, you cannot upload it and benefit from its quality and nature.
Step 4Edit Audio
In this step, you can adjust the audio volume and pitch, etc. There are multiple options for you to benefit from, including the Audio Equalizer, Music, Mix Audio. In this way, you can make sure that the audio is exactly like you have wanted it to be. For further information as to how you can improve the sound quality of your recorded videos, you can check out: How to improve sound quality of recorded videos.
Step 5Save Your Work and Upload on YouTube
If you are satisfied with your work on the audio file and you wish to publish it, the process is quite simple. You just hit Export and select to upload the video to YouTube. After signing in to your YouTube account, you will be ready to start uploading the audio file.

In case you wish to edit the audio from an already published video, you have to download the video first. Then, you can follow the steps above to edit the audio file in Filmora. As one of the widely used video editing software for YouTubers, Filmora is here to empower your imagination. Just download the free trial version and try it now.

Part 2: How to Edit Audio with YouTube Video Editor
Unfortunately, YouTube does not allow users to upload audio files such as MP3, WAV, etc. Instead, you can only upload audio files which are offered by YouTube in the first place. Since YouTube has got a plentiful audio library, you can find a lot of audio there. In this part, we will show you how to add and edit audio with YouTube Video Editor.
You may also like: How to Add Music to YouTube Videos >>
Note: From 20th September 2017 users will no longer be able to use the complimentary editing suite. Check the best YouTube video editor alternatives from this complete guide. In the following part, I will show you how to add audio track , replace the original audio and adjust the audio position and length as well.
- Step 1: Sign in to your YouTube account
- **Step 2:**Click your profile avatar and select Creator Studio option.
- Step 3: In the left pane, go to Video Manager and then click Videos. In the Videos list, choose the video that you want to add new audio track, and then select Audio from the Edit button.

- Step 4: Now you can add or replace the audio in your video. Here you will find that there are various songs and audio files you can choose from. Click ADD TO VIDEO and the audio track will be added to the video directly.

- Step 5: Now you will see the audio track appears at the bottom of the player. Here you can trim and drag the audio bar to adjust the audio positon and length. To Trim the audio, click the beginning or the end of the audio bar and then drag it to the left or right. After trimming, drag it to meet the target position.

Conclusion
Normally, it would be better to add and edit audio to video before updating to YouTube. In this case, Filmora is highly recommended as one of the best video editor for YouTubers , which provides some royalty free music sound in the Music Library to choose from and also the audio editing tools like remove background noise from the video, add fade in and fade out effects with ease or play the video backward or fast forward.
Richard Bennett
Richard Bennett is a writer and a lover of all things video.
Follow @Richard Bennett
Richard Bennett
Mar 27, 2024• Proven solutions
In this article, we are going to show you how to edit audio with YouTube Video Editor, and the tips on adding your own audio file to YouTube.
- Part 1: Add your Own Audio File to YouTube Video
- Part 2: How to Edit Audio with YouTube Video Editor
Part 1: Add your Own Audio File to YouTube Video
Tools You Are Going to Need
YouTube video editor is far from meeting the needs of people who want to have more control on their audio. On the bright side, if you are interested in learning how to edit audio on YouTube, there is a solution. There are many video editors in the market that allow you to add your own music or audio files to a video. Windows Movie Maker, iMovie, Adobe Premiere, and Magisto are some of the video editors available for you to choose from. In this guide, we recommend the Wondershare Filmora video editor. Below is a quick tutorial about how to edit audio in Filmora.
Download Mac Version ](https://tools.techidaily.com/wondershare/filmora/download/ )
Why Should You Choose Wondershare Filmora?
There are many advantages associated with the use of Wondershare Filmora. You will see that it allows you to fully edit any audio file and gain 100% control over your files. It is an integrated solution that lacks nothing in terms of efficiency and quality standards. To be more specific, Filmora offers the following unique features:
- Built-in audio editing tools that allow you to gain full control of your audio in an easy way
- Exclusive audio track that enables you to mute, detach or even de-noise the audio from video
- All audio effects can easily be adjusted with one click only
- The built-in Equalizer is capable enough to create amazing audio effects
- Directly upload your video to YouTube, Facebook or Vimeo from Wondershare Filmora
How to add audio files to YouTube video with Wondershare Filmora
Do you want to know more about audio editing? Please read this article: How to add audio to video.
Step 1 Import Video Clips into Filmora
Filmora supports a wide range of video formats, such as MKV, MOV, AVI, WebM and MP4, you can import the video clip shot with Camera, smartphone or camcorder easily to it.
Step 2 Detach Audio
If you want to edit the original audio of the video, you can choose to split the audio file from the video by using the Audio Detach option on Wondershare Filmora. Then, the audio file will be shown in the audio track, and you can cut or trim it.
Note: If you do not want to keep the original audio file in the video, you can delete it from the audio track directly.
Step 3Add Audio Files
Wondershare Filmora offers you multiple royalty free audio effects and music in its rich audio library. What is more, you can also import your own music or audio file from your computer or iTunes. Of course, you should know that the audio should be royalty free for you to make use of. In a different situation, you cannot upload it and benefit from its quality and nature.
Step 4Edit Audio
In this step, you can adjust the audio volume and pitch, etc. There are multiple options for you to benefit from, including the Audio Equalizer, Music, Mix Audio. In this way, you can make sure that the audio is exactly like you have wanted it to be. For further information as to how you can improve the sound quality of your recorded videos, you can check out: How to improve sound quality of recorded videos.
Step 5Save Your Work and Upload on YouTube
If you are satisfied with your work on the audio file and you wish to publish it, the process is quite simple. You just hit Export and select to upload the video to YouTube. After signing in to your YouTube account, you will be ready to start uploading the audio file.
In case you wish to edit the audio from an already published video, you have to download the video first. Then, you can follow the steps above to edit the audio file in Filmora. As one of the widely used video editing software for YouTubers, Filmora is here to empower your imagination. Just download the free trial version and try it now.
Part 2: How to Edit Audio with YouTube Video Editor
Unfortunately, YouTube does not allow users to upload audio files such as MP3, WAV, etc. Instead, you can only upload audio files which are offered by YouTube in the first place. Since YouTube has got a plentiful audio library, you can find a lot of audio there. In this part, we will show you how to add and edit audio with YouTube Video Editor.
You may also like: How to Add Music to YouTube Videos >>
Note: From 20th September 2017 users will no longer be able to use the complimentary editing suite. Check the best YouTube video editor alternatives from this complete guide. In the following part, I will show you how to add audio track , replace the original audio and adjust the audio position and length as well.
- Step 1: Sign in to your YouTube account
- **Step 2:**Click your profile avatar and select Creator Studio option.
- Step 3: In the left pane, go to Video Manager and then click Videos. In the Videos list, choose the video that you want to add new audio track, and then select Audio from the Edit button.
- Step 4: Now you can add or replace the audio in your video. Here you will find that there are various songs and audio files you can choose from. Click ADD TO VIDEO and the audio track will be added to the video directly.
- Step 5: Now you will see the audio track appears at the bottom of the player. Here you can trim and drag the audio bar to adjust the audio positon and length. To Trim the audio, click the beginning or the end of the audio bar and then drag it to the left or right. After trimming, drag it to meet the target position.
Conclusion
Normally, it would be better to add and edit audio to video before updating to YouTube. In this case, Filmora is highly recommended as one of the best video editor for YouTubers , which provides some royalty free music sound in the Music Library to choose from and also the audio editing tools like remove background noise from the video, add fade in and fade out effects with ease or play the video backward or fast forward.
Richard Bennett
Richard Bennett is a writer and a lover of all things video.
Follow @Richard Bennett
Analyze YouTube Data Efficiently with Social Blade Tools
Use Social Blade for YouTube Analytics - Stats & How to Use Them
Richard Bennett
Oct 26, 2023• Proven solutions
Want to learn how to use Social Blade for YouTube? SocialBlade.com is a free-to-use website that displays your YouTube statistics – or the stats of any channel you are interested in – using an intuitive layout.
While many of the stats you can find on Social Blade are also available right on YouTube, some people find it easier to read on Social Blade. YouTube provides you with a lot of information, and a lot of it might not be useful to all creators.
Your YouTube Analytics
Social Blade is an excellent place to gauge the growth of your channel. It provides statistics on our subscribers, views, and estimated revenue.
To start using Social Blade, type your channel name into the search bar.
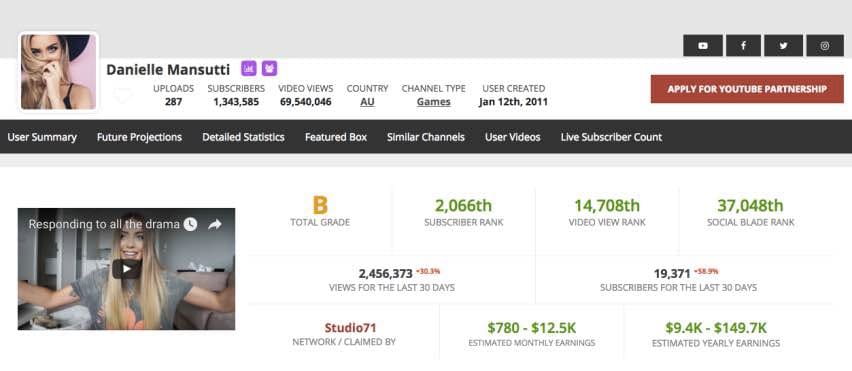
On the top section of the page, several stats will be clearly displayed.
First, you will see the letter grade assigned to your channel by Social Blade. If it is not a very good one, keep in mind that channels with over 10, 000 might still only receive Cs. Only YouTube megastars are getting As and Bs.
Next to your grade are your subscriber and video view ranks, as well as a rank assigned to you by Social Blade.
On the second line, you will see the views and subscribers you got in the last 30 days and the percentage by which you are up or down. Simply searching for yourself and glancing at this line is the easiest way to see whether your channel is growing, even easier than in your YouTube Creator Studio.
The final line of the first section will show you an estimate of your monthly revenue.
If you scroll down to the second section you will be able to see your views, subscribers, and estimated earnings per day rather than per month. Growth is in green and loss is in red.
By looking at this chart you can see which videos benefited your channel most after they were posted (your videos are not listed, but you can see based on the day you posted them). This will give you a good idea of what your audience wants to see.
Spying on Other Channels
When you check your stats, you type your channel name into the search bar. If you want to use Social Blade to monitor somebody else’s stats, type their channel name instead.
By looking up your direct competitors (channels about the same size as yours within your same genre) you will be able to see which of their videos are performing best for them when you combine the daily information Social Blade provides with your knowledge of what videos they posted when.
Knowing what is working for your rivals will help you design your content strategy .
You can also use Social Blade to look up huge YouTube stars who you admire, just to see how well they are doing. Take their estimated revenue with a grain of salt, though – it’s just an estimate.
That’s how you can use Social Blade for YouTube - have you ever used it?
Make Your Videos Stand Out with Powerful Video Editor
Richard Bennett
Richard Bennett is a writer and a lover of all things video.
Follow @Richard Bennett
Richard Bennett
Oct 26, 2023• Proven solutions
Want to learn how to use Social Blade for YouTube? SocialBlade.com is a free-to-use website that displays your YouTube statistics – or the stats of any channel you are interested in – using an intuitive layout.
While many of the stats you can find on Social Blade are also available right on YouTube, some people find it easier to read on Social Blade. YouTube provides you with a lot of information, and a lot of it might not be useful to all creators.
Your YouTube Analytics
Social Blade is an excellent place to gauge the growth of your channel. It provides statistics on our subscribers, views, and estimated revenue.
To start using Social Blade, type your channel name into the search bar.
On the top section of the page, several stats will be clearly displayed.
First, you will see the letter grade assigned to your channel by Social Blade. If it is not a very good one, keep in mind that channels with over 10, 000 might still only receive Cs. Only YouTube megastars are getting As and Bs.
Next to your grade are your subscriber and video view ranks, as well as a rank assigned to you by Social Blade.
On the second line, you will see the views and subscribers you got in the last 30 days and the percentage by which you are up or down. Simply searching for yourself and glancing at this line is the easiest way to see whether your channel is growing, even easier than in your YouTube Creator Studio.
The final line of the first section will show you an estimate of your monthly revenue.
If you scroll down to the second section you will be able to see your views, subscribers, and estimated earnings per day rather than per month. Growth is in green and loss is in red.
By looking at this chart you can see which videos benefited your channel most after they were posted (your videos are not listed, but you can see based on the day you posted them). This will give you a good idea of what your audience wants to see.
Spying on Other Channels
When you check your stats, you type your channel name into the search bar. If you want to use Social Blade to monitor somebody else’s stats, type their channel name instead.
By looking up your direct competitors (channels about the same size as yours within your same genre) you will be able to see which of their videos are performing best for them when you combine the daily information Social Blade provides with your knowledge of what videos they posted when.
Knowing what is working for your rivals will help you design your content strategy .
You can also use Social Blade to look up huge YouTube stars who you admire, just to see how well they are doing. Take their estimated revenue with a grain of salt, though – it’s just an estimate.
That’s how you can use Social Blade for YouTube - have you ever used it?
Make Your Videos Stand Out with Powerful Video Editor
Richard Bennett
Richard Bennett is a writer and a lover of all things video.
Follow @Richard Bennett
Also read:
- [New] Harnessing the Power of YouTube's SEO Keywords for 2024
- [Updated] Six Sensational Videos That Keep On Watchers for 2024
- [Updated] Vlc Player Tips 10 Hidden Features
- Addressing Software Failure During Windows Driver Rollout
- Complete Monthly Scheduler: Gratis Bootstrapped Calendars From Design Icon Creative Tim
- How to Get the Best YouTube Thumbnails The Free Guide
- How To Retrieve Disappeared Event Information From Your iPhone's Calendar
- In 2024, Boosting Traffic with Smart YouTube Title & Tag Use
- In 2024, Cooking Chronicles Video Production Insights
- In 2024, Demystifying the Anatomy of a Great YT Short Video
- In 2024, Digital Detox How to Turn Off Youtube on Computers and Phones
- In 2024, Elevated Viewership Status Symbolized by Buttons
- Investing Wisely in Subscribers Get More for Less
- Step-by-Step Tutorial: Correcting the Motherboard's CMOS Checksum Failure
- Updated In 2024, Create Stunning Videos Best Collage Makers for iOS Devices
- Title: The Art of Tweaking Soundtracks in YouTube Videos
- Author: Kevin
- Created at : 2024-12-04 17:41:06
- Updated at : 2024-12-10 16:57:42
- Link: https://youtube-videos.techidaily.com/the-art-of-tweaking-soundtracks-in-youtube-videos/
- License: This work is licensed under CC BY-NC-SA 4.0.