Techniques for Perfect Chroma Key Compositing

Techniques for Perfect Chroma Key Compositing
The world of video-making owes much of its magic to small leaps of innovation. One of these leaps is the use of the chroma key background, which most people know by the more colloquial term—green screen.

Chroma key, also known as green screen or blue screen, is a cool hack for seamless visual storytelling, allowing content creators to replace backgrounds with any image or video they want. This technique is widely embraced in film, television, and online content, and has opened the door to limitless creative possibilities. Aside from its ability to maximize creativity, it is also cheap to employ and convenient to set up, which has made it a staple for everyone who works with visuals.
In this simple guide, we’ll delve into the fundamentals of the chroma key effect, how it is used for video making, and how to leverage that as you perfect your visual content.
YouTube Video Background Creating realistic video scenes at your will is easy to complete with Filmora green screen removal.
Create Video Backgrounds Create Video Backgrounds Learn Green Screen

How Does Chroma Key Work?

Chroma Keying is done by singling out a specific color (usually green or blue) from the foreground, removing it, and replacing it with a different background (for example, a sunset). This process typically follows a series of steps:
- Background Selection:
A solid, single-color background, often green or blue, that contrasts well with the subject must be used. The color chosen should not be present in the subject or any props in the camera field to avoid unintentional transparency.
- Color Keying:
This requires the use of specialized visual effects software to key out the chosen color. The green or blue background is designated as transparent, making everything of that color see-through. The software distinguishes between the keyed color and the subject, creating a mask for the transparent areas.
- Foreground Filming:
This involves filming the subject against the live chroma key background. During filming, the chosen background color (green or blue) won’t appear in the final result due to its transparency. The subject is captured as if separately from the isolated background.
- Post-Processing:
In post-production processing, the editor takes the keyed-out color and replaces it with the new background of their choice. This step creates the illusion that the subject is in a different setting or environment. The transparent areas become filled with the chosen background which, if done right, results in a cohesive and visually appealing composition.
Why Green?
Theoretically, the chroma key background can be any solid color. However, the most commonly used colors are studio blue and bright green, with the latter far more common.
The choice of background color depends on the specific requirements of the production and the colors present in the scenes being filmed.
Free Download For Win 7 or later(64-bit)
Free Download For macOS 10.14 or later
Contrast
The less similar your chosen background color is to natural skin tones, the easier to isolate and replace in your footage. Bright green provides a strong contrast to most human skin tones and is less likely to be present in costumes or natural surroundings, making it easier to isolate subjects during the color separation.
Luminance
The color green emits light with greater intensity than blue, allowing for far more effective isolation by cameras during filming. This also means that blue screens demand increased lighting for proper exposure compared to green. This situation may be less than ideal if you lack powerful lighting or you don’t have the big bucks for them.
Digital Sensors
Many digital cameras and sensors are more sensitive to green wavelengths, resulting in cleaner and more accurate color keying during post-processing. Modern technology has also evolved to optimize for a green background, making it a more practical choice for the chroma key effect.
Wardrobe and Set Design
Bright green occurs less naturally in costumes and set designs than other colors, making green the optimal choice for reducing the likelihood of color spill and keying issues. However, if you know your scene will have lots of green, it is probably best to film with a blue screen, so there’s less risk of color spill and less post-production work.
Setting up Your Own Chroma Key Studio
Setting up your chroma key is convenient and straightforward, but there are some key factors to consider while setting up to ensure maximal performance.
Choosing the Right Background Color
The first step in the chroma key setup is selecting the right background color to be keyed out. This choice determines your effective color separation and ensures a smooth keying process during editing. Choosing a chroma-key background color that contrasts distinctly with the subject’s colors is essential for effective color separation. This prevents unintentional transparency, color spill, and ensures a polished final result.
Lighting Considerations
Lighting is an important part of the chroma-keying process. Bold, uniform, and consistent lighting on both the subject and the background makes it easy to delineate one from the other fully. This minimizes shadows and variations in color, creating a smooth and seamless keying process. Multiple diffuse lights from different angles are often used to illuminate the green screen evenly.
Positioning/Camera
Proper subject and camera placement are necessary to ensure an even color-keying process during post-production. To prevent shadow interference, the green screen should be smooth, tense, and without wrinkles or shadows.
High-quality cameras are essential every time, especially for chroma keying. Images with better definition are easier to key, so camera quality significantly affects the outcome. Even if your camera isn’t the best, merely shooting well can ensure a clean color-keying process during editing, resulting in professional-looking visuals.
Recording Tips for Chroma Key
- Proper Lighting
Maintaining uniform and well-defined lighting during recording is essential for a successful chroma-keying process. This consistency ensures a seamless keying process during post-production.
- Keep Distance from the Green Screen
The optimal distance between the subject and the green screen minimizes color spill and allows for natural movements. Proper distance between subject and background allows for easier isolation of the background and much smoother post-editing. A recommended starting point for the issue is around 6 to 10 feet from the background.
- Subjects and Clothing
As mentioned before, the choice of costume for Selecting appropriate clothing that doesn’t match the chroma key color prevents transparency issues. Subjects also have to be positioned in such a way that there is minimal light interference and reflection. These contribute to a flawless chroma key outcome.
3 Basic Troubleshooting Strategies
- Color Spill
Sometimes, reflected light from your green background can be cast on your subject and may remain so when the background light is keyed out. This phenomenon is known as a color spill. It is usually because of uneven lighting or shooting around reflecting surfaces. Avoiding spill can differentiate between good and lousy chroma key aftereffects.
Human hair is one area where color spill can show up unsuspectingly. Due to the translucency of hair, it is common for some unintended light to seep through. This allows some background visibility, which you do not want with a chroma key. This is especially notable with lighter hair colors like blond hair.
There are ways to account for this. Many video-editing software have features such as spill suppression and screen matte adjustments that can enhance the final footage. Specialized plugins also go a long way in ensuring minimizing spill. Addressing spill correction tackles unwanted green artifacts and ensures a clean keying process.
- Poor Lighting
Suboptimal green screen lighting can lead to inconsistencies in keying and editing, undermining your product. One way to avoid this is to light the screen and subject separately. Another tip, although expensive, is using multiple diffuse light sources and trying to maintain even lighting across every square foot of your scene. Super bright or dark spots can ruin your output, so it’s worth the extra effort if you don’t want to deal with problematic post-production.
- Poorly Refined Edges
Chroma keying should leave your videos with crisp, defined, natural-looking edges. But post-production editing can make all the difference if it doesn’t come out to your taste. Softening and refining edges make a smoother transition between the foreground object and the new background. Light adjustments to edge thickness and screen matte settings can also help enhance overall visual quality and add finesse to your work.
Conclusion
Green screen photography produces excellent results, and its ease of use makes it indispensable for videographers of all levels. In this guide, we’ve discussed chroma key technology, its role in the industry, and how to apply it to your craft to elevate visual content.
Chroma key, also known as green screen or blue screen, is a cool hack for seamless visual storytelling, allowing content creators to replace backgrounds with any image or video they want. This technique is widely embraced in film, television, and online content, and has opened the door to limitless creative possibilities. Aside from its ability to maximize creativity, it is also cheap to employ and convenient to set up, which has made it a staple for everyone who works with visuals.
In this simple guide, we’ll delve into the fundamentals of the chroma key effect, how it is used for video making, and how to leverage that as you perfect your visual content.
YouTube Video Background Creating realistic video scenes at your will is easy to complete with Filmora green screen removal.
Create Video Backgrounds Create Video Backgrounds Learn Green Screen

How Does Chroma Key Work?

Chroma Keying is done by singling out a specific color (usually green or blue) from the foreground, removing it, and replacing it with a different background (for example, a sunset). This process typically follows a series of steps:
- Background Selection:
A solid, single-color background, often green or blue, that contrasts well with the subject must be used. The color chosen should not be present in the subject or any props in the camera field to avoid unintentional transparency.
- Color Keying:
This requires the use of specialized visual effects software to key out the chosen color. The green or blue background is designated as transparent, making everything of that color see-through. The software distinguishes between the keyed color and the subject, creating a mask for the transparent areas.
- Foreground Filming:
This involves filming the subject against the live chroma key background. During filming, the chosen background color (green or blue) won’t appear in the final result due to its transparency. The subject is captured as if separately from the isolated background.
- Post-Processing:
In post-production processing, the editor takes the keyed-out color and replaces it with the new background of their choice. This step creates the illusion that the subject is in a different setting or environment. The transparent areas become filled with the chosen background which, if done right, results in a cohesive and visually appealing composition.
Why Green?
Theoretically, the chroma key background can be any solid color. However, the most commonly used colors are studio blue and bright green, with the latter far more common.
The choice of background color depends on the specific requirements of the production and the colors present in the scenes being filmed.
Free Download For Win 7 or later(64-bit)
Free Download For macOS 10.14 or later
Contrast
The less similar your chosen background color is to natural skin tones, the easier to isolate and replace in your footage. Bright green provides a strong contrast to most human skin tones and is less likely to be present in costumes or natural surroundings, making it easier to isolate subjects during the color separation.
Luminance
The color green emits light with greater intensity than blue, allowing for far more effective isolation by cameras during filming. This also means that blue screens demand increased lighting for proper exposure compared to green. This situation may be less than ideal if you lack powerful lighting or you don’t have the big bucks for them.
Digital Sensors
Many digital cameras and sensors are more sensitive to green wavelengths, resulting in cleaner and more accurate color keying during post-processing. Modern technology has also evolved to optimize for a green background, making it a more practical choice for the chroma key effect.
Wardrobe and Set Design
Bright green occurs less naturally in costumes and set designs than other colors, making green the optimal choice for reducing the likelihood of color spill and keying issues. However, if you know your scene will have lots of green, it is probably best to film with a blue screen, so there’s less risk of color spill and less post-production work.
Setting up Your Own Chroma Key Studio
Setting up your chroma key is convenient and straightforward, but there are some key factors to consider while setting up to ensure maximal performance.
Choosing the Right Background Color
The first step in the chroma key setup is selecting the right background color to be keyed out. This choice determines your effective color separation and ensures a smooth keying process during editing. Choosing a chroma-key background color that contrasts distinctly with the subject’s colors is essential for effective color separation. This prevents unintentional transparency, color spill, and ensures a polished final result.
Lighting Considerations
Lighting is an important part of the chroma-keying process. Bold, uniform, and consistent lighting on both the subject and the background makes it easy to delineate one from the other fully. This minimizes shadows and variations in color, creating a smooth and seamless keying process. Multiple diffuse lights from different angles are often used to illuminate the green screen evenly.
Positioning/Camera
Proper subject and camera placement are necessary to ensure an even color-keying process during post-production. To prevent shadow interference, the green screen should be smooth, tense, and without wrinkles or shadows.
High-quality cameras are essential every time, especially for chroma keying. Images with better definition are easier to key, so camera quality significantly affects the outcome. Even if your camera isn’t the best, merely shooting well can ensure a clean color-keying process during editing, resulting in professional-looking visuals.
Recording Tips for Chroma Key
- Proper Lighting
Maintaining uniform and well-defined lighting during recording is essential for a successful chroma-keying process. This consistency ensures a seamless keying process during post-production.
- Keep Distance from the Green Screen
The optimal distance between the subject and the green screen minimizes color spill and allows for natural movements. Proper distance between subject and background allows for easier isolation of the background and much smoother post-editing. A recommended starting point for the issue is around 6 to 10 feet from the background.
- Subjects and Clothing
As mentioned before, the choice of costume for Selecting appropriate clothing that doesn’t match the chroma key color prevents transparency issues. Subjects also have to be positioned in such a way that there is minimal light interference and reflection. These contribute to a flawless chroma key outcome.
3 Basic Troubleshooting Strategies
- Color Spill
Sometimes, reflected light from your green background can be cast on your subject and may remain so when the background light is keyed out. This phenomenon is known as a color spill. It is usually because of uneven lighting or shooting around reflecting surfaces. Avoiding spill can differentiate between good and lousy chroma key aftereffects.
Human hair is one area where color spill can show up unsuspectingly. Due to the translucency of hair, it is common for some unintended light to seep through. This allows some background visibility, which you do not want with a chroma key. This is especially notable with lighter hair colors like blond hair.
There are ways to account for this. Many video-editing software have features such as spill suppression and screen matte adjustments that can enhance the final footage. Specialized plugins also go a long way in ensuring minimizing spill. Addressing spill correction tackles unwanted green artifacts and ensures a clean keying process.
- Poor Lighting
Suboptimal green screen lighting can lead to inconsistencies in keying and editing, undermining your product. One way to avoid this is to light the screen and subject separately. Another tip, although expensive, is using multiple diffuse light sources and trying to maintain even lighting across every square foot of your scene. Super bright or dark spots can ruin your output, so it’s worth the extra effort if you don’t want to deal with problematic post-production.
- Poorly Refined Edges
Chroma keying should leave your videos with crisp, defined, natural-looking edges. But post-production editing can make all the difference if it doesn’t come out to your taste. Softening and refining edges make a smoother transition between the foreground object and the new background. Light adjustments to edge thickness and screen matte settings can also help enhance overall visual quality and add finesse to your work.
Conclusion
Green screen photography produces excellent results, and its ease of use makes it indispensable for videographers of all levels. In this guide, we’ve discussed chroma key technology, its role in the industry, and how to apply it to your craft to elevate visual content.
Efficiently Engaging with Numerous YouTube Lectures
Facebook Video Maker - Wondershare Filmora
Provide abundant video effects - A creative video editor
Powerful color correction and grading
Detailed tutorials provided by the official channel
There are some unfortunate times when two of your favorite games or streams from your favorite content creators have the same timing, or you want to watch multiple videos on a single screen at the same time for comparison or any other reason.
It is a hassle to continuously switch between tabs or to drag and minimize windows continuously just to watch a few glimpses of each stream. Thanks to technological advances, there are now third-party services that allow you to watch multiple YouTube videos at one time on a single screen.
Below are some of the services and websites that save you from this hassle.
In this article
Part 1: YouTube Multistream
Part 2: ViewSync
Part 3: WonderShare Filmora
Part 1: YouTube Multistream
YouTube Multistream is a free service that quite effectively simplifies things for you and allows you to watch live streams or play up to 4 videos at the same time. Below are the steps you need to follow in order to play videos simultaneously.
The only caveats are that you cannot sync audio and it does not allow you to play more than 4 videos at the same time.
Step 1: Open YouTube Multistream
Open the website using the link:
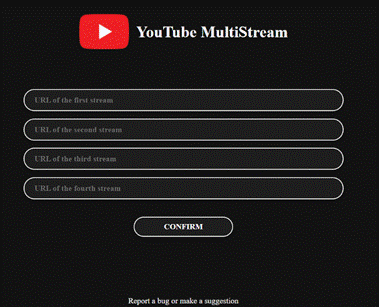
You will see 4 boxes where you can input the links of your desired videos you wish to watch.
Step 2: Input Links
After opening the website, copy and paste the links of your desired videos that you wish to watch at the same time.

Step 3: Play What You Like
After copying and pasting the links of the YouTube videos, click on ‘Confirm’. It will redirect you to another page with all 4 videos on one screen and then you can decide which one to play or if you want to stream all 4 at the same time, that is also possible.

It is up to you if you want to stream 2, 3, or 4 videos at the same time and you can play or pause them at any time. It is also helpful if you want to overlap audio of different instruments just for fun or you can stream your favorite games along with any e-sport competition and add in some music to make the environment lively.
Part 2: ViewSync
ViewSync is a free multiplayer for YouTube videos. It was designed to watch Mindcrack UHC videos but it can also be used to watch multiple YouTube videos at the same time. You can add links and watch as many YouTube videos at the same time as you wish.
Another amazing feature of ViewSync is that you can sync audio if the videos share the same voice audio or you can even create pleasing mashups by syncing different audio cues from each video. Below are the steps you need to follow to watch multiple YouTube videos at the same time.
Step 1: Open ViewSync
Open ViewSync using the link:
Step 2: Input Links
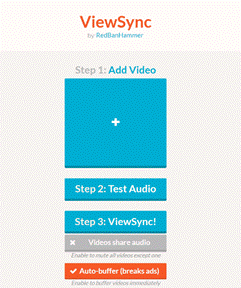
Click the + icon and paste the link to the YouTube video you want to watch. Repeat the process and add as many links to YouTube videos as you desire to watch.
Step 3: Adjust Audio Cues
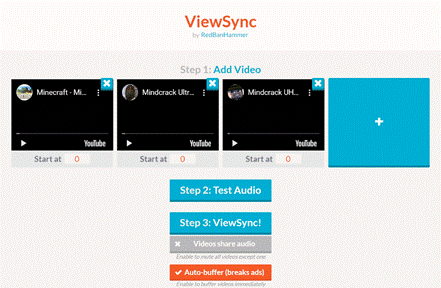
After adding the links, if the videos share the same audio voice, you can adjust the audio cues as in where each video will start from so the audio is in sync. You can play and check the audio or just manually put the exact time in the dialogue box under the video.

Step 4: Test Audio
After adjusting the audio cues, click Test Audio and it will play the audio for you so you can make sure it is perfectly in sync.
Step 5: Generate Link
Click on the ViewSync! button and it will generate a final ViewSync link for you where you can watch the finalized and synced videos. Copy and paste the link in your browser.
Step 6: Buffer the videos
Once you have opened the link generated by ViewSync, click on each video once to start the buffering process.

After buffering is complete, the master controller will start to show from which you can play and pause all the videos at the same time or even resync them.

Step 7: All Set
Now you are all set to play all your desired YouTube videos at the same time. You can also tweak the audio and video quality settings and can choose which video should play audio and all other settings will be available once you click the gear icon on the master controller.

Part 3: WonderShare Filmora
WonderShare Filmora is a great tool for editing your videos and content that you can eventually upload on YouTube or other platforms and share with the world. If you are a content creator or gamer yourself and frequently collaborate with other creators, you can use WonderShare Filmora to eliminate the need for a separate multiplayer.
WonderShare Filmora is very powerful and simple to use. You can easily add multiple video frames and combine them into one e.g. join videos from your fellow creators and then sync the audio in-app using the easy-to-use tools and features in this user-friendly application.
This will eliminate the need for a Multi Stream service.
Conclusion
Now you don’t have to worry about missing one of your favorite games or streams from your favorite content creators or gamers just because the timing overlaps. You can now watch multiple YouTube videos at the same time with great ease and it will not only save your time but immensely relieve the pressure of missing a live game or stream.
You can now sync audio and create a realistic moment as if you are sitting among the streamers and watching them play in real-time that too on a single screen!
There are some unfortunate times when two of your favorite games or streams from your favorite content creators have the same timing, or you want to watch multiple videos on a single screen at the same time for comparison or any other reason.
It is a hassle to continuously switch between tabs or to drag and minimize windows continuously just to watch a few glimpses of each stream. Thanks to technological advances, there are now third-party services that allow you to watch multiple YouTube videos at one time on a single screen.
Below are some of the services and websites that save you from this hassle.
In this article
Part 1: YouTube Multistream
Part 2: ViewSync
Part 3: WonderShare Filmora
Part 1: YouTube Multistream
YouTube Multistream is a free service that quite effectively simplifies things for you and allows you to watch live streams or play up to 4 videos at the same time. Below are the steps you need to follow in order to play videos simultaneously.
The only caveats are that you cannot sync audio and it does not allow you to play more than 4 videos at the same time.
Step 1: Open YouTube Multistream
Open the website using the link:
You will see 4 boxes where you can input the links of your desired videos you wish to watch.

Step 2: Input Links
After opening the website, copy and paste the links of your desired videos that you wish to watch at the same time.

Step 3: Play What You Like
After copying and pasting the links of the YouTube videos, click on ‘Confirm’. It will redirect you to another page with all 4 videos on one screen and then you can decide which one to play or if you want to stream all 4 at the same time, that is also possible.

It is up to you if you want to stream 2, 3, or 4 videos at the same time and you can play or pause them at any time. It is also helpful if you want to overlap audio of different instruments just for fun or you can stream your favorite games along with any e-sport competition and add in some music to make the environment lively.
Part 2: ViewSync
ViewSync is a free multiplayer for YouTube videos. It was designed to watch Mindcrack UHC videos but it can also be used to watch multiple YouTube videos at the same time. You can add links and watch as many YouTube videos at the same time as you wish.
Another amazing feature of ViewSync is that you can sync audio if the videos share the same voice audio or you can even create pleasing mashups by syncing different audio cues from each video. Below are the steps you need to follow to watch multiple YouTube videos at the same time.
Step 1: Open ViewSync
Open ViewSync using the link:

Step 2: Input Links
Click the + icon and paste the link to the YouTube video you want to watch. Repeat the process and add as many links to YouTube videos as you desire to watch.

Step 3: Adjust Audio Cues
After adding the links, if the videos share the same audio voice, you can adjust the audio cues as in where each video will start from so the audio is in sync. You can play and check the audio or just manually put the exact time in the dialogue box under the video.

Step 4: Test Audio
After adjusting the audio cues, click Test Audio and it will play the audio for you so you can make sure it is perfectly in sync.
Step 5: Generate Link
Click on the ViewSync! button and it will generate a final ViewSync link for you where you can watch the finalized and synced videos. Copy and paste the link in your browser.
Step 6: Buffer the videos
Once you have opened the link generated by ViewSync, click on each video once to start the buffering process.

After buffering is complete, the master controller will start to show from which you can play and pause all the videos at the same time or even resync them.

Step 7: All Set
Now you are all set to play all your desired YouTube videos at the same time. You can also tweak the audio and video quality settings and can choose which video should play audio and all other settings will be available once you click the gear icon on the master controller.

Part 3: WonderShare Filmora
WonderShare Filmora is a great tool for editing your videos and content that you can eventually upload on YouTube or other platforms and share with the world. If you are a content creator or gamer yourself and frequently collaborate with other creators, you can use WonderShare Filmora to eliminate the need for a separate multiplayer.
WonderShare Filmora is very powerful and simple to use. You can easily add multiple video frames and combine them into one e.g. join videos from your fellow creators and then sync the audio in-app using the easy-to-use tools and features in this user-friendly application.
This will eliminate the need for a Multi Stream service.
Conclusion
Now you don’t have to worry about missing one of your favorite games or streams from your favorite content creators or gamers just because the timing overlaps. You can now watch multiple YouTube videos at the same time with great ease and it will not only save your time but immensely relieve the pressure of missing a live game or stream.
You can now sync audio and create a realistic moment as if you are sitting among the streamers and watching them play in real-time that too on a single screen!
There are some unfortunate times when two of your favorite games or streams from your favorite content creators have the same timing, or you want to watch multiple videos on a single screen at the same time for comparison or any other reason.
It is a hassle to continuously switch between tabs or to drag and minimize windows continuously just to watch a few glimpses of each stream. Thanks to technological advances, there are now third-party services that allow you to watch multiple YouTube videos at one time on a single screen.
Below are some of the services and websites that save you from this hassle.
In this article
Part 1: YouTube Multistream
Part 2: ViewSync
Part 3: WonderShare Filmora
Part 1: YouTube Multistream
YouTube Multistream is a free service that quite effectively simplifies things for you and allows you to watch live streams or play up to 4 videos at the same time. Below are the steps you need to follow in order to play videos simultaneously.
The only caveats are that you cannot sync audio and it does not allow you to play more than 4 videos at the same time.
Step 1: Open YouTube Multistream
Open the website using the link:
You will see 4 boxes where you can input the links of your desired videos you wish to watch.

Step 2: Input Links
After opening the website, copy and paste the links of your desired videos that you wish to watch at the same time.

Step 3: Play What You Like
After copying and pasting the links of the YouTube videos, click on ‘Confirm’. It will redirect you to another page with all 4 videos on one screen and then you can decide which one to play or if you want to stream all 4 at the same time, that is also possible.

It is up to you if you want to stream 2, 3, or 4 videos at the same time and you can play or pause them at any time. It is also helpful if you want to overlap audio of different instruments just for fun or you can stream your favorite games along with any e-sport competition and add in some music to make the environment lively.
Part 2: ViewSync
ViewSync is a free multiplayer for YouTube videos. It was designed to watch Mindcrack UHC videos but it can also be used to watch multiple YouTube videos at the same time. You can add links and watch as many YouTube videos at the same time as you wish.
Another amazing feature of ViewSync is that you can sync audio if the videos share the same voice audio or you can even create pleasing mashups by syncing different audio cues from each video. Below are the steps you need to follow to watch multiple YouTube videos at the same time.
Step 1: Open ViewSync
Open ViewSync using the link:

Step 2: Input Links
Click the + icon and paste the link to the YouTube video you want to watch. Repeat the process and add as many links to YouTube videos as you desire to watch.

Step 3: Adjust Audio Cues
After adding the links, if the videos share the same audio voice, you can adjust the audio cues as in where each video will start from so the audio is in sync. You can play and check the audio or just manually put the exact time in the dialogue box under the video.

Step 4: Test Audio
After adjusting the audio cues, click Test Audio and it will play the audio for you so you can make sure it is perfectly in sync.
Step 5: Generate Link
Click on the ViewSync! button and it will generate a final ViewSync link for you where you can watch the finalized and synced videos. Copy and paste the link in your browser.
Step 6: Buffer the videos
Once you have opened the link generated by ViewSync, click on each video once to start the buffering process.

After buffering is complete, the master controller will start to show from which you can play and pause all the videos at the same time or even resync them.

Step 7: All Set
Now you are all set to play all your desired YouTube videos at the same time. You can also tweak the audio and video quality settings and can choose which video should play audio and all other settings will be available once you click the gear icon on the master controller.

Part 3: WonderShare Filmora
WonderShare Filmora is a great tool for editing your videos and content that you can eventually upload on YouTube or other platforms and share with the world. If you are a content creator or gamer yourself and frequently collaborate with other creators, you can use WonderShare Filmora to eliminate the need for a separate multiplayer.
WonderShare Filmora is very powerful and simple to use. You can easily add multiple video frames and combine them into one e.g. join videos from your fellow creators and then sync the audio in-app using the easy-to-use tools and features in this user-friendly application.
This will eliminate the need for a Multi Stream service.
Conclusion
Now you don’t have to worry about missing one of your favorite games or streams from your favorite content creators or gamers just because the timing overlaps. You can now watch multiple YouTube videos at the same time with great ease and it will not only save your time but immensely relieve the pressure of missing a live game or stream.
You can now sync audio and create a realistic moment as if you are sitting among the streamers and watching them play in real-time that too on a single screen!
There are some unfortunate times when two of your favorite games or streams from your favorite content creators have the same timing, or you want to watch multiple videos on a single screen at the same time for comparison or any other reason.
It is a hassle to continuously switch between tabs or to drag and minimize windows continuously just to watch a few glimpses of each stream. Thanks to technological advances, there are now third-party services that allow you to watch multiple YouTube videos at one time on a single screen.
Below are some of the services and websites that save you from this hassle.
In this article
Part 1: YouTube Multistream
Part 2: ViewSync
Part 3: WonderShare Filmora
Part 1: YouTube Multistream
YouTube Multistream is a free service that quite effectively simplifies things for you and allows you to watch live streams or play up to 4 videos at the same time. Below are the steps you need to follow in order to play videos simultaneously.
The only caveats are that you cannot sync audio and it does not allow you to play more than 4 videos at the same time.
Step 1: Open YouTube Multistream
Open the website using the link:
You will see 4 boxes where you can input the links of your desired videos you wish to watch.

Step 2: Input Links
After opening the website, copy and paste the links of your desired videos that you wish to watch at the same time.

Step 3: Play What You Like
After copying and pasting the links of the YouTube videos, click on ‘Confirm’. It will redirect you to another page with all 4 videos on one screen and then you can decide which one to play or if you want to stream all 4 at the same time, that is also possible.

It is up to you if you want to stream 2, 3, or 4 videos at the same time and you can play or pause them at any time. It is also helpful if you want to overlap audio of different instruments just for fun or you can stream your favorite games along with any e-sport competition and add in some music to make the environment lively.
Part 2: ViewSync
ViewSync is a free multiplayer for YouTube videos. It was designed to watch Mindcrack UHC videos but it can also be used to watch multiple YouTube videos at the same time. You can add links and watch as many YouTube videos at the same time as you wish.
Another amazing feature of ViewSync is that you can sync audio if the videos share the same voice audio or you can even create pleasing mashups by syncing different audio cues from each video. Below are the steps you need to follow to watch multiple YouTube videos at the same time.
Step 1: Open ViewSync
Open ViewSync using the link:

Step 2: Input Links
Click the + icon and paste the link to the YouTube video you want to watch. Repeat the process and add as many links to YouTube videos as you desire to watch.

Step 3: Adjust Audio Cues
After adding the links, if the videos share the same audio voice, you can adjust the audio cues as in where each video will start from so the audio is in sync. You can play and check the audio or just manually put the exact time in the dialogue box under the video.

Step 4: Test Audio
After adjusting the audio cues, click Test Audio and it will play the audio for you so you can make sure it is perfectly in sync.
Step 5: Generate Link
Click on the ViewSync! button and it will generate a final ViewSync link for you where you can watch the finalized and synced videos. Copy and paste the link in your browser.
Step 6: Buffer the videos
Once you have opened the link generated by ViewSync, click on each video once to start the buffering process.

After buffering is complete, the master controller will start to show from which you can play and pause all the videos at the same time or even resync them.

Step 7: All Set
Now you are all set to play all your desired YouTube videos at the same time. You can also tweak the audio and video quality settings and can choose which video should play audio and all other settings will be available once you click the gear icon on the master controller.

Part 3: WonderShare Filmora
WonderShare Filmora is a great tool for editing your videos and content that you can eventually upload on YouTube or other platforms and share with the world. If you are a content creator or gamer yourself and frequently collaborate with other creators, you can use WonderShare Filmora to eliminate the need for a separate multiplayer.
WonderShare Filmora is very powerful and simple to use. You can easily add multiple video frames and combine them into one e.g. join videos from your fellow creators and then sync the audio in-app using the easy-to-use tools and features in this user-friendly application.
This will eliminate the need for a Multi Stream service.
Conclusion
Now you don’t have to worry about missing one of your favorite games or streams from your favorite content creators or gamers just because the timing overlaps. You can now watch multiple YouTube videos at the same time with great ease and it will not only save your time but immensely relieve the pressure of missing a live game or stream.
You can now sync audio and create a realistic moment as if you are sitting among the streamers and watching them play in real-time that too on a single screen!
Also read:
- [Updated] 2024 Approved A Deeper Dive Into Video Enhancement Techniques for PC/Mobile
- [Updated] Deciphering Customization The Art of iPhone Rings
- Adobe's Quick Guide for Perfect Photo Colors
- Can I use iTools gpx file to catch the rare Pokemon On Realme Narzo 60x 5G | Dr.fone
- Enhancing Video Discoverability with Smart Thumbnails
- Exciting Conversation Starter Ideas
- In 2024, A Comprehensive Guide to Maximizing Channels' Earnings Through Trailers
- In 2024, Enhancing Watchability Adding Time Stamps to YouTube Videos
- Resizing Your Windows Taskbar via Control Panel: A Step-by-Step Guide - Tips From YL Computing
- Review, Evaluate, and Refine
- The Mystery of Why | Free Book
- Unearth Intriguing Tidbits About Emojis - Top Ten Emoji Discoveries
- Title: Techniques for Perfect Chroma Key Compositing
- Author: Kevin
- Created at : 2024-12-03 17:16:49
- Updated at : 2024-12-10 17:28:09
- Link: https://youtube-videos.techidaily.com/techniques-for-perfect-chroma-key-compositing/
- License: This work is licensed under CC BY-NC-SA 4.0.