
"Techniques for Cost-Efficient YouTube Introduction & Conclusion Creation"
Techniques for Cost-Efficient YouTube Introduction & Conclusion Creation
How to Create YouTube Intros & End Cards - Free and Easy

Shanoon Cox
Oct 26, 2023• Proven solutions
Part1: Intros
Elements of an Intro
Intros should only last about five seconds, and that can be cut down to two or three if you have a larger following.
When your intro video is longer than five seconds viewers are more likely to click away. The first 15 seconds of a video is when viewers are most likely to decide to click on one of the recommended videos, or go back to their search results and choose something else. The odds of them leaving within these first 15 seconds are greater if you do not get right to the main point of your video. That is why long intro sequences are bad for your watch time.
Whether it is better to put your intro at the very beginning of your video, or after you introduce your topic, will depend on your viewers. You may want to try it both ways and then look at your retention report (found in your YouTube Creator Studio under Analytics) to see which works best for you.
Top Intro Sites
There are a few different sites where you can download animated intros, customized to include your username or logo. Here are two of the best:
FlixPress.com
This is probably the most popular intro site. There are a lot of great animated intros available for under $5, or even for free.
IntroMaker.net
This is another site with really professional looking intros for $5. They only have two free options, though.
Creating an Intro in Filmora
You can create a simple intro card in Filmora.


- Choose your background. You may want to use a short clip as your intro, or you may just want a colored background.
- Drag your clip or background into the video track of your timeline and trim it down to five seconds.
- If you have a logo, import it into Filmora and drag it into your picture-in-picture track.
- With your logo selected, click on the Green Screen icon. In the pop-up, select the background of your logo to make it transparent. For this to work your logo cannot be the same color as its background.
- Click on the editing icon with your logo selected and choose an animation.
- Go to the Text/Titles menu and choose an animated title that suits your channel. Drag it into your text track and edit it to include your name.
- The last piece of your intro is sound. You can choose a song from Filmora’s library and cut it down to five seconds, or import your sound effect.
- Export your video and save it for use in all of your other videos.
Part 2: End Cards
When your video ends, YouTube will recommend a selection of videos users may want to watch next. Often, these recommendations will not include more of your videos.
To keep viewers on your channel, you can create your End Card which recommends other content you have created.
Elements of an End Card
An end card includes clips from two or three of your videos, muted, and shrunk down to thumbnail-size. Using spotlight annotations you can make these thumbnails click-able.
It is also important that your end card includes multiple calls to action. A call to action is meant to spur a viewer to some kind of action. Writing ‘Check out this video’ above one of your thumbnails is a call to action.
You should also have a subscribe link somewhere in your end card, ideally a very noticeable button with a proven call to action like ‘Subscribe Now!’.
Some creators will leave their end cards at that and play music overtop, but it can be even more effective to include a voiceover where you ask viewers to subscribe and watch your other videos.
How To Make an End Card
- Choose a static background. You may want to download an end card template or create one in a drawing program. If you do, make sure to include calls to action like ‘Watch more!’ and ‘Subscribe’.
- Drag your background into your timeline at the end of your video.
- Import two or three of your previous videos and drag them into your picture in picture tracks. Each clip should be on its track.
- Trim the clips in your picture in picture track down to the same length as your end card.
- Shrink your clips down to thumbnail-size by dragging their corners in the preview window.
- Position your clips so they are spaced evenly by dragging them in the preview screen.
- Mute your clips.
- If your background does not include any calls to action, choose a title from the Text/Titles menu in Filmora and create at least two – one asking viewers to subscribe, and one asking them to watch your suggested videos.
- Export your video from Filmora and upload it to YouTube.
- Go to your Video Manager and select Annotations in the drop-down menu next to your video.
- Go to your end card in the previewer, as that is where you want to add your annotations.
- Click Add Annotation and add a spotlight annotation to your video. Stretch it over one of your thumbnails and then check the Link box under your Annotation’s timing. Insert a link to the video you are previewing.
- Repeat for any other thumbnails. For your subscribe button, change where it said ‘Video’ to ‘Subscribe’ and enter your channel URL.
- Click Apply Changes.
Shanoon Cox
Shanoon Cox is a writer and a lover of all things video.
Follow @Shanoon Cox
Shanoon Cox
Oct 26, 2023• Proven solutions
Part1: Intros
Elements of an Intro
Intros should only last about five seconds, and that can be cut down to two or three if you have a larger following.
When your intro video is longer than five seconds viewers are more likely to click away. The first 15 seconds of a video is when viewers are most likely to decide to click on one of the recommended videos, or go back to their search results and choose something else. The odds of them leaving within these first 15 seconds are greater if you do not get right to the main point of your video. That is why long intro sequences are bad for your watch time.
Whether it is better to put your intro at the very beginning of your video, or after you introduce your topic, will depend on your viewers. You may want to try it both ways and then look at your retention report (found in your YouTube Creator Studio under Analytics) to see which works best for you.
Top Intro Sites
There are a few different sites where you can download animated intros, customized to include your username or logo. Here are two of the best:
FlixPress.com
This is probably the most popular intro site. There are a lot of great animated intros available for under $5, or even for free.
IntroMaker.net
This is another site with really professional looking intros for $5. They only have two free options, though.
Creating an Intro in Filmora
You can create a simple intro card in Filmora.
- Choose your background. You may want to use a short clip as your intro, or you may just want a colored background.
- Drag your clip or background into the video track of your timeline and trim it down to five seconds.
- If you have a logo, import it into Filmora and drag it into your picture-in-picture track.
- With your logo selected, click on the Green Screen icon. In the pop-up, select the background of your logo to make it transparent. For this to work your logo cannot be the same color as its background.
- Click on the editing icon with your logo selected and choose an animation.
- Go to the Text/Titles menu and choose an animated title that suits your channel. Drag it into your text track and edit it to include your name.
- The last piece of your intro is sound. You can choose a song from Filmora’s library and cut it down to five seconds, or import your sound effect.
- Export your video and save it for use in all of your other videos.
Part 2: End Cards
When your video ends, YouTube will recommend a selection of videos users may want to watch next. Often, these recommendations will not include more of your videos.
To keep viewers on your channel, you can create your End Card which recommends other content you have created.
Elements of an End Card
An end card includes clips from two or three of your videos, muted, and shrunk down to thumbnail-size. Using spotlight annotations you can make these thumbnails click-able.
It is also important that your end card includes multiple calls to action. A call to action is meant to spur a viewer to some kind of action. Writing ‘Check out this video’ above one of your thumbnails is a call to action.
You should also have a subscribe link somewhere in your end card, ideally a very noticeable button with a proven call to action like ‘Subscribe Now!’.
Some creators will leave their end cards at that and play music overtop, but it can be even more effective to include a voiceover where you ask viewers to subscribe and watch your other videos.
How To Make an End Card
- Choose a static background. You may want to download an end card template or create one in a drawing program. If you do, make sure to include calls to action like ‘Watch more!’ and ‘Subscribe’.
- Drag your background into your timeline at the end of your video.
- Import two or three of your previous videos and drag them into your picture in picture tracks. Each clip should be on its track.
- Trim the clips in your picture in picture track down to the same length as your end card.
- Shrink your clips down to thumbnail-size by dragging their corners in the preview window.
- Position your clips so they are spaced evenly by dragging them in the preview screen.
- Mute your clips.
- If your background does not include any calls to action, choose a title from the Text/Titles menu in Filmora and create at least two – one asking viewers to subscribe, and one asking them to watch your suggested videos.
- Export your video from Filmora and upload it to YouTube.
- Go to your Video Manager and select Annotations in the drop-down menu next to your video.
- Go to your end card in the previewer, as that is where you want to add your annotations.
- Click Add Annotation and add a spotlight annotation to your video. Stretch it over one of your thumbnails and then check the Link box under your Annotation’s timing. Insert a link to the video you are previewing.
- Repeat for any other thumbnails. For your subscribe button, change where it said ‘Video’ to ‘Subscribe’ and enter your channel URL.
- Click Apply Changes.
Shanoon Cox
Shanoon Cox is a writer and a lover of all things video.
Follow @Shanoon Cox
Playlist on a Page: Embedding YT Videos Online
YouTube is an excellent resource for entertainment, education, and general information, but did you know you can also display a YouTube playlist on your website?
Embedding a YouTube playlist will allow you to showcase a collection of videos on a topic or theme on your website. It’s also a great way to keep your visitors engaged on your site for more extended periods.
To help you with the process, we’ll explore different step-by-step methods to embed a YouTube playlist on a website to add interactivity to your site.
So, if you’re ready to get started, read on!
How To Embed a YouTube Playlist on a Website
If you want to embed and display a YouTube playlist on your website, we’ll give you a complete rundown of the three methods you can try to get this done. But, of course, each method has its pros and cons, so you’ll need to decide which is right for you.
Here’s how to embed a YouTube playlist on a Website:
Embedding a YouTube Playlist on Website Using WordPress Plugin
The plugin is the simplest way to add a YouTube Playlist to your WordPress website. This will help you get this done in no time without having to write any code for the process.
With plugins like YouTube Feed Pro by Smash Balloon , you can extend your website’s functionality and create, customize, or embed a YouTube playlist with just a few clicks of a mouse.
To embed and add a YouTube playlist on your website page/post, do the following steps in sequence:
Step1 Launch a browser on your PC and head to your WordPress website’s login page. Sign in to your dashboard using your username and password.
Step2 Click the “Plugins” option from the left-hand side menu on the WordPress dashboard. Now, click “Add New” and use the search option to find and install the YouTube Feed Pro plugin. Afterward, click the “Activate” option to enable the plugin.
Step3 Click the “YouTube Feed” option from the left menu and open “All Feeds.” On the next page, click “Add New” at the top left of the screen.

You will now be asked what type of feed you want to create. Select “Playlist” and click “Next.”

Step4 You need to create your YouTube API Key , copy it, and paste it into the pop-up. Click “Add” to connect your YouTube account to the plugin.
Step5 Select the Playlist you want to display on your WordPress website and take its ID. Paste that in the next pop-up window and click “Next” to continue the process.

Your YouTube playlist will be connected to your WordPress website. To further customize it, select the template you want and click “Next.” You can also configure the Feed Layout and Color Scheme.

Step6 Once you are done with customization, click the “Embed” option on the top-right side of the screen, and a pop-up window will appear. Next, click “Add to a Page,” and a list of pages on your website will be displayed.
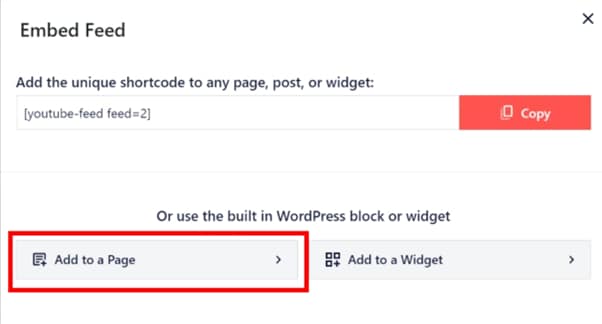
Choose your page and click “Add” at the bottom of the pop-up window. You’ll be directed to a new page where you can embed the feed. Click the “Plus” icon at the top-left of the screen, search for YouTube Feed and choose the Feeds for YouTube block to embed and add your playlist.
That’s about it! You’ve successfully embedded a YouTube playlist on your WordPress website.
Embedding a YouTube Playlist on a Website Using oEmbed Code
Another method to embed a YouTube playlist on your WordPress website is to use oEmbed Code. This method requires basic CSS, HTML, or Java knowledge; otherwise, you won’t be able to customize your playlist.
Moreover, this method is too complicated for beginners, and you will miss the customer support provided by WordPress plugin developers in case of any mishaps.
To use the oEmbed Code method, do the following steps:
Step1 In the first step, head to your YouTube account and access the Playlist you want to embed. Next, click the three dots below it and copy its URL.
Step2 Now, login to your WordPress dashboard and open the post or page editor where you want to add the playlist.
Step3 Paste the URL directly in the editor and click “Update” to save the changes.
WordPress will grab your playlist from YouTube and automatically show it in your post using oEmbed. The outcome is a single video with a menu that your viewers can click to see other videos in the playlist.
Embedding a YouTube Playlist on WebsiteUsing
Conclusion
This article discusses step-by-step methods to embed a YouTube playlist on a website using the WordPress plugin, oEmbed code, and iFrame embed code.
Additionally, we’ve recommended Wondershare Filmora for making engaging and captivating YouTube videos that you can export directly to your channel from the software.
We hope you’ve found this article informative and can now display your YouTube playlist on your site without hassle.
Also read:
- 2024 Approved Optimal Screen Capture ChromeOS Enhanced
- 2024 Approved Video Perfection Streamlined Subtitle/CC Implementation on YouTube
- Expert Insights on Maximizing ROI Through Effective YouTube Banner Campaigns
- Fixed YouTube Shorts Lacking in Sight
- How to Fix Corrupted System Files on Windows 11, 11
- How to Monetize Your YouTube Shorts Simple Steps
- How to Unlock Apple iPhone 8 With an Apple Watch & What to Do if It Doesnt Work
- Ideal Tools for Saving Your Online Video Presence
- In 2024, Essential Steps for Starting a YouTube Channel
- Maximize Gaming on AMD RX 570 with Newest Windows Drivers Update
- New In 2024, Free Online Movie Creation Top 9 Picks
- Revolutionizing Academic Research with AI Tools
- Top 11 Free Apps to Check IMEI on Xiaomi Phones
- Title: Techniques for Cost-Efficient YouTube Introduction & Conclusion Creation
- Author: Kevin
- Created at : 2024-12-06 18:05:52
- Updated at : 2024-12-10 17:46:08
- Link: https://youtube-videos.techidaily.com/techniques-for-cost-efficient-youtube-introduction-and-conclusion-creation/
- License: This work is licensed under CC BY-NC-SA 4.0.