Superb Phone Video & Photo Capturing with Best Apps List
Superb Phone Video & Photo Capturing with Best Apps List
Best Camera Apps to Shoot and Record Videos on iPhone and Andriod Phones

Richard Bennett
Oct 26, 2023• Proven solutions
Smartphone cameras, especially the newest models, are capable of recording great videos. Depending on what kind of videos you make, you might not actually need a separate camera.
The majority of phone cameras record in full HD now, and some can even manage 4K. Where things get tricky is shooting in less than ideal conditions, i.e low light. You cannot make the same adjustments and customizations to your settings with a smartphone camera as you can with a DSLR.
You don’t have the same level of control.
But don’t worry – there are 5 camera apps that will allow you to record videos and get even more creative with how you use your phone’s camera.
- Part 1: Bonus Tip-Make Your Own Video with Wondershare Filmora
- Part 2: Best 5 Camera Apps to Record Videos on iPhone and Android
Part 1: Bonus Tip-Make Your Own Video with Wondershare Filmora
Wondershare Filmora is an amazing video editor for both professional staff and beginners. Its intuitive interface, fast timeline rendering, advanced color tuning, and surprising video effects, etc will make your video stand out! Just download it and edit your smartphone videos with Wondershare Filmora!


Part 2: Best 5 Camera Apps to Record Videos on iPhone and Android
Let’s dive!
1. Open Camera – Free, Android Only

This camera app gives you control over your exposure, flash, focus, ISO, shutter speed, torch, and white balance. How much control you have is up to you. If managing all these things manually is a hassle for you, you can use its automatic or semi-manual modes instead of manual mode.
This is a great camera app to record time-lapses. It is simplistic compared to some of the other apps on this list, but it is also extremely easy to use.
2. ProShot - $4, iOS or Android
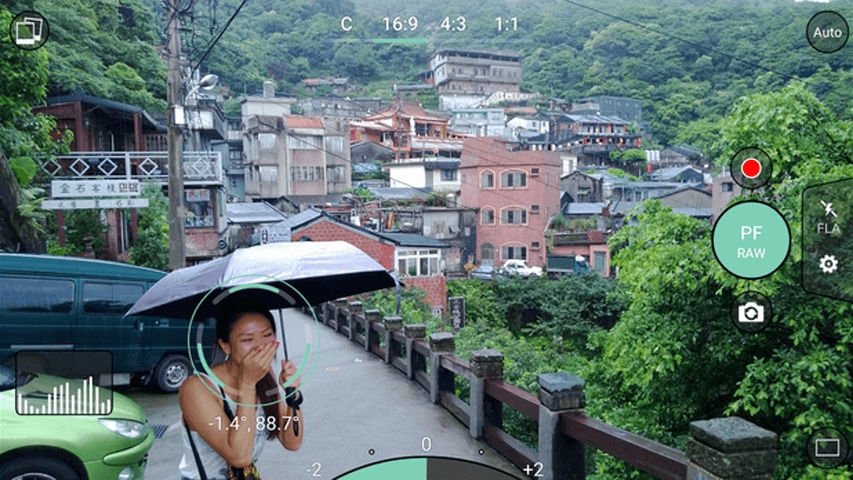
ProShot lets you adjust your frame rate, which is important if you want to shoot slow motion or time-lapse videos. You can also adjust your brightness while filming. One of the most useful features of this camera app is that it provides a real-time audio level meter, so you won’t be surprised by a poor sound recording when you watch your videos back.
3. ProCamera - $5, iOS Only
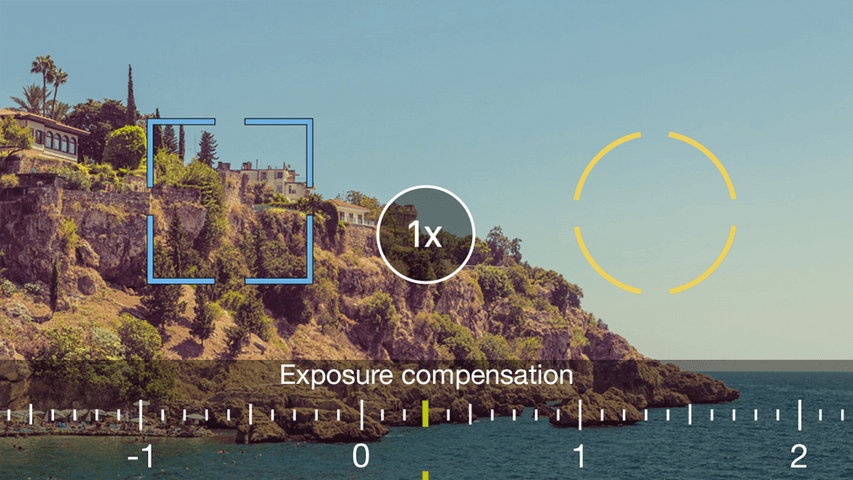
This is one of the most frequently recommended camera apps for iPhones. It makes it easy for you to adjust your focus, iOS, and exposure. You can also play with different filters and effects right in the app. One of the only downsides of this app is that some of its most useful features, like Lowlight Plus, are in-app purchases.
4. Sun Seeker - $10, iOS or Android

A lot of the time when you’re shooting with your phone, you’re shooting outside. When you’re shooting outside, the most important thing you need to keep track of is the sun. Sun Seeker is the perfect app for figuring out where the sun will be in the sky at any given time, which will tell you the best time to go out and make your video.
For more information on making videos with natural light, check out Indoor Natural Lighting Tips .
Besides just keeping track of the sun, Sun Seeker provides an augmented reality view of its path and how it will affect specific locations.
5. FiLMiC Pro - $10, iOS or Android
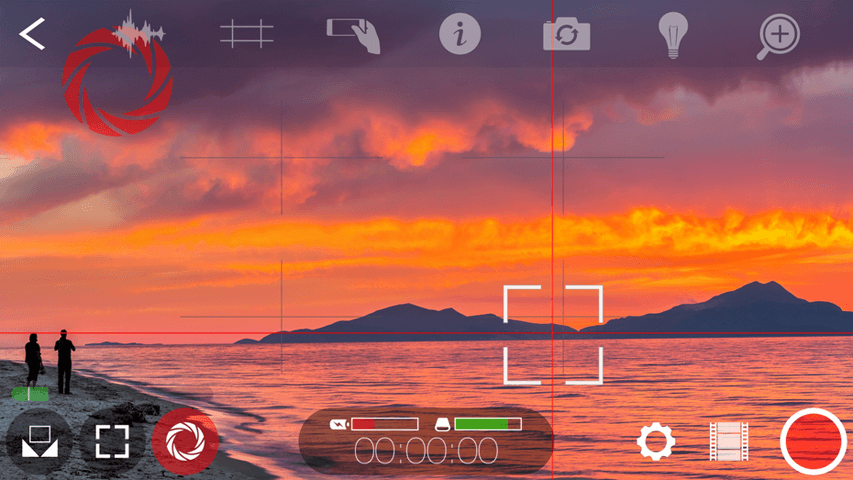
This is probably the best all-purpose camera app available. It gives you exactly the same kind of control over your smartphone camera as you would have over a DSLR. You can manually adjust your focus, exposure, ISO, shutter speed, tint, and color temperature. There are even voice processing audio filters, so you can capture better audio while you’re shooting and have less to fix in post.
Final Words
Because mobile cameras already perform so well, it can be easy to think to have more to adjust would only make things more complicated. However, there are occasions where you need to be able to make these adjustments. Are the videos you take inside at night at a lower quality than the ones you record during the day, for example? If you could set a higher ISO, you would be able to fix that.
Another example: just the other day, there was a question here about shooting green screen videos on a mobile device. One of our community members, Vivekpanwar, was having an issue with motion blur. Motion blur isn’t always distracting in normal videos, but it becomes a huge issue when you apply a Chroma key effect. The best way to avoid motion blur is to set a high shutter speed, which you can do if you download a quality camera app.
Richard Bennett
Richard Bennett is a writer and a lover of all things video.
Follow @Richard Bennett
Richard Bennett
Oct 26, 2023• Proven solutions
Smartphone cameras, especially the newest models, are capable of recording great videos. Depending on what kind of videos you make, you might not actually need a separate camera.
The majority of phone cameras record in full HD now, and some can even manage 4K. Where things get tricky is shooting in less than ideal conditions, i.e low light. You cannot make the same adjustments and customizations to your settings with a smartphone camera as you can with a DSLR.
You don’t have the same level of control.
But don’t worry – there are 5 camera apps that will allow you to record videos and get even more creative with how you use your phone’s camera.
- Part 1: Bonus Tip-Make Your Own Video with Wondershare Filmora
- Part 2: Best 5 Camera Apps to Record Videos on iPhone and Android
Part 1: Bonus Tip-Make Your Own Video with Wondershare Filmora
Wondershare Filmora is an amazing video editor for both professional staff and beginners. Its intuitive interface, fast timeline rendering, advanced color tuning, and surprising video effects, etc will make your video stand out! Just download it and edit your smartphone videos with Wondershare Filmora!
Part 2: Best 5 Camera Apps to Record Videos on iPhone and Android
Let’s dive!
1. Open Camera – Free, Android Only
This camera app gives you control over your exposure, flash, focus, ISO, shutter speed, torch, and white balance. How much control you have is up to you. If managing all these things manually is a hassle for you, you can use its automatic or semi-manual modes instead of manual mode.
This is a great camera app to record time-lapses. It is simplistic compared to some of the other apps on this list, but it is also extremely easy to use.
2. ProShot - $4, iOS or Android
ProShot lets you adjust your frame rate, which is important if you want to shoot slow motion or time-lapse videos. You can also adjust your brightness while filming. One of the most useful features of this camera app is that it provides a real-time audio level meter, so you won’t be surprised by a poor sound recording when you watch your videos back.
3. ProCamera - $5, iOS Only
This is one of the most frequently recommended camera apps for iPhones. It makes it easy for you to adjust your focus, iOS, and exposure. You can also play with different filters and effects right in the app. One of the only downsides of this app is that some of its most useful features, like Lowlight Plus, are in-app purchases.
4. Sun Seeker - $10, iOS or Android
A lot of the time when you’re shooting with your phone, you’re shooting outside. When you’re shooting outside, the most important thing you need to keep track of is the sun. Sun Seeker is the perfect app for figuring out where the sun will be in the sky at any given time, which will tell you the best time to go out and make your video.
For more information on making videos with natural light, check out Indoor Natural Lighting Tips .
Besides just keeping track of the sun, Sun Seeker provides an augmented reality view of its path and how it will affect specific locations.
5. FiLMiC Pro - $10, iOS or Android
This is probably the best all-purpose camera app available. It gives you exactly the same kind of control over your smartphone camera as you would have over a DSLR. You can manually adjust your focus, exposure, ISO, shutter speed, tint, and color temperature. There are even voice processing audio filters, so you can capture better audio while you’re shooting and have less to fix in post.
Final Words
Because mobile cameras already perform so well, it can be easy to think to have more to adjust would only make things more complicated. However, there are occasions where you need to be able to make these adjustments. Are the videos you take inside at night at a lower quality than the ones you record during the day, for example? If you could set a higher ISO, you would be able to fix that.
Another example: just the other day, there was a question here about shooting green screen videos on a mobile device. One of our community members, Vivekpanwar, was having an issue with motion blur. Motion blur isn’t always distracting in normal videos, but it becomes a huge issue when you apply a Chroma key effect. The best way to avoid motion blur is to set a high shutter speed, which you can do if you download a quality camera app.
Richard Bennett
Richard Bennett is a writer and a lover of all things video.
Follow @Richard Bennett
Maximizing Your YouTube Click-Through Rate: Upload Schedule Insights
How Often Should You Upload Videos to YouTube to Get More Views
Richard Bennett
Oct 26, 2023• Proven solutions
How often should you upload to YouTube?
Scheduling isn’t the most glamourous part of being a YouTube creator, but it is important. Having a schedule and sticking to it is one of the best ways to grow your subscriber base , keep your existing subscribers engaged , and keep yourself from drifting away from YouTube.
- Be Specific About Your YouTube Posting Schedule
- Make Your Upload Schedule Public
- Remember That Posting on YouTube Takes Time
- Bank YouTube Videos
- Set Realistic Goals
Polish Your YouTube Videos with Filmora
As one of the most widely used video editing software in YouTube video editing, Filmora provides lots of templates and effects with an intuitive interface, which saves much time. Download the free trial version and get started now.
Creative people don’t always like the idea of scheduling. You either feel inspired or you don’t (click here to learn how to come up with video ideas ). If that means you go a month without posting and then post 3 times in one week, what’s the harm in that?
The harm is that your channel will grow more slowly, you won’t get as many views on the videos when you post them, and if you do manage to bring in new subscribers they might forget about you by the next time you’re feeling inspired. Making great content that you really care about is essential to being successful on YouTube, but it isn’t the only important thing.
Sticking to a schedule is one of Phil’s most important tips for getting subs!
Here are 5 tips on how you can make a schedule for yourself and actually stick to it. Read to the end to find out which are the best days to post to YouTube!
People who read this also read:
5 Tips To Get More Views With YouTube Video Optimization [Free Checklist] >>
1. Be Specific About Your YouTube Posting Schedule
Don’t just say you’re going to post a new video every week, decide on a specific day and time. If your subscribers expect new posts from you Thursdays at 4 pm, they will check your channel for those new posts every Thursday at 4 pm. This will make it easier for you to keep your view count close to your subscriber count.
The other benefit of being specific about your posting time is that the more specific you are, the less wiggle room you give yourself. Setting a clear deadline with yourself makes it harder to procrastinate.
2. Make Your YouTube Upload Schedule Public
Post your schedule somewhere potential subscribers can see it like in your channel banner, intro, or video descriptions. The reason schedules work as a tool for growth is that they allow your audience to build up anticipation. It will be easier for newcomers to your channel to feel that anticipation if you start setting expectations for them on their first visit.
Committing publicly to a posting schedule means making a promise to your viewers. If you break that promise, they will be disappointed. This social pressure should help to keep you posting consistently.
3. Remember That Posting on YouTube Takes Time
When you decide what day you want to post on, make sure that it’s a day where you have a lot of time to spend on things like writing your description, promoting your video, and answering comments.
It might be helpful to set a private deadline for yourself the day before your official post to upload your video and enter all of your metadata (title, description, tags). Then you can keep the video private until it’s time to post. You might also want to check out these tips on how to export and upload faster .
4. Bank YouTube Videos
It might happen that one week you’re full of ideas and energy and making videos is a breeze. It can be tempting to abandon your schedule and post more than normal, but you should resist that urge. Don’t waste all that energy – make the videos – but instead of posting them all right away, you should save them for weeks where you aren’t feeling the same enthusiasm.
5. Set Realistic Goals
Your schedule shouldn’t leave you feeling burnt out. When you’re coming up with your schedule, think realistically about how much time you have to devote to YouTube and how much time you need to spend on a video. Give yourself enough time that you can keep to your schedule without feeling rushed.
Never make your schedule based on what other YouTubers are doing. Your lives are different.
Posting once a week is a good standard schedule, but if you like to spend a lot of time editing your videos and you work full time then maybe once a week isn’t realistic for you. Maybe you should post once every two weeks.
The Best Days and Times to Post to YouTube
The best times to post are Thursdays and Fridays between 12 and 3pm (in the time zone of the majority of your subscribers – just check analytics in your Creator Studio). These are the times when there are the most viewers available to watch your videos. Monday and Tuesday are the worst days to post.
Amy’s scheduling advice: don’t bite off more than you can chew!
So, how many times do you upload per week, or per month? How often should you upload to YouTube?
Richard Bennett
Richard Bennett is a writer and a lover of all things video.
Follow @Richard Bennett
Richard Bennett
Oct 26, 2023• Proven solutions
How often should you upload to YouTube?
Scheduling isn’t the most glamourous part of being a YouTube creator, but it is important. Having a schedule and sticking to it is one of the best ways to grow your subscriber base , keep your existing subscribers engaged , and keep yourself from drifting away from YouTube.
- Be Specific About Your YouTube Posting Schedule
- Make Your Upload Schedule Public
- Remember That Posting on YouTube Takes Time
- Bank YouTube Videos
- Set Realistic Goals
Polish Your YouTube Videos with Filmora
As one of the most widely used video editing software in YouTube video editing, Filmora provides lots of templates and effects with an intuitive interface, which saves much time. Download the free trial version and get started now.
Creative people don’t always like the idea of scheduling. You either feel inspired or you don’t (click here to learn how to come up with video ideas ). If that means you go a month without posting and then post 3 times in one week, what’s the harm in that?
The harm is that your channel will grow more slowly, you won’t get as many views on the videos when you post them, and if you do manage to bring in new subscribers they might forget about you by the next time you’re feeling inspired. Making great content that you really care about is essential to being successful on YouTube, but it isn’t the only important thing.
Sticking to a schedule is one of Phil’s most important tips for getting subs!
Here are 5 tips on how you can make a schedule for yourself and actually stick to it. Read to the end to find out which are the best days to post to YouTube!
People who read this also read:
5 Tips To Get More Views With YouTube Video Optimization [Free Checklist] >>
1. Be Specific About Your YouTube Posting Schedule
Don’t just say you’re going to post a new video every week, decide on a specific day and time. If your subscribers expect new posts from you Thursdays at 4 pm, they will check your channel for those new posts every Thursday at 4 pm. This will make it easier for you to keep your view count close to your subscriber count.
The other benefit of being specific about your posting time is that the more specific you are, the less wiggle room you give yourself. Setting a clear deadline with yourself makes it harder to procrastinate.
2. Make Your YouTube Upload Schedule Public
Post your schedule somewhere potential subscribers can see it like in your channel banner, intro, or video descriptions. The reason schedules work as a tool for growth is that they allow your audience to build up anticipation. It will be easier for newcomers to your channel to feel that anticipation if you start setting expectations for them on their first visit.
Committing publicly to a posting schedule means making a promise to your viewers. If you break that promise, they will be disappointed. This social pressure should help to keep you posting consistently.
3. Remember That Posting on YouTube Takes Time
When you decide what day you want to post on, make sure that it’s a day where you have a lot of time to spend on things like writing your description, promoting your video, and answering comments.
It might be helpful to set a private deadline for yourself the day before your official post to upload your video and enter all of your metadata (title, description, tags). Then you can keep the video private until it’s time to post. You might also want to check out these tips on how to export and upload faster .
4. Bank YouTube Videos
It might happen that one week you’re full of ideas and energy and making videos is a breeze. It can be tempting to abandon your schedule and post more than normal, but you should resist that urge. Don’t waste all that energy – make the videos – but instead of posting them all right away, you should save them for weeks where you aren’t feeling the same enthusiasm.
5. Set Realistic Goals
Your schedule shouldn’t leave you feeling burnt out. When you’re coming up with your schedule, think realistically about how much time you have to devote to YouTube and how much time you need to spend on a video. Give yourself enough time that you can keep to your schedule without feeling rushed.
Never make your schedule based on what other YouTubers are doing. Your lives are different.
Posting once a week is a good standard schedule, but if you like to spend a lot of time editing your videos and you work full time then maybe once a week isn’t realistic for you. Maybe you should post once every two weeks.
The Best Days and Times to Post to YouTube
The best times to post are Thursdays and Fridays between 12 and 3pm (in the time zone of the majority of your subscribers – just check analytics in your Creator Studio). These are the times when there are the most viewers available to watch your videos. Monday and Tuesday are the worst days to post.
Amy’s scheduling advice: don’t bite off more than you can chew!
So, how many times do you upload per week, or per month? How often should you upload to YouTube?
Richard Bennett
Richard Bennett is a writer and a lover of all things video.
Follow @Richard Bennett
Also read:
- [New] In 2024, Efficient Keyword Utilization Discover the Best 7 Online Video Tag Extractors Reviewed
- [Updated] 2024 Approved Multimedia IPTV Networking
- [Updated] In 2024, Pioneering Vlogging Tech Our Ranking of Top 12 Video Cameras
- [Updated] In 2024, Selecting Ideal FPV Propellers A Comprehensive Guide
- [Updated] In 2024, The Dual Approach – Mastering Two-Point of View Techniques in Your YouTube Reaction Video Content
- Complete Insights Into the Updated VideoShow App for '24
- Essential Guide to YouTube Video Resolutions & Aspects
- Expert Insights Where to Invest in YouTube Creator Revenue
- Experts Choose the Ideal Mini Tablets for 2 Cuisines | In-Depth Analysis and Rankings on ZDNET
- From Editing to Sharing YouTube Mastery with Adobe Premiere
- How to Add YouTube Annotations and Cards?
- In 2024, Amplifying Your Content Free Techniques to Boost YouTube Views
- In 2024, Channeling Success The Personal Brand Strategy for YouTubers
- In 2024, Craft Compelling Content Essential Youtube Short Video Edits
- In 2024, Learn How To Lock Stolen Your Apple iPhone 12 Properly
- Restoring Order: 7 Solutions for Lost Windows Server Time
- Title: Superb Phone Video & Photo Capturing with Best Apps List
- Author: Kevin
- Created at : 2024-12-03 17:55:06
- Updated at : 2024-12-10 17:51:49
- Link: https://youtube-videos.techidaily.com/superb-phone-video-and-photo-capturing-with-best-apps-list/
- License: This work is licensed under CC BY-NC-SA 4.0.