

Streamlining Your iPhones Video Loops
Streamlining Your iPhones Video Loops
How to Loop A Video on iPhone?

Shanoon Cox
Mar 27, 2024• Proven solutions
For Win 7 or later (64-bit)
 Secure Download
For macOS 10.14 or later
Secure Download
Click here to get Filmora for PC by email
or Try Filmora App for mobile >>>
download filmora app for ios ](https://app.adjust.com/b0k9hf2%5F4bsu85t ) download filmora app for android ](https://app.adjust.com/b0k9hf2%5F4bsu85t )
Nowadays, we can see a trend of people posting looping videos on their social media. These looping videos are fascinating and fun to watch. A loop is a popular element in photography and especially music videos, the idea being that the camera appears to magically repeat itself as many times as there are photos or frames showing the action. They can also simply recur a sequence a certain number of times, then stop.
Now some people don’t know how to make looping videos, so in this article, we are going to discuss how to loop a video on iPhone videos and also how to loop YouTube videos on iPhone. Let’s get started.
- Part 1: Convert iPhone Live Photos to a Loop Video
- Part 2: Repeat Slideshow Video to Loop on iPhone
- Part 3: Loop YouTube Videos On iPhone
- Part 4: Best Apps to Loop Videos on iPhone and iPad
- Part 5: Better Way to Loop and Create Boomerang Videos in Filmora Video Editor
- Part 6: Frequently Asked Questions About Choosing Best Free Video Editor for Windows
Part 1: How to Convert iPhone Live Photos to a Loop Video
A loop video is a short video that plays in repeat/ indefinitely. Loop videos can be created with features on social media apps and third-party apps.
iPhone has a setting that allows you to edit the photos to loop or bounce videos, and it only works with a photo feature called ‘live photo’. The live photo feature records 1.5 seconds moving picture when you click on the shutter button.
The live photo feature can be edited to create a loop video, and you can do that by following these steps:
- Before creating the video, you need to have the live picture saved on your phone.
To do this, capture a live photo by opening your camera app. Then click on the live photo icon, which is located in the upper right corner. And tap on the shutter button.
- Afterward, you locate the live photo you want to convert to a loop video by going to the Photos apps. Then click on Albums > Media Types> Live photos.

- After locating and clicking on the live picture, you will see the Live tab in the upper left corner. Click on the arrow down to view other options, including Loop, Bounce, and long exposure.

- Select the effect you want to create (loop) and save the file. The loop feature plays the video in a one-way order. So, to make it more interesting, you can select the bounce effect, which makes it play back and forth.
- You can share the created loop video with the share icon at the lower-left corner.

Part 2: Repeat Slideshow to Loop Video on iPhone for Free
Slideshow videos are a very fun way to see your content. People gather around a screen to enjoy these beautiful memories of their life. Here is a step-by-step guide on how to loop a slideshow video on iPhone.
- First, go to your gallery and select a video that you want to make a slideshow of.
- Add that video to an album in your gallery under any name.
- Pause the slideshow video, and you will see Options button at the bottom. Click it and then enable the Repeat option.

Now open that video from the album and start playing the video. That video will start playing in a loop until you make it stop.
Part 3: How to Loop YouTube Videos On iPhone?
Now coming to the part that we discussed in the intro, how to loop YouTube videos on iPhone. So here, we will show you a step-by-step guide on how to loop the videos on your iPhone.
- Launch YouTube on your iPhone and log in to your account if you are not already logged in.
- Now go to the “Search” option and lookup for the desired video that you want to loop, and add it to the playlist. There are two ways you can do that. Click and hold on to the video; a small menu will appear, then click on “Add to” to make a playlist. Start the video and then scroll down a bit and on the extreme right side, click on the “Add to” option, and then name the playlist.
- After that, go back to the main menu and on the lower bottom right side of the screen, click on “Library,” and then select the new playlist.
- Start playing the video, and under the video, click on the drop-down button, and on the left side of the drop-down screen, there is a loop button, click on that, and it will start to play the loop infinitely.
Check this ultimate guide to looping YouTube videos to get more ways.
Part 4: Best Apps to Loop Videos on iPhone and iPad
1. Loopideo - Loop Videos

Loopideo is the app on our list that is an answer to how to loop a video on iPhone. It lets you import any video from your play that you want to play in a loop. This is a great tool when it comes to individual and organizational presentations. This powerful app can be very useful for you in many cases.
2. Loop Video – GIF Maker

The second app on our list is Loop Video GIF Maker. It is very fun and easy to use the tool. It allows you to make the videos loop by turning them into GIFs. Loop Video GIF Maker allows you to import any video from your gallery into your app. You can then convert into a looping GIF. You can also choose the playback speed of the GIF after you can export it to the gallery or upload it to your social media directly from the app.
3. Loopideo Pro

Loopideo Pro is a more feature-filled app on the App Store. Loopideo allows you to make the videos loop an unlimited amount of times. You can also choose the formats that you want to convert the looping video into. This app also gives you the option to choose the playback speed and then can also convert it into GIF speed so that you can save it in your gallery.
4. iMovie
iMovie is a more professional app that is available on the list. This app allows you to loop not only the video but also edit the video. This allows you to play the video in a loop for an unlimited amount of time in the built-in player, but when it comes to saving the looping video, it is not possible because you would need an unlimited amount of space to save that video.
5. Looper

The last app on our list is a looper, and it is a very fun and easy-to-use app available on this list. Choose a video from your gallery, Local Videos, or iCloud Drive. Select the times you want the video to repeat and play. You can also export your video in reverse or in GIF format.
Bonus: Record a Looping Video with Boomerang app on iPhone
To make a looping video on your iPhone, you can either download the boomerang app or use the boomerang video on Instagram.
If you are using the Boomerang app, take these steps to make a looping video:
- Launch the Boomerang from Instagram app on your iPhone, if you haven’t installed it already, click on the search bar and type in Boomerang in the App Store.
- The welcome screen will appear, swipe left and tap on Get started. Allow it to access to your camera, location, and photos. After you are done setting up, you can make the videos.
- To make a boomerang video, click and hold the shutter button. Hold the shutter for a few seconds and move the phone across the image or scene.
- A preview of the looping video will appear; tap on Done to save the video. Or click on the X symbol to make a new video.
- You can change the settings to record a selfie video by clicking on the curved arrows symbol. And you can also tap the lightning sign to put the flash on and off.
To make the video with the Instagram Boomerang feature:
- Open the Instagram app, and then swipe left as if to add a story.
- Click on the boomerang icon (infinity symbol). Press and hold the shutter to make the video.
- Preview the video, and you can add texts, songs, markups, and stickers to the video.
- And then click on the arrow-down symbol to save/ download the video. You can share the video to close friends or your story.
Part 5: What If You’d Like to Loop Videos on Computer?
Filmora is one of the most popular video editors among video creators. It gives you high-quality end product, smooth slowing down & speeding up movements, voiceovers on top of music tracks and transitions between audio & video clips. But another amazing benefit of this computer video editor is that you can produce a loop video.
![]()

The Best Video Looper on Windows and Mac
- Loop and repeat videos multiple times
- Copy and paste clips easily
- Built-in plentiful templates and effects
- Export to MP4, MOV, MKV, GIF and multiple formats
For Win 7 or later (64-bit)
Secure Download
For macOS 10.14 or later
Secure Download
Click here to get Filmora for PC by email
or Try Filmora App for mobile >>>
download filmora app for ios ](https://app.adjust.com/b0k9hf2%5F4bsu85t ) download filmora app for android ](https://app.adjust.com/b0k9hf2%5F4bsu85t )
In this part, I’m going to show you how to create looping video in Filmora video editor with the reverse effect. It’s actually really easy and doesn’t require any complicated steps. You’ll be able to create a cool, looping video in no time! So, let’s get started!
Step 1: Import Videos to Filmora video editor
Launch Filmora video editor on your Windows or Mac computer and then make a new project. Import videos as you can see it has been already imported all the media in the media library from your which you want to loop effect, and then drag the video clip to the timeline.

Step 2: Copy and Paste the Video
After drag and drop the video to the timeline, make a copy of it (Ctrl+C). Go to the last frame and paste this video again.

Step 3: Enable Reverse Speed effect
Right click on the pasted video and go to Speed and Duration option in which custom speed dialog box where you can adjust the speed.
In the Custom Speed dialog box you will find the speed, duration, reverse and ripple options. To make a video with loop effects, click the Reverse option to reverse the video play back from end to start frames automatically. Click OK to save the settings.

Now you have got a video with one looping count, if you want the video to loop several times, you can select these 2 clips and paste it based on your needs to get a continuous looping effect.

We hope you found this post helpful in learning how to create looping video with Filmora video editor. This makes them perfect for use as GIFs because they are never ending! What’s more, you can create a looping video in Filmora video editor by adding a sound that plays continuously. If you’re looking to make an endlessly repeating animated image or video clip using just one still image, look no further than Filmora video editor. It’s easy and fun to use.
For Win 7 or later (64-bit)
Secure Download
For macOS 10.14 or later
Secure Download
Click here to get Filmora for PC by email
or Try Filmora App for mobile >>>
download filmora app for ios ](https://app.adjust.com/b0k9hf2%5F4bsu85t ) download filmora app for android ](https://app.adjust.com/b0k9hf2%5F4bsu85t )
Part 6: Frequently Asked Question About Looping Videos on iPhone
- What is a looping video?
It means a video that repeats for a specific number of times or maybe an unlimited amount of times automatically. For example, a GIF.
- Can I loop videos an unlimited number of times?
Yes, it is possible to loop a video an unlimited amount of times. You can learn how to loop a video on iPhone by using the methods that we discussed above in the whole article. It is not possible to save the infinitely looping because it will take an infinite amount of memory.
- Does the view count if I play a YouTube video in a loop?
No, YouTube will not count repeated views if they all come over and over again from the same sources. This is to maintain the overall quality of YouTube and make it scam-free.
For Win 7 or later (64-bit)
Secure Download
For macOS 10.14 or later
Secure Download
Click here to get Filmora for PC by email
or Try Filmora App for mobile >>>
download filmora app for ios ](https://app.adjust.com/b0k9hf2%5F4bsu85t ) download filmora app for android ](https://app.adjust.com/b0k9hf2%5F4bsu85t )
Shanoon Cox
Shanoon Cox is a writer and a lover of all things video.
Follow @Shanoon Cox
Shanoon Cox
Mar 27, 2024• Proven solutions
For Win 7 or later (64-bit)
Secure Download
For macOS 10.14 or later
Secure Download
Click here to get Filmora for PC by email
or Try Filmora App for mobile >>>
download filmora app for ios ](https://app.adjust.com/b0k9hf2%5F4bsu85t ) download filmora app for android ](https://app.adjust.com/b0k9hf2%5F4bsu85t )
Nowadays, we can see a trend of people posting looping videos on their social media. These looping videos are fascinating and fun to watch. A loop is a popular element in photography and especially music videos, the idea being that the camera appears to magically repeat itself as many times as there are photos or frames showing the action. They can also simply recur a sequence a certain number of times, then stop.
Now some people don’t know how to make looping videos, so in this article, we are going to discuss how to loop a video on iPhone videos and also how to loop YouTube videos on iPhone. Let’s get started.
- Part 1: Convert iPhone Live Photos to a Loop Video
- Part 2: Repeat Slideshow Video to Loop on iPhone
- Part 3: Loop YouTube Videos On iPhone
- Part 4: Best Apps to Loop Videos on iPhone and iPad
- Part 5: Better Way to Loop and Create Boomerang Videos in Filmora Video Editor
- Part 6: Frequently Asked Questions About Choosing Best Free Video Editor for Windows
Part 1: How to Convert iPhone Live Photos to a Loop Video
A loop video is a short video that plays in repeat/ indefinitely. Loop videos can be created with features on social media apps and third-party apps.
iPhone has a setting that allows you to edit the photos to loop or bounce videos, and it only works with a photo feature called ‘live photo’. The live photo feature records 1.5 seconds moving picture when you click on the shutter button.
The live photo feature can be edited to create a loop video, and you can do that by following these steps:
- Before creating the video, you need to have the live picture saved on your phone.
To do this, capture a live photo by opening your camera app. Then click on the live photo icon, which is located in the upper right corner. And tap on the shutter button.
- Afterward, you locate the live photo you want to convert to a loop video by going to the Photos apps. Then click on Albums > Media Types> Live photos.
- After locating and clicking on the live picture, you will see the Live tab in the upper left corner. Click on the arrow down to view other options, including Loop, Bounce, and long exposure.
- Select the effect you want to create (loop) and save the file. The loop feature plays the video in a one-way order. So, to make it more interesting, you can select the bounce effect, which makes it play back and forth.
- You can share the created loop video with the share icon at the lower-left corner.
Part 2: Repeat Slideshow to Loop Video on iPhone for Free
Slideshow videos are a very fun way to see your content. People gather around a screen to enjoy these beautiful memories of their life. Here is a step-by-step guide on how to loop a slideshow video on iPhone.
- First, go to your gallery and select a video that you want to make a slideshow of.
- Add that video to an album in your gallery under any name.
- Pause the slideshow video, and you will see Options button at the bottom. Click it and then enable the Repeat option.
Now open that video from the album and start playing the video. That video will start playing in a loop until you make it stop.
Part 3: How to Loop YouTube Videos On iPhone?
Now coming to the part that we discussed in the intro, how to loop YouTube videos on iPhone. So here, we will show you a step-by-step guide on how to loop the videos on your iPhone.
- Launch YouTube on your iPhone and log in to your account if you are not already logged in.
- Now go to the “Search” option and lookup for the desired video that you want to loop, and add it to the playlist. There are two ways you can do that. Click and hold on to the video; a small menu will appear, then click on “Add to” to make a playlist. Start the video and then scroll down a bit and on the extreme right side, click on the “Add to” option, and then name the playlist.
- After that, go back to the main menu and on the lower bottom right side of the screen, click on “Library,” and then select the new playlist.
- Start playing the video, and under the video, click on the drop-down button, and on the left side of the drop-down screen, there is a loop button, click on that, and it will start to play the loop infinitely.
Check this ultimate guide to looping YouTube videos to get more ways.
Part 4: Best Apps to Loop Videos on iPhone and iPad
1. Loopideo - Loop Videos
Loopideo is the app on our list that is an answer to how to loop a video on iPhone. It lets you import any video from your play that you want to play in a loop. This is a great tool when it comes to individual and organizational presentations. This powerful app can be very useful for you in many cases.
2. Loop Video – GIF Maker
The second app on our list is Loop Video GIF Maker. It is very fun and easy to use the tool. It allows you to make the videos loop by turning them into GIFs. Loop Video GIF Maker allows you to import any video from your gallery into your app. You can then convert into a looping GIF. You can also choose the playback speed of the GIF after you can export it to the gallery or upload it to your social media directly from the app.
3. Loopideo Pro
Loopideo Pro is a more feature-filled app on the App Store. Loopideo allows you to make the videos loop an unlimited amount of times. You can also choose the formats that you want to convert the looping video into. This app also gives you the option to choose the playback speed and then can also convert it into GIF speed so that you can save it in your gallery.
4. iMovie
iMovie is a more professional app that is available on the list. This app allows you to loop not only the video but also edit the video. This allows you to play the video in a loop for an unlimited amount of time in the built-in player, but when it comes to saving the looping video, it is not possible because you would need an unlimited amount of space to save that video.
5. Looper
The last app on our list is a looper, and it is a very fun and easy-to-use app available on this list. Choose a video from your gallery, Local Videos, or iCloud Drive. Select the times you want the video to repeat and play. You can also export your video in reverse or in GIF format.
Bonus: Record a Looping Video with Boomerang app on iPhone
To make a looping video on your iPhone, you can either download the boomerang app or use the boomerang video on Instagram.
If you are using the Boomerang app, take these steps to make a looping video:
- Launch the Boomerang from Instagram app on your iPhone, if you haven’t installed it already, click on the search bar and type in Boomerang in the App Store.
- The welcome screen will appear, swipe left and tap on Get started. Allow it to access to your camera, location, and photos. After you are done setting up, you can make the videos.
- To make a boomerang video, click and hold the shutter button. Hold the shutter for a few seconds and move the phone across the image or scene.
- A preview of the looping video will appear; tap on Done to save the video. Or click on the X symbol to make a new video.
- You can change the settings to record a selfie video by clicking on the curved arrows symbol. And you can also tap the lightning sign to put the flash on and off.
To make the video with the Instagram Boomerang feature:
- Open the Instagram app, and then swipe left as if to add a story.
- Click on the boomerang icon (infinity symbol). Press and hold the shutter to make the video.
- Preview the video, and you can add texts, songs, markups, and stickers to the video.
- And then click on the arrow-down symbol to save/ download the video. You can share the video to close friends or your story.
Part 5: What If You’d Like to Loop Videos on Computer?
Filmora is one of the most popular video editors among video creators. It gives you high-quality end product, smooth slowing down & speeding up movements, voiceovers on top of music tracks and transitions between audio & video clips. But another amazing benefit of this computer video editor is that you can produce a loop video.
![]()
The Best Video Looper on Windows and Mac
- Loop and repeat videos multiple times
- Copy and paste clips easily
- Built-in plentiful templates and effects
- Export to MP4, MOV, MKV, GIF and multiple formats
For Win 7 or later (64-bit)
Secure Download
For macOS 10.14 or later
Secure Download
Click here to get Filmora for PC by email
or Try Filmora App for mobile >>>
download filmora app for ios ](https://app.adjust.com/b0k9hf2%5F4bsu85t ) download filmora app for android ](https://app.adjust.com/b0k9hf2%5F4bsu85t )
In this part, I’m going to show you how to create looping video in Filmora video editor with the reverse effect. It’s actually really easy and doesn’t require any complicated steps. You’ll be able to create a cool, looping video in no time! So, let’s get started!
Step 1: Import Videos to Filmora video editor
Launch Filmora video editor on your Windows or Mac computer and then make a new project. Import videos as you can see it has been already imported all the media in the media library from your which you want to loop effect, and then drag the video clip to the timeline.
Step 2: Copy and Paste the Video
After drag and drop the video to the timeline, make a copy of it (Ctrl+C). Go to the last frame and paste this video again.
Step 3: Enable Reverse Speed effect
Right click on the pasted video and go to Speed and Duration option in which custom speed dialog box where you can adjust the speed.
In the Custom Speed dialog box you will find the speed, duration, reverse and ripple options. To make a video with loop effects, click the Reverse option to reverse the video play back from end to start frames automatically. Click OK to save the settings.
Now you have got a video with one looping count, if you want the video to loop several times, you can select these 2 clips and paste it based on your needs to get a continuous looping effect.

We hope you found this post helpful in learning how to create looping video with Filmora video editor. This makes them perfect for use as GIFs because they are never ending! What’s more, you can create a looping video in Filmora video editor by adding a sound that plays continuously. If you’re looking to make an endlessly repeating animated image or video clip using just one still image, look no further than Filmora video editor. It’s easy and fun to use.
For Win 7 or later (64-bit)
Secure Download
For macOS 10.14 or later
Secure Download
Click here to get Filmora for PC by email
or Try Filmora App for mobile >>>
download filmora app for ios ](https://app.adjust.com/b0k9hf2%5F4bsu85t ) download filmora app for android ](https://app.adjust.com/b0k9hf2%5F4bsu85t )
Part 6: Frequently Asked Question About Looping Videos on iPhone
- What is a looping video?
It means a video that repeats for a specific number of times or maybe an unlimited amount of times automatically. For example, a GIF.
- Can I loop videos an unlimited number of times?
Yes, it is possible to loop a video an unlimited amount of times. You can learn how to loop a video on iPhone by using the methods that we discussed above in the whole article. It is not possible to save the infinitely looping because it will take an infinite amount of memory.
- Does the view count if I play a YouTube video in a loop?
No, YouTube will not count repeated views if they all come over and over again from the same sources. This is to maintain the overall quality of YouTube and make it scam-free.
For Win 7 or later (64-bit)
Secure Download
For macOS 10.14 or later
Secure Download
Click here to get Filmora for PC by email
or Try Filmora App for mobile >>>
download filmora app for ios ](https://app.adjust.com/b0k9hf2%5F4bsu85t ) download filmora app for android ](https://app.adjust.com/b0k9hf2%5F4bsu85t )
Shanoon Cox
Shanoon Cox is a writer and a lover of all things video.
Follow @Shanoon Cox
Beginner’s Blueprint to YouTube Streaming Games
How to Live Stream on YouTube Gaming?

Richard Bennett
Mar 27, 2024• Proven solutions
1. Live Stream on YouTube Gaming with OBS
You need to follow these simple Step s to use OBS for YouTube Live Streaming:
**Step 1:**First of all you need to login to your YouTube account. You might be aware of the fact that same YouTube account is used for YouTube gaming needs.
**Step 2:**Once entered inside your account then you need to visit the Go live streaming options and then from drop down menu simply choose Stream Now option.
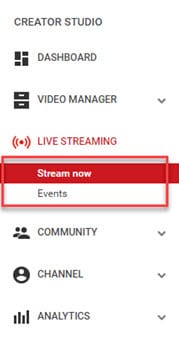
**Step 3:**It is time to fill the details on screen; put impressive words for your live stream description so that it can grab attention of more viewers. Then select category as ‘Gaming’.

**Step 4:**Now you need to copy the stream key.
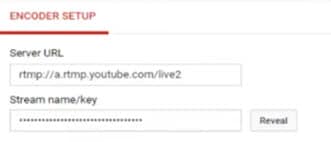
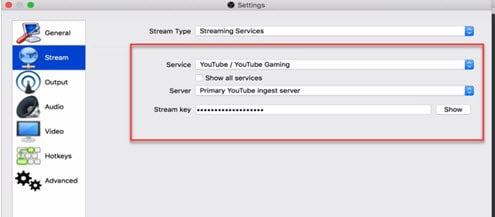
**Step 5:**Now open your OBS tool and then select YouTube as your active game streaming service. Users here need to paste that copied streaming key of Step 5 into the space provided on OBS settings page.
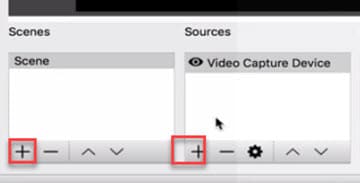
**Step 6:**It is time to make your desktop a video source.
**Step 7:**Once all these settings are completed then you need to hit the start streaming option.
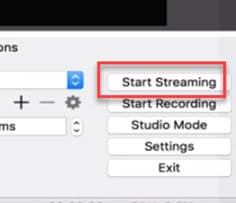
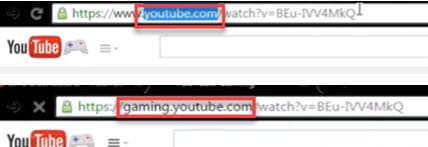
**Step 8:**The service may take few seconds to bring your live on YouTube and after this small duration you will be connected to your channel with your streamed content. Then change your url from youtube.com to gaming.youtube.com
**Step 9:**You are all set to be live on your YouTube gaming profile.
2. Live Stream on YouTube with Elgato Game Capture HD
A: Basic Settings for Elgato Game Capture HD
The Step s below will help you to get ready for streaming with all basic settings that are required by Elgato Game Capture HD tool.
**Step 1:**First of all, you need to open your browser, search for Elgato Game Capture HD software on its official website and then download it for your system. Get it installed.
**Step 2:**Once installation process is complete then launch your software.
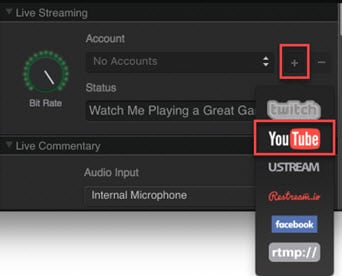
**Step 3:**Now you need to hit the add button on screen and select YouTube from drop down menu.
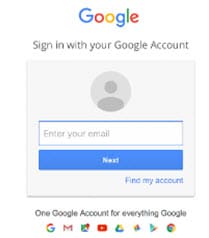
Step 4: It is time to sign in with your Google Account.
**Step 5:**After sign up process, allow the Elgato Game Capture tool to make connection with your YouTube account.

**Step 6:**Soon you will be able to access you account from Elgato platform.

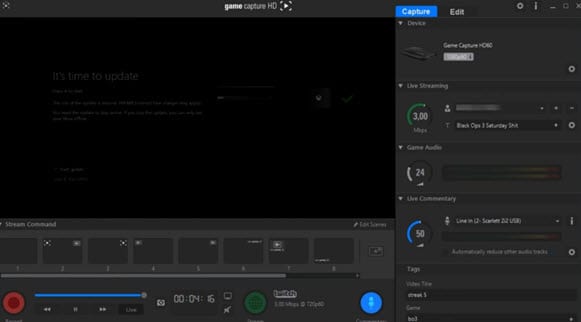
**Step 7:**It is time to make adjustments for streaming settings.
B: Test your Bandwidth and make adjustments for Stream settings
It is essential to check speed of your internet connection during live streaming because if it goes slow then your content will become annoying to viewers and it will decay the reputation of your channel. So prefer to use following Step s to complete the basic settings and to test your internet connection.
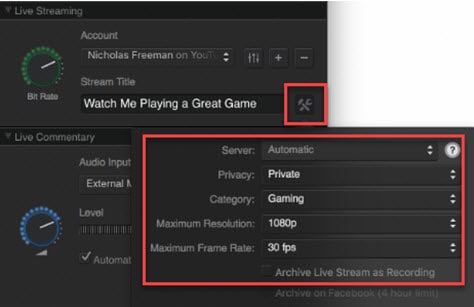
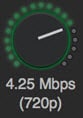
**Step 1:**Open your browser and then visit the speedtest.net platform. You can also use other similar kind of websites to ensure the speed of your internet. Note that you will find a Bit Rate dial in the live streaming section, here you can make adjustments for bit rates to bring it to desired level.
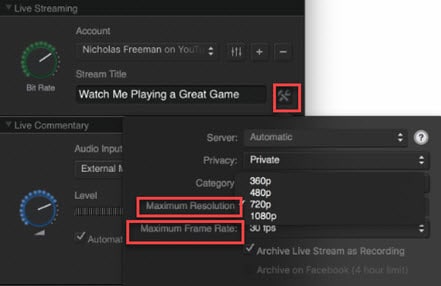
**Step 2:**It is also possible to make customized settings for frame rate and resolution as per need of your stream content.
**Step 3:**One can also prefer to archive his streaming.
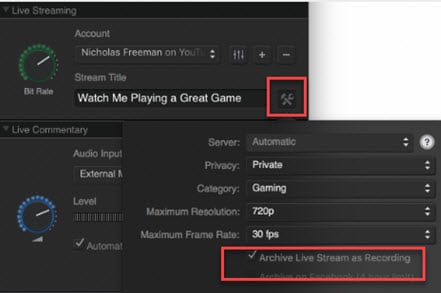
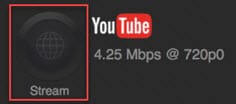
**Step 4:**As soon as you have completed all above settings then you need to hit the stream button on screen.
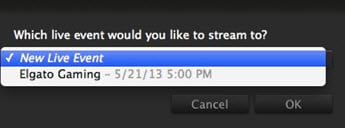
**Step 5:**Soon your software will ask you to select the event that you want to stream, choose your desired event and then press Ok. Soon you will be live on YouTube.
Richard Bennett
Richard Bennett is a writer and a lover of all things video.
Follow @Richard Bennett
Richard Bennett
Mar 27, 2024• Proven solutions
1. Live Stream on YouTube Gaming with OBS
You need to follow these simple Step s to use OBS for YouTube Live Streaming:
**Step 1:**First of all you need to login to your YouTube account. You might be aware of the fact that same YouTube account is used for YouTube gaming needs.
**Step 2:**Once entered inside your account then you need to visit the Go live streaming options and then from drop down menu simply choose Stream Now option.
**Step 3:**It is time to fill the details on screen; put impressive words for your live stream description so that it can grab attention of more viewers. Then select category as ‘Gaming’.
**Step 4:**Now you need to copy the stream key.
**Step 5:**Now open your OBS tool and then select YouTube as your active game streaming service. Users here need to paste that copied streaming key of Step 5 into the space provided on OBS settings page.
**Step 6:**It is time to make your desktop a video source.
**Step 7:**Once all these settings are completed then you need to hit the start streaming option.
**Step 8:**The service may take few seconds to bring your live on YouTube and after this small duration you will be connected to your channel with your streamed content. Then change your url from youtube.com to gaming.youtube.com
**Step 9:**You are all set to be live on your YouTube gaming profile.
2. Live Stream on YouTube with Elgato Game Capture HD
A: Basic Settings for Elgato Game Capture HD
The Step s below will help you to get ready for streaming with all basic settings that are required by Elgato Game Capture HD tool.
**Step 1:**First of all, you need to open your browser, search for Elgato Game Capture HD software on its official website and then download it for your system. Get it installed.
**Step 2:**Once installation process is complete then launch your software.
**Step 3:**Now you need to hit the add button on screen and select YouTube from drop down menu.
Step 4: It is time to sign in with your Google Account.
**Step 5:**After sign up process, allow the Elgato Game Capture tool to make connection with your YouTube account.
**Step 6:**Soon you will be able to access you account from Elgato platform.
**Step 7:**It is time to make adjustments for streaming settings.
B: Test your Bandwidth and make adjustments for Stream settings
It is essential to check speed of your internet connection during live streaming because if it goes slow then your content will become annoying to viewers and it will decay the reputation of your channel. So prefer to use following Step s to complete the basic settings and to test your internet connection.
**Step 1:**Open your browser and then visit the speedtest.net platform. You can also use other similar kind of websites to ensure the speed of your internet. Note that you will find a Bit Rate dial in the live streaming section, here you can make adjustments for bit rates to bring it to desired level.
**Step 2:**It is also possible to make customized settings for frame rate and resolution as per need of your stream content.
**Step 3:**One can also prefer to archive his streaming.
**Step 4:**As soon as you have completed all above settings then you need to hit the stream button on screen.
**Step 5:**Soon your software will ask you to select the event that you want to stream, choose your desired event and then press Ok. Soon you will be live on YouTube.
Richard Bennett
Richard Bennett is a writer and a lover of all things video.
Follow @Richard Bennett
Also read:
- In 2024, What Is the Difference Between YouTube and Dailymotion
- [Updated] YouTube to WAV File 4 Best Free Convert Solutions
- In 2024, Broadcast Your Curated Playlist with Ease
- In 2024, Deciphering Ad Revenue and Affiliate Opportunities on YouTube
- ASMR App Selection Guide for Phones for 2024
- [New] Essential 10 Boosters for Multi-Device Use
- [Updated] 15 Best Sites to Find & Download Royalty-Free Music for YouTube
- A List of Ten Soaring YouTube Creations with Speed and Purpose for 2024
- 2024 Approved Economical Options Best 11 Vlogging Gear
- 2024 Approved Crafting the Perfect Harmony Fusing Lyrics & Images with Lyric Video Maker
- In 2024, Crafting Splitscreen YouTube Videos A Guide to Creativity
- [Updated] Cut Costs, Boost Creativity Learn the Secrets of Green Screen Artistry From 4 Leading Educators
- In 2024, Defending Your Videos Against YouTube Copyright Strikes
- 2024 Approved Analyzing TSeries Earnings via YouTube Engagement
- Conquer YouTube's Realms A Step-by-Step Video Uploading Guidebook
- Revenue Calculation for Every Clicked Video
- Navigating the World of Time Stamps in YouTube Links (Desktop/Mobile)
- [New] Adding Value Instructional Design of YouTube Alerts & Annotations
- [New] Comprehensive Tips for Monitoring Subscriber Engagement
- Cross-Platform Dimensions Titling for YTB Shorts & Beyond for 2024
- ASMR Mastery in Action Strategies for Dynamic and Effective Videos for 2024
- Efficient Techniques for YouTube Shorts Revenue
- 2024 Approved 11 FREE YouTube Playlist Downloaders [Online/PC/Android/iOS]
- Universal Creatives for Social Media Hubs
- [New] Enhance Audio-Visual Fidelity Use AV1 on YouTube
- Gain Traction on YouTube Deciphering Ranking Principles
- In 2024, Building Brand Voice via Micro-Business Videos
- Making an Impression Professional PC Editing Strategies for YouTube
- The Ultimate Guide to Beauty Channels Your Step-By-Step Blueprint
- Captivating Audiences with Cross-Platform Multistreaming on Youtube and Twitch for 2024
- In 2024, Enhance Your Videos - Discover the Top 10 Efficient Cutter Apps
- [Updated] Easy Guide Turning Your Favorite YouTube Videos Into Animated GIFs
- Easy Steps to Save YouTube Videos
- In 2024, Adding Impact Strategies for Youtubes' Last Impressions
- 2024 Approved Effortlessly Create Engaging YouTube Thumbnails
- [New] Discover YouTube's Frame Advantage - Five Free Tools
- [Updated] Bites & Bloopers Tasty Talents on TikTok
- Updated Motion Tracking Apps The Ultimate Guide for Android and iOS
- 2024 Approved Expert Tips to Enhance Your Live FB Broadcast Quality (PC/Mac)
- How To Activate and Use Life360 Ghost Mode On ZTE Nubia Z60 Ultra | Dr.fone
- Best Female-Sounding Voice Transformation Software for Men for 2024
- In 2024, How To Leave a Life360 Group On Realme C33 2023 Without Anyone Knowing? | Dr.fone
- 20 Quick Video Concepts for Aspiring Vloggers for 2024
- Advanced Techniques for 360° Video Editing in Premiere for 2024
- New Audio Transition Techniques with Keyframes A Mac-Based Filmorians Handbook for 2024
- 2024 Approved Step-by-Step Methods to Incorporate Microphone Input Into PowerPoint Slides (Windows & macOS)
- In 2024, From Novice to Leader Top 30 Facebook Tactics Unlocked
- [Updated] Exclusive Look at Top 10 Gamers on TikTok for 2024
- 3 Easy Ways to Factory Reset a Locked Apple iPhone SE (2020) Without iTunes
- 2024 Approved Capturing Audiences' Attention with Animated Viral Video Hits
- [New] In 2024, 5 Creative TikTok Caption Ideas for Maximum Impact
- Title: Streamlining Your iPhones Video Loops
- Author: Kevin
- Created at : 2024-06-18 20:20:34
- Updated at : 2024-06-19 20:20:34
- Link: https://youtube-videos.techidaily.com/streamlining-your-iphones-video-loops/
- License: This work is licensed under CC BY-NC-SA 4.0.
