
:max_bytes(150000):strip_icc()/android-phone-9eea685d77174a2fbab326fc95cdd2c0.jpg)
Streamlining Audio Integration in YouTube Videos for Professionals
Streamlining Audio Integration in YouTube Videos for Professionals
How to Add Music to YouTubeVideo with YouTube Video Editor

Richard Bennett
Mar 27, 2024• Proven solutions
Adding the right music to your YouTube can significantly increase its entertainment value. Professional video maker will not play a music background while shooting the video; they do it during the editing process. You can remove the background noisy during editing and add your own music sound during editing, but you can also upload the video to YouTube first and then choose the right music for your video in YouTube. In this article, we are going to show you how to add or change music to your YouTube videos in YouTube platform after uploading and how to add music to YouTube Video with royalty free music in Audio Library.
You may also like: How to edit YouTube videos >>
Before we get started, there is a better way on how to add music to YouTube Video. You may use Wondershare Filmora to better manage your video. It allows you to import any track you want in different format including but not limited to MP3, WAV, FLAC and others. They also have a huge and better collection of royalty-free music. Compared to YouTube Video Editor where you have a pretty limited audio mix manager, the Filmora comes with an audio equalizer. You may also detach the music easily or add multiple tracks on a single video. You can also import the video that you created in different format or upload it directly to YouTube.
 Download Mac Version ](https://tools.techidaily.com/wondershare/filmora/download/ )
Part 1: How to Add Music to YouTube Video
We’re going to offer you two ways to add music to YouTube video with YouTube built-in video editing features.
Section 1: Using Video Manager
There are thousands of royalty free songs that you can use in the YouTube video. You can choose from different genres and moods songs with different duration as well. Here is how to add music to YouTube videos in Video Manager tab.
Step 1 Sign in
The first thing you need to do when you want to know how to add music to YouTube Video is to sign into your account on YouTube. Go to the official site of YouTube and click the sign-in option found at the upper right corner of your screen. You will then be asked to enter your Gmail account and your password. After you managed to sign in, you should be able to see your profile picture on the upper right corner of the page. Click your picture, and you will be able to see the Creator Studio Option. Click that button.

Step 2 Choosing the Video
Start Browsing Your Video Channel. You may do this by clicking on the Video Tab on your Profile Page or Clicking the Video Manager option located at the left bar. You will then be redirected to the videos that you uploaded. Choose your video that you want to have background music.

Step 3 Choosing the Music
Click the Edit option that is located next to the video that you want to edit. This will open the online video editing tool of YouTube. Located on top of the page are the different commands that you can execute to edit the video; you may enhance, add audio, put annotation, create cards, add subtitle and add copyright. Click the Audio Option. It will lead you to a library of music that you may add to your video.

Step 4 Finding the Right Music
The next thing to do on how to add music to YouTube Video is to find an appropriate music for your video. You also need to make sure that the length of the track will perfectly match the length of your video. To do this, Click on the drop down menu that says ‘Top Tracks’ and you will see the different genre of music. In case you already have music in your mind, simply type the title of the song on the search bar and hit enter.

Additional Tip: Not satisfied with the track? Try the sound effects by going at YouTube Audio Library . You can create an advance search by customizing the result based on popularity, duration, instrument, mood and genre.
Step 5 Adding the Selected Music
Before you decided to add the music to your video, make sure that it fits the duration of your video. In case you want to know how to add music to YouTube Video, you should do nothing more than to click the ADD TO VIDEO button and it will be automatically integrated into your video.
Step 6 Editing the Music
- After you successfully integrate the music to the video, you will see the title of the music under your video. You also have additional tools that you can use. Let us take a look at the Position audio and the slide bar option a little closer.

- Once You Click the Position Audio Button, you will be able to customize and position your integrated music as well as compress the length of the music. To trim the music, simply put your pointer either at the end or the beginning of the music. When you want to move the audio, you may just drag the music.
- The ‘Only Music’ option located at the left side of the Position Audio can be used to adjust the volume of the music. In case you want to remove the original sound from the video, drag the pointer at the right most.
Step 7 Saving the Changes
When you save the edited video, you can save it as a separate video, or you can overwrite the existing video.
Additional Reminder: You can’t add multiple audio tracks in one video with youtube video editor, if you want to get an advanced audio editing, check this article How to mix audio tracks into one file for video
Section 2: Using Audio Library
Since YouTube has shut down the Video Editor module in 2017, you can now add music in YouTube Video Editor Module. Though there are plentiful video editing software for YouTube videos , you can also download Free Music and Sound Effects in YouTube Audio Library first and then add it to your video clips. Here is how to add music to YouTube video with YouTube Audio Library.
Step 1 Click on Audio Library
This time instead of clicking the Video Manager option, you will have to click on the Create option and choose Audio Library.

Step 2 Download target free music or sound effect
In YouTube Audio Library, you will find some free music sounds and sound effects available. You can search music in the library and filter genre, duration, mood, attribution and instrument properties. Click the download icon to download this royalty free music and sound effect to your computer. And then you can combine the audio and video and make it as a video with music sound. You can download multiple audio files and then add multiple songs to the YouTube video.

Step 3 Add Music to Video and Edit the music track
There are numerous video editors that you can add the downloaded music from YouTube Audio Library to the video. You can check our guide abouthow to edit YouTube videos in Windows Movie Maker orhow to add music to video in iMovie . While, as we described before, Filmora video editor is one of the best video editor for YouTubers. And here is how to add music to YouTube videos with Filmora . You can edit the treble, bass, pan and volume. However, it is impossible for you to position the music in a desired spot. If you want to get more control on your audio tracks, please read this article to know how to add audio effects to your video
Importing the video and audio
Importing media files to Filmora is easy. After launching Filmora, import all the files to the media library first and then drag and drop the target video and audio to the timeline. One of the best things of using Filmora to edit YouTube video is there is a built-in Music Library which including some royalty free music sound and sound effects as well.

Detach the original audio from video [Optional]
If you want to remove the recorded original audio file from video , just right click the video and then select Audio Detach option and the audio will be separated from the video automatically and then delete the audio.
What’s more, you can also use Filmora to remove the background noise and then keep the original audio as well.
Edit the Music

In Filmora, you can change the video and audio speed, add fade in and fade out to the music and change the music sound.
Read More to Get: 10 Best Music Video Makers >>
Watch the video below to check how to empower your imagination with Filmora

Richard Bennett
Richard Bennett is a writer and a lover of all things video.
Follow @Richard Bennett
Richard Bennett
Mar 27, 2024• Proven solutions
Adding the right music to your YouTube can significantly increase its entertainment value. Professional video maker will not play a music background while shooting the video; they do it during the editing process. You can remove the background noisy during editing and add your own music sound during editing, but you can also upload the video to YouTube first and then choose the right music for your video in YouTube. In this article, we are going to show you how to add or change music to your YouTube videos in YouTube platform after uploading and how to add music to YouTube Video with royalty free music in Audio Library.
You may also like: How to edit YouTube videos >>
Before we get started, there is a better way on how to add music to YouTube Video. You may use Wondershare Filmora to better manage your video. It allows you to import any track you want in different format including but not limited to MP3, WAV, FLAC and others. They also have a huge and better collection of royalty-free music. Compared to YouTube Video Editor where you have a pretty limited audio mix manager, the Filmora comes with an audio equalizer. You may also detach the music easily or add multiple tracks on a single video. You can also import the video that you created in different format or upload it directly to YouTube.
Download Mac Version ](https://tools.techidaily.com/wondershare/filmora/download/ )
Part 1: How to Add Music to YouTube Video
We’re going to offer you two ways to add music to YouTube video with YouTube built-in video editing features.
Section 1: Using Video Manager
There are thousands of royalty free songs that you can use in the YouTube video. You can choose from different genres and moods songs with different duration as well. Here is how to add music to YouTube videos in Video Manager tab.
Step 1 Sign in
The first thing you need to do when you want to know how to add music to YouTube Video is to sign into your account on YouTube. Go to the official site of YouTube and click the sign-in option found at the upper right corner of your screen. You will then be asked to enter your Gmail account and your password. After you managed to sign in, you should be able to see your profile picture on the upper right corner of the page. Click your picture, and you will be able to see the Creator Studio Option. Click that button.
Step 2 Choosing the Video
Start Browsing Your Video Channel. You may do this by clicking on the Video Tab on your Profile Page or Clicking the Video Manager option located at the left bar. You will then be redirected to the videos that you uploaded. Choose your video that you want to have background music.
Step 3 Choosing the Music
Click the Edit option that is located next to the video that you want to edit. This will open the online video editing tool of YouTube. Located on top of the page are the different commands that you can execute to edit the video; you may enhance, add audio, put annotation, create cards, add subtitle and add copyright. Click the Audio Option. It will lead you to a library of music that you may add to your video.
Step 4 Finding the Right Music
The next thing to do on how to add music to YouTube Video is to find an appropriate music for your video. You also need to make sure that the length of the track will perfectly match the length of your video. To do this, Click on the drop down menu that says ‘Top Tracks’ and you will see the different genre of music. In case you already have music in your mind, simply type the title of the song on the search bar and hit enter.
Additional Tip: Not satisfied with the track? Try the sound effects by going at YouTube Audio Library . You can create an advance search by customizing the result based on popularity, duration, instrument, mood and genre.
Step 5 Adding the Selected Music
Before you decided to add the music to your video, make sure that it fits the duration of your video. In case you want to know how to add music to YouTube Video, you should do nothing more than to click the ADD TO VIDEO button and it will be automatically integrated into your video.
Step 6 Editing the Music
- After you successfully integrate the music to the video, you will see the title of the music under your video. You also have additional tools that you can use. Let us take a look at the Position audio and the slide bar option a little closer.
- Once You Click the Position Audio Button, you will be able to customize and position your integrated music as well as compress the length of the music. To trim the music, simply put your pointer either at the end or the beginning of the music. When you want to move the audio, you may just drag the music.
- The ‘Only Music’ option located at the left side of the Position Audio can be used to adjust the volume of the music. In case you want to remove the original sound from the video, drag the pointer at the right most.
Step 7 Saving the Changes
When you save the edited video, you can save it as a separate video, or you can overwrite the existing video.
Additional Reminder: You can’t add multiple audio tracks in one video with youtube video editor, if you want to get an advanced audio editing, check this article How to mix audio tracks into one file for video
Section 2: Using Audio Library
Since YouTube has shut down the Video Editor module in 2017, you can now add music in YouTube Video Editor Module. Though there are plentiful video editing software for YouTube videos , you can also download Free Music and Sound Effects in YouTube Audio Library first and then add it to your video clips. Here is how to add music to YouTube video with YouTube Audio Library.
Step 1 Click on Audio Library
This time instead of clicking the Video Manager option, you will have to click on the Create option and choose Audio Library.
Step 2 Download target free music or sound effect
In YouTube Audio Library, you will find some free music sounds and sound effects available. You can search music in the library and filter genre, duration, mood, attribution and instrument properties. Click the download icon to download this royalty free music and sound effect to your computer. And then you can combine the audio and video and make it as a video with music sound. You can download multiple audio files and then add multiple songs to the YouTube video.
Step 3 Add Music to Video and Edit the music track
There are numerous video editors that you can add the downloaded music from YouTube Audio Library to the video. You can check our guide abouthow to edit YouTube videos in Windows Movie Maker orhow to add music to video in iMovie . While, as we described before, Filmora video editor is one of the best video editor for YouTubers. And here is how to add music to YouTube videos with Filmora . You can edit the treble, bass, pan and volume. However, it is impossible for you to position the music in a desired spot. If you want to get more control on your audio tracks, please read this article to know how to add audio effects to your video
Importing the video and audio
Importing media files to Filmora is easy. After launching Filmora, import all the files to the media library first and then drag and drop the target video and audio to the timeline. One of the best things of using Filmora to edit YouTube video is there is a built-in Music Library which including some royalty free music sound and sound effects as well.
Detach the original audio from video [Optional]
If you want to remove the recorded original audio file from video , just right click the video and then select Audio Detach option and the audio will be separated from the video automatically and then delete the audio.
What’s more, you can also use Filmora to remove the background noise and then keep the original audio as well.
Edit the Music
In Filmora, you can change the video and audio speed, add fade in and fade out to the music and change the music sound.
Read More to Get: 10 Best Music Video Makers >>
Watch the video below to check how to empower your imagination with Filmora
Richard Bennett
Richard Bennett is a writer and a lover of all things video.
Follow @Richard Bennett
Best Cameras for Quality YouTube Content
The Best Cameras for YouTube from Beginners to Professionals

Max Wales
Mar 27, 2024• Proven solutions
Whether you’re a beginner or a pro as a YouTuber, your YouTube equipment shouldn’t be the thing that holds you back from becoming a YouTube star. But, how do you find the best camera for making YouTube videos? What options do you have?
In this article, we’re going to explore some of the best cameras for YouTube. We’ll label each one based on what we believe is best for particular uses, so that you can better parse what it is that you want to purchase. All of this is in hopes that you can find the video camera for YouTube that is right for you and what you need.
Part 1: 7 Best Best Camera for Youtube to Make Videos
1. Sony DSC WX350 Digital Camera – Best Point and Shoot Video Camera
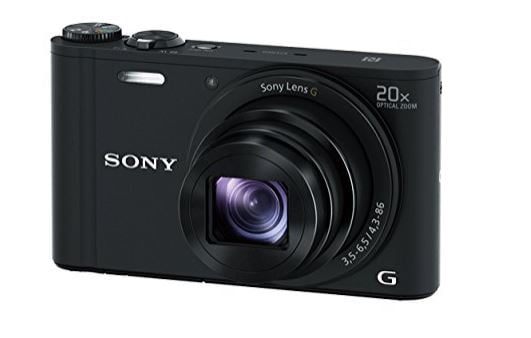
Specifications:
- 40x clear image zoom; 20x optical zoom
- Lock-on Auto Focus
- Wi-Fi with NFC3 connectivity for mobile devices
- 4 megapixels
- CMOS sensor that provides top quality images, even in low lighting
- Motion shot video with up to 4k quality output
Description: Have you been looking for a 20x zoom camera that fits in your pocket ? Get the best pictures with the Sony DSC WX350. This camera offers both still photos and video recording, using technology that minimizes how much the camera shakes, even if you’re filming on the go.
Pros: The image stabilizer makes this one of the best cameras for making YouTube videos out there, alongside of the 20x optical zoom. The battery life is quite long as well, which means you can get a lot of content done without any problems. Lastly, you can film in HD, which makes any YouTube influencer happy.
Cons: The LED screen can be quite dim, so it’s hard to see it when you’re out in bright sunlight; be sure you make adjustments before you go outside. There is also not your typical viewfinder installed, so experienced videographers may not like using it.
2. GoPro HERO8 Action Camera - Best Wearable Sports Camera
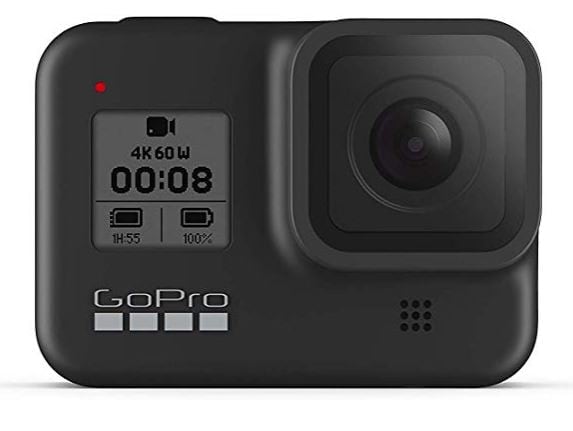
Specifications:
- Up to 60 FPS
- 4k and HD capabilities
- HyperSmooth 2.0 stabilization options.
- Optional Battery Mod available.
- Integrated Mount
- Crisp, easy to use and navigate LCD.
Description: If you need an on-the-go video camera for YouTube, there’s nothing better than a GoPro. With their HERO series of GoPros, they have all sorts of great features that allow you to capture the smoothest video, even when you’re out and on the go. Their top end stabilization makes their cameras the best for the active YouTuber.
Pros: The rugged, waterproof design of the HERO7 is a great option for anyone who is looking to be on the go with their YouTube. The integrated mount makes it simple for anyone who wants to put it on a selfie stick or something else, and it even has a companion app for easy, on the go editing!
Cons: The Wi-Fi capabilities are great, but the video transfer can take a bit of time due to how large the files may be. So, if you’re uploading the transfer, you may want to consider using the USB port instead. Also, the memory card slot is in an awkward place near the mount, so those with larger fingers may have trouble putting a card in there.
3. Logitech BRIO HD Webcam for Video – Best Video Recording and Streaming Camera
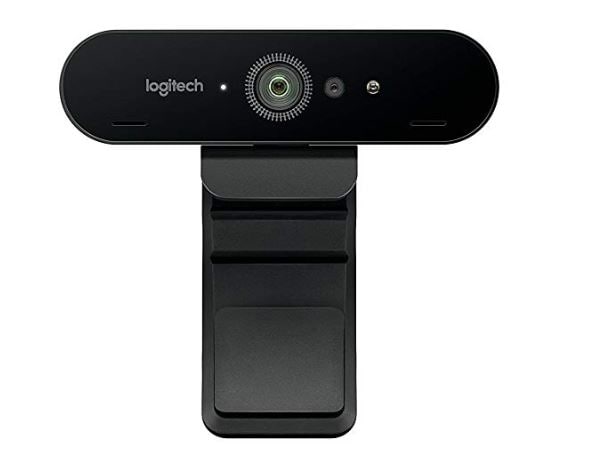
Specifications:
- 5x zoom
- Premium glass lens
- 4k image sensor for videoing and HDR with autofocus
- Light exposure automatically adjusts for whatever lighting that you’re filming in.
- Streaming and recording available.
- Enterprise ready for any use.
- Plug and play software automatically installs upon first use.
- Cover clip so you can cover the camera quickly, when needed.
Description: If you need an easy to use, simple to install option for filming and streaming from your computer, then this Logitech is the best camera for YouTube videos of this type. With multiple features and a design that has been made for streamers like you, you’ll always be able to just turn it on, make adjustments with ease, and get streaming in no time.
Pros: The camera is incredibly easy to use and install; it connects to your PC with a USB type C to USB type 3.0 cord (backwards compatible to 2.0). You can easily tinker with all of the settings and such in the included software.
Cons: The arm is designed for thick edges; those with flat monitors or borderless monitors may find that it’s difficult to attach it to your monitor. The software is easy to use, but it’s missing a handful of settings that more experienced streamers would want to have available. There is a crop out background feature, but it can be hard to find and use.
4. PANASONIC Lumix G7 4K Digital Camera - Best Mirrorless Camera for Professionals

Specifications:
- 16 megapixels
- No pass filter with four thirds sensor
- Wi-Fi capability
- 4k and HD video capture available at 30 frames per second.
- Aperture and shutter settings are adjusted via knobs, not menus.
- 3 inch tilt and swivel display
- High resolution viewfinder
Description: If you want to have professional looking photos and videos, the PANASONIC Lumix G7 4K is a solid choice for a mirrorless camera. All of the controls make it easy to get things the way that you want it, and it comes with multiple ports so that you can plug it into any device and get it ready to go.
Pros: This one of the best 4k video options out there, and you don’t need to spend an arm and a leg on it. The dual control dials and the variable touch LCD allow for maximum control, making it simple to film what you want with minimal editing after you’ve filmed.
Cons: There is a tracking focus, which can be good, but it makes the burst rate (which helps with motion blur) a lot slower. It does have a plastic build, rather than metal, so it’s not as heavy duty as other options. And, you need to purchase it with everything included, instead of just purchasing the body.
5. Sony CX405 Full HD - Best Camcorder (Only) for Video
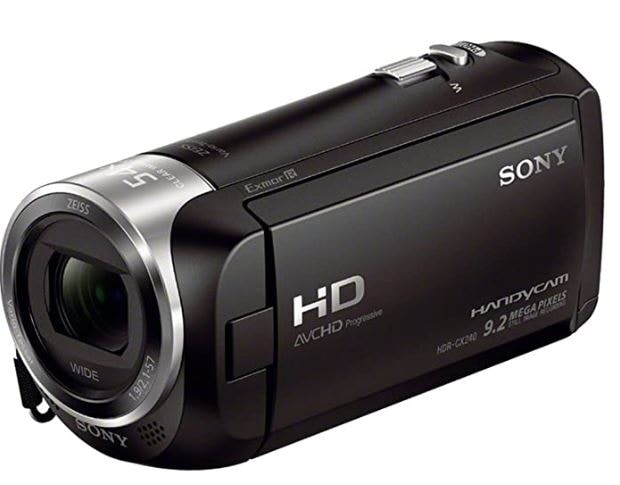
Specifications:
- 60x clear image zoom with Zeiss Lens
- 50 Mbps XAVC
- MP4 and AVCHD codecs
- SteadyShot image stabilization
- Built-in USB cable
- Face detection and noise reduction
- 7 picture effects for video
Description: If you’re looking for the best cheap camera for YouTube, this is a pretty solid option. It has a Carl Zeiss lens (low light capable) and SteadyShot technology for stabilization. It’s the starter camera that beginners dream of due to its ease of use and affordability.
Pros: The image stabilization is some of the best out there, and it’s got a user friendly interface. Dual recording options make for great YouTube and other social media use. Lightweight makes it easy to take anywhere.
Cons: Connectivity ports are in strange spots, and can be hard to get to. You cannot add an external mic, so you have to use the on-board ones. After extensive use of the ports, the on-board USB cable may have some issues with connectivity over time.
6. DJI OSMO Handheld Gimbal – Best Easy to Use Holder for Camera Phone for Beginners
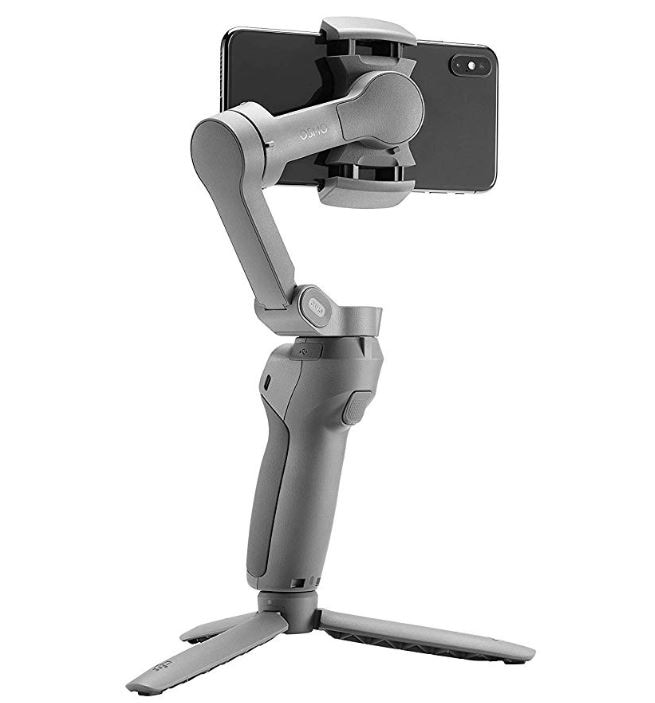
Specifications:
- 3 axis Gimbal that reduces shaky footage
- Ultra-responsive design reacts in real time.
- Easily folds up for maximum portability
- Battery operated ensures that you don’t always need a connection
- Comfortable grip allows you to use the gimbal without discomfort or pain.
Description: If your phone is currently the best camera for YouTube videos, then the DJI OSMO Handheld Gimbal makes it really easy for you to use it on the go. This has been designed to keep your camera flat, no matter where you’re moving, and it helps you take some pretty great shots. This is an option if you need freedom in your movement.
Pros: The DJI OSMO Handheld Gimbal is really easy to use and compatible with most mobile phones that are out there. With multiple settings and options, you can easily turn your phone into the very best option for getting footage, even if your regular video camera isn’t nearby.
Cons: Some people note that it doesn’t work with wide-screen mobile devices or “phablets” as they are called. Another complaint is that it can be difficult to get used the construction of the Gimbal, but that’s something that you can sort out with practice.
7. Canon Digital SLR Camera Kit – Best Cheap SLR Choice
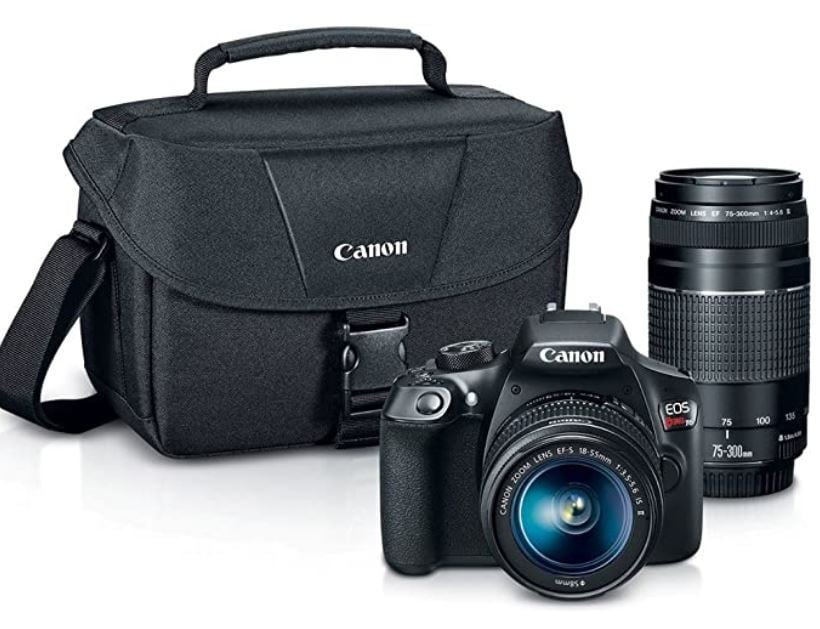
Specifications:
- Wi-Fi and NFC built in for ease of video and photo transfer
- 18 Megapixel
- Image sensor with an IS of 100 to 6400 (and the option to expand to 12800)
- Full HD videos with manual controls for focus and exposure
- 3 inch LCD monitor turns and adjusts as needed.
- Interchangeable lens, Bayonet mount for tripods and selfie sticks.
Description: The Canon Digital SLR Camera Kit is an all-in-one kit that makes it simple for you to start making videos right out of the bag. Complete with everything that you need in order to use an SLR well, you’ll find it’s quite simple to get the hang of, and that you have a lot of flexibility in how you use it.
Pros: The Canon Digital SLR Camera Kit has Wi-Fi capability, offers a great auto focus and is made from heavy duty materials. Plus, it can shoot stills, video, and rolls, which makes it really versatile for anyone.
Cons: This particular set doesn’t have Bluetooth with it, so you can’t connect a remote. Its lens is interchangeable, but you can only use Canon lenses and flashes with it, so that decreases the number of options you have here.
Want to know more about camera? Watch this!
What Gear Do Creators Actually Use | Vidcon 2023 | Sony vs Canon
Part 2: Frequently Asked Questions
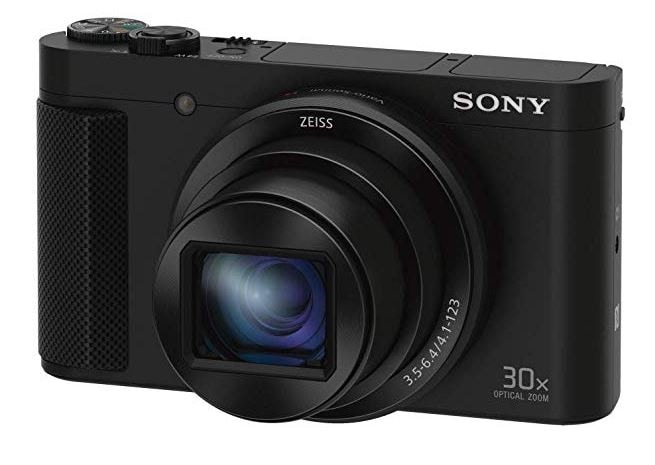
1. What is a good camera for YouTube beginners?
Sony DSCHX80/B Point & Shoot Camera is the best cheap camera for YouTube that you can find if you’re on any sort of budget. It has a 60x clear image zoom and incredibly versatile video with multiple viewfinder and autofocus options. It’s selfie ready with a multi-angle LCD display and you can customize your setting sin whatever way that you wish to do so. It also comes with pretty much anything that you need in the box, so you’re ready to start filming as soon as you charge it.
2. What equipment do you need to start a YouTube channel?
- A camera that meets all of your needs and purposes.
- A microphone that is easy to use and produces high quality audio options.
- A sturdy, reliable tripod that is compatible with your camera
- Lighting equipment for the space that you’re filming in.
- An idea as to what you’re going to do and how you’d like to proceed.
3. What software do YouTubers use to edit videos?
There are a number of different options that you can consider if you’re looking to edit your videos well. Here is a quick list of some of the top options that you’ll see them using alongside of the best cameras for YouTube
Beginners
- Filmora : A simple to download and use option which can create high-quality videos in just a few clicks.
- iMovie: Only for Macs, this is a simple to use, intuitively designed video editor has a lot of features, and comes pre-installed on most Macs.
- Adobe Rush: Adobe Rush is a simple to use, browser based, video editing program that is also available as a phone app.
Professional
- Adobe Premiere: One of the top programs out there for editing video, this is part of the Adobe series and has endless options and features.
- Final Cut Pro: A Mac-Only, high end video editing software, many people who use the best YouTube camera also use this.
Max Wales
Max Wales is a writer and a lover of all things video.
Follow @Max Wales
Max Wales
Mar 27, 2024• Proven solutions
Whether you’re a beginner or a pro as a YouTuber, your YouTube equipment shouldn’t be the thing that holds you back from becoming a YouTube star. But, how do you find the best camera for making YouTube videos? What options do you have?
In this article, we’re going to explore some of the best cameras for YouTube. We’ll label each one based on what we believe is best for particular uses, so that you can better parse what it is that you want to purchase. All of this is in hopes that you can find the video camera for YouTube that is right for you and what you need.
Part 1: 7 Best Best Camera for Youtube to Make Videos
1. Sony DSC WX350 Digital Camera – Best Point and Shoot Video Camera
Specifications:
- 40x clear image zoom; 20x optical zoom
- Lock-on Auto Focus
- Wi-Fi with NFC3 connectivity for mobile devices
- 4 megapixels
- CMOS sensor that provides top quality images, even in low lighting
- Motion shot video with up to 4k quality output
Description: Have you been looking for a 20x zoom camera that fits in your pocket ? Get the best pictures with the Sony DSC WX350. This camera offers both still photos and video recording, using technology that minimizes how much the camera shakes, even if you’re filming on the go.
Pros: The image stabilizer makes this one of the best cameras for making YouTube videos out there, alongside of the 20x optical zoom. The battery life is quite long as well, which means you can get a lot of content done without any problems. Lastly, you can film in HD, which makes any YouTube influencer happy.
Cons: The LED screen can be quite dim, so it’s hard to see it when you’re out in bright sunlight; be sure you make adjustments before you go outside. There is also not your typical viewfinder installed, so experienced videographers may not like using it.
2. GoPro HERO8 Action Camera - Best Wearable Sports Camera
Specifications:
- Up to 60 FPS
- 4k and HD capabilities
- HyperSmooth 2.0 stabilization options.
- Optional Battery Mod available.
- Integrated Mount
- Crisp, easy to use and navigate LCD.
Description: If you need an on-the-go video camera for YouTube, there’s nothing better than a GoPro. With their HERO series of GoPros, they have all sorts of great features that allow you to capture the smoothest video, even when you’re out and on the go. Their top end stabilization makes their cameras the best for the active YouTuber.
Pros: The rugged, waterproof design of the HERO7 is a great option for anyone who is looking to be on the go with their YouTube. The integrated mount makes it simple for anyone who wants to put it on a selfie stick or something else, and it even has a companion app for easy, on the go editing!
Cons: The Wi-Fi capabilities are great, but the video transfer can take a bit of time due to how large the files may be. So, if you’re uploading the transfer, you may want to consider using the USB port instead. Also, the memory card slot is in an awkward place near the mount, so those with larger fingers may have trouble putting a card in there.
3. Logitech BRIO HD Webcam for Video – Best Video Recording and Streaming Camera
Specifications:
- 5x zoom
- Premium glass lens
- 4k image sensor for videoing and HDR with autofocus
- Light exposure automatically adjusts for whatever lighting that you’re filming in.
- Streaming and recording available.
- Enterprise ready for any use.
- Plug and play software automatically installs upon first use.
- Cover clip so you can cover the camera quickly, when needed.
Description: If you need an easy to use, simple to install option for filming and streaming from your computer, then this Logitech is the best camera for YouTube videos of this type. With multiple features and a design that has been made for streamers like you, you’ll always be able to just turn it on, make adjustments with ease, and get streaming in no time.
Pros: The camera is incredibly easy to use and install; it connects to your PC with a USB type C to USB type 3.0 cord (backwards compatible to 2.0). You can easily tinker with all of the settings and such in the included software.
Cons: The arm is designed for thick edges; those with flat monitors or borderless monitors may find that it’s difficult to attach it to your monitor. The software is easy to use, but it’s missing a handful of settings that more experienced streamers would want to have available. There is a crop out background feature, but it can be hard to find and use.
4. PANASONIC Lumix G7 4K Digital Camera - Best Mirrorless Camera for Professionals
Specifications:
- 16 megapixels
- No pass filter with four thirds sensor
- Wi-Fi capability
- 4k and HD video capture available at 30 frames per second.
- Aperture and shutter settings are adjusted via knobs, not menus.
- 3 inch tilt and swivel display
- High resolution viewfinder
Description: If you want to have professional looking photos and videos, the PANASONIC Lumix G7 4K is a solid choice for a mirrorless camera. All of the controls make it easy to get things the way that you want it, and it comes with multiple ports so that you can plug it into any device and get it ready to go.
Pros: This one of the best 4k video options out there, and you don’t need to spend an arm and a leg on it. The dual control dials and the variable touch LCD allow for maximum control, making it simple to film what you want with minimal editing after you’ve filmed.
Cons: There is a tracking focus, which can be good, but it makes the burst rate (which helps with motion blur) a lot slower. It does have a plastic build, rather than metal, so it’s not as heavy duty as other options. And, you need to purchase it with everything included, instead of just purchasing the body.
5. Sony CX405 Full HD - Best Camcorder (Only) for Video
Specifications:
- 60x clear image zoom with Zeiss Lens
- 50 Mbps XAVC
- MP4 and AVCHD codecs
- SteadyShot image stabilization
- Built-in USB cable
- Face detection and noise reduction
- 7 picture effects for video
Description: If you’re looking for the best cheap camera for YouTube, this is a pretty solid option. It has a Carl Zeiss lens (low light capable) and SteadyShot technology for stabilization. It’s the starter camera that beginners dream of due to its ease of use and affordability.
Pros: The image stabilization is some of the best out there, and it’s got a user friendly interface. Dual recording options make for great YouTube and other social media use. Lightweight makes it easy to take anywhere.
Cons: Connectivity ports are in strange spots, and can be hard to get to. You cannot add an external mic, so you have to use the on-board ones. After extensive use of the ports, the on-board USB cable may have some issues with connectivity over time.
6. DJI OSMO Handheld Gimbal – Best Easy to Use Holder for Camera Phone for Beginners
Specifications:
- 3 axis Gimbal that reduces shaky footage
- Ultra-responsive design reacts in real time.
- Easily folds up for maximum portability
- Battery operated ensures that you don’t always need a connection
- Comfortable grip allows you to use the gimbal without discomfort or pain.
Description: If your phone is currently the best camera for YouTube videos, then the DJI OSMO Handheld Gimbal makes it really easy for you to use it on the go. This has been designed to keep your camera flat, no matter where you’re moving, and it helps you take some pretty great shots. This is an option if you need freedom in your movement.
Pros: The DJI OSMO Handheld Gimbal is really easy to use and compatible with most mobile phones that are out there. With multiple settings and options, you can easily turn your phone into the very best option for getting footage, even if your regular video camera isn’t nearby.
Cons: Some people note that it doesn’t work with wide-screen mobile devices or “phablets” as they are called. Another complaint is that it can be difficult to get used the construction of the Gimbal, but that’s something that you can sort out with practice.
7. Canon Digital SLR Camera Kit – Best Cheap SLR Choice
Specifications:
- Wi-Fi and NFC built in for ease of video and photo transfer
- 18 Megapixel
- Image sensor with an IS of 100 to 6400 (and the option to expand to 12800)
- Full HD videos with manual controls for focus and exposure
- 3 inch LCD monitor turns and adjusts as needed.
- Interchangeable lens, Bayonet mount for tripods and selfie sticks.
Description: The Canon Digital SLR Camera Kit is an all-in-one kit that makes it simple for you to start making videos right out of the bag. Complete with everything that you need in order to use an SLR well, you’ll find it’s quite simple to get the hang of, and that you have a lot of flexibility in how you use it.
Pros: The Canon Digital SLR Camera Kit has Wi-Fi capability, offers a great auto focus and is made from heavy duty materials. Plus, it can shoot stills, video, and rolls, which makes it really versatile for anyone.
Cons: This particular set doesn’t have Bluetooth with it, so you can’t connect a remote. Its lens is interchangeable, but you can only use Canon lenses and flashes with it, so that decreases the number of options you have here.
Want to know more about camera? Watch this!
What Gear Do Creators Actually Use | Vidcon 2023 | Sony vs Canon
Part 2: Frequently Asked Questions
1. What is a good camera for YouTube beginners?
Sony DSCHX80/B Point & Shoot Camera is the best cheap camera for YouTube that you can find if you’re on any sort of budget. It has a 60x clear image zoom and incredibly versatile video with multiple viewfinder and autofocus options. It’s selfie ready with a multi-angle LCD display and you can customize your setting sin whatever way that you wish to do so. It also comes with pretty much anything that you need in the box, so you’re ready to start filming as soon as you charge it.
2. What equipment do you need to start a YouTube channel?
- A camera that meets all of your needs and purposes.
- A microphone that is easy to use and produces high quality audio options.
- A sturdy, reliable tripod that is compatible with your camera
- Lighting equipment for the space that you’re filming in.
- An idea as to what you’re going to do and how you’d like to proceed.
3. What software do YouTubers use to edit videos?
There are a number of different options that you can consider if you’re looking to edit your videos well. Here is a quick list of some of the top options that you’ll see them using alongside of the best cameras for YouTube
Beginners
- Filmora : A simple to download and use option which can create high-quality videos in just a few clicks.
- iMovie: Only for Macs, this is a simple to use, intuitively designed video editor has a lot of features, and comes pre-installed on most Macs.
- Adobe Rush: Adobe Rush is a simple to use, browser based, video editing program that is also available as a phone app.
Professional
- Adobe Premiere: One of the top programs out there for editing video, this is part of the Adobe series and has endless options and features.
- Final Cut Pro: A Mac-Only, high end video editing software, many people who use the best YouTube camera also use this.
Max Wales
Max Wales is a writer and a lover of all things video.
Follow @Max Wales
Also read:
- A Taste of Film Home Cook's Visual Journey
- Flawless Techniques for Inspiring Gadget Unboxings Every Time
- [Updated] Elevate Engagement Personalized YouTube Thumbnail Guide
- Unveiling the Secrets of Popularity A Guide to 15 Best Opener Plans
- [Updated] Evade Robotic Ratings for Real-Time Traffic Surge
- Elevated Viewership Status Symbolized by Buttons
- In 2024, Enhance Your Online Skills A Guide to YouTube Editing via Sony Vegas
- [New] Enhancing Engagement Professional PC Techniques for YouTube Editors
- 2024 Approved Designing Direct URLs for Automatic Content Subscription
- Jump to YouTube Affiliate Ranking with a Swift 10,000 Views
- Step-by-Step Finding Your Digital Filming Suite on YouTube
- Unlocking the Power of Targeted Keywords on YouTube
- In 2024, Dive Into the Deep End - Your Guide to the Best Free Movies on YouTube
- Steering to Your Own Musical Selections on Youtube
- The Ultimate Guide to Cinematography on YouTube
- [New] Delightful Digests A List of Top Food Channels
- [New] Charting New Heights with Popular YouTube Content
- Growth Hacks for YouTuber's Short Form Content Boosting View Counts Effectively
- Charting Updates YouTube Money Standards for 2024
- In 2024, Earnings Explosion How to Maximize Income on YouTube Shorts
- Understanding the Inner Workings of YouTube Post-Upload
- Efficiently Downloading YouTube Sections in Minutes
- Charting a Path to Monthly Earnings From YouTube
- [New] Avoid Shaky Footage Proper Tripod Usage Techniques in Vlog Creation
- In 2024, Defeat Bot Intruders, Elevate Video Engagement
- Become a Viral Sensation Maximizing Your YouTube Reach for 2024
- Cultivate Creativity Best Video Concepts for Viewers for 2024
- A Step-by-Step Guide to YouTube Shorts Excellence
- Instant Video Visionary
- In 2024, Amplify Your Earnings Universal Strategies for YouTube Revenue
- [New] 5-Star Channel Cutting Long URLs Down for YouTube Videos
- [Updated] Capture, Create, Curate Mobiles in Action for YouTube Thumbnails
- [Updated] Discover Top 15 YouTube Sources for Sci-Education
- Skyline Your Videos Dodging the Bot Observers
- [Updated] Efficiently Transfer Vids From Premiere to YouTube
- Accelerate Follower Count Key Strategies Unlocked
- [Updated] Accolades Across Platforms for Video Creators
- 2024 Approved Calculating Monetary Gain for a Milion of YouTube Watchers
- Dissecting YouTube’s Strategy to Empower Short-Form Content Makers for 2024
- Channel Conclusion Mastery - Makers & Templates for Best Practices
- [New] 2024 Approved From Capture to Share Precision Cropping & Export Tips for Instagram
- In 2024, WhatsApp Video Status Production Apps
- In 2024, Does Life360 Notify When You Log Out On Infinix Smart 8 Pro? | Dr.fone
- [New] 2024 Approved Best of the Best PC/Mac Screen Recorder Software
- 2024 Approved Unlocking Discord Nitro Secrets VIP Service and Acquisition Details
- In 2024, 9 Best Phone Monitoring Apps for Poco X6 Pro | Dr.fone
- [New] 2024 Approved Peeking Into Instagram Stories What Viewers Don’t Know
- New In 2024, Effortless Video Ratio Conversion A Quick Start
- In 2024, Unveiling Instagram's Filters A Comprehensive Guide to Enhance Your Posts
- How To Remove Phone Number From Your Apple ID from Your iPhone X?
- In 2024, 3 Solutions to Find Your Vivo Y100 5G Current Location of a Mobile Number | Dr.fone
- In-Depth Look at Engaging with YouTube Comment Threads
- A Comprehensive Tutorial on Adding Music to KineMaster for 2024
- Updated In 2024, Top 10 Best Photo to Animation Converters
- [Updated] The Indicator of a Block No Snapshots Received for 2024
- Boosting TikTok Quality with Smart Zoom Use for 2024
- Regaining Exclusive Snap Privacy
- In 2024, How Can You Transfer Files From Samsung Galaxy S23 FE To iPhone 15/14/13? | Dr.fone
- New 2024 Approved Split Screen Video Makers The Ultimate Guide for iOS and Android Users
- How To Revive Your Bricked Xiaomi Mix Fold 3 in Minutes | Dr.fone
- Updated In 2024, The Ultimate List Top 10 Free Video Trimmers for Windows 10
- In 2024, A Step-by-Step Guide on Using ADB and Fastboot to Remove FRP Lock on your Oppo A58 4G
- [Updated] In 2024, Enhancing Your Videography Skills with Mac Webcam - Top Techniques
- [Updated] Unbeatable Downloaders for YouTube & FB Vids (MP4)
- In 2024, The Ultimate List of Video Editors with Audio Features
- Efficient Ways to Extract and Save Audio Tracks From Video Files Across Multiple Devices
- [Updated] 2024 Approved Updating Facebook Video Coverage with Ease
- Updated Refinement Through Removal Advanced Techniques for Enhancing Music Clarity in Adobe Audition for 2024
- About Poco M6 Pro 4G FRP Bypass
- Updated 2024 Approved The Art of Vertical Video Best Practices for Smartphone Creators
- Mastering Lock Screen Settings How to Enable and Disable on Vivo X90S
- How To Do Lava Agni 2 5G Screen Sharing | Dr.fone
- [New] Techniques to Pull Facebook Videos Easily for 2024
- How to Get and Use Pokemon Go Promo Codes On Honor 100 Pro | Dr.fone
- Use Device Manager to reinstall hardware drivers in Windows 11 & 10
- New In 2024, Silencing Audio in Updated MKV Files - A Comprehensive Guide (MKV-2023)
- How To Upgrade or Downgrade Apple iPhone 13 Without Data Loss? | Dr.fone
- 2024 Approved Elite Cross-Gender Vocal Impersonators Guide - Updated
- [New] Top Tactics Eliminate FB's Intrusive Video Ads
- Title: Streamlining Audio Integration in YouTube Videos for Professionals
- Author: Kevin
- Created at : 2024-05-25 16:20:17
- Updated at : 2024-05-26 16:20:17
- Link: https://youtube-videos.techidaily.com/streamlining-audio-integration-in-youtube-videos-for-professionals/
- License: This work is licensed under CC BY-NC-SA 4.0.
