"Straight From the Studio Simple Steps to Sizzling Mac Vids on YouTube"
Straight From the Studio: Simple Steps to Sizzling Mac Vids on YouTube
How do Beginners Make a Cool Video for YouTube on Mac

Shanoon Cox
Dec 14, 2023• Proven solutions
To get the right video editors to cut a video for YouTube on your Mac can be a bit of a problem for beginners. It is understandable that there will be a learning curve if you just want to get tons of subscribers on your channel – who doesn’t? Ultimately, in getting a standard video that will attract and sustain the interest of the viewers, you will need to employ certain strategies that will enhance your credibility.
Let’s tell each other the truth, no one wants to watch a video that is not aesthetically appealing even if it is a close friend. So, if you have got the relevant content and the video to pull traffic to your channel, what you will need is editing software that will help you make the correct adjustments to your video
Nobody wants a random viewer to comment “This video is a little bit tacky, touch-up properly”, that will definitely leave a sting. As such, understand the best technique that works for you as well as the software that meets your needs based on the current level of expertise. It is okay for you to grow.

Five Video Cutting Skills Youtubers Must Have
As much as the enthusiasm is brewing to get on your mac and upload the video you just shot, there are certain elements you need to implement to make a cool video for YouTube. Beginners sometimes feel their content is the best, the excitement of posting their very first series can be overwhelming. Sometimes, it blocks off other ideas for making the video better.
However, having amazing content dies not to exclude the need for the right editing technique. Here are five methods for editing your YouTube videos:
1.Control the video duration
The length of a particular scene can have different meanings depending on how long or short it is in a video. This means the duration can impact the message you are trying to pass across to your viewers, hence it is important to know what places to accelerate and cut in the video.
You can have a system where each part of the content is labeled in their order of importance such as A, B, C. This means from the most important to the least important. Consequently, you will be able to sieve through the content and make the appropriate changes while editing the video.
![]()
2.Customize the intro and end of the video
It is possible to grab the attention of the viewer in the intro and even more likely to lose someone once the opening montage comes in. Creating an intro that is captivating and appealing to drag the audience to your video is an important technique for editing your videos. Also, the end of the video, from the signing out to the closing montage has to appeal to the audience. You will be surprised by the number of people that love seeing end credits if the closing montage is good. Customize the intro and the end of the video so the audience is tuned all through.
You May Like: Best YouTube Banner Size and Channel Art Dimension (The Ultimate Guide)
You May Like: How to Add Logo or Watermark to YouTube Video
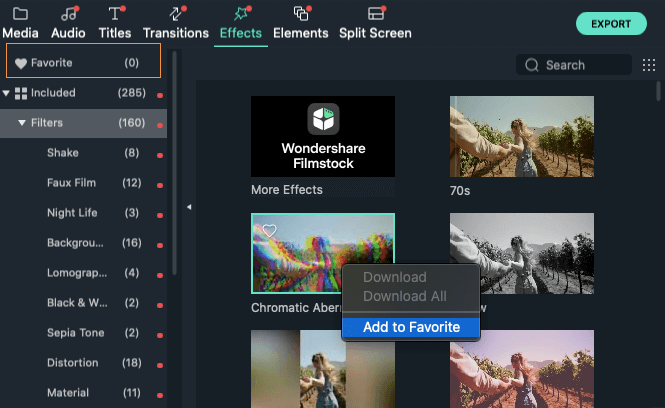
3.Use Cool transitions or filters
If there is anything the audience love to see, it is the way you move from different points in the vudeo. The ability to use transition that does not affect their attention but leaves them wanting more is very key. Use fanciful transitions that do noy hurt the eyes and allows for easy comprehension.
4.Match the cuts
Whatever you cut has to match the next phase of the video. You do not want to leave the audience behind as they will wonder how the last scene correlates with a new one. You need to ensure that all cuts match the next scenes.
5.Cutaway shots
This is very good in providing the audience context. You can take shots of the room or item that you are trying to discuss in your video. If people keep staring at a particular thing for long, they get bored, cutaway shots keep the excitement alive for the audience.
What Editing Software can Meet Your Needs?
As a beginner, it is important to use software that is easily adaptable to your needs. If you want to make a cool video for you be on your mac, getting software that allows you to be creative without confusion is key. Here are two software for making cool YouTube videos for your Mac;
Filmora X
This is one of the simplest yet powerful tools that is lightweight and apt for your Mac. One of the perks of using the Filmora X is the feature that allows you to upload the video directly to YouTube, saving you any extended hassles.


There are also 400+ transition effects as well as a stylish text editor that is fun to use. There is also a built-in music and sound effect feature that enables you to select sounds to match the video you are editing. This is if you do not have the music you want for the video already.
Other pros of Filmora are:
• It has fast rendering sped for your video
• The lifetime price is affordable.
However, there are some disadvantages to the usage of Filmora X, which are:
• The free version contains the Filmora X watermark
• The color grading tool is limited.
Blender
If you are looking for software for the model, game creating, and animation then opting for Blender will be a good fit. You can trim videos, insert filters, and add as many videos as you want.
Pros
- The 3D graphics make it suitable for editing YouTube videos.
- Composting system and node-based material
- It supports your Mac.
Cons:
- It could be slow when running
- Some think it might be a bit complicated.
Although there is other editing software for your Mac, Filmora X simplifies the whole process. If you are looking for quality wrapped in affordability and convenience, then Filmora X will be right for you. Start editing and enjoy the ride!
Learn More: YouTuber Skillshare: Essential Video Cutting Skills For YouTubers
Shanoon Cox
Shanoon Cox is a writer and a lover of all things video.
Follow @Shanoon Cox
Shanoon Cox
Dec 14, 2023• Proven solutions
To get the right video editors to cut a video for YouTube on your Mac can be a bit of a problem for beginners. It is understandable that there will be a learning curve if you just want to get tons of subscribers on your channel – who doesn’t? Ultimately, in getting a standard video that will attract and sustain the interest of the viewers, you will need to employ certain strategies that will enhance your credibility.
Let’s tell each other the truth, no one wants to watch a video that is not aesthetically appealing even if it is a close friend. So, if you have got the relevant content and the video to pull traffic to your channel, what you will need is editing software that will help you make the correct adjustments to your video
Nobody wants a random viewer to comment “This video is a little bit tacky, touch-up properly”, that will definitely leave a sting. As such, understand the best technique that works for you as well as the software that meets your needs based on the current level of expertise. It is okay for you to grow.
Five Video Cutting Skills Youtubers Must Have
As much as the enthusiasm is brewing to get on your mac and upload the video you just shot, there are certain elements you need to implement to make a cool video for YouTube. Beginners sometimes feel their content is the best, the excitement of posting their very first series can be overwhelming. Sometimes, it blocks off other ideas for making the video better.
However, having amazing content dies not to exclude the need for the right editing technique. Here are five methods for editing your YouTube videos:
1.Control the video duration
The length of a particular scene can have different meanings depending on how long or short it is in a video. This means the duration can impact the message you are trying to pass across to your viewers, hence it is important to know what places to accelerate and cut in the video.
You can have a system where each part of the content is labeled in their order of importance such as A, B, C. This means from the most important to the least important. Consequently, you will be able to sieve through the content and make the appropriate changes while editing the video.
![]()
2.Customize the intro and end of the video
It is possible to grab the attention of the viewer in the intro and even more likely to lose someone once the opening montage comes in. Creating an intro that is captivating and appealing to drag the audience to your video is an important technique for editing your videos. Also, the end of the video, from the signing out to the closing montage has to appeal to the audience. You will be surprised by the number of people that love seeing end credits if the closing montage is good. Customize the intro and the end of the video so the audience is tuned all through.
You May Like: Best YouTube Banner Size and Channel Art Dimension (The Ultimate Guide)
You May Like: How to Add Logo or Watermark to YouTube Video
3.Use Cool transitions or filters
If there is anything the audience love to see, it is the way you move from different points in the vudeo. The ability to use transition that does not affect their attention but leaves them wanting more is very key. Use fanciful transitions that do noy hurt the eyes and allows for easy comprehension.
4.Match the cuts
Whatever you cut has to match the next phase of the video. You do not want to leave the audience behind as they will wonder how the last scene correlates with a new one. You need to ensure that all cuts match the next scenes.
5.Cutaway shots
This is very good in providing the audience context. You can take shots of the room or item that you are trying to discuss in your video. If people keep staring at a particular thing for long, they get bored, cutaway shots keep the excitement alive for the audience.
What Editing Software can Meet Your Needs?
As a beginner, it is important to use software that is easily adaptable to your needs. If you want to make a cool video for you be on your mac, getting software that allows you to be creative without confusion is key. Here are two software for making cool YouTube videos for your Mac;
Filmora X
This is one of the simplest yet powerful tools that is lightweight and apt for your Mac. One of the perks of using the Filmora X is the feature that allows you to upload the video directly to YouTube, saving you any extended hassles.
There are also 400+ transition effects as well as a stylish text editor that is fun to use. There is also a built-in music and sound effect feature that enables you to select sounds to match the video you are editing. This is if you do not have the music you want for the video already.
Other pros of Filmora are:
• It has fast rendering sped for your video
• The lifetime price is affordable.
However, there are some disadvantages to the usage of Filmora X, which are:
• The free version contains the Filmora X watermark
• The color grading tool is limited.
Blender
If you are looking for software for the model, game creating, and animation then opting for Blender will be a good fit. You can trim videos, insert filters, and add as many videos as you want.
Pros
- The 3D graphics make it suitable for editing YouTube videos.
- Composting system and node-based material
- It supports your Mac.
Cons:
- It could be slow when running
- Some think it might be a bit complicated.
Although there is other editing software for your Mac, Filmora X simplifies the whole process. If you are looking for quality wrapped in affordability and convenience, then Filmora X will be right for you. Start editing and enjoy the ride!
Learn More: YouTuber Skillshare: Essential Video Cutting Skills For YouTubers
Shanoon Cox
Shanoon Cox is a writer and a lover of all things video.
Follow @Shanoon Cox
Navigating YouTube’s Rules: The Safe Way
How to Avoid and Reverse Strikes on Your YouTube Channel

Richard Bennett
Oct 26, 2023• Proven solutions
Do you monetize your videos? Or, do you like to Livestream? These are two perks of having a YouTube account in good standing. You can lose these privileges, have your ability to post videos frozen, and even have your account terminated if you start accumulating strikes.
If you receive a strike, you will usually be able to get rid of it. This article will show you how.
Table of Content:
3. Community Guidelines Strikes

There are two types of strikes: Community Guideline Strikes and Copyright Strikes. Your account and all your videos will be deleted if you get three of either one of these types of strikes, but YouTube is fair about how these strikes are given out and how you can reverse them.
1. Copyright Strikes
You get a copyright strike when you use media in your video which someone else owns the copyrights to. Music, clips, photographs, and sound effects are examples of the kinds of media you may use that could be owned by someone else.
The most obvious way to earn a copyright strike is to repost content which you did not create, i.e. clips from a television show or a popular song. If you know that the content you got a strike for was not yours and did not fall under ‘fair use ’, then there are two ways you can resolve it.
1. You can complete YouTube’s simple course on copyright infringement (Copyright School ) and wait three months. Copyright strikes expire in three months so long as you complete the course (they will not expire if you don’t take the course).
2. you can contact the holder of the copyright and ask them to retract their claim. You will probably have to offer to delete your video. Keep in mind that it is completely up to the rights holder whether you deleting your video is enough for them to retract their claim. They are allowed to say ‘no’.
Deleting your video, especially if you do so without contacting the rights holder, will not automatically reverse your copyright strike.
The majority of copyright strikes that you as a YouTube creator receive – if you receive any – will not be as black and white as ‘someone else owns it, you shouldn’t have used it’. If you know that you have a license to use the song or other media you got the strike for, or feel like your use of a clip falls under ‘fair use’, then your path to reversing the strike will be different.
2. Wrongful Copyright Strikes
YouTube’s system for detecting copyright infringement is automated. This means that you can get a copyright strike without actually breaking any rules. These strikes are generally easy to reverse.
For creators, the most common instance of this is being flagged for using copyrighted music. When you download royalty-free music – whether you download it for free or pay for it – you might not realize that that music is still copyrighted to someone else and can still be flagged by YouTube’s system.
If this has happened to you, reversing it is simple.
1. Submit a counter-notification through the form provided and include either your licensing information or a link to where it can be found online.
2. After you submit your counter-notification, the copyright holder will have 10 business days to respond. Since in this scenario the rights holder will know they have allowed their content to be licensed out, there should be no conflict and your video will be reinstated.
‘Fair use’ is another thing YouTube’s system has no way of detecting. ‘Fair use’ means that you are using content that you do not own, and which you do not have a license to use, but that you are using it in a way that is legally protected. Satire, criticism, education, and news reporting are areas that may be protected by fair use, although every situation is different.
There is no situation in which crediting a rights holder, adding a disclaimer, or simply not monetizing your video will make it fair use.
To reverse a copyright strike where you believe your video should be protected as ‘fair use’, submit a counter-notification through the web form YouTube provides. The rights holder will have 10 business days to provide YouTube with evidence that they have initiated a court action against your content. There is a chance that they will not agree with you about the ‘fair use’ status of your video. You could be in for a bit of a fight.
If your account has been suspended for accumulating multiple strikes, you will no longer be able to access the online counter-notification form and will have to send a free-form counter-notification. Information on that can be found here .
3. Community Guidelines Strikes
Most video creators – people who post vlogs, travel videos, and various kinds of tutorials – will never receive this type of strike. Sexual content, hateful content, threats, and scams are among the things you could post which would result in a community guidelines strike. Creators, in general, are not interested in posting cruel or graphic content.
The only thing some video creators might have to be careful of is misleading metadata. You can get community guidelines to strike for intentionally using the title, tags, and description of your video to build up an expectation of the content your video does not deliver on. For example, if you post a personal vlog and title it ‘Call of Duty Review’ to try and capitalize on people who might be searching for gaming videos then you might receive a strike.
Blatantly using keywords that have nothing to do with your content is not something you can do accidentally, but it is possible to be misleading in your metadata without trying to be dishonest. YouTube is a very competitive place, and many creators are turning towards title strategies which could be considered ‘clickbait’. If you say in your title that you had a baby, but reveal in your actual video that ‘had a baby’ meant ‘wrote a new song’, will that get you a community guidelines strike? Probably not, but it can be a thin line.
In general, just don’t mention anything in your title or tags which you do not talk about in your video.
Community Guidelines strikes expire after three months. As long as you only have one strike, it will not affect your channel or what you can do on YouTube. If you receive a second strike within the three months of your first strike, you will lose the ability to post videos for two weeks. If you receive a third strike before either of your previous strikes has expired, your account will be terminated.
Have you experienced a copyright strike against your YouTube channel? Let us know what happened in the comments.
Create Original Videos with Excellent Video Editor
Richard Bennett
Richard Bennett is a writer and a lover of all things video.
Follow @Richard Bennett
Richard Bennett
Oct 26, 2023• Proven solutions
Do you monetize your videos? Or, do you like to Livestream? These are two perks of having a YouTube account in good standing. You can lose these privileges, have your ability to post videos frozen, and even have your account terminated if you start accumulating strikes.
If you receive a strike, you will usually be able to get rid of it. This article will show you how.
Table of Content:
3. Community Guidelines Strikes
There are two types of strikes: Community Guideline Strikes and Copyright Strikes. Your account and all your videos will be deleted if you get three of either one of these types of strikes, but YouTube is fair about how these strikes are given out and how you can reverse them.
1. Copyright Strikes
You get a copyright strike when you use media in your video which someone else owns the copyrights to. Music, clips, photographs, and sound effects are examples of the kinds of media you may use that could be owned by someone else.
The most obvious way to earn a copyright strike is to repost content which you did not create, i.e. clips from a television show or a popular song. If you know that the content you got a strike for was not yours and did not fall under ‘fair use ’, then there are two ways you can resolve it.
1. You can complete YouTube’s simple course on copyright infringement (Copyright School ) and wait three months. Copyright strikes expire in three months so long as you complete the course (they will not expire if you don’t take the course).
2. you can contact the holder of the copyright and ask them to retract their claim. You will probably have to offer to delete your video. Keep in mind that it is completely up to the rights holder whether you deleting your video is enough for them to retract their claim. They are allowed to say ‘no’.
Deleting your video, especially if you do so without contacting the rights holder, will not automatically reverse your copyright strike.
The majority of copyright strikes that you as a YouTube creator receive – if you receive any – will not be as black and white as ‘someone else owns it, you shouldn’t have used it’. If you know that you have a license to use the song or other media you got the strike for, or feel like your use of a clip falls under ‘fair use’, then your path to reversing the strike will be different.
2. Wrongful Copyright Strikes
YouTube’s system for detecting copyright infringement is automated. This means that you can get a copyright strike without actually breaking any rules. These strikes are generally easy to reverse.
For creators, the most common instance of this is being flagged for using copyrighted music. When you download royalty-free music – whether you download it for free or pay for it – you might not realize that that music is still copyrighted to someone else and can still be flagged by YouTube’s system.
If this has happened to you, reversing it is simple.
1. Submit a counter-notification through the form provided and include either your licensing information or a link to where it can be found online.
2. After you submit your counter-notification, the copyright holder will have 10 business days to respond. Since in this scenario the rights holder will know they have allowed their content to be licensed out, there should be no conflict and your video will be reinstated.
‘Fair use’ is another thing YouTube’s system has no way of detecting. ‘Fair use’ means that you are using content that you do not own, and which you do not have a license to use, but that you are using it in a way that is legally protected. Satire, criticism, education, and news reporting are areas that may be protected by fair use, although every situation is different.
There is no situation in which crediting a rights holder, adding a disclaimer, or simply not monetizing your video will make it fair use.
To reverse a copyright strike where you believe your video should be protected as ‘fair use’, submit a counter-notification through the web form YouTube provides. The rights holder will have 10 business days to provide YouTube with evidence that they have initiated a court action against your content. There is a chance that they will not agree with you about the ‘fair use’ status of your video. You could be in for a bit of a fight.
If your account has been suspended for accumulating multiple strikes, you will no longer be able to access the online counter-notification form and will have to send a free-form counter-notification. Information on that can be found here .
3. Community Guidelines Strikes
Most video creators – people who post vlogs, travel videos, and various kinds of tutorials – will never receive this type of strike. Sexual content, hateful content, threats, and scams are among the things you could post which would result in a community guidelines strike. Creators, in general, are not interested in posting cruel or graphic content.
The only thing some video creators might have to be careful of is misleading metadata. You can get community guidelines to strike for intentionally using the title, tags, and description of your video to build up an expectation of the content your video does not deliver on. For example, if you post a personal vlog and title it ‘Call of Duty Review’ to try and capitalize on people who might be searching for gaming videos then you might receive a strike.
Blatantly using keywords that have nothing to do with your content is not something you can do accidentally, but it is possible to be misleading in your metadata without trying to be dishonest. YouTube is a very competitive place, and many creators are turning towards title strategies which could be considered ‘clickbait’. If you say in your title that you had a baby, but reveal in your actual video that ‘had a baby’ meant ‘wrote a new song’, will that get you a community guidelines strike? Probably not, but it can be a thin line.
In general, just don’t mention anything in your title or tags which you do not talk about in your video.
Community Guidelines strikes expire after three months. As long as you only have one strike, it will not affect your channel or what you can do on YouTube. If you receive a second strike within the three months of your first strike, you will lose the ability to post videos for two weeks. If you receive a third strike before either of your previous strikes has expired, your account will be terminated.
Have you experienced a copyright strike against your YouTube channel? Let us know what happened in the comments.
Create Original Videos with Excellent Video Editor
Richard Bennett
Richard Bennett is a writer and a lover of all things video.
Follow @Richard Bennett
Also read:
- [New] 5 Simple Yet Powerful Strategies to Skyrocket Your YouTube Views
- [New] Quieten System Sounds on PC and Mac Devices for 2024
- [New] Unleashing Potential Channel Building Mastery
- [Updated] A Beginner’s Guide to SEO Skyrocket Your View Count for 2024
- [Updated] A Step-by-Step on YouTube Annotations
- [Updated] Creating Cohesive Content with Soundtracks on Instagram for 2024
- [Updated] Elevate Videography Quality Top 7 Sound Effects Pick
- [Updated] Elevate Your Online Video Quality Mastery in FinalCut for YouTube
- 2024 Approved Expert Insight Screening Sweet Indulgences
- How to Change Netflix Location to Get More Country Version On Apple iPhone XR | Dr.fone
- In 2024, Blurface Secrets Clean Up Your Photos Quickly
- Invisible iPhone Contacts? Uncover The Fix With Our Expert Tips!
- Leveraging Social Media for Increased Video Engagement on YouTube
- Love in the Digital Age: Leveraging ChatGPT for a Better Romance Experience
- Organizing Your YouTube Content with Ease
- Pivotal Information in the Realm of ASMR
- The Ultimate Blueprint for Successful FreeFire Videos on YouTube
- Title: Straight From the Studio Simple Steps to Sizzling Mac Vids on YouTube
- Author: Kevin
- Created at : 2024-12-09 17:23:27
- Updated at : 2024-12-10 17:09:57
- Link: https://youtube-videos.techidaily.com/straight-from-the-studio-simple-steps-to-sizzling-mac-vids-on-youtube/
- License: This work is licensed under CC BY-NC-SA 4.0.