
"Steady Your Screen The Key to Slowdown in YouTube Videos (48 Chars)"
Steady Your Screen: The Key to Slowdown in YouTube Videos (48 Chars)
YouTube Slow: How to Slow Down YouTube Videos [3 Ways]

Richard Bennett
Mar 27, 2024• Proven solutions
Have you ever wanted to learn something from a YouTube video, but found that the video is too fast? If you are wondering how to slow down YouTube videos, then you’re in the right place. Well, there are different ways to slow down YouTube videos and in this article, we will show you how to slow down the YouTube videos with 3 most effective ways: slow down the YouTube videos by changing playback video speed at playback, slow down YouTube video using YouTube’s Video Editor tools or change YouTube video speed to slow down or speed up with Wondershare Filmora video editor .
- Part 1: How to Play YouTube Videos in Slow Motion
- Part 2: Add Slow Motion with Wondershare Filmora (originally Wondershare Video Editor)
- Part 3: Add Slow Motion with YouTube Video Editor
Part 1: YouTube Slow Down: How to Play YouTube Videos in Slow Motion
While, you can now change the speed of any YouTube videos easily and watch YouTube videos in slow motion in a few steps. Below is how to slow down YouTube Videos:
- Open the video in YouTube
- Click the Settings icon on the bottom right and then you will see Autoplay, Annotations, Speed, Subtitles, and Quality options. By default, the speed is set to Normal. Click Speed and open the speed change options. The speed options are in multiples.
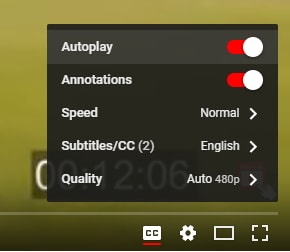
- Choose the target video speed from 0.25x, 0.5x, 0.75x to slow down the play back speed of the YouTube video. You can also select 1.25x, 1.5x, 1.75x or 2x to fast forward this YouTube video depending on how fast or slow you want the playback of the YouTube video to be.
- That’s it how to make a YouTube video slow down by changing the playback speed. If you selected 0.5X, you will see the playback speed is half of the original speed. You can now see the YouTube video is played back in a slower speed.
You May Also Like: Take good use of YouTube’s Enhancements feature to improve your video quality.
Besides, watching YouTube videos in slow motion, you can also make a slow motion video and upload to YouTube. The Flash from Zootopia is so impressive and you can see a lot of memes and gifs online about this funny cute sloth. In the following part, we will show you how to make a slow motion YouTube video like the sloth Flash in two ways by adding slow motion effects.
Part 2: Add Slow Motion to YT Videos with Wondershare Filmora video editor [3 Steps]Wondershare Filmora is an easy-to-use yet powerful video editing tool to which let beginners edit their YouTube videos in minutes. It includes every classic video editing functions including adjust playback speed, trim, crop, rotate, split as well as many special editing features like Jump Cut, Mosaic Blur and Tilt Shift. Now let’s see how to add slow motion with this video editing software.


Step 1. Import Video Footage to Filmora Video Editor
First of all, you need to import all your video footage for YouTube videos to Filmora. If you want to slow down a video downloaded from online, like youtube, please make sure there is copyright issue for you to use the video before processing. In case that you want to download YouTube with free youtube downloader, you can try Wondershare Free Youtube Downloader and Video DownloadHelper (Firefox Add-on).
After downloading YouTube videos on hard disk, you can now import it to this YouTube video editor. The downloaded YouTube videos is usually in FLV format, and Filmora has a wide range of support for video formats, which includes FLV as well. You can either click “Import” on the primary windows and select YouTube FLV video file from your computer, or simply drag and drop YouTube FLV file to the User’s Album. Next, drag YouTube video from User’s Album to Timeline for editing.

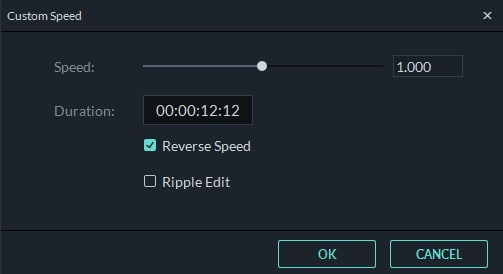
Step 2. One click to add slow motion to YouTube video
On the Timeline, click on the added YouTube video and select Speed and Duration to open up the video custom speed window. You will see the Speed option, Duration, Reverse Speed and Ripple Edit options. and the speed number indicates fast or slow motion. To slow down the YouTube video, drag the speed slider to left and you get a slow down version of the YouTube video. You can slow down the YouTube video in 0.01x. Click the OK button to save the slow motion settings and then click the Play button in the preview windows to have a look at the new YouTube slow down video. You can also change the duration of the YouTube video to change the YouTube video speed. For example, if you want to slow down a 30-second YouTube video to half speed, you can just enter the duration to 60 seconds to get a slow down motion effect.
With Filmora youtube video editor, you can also add the slow motion effects to some certain clips of the video footage. What you need to do is use the split feature to split the video first. Learn more details about How to Cut / Split / Trim Videos without Quality Loss
Step 3. Export slow down YouTube video
You could continue editing YouTube videos. When all done, click “Export” to save the result. You can save YouTube video in any popular formats on the computer by clicking “Format”. If you want to play YouTube video on iPod, iPhone, iPad, click “Device” and select your device. You can also share the YouTube video up to YouTube or Vimeo directly or burn YouTube video to DVD.

See, with Filmora video editor you can slow down YouTube videos with ease, what’s more, you can also apply reverse effects to play Youtube videos backwards. Download and try this YouTube Slow motion effect and you will master how to slow down YouTube videos.
Related:How to Make Slow/Fast Motion Videos
Part 3: Slow down YouTube videos with Slow Motion in YouTube Video Editor
Updated: From 20th September 2017 users will no longer be able to use the complimentary editing suite. Check the best YouTube video editor alternatives from this complete guide.
If you’ve ever been annoyed by the speed of your user-generated videos on YouTube, try out its own video editor. As YouTube has added a new “slow motion” tool to its YouTube Editor, it does pretty much exactly what it sounds like. Here is a simple guide on how to add slow motion with it.
Step 1: Get Access to YouTube Video Editor. You can either go directly to the URL, which is https://www.youtube.com/editor , or click “Upload”>”Edit” to the Video Editor tab.
Step 2: Drag your video on the timeline and double click it. In the pop up window, you will see the “Slow Motion” option. Enable it and then select how slow you want the video to be. This applies the effect to the entire video that you’ve selected.
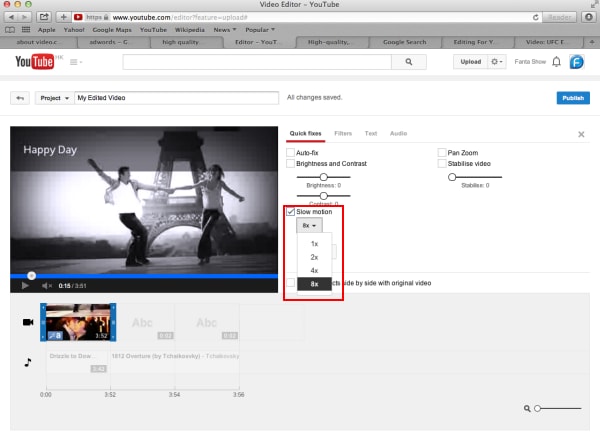
If you just want to slow down parts of the video, go back to the main editing tab, clip it from the original video using the slicing tool and add the slow-motion effect to that clip only. You can then arrange the different clips you have in the editor to create your final video.
Step 3: Tick the option “Preview effects side-by-side” with original video and then you can see how the original video plays compared to the one you’ve slowed down. If you’re happy with the result, hit “Done” to save the settings.
Conclusion
Above are the 3 ways that you can watch a YouTube video in slow motion, and slow down YouTube videos. You can directly change the playback speed of the YouTube video on Youtube, or download the YouTube video first and then slow down the speed of the YouTube video with some video editing software for YouTube like Filmora. No matter which way you prefer, we hope these information can help you slow down youtube videos.
Richard Bennett
Richard Bennett is a writer and a lover of all things video.
Follow @Richard Bennett
Richard Bennett
Mar 27, 2024• Proven solutions
Have you ever wanted to learn something from a YouTube video, but found that the video is too fast? If you are wondering how to slow down YouTube videos, then you’re in the right place. Well, there are different ways to slow down YouTube videos and in this article, we will show you how to slow down the YouTube videos with 3 most effective ways: slow down the YouTube videos by changing playback video speed at playback, slow down YouTube video using YouTube’s Video Editor tools or change YouTube video speed to slow down or speed up with Wondershare Filmora video editor .
- Part 1: How to Play YouTube Videos in Slow Motion
- Part 2: Add Slow Motion with Wondershare Filmora (originally Wondershare Video Editor)
- Part 3: Add Slow Motion with YouTube Video Editor
Part 1: YouTube Slow Down: How to Play YouTube Videos in Slow Motion
While, you can now change the speed of any YouTube videos easily and watch YouTube videos in slow motion in a few steps. Below is how to slow down YouTube Videos:
- Open the video in YouTube
- Click the Settings icon on the bottom right and then you will see Autoplay, Annotations, Speed, Subtitles, and Quality options. By default, the speed is set to Normal. Click Speed and open the speed change options. The speed options are in multiples.
- Choose the target video speed from 0.25x, 0.5x, 0.75x to slow down the play back speed of the YouTube video. You can also select 1.25x, 1.5x, 1.75x or 2x to fast forward this YouTube video depending on how fast or slow you want the playback of the YouTube video to be.
- That’s it how to make a YouTube video slow down by changing the playback speed. If you selected 0.5X, you will see the playback speed is half of the original speed. You can now see the YouTube video is played back in a slower speed.
You May Also Like: Take good use of YouTube’s Enhancements feature to improve your video quality.
Besides, watching YouTube videos in slow motion, you can also make a slow motion video and upload to YouTube. The Flash from Zootopia is so impressive and you can see a lot of memes and gifs online about this funny cute sloth. In the following part, we will show you how to make a slow motion YouTube video like the sloth Flash in two ways by adding slow motion effects.
Part 2: Add Slow Motion to YT Videos with Wondershare Filmora video editor [3 Steps]Wondershare Filmora is an easy-to-use yet powerful video editing tool to which let beginners edit their YouTube videos in minutes. It includes every classic video editing functions including adjust playback speed, trim, crop, rotate, split as well as many special editing features like Jump Cut, Mosaic Blur and Tilt Shift. Now let’s see how to add slow motion with this video editing software.
Step 1. Import Video Footage to Filmora Video Editor
First of all, you need to import all your video footage for YouTube videos to Filmora. If you want to slow down a video downloaded from online, like youtube, please make sure there is copyright issue for you to use the video before processing. In case that you want to download YouTube with free youtube downloader, you can try Wondershare Free Youtube Downloader and Video DownloadHelper (Firefox Add-on).
After downloading YouTube videos on hard disk, you can now import it to this YouTube video editor. The downloaded YouTube videos is usually in FLV format, and Filmora has a wide range of support for video formats, which includes FLV as well. You can either click “Import” on the primary windows and select YouTube FLV video file from your computer, or simply drag and drop YouTube FLV file to the User’s Album. Next, drag YouTube video from User’s Album to Timeline for editing.
Step 2. One click to add slow motion to YouTube video
On the Timeline, click on the added YouTube video and select Speed and Duration to open up the video custom speed window. You will see the Speed option, Duration, Reverse Speed and Ripple Edit options. and the speed number indicates fast or slow motion. To slow down the YouTube video, drag the speed slider to left and you get a slow down version of the YouTube video. You can slow down the YouTube video in 0.01x. Click the OK button to save the slow motion settings and then click the Play button in the preview windows to have a look at the new YouTube slow down video. You can also change the duration of the YouTube video to change the YouTube video speed. For example, if you want to slow down a 30-second YouTube video to half speed, you can just enter the duration to 60 seconds to get a slow down motion effect.
With Filmora youtube video editor, you can also add the slow motion effects to some certain clips of the video footage. What you need to do is use the split feature to split the video first. Learn more details about How to Cut / Split / Trim Videos without Quality Loss
Step 3. Export slow down YouTube video
You could continue editing YouTube videos. When all done, click “Export” to save the result. You can save YouTube video in any popular formats on the computer by clicking “Format”. If you want to play YouTube video on iPod, iPhone, iPad, click “Device” and select your device. You can also share the YouTube video up to YouTube or Vimeo directly or burn YouTube video to DVD.
See, with Filmora video editor you can slow down YouTube videos with ease, what’s more, you can also apply reverse effects to play Youtube videos backwards. Download and try this YouTube Slow motion effect and you will master how to slow down YouTube videos.
Related:How to Make Slow/Fast Motion Videos
Part 3: Slow down YouTube videos with Slow Motion in YouTube Video Editor
Updated: From 20th September 2017 users will no longer be able to use the complimentary editing suite. Check the best YouTube video editor alternatives from this complete guide.
If you’ve ever been annoyed by the speed of your user-generated videos on YouTube, try out its own video editor. As YouTube has added a new “slow motion” tool to its YouTube Editor, it does pretty much exactly what it sounds like. Here is a simple guide on how to add slow motion with it.
Step 1: Get Access to YouTube Video Editor. You can either go directly to the URL, which is https://www.youtube.com/editor , or click “Upload”>”Edit” to the Video Editor tab.
Step 2: Drag your video on the timeline and double click it. In the pop up window, you will see the “Slow Motion” option. Enable it and then select how slow you want the video to be. This applies the effect to the entire video that you’ve selected.
If you just want to slow down parts of the video, go back to the main editing tab, clip it from the original video using the slicing tool and add the slow-motion effect to that clip only. You can then arrange the different clips you have in the editor to create your final video.
Step 3: Tick the option “Preview effects side-by-side” with original video and then you can see how the original video plays compared to the one you’ve slowed down. If you’re happy with the result, hit “Done” to save the settings.
Conclusion
Above are the 3 ways that you can watch a YouTube video in slow motion, and slow down YouTube videos. You can directly change the playback speed of the YouTube video on Youtube, or download the YouTube video first and then slow down the speed of the YouTube video with some video editing software for YouTube like Filmora. No matter which way you prefer, we hope these information can help you slow down youtube videos.
Richard Bennett
Richard Bennett is a writer and a lover of all things video.
Follow @Richard Bennett
UltraEdit Pro: Music & Visual Craftsmanship for PCs
The online world is steadily shifting from static photos to videos and it is quite evident from the social media users. Everyone prefers uploading short videos with music to get more attention rather than uploading a collection of photos. You can join multiple video clips and add background music as well as make a slideshow video with audio. You will require a video editor with music to get the job done.
There are different types of video editors available where you can upload photos and video clips along with songs and music. You turn them into an eye-catching music video instantly with different video effects and animations. Starting from online video editors with music to standalone video editing software, here is the list of the top 10 best video editors for creating and editing videos with music like a professional.
Part 1. Best music video editors for PC
1. Filmora
System compatibility: Windows 11/10/8/7 and Mac
Rating: 4.7/5
Wondershare Filmora is the best video editor with music. It is a premium software where you get all the features and functionalities you need to make and edit music videos like a pro. The software lets you capture screen video, webcam video, external audio as well as voiceover. Therefore, you can use your own music or song in the background of your video.
When it comes to video editing, all the standard tools are available for music video creation. There are loads of transitions, effects, elements, audio and titles available. Besides, there is a dedicated stock media library available. You can import and export different file formats and publish 4K videos as well. Here are the top features of Wondershare Filmora.
For Win 7 or later (64-bit)
For macOS 10.12 or later
- Drag and drop all media files for video creation.
- Easy timeline for organizing media files and editing them quickly.
- Crop, trim, split, cut, and combine media files.
- Wide range of video transitions and audio effects.
- Different motion elements, titles, and stock media files.
- Keyframing, noise removal, video stabilization options.
- Super intuitive user interface for all users.

2. Windows Movie Maker
System compatibility: Windows 11, 10
Rating: 4.0/5
If you are Windows user and you are looking for a free video editor with song, Windows Movie Maker is the perfect app you can get from Microsoft Store. Even though it comes free, the video editor is quite powerful. You can crop, trim, join video clips and add text and music to your video. There are image filters available for photo enhancement as well as transitions to apply in the video.
There are in-built music tracks available and it supports importing a wide range of media files. You can avail animated pan and zoom feature for photos and adjust volume and speed. There is also a Pro version available that supports 4K video and better project management as well as advanced tools. Here are the top features of Windows Movie Maker.
- Rotate, trim, flip, and join video clips to make music video.
- Make video from photos and add in-built or external music files.
- Add titles, credits, texts, stickers, as well as pan-zoom animation.
- Wide range of transition effects and photo filters available.
- Supports importing and exporting different file formats.
- Pro version supports 4K resolution and offers exclusive quick tools.

3. Blender
System compatibility: Windows 11, 10, 8.1 macOS 10.13+, Linux.
Rating: 4.5/5
If you are looking for an open-source video editor, Blender is the best choice. It is completely free to use and it comes with all the standard features for creating and editing music videos. The software is particularly popular for modelling, sculpting, rendering and creating animation-based videos. The video editor contains 32 slots where you can add your media files to create the video.
Blender allows you to change video speed, adjust different layers in the videos and add preferred transitions. Moreover, there are masks and filters available to enhance video content. The advance options of audio mixing and keyframing will surely come handy for advanced users. Here are the top features of Blender video editor.
- Cut, split, trim, and join videos clips.
- Color grading, photo filters and custom text options.
- Add effects, transitions, and animations to your video.
- Live visualization options for advanced users.
- Motion tracking, scene stabilization and compositing options.

4. Adobe Premiere Pro
System compatibility: Windows 10 and 11.
Rating: 4.5/5
Adobe Premiere Pro is the best video editor for professionals. The software has a slightly steep learning curve and it requires a high-end computer. Therefore, it is useful for you when you are serious about making professional-quality music video. In fact, Adobe Premiere Pro is widely used in the music video and video creation industry.
Adobe Premiere Pro is the perfect combination of standard and advanced video editing options. You can edit various video files at the same time. In fact, it is perfect for a team to work on your music video files. You can edit VR videos, multi-cam videos as well 3D videos. You can edit your photos, video clips and audio files perfectly as per your requirements. Here are the top features of Adobe Premiere Pro.
- Trim, split, crop, merge, adjust speed, color correction options.
- Edit video clips and audio files minutely with comparison view.
- Auto color correction, auto reframe, and configurable user interface.
- Editing advanced videos like VR and 3D as well as advance audio editor.
- Supports importing and exporting different media file formats.

5. Final Cut Pro
System compatibility: macOS 10.14 or higher
Rating: 4.4/5
Final Cut Pro for Mac users is equivalent to Adobe Premium Pro for Windows users. It is widely used by video creators to edit your videos and add effects and audio to get the desired result. You get the standard as well as the advanced video editing options and features. You can publish your music video at high resolution, and the software takes minimum time for rendering.
Final Cut Pro allows editing 3D, VR, multi-cam, and 360-degree videos. There are loads of effects, filters, and presets available to apply to your video clips and photos to create a music video. The presence of cinematic mode and object tracker could be useful for creating out-of-the-box videos. Here are the top features of Final Cut Pro.
- Trim, split, crop, change speed, color correction, and multi-cam video editing.
- Amazing cinematic mode to enhance music video content and quality.
- Add external music file and edit the music file as required.
- Proper organization tool for team to work collaboratively.
- Background rendering feature saves a lot of time in video processing.
- Publish your music video in high resolution without long processing time.

7. Clido
System compatibility: Windows, Mac, Linux, Android and iOS.
Rating: 4.5/5
Clido is an online platform where you get different tools for video editing. It is a premium online video editor with music and hence, it is suitable for all those who want to edit video with music on the go. There is no need to download any software and you can merge, compress, resize, cut and crop video as per your requirements.
You can even rotate and adjust speed to create slow-motion videos. To create your music video, you have to opt for its video maker where you can use photos, video clips, GIFs, and music. You can edit the duration for photos and video clips as per your preference. There is also a slideshow maker available for instant video creation with your photos. Here are the top features of Clido that you should be aware of.
- Flip, loop, reverse, crop, resize, and merge video clips.
- Create slideshow videos and add music of your choice instantly.
- Wide range of presets and video filters.
- Change aspect ratios to make videos for different platforms.
- Super intuitive user interface and secure platform.
- Compatible with popular browsers and suitable for PC and phone users

8. Adobe Express
System compatibility: Windows, Mac, Linux, Android, and iOS.
Rating: 4.5/5
Adobe Express is an online video editor with song that is compatible with popular browsers and all devices. You can create stunning music videos in a few minutes. There are various templates available to get started and finish your stunning music video in a few steps. There is a wide range of stock images available from Adobe. You get access to effects, textures, overlays, and filters to enhance video quality.
You can also remove background from your photos to improve video content. There are various graphical elements available to add to your video. You can resize your video to be compatible with online platforms and different devices. The software allows you to play with texts and titles by offering various customization options. Here are the top features of Adobe Express.
- Loads of video templates for quick video creation.
- Resize photos, convert to different formats, and remove background.
- Trim and crop video clips, convert to GIFs, resize as required.
- Access to stock media library of Adobe and experiment with text.
- Make video for different online platforms and different devices.

9. VideoPad
System compatibility: Windows 11, 10, 8, 7, Vista and XP & Mac OS X 10.5 or above.
Rating: 4.1/5
VideoPad from NCH Software is a simple but powerful video editor. You can create stunning music videos and edit them as per your requirements. The user interface is suitable for beginners and you can avail different video effects and transitions to apply to your video. There are also dedicated audio tools available to edit audio and music files.
The software supports editing 360-degree and 3D videos. In fact, it supports over 60 video file formats for importing them. The software is equally useful in video optimization and you can share the edited video on different online platforms as per your preference. Here are the top features of VideoPad.
- Standard video and audio editing options available.
- Mix music track, add audio effects, and record your narration.
- Wide range of templates for intro, outro and others for branding.
- Supports up to 4K resolution and lossless export.
- Video optimization, stabilization, color correction, and change speed.
- Upload videos directly to YouTube, Vimeo, and Flickr and cloud platforms.

Part 2. How to make a music video on my own?
In order to make a music video file, you will need a video editor, video clips or photos, and background music. We recommend Wondershare Filmora as the best video editor for music videos. Transfer the video clips or photos with which you want to make the music video from your phone to your computer. Choose and download the music file that you would want to add to the background of your video. You can also record your own song or music and use the same for background music. Here are the steps to make a music video on your own.
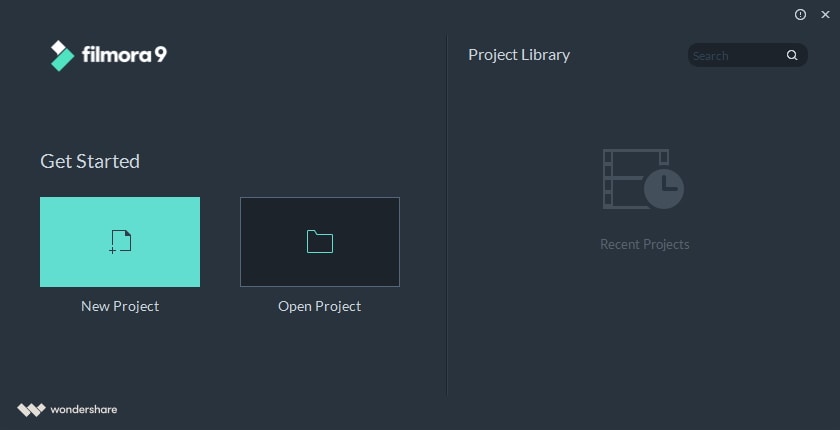
Step 1: Download and install Filmora as per your operating system. Launch the software and click on New Project.
Step 2: Drag and drop the video clips, photos, music and audio files on Project Media folder.
Step 3: Drag and drop the video clips or photos on Timeline and arrange them in order as you want in your video. You can stretch the duration of the photos and videos as per your requirements.

Step 4: Go to Transition option at the top bar and drag and drop the transition of your choice on the photos or video clips so that the transition is eye-catching and eye-soothing.

Step 5: Drag and drop the music file from Project Media folder on the Timeline below the photos or video clips. You can stretch or trim the music track to suit the video length. Check out Audio, Effects, Elements and Titles section at the top bar so that you can incorporate them in your music video to be more appealing and engaging.

Step 6: Preview the music video on Filmora and click on Export button to save it on your hard drive as per your selected file format.

Part 3. Related FAQs
1. How do I add music to video editor on PC?
Different video editor offers different options to add music. Some allow you to drag and drop music file from your hard drive to video editor directly. Otherwise, you have to browse and go to the location and select the music file. Online video editor also allows uploading music file from cloud storage.
2. What software is best for editing music videos?
Wondershare Filmora is the best video editor for editing music videos. This is because it is a premium software with all the features and functionalities that you need to edit your music video. The user interface is intuitive for everyone to enhance video content and quality.
3. What is the best app to put music to videos?
InShot is the best app to put music to videos for Android users. For iOS users, Video Maker with Music Editor is the best app to use where all the required features are readily available.
For macOS 10.12 or later
- Drag and drop all media files for video creation.
- Easy timeline for organizing media files and editing them quickly.
- Crop, trim, split, cut, and combine media files.
- Wide range of video transitions and audio effects.
- Different motion elements, titles, and stock media files.
- Keyframing, noise removal, video stabilization options.
- Super intuitive user interface for all users.
2. Windows Movie Maker
System compatibility: Windows 11, 10
Rating: 4.0/5
If you are Windows user and you are looking for a free video editor with song, Windows Movie Maker is the perfect app you can get from Microsoft Store. Even though it comes free, the video editor is quite powerful. You can crop, trim, join video clips and add text and music to your video. There are image filters available for photo enhancement as well as transitions to apply in the video.
There are in-built music tracks available and it supports importing a wide range of media files. You can avail animated pan and zoom feature for photos and adjust volume and speed. There is also a Pro version available that supports 4K video and better project management as well as advanced tools. Here are the top features of Windows Movie Maker.
- Rotate, trim, flip, and join video clips to make music video.
- Make video from photos and add in-built or external music files.
- Add titles, credits, texts, stickers, as well as pan-zoom animation.
- Wide range of transition effects and photo filters available.
- Supports importing and exporting different file formats.
- Pro version supports 4K resolution and offers exclusive quick tools.
3. Blender
System compatibility: Windows 11, 10, 8.1 macOS 10.13+, Linux.
Rating: 4.5/5
If you are looking for an open-source video editor, Blender is the best choice. It is completely free to use and it comes with all the standard features for creating and editing music videos. The software is particularly popular for modelling, sculpting, rendering and creating animation-based videos. The video editor contains 32 slots where you can add your media files to create the video.
Blender allows you to change video speed, adjust different layers in the videos and add preferred transitions. Moreover, there are masks and filters available to enhance video content. The advance options of audio mixing and keyframing will surely come handy for advanced users. Here are the top features of Blender video editor.
- Cut, split, trim, and join videos clips.
- Color grading, photo filters and custom text options.
- Add effects, transitions, and animations to your video.
- Live visualization options for advanced users.
- Motion tracking, scene stabilization and compositing options.
4. Adobe Premiere Pro
System compatibility: Windows 10 and 11.
Rating: 4.5/5
Adobe Premiere Pro is the best video editor for professionals. The software has a slightly steep learning curve and it requires a high-end computer. Therefore, it is useful for you when you are serious about making professional-quality music video. In fact, Adobe Premiere Pro is widely used in the music video and video creation industry.
Adobe Premiere Pro is the perfect combination of standard and advanced video editing options. You can edit various video files at the same time. In fact, it is perfect for a team to work on your music video files. You can edit VR videos, multi-cam videos as well 3D videos. You can edit your photos, video clips and audio files perfectly as per your requirements. Here are the top features of Adobe Premiere Pro.
- Trim, split, crop, merge, adjust speed, color correction options.
- Edit video clips and audio files minutely with comparison view.
- Auto color correction, auto reframe, and configurable user interface.
- Editing advanced videos like VR and 3D as well as advance audio editor.
- Supports importing and exporting different media file formats.
5. Final Cut Pro
System compatibility: macOS 10.14 or higher
Rating: 4.4/5
Final Cut Pro for Mac users is equivalent to Adobe Premium Pro for Windows users. It is widely used by video creators to edit your videos and add effects and audio to get the desired result. You get the standard as well as the advanced video editing options and features. You can publish your music video at high resolution, and the software takes minimum time for rendering.
Final Cut Pro allows editing 3D, VR, multi-cam, and 360-degree videos. There are loads of effects, filters, and presets available to apply to your video clips and photos to create a music video. The presence of cinematic mode and object tracker could be useful for creating out-of-the-box videos. Here are the top features of Final Cut Pro.
- Trim, split, crop, change speed, color correction, and multi-cam video editing.
- Amazing cinematic mode to enhance music video content and quality.
- Add external music file and edit the music file as required.
- Proper organization tool for team to work collaboratively.
- Background rendering feature saves a lot of time in video processing.
- Publish your music video in high resolution without long processing time.
7. Clido
System compatibility: Windows, Mac, Linux, Android and iOS.
Rating: 4.5/5
Clido is an online platform where you get different tools for video editing. It is a premium online video editor with music and hence, it is suitable for all those who want to edit video with music on the go. There is no need to download any software and you can merge, compress, resize, cut and crop video as per your requirements.
You can even rotate and adjust speed to create slow-motion videos. To create your music video, you have to opt for its video maker where you can use photos, video clips, GIFs, and music. You can edit the duration for photos and video clips as per your preference. There is also a slideshow maker available for instant video creation with your photos. Here are the top features of Clido that you should be aware of.
- Flip, loop, reverse, crop, resize, and merge video clips.
- Create slideshow videos and add music of your choice instantly.
- Wide range of presets and video filters.
- Change aspect ratios to make videos for different platforms.
- Super intuitive user interface and secure platform.
- Compatible with popular browsers and suitable for PC and phone users
8. Adobe Express
System compatibility: Windows, Mac, Linux, Android, and iOS.
Rating: 4.5/5
Adobe Express is an online video editor with song that is compatible with popular browsers and all devices. You can create stunning music videos in a few minutes. There are various templates available to get started and finish your stunning music video in a few steps. There is a wide range of stock images available from Adobe. You get access to effects, textures, overlays, and filters to enhance video quality.
You can also remove background from your photos to improve video content. There are various graphical elements available to add to your video. You can resize your video to be compatible with online platforms and different devices. The software allows you to play with texts and titles by offering various customization options. Here are the top features of Adobe Express.
- Loads of video templates for quick video creation.
- Resize photos, convert to different formats, and remove background.
- Trim and crop video clips, convert to GIFs, resize as required.
- Access to stock media library of Adobe and experiment with text.
- Make video for different online platforms and different devices.
9. VideoPad
System compatibility: Windows 11, 10, 8, 7, Vista and XP & Mac OS X 10.5 or above.
Rating: 4.1/5
VideoPad from NCH Software is a simple but powerful video editor. You can create stunning music videos and edit them as per your requirements. The user interface is suitable for beginners and you can avail different video effects and transitions to apply to your video. There are also dedicated audio tools available to edit audio and music files.
The software supports editing 360-degree and 3D videos. In fact, it supports over 60 video file formats for importing them. The software is equally useful in video optimization and you can share the edited video on different online platforms as per your preference. Here are the top features of VideoPad.
- Standard video and audio editing options available.
- Mix music track, add audio effects, and record your narration.
- Wide range of templates for intro, outro and others for branding.
- Supports up to 4K resolution and lossless export.
- Video optimization, stabilization, color correction, and change speed.
- Upload videos directly to YouTube, Vimeo, and Flickr and cloud platforms.
Part 2. How to make a music video on my own?
In order to make a music video file, you will need a video editor, video clips or photos, and background music. We recommend Wondershare Filmora as the best video editor for music videos. Transfer the video clips or photos with which you want to make the music video from your phone to your computer. Choose and download the music file that you would want to add to the background of your video. You can also record your own song or music and use the same for background music. Here are the steps to make a music video on your own.
Step 1: Download and install Filmora as per your operating system. Launch the software and click on New Project.
Step 2: Drag and drop the video clips, photos, music and audio files on Project Media folder.
Step 3: Drag and drop the video clips or photos on Timeline and arrange them in order as you want in your video. You can stretch the duration of the photos and videos as per your requirements.
Step 4: Go to Transition option at the top bar and drag and drop the transition of your choice on the photos or video clips so that the transition is eye-catching and eye-soothing.
Step 5: Drag and drop the music file from Project Media folder on the Timeline below the photos or video clips. You can stretch or trim the music track to suit the video length. Check out Audio, Effects, Elements and Titles section at the top bar so that you can incorporate them in your music video to be more appealing and engaging.
Step 6: Preview the music video on Filmora and click on Export button to save it on your hard drive as per your selected file format.
Part 3. Related FAQs
1. How do I add music to video editor on PC?
Different video editor offers different options to add music. Some allow you to drag and drop music file from your hard drive to video editor directly. Otherwise, you have to browse and go to the location and select the music file. Online video editor also allows uploading music file from cloud storage.
2. What software is best for editing music videos?
Wondershare Filmora is the best video editor for editing music videos. This is because it is a premium software with all the features and functionalities that you need to edit your music video. The user interface is intuitive for everyone to enhance video content and quality.
3. What is the best app to put music to videos?
InShot is the best app to put music to videos for Android users. For iOS users, Video Maker with Music Editor is the best app to use where all the required features are readily available.
Also read:
- In 2024, Bridging YouTube and iMovie with Seamless Audio Transfer
- [Updated] Compreran't & Reviewed The Ultimate List of iOS Video Edits
- YouTube's Ultimate MP3 Creators List
- Speedy Spectaculars – YouTube's Top Videos Surpassing 100 Million by End of Year
- Essential Insights on ASMR Videos
- In 2024, Enhancing Your Content 10 Exceptional Reacting Techniques
- The Ethical Way to Grow Your Fan Base Effectively
- Eco-Friendly Cities Redefining Urban Spaces for Nature
- [Updated] Amplify Earnings Monetize YouTube on the Go with Effective Techniques
- Crafting Visual Stories In-Depth PC Editing Techniques for YouTube for 2024
- In 2024, Enhance Your Video with These Premium, Free Audio Stores
- In 2024, Elevating Channels Exposure on YouTube The Featured Channel Methodology
- 2024 Approved Cohesive Title Blueprint for Social & Mobile Platforms
- The Hidden Prowess in Locating Elusive YouTube Videos
- Skyrocketing Subscribers on YouTube Step-by-Step
- Ace the Art of Online Fame Trending on YouTube for 2024
- In 2024, Core Auditory Stimulation Channels
- Personalize Your Pixelated World The Ultimate Guide to Discovering Creator Types via 6 Tests
- Flavorful Faves Top Online Chefs & Culinary Stars
- Elevate Your Online Presence with Expert Streaming Guide for 2024
- [New] Captivating Content Top Three Channel Growth Strategies
- How To Use Jump Cuts in Your Vlog
- Premium Opening Scenes Top 16 YouTube Intros for Popularity
- [Updated] DIY Movie Making on YouTube & Comparable Creative Tools
- Earning Streaming Strategies - 8 Beginners' Tips for 2024
- [Updated] Download and Save YouTube Thumbnails with Simplicity & Speed
- Cutting-Edge PC Editing Techniques Enhancing Your YouTube Presence for 2024
- 2024 Approved Diving Into Mr. Beast's Cash Flow
- Boosting Channel Earnings The Step-by-Step FameBit Guide to Affiliates
- [New] Elevating Your YouTube Experience Tips on Channel Art and Sizes
- The Escape Artist's Manual to Disguised YouTube Archives
- [Updated] Dissecting Biggest FIFA Footage Trends in Graphs
- [Updated] 8 Key Money-Making Moves for YouTube Rookies
- 2024 Approved 16 Best Kickstart Videos on YouTube for Visibility Boost
- 2024 Approved Dive Into DIY The Beginner’s Guide to Eye-Catching Mac Videos
- Deciphering the Language of Copyright Notices From YouTube for 2024
- 2024 Approved Connecting YouTube & TikTok Your Ultimate Step-by-Step Walkthrough
- [New] Efficiency at Fingertips Swiftly Upload Videos From iPhone/iPad to YouTube
- Mastering the Art of Gamers' Intros Top 12 YT Videographers' Lists
- [New] Bridging App Dimensions with YouTube Shorts
- Achieving Million-Sub Milestone The YouTube Guide for 2024
- [Updated] Desktop/Mobile Techniques for Sound Rate Manipulation in YouTube
- Transforming Trips Into Tales The Roadmap to Becoming a Travel Blogger
- In 2024, Elevating Your YouTube Presence with Ideal Video Formats
- Total Disconnect From YouTube Shorts Made Simple
- 2024 Approved Engineering Endgame Echoes
- In 2024, Chuckle Campaign 7 Ingenious Ideas for Funny YouTube Videos
- 2024 Approved How to Unlock Instagram's Filter Treasure Trove Without Spending
- New In 2024, 10 Premium Multitrack Audio Editors That Outshine Audacity
- Failed to play MP4 movies with Samsung Galaxy M34
- Most Improved 10 Elements of Terraria
- 2024 Approved Audio-Free Editing How to Cut Out Channels From MP4/MKV/AVI/MOV Files
- New In 2024, The Ultimate Guide to Free Video Editing Software for Starters
- In 2024, Unleash Your Creativity Top Video Editing Software for Windows 11 (Free & Paid)
- Perfect Precision The Best 39 Video-Trimming Tools From Google Play
- Super Easy Ways To Deal with Tecno Camon 20 Premier 5G Unresponsive Screen | Dr.fone
- [Updated] In 2024, Unlock More Likes and Shares Top 30 TikTok Usernames for Success
- In 2024, Lenovo's Easy Pathway to Screen Recording
- [New] Visual Enhancement Expertly Applying Borders on Social Media Images for 2024
- [New] Elevate Your FB Campaigns The 20 Premier Video Tactics
- [New] In 2024, How To Use Voicemod On Discord [Desktop and Mobile]
- How to Restore Deleted Motorola Moto G Stylus 5G (2023) Pictures An Easy Method Explained.
- The Definitive Guide to SRT Editing on Mac
- Digging Into the Heart of RecordCast Technology
- 6 Fixes to Unfortunately WhatsApp has stopped Error Popups On Samsung Galaxy S23 | Dr.fone
- New Cutting-Edge Video Editing Without the Cost Top 10 Free Open-Source Options
- [New] In 2024, Captivating Costless Visual Collaboration Games
- Leverage Your Xbox Gameplay for Virtual Engagement on FB for 2024
- [New] Balancing iPhone HD Video with Premiere Pro’s Exposure Control
- Windows 11'S Latest Traits Unveiled
- In 2024, Refining Your Digital Footprint Editing the Look Back Feature
- In 2024, Complete Tutorial to Use GPS Joystick to Fake GPS Location On Realme V30 | Dr.fone
- How to Downgrade Apple iPhone XS to the Previous iOS/iPadOS Version? | Dr.fone
- How to Track WhatsApp Messages on Oppo A58 4G Without Them Knowing? | Dr.fone
- How To Transfer WhatsApp From iPhone 11 Pro Max to other iPhone 12 Pro Max devices? | Dr.fone
- 2024 Approved Accelerating Your TikTok Content A Quick Guide
- [New] 2024 Approved Unveiling IGTV Your Ultimate Tutorial
- In 2024, Brainless Battles Top 8 Zombie Shooter Contenders
- Perfecting the Art of Saving Gameplay Footage on Android
- Title: "Steady Your Screen The Key to Slowdown in YouTube Videos (48 Chars)"
- Author: Kevin
- Created at : 2024-06-18 20:20:49
- Updated at : 2024-06-19 20:20:49
- Link: https://youtube-videos.techidaily.com/steady-your-screen-the-key-to-slowdown-in-youtube-videos-48-chars/
- License: This work is licensed under CC BY-NC-SA 4.0.
