
:max_bytes(150000):strip_icc()/nintendo-switch-vs-nintendo-switch-lite-01-61592395e9e44fc78403c7e99105de84.jpg)
Snappy Film Maker
Snappy Film Maker
In today’s world where businesses are going digital, it is very important to think of how you are going to get your products in front of many customers as possible without having to spend a fortune. That’s where YouTube Clip Maker comes in. It is an effective way for making YouTube videos that you can use for your business advertisements.
If you are a budding YouTuber or just looking at starting to make YouTube videos, you should consider among your editing tools a YouTube Clip Maker. It is an application that has all the tools necessary for you to edit videos in a fast and convenient way and enables you to upload the completed videos to YouTube. It is a simple tool with a friendly-to-use interface for editing videos, it should be a must-have for all users.
Part 1. Best YouTube Clip Maker Filmora
Filmora is a feature-rich audio and video editor that helps beginners with the editing of their audio and video files. The designers did their job with the armature editors in mind. It gives them a simple and easy-to-use layout that makes the work less complicated. Filmora has a built-in feature that lets you record your music and voice and also trim, merge, and cut a split your mp3 files.
Besides all the wonderful features, Filmora lets you make adjustments to speed, pitch, and volume, this makes you improve the clarity of your audio file. The app can be used to customize ringtones and specialized sound effects for your presentation.

For Win 7 or later (64-bit)
For macOS 10.12 or later
Steps on How to Use Filmora
This is an app that is best suited to those starting in video editing and requires the use of an easy-to-use app that can as well deliver quality work. Filmora is an application that was made with the armature editors in mind and is one they should consider while looking for a program to work with. It features some of the essential tools one would require and it is easy to learn how to navigate through it.
Installation Steps
- Click the icon in the center of the Media Library to add files directly.
- Go File > Import Media > Import Media Files.
- Drag and drop to the ‘media library’ directly.
When importing a media file and Filmora asks you to create a proxy file to speed up the editing process. Select “Yes” to have a fast video editing experience.
You can also import video clips using your Touch Bar controls if your computer has Touch Bar.
Record a media file
Apart from the videos shot by your digital devices, you can also directly import media files by recording video from your webcam, screen recording your computer, and a voice-over recording.
Computer screen recording:
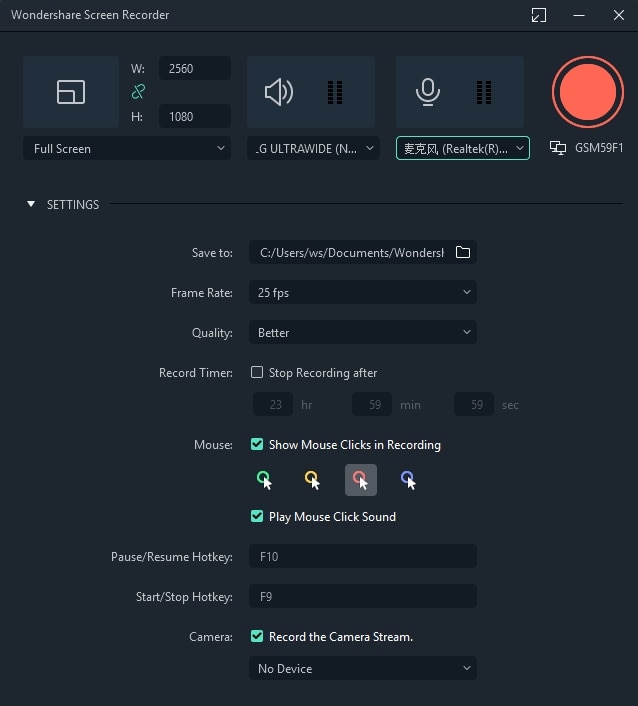
Click the “Record” option, and choose “Record PC Screen” to get the built-in Wondershare Screen Recorder. Hit the red button to get started. To finish recording click on F9
Record videos from webcam:
Also, click the “Record” option, and choose “Record from Webcam”. In the recording pop-up window, select the red button, it will start the recording process and is also the button to choose when you want to stop recording. You will then select OK to save the recorded video clip.
Record voice-over:
Choose “Record a voiceover” on the Record menu. It would be better to connect a microphone to your Mac for a better result. Hit the Record button, and it leaves you 3 seconds to get ready.
All media files recorded are automatically saved in the “Media Library”, in case of further editing, you can drag them to the timeline.
Part 2. How to Make YouTube Clip Online
The application lets you trim your YouTube videos without having to have an account. It provides you with a quick way to either cut the beginning or end of a YouTube video. YouTube Trimmer will let you trim the video in a couple of seconds with just a few clicks. To use the app, you just need to copy and paste the earl and you are on your way to editing. You don’t have to be worried about downloading or installing the application for you to use it.
Steps on How to Use YouTube Trimmer
Step 1:
Import
Copy the YouTube link that you want to work on and paste it into the field indicated on the application.
Step 2:
Trim and Edit
You can drag the video at the edges to trim it. You can also move the playhead with your mouse and manually make cuts by clicking on the cut button.
Step 3:
Export
Once you are done editing and happy with the outcome, select the Export button to start rendering the video. Here you can choose to publish it on YouTube or save it for other uses.
Part 3. YouTube Clip Maker for Android and iPhone
KineMaster
It is a simple-to-use application that lets you create professional-quality videos in very short minutes. It enables you to edit pre-made videos or lets you make fresh ones by combining your video with several visual and sound effects. After you are done with the editing, you can save your video or share it out there.
Steps on How to Use Kinemater
Step 1:Create
It lets you import videos, audio, and images from your device. After which you can cut, rearrange, and transition between your images and videos using the KineMaster’s video layering support. This is highly dependent on your computer’s hardware capabilities.
Step 2:Edit
Adjust your video’s appearance parameters by blending color modes, adding light and sound effects, overlaying graphics, and text, or rather directly drawing on the video by using the handwriting layers.
Step 3:Share
You can export your project up to 4k and 60fps. The app saves directly to your camera’s roll besides letting you share to social media.
Part 4: Related FAQs
**How to Make a Clip from a YouTube Video ?
First, sign in to YouTube and start playing a video. Under the video click on the Clip, this will create a clip box after which you will select the part of the video that you want to clip. Give the clip a title then click share after which you will be prompted to choose an option for sharing.
**How to Clip Parts of a YouTube Video ?
Start by sign-in and opening YouTube then proceed by watching a video. If clips are available, you will see a clips icon in the bar at the bottom of the video. Click on the clip icon and select that part of the video you are interested in, give the clip a title, and select Share Clip. Choose whether you want to share the clip or save it for later use.
**What YouTubers Use to Get Clips ?
YouTubers use several video editors for their work. Some of the most popular editors are iMovie, Final Cut Pro X, and Premier Pro CC. These YouTube editing apps vary in technicalities of use and features whereby you will find that some are easy to use and have varying features. Some of the editors are free while others require payments for one to use.
For macOS 10.12 or later
Steps on How to Use Filmora
This is an app that is best suited to those starting in video editing and requires the use of an easy-to-use app that can as well deliver quality work. Filmora is an application that was made with the armature editors in mind and is one they should consider while looking for a program to work with. It features some of the essential tools one would require and it is easy to learn how to navigate through it.
Installation Steps
- Click the icon in the center of the Media Library to add files directly.
- Go File > Import Media > Import Media Files.
- Drag and drop to the ‘media library’ directly.
When importing a media file and Filmora asks you to create a proxy file to speed up the editing process. Select “Yes” to have a fast video editing experience.
You can also import video clips using your Touch Bar controls if your computer has Touch Bar.
Record a media file
Apart from the videos shot by your digital devices, you can also directly import media files by recording video from your webcam, screen recording your computer, and a voice-over recording.
Computer screen recording:
Click the “Record” option, and choose “Record PC Screen” to get the built-in Wondershare Screen Recorder. Hit the red button to get started. To finish recording click on F9
Record videos from webcam:
Also, click the “Record” option, and choose “Record from Webcam”. In the recording pop-up window, select the red button, it will start the recording process and is also the button to choose when you want to stop recording. You will then select OK to save the recorded video clip.
Record voice-over:
Choose “Record a voiceover” on the Record menu. It would be better to connect a microphone to your Mac for a better result. Hit the Record button, and it leaves you 3 seconds to get ready.
All media files recorded are automatically saved in the “Media Library”, in case of further editing, you can drag them to the timeline.
Part 2. How to Make YouTube Clip Online
The application lets you trim your YouTube videos without having to have an account. It provides you with a quick way to either cut the beginning or end of a YouTube video. YouTube Trimmer will let you trim the video in a couple of seconds with just a few clicks. To use the app, you just need to copy and paste the earl and you are on your way to editing. You don’t have to be worried about downloading or installing the application for you to use it.
Steps on How to Use YouTube Trimmer
Step 1:
Import
Copy the YouTube link that you want to work on and paste it into the field indicated on the application.
Step 2:
Trim and Edit
You can drag the video at the edges to trim it. You can also move the playhead with your mouse and manually make cuts by clicking on the cut button.
Step 3:
Export
Once you are done editing and happy with the outcome, select the Export button to start rendering the video. Here you can choose to publish it on YouTube or save it for other uses.
Part 3. YouTube Clip Maker for Android and iPhone
KineMaster
It is a simple-to-use application that lets you create professional-quality videos in very short minutes. It enables you to edit pre-made videos or lets you make fresh ones by combining your video with several visual and sound effects. After you are done with the editing, you can save your video or share it out there.
Steps on How to Use Kinemater
Step 1:Create
It lets you import videos, audio, and images from your device. After which you can cut, rearrange, and transition between your images and videos using the KineMaster’s video layering support. This is highly dependent on your computer’s hardware capabilities.
Step 2:Edit
Adjust your video’s appearance parameters by blending color modes, adding light and sound effects, overlaying graphics, and text, or rather directly drawing on the video by using the handwriting layers.
Step 3:Share
You can export your project up to 4k and 60fps. The app saves directly to your camera’s roll besides letting you share to social media.
Part 4: Related FAQs
**How to Make a Clip from a YouTube Video ?
First, sign in to YouTube and start playing a video. Under the video click on the Clip, this will create a clip box after which you will select the part of the video that you want to clip. Give the clip a title then click share after which you will be prompted to choose an option for sharing.
**How to Clip Parts of a YouTube Video ?
Start by sign-in and opening YouTube then proceed by watching a video. If clips are available, you will see a clips icon in the bar at the bottom of the video. Click on the clip icon and select that part of the video you are interested in, give the clip a title, and select Share Clip. Choose whether you want to share the clip or save it for later use.
**What YouTubers Use to Get Clips ?
YouTubers use several video editors for their work. Some of the most popular editors are iMovie, Final Cut Pro X, and Premier Pro CC. These YouTube editing apps vary in technicalities of use and features whereby you will find that some are easy to use and have varying features. Some of the editors are free while others require payments for one to use.
Premier Screener for Capturing High-Quality Videos
Best Screen Recorder for YouTube

Richard Bennett
Mar 27, 2024• Proven solutions
Taking viewers ‘in app’ is an effective way to show them how you work or play. A screen recording is a footage recorded not from your camera, but directly from the interface of your computer or mobile device. A screen recording might be footage from a game, a software tutorial, or a demonstration of your creative process in a program.
We have picked up the best 10 paid screen recorders for YouTube on Windows and Mac, but if you are looking for a complete solution to record videos on Windows, Mac, Android or iOS phone to make tutorial videos, how-to videos, or demonstration videos, or products/software review videos, or gameplay videos on YouTube, here is the all the information you need. This article will introduce you to the best screen recorders on computers, Android devices, and iPhones for YouTube.
- Part 1: Best Screen Recording Software for Recording Windows/Mac Screen for YouTube
- Part 2: Best Screen Capturing Apps for Recording Your Android Screen (No Root)
- Part 3: Best Screen Recording Apps for Recording on iOS Devices for YouTube Videos
Part 1: Best Software for Recording Your Computer Screen for YouTube Videos
1.Filmora Video Editor [Windows & Mac, Freemium]


In addition to being a powerful editing tool, Filmora can also be used to record your computer screen. In Filmora, just select Media and then Record. In the Record menu, click Record PC Screen. The recording window will pop up and you will be able to decide whether you want to record your full screen, a customized selection of it, or a specific target window. After you have finished recording your clip will automatically appear in the Media menu in your Filmora project so you can edit it right away. You can download Filmora from Filmora.wondershare.com if you do not have it yet.
If you just want to make a how-to video with some captured screens, Filmora will be a good choice. Check the video below about how to record Screen with Filmora.
2.Wondershare DemoCreator
DemoCreator is a specially designed screen recording software from Wondershare for both gameplay recording, tutorial making, screen capturing, and webcam recording as well. You can use it to record the full screen of your Windows or Mac computer or a particular part on the screen. The best part is that you can both record and edit the video in DemoCreator and upload it to YouTube directly. This screen recorder for YouTube is a perfect solution for those who want to capture 120 frames per second and 4K videos.
3.VLC Media Player [Windows & Mac & Linux, Free]
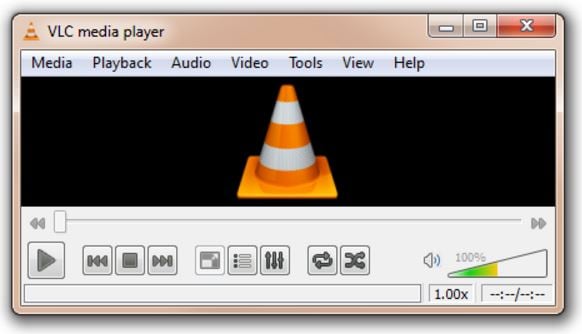
VLC Media Player is a free media player that has a great screen recording feature. You can download it from Video LAN.org. In order to take a screen recording using VLC you first need to click on View and Advanced Controls. A lot of the more advanced features, like screen recording, are initially hidden so as not to confuse users, but selecting Advanced Controls will make them visible. Then you can go to Media and Open Capture Device. In the window that opens choose Desktop next to Capture Mode and click Play. VLC will start displaying your desktop in the player window. Now you just have to click Record.
Learn more details about how to record YouTube videos with VLC
4.QuickTime [Mac, Free]

QuickTime is the default media player for Mac users. To access QuickTime’s screen recording feature select File and New Screen Recording. In the window that pops up click on the arrow next to the Record button and choose a microphone. Then you can press Record. Your recording will not start right away. First, a window will pop up explaining that you can stop your recording by pressing ‘command-control-escape’. Although QuickTime is available for PCs the PC version does not have a screen recording feature.
Learn more details about how to record YouTube video and audio with QuickTime Player on Mac
Part 2: Recording Your Android Screen for YouTube Videos (No Root)
We have already described 4 ways of recording screen videos on Android , while in this part, we will introduce some useful screen recording apps for recording YouTube videos on Android phones.
1. AZ Screen Recorder
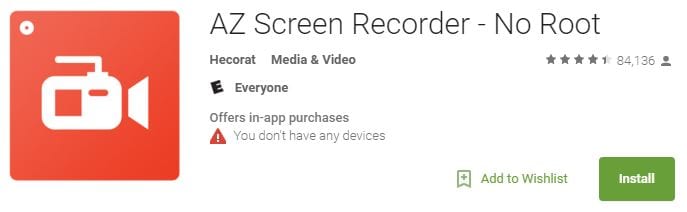
AZ Screen Recorder is free screen recording app for Android 5.0 Lollipop. Using AZ Screen Recorder you can simultaneously record from your phone’s camera and screen. This is useful if you want to shoot a video of yourself explaining an app to add into your final video. Although the basic version of AZ Screen Recorder is free there are in-app purchases.
2.Unlimited Screen Recorder
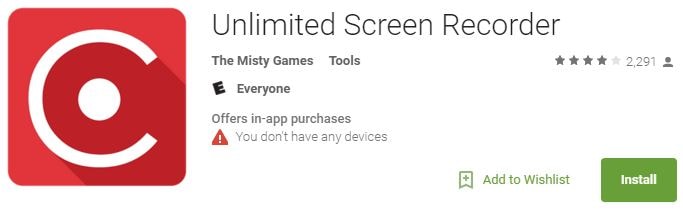
Unlimited Screen Recorder is also for 5.0 Lollipop and is free with in-app purchases. Like the name ‘Unlimited’ suggests you can use this app to record for as long as you want. There is no time limit. You can also record audio through Unlimited Screen Recorder so it is convenient to make a voiceover for your video.
There are very few options available for recording Android devices older than Lollipop without rooting your device.
Click here to check more screen recording apps to capture videos on Android
Part 3: Recording Your iOS Device Screen for YouTube Videos
With the release of iOS 11, recording on iPhone and iPad is much easier with the built-in screen recording tool . If your iOS is above 11 (including 11) version, you can record the screen with its in-app application, check this video to know the details:
Apart from recording with the built-in recording tool, you can also use some best iOS screen recording apps to record YouTube videos, or use some mirror software to record iPhone/iPad on Windows and Mac and create a YouTube video.
1.QuickTime
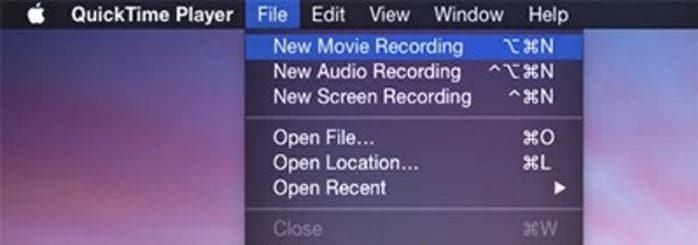
QuickTime can be used to record the screen of your iPhone or iPad in addition to the screen of your Mac. First you need to connect your device to your computer with a USB port. Instead of selecting ‘New Screen Recording’ in QuickTime, the way you would when recording your computer screen, select ‘New Movie Recording’. In the recording window click on the arrow next to the ‘Record’ button and choose your iOS device where it asks you to choose a camera. This method only works with the Mac version of QuickTime.
2.Reflector
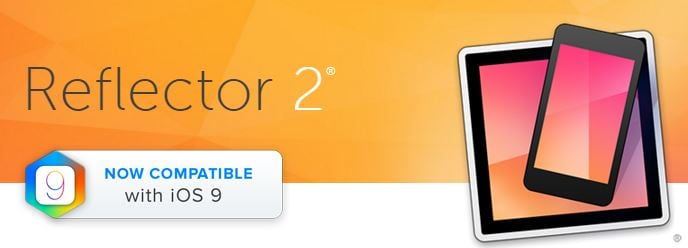
Reflector is mirroring software available for Mac or PC. Mirroring software creates a clone of your device’s interface on your computer screen. Once your device is being displayed on the screen of your computer you can capture it by recording your computer screen. You can download Reflector from Airsquirrels.com.
In order to use Reflector to mirror your device, you will also need to use AirPlay on your iPhone or iPad, and your device and your computer will need to be connected to the same wifi network. In AirPlay, make sure mirroring is on and select your computer as a receiver. Your computer will not show up as an option if you do not have Reflector running.
Conclusion
Above are the screen and video recording software programs that we picked up for you to make a YouTube tutorial, how-to or software review video on most popular platforms including Windows and Mac computer and Android and iOS smartphones. Besides recording, you may also need thebest video editing software for editing YouTube videos . Watch the video tutorial to check how to edit your YouTube videos and get to know some terms in video editing. Remember to download Filmora and have a try today.
Richard Bennett
Richard Bennett is a writer and a lover of all things video.
Follow @Richard Bennett
Richard Bennett
Mar 27, 2024• Proven solutions
Taking viewers ‘in app’ is an effective way to show them how you work or play. A screen recording is a footage recorded not from your camera, but directly from the interface of your computer or mobile device. A screen recording might be footage from a game, a software tutorial, or a demonstration of your creative process in a program.
We have picked up the best 10 paid screen recorders for YouTube on Windows and Mac, but if you are looking for a complete solution to record videos on Windows, Mac, Android or iOS phone to make tutorial videos, how-to videos, or demonstration videos, or products/software review videos, or gameplay videos on YouTube, here is the all the information you need. This article will introduce you to the best screen recorders on computers, Android devices, and iPhones for YouTube.
- Part 1: Best Screen Recording Software for Recording Windows/Mac Screen for YouTube
- Part 2: Best Screen Capturing Apps for Recording Your Android Screen (No Root)
- Part 3: Best Screen Recording Apps for Recording on iOS Devices for YouTube Videos
Part 1: Best Software for Recording Your Computer Screen for YouTube Videos
1.Filmora Video Editor [Windows & Mac, Freemium]
In addition to being a powerful editing tool, Filmora can also be used to record your computer screen. In Filmora, just select Media and then Record. In the Record menu, click Record PC Screen. The recording window will pop up and you will be able to decide whether you want to record your full screen, a customized selection of it, or a specific target window. After you have finished recording your clip will automatically appear in the Media menu in your Filmora project so you can edit it right away. You can download Filmora from Filmora.wondershare.com if you do not have it yet.
If you just want to make a how-to video with some captured screens, Filmora will be a good choice. Check the video below about how to record Screen with Filmora.
2.Wondershare DemoCreator
DemoCreator is a specially designed screen recording software from Wondershare for both gameplay recording, tutorial making, screen capturing, and webcam recording as well. You can use it to record the full screen of your Windows or Mac computer or a particular part on the screen. The best part is that you can both record and edit the video in DemoCreator and upload it to YouTube directly. This screen recorder for YouTube is a perfect solution for those who want to capture 120 frames per second and 4K videos.
3.VLC Media Player [Windows & Mac & Linux, Free]
VLC Media Player is a free media player that has a great screen recording feature. You can download it from Video LAN.org. In order to take a screen recording using VLC you first need to click on View and Advanced Controls. A lot of the more advanced features, like screen recording, are initially hidden so as not to confuse users, but selecting Advanced Controls will make them visible. Then you can go to Media and Open Capture Device. In the window that opens choose Desktop next to Capture Mode and click Play. VLC will start displaying your desktop in the player window. Now you just have to click Record.
Learn more details about how to record YouTube videos with VLC
4.QuickTime [Mac, Free]
QuickTime is the default media player for Mac users. To access QuickTime’s screen recording feature select File and New Screen Recording. In the window that pops up click on the arrow next to the Record button and choose a microphone. Then you can press Record. Your recording will not start right away. First, a window will pop up explaining that you can stop your recording by pressing ‘command-control-escape’. Although QuickTime is available for PCs the PC version does not have a screen recording feature.
Learn more details about how to record YouTube video and audio with QuickTime Player on Mac
Part 2: Recording Your Android Screen for YouTube Videos (No Root)
We have already described 4 ways of recording screen videos on Android , while in this part, we will introduce some useful screen recording apps for recording YouTube videos on Android phones.
1. AZ Screen Recorder
AZ Screen Recorder is free screen recording app for Android 5.0 Lollipop. Using AZ Screen Recorder you can simultaneously record from your phone’s camera and screen. This is useful if you want to shoot a video of yourself explaining an app to add into your final video. Although the basic version of AZ Screen Recorder is free there are in-app purchases.
2.Unlimited Screen Recorder
Unlimited Screen Recorder is also for 5.0 Lollipop and is free with in-app purchases. Like the name ‘Unlimited’ suggests you can use this app to record for as long as you want. There is no time limit. You can also record audio through Unlimited Screen Recorder so it is convenient to make a voiceover for your video.
There are very few options available for recording Android devices older than Lollipop without rooting your device.
Click here to check more screen recording apps to capture videos on Android
Part 3: Recording Your iOS Device Screen for YouTube Videos
With the release of iOS 11, recording on iPhone and iPad is much easier with the built-in screen recording tool . If your iOS is above 11 (including 11) version, you can record the screen with its in-app application, check this video to know the details:
Apart from recording with the built-in recording tool, you can also use some best iOS screen recording apps to record YouTube videos, or use some mirror software to record iPhone/iPad on Windows and Mac and create a YouTube video.
1.QuickTime
QuickTime can be used to record the screen of your iPhone or iPad in addition to the screen of your Mac. First you need to connect your device to your computer with a USB port. Instead of selecting ‘New Screen Recording’ in QuickTime, the way you would when recording your computer screen, select ‘New Movie Recording’. In the recording window click on the arrow next to the ‘Record’ button and choose your iOS device where it asks you to choose a camera. This method only works with the Mac version of QuickTime.
2.Reflector
Reflector is mirroring software available for Mac or PC. Mirroring software creates a clone of your device’s interface on your computer screen. Once your device is being displayed on the screen of your computer you can capture it by recording your computer screen. You can download Reflector from Airsquirrels.com.
In order to use Reflector to mirror your device, you will also need to use AirPlay on your iPhone or iPad, and your device and your computer will need to be connected to the same wifi network. In AirPlay, make sure mirroring is on and select your computer as a receiver. Your computer will not show up as an option if you do not have Reflector running.
Conclusion
Above are the screen and video recording software programs that we picked up for you to make a YouTube tutorial, how-to or software review video on most popular platforms including Windows and Mac computer and Android and iOS smartphones. Besides recording, you may also need thebest video editing software for editing YouTube videos . Watch the video tutorial to check how to edit your YouTube videos and get to know some terms in video editing. Remember to download Filmora and have a try today.
Richard Bennett
Richard Bennett is a writer and a lover of all things video.
Follow @Richard Bennett
Also read:
- [Updated] Affordable Methods to Craft Your Own YouTube Intros
- The Ultimate List of Premium YouTube News Networks
- In 2024, Elevating Your Content Strategy YouTube Keywords Explained
- Top-Rated ASMR Mic Picks for Quality Sound
- Gain Traction on YouTube Deciphering Ranking Principles
- In 2024, Elite Online Collection of Video Downloader Tools
- 2024 Approved Elevate Your YouTube Gaming Content With Key FreeFire Hashtags
- [New] Breaking Free From YouTube The Best 27 Online Video Sites Compared
- [Updated] Discovering the Stars of YouTube's Best Music Videos, 2023
- [Updated] Designing a Trailer Blueprint to Amplify Channel Income
- [New] Elevate Your Brand - Discover the Riches in Our Gallery of 50 Free YouTube Banners
- In 2024, Cutting Edge Youtube End Card Tactics & Layouts
- [New] Elevate Your Content Selecting Top Thumbnail Fonts
- Secrets to Profitability on YouTube Shorts Fundamentals & Future Earnings
- Break Even on Youtube Monetizing with a Minimum of 500 Viewers
- 2024 Approved Enhance Audio Quality, Get High-Quality FX
- Channeling Success The Personal Brand Strategy for YouTubers
- Defining Your Visual and Stylistic Identity [High Relevance]
- 2024 Approved Elevate Your YouTube Presence with Custom Animated Subscription Buttons in Filmora
- Step-by-Step Adding Tracks to YouTube's Playlist
- [New] Eco-Friendly Ad Strategy with Screen Tools
- 2024 Approved Cementing Climactic Conclusions
- Top 15 YouTube Movies Channels for You to Kill Time
- [Updated] 2024 Approved Binge on the Best TikTok's Viral Video Collection
- New Essential Radio Sounds The 2023 Most Favored List for 2024
- [Updated] 2024 Approved Leading Software Guide Top 15 Cost-Free Windows & Mac Capture Apps
- Get Savvy with Chromebook Snaps - Explore These 4 Methods!
- Tutorial to Change Xiaomi Redmi Note 12 5G IMEI without Root A Comprehensive Guide
- [New] 2024 Approved The Ultimate Windows PC Broadcast Toolkit for Live TV Capture
- New In 2024, Filmora Watermark How to Delete It Permanently
- In 2024, How To Use Special Features - Virtual Location On Honor Magic Vs 2? | Dr.fone
- 2024 Approved Highest Quality Capture Options
- [New] How to Make Big Head Effect Video for TikTok? [3 Ways] for 2024
- [Updated] 2024 Approved How to Use Snap Camera on Google Meet
- Prodigious Editing Power Utilizing Inshot on Devices
- Syncing Zoom to Your Calendar
- New 2024 Approved Say Goodbye to Camera Shake After Effects Stabilization Techniques
- Integrating Pre-Recorded Content Into Facebook Live Shows
- Title: Snappy Film Maker
- Author: Kevin
- Created at : 2024-05-25 16:17:09
- Updated at : 2024-05-26 16:17:09
- Link: https://youtube-videos.techidaily.com/snappy-film-maker/
- License: This work is licensed under CC BY-NC-SA 4.0.
