
:max_bytes(150000):strip_icc()/what-is-facebook-3486391-6d59fe19bf964da58ca4aa4573a13d80.png)
"ScreenCast Pro Efficient Recording, Mac/PC Upload to YouTube"
ScreenCast Pro: Efficient Recording, Mac/PC Upload to YouTube
10 Record Screen and Upload to YouTube Tools [PC, Mac, Online]

Richard Bennett
Mar 27, 2024• Proven solutions
Recording the screen, including the audio, can help you introduce your gaming flow, show how to perform a task on the computer, or create a presentation. You can also upload the screen record to YouTube for free. There are several solutions if you want to record your screen and upload it to YouTube. You can record the screen with some screen recording software on your Mac or your Windows PC or with some online screen recording software or the screen recording feature built-in YouTube itself. In this article, we will show you how to to record screens and upload to YouTube on Windows and Mac with some screen recorders , some of which are free to use, or freemium, which are built in your computer. Check it out now.
- Part 1: Record Screen and Upload to YouTube Directly on PC
- Part 2: Record Screen and Upload to YouTube Online
- Part 3: Record Screen and Upload it to YouTube on Mac
Recommended YouTube Screen Recorders to Record Screen and Upload to YouTube Directly [Windows & Mac]
The following YouTube screen recording software can be used on both Windows and Mac computers. You can record the entire screen or a particular portion of the screen, record your own voiceover or add music to the recorded video and then upload it to YouTube directly.
Using Wondershare Filmora
Filmora is an easy-to-use yet powerful enough video editing software which features the Recording tools. Using Filmora, you can record the desktop screen , audio and webcam simultaneously. But compared with Filmora, the highest frame rates that Filmora can capture at 1 second is 60FPS.

Launch Wondershare Filmora and choose Full Feature mode to begin a project. Go to the Record tab and choose Record PC Screen. There are three types of screen recording to choose from – Target Window, Full Screen and Custom. You can also choose to record computer system audio or record from microphone. Click the icons to turn them off or on accordingly. Click Settings to see if there’s anything you need to adjust before recording.
 Download Mac Version ](https://tools.techidaily.com/wondershare/filmora/download/ )
The recorded footage will be loaded to the Media panel directly, you can then cut out imperfect frames, add some texts and titles, or apply transitions and filters to it. To upload the recorded screen video, click the Export in the main interface, and then switch to YouTube tab in the Export window.

Sign in your YouTube account and complete the video info accordingly and then click the Export button to upload the recorded video to YouTube directly.
If you are looking for more screen recorders which can run on Windows, Mac, Linux, Android, iOS or online for different purposes, you can check our picks of the best screen recorders for all platforms based on different purposes.
Part 1: How to Record Screen on Windows PC and Upload to YouTube Directly
1. Bandicam
To record screen using Bandicam, select “Screen Recording” and a green-edged rectangle window will appear. Adjust the rectangle window on the video then play the video.
Clicking the REC button will change the green-edged line of the rectangle window to red. Click the stop button to stop recording. To watch the recorded video, go to the “General” tab and click “Open.”
You can also upload your desired videos to YouTube from Bandicam by clicking the “Upload” button found under Bandicam’s “Output” tab.

2. Using Microsoft Expression Encoder 4
You can download Microsoft Expression Encoder 4 to record the screen of your device and upload it to YouTube. The software has a screen capture tool and encoder. Install the software as you would usually do. There’ll be 2 shortcuts in the start menu – Microsoft Expression Encoder 4 Screen Capture (used to capture the screen) and Microsoft Expression Encoder 4 (converts the screen into a video that can be uploaded to YouTube).
3. Using Ezvid
Ezvid can record screen and audio simultaneously. It can also capture the whole area of the screen, making it perfect for tutorial videos. Ezvid also has speech synthesis that translates text captions into artificial human language, so it can easily produce human sound with only a click of a button.
4. Using Smartpixel
Smartpixel is a screen recorder for Android and Windows. It has a user-friendly interface and different editing as well as recording functions. Smartpixel can export various video formats such as 3gp, MP4, wmv, avi and flv. It also allows you to upload videos to different online platforms like GoPlay and YouTube.
Part 2: How to Record Screen Online
1. Using YouTube
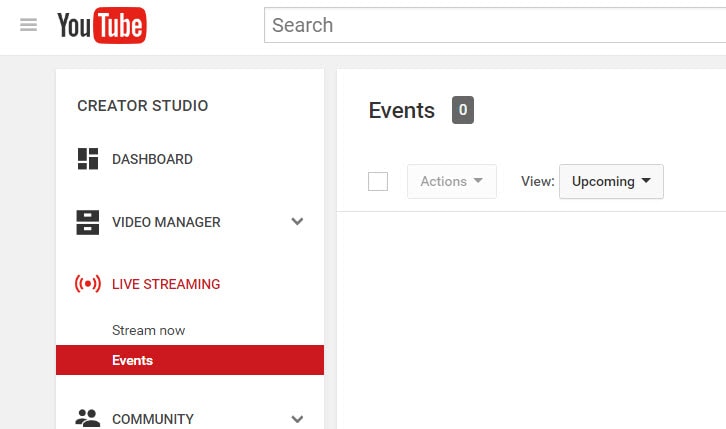
You can now also record desktop screen with the features in YouTube. To start recording the screen using YouTube, you just need to sign-in to the website using your Google Account. Click “Creator Studio”. Go to Live Streaming and choose “Events”. You’ll be directed to the “Create Event” page. Provide the title for your screencast video, set the video’s privacy to either Private or Unlisted.
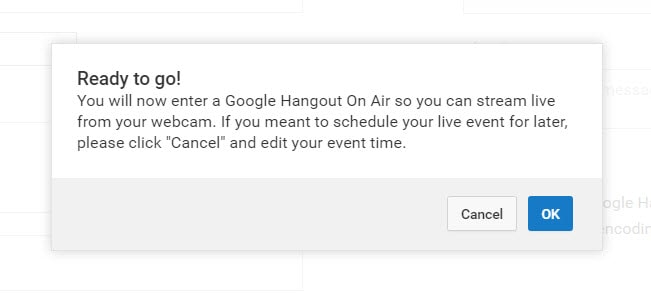
Click “Go Live Now” The Hangouts on Air page will open. Start the webcam from recording by clicking the camera icon. If you don’t want to record audio, you can just click the microphone icon.
Click “Screenshare” and choose a desktop window that you want to record for the screencast. Click “Start Screenshare” to share the screen then click the “Start Broadcast” button to begin recording the screen. When you’re done recording, just “Stop Broadcast” and go to the YouTube website. The new screencast video is stored in your YouTube video dashboard. You can share the video or download it to your Google Drive.
For more details, you can check How to record YouTube videos . If you’re looking for more online screen recorders for YouTube, you can check our picks of the 10 Best Free Online Screen Recorders .
2. Using FlexClip - Free Online Screen Recorder
FlexClip is a complete bundle of creativity. Why so? It is because it’s a web-based tool that helps you with image and video editing and post-production. It also offers a free online screen recording option.
FlexClip lets you record your webcam, screen, and audio with a simple click. Contrarily, you can also record simultaneous screens without a hitch! It can record almost anything that is being displayed on your computer screen. So be it gameplays, seminars, courses, presentations, or anything, you can always use this program to save your recording.
And once you’re done capturing the screen, FlexClip also allows you to edit your recording. You can add subtitles, highlights, overlays, and annotations to increase your video’s worth. So no wonder why FlexClip is one of the leading web-based software for free online screen capturing, especially if you want to make great YouTube videos.
The recording process is easy. All you need to do is visit the website and click the “Start Recording” button.
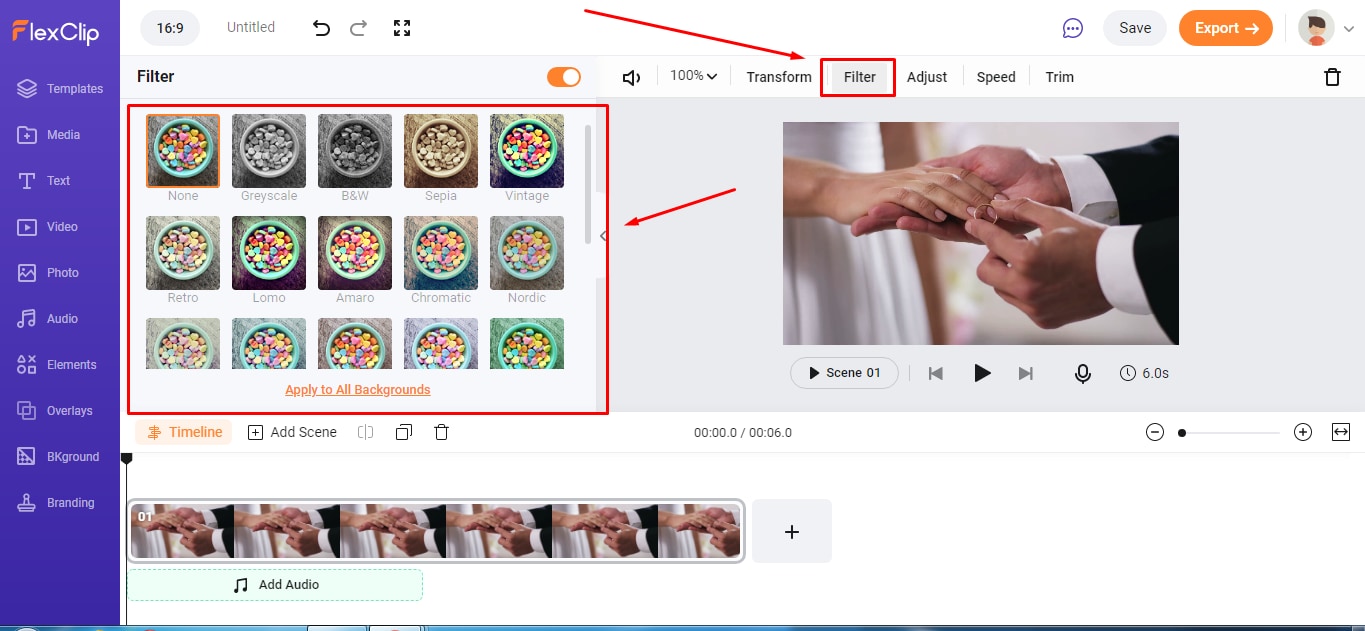
Then, choose your layout to start recording the screen and audio. When you’re finished, just hit the “Stop” button to end recording to edit the video in FlexClip’s built-in video editor. Lastly, download the screencast to upload it to your YouTube channel.
3. Using Apowersoft - Online Screen Recorder (Free)
Apowersoft is a renowned company that creates digital products, including file compressors, watermark removers, and more. Since there’s a growing demand for screen recorders for YouTube, the Apowersoft creators have also launched a “Free Online Screen Recorder.” Yup! You’re reading the right name.
Apowersoft – Free Online Screen Recorder eases the screen recording process. While it’s an online tool, you can also download the app on your Mac or Windows OS.
It’s a free program with simple features, such as a screen and webcam recording with audio. So if your YouTube content doesn’t require overlays, subtitles, or other editing stuff, this software is ideal due to its simplicity.
You can click the “Start Recording” button to get started.
.
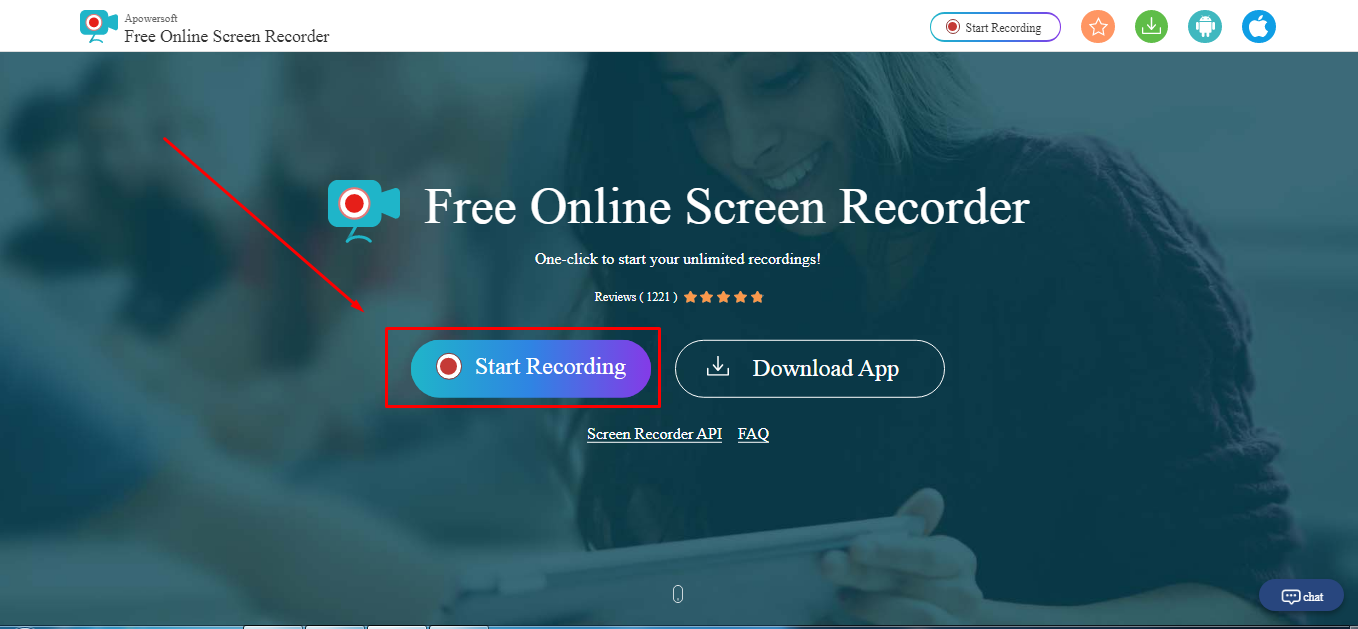
Then, select the screen you wish to record, and save the captured screen to your local disk or cloud so you can upload the videos later to your YouTube channel.
Part 3: How to Record Screen for YouTube with Free Screen Recorder on Mac
1. Using QuickTime Player
QuickTime Player can be used to record movies from your camera or the screen of your iPad, iPod touch or iPhone. It can also record your Mac’s screen or record audio from your microphone. To record the screen of your Pad, iPod touch or iPhone, you should use the movie-recording function. You can use it to record the screen for YouTube video, or you can also record the YouTube video and empower it with your creativity.
For more details of using QuickTime Player to record YouTube videos, check our guide: How to record videos with Quicktime.
2. Using Screen Flow
Screen Flow is our second pick for Mac. Although it’s paid software, you can still enjoy the blessings of this screen recorder through the trial version. It’s a very handy tool that allows Mac screen recording and all iOS devices, such as iPhones and iPad.
Okay! So what’s good about screen flow? Let’s uncover. Firstly, it’s an editor + screen recorder specifically made for YouTube. You can capture the screen and edit the footage before uploading it to your channel.
Secondly, this software allows you to record simultaneous screens and your webcam. Plus, you can also record your voice through its mic recording option.
Another great thing about Screen Flow is that it has numerous video filters and a customizable title library. It also permits you to save screen recordings on your Mac or directly share them to your YouTube channel, other social media accounts, websites, or cloud storage in a few clicks.
Here’s a video to help you get started with screen recording on your Mac using Screen Flow:
3. Using Vmaker
Vmaker is another authentic software to record screens for your YouTube videos. It’s a free program, but you can buy premium versions to unlock more features.
The tool is trusted by many software review websites, such as “crozdesk.” It is available on both Mac and Windows OS. However, it seems like this software performs well on Mac operating systems.
Vmaker allows you to record your screen, your favorite YouTube videos, and the audio – all together! You can record the entire Mac screen or a specific portion in HD quality. Moreover, the software allows you to pick resolutions up to 4K to record the media.
This program also offers editing features like adding subtitles, music, flip, blur, trim, and more to create an awesome video. All videos are saved to your cloud workspace once you finish recording. Then, you can share the recorded video screens on your YouTube.
The tool is ideal for making tutorials, courses, demos, and product review videos. All you need to do is download Vmaker on your Mac. Choose a webcam, screen, or both with audio for recording. Start recording in the highest quality. Edit your video and share it on your YouTube channel.
Conclusion
Above are some screen recorders that you can use to record YouTube videos or record the screen and webcam simultaneously to make a video and upload it it to YouTube. If you want to record a screen video and edit it further, you should try Wondershare Filmora video editor.
Download Mac Version ](https://tools.techidaily.com/wondershare/filmora/download/ )
FAQs
Q1. How do you record your screen on a Mac for YouTube?
There are some great tools for screen recording on Mac for YouTube. The most loved and enjoyed program is Filmora by Wondershare. It’s a professional tool for screen recording and video editing. Most importantly, it has a user-friendly interface and records your screen in high quality.
Another option is the Quick Time Player. This program also allows screen recording. Likewise, Screen Flow is also a great program for screen capturing for YouTube on Mac.
Q2. Can I screen-record and upload it to YouTube?
There are two ways to do it. First, you can download the free or paid screen recording software on your Windows or macOS. Second, you can look for online screen recorders like FlexClip or the built-in YouTube recorder and directly share the recorded video to your channel.
Some tools, like Apowersoft and Vmaker, save screen recordings to the cloud or local disk. And there’s no direct sharing of the recorded screens to your YouTube channel. So if you’re using such programs, you will need to sign in to your YouTube channel and upload the file from your computer hard drive.
Q3. How do I record my computer screen for 2022?
Some of the greatest video editing and screen recording tools like Filmora, Bandicam, and FlexClip allow you to record your computer screen. Depending on the software, you can directly share the video to your YouTube channel. Or, save the video on your computer and then upload it on your channel.
Richard Bennett
Richard Bennett is a writer and a lover of all things video.
Follow @Richard Bennett
Richard Bennett
Mar 27, 2024• Proven solutions
Recording the screen, including the audio, can help you introduce your gaming flow, show how to perform a task on the computer, or create a presentation. You can also upload the screen record to YouTube for free. There are several solutions if you want to record your screen and upload it to YouTube. You can record the screen with some screen recording software on your Mac or your Windows PC or with some online screen recording software or the screen recording feature built-in YouTube itself. In this article, we will show you how to to record screens and upload to YouTube on Windows and Mac with some screen recorders , some of which are free to use, or freemium, which are built in your computer. Check it out now.
- Part 1: Record Screen and Upload to YouTube Directly on PC
- Part 2: Record Screen and Upload to YouTube Online
- Part 3: Record Screen and Upload it to YouTube on Mac
Recommended YouTube Screen Recorders to Record Screen and Upload to YouTube Directly [Windows & Mac]
The following YouTube screen recording software can be used on both Windows and Mac computers. You can record the entire screen or a particular portion of the screen, record your own voiceover or add music to the recorded video and then upload it to YouTube directly.
Using Wondershare Filmora
Filmora is an easy-to-use yet powerful enough video editing software which features the Recording tools. Using Filmora, you can record the desktop screen , audio and webcam simultaneously. But compared with Filmora, the highest frame rates that Filmora can capture at 1 second is 60FPS.
Launch Wondershare Filmora and choose Full Feature mode to begin a project. Go to the Record tab and choose Record PC Screen. There are three types of screen recording to choose from – Target Window, Full Screen and Custom. You can also choose to record computer system audio or record from microphone. Click the icons to turn them off or on accordingly. Click Settings to see if there’s anything you need to adjust before recording.
Download Mac Version ](https://tools.techidaily.com/wondershare/filmora/download/ )
The recorded footage will be loaded to the Media panel directly, you can then cut out imperfect frames, add some texts and titles, or apply transitions and filters to it. To upload the recorded screen video, click the Export in the main interface, and then switch to YouTube tab in the Export window.
Sign in your YouTube account and complete the video info accordingly and then click the Export button to upload the recorded video to YouTube directly.
If you are looking for more screen recorders which can run on Windows, Mac, Linux, Android, iOS or online for different purposes, you can check our picks of the best screen recorders for all platforms based on different purposes.
Part 1: How to Record Screen on Windows PC and Upload to YouTube Directly
1. Bandicam
To record screen using Bandicam, select “Screen Recording” and a green-edged rectangle window will appear. Adjust the rectangle window on the video then play the video.
Clicking the REC button will change the green-edged line of the rectangle window to red. Click the stop button to stop recording. To watch the recorded video, go to the “General” tab and click “Open.”
You can also upload your desired videos to YouTube from Bandicam by clicking the “Upload” button found under Bandicam’s “Output” tab.
2. Using Microsoft Expression Encoder 4
You can download Microsoft Expression Encoder 4 to record the screen of your device and upload it to YouTube. The software has a screen capture tool and encoder. Install the software as you would usually do. There’ll be 2 shortcuts in the start menu – Microsoft Expression Encoder 4 Screen Capture (used to capture the screen) and Microsoft Expression Encoder 4 (converts the screen into a video that can be uploaded to YouTube).
3. Using Ezvid
Ezvid can record screen and audio simultaneously. It can also capture the whole area of the screen, making it perfect for tutorial videos. Ezvid also has speech synthesis that translates text captions into artificial human language, so it can easily produce human sound with only a click of a button.
4. Using Smartpixel
Smartpixel is a screen recorder for Android and Windows. It has a user-friendly interface and different editing as well as recording functions. Smartpixel can export various video formats such as 3gp, MP4, wmv, avi and flv. It also allows you to upload videos to different online platforms like GoPlay and YouTube.
Part 2: How to Record Screen Online
1. Using YouTube
You can now also record desktop screen with the features in YouTube. To start recording the screen using YouTube, you just need to sign-in to the website using your Google Account. Click “Creator Studio”. Go to Live Streaming and choose “Events”. You’ll be directed to the “Create Event” page. Provide the title for your screencast video, set the video’s privacy to either Private or Unlisted.
Click “Go Live Now” The Hangouts on Air page will open. Start the webcam from recording by clicking the camera icon. If you don’t want to record audio, you can just click the microphone icon.
Click “Screenshare” and choose a desktop window that you want to record for the screencast. Click “Start Screenshare” to share the screen then click the “Start Broadcast” button to begin recording the screen. When you’re done recording, just “Stop Broadcast” and go to the YouTube website. The new screencast video is stored in your YouTube video dashboard. You can share the video or download it to your Google Drive.
For more details, you can check How to record YouTube videos . If you’re looking for more online screen recorders for YouTube, you can check our picks of the 10 Best Free Online Screen Recorders .
2. Using FlexClip - Free Online Screen Recorder
FlexClip is a complete bundle of creativity. Why so? It is because it’s a web-based tool that helps you with image and video editing and post-production. It also offers a free online screen recording option.
FlexClip lets you record your webcam, screen, and audio with a simple click. Contrarily, you can also record simultaneous screens without a hitch! It can record almost anything that is being displayed on your computer screen. So be it gameplays, seminars, courses, presentations, or anything, you can always use this program to save your recording.
And once you’re done capturing the screen, FlexClip also allows you to edit your recording. You can add subtitles, highlights, overlays, and annotations to increase your video’s worth. So no wonder why FlexClip is one of the leading web-based software for free online screen capturing, especially if you want to make great YouTube videos.
The recording process is easy. All you need to do is visit the website and click the “Start Recording” button.
Then, choose your layout to start recording the screen and audio. When you’re finished, just hit the “Stop” button to end recording to edit the video in FlexClip’s built-in video editor. Lastly, download the screencast to upload it to your YouTube channel.
3. Using Apowersoft - Online Screen Recorder (Free)
Apowersoft is a renowned company that creates digital products, including file compressors, watermark removers, and more. Since there’s a growing demand for screen recorders for YouTube, the Apowersoft creators have also launched a “Free Online Screen Recorder.” Yup! You’re reading the right name.
Apowersoft – Free Online Screen Recorder eases the screen recording process. While it’s an online tool, you can also download the app on your Mac or Windows OS.
It’s a free program with simple features, such as a screen and webcam recording with audio. So if your YouTube content doesn’t require overlays, subtitles, or other editing stuff, this software is ideal due to its simplicity.
You can click the “Start Recording” button to get started.
.
Then, select the screen you wish to record, and save the captured screen to your local disk or cloud so you can upload the videos later to your YouTube channel.
Part 3: How to Record Screen for YouTube with Free Screen Recorder on Mac
1. Using QuickTime Player
QuickTime Player can be used to record movies from your camera or the screen of your iPad, iPod touch or iPhone. It can also record your Mac’s screen or record audio from your microphone. To record the screen of your Pad, iPod touch or iPhone, you should use the movie-recording function. You can use it to record the screen for YouTube video, or you can also record the YouTube video and empower it with your creativity.
For more details of using QuickTime Player to record YouTube videos, check our guide: How to record videos with Quicktime.
2. Using Screen Flow
Screen Flow is our second pick for Mac. Although it’s paid software, you can still enjoy the blessings of this screen recorder through the trial version. It’s a very handy tool that allows Mac screen recording and all iOS devices, such as iPhones and iPad.
Okay! So what’s good about screen flow? Let’s uncover. Firstly, it’s an editor + screen recorder specifically made for YouTube. You can capture the screen and edit the footage before uploading it to your channel.
Secondly, this software allows you to record simultaneous screens and your webcam. Plus, you can also record your voice through its mic recording option.
Another great thing about Screen Flow is that it has numerous video filters and a customizable title library. It also permits you to save screen recordings on your Mac or directly share them to your YouTube channel, other social media accounts, websites, or cloud storage in a few clicks.
Here’s a video to help you get started with screen recording on your Mac using Screen Flow:
3. Using Vmaker
Vmaker is another authentic software to record screens for your YouTube videos. It’s a free program, but you can buy premium versions to unlock more features.
The tool is trusted by many software review websites, such as “crozdesk.” It is available on both Mac and Windows OS. However, it seems like this software performs well on Mac operating systems.
Vmaker allows you to record your screen, your favorite YouTube videos, and the audio – all together! You can record the entire Mac screen or a specific portion in HD quality. Moreover, the software allows you to pick resolutions up to 4K to record the media.
This program also offers editing features like adding subtitles, music, flip, blur, trim, and more to create an awesome video. All videos are saved to your cloud workspace once you finish recording. Then, you can share the recorded video screens on your YouTube.
The tool is ideal for making tutorials, courses, demos, and product review videos. All you need to do is download Vmaker on your Mac. Choose a webcam, screen, or both with audio for recording. Start recording in the highest quality. Edit your video and share it on your YouTube channel.
Conclusion
Above are some screen recorders that you can use to record YouTube videos or record the screen and webcam simultaneously to make a video and upload it it to YouTube. If you want to record a screen video and edit it further, you should try Wondershare Filmora video editor.
Download Mac Version ](https://tools.techidaily.com/wondershare/filmora/download/ )
FAQs
Q1. How do you record your screen on a Mac for YouTube?
There are some great tools for screen recording on Mac for YouTube. The most loved and enjoyed program is Filmora by Wondershare. It’s a professional tool for screen recording and video editing. Most importantly, it has a user-friendly interface and records your screen in high quality.
Another option is the Quick Time Player. This program also allows screen recording. Likewise, Screen Flow is also a great program for screen capturing for YouTube on Mac.
Q2. Can I screen-record and upload it to YouTube?
There are two ways to do it. First, you can download the free or paid screen recording software on your Windows or macOS. Second, you can look for online screen recorders like FlexClip or the built-in YouTube recorder and directly share the recorded video to your channel.
Some tools, like Apowersoft and Vmaker, save screen recordings to the cloud or local disk. And there’s no direct sharing of the recorded screens to your YouTube channel. So if you’re using such programs, you will need to sign in to your YouTube channel and upload the file from your computer hard drive.
Q3. How do I record my computer screen for 2022?
Some of the greatest video editing and screen recording tools like Filmora, Bandicam, and FlexClip allow you to record your computer screen. Depending on the software, you can directly share the video to your YouTube channel. Or, save the video on your computer and then upload it on your channel.
Richard Bennett
Richard Bennett is a writer and a lover of all things video.
Follow @Richard Bennett
Sustainable CTAs with Subscription Tools
Create High-Quality Video - Wondershare Filmora
An easy and powerful YouTube video editor
Numerous video and audio effects to choose from
Detailed tutorials provided by the official channel
Advances in filmmaking have brought many concepts into reality. And the green screen is one common practice. Green screen technology is a technique where you use two images or video streams to composite them together. You can use any background images, either foreground or behind the actors. For YouTube, you can use green screen subscribe to facilitate video Call To Action. A green screen easily produces impossible scenes and expands filming ideas. Everything done at the Studio is also the best way to protect actors from hazardous environments.
More so, the best trick is to allow actors to appear together on the screen even when the scenes were captured separately. And did you know that subscribe green screen makes it easy to add YouTube Call To Action and direct viewers on what to do?

Methods to add a subscribe button to your video
Viewers are not likely to subscribe to any channel if they are not guided. One best method is to engage a subscribe button to your video and draw the attention of as many as possible.
1 Use Subscribe Green Screen
Put your green screen to work by subscribing to it. Follow these steps to produce eye-catching videos, with a call to action closing point.
Step 1. Set screen
You need to create a background at the Studio – and that’s the green screen. Keenly hand it on a frame before you start filming. Also, note that no wrinkles or fold-ups are visible.

Step 2. Adjust lighting
Lighting is important to facilitate high-resolution video output quality. Put appropriate lighting settings to avoid directional shadows and get the best results.
Step 3. Set up the subject
Give ample space between the subject and the green screen for an effective outcome. If they are too close, there will be a reflection of the green screen on the subject. It isn’t professional as it will be hard when it comes to matching to a different background.

Step 4. Start filming
Begin to film your video and ensure you take various shots for comparison. It is good to film at different angles to see what works best.
Step 5. Polish the rough cut
Tune all the footage to perfect video clips. It will save your efforts when keying out green screen footage. Remove the unwanted parts by trimming. You can also do other edits like merge and split where necessary.
Step 6. Key out the footage and edit the green screen
Your footage is now ready, and you are now free to edit the green screen. It is better to engage reliable editing software to remove the green traces in the shot.
Step 7. Paste the new background
Any background concept can now fit in. Add your desired background video or image in a new layer below the subject. You can continue to make other necessary adjustments like sharpness and hue for reality.
Step 8. Add Call To Action
Finally, tell your viewers to subscribe to your YouTube channel while watching the video. You can also introduce your other channels that aren’t yet known or those that have not reached 1,000 subscribers.
2 Using YouTube Studio
You can also enable the green screen to subscribe via the YouTube Studio. It is a YouTube application that provides you with the tools you need to create a successful YouTube channel. You can manage your videos, respond to comments and even add adverts to your content for pay. Here are the steps to add subscribe button.
Step 1. First, go directly to “studio.youtube.com” or click on your profile picture on the YouTube page to launch YT Studio.

Step 2. Click on the “Menu” option and choose the “Settings”> “Channel” option.

Step 3. Then select the “Choose” image and select which subscribe button image you wish to use as your branding watermark. You can easily get one on the Google images section.
Step 4. Next, choose the display time for the branding watermark. It could be a custom start time if you want the branding watermark to start showing at a specific time. You can also choose “End or video” for it to appear at the last 10 to 15 seconds of your video. Likewise, the branding watermark can show throughout the video if you choose the “Entire video” option.
Step 5. Finally, save the changes. Voila! Viewers can subscribe to your channel easily, with a single click of a button.
3 Using Subscribe Effects
You can also use the subscribers’ effects to add a Call To Action. Remember, your main aim is to increase the audience to your channel. And in most cases, viewers forget to subscribe even though they love your video. Perhaps they don’t understand the importance it holds to your channel. You can do this using a reliable video editor software – Filmora.
Filmora is a sophisticated tool that is easy to use and export your videos to your computer and upload them to YouTube. It has over 300 effects for YouTubers and comprises exclusive overlays for any scene. Follow these steps to add the subscribe button with subscribe effects.
Key Features of Filmora
- Edit and export your videos at up to 4K resolution
- Supports GIF animation, which you can use for CTA
- It has an advanced text editor
- Easily remove background noise for a polished video sound
- It has an audio equalizer functionality for audio uniformity
- It has the video stabilization functionality
For Win 7 or later (64-bit)
For macOS 10.12 or later
Step 1. Launch Filmora
Open Filmora on your computer, then navigate to the upper left corner of the screen. Click on the “Sample Colors” and select the “Green color.” Next, drag it to video track into the timeline. Then adjust the duration of your video track to your preference.

Step 2. Design the subscribe GIF animation
Use a different color shade to design the subscribe GIF animation. Take “Red” in this case as it smartly blends with the green color that we choose earlier. Drag the red color above the green background.

Step 3. Adjust the red box
Make the added color red button look like a subscribe button. Then place it at any point you want it to appear in front of the background.
Step 4. Add the subscribe text
Write a text into the button. Filmora offers you various styles of text to choose from. You can select the text style you want to use, then drag and drop it into the timeline.

Step 5. Edit title with “Subscribe”
Edit your text with the word “Subscribe,” then place it under the red rectangle and hit the “OK” button.
Step 6. Animate the “Subscribe” button
Double click on the “Red” button. Just go to the “Animate” tab and click on the “Customize” option. Next, click on the “Add” button.

Step 7. Animate text as well
Go to the “Text” option in the timeline and click on “Advanced” text editor. Then go to the “Animation” tab and select the animation you wish to use. Here, you can adjust your text’s start and ending time when you want it to start fading.
Step 8. Export GIF
Your Subscribe GIF is now ready to be exported to your video. Hit the “Export” button and select which format to export it in.

Extra Tip: Ways to Include Calls to Action on videos
Know how to include CTA in your video marketing strategy to boost your subscribers.
- Include Annotations
Annotations are eye-catching and a quick reminder for viewers. You have a variety to choose from, like bubbles, shoutouts, etc. They are used to remind you to subscribe to the channel, view another video, or comment after watching it. - Edit CTAs in your video
It lets the viewer know what to do next before the video ends. The likely reminder is to subscribe to the channel. They could also be reminded to watch the next video or leave a comment. - YouTube Ad Overlays also work
However, ad overlay is for content creators with Google AdWords enabled on their YT channel. Adding an Ad Overlay will link you to any part of the web. Do you want to know the best part? No cost at all! You only need to pay for the views you buy during your video promotion.
Conclusion
● The best strategy to get viewers to subscribe to your YouTube channel is to engage a Call To Action. A bigger number of subscribers guarantees more watch time and the possible growth of your channel. Subscribe green screen even makes it perfect as far as video creation is concerned. You can get different video background ideas and make every scene look authentic. You can engage a third-party tool like Filmora. It will effortlessly add a green screen subscribe in a few steps. Likewise, you can add annotations and other text styles to enhance your look.
Advances in filmmaking have brought many concepts into reality. And the green screen is one common practice. Green screen technology is a technique where you use two images or video streams to composite them together. You can use any background images, either foreground or behind the actors. For YouTube, you can use green screen subscribe to facilitate video Call To Action. A green screen easily produces impossible scenes and expands filming ideas. Everything done at the Studio is also the best way to protect actors from hazardous environments.
More so, the best trick is to allow actors to appear together on the screen even when the scenes were captured separately. And did you know that subscribe green screen makes it easy to add YouTube Call To Action and direct viewers on what to do?
Methods to add a subscribe button to your video
Viewers are not likely to subscribe to any channel if they are not guided. One best method is to engage a subscribe button to your video and draw the attention of as many as possible.
1 Use Subscribe Green Screen
Put your green screen to work by subscribing to it. Follow these steps to produce eye-catching videos, with a call to action closing point.
Step 1. Set screen
You need to create a background at the Studio – and that’s the green screen. Keenly hand it on a frame before you start filming. Also, note that no wrinkles or fold-ups are visible.
Step 2. Adjust lighting
Lighting is important to facilitate high-resolution video output quality. Put appropriate lighting settings to avoid directional shadows and get the best results.
Step 3. Set up the subject
Give ample space between the subject and the green screen for an effective outcome. If they are too close, there will be a reflection of the green screen on the subject. It isn’t professional as it will be hard when it comes to matching to a different background.
Step 4. Start filming
Begin to film your video and ensure you take various shots for comparison. It is good to film at different angles to see what works best.
Step 5. Polish the rough cut
Tune all the footage to perfect video clips. It will save your efforts when keying out green screen footage. Remove the unwanted parts by trimming. You can also do other edits like merge and split where necessary.
Step 6. Key out the footage and edit the green screen
Your footage is now ready, and you are now free to edit the green screen. It is better to engage reliable editing software to remove the green traces in the shot.
Step 7. Paste the new background
Any background concept can now fit in. Add your desired background video or image in a new layer below the subject. You can continue to make other necessary adjustments like sharpness and hue for reality.
Step 8. Add Call To Action
Finally, tell your viewers to subscribe to your YouTube channel while watching the video. You can also introduce your other channels that aren’t yet known or those that have not reached 1,000 subscribers.
2 Using YouTube Studio
You can also enable the green screen to subscribe via the YouTube Studio. It is a YouTube application that provides you with the tools you need to create a successful YouTube channel. You can manage your videos, respond to comments and even add adverts to your content for pay. Here are the steps to add subscribe button.
Step 1. First, go directly to “studio.youtube.com” or click on your profile picture on the YouTube page to launch YT Studio.
Step 2. Click on the “Menu” option and choose the “Settings”> “Channel” option.
Step 3. Then select the “Choose” image and select which subscribe button image you wish to use as your branding watermark. You can easily get one on the Google images section.
Step 4. Next, choose the display time for the branding watermark. It could be a custom start time if you want the branding watermark to start showing at a specific time. You can also choose “End or video” for it to appear at the last 10 to 15 seconds of your video. Likewise, the branding watermark can show throughout the video if you choose the “Entire video” option.
Step 5. Finally, save the changes. Voila! Viewers can subscribe to your channel easily, with a single click of a button.
3 Using Subscribe Effects
You can also use the subscribers’ effects to add a Call To Action. Remember, your main aim is to increase the audience to your channel. And in most cases, viewers forget to subscribe even though they love your video. Perhaps they don’t understand the importance it holds to your channel. You can do this using a reliable video editor software – Filmora.
Filmora is a sophisticated tool that is easy to use and export your videos to your computer and upload them to YouTube. It has over 300 effects for YouTubers and comprises exclusive overlays for any scene. Follow these steps to add the subscribe button with subscribe effects.
Key Features of Filmora
- Edit and export your videos at up to 4K resolution
- Supports GIF animation, which you can use for CTA
- It has an advanced text editor
- Easily remove background noise for a polished video sound
- It has an audio equalizer functionality for audio uniformity
- It has the video stabilization functionality
For Win 7 or later (64-bit)
For macOS 10.12 or later
Step 1. Launch Filmora
Open Filmora on your computer, then navigate to the upper left corner of the screen. Click on the “Sample Colors” and select the “Green color.” Next, drag it to video track into the timeline. Then adjust the duration of your video track to your preference.
Step 2. Design the subscribe GIF animation
Use a different color shade to design the subscribe GIF animation. Take “Red” in this case as it smartly blends with the green color that we choose earlier. Drag the red color above the green background.
Step 3. Adjust the red box
Make the added color red button look like a subscribe button. Then place it at any point you want it to appear in front of the background.
Step 4. Add the subscribe text
Write a text into the button. Filmora offers you various styles of text to choose from. You can select the text style you want to use, then drag and drop it into the timeline.
Step 5. Edit title with “Subscribe”
Edit your text with the word “Subscribe,” then place it under the red rectangle and hit the “OK” button.
Step 6. Animate the “Subscribe” button
Double click on the “Red” button. Just go to the “Animate” tab and click on the “Customize” option. Next, click on the “Add” button.
Step 7. Animate text as well
Go to the “Text” option in the timeline and click on “Advanced” text editor. Then go to the “Animation” tab and select the animation you wish to use. Here, you can adjust your text’s start and ending time when you want it to start fading.
Step 8. Export GIF
Your Subscribe GIF is now ready to be exported to your video. Hit the “Export” button and select which format to export it in.
Extra Tip: Ways to Include Calls to Action on videos
Know how to include CTA in your video marketing strategy to boost your subscribers.
- Include Annotations
Annotations are eye-catching and a quick reminder for viewers. You have a variety to choose from, like bubbles, shoutouts, etc. They are used to remind you to subscribe to the channel, view another video, or comment after watching it. - Edit CTAs in your video
It lets the viewer know what to do next before the video ends. The likely reminder is to subscribe to the channel. They could also be reminded to watch the next video or leave a comment. - YouTube Ad Overlays also work
However, ad overlay is for content creators with Google AdWords enabled on their YT channel. Adding an Ad Overlay will link you to any part of the web. Do you want to know the best part? No cost at all! You only need to pay for the views you buy during your video promotion.
Conclusion
● The best strategy to get viewers to subscribe to your YouTube channel is to engage a Call To Action. A bigger number of subscribers guarantees more watch time and the possible growth of your channel. Subscribe green screen even makes it perfect as far as video creation is concerned. You can get different video background ideas and make every scene look authentic. You can engage a third-party tool like Filmora. It will effortlessly add a green screen subscribe in a few steps. Likewise, you can add annotations and other text styles to enhance your look.
Also read:
- Crafting Engaging, Extended Videos A YouTube Expert's Guide
- [New] Channel Alchemy Turning Viewers Into Believers
- [New] 10 Easy YouTube Video Ideas Everyone Can Make It
- In 2024, Audio Amplified Today's Hits Backdropping YT Shorts
- [Updated] Add YouTube Melodies in iMovie Without Hurdles
- From Device Capture to Viral Content YouTube's Upload Guide
- 2024 Approved Crafting the Perfect Harmony Fusing Lyrics & Images with Lyric Video Maker
- Skyrocket Viewer Numbers with the Top 12 Effective Tactics
- Bite-Sized Video Knowledge Now for 2024
- 2024 Approved Characters That Convert Ideal Story Strategies
- In 2024, Elevate Your Views Degrees of Rotation on YouTube - A 2023 Guide
- Easy Paths to Profitable YouTube Business Channels, Top 10 List!
- Top Ten Capture Hardware Rankings for Professional Streamers
- Spotlight on 10 YouTube Channels With Swift Popularity Boosts
- [New] 6 FREE YouTube Outros for Aspiring Filmmakers
- Entering the Fullscreen Realm Choosing a CMS
- [Updated] Comparative Content Crusade Analyzing Your Videos Against Others'
- [Updated] Customize & Captivate Thumbnail Magic for Shorts
- In 2024, Collaborative Titling Framework Across Platforms
- Transforming Ordinary Videos Into Viral Hits with Innovative Thumbnails
- [New] Beware The Risk in Fake Followers on YouTube
- In 2024, Effective Visual Branding Crafting Compelling YouTube Logos
- [New] Dazzling Deception YouTube's Editors Magic Showcase
- Side-Splitting Scripts Crafting 7 Hilarious YouTube Scenes
- [New] Best Screen Reporter Toolkit for YouTube Streamers
- [New] Cutting-Edge Content Summit
- Visionary Composer Sensory Media Masterpiece
- [New] Adobe Premiere Pro 101 for YouTube Clips and Edits
- Direct Linkage Bridging YouTube and iMovie with Music for 2024
- In 2024, Elevating Privacy Share Exclusive YouTube Clips Through Gmail
- Unlocking Success Top 10 Strategies for Boosting YouTube Video Views
- Does YouTube Offer Regular Viewers Money?
- 2024 Approved Discover How to Craft Videos Flawlessly in 8 Tools
- [New] Elevate Your Content's Visibility Strategic Use of Imagery in Video Thumbnails
- Skyrocket Your YouTube Speed - Render and Upload Hacks
- In 2024, Cutting-Edge Voice Altering Apps for Vloggers
- Navigating Through Time The Finest History YouTube Sources for Students
- [New] Elevating Your YouTube Experience Tips on Channel Art and Sizes
- Top 11 Free Apps to Check IMEI on Nokia C110 Phones
- Etiology of Fetal Alcohol Syndrome for 2024
- [Updated] Professional-Level Photo Enhancement on Snapchat
- Unlock the Full Potential of TikTok on Apple/Windows Devices for 2024
- In 2024, Cinematic Capture A Device-Friendly Movie Guidebook
- In 2024, Guide to Mirror Your Nubia Red Magic 8S Pro to Other Android devices | Dr.fone
- How to Reset Apple ID and Apple Password On Apple iPhone 7
- New In 2024, Split a Video in the Lightworks Step by Step
- 5 Easy Ways to Copy Contacts from Infinix GT 10 Pro to iPhone 14 and 15 | Dr.fone
- 3 Solutions to Hard Reset Lava Blaze 2 5G Phone Using PC | Dr.fone
- Best Voice Changer and Editing Software for Singing for 2024
- [Updated] In 2024, Complete TikTok Termination Protocol Unveiled
- The Ultimate Guide How to Bypass Swipe Screen to Unlock on Vivo Y36 Device
- How To Update or Downgrade iPhone 14 Pro? | Dr.fone
- [Updated] Conveniently Record and Preserve Your Online Gatherings for 2024
- In 2024, Tag, Organize, and Enjoy Best Video Tag Editors for Windows and macOS
- Title: "ScreenCast Pro Efficient Recording, Mac/PC Upload to YouTube"
- Author: Kevin
- Created at : 2024-05-25 16:15:08
- Updated at : 2024-05-26 16:15:08
- Link: https://youtube-videos.techidaily.com/screencast-pro-efficient-recording-macpc-upload-to-youtube/
- License: This work is licensed under CC BY-NC-SA 4.0.
