Revel in the Rhythm of Rising Text
Revel in the Rhythm of Rising Text
How to Create Animated Bouncing Text

Liza Brown
Mar 27, 2024• Proven solutions
Earlier, you learned how to have a bounce text effect in Adobe After Effects . However, because AE is a complex application and has a steep learning curve, this section explains the two alternative ways to get the same effect on your existing video footage.
Method 1: How to Create Bouncing Text in Filmora Video Editor?
When talking about Wondershare Filmora , the application is populated with several presets for texts and titles, animations, effects, filters, and much more.
These pre-built templates not only make your task easier, they also save your decent amount of time that you would spend while working with After Effects or any other similar app that requires you to build things from scratch.
You can follow the instructions given below to add animated bounce text to any of your video footages with Filmora:
Step 1: Add a Footage to Timeline
Launch Wondershare Filmora on your Windows or Mac PC. By default, the aspect ratio of the project is set to 16:9. Click anywhere inside the Media window at the upper-left section, and select and import footage you want to add bounce text to.
Step 2: Insert Text and Add Bounce Effect
Click Titles from the standard toolbar at the top, and click and drag your preferred title template from the Library to the timeline. In case you don’t want any specific animation or style on the title, you can use the default title.
In the timeline, double-click the title you just added, use the upper-left section to edit the text, go to the Animation tab from the left pane, scroll down the list, and double-click the Up Down 1 or Up Down 2 preset to apply the bounce effect to the credits. Click OK to save the changes and to get back to the main window.

Step 3: Add Shake Filters
Go to Effects from the standard toolbar, expand the Filters category from the left pane, and click Shake. From the Library window, click and drag your preferred shake filter to the timeline. Here, I will choose Mild.

You can customize the default effect by double-clicking the shake filter in the timeline, using the sliders in the upper-left area of the interface to make necessary adjustments, and then clicking OK to save the changes and to get back to the previous interface.

Step 4: Export the Final Output
Click EXPORT from the top of the interface, go to the Local tab in the Export box, choose your preferred output format from the list in the left, make required customizations from the right pane, and click EXPORT from the bottom-right corner to export the video.

Now, you can add the bouncing text video and the background video to the timeline, and then place the bouncing text video above the background video track.
Double click the text track, go to the Chroma Key effect, select the Color Picker tool, and click anywhere in the Preview window to get things right. Finally, export the entire project to your preferred output format as explained in Step 4.
As explained before, Wondeshare Filmora makes the entire process of creating and adding bounce text effect pretty simple. With all the pre-build templates, and the versatility of the options that can be used to customize those presets, you can come up with the effects that are usually obtained when you start generating them from the scratch.


Method 2: Generate Animated Bouncing Texts Online
If you don’t want any heavy and resource-intensive app on your PC merely for some special text effects, you can try any of the online solutions instead. The benefit of using any such web app is that all the processing is done on site’s server, and it is only a web browser and an Internet connection that you need to have at your side.
Some most trusted websites to generate bounce text are listed below:
1. ENGFTO
Website: https://engfto.com/index/create%5Fanimated%5Fbouncing%5Ftext/0-26

You can follow the instructions given below to use Engfto to generate bouncing text for your footages:
Step 1: Get to the Animated Bouncing Text Page
Launch your favorite web browser, and go to the link given above to get to the Engfto’s animated bouncing text page.
Step 2: Customize Text and Preferences
Modify the values in the fields under the SIZE AREA and TEXT sections to customize the text area, the text itself, its size, and font. Next, adjust the values in the fields under the EFFECT PARAMETERS section to get the required bounce effect. Also, use the fields under the BACKGROUND section to either change the background color, or pick a background image from your PC.
Step 3: Obtain the Animated Text
Click the SAVE GIF ANIMATION button from the lower section of the page to download the animated text to your PC.
2. Loading.io
The instructions given below explain how to use Loading.io to get animated bounce text effect for your footages:
Step 1: Get to the Loading.io Webpage
Launch your favorite web browser and go to https://loading.io/animation/text/ .
Step 2: Customize the Text and Choose Animation Effect

Use the options available on the webpage to type your text, and change its font, color, background, transparency level etc. Select Bounce (or any of its variants) from the Animation drop-down list, and adjust the speed using the Speed slider.
Step 3: Obtain the Text
Click your preferred option from next to the Download As section to download the animated text to your PC.
Note: Regardless of the web solution you choose to generate and obtain animated bounce text, you will still need a post-production tool to add the downloaded text to your footage.
Conclusion
Generating bounce text effect is much simpler when you use Wondershare Filmora or any of the online solutions as explained in Method 2. While the former gives you more flexibility when it comes to customizations, the latter doesn’t require any app to be installed on your PC. In addition, many times the web apps offer their services for free, and therefore they are preferred by the novice users who are not much into post-production processes.
Liza Brown
Liza Brown is a writer and a lover of all things video.
Follow @Liza Brown
Liza Brown
Mar 27, 2024• Proven solutions
Earlier, you learned how to have a bounce text effect in Adobe After Effects . However, because AE is a complex application and has a steep learning curve, this section explains the two alternative ways to get the same effect on your existing video footage.
Method 1: How to Create Bouncing Text in Filmora Video Editor?
When talking about Wondershare Filmora , the application is populated with several presets for texts and titles, animations, effects, filters, and much more.
These pre-built templates not only make your task easier, they also save your decent amount of time that you would spend while working with After Effects or any other similar app that requires you to build things from scratch.
You can follow the instructions given below to add animated bounce text to any of your video footages with Filmora:
Step 1: Add a Footage to Timeline
Launch Wondershare Filmora on your Windows or Mac PC. By default, the aspect ratio of the project is set to 16:9. Click anywhere inside the Media window at the upper-left section, and select and import footage you want to add bounce text to.
Step 2: Insert Text and Add Bounce Effect
Click Titles from the standard toolbar at the top, and click and drag your preferred title template from the Library to the timeline. In case you don’t want any specific animation or style on the title, you can use the default title.
In the timeline, double-click the title you just added, use the upper-left section to edit the text, go to the Animation tab from the left pane, scroll down the list, and double-click the Up Down 1 or Up Down 2 preset to apply the bounce effect to the credits. Click OK to save the changes and to get back to the main window.
Step 3: Add Shake Filters
Go to Effects from the standard toolbar, expand the Filters category from the left pane, and click Shake. From the Library window, click and drag your preferred shake filter to the timeline. Here, I will choose Mild.
You can customize the default effect by double-clicking the shake filter in the timeline, using the sliders in the upper-left area of the interface to make necessary adjustments, and then clicking OK to save the changes and to get back to the previous interface.
Step 4: Export the Final Output
Click EXPORT from the top of the interface, go to the Local tab in the Export box, choose your preferred output format from the list in the left, make required customizations from the right pane, and click EXPORT from the bottom-right corner to export the video.
Now, you can add the bouncing text video and the background video to the timeline, and then place the bouncing text video above the background video track.
Double click the text track, go to the Chroma Key effect, select the Color Picker tool, and click anywhere in the Preview window to get things right. Finally, export the entire project to your preferred output format as explained in Step 4.
As explained before, Wondeshare Filmora makes the entire process of creating and adding bounce text effect pretty simple. With all the pre-build templates, and the versatility of the options that can be used to customize those presets, you can come up with the effects that are usually obtained when you start generating them from the scratch.
Method 2: Generate Animated Bouncing Texts Online
If you don’t want any heavy and resource-intensive app on your PC merely for some special text effects, you can try any of the online solutions instead. The benefit of using any such web app is that all the processing is done on site’s server, and it is only a web browser and an Internet connection that you need to have at your side.
Some most trusted websites to generate bounce text are listed below:
1. ENGFTO
Website: https://engfto.com/index/create%5Fanimated%5Fbouncing%5Ftext/0-26
You can follow the instructions given below to use Engfto to generate bouncing text for your footages:
Step 1: Get to the Animated Bouncing Text Page
Launch your favorite web browser, and go to the link given above to get to the Engfto’s animated bouncing text page.
Step 2: Customize Text and Preferences
Modify the values in the fields under the SIZE AREA and TEXT sections to customize the text area, the text itself, its size, and font. Next, adjust the values in the fields under the EFFECT PARAMETERS section to get the required bounce effect. Also, use the fields under the BACKGROUND section to either change the background color, or pick a background image from your PC.
Step 3: Obtain the Animated Text
Click the SAVE GIF ANIMATION button from the lower section of the page to download the animated text to your PC.
2. Loading.io
The instructions given below explain how to use Loading.io to get animated bounce text effect for your footages:
Step 1: Get to the Loading.io Webpage
Launch your favorite web browser and go to https://loading.io/animation/text/ .
Step 2: Customize the Text and Choose Animation Effect
Use the options available on the webpage to type your text, and change its font, color, background, transparency level etc. Select Bounce (or any of its variants) from the Animation drop-down list, and adjust the speed using the Speed slider.
Step 3: Obtain the Text
Click your preferred option from next to the Download As section to download the animated text to your PC.
Note: Regardless of the web solution you choose to generate and obtain animated bounce text, you will still need a post-production tool to add the downloaded text to your footage.
Conclusion
Generating bounce text effect is much simpler when you use Wondershare Filmora or any of the online solutions as explained in Method 2. While the former gives you more flexibility when it comes to customizations, the latter doesn’t require any app to be installed on your PC. In addition, many times the web apps offer their services for free, and therefore they are preferred by the novice users who are not much into post-production processes.
Liza Brown
Liza Brown is a writer and a lover of all things video.
Follow @Liza Brown
Unraveling the Mystery of Disappearing YouTube Shorts Thumbnails
Video thumbnails are important since they encourage people to click and watch the video. But what if your set YouTube Shorts thumbnail is not showing? YouTube will use a random part of the video as the thumbnail. It may be an unflattering or uninteresting shot. Then, your Shorts video is doomed.
That said, it is a problem you want to solve. Here are 7 FAQs about YouTube Shorts thumbnails. They may help you with fixing this issue.
Q1. Can I Customize YouTube Shorts Thumbnails?
Yes, you can. YouTube did allow short-form video creators to upload custom thumbnails for their Shorts. However, they aren’t that optimized. For instance, some people may not see them on the Shorts shelf. Also, if you share a link to the video somewhere else, the old video thumbnail may show instead of the new one.
Adding a custom thumbnail for YouTube Shorts is the same as adding one for long-form videos on the platform. Follow these steps:
- Open the YouTube mobile app. Click the “Plus” icon at the bottom center > “Create Short.” Upload, edit, and post your video.
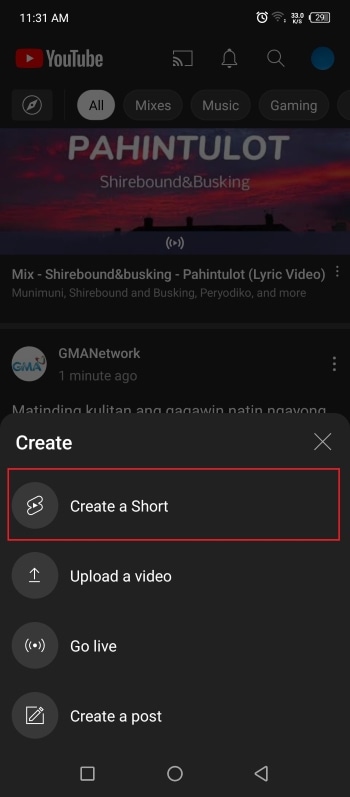
- Get to your desktop computer or laptop. Open your channel’s YouTube Studio.

- On the left navigation menu, click “Content.”

- Click the “pencil” icon next to the Shorts you just uploaded. This video should be at the top of the list.
- Navigate to the Thumbnail section. Click “Create Thumbnail.”

Q2. Why Are YouTube Shorts Thumbnails Not Showing?
It’s not you who’s the only one with Shorts thumbnails not showing. Many short-form content creators on the platform are also facing this issue. A YouTuber took to Reddit to complain about how he uploaded custom thumbnails for all his videos. The thumbnails are correct in the editor. However, YouTube still displays a random frame as the thumbnail on the Shorts shelf.
“They ALL have randomly selected different parts of each video I have uploaded & somehow generated a new/unknown thumbnail that was neither what I uploaded as the custom option nor 1 of the 3 that YouTube auto populated.”
The reason behind this is the difference in the thumbnail size. Regular YouTube video thumbnails are in the ratio of 16:9. Meanwhile, Shorts uses a ratio of 9:16. The thing is that YouTube does not yet allow you to upload 9:16 thumbnails. Thus, the thumbnail for Shorts may show correctly on the video section but not on the Shorts shelf.
Q3. How to Fix YouTube Shorts Thumbnail Problem?
Unfortunately, there is no reliable fix to this problem yet. YouTubers have tried different things in hopes that YouTube will display the correct thumbnail for their Shorts.
Some YouTubers have tried using different images. Others have experimented with changing the aspect ratio of the thumbnail or using Adobe editor for ratios. Clearing histories and cache, using different browsers, resizing, and changing the images’ resolution have also been done. Sadly, these are all failed attempts.
Q4. How To Boost Views When I Have no Control Over YouTube Shorts Thumbnails?
Attracting viewers on Shorts is the same as attracting viewers on the main YouTube. You use interesting thumbnails and video titles. Since thumbnails are out of the options, selecting great video titles has become even more important.
Here are some pointers. Your title should be at most 40 characters. Also, it should be concise and irresistible. And forget about SEO since no one is searching for YouTube Shorts anyway. People consume what they see in their feeds. So instead, the title should be “snappy.” It should intrigue, entertain, or enlighten the viewers. That will net you some views for your Shorts content.
Q5. How To Get More Views on YouTube Shorts?
Forgoing the intro is the way to go. An intro will just prolong the video when people are in Shorts to find bite-sized videos. So jump right into the video content. You can also start the video with a still frame instead. Using hashtags, captions, and text effects are also recommended. And interacting with your audience through comments and pinned comments will keep them coming back to your Shorts channel.
Of course, ensuring that the video quality is high is key to getting more views. For that, you need a good video editor. You can try Wondershare Filmora , a powerful and easy-to-use video editor.
Free Download For Win 7 or later(64-bit)
Free Download For macOS 10.14 or later
The best thing is that you don’t need to transfer the video from your phone to your computer and back. Wondershare Filmora is available on mobile. And it’s one of the best tools for enhancing a short-form video.
Short-form video watchers love filters, transitions, and effects. And Filmora gives you access to all of that. It provides you with fun and amazing filters, effects, transitions, and stamps that can add a wow factor to your short-form video.
Q6. Do YouTube Shorts Make Money?
Making money from YouTube Shorts was challenging. The platform pays content creators who are doing well through the Creator Fund. However, as Shorts grew, the payout became smaller.
Luckily, that’s going to change. Starting this year, Shorts will be a part of the YouTube Partner Program. This means that you can make money from the ads that people watch on Shorts. According to YouTube, creators will keep 45% of the revenue. It will be distributed based on your share of total Shorts views.
YouTube also adjusted the requirements to qualify for the YPP. They made it easier for Shorts content creators to get into the program.
Q7. How Do You Make YouTube Shorts Play Normal?
You can watch Shorts like normal YouTube videos where you can rewind when you want to. Follow these steps.
On a Desktop Computer
- Open a Shorts video on YouTube.

- Pause the video.

- Click “Library” on the left panel.

- Select the Shorts you just watched. It should be on the top and first on the list.

On a Mobile Phone
- Open the YouTube app. Watch a Shorts video.
- Like the Shorts video.

- Tap “Library”

- Scroll down to find “Liked Videos.” Click on it.

- Select the Shorts video you just watched. It should be at the top of the list.

Conclusion
Unfortunately, custom thumbnails not showing on Shorts does not have a fix yet. So to attract viewers, you must leverage the things in your control. You must title your videos in a way that will make users click the video. Also, adding effects and filters on the video using an editor like Wondershare Filmora can help.
Users can subscribe to Shorts channels. And if they see that your videos are well-edited and high-quality, they’ll be more likely to do so. Once they are subscribed, they will see and watch your videos more often.
Free Download For macOS 10.14 or later
The best thing is that you don’t need to transfer the video from your phone to your computer and back. Wondershare Filmora is available on mobile. And it’s one of the best tools for enhancing a short-form video.
Short-form video watchers love filters, transitions, and effects. And Filmora gives you access to all of that. It provides you with fun and amazing filters, effects, transitions, and stamps that can add a wow factor to your short-form video.
Q6. Do YouTube Shorts Make Money?
Making money from YouTube Shorts was challenging. The platform pays content creators who are doing well through the Creator Fund. However, as Shorts grew, the payout became smaller.
Luckily, that’s going to change. Starting this year, Shorts will be a part of the YouTube Partner Program. This means that you can make money from the ads that people watch on Shorts. According to YouTube, creators will keep 45% of the revenue. It will be distributed based on your share of total Shorts views.
YouTube also adjusted the requirements to qualify for the YPP. They made it easier for Shorts content creators to get into the program.
Q7. How Do You Make YouTube Shorts Play Normal?
You can watch Shorts like normal YouTube videos where you can rewind when you want to. Follow these steps.
On a Desktop Computer
- Open a Shorts video on YouTube.
- Pause the video.
- Click “Library” on the left panel.
- Select the Shorts you just watched. It should be on the top and first on the list.
On a Mobile Phone
- Open the YouTube app. Watch a Shorts video.
- Like the Shorts video.
- Tap “Library”
- Scroll down to find “Liked Videos.” Click on it.
- Select the Shorts video you just watched. It should be at the top of the list.
Conclusion
Unfortunately, custom thumbnails not showing on Shorts does not have a fix yet. So to attract viewers, you must leverage the things in your control. You must title your videos in a way that will make users click the video. Also, adding effects and filters on the video using an editor like Wondershare Filmora can help.
Users can subscribe to Shorts channels. And if they see that your videos are well-edited and high-quality, they’ll be more likely to do so. Once they are subscribed, they will see and watch your videos more often.
Also read:
- [New] A Step-by-Step Guide for Earning with YouTube Shorts
- [New] Budget-Friendly Webinar Strategies for YouTube
- [New] How to Upload Your Music to YouTube
- [New] ScreenRecorder Evaluation Tool
- [Updated] Craft Proficient Content for Short-Form Video Best Edits Reviewed
- [Updated] Crafting Compelling Videos YouTube's Best Thumbnail Practices
- [Updated] Direct MP3 to YouTube 3 Steps for Seamless Video Posting
- [Updated] Ensuring Data Privacy While Transforming YouTube Video Audio to MP3
- [Updated] In 2024, Encase Full Browser Window
- [Updated] In 2024, Mastering Canva Imagery Top 10 Pro-Level Techniques
- 2024 Approved Bringing History Forward Digitizing Old Photographs Into Video
- 2024 Legal Update: Understanding the Intricacies of 'CIV-6 Exception Access' Errors
- In 2024, 3 Ways to Unlock Your Apple iPhone 13 Pro for Free
- In 2024, How to Bypass FRP from Huawei P60?
- Selective MP4 Editing Made Simple on Mac
- The Ultimate Showdown of Projectors & TVs in a 4K Setting for 2024
- Top 8 Youtuber Blunders to Avoid and Why They're Common
- Title: Revel in the Rhythm of Rising Text
- Author: Kevin
- Created at : 2024-12-05 17:37:55
- Updated at : 2024-12-10 16:37:30
- Link: https://youtube-videos.techidaily.com/revel-in-the-rhythm-of-rising-text/
- License: This work is licensed under CC BY-NC-SA 4.0.