
:max_bytes(150000):strip_icc()/how-to-set-up-and-use-the-nintendo-online-family-plan-featured-3b6c415d14f34e37a972e3800dc94c7d.jpg)
"Quick Tips IOS Devices & YouTube Video Submission"
Quick Tips: IOS Devices & YouTube Video Submission
Create High-Quality Video - Wondershare Filmora
An easy and powerful YouTube video editor
Numerous video and audio effects to choose from
Detailed tutorials provided by the official channel
Initially, iOS users had the option to load videos directly to YouTube via the tap-to-upload feature. However, this option is missing in the recent iOS devices versions. Therefore, many users search for possible ways to post a video on YouTube from iPhone. For this, you have to put some considerations into place before moving on. The video title length should not exceed 100 characters, while the description is maintained at 5,000 characters. Also, ensure the video length doesn’t exceed 15 minutes. Let’s roll out the best ways to upload your videos and make that big catch on subscribers.

In this article
01 [ How to upload a video to YouTube from iPhone or iPad](#Part 1)
02 [Why your phone doesn’t post videos to YouTube](#Part 2)
03 [Make your YouTube video better with Filmora](#Part 3)
How to upload a video to YouTube from iPhone or iPad
Are you ready to start on that big adventure and share your videos on YouTube? Follow these steps to learn how to upload a video to YouTube from your iPhone.
Method 1: Upload using the YouTube iOS app
Using the YouTube app is the simplest way to upload your YouTube videos. The YouTube app should be installed on your iOS device.
Step 1. Launch the YouTube app on your device, then sign in to your account. If you don’t have an account yet, you will need to “Sign up” for a new one before continuing the upload process.
Step 2. Click on the “+” icon found at the bottom of the screen.
Step 3. Then choose the “Upload a video” option from the populated list of options.
Step 4. Check out the pop-up that appears and “Allow access” to it.
Step 5. Edit your video to your preference by trimming or cropping as you desire. Then click on the “Next” option.

Step 6. Add “title and description” to your video. Remember, the title should contain less than 100 characters and the description no more than 500 characters.
Step 7. Then set the visibility mode as “Public” to enable you to share your video over the internet.
Step 8. Click on the “Upload” button to finally upload your video to YouTube.

Method 2: Upload using Photo App
The Photo App has a “Share” option that you can use to upload your videos to YouTube. Here is the guide.
Step 1. Go to your iOS device and tap on the “Photos” app.
Step 2. Then tap on the “Videos Folder” to locate the video you wish to upload to YouTube.

Step 3. Next, tap on the video that you want to upload.
Step 4. Then tap on the “Share” icon located at the bottom left of your iOS device screen.
Step 5. You’ll then access a “Share” menu from where you have various share options for your video.
Step 6. Choose the “YouTube” option to continue to share your video there. At this juncture, ensure you have logged in to your Google Account.

Step 7. You need to provide a “Title” and “Description” of your video. Then go to the “Privacy” Options and make your video “Public.”
Step 8. Finally, tap on the “Publish” tab found at the top-right corner of your screen to make your video viewable by the public.

Method 3: Upload video to YouTube using Safari
Safari is another alternative method to upload a video to YouTube.
Step 1. First, go to “youtube.com” on Safari and sign in.

Step 2. Then tap on the “account” icon at the top right side of the screen.
Step 3. Hit on the “Upload” icon and wait to be redirected to the YouTube Studio desktop site.
Step 4. Click on the “Select Files” option.
Step 5. Choose the video you wish to add to YouTube from the “Photo” library and tap on the “Add” button.

Step 6. Add your video’s “title and description” and hit the “Next” button.
Step 7. Tap on the “Next” button once more to go to the “Visibility” page.
Step 8. Select the “Public” option to upload your video to the public.
Why your phone doesn’t post videos to YouTube
Despite learning how to upload to YouTube from iPhone, you may be perplexed to realize that your phone refuses to post videos to YouTube. What could be the reason?
1) YouTube issues
In most cases, the problem doesn’t arise from your phone but from YouTube. This streaming app may also experience some hitches along the way. Remember that even if your phone sync with your YouTube account to upload videos from the “Camera Roll,” YouTube isn’t managed from the Camera Roll but the YouTube app directly. You can solve the issue by signing out of your YouTube account and signing back in.
2) Connection Strength
Some videos may appear quite large and cause a time-out during the upload process. Check your Wi-Fi or internet connection strength to determine if it needs a boost or wait until the streaming strength is strong for a quick upload. Test your internet speed by searching “internet test speed” on Google. Then click the “Run Speed Test” in the search box. A window will open and give you an estimate of the Mbps that your connection is operating at. If too low, switch to other alternatives.
3) Verify your YouTube account
Verifying your account will help you to enjoy YouTube’s full features. It’s then that you’ll manage to upload videos without any drawbacks. Also, that’s when you’ll manage to upload longer videos that go beyond the 15-minute duration.
4) Pay attention to the video size
There is a limit for videos to post to YouTube. If it is too large or long, the upload will cancel before completion.
5) Be patient
YouTube can save your partial upload for 24 hours. So, you can continue to upload from where you left. Learn to be patient as there could be a surge of user traffic, especially during evenings.
Make your YouTube video better with Filmora
Good video quality will make you go miles ahead of your marketing gig. You can use Filmora mobile application to make your videos look better before uploading them to YouTube. This intuitive video editing app has advanced features and several ways to compose creative videos.
- Stunning video effects that let you add animated text to video
- Easily record your voice-overs with its perfect sound effects
- Split functionality that allows you to slice your video footage into two or more separate video clips
- Playback your clips in reverse and adjust the speed for fast or slow motion
- Select the best aspect ratio for your video
- Advanced camera to create emoji selfies and other video beautification
- Directly share your videos to social media sites like YouTube and Facebook.
Check out the steps to edit your video with Filmora on your iOS device
Step 1. Download and install Filmora
For iOS devices, go to the “Apple Store” to download and install the app. Also, allow it to access your videos, camera, and pictures in the process.
Step 2. Import video
You may already have a video in your library that you wish to upload to YouTube. Nonetheless, you can shoot a video afresh to add. To shoot one, you need to settle on a topic before recording and downloading other images you may need. Ensure you watch what you are filming and use adequate lighting during the shooting process.
Next, begin to import your video file. Just open the application and select the “Create new video” option. Then choose the “Video” icon and select a folder that contains the video to be added. Hit the “Add” button from the bottom right corner.
Step 3. Edit video
Filmora has several editing features to make your video better. Use the “Edit tools” feature to turn your video into an impeccable piece. Easily add filters, adjust the speed, or create subtitles, among other functions. You can also split, trim, or delete the unwanted clip parts.
It is important to add a title and description to your video. Just use the “Titles” button to add the title. Other precepts that you can add include transitions, sound like voice-over,
Step 4. Export and share
You’ve just finished creating and editing your video. Click on the “Save” tab and let the application export your video. Then select the “Save to Camera Roll” option to save the video to your iPhone. Finally, you can upload and share the video directly to your YouTube account.
Conclusion
● However, it appears to be a difficult task; you must have found relief after going through these procedures. You don’t need prior knowledge on how to upload a video to YouTube from your iPhone. Several options are at your disposal. You can use the Safari, YouTube app, or the Photo app to upload your videos. The better part is that you can create top-notch videos with Filmora. This mobile video editing app has a lot to offer, ensuring quality content.
Initially, iOS users had the option to load videos directly to YouTube via the tap-to-upload feature. However, this option is missing in the recent iOS devices versions. Therefore, many users search for possible ways to post a video on YouTube from iPhone. For this, you have to put some considerations into place before moving on. The video title length should not exceed 100 characters, while the description is maintained at 5,000 characters. Also, ensure the video length doesn’t exceed 15 minutes. Let’s roll out the best ways to upload your videos and make that big catch on subscribers.
In this article
01 [ How to upload a video to YouTube from iPhone or iPad](#Part 1)
02 [Why your phone doesn’t post videos to YouTube](#Part 2)
03 [Make your YouTube video better with Filmora](#Part 3)
How to upload a video to YouTube from iPhone or iPad
Are you ready to start on that big adventure and share your videos on YouTube? Follow these steps to learn how to upload a video to YouTube from your iPhone.
Method 1: Upload using the YouTube iOS app
Using the YouTube app is the simplest way to upload your YouTube videos. The YouTube app should be installed on your iOS device.
Step 1. Launch the YouTube app on your device, then sign in to your account. If you don’t have an account yet, you will need to “Sign up” for a new one before continuing the upload process.
Step 2. Click on the “+” icon found at the bottom of the screen.
Step 3. Then choose the “Upload a video” option from the populated list of options.
Step 4. Check out the pop-up that appears and “Allow access” to it.
Step 5. Edit your video to your preference by trimming or cropping as you desire. Then click on the “Next” option.
Step 6. Add “title and description” to your video. Remember, the title should contain less than 100 characters and the description no more than 500 characters.
Step 7. Then set the visibility mode as “Public” to enable you to share your video over the internet.
Step 8. Click on the “Upload” button to finally upload your video to YouTube.
Method 2: Upload using Photo App
The Photo App has a “Share” option that you can use to upload your videos to YouTube. Here is the guide.
Step 1. Go to your iOS device and tap on the “Photos” app.
Step 2. Then tap on the “Videos Folder” to locate the video you wish to upload to YouTube.
Step 3. Next, tap on the video that you want to upload.
Step 4. Then tap on the “Share” icon located at the bottom left of your iOS device screen.
Step 5. You’ll then access a “Share” menu from where you have various share options for your video.
Step 6. Choose the “YouTube” option to continue to share your video there. At this juncture, ensure you have logged in to your Google Account.
Step 7. You need to provide a “Title” and “Description” of your video. Then go to the “Privacy” Options and make your video “Public.”
Step 8. Finally, tap on the “Publish” tab found at the top-right corner of your screen to make your video viewable by the public.
Method 3: Upload video to YouTube using Safari
Safari is another alternative method to upload a video to YouTube.
Step 1. First, go to “youtube.com” on Safari and sign in.
Step 2. Then tap on the “account” icon at the top right side of the screen.
Step 3. Hit on the “Upload” icon and wait to be redirected to the YouTube Studio desktop site.
Step 4. Click on the “Select Files” option.
Step 5. Choose the video you wish to add to YouTube from the “Photo” library and tap on the “Add” button.
Step 6. Add your video’s “title and description” and hit the “Next” button.
Step 7. Tap on the “Next” button once more to go to the “Visibility” page.
Step 8. Select the “Public” option to upload your video to the public.
Why your phone doesn’t post videos to YouTube
Despite learning how to upload to YouTube from iPhone, you may be perplexed to realize that your phone refuses to post videos to YouTube. What could be the reason?
1) YouTube issues
In most cases, the problem doesn’t arise from your phone but from YouTube. This streaming app may also experience some hitches along the way. Remember that even if your phone sync with your YouTube account to upload videos from the “Camera Roll,” YouTube isn’t managed from the Camera Roll but the YouTube app directly. You can solve the issue by signing out of your YouTube account and signing back in.
2) Connection Strength
Some videos may appear quite large and cause a time-out during the upload process. Check your Wi-Fi or internet connection strength to determine if it needs a boost or wait until the streaming strength is strong for a quick upload. Test your internet speed by searching “internet test speed” on Google. Then click the “Run Speed Test” in the search box. A window will open and give you an estimate of the Mbps that your connection is operating at. If too low, switch to other alternatives.
3) Verify your YouTube account
Verifying your account will help you to enjoy YouTube’s full features. It’s then that you’ll manage to upload videos without any drawbacks. Also, that’s when you’ll manage to upload longer videos that go beyond the 15-minute duration.
4) Pay attention to the video size
There is a limit for videos to post to YouTube. If it is too large or long, the upload will cancel before completion.
5) Be patient
YouTube can save your partial upload for 24 hours. So, you can continue to upload from where you left. Learn to be patient as there could be a surge of user traffic, especially during evenings.
Make your YouTube video better with Filmora
Good video quality will make you go miles ahead of your marketing gig. You can use Filmora mobile application to make your videos look better before uploading them to YouTube. This intuitive video editing app has advanced features and several ways to compose creative videos.
- Stunning video effects that let you add animated text to video
- Easily record your voice-overs with its perfect sound effects
- Split functionality that allows you to slice your video footage into two or more separate video clips
- Playback your clips in reverse and adjust the speed for fast or slow motion
- Select the best aspect ratio for your video
- Advanced camera to create emoji selfies and other video beautification
- Directly share your videos to social media sites like YouTube and Facebook.
Check out the steps to edit your video with Filmora on your iOS device
Step 1. Download and install Filmora
For iOS devices, go to the “Apple Store” to download and install the app. Also, allow it to access your videos, camera, and pictures in the process.
Step 2. Import video
You may already have a video in your library that you wish to upload to YouTube. Nonetheless, you can shoot a video afresh to add. To shoot one, you need to settle on a topic before recording and downloading other images you may need. Ensure you watch what you are filming and use adequate lighting during the shooting process.
Next, begin to import your video file. Just open the application and select the “Create new video” option. Then choose the “Video” icon and select a folder that contains the video to be added. Hit the “Add” button from the bottom right corner.
Step 3. Edit video
Filmora has several editing features to make your video better. Use the “Edit tools” feature to turn your video into an impeccable piece. Easily add filters, adjust the speed, or create subtitles, among other functions. You can also split, trim, or delete the unwanted clip parts.
It is important to add a title and description to your video. Just use the “Titles” button to add the title. Other precepts that you can add include transitions, sound like voice-over,
Step 4. Export and share
You’ve just finished creating and editing your video. Click on the “Save” tab and let the application export your video. Then select the “Save to Camera Roll” option to save the video to your iPhone. Finally, you can upload and share the video directly to your YouTube account.
Conclusion
● However, it appears to be a difficult task; you must have found relief after going through these procedures. You don’t need prior knowledge on how to upload a video to YouTube from your iPhone. Several options are at your disposal. You can use the Safari, YouTube app, or the Photo app to upload your videos. The better part is that you can create top-notch videos with Filmora. This mobile video editing app has a lot to offer, ensuring quality content.
A Comparative Analysis: Android’s Finest Video Downloaders
9 Powerful YouTube Video Downloader for Android

Ollie Mattison
Mar 27, 2024• Proven solutions
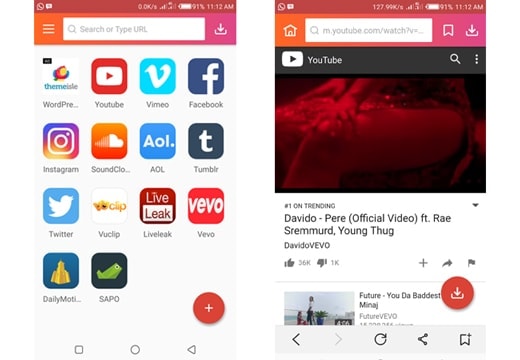
Streaming online videos on YouTube has become a lifestyle for almost all of us now. But time and data usage are huge constraints. Isn’t it annoying when you find free Wi-Fi but lack a suitable video downloader or you have a downloader but no Wi-Fi access at the moment to stream the videos. You may already know how to download mp3 on Android , to solve your dilemma and let you download YouTube videos on your Android phone, we have collected the most popular YouTube video downloader for Android in this article.
Note: We resolutely oppose all forms of copyright-infringing downloads. This tutorial is only for downloading YouTube videos/audio materials from your own channel.
Part 1: Online Video Downloader App Only Supporting YouTube video
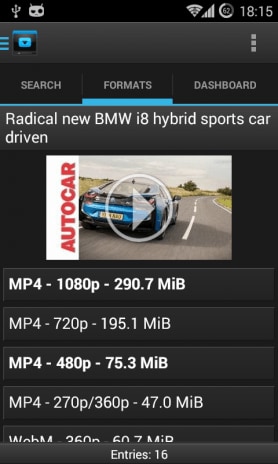
1. TubeMate
Using TubeMate, you can now save your favorite YouTube videos directly on your phone and cherish them anywhere offline. You can choose the quality of the video as this tool supports different resolutions. If you are a novice user this App is simple as one two three, you need to search the video on YouTube and tap the green arrow at the bottom of the screen to download it.

Pros:
- Multiple download options are available, along with the background download option to carry on with other routine work on your phone.
- It can download the video as well as audio.
- Videos can be converted to MP3 format.
Cons:
- It cannot download in 4K format.
- TubeMate doesn’t download the original YouTube video, but rather a video encoded video by YouTube. Hence, the video sometimes fails to play, and downloading a low-resolution video to save YouTube videos on Android might help.
![]()
A cross-platform for making videos anywhere for all creators

Why your video editing isn’t good enough? How about some creative inspo?
- 100 Million+ Users
- 150+ Countries and Regions
- 4 Million+ Social Media Followers
- 5 Million+ Stock Media for Use
* Secure Download

2. Dentex YouTube Downloader
Dentex is a YouTube video downloader for Android that allows you to download YouTube videos within seconds. The interface is divided into 3 parts. In the first part, you can search the YouTube video and see the results, the second part shows the quality and format options, whereas the third part lists the previously downloaded videos.
Pros:
- You can change the format of any video even after downloading.
- You can extract audio files from the videos and later convert them to MP3 format.
- You can remote download through SSH.
Cons:
- An additional plug-in is required to change the format of the video.
- The app is not compatible with lower Android versions such as Gingerbread, Froyo and Éclair.
- The downloading process might sometimes stop, requiring you to resume the process.
3. InsTube Free Video & Music Downloader
InsTube Free Video & Music Downloader allows you to download YouTube videos at high speed supporting MP3, MP4, 3GP, as well as M4A formats. With this tool, downloading YouTube videos in HD, Full HD, or 4K is at your fingertips. You can download videos from more than 40 websites apart from YouTube and enjoy them offline.
Pros:
- It has an inbuilt locker to protect videos and keep them private.
- The hassle-free and neat interface allows easy operation.
- Faster downloading options across 40 plus websites and free YouTube video download is also possible.
Cons:
- Unwanted Ads popup on the screen forcing you to install updates.
- You see the clipboard identifier icon only for few seconds on the screen.
4. WonTube
With WonTube, you can stock and save YouTube videos on Android. Its high conversion speed saves your time. The simple interface of the App makes it user friendly. The App can merge videos and convert the result to any format is a very unique feature.
Pros:
- It supports AVI, WMV, MP4, MKV, FLV, 3GP, and MPG.
- It works well with poor internet connectivity compared to other video downloaders.
- It can convert videos into 20+ formats.
Cons:
- Even though multiple videos can be downloaded simultaneously, the same batch of videos can be converted only to one output format.
5. NewPipe
NewPipe analyses YouTube videos by itself to obtain the necessary information for downloading the videos. This downloader can thus work with phones that do not have Google Services installed in them. In addition, the app allows you to download audio and video with different formats and resolutions. NewPipe also keeps you updated about your favorite YouTube channels while you save YouTube videos on Android.
Pros:
- It is merely 2MB.
- It has a pop-up mode that is movable and resizable, using which you can watch the videos while carrying out other activities on your mobile.
- There are no Ads.
Cons:
- It doesn’t have a log in option, so you cannot view your history.
- It requires additional settings.
![]()

Best YouTube Video Editor for PC - Filmora
- Cut, Trim, Split and Deatch audio from YouTube videos
- Edit Videos with key frame, motion track, green screen ect.
- Built-in plentiful YouTube templates and effects
- Export to MP4, MOV, MKV, GIF and multiple formats
For Win 7 or later (64-bit)
For macOS 10.12 or later
 Secure Download


Part 2: YouTube Video Downloader App Supporting multiple video site
1. SnapTube
SnapTube is yet another amazing video and audio downloading app to download audio in MP3 format and video in MP4 format. The app is organized in itself, carrying a section of popular videos, most viewed videos and a daily recommendation section. The app also allows video downloading option from popular social media sites such as Instagram and Facebook.
Pros:
- It does not require an additional plug-in.
- It does not have malware and Ads.
Cons:
- YouTube multimedia download is restricted in India and China.
2. Videoder
Videoder is the app for you when you want to broaden your horizon and download videos from Facebook, Instagram, YouTube, Hotstar etc. in MP3 or MP4 format. It comes with an inbuilt feature to convert videos to MP3 format. You can personalize the app by using themes, setting cover art, and tag editor to organize your playlist in a visually attractive way.

Pros:
- Looking for HD quality viewing? You have 4K quality videos with Videoder.
- Multiple downloading is possible with a single tap.
- Downloading speed is accelerated by the number of network connections and utilizing it to the maximum.
Cons:
- Because of the numerous features, it may take time to learn all the functionalities.
- An audio encoding pop-up may sometimes appear asking to install a plug-in.
- It doesn’t support files other than MP3 and MP4 format.
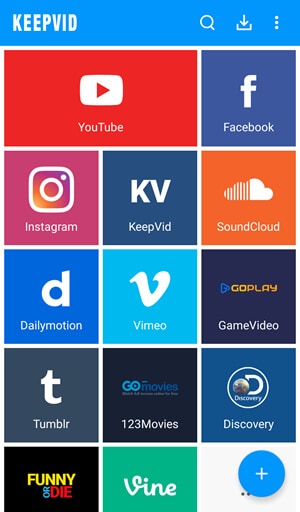
3. KeepVid
KeepVid is a handy YouTube downloader that can download videos from YouTube and 27 other sites. It is a fantastic downloading tool that comes with a user-friendly interface and allows you to download videos from many sites, including YouTube, Vimeo, and Dailymotion. KeepVid also allows you to download multiple videos simultaneously with the option of selecting the quality of the videos.
Pros:
- The app does not have any size limit to the video.
- It does not have any Ads.
- It can download videos as good as 4K.
Cons:
- The only disadvantage is that you must download the app from the official site KeepVid.com.
Conclusion
In the end, we would like to say that as time passes by and with the tight schedules a YouTube video downloader on your phone frees you from your computer. For all those offline viewing needs of yours, the above-mentioned downloaders are excellent alternatives and help you save YouTube videos on Android.
Ollie Mattison
Ollie Mattison is a writer and a lover of all things video.
Follow @Ollie Mattison
Ollie Mattison
Mar 27, 2024• Proven solutions
Streaming online videos on YouTube has become a lifestyle for almost all of us now. But time and data usage are huge constraints. Isn’t it annoying when you find free Wi-Fi but lack a suitable video downloader or you have a downloader but no Wi-Fi access at the moment to stream the videos. You may already know how to download mp3 on Android , to solve your dilemma and let you download YouTube videos on your Android phone, we have collected the most popular YouTube video downloader for Android in this article.
Note: We resolutely oppose all forms of copyright-infringing downloads. This tutorial is only for downloading YouTube videos/audio materials from your own channel.
Part 1: Online Video Downloader App Only Supporting YouTube video
1. TubeMate
Using TubeMate, you can now save your favorite YouTube videos directly on your phone and cherish them anywhere offline. You can choose the quality of the video as this tool supports different resolutions. If you are a novice user this App is simple as one two three, you need to search the video on YouTube and tap the green arrow at the bottom of the screen to download it.
Pros:
- Multiple download options are available, along with the background download option to carry on with other routine work on your phone.
- It can download the video as well as audio.
- Videos can be converted to MP3 format.
Cons:
- It cannot download in 4K format.
- TubeMate doesn’t download the original YouTube video, but rather a video encoded video by YouTube. Hence, the video sometimes fails to play, and downloading a low-resolution video to save YouTube videos on Android might help.
![]()
A cross-platform for making videos anywhere for all creators
Why your video editing isn’t good enough? How about some creative inspo?
- 100 Million+ Users
- 150+ Countries and Regions
- 4 Million+ Social Media Followers
- 5 Million+ Stock Media for Use
* Secure Download
2. Dentex YouTube Downloader
Dentex is a YouTube video downloader for Android that allows you to download YouTube videos within seconds. The interface is divided into 3 parts. In the first part, you can search the YouTube video and see the results, the second part shows the quality and format options, whereas the third part lists the previously downloaded videos.
Pros:
- You can change the format of any video even after downloading.
- You can extract audio files from the videos and later convert them to MP3 format.
- You can remote download through SSH.
Cons:
- An additional plug-in is required to change the format of the video.
- The app is not compatible with lower Android versions such as Gingerbread, Froyo and Éclair.
- The downloading process might sometimes stop, requiring you to resume the process.
3. InsTube Free Video & Music Downloader
InsTube Free Video & Music Downloader allows you to download YouTube videos at high speed supporting MP3, MP4, 3GP, as well as M4A formats. With this tool, downloading YouTube videos in HD, Full HD, or 4K is at your fingertips. You can download videos from more than 40 websites apart from YouTube and enjoy them offline.
Pros:
- It has an inbuilt locker to protect videos and keep them private.
- The hassle-free and neat interface allows easy operation.
- Faster downloading options across 40 plus websites and free YouTube video download is also possible.
Cons:
- Unwanted Ads popup on the screen forcing you to install updates.
- You see the clipboard identifier icon only for few seconds on the screen.
4. WonTube
With WonTube, you can stock and save YouTube videos on Android. Its high conversion speed saves your time. The simple interface of the App makes it user friendly. The App can merge videos and convert the result to any format is a very unique feature.
Pros:
- It supports AVI, WMV, MP4, MKV, FLV, 3GP, and MPG.
- It works well with poor internet connectivity compared to other video downloaders.
- It can convert videos into 20+ formats.
Cons:
- Even though multiple videos can be downloaded simultaneously, the same batch of videos can be converted only to one output format.
5. NewPipe
NewPipe analyses YouTube videos by itself to obtain the necessary information for downloading the videos. This downloader can thus work with phones that do not have Google Services installed in them. In addition, the app allows you to download audio and video with different formats and resolutions. NewPipe also keeps you updated about your favorite YouTube channels while you save YouTube videos on Android.
Pros:
- It is merely 2MB.
- It has a pop-up mode that is movable and resizable, using which you can watch the videos while carrying out other activities on your mobile.
- There are no Ads.
Cons:
- It doesn’t have a log in option, so you cannot view your history.
- It requires additional settings.
![]()
Best YouTube Video Editor for PC - Filmora
- Cut, Trim, Split and Deatch audio from YouTube videos
- Edit Videos with key frame, motion track, green screen ect.
- Built-in plentiful YouTube templates and effects
- Export to MP4, MOV, MKV, GIF and multiple formats
For Win 7 or later (64-bit)
For macOS 10.12 or later
Secure Download
Part 2: YouTube Video Downloader App Supporting multiple video site
1. SnapTube
SnapTube is yet another amazing video and audio downloading app to download audio in MP3 format and video in MP4 format. The app is organized in itself, carrying a section of popular videos, most viewed videos and a daily recommendation section. The app also allows video downloading option from popular social media sites such as Instagram and Facebook.
Pros:
- It does not require an additional plug-in.
- It does not have malware and Ads.
Cons:
- YouTube multimedia download is restricted in India and China.
2. Videoder
Videoder is the app for you when you want to broaden your horizon and download videos from Facebook, Instagram, YouTube, Hotstar etc. in MP3 or MP4 format. It comes with an inbuilt feature to convert videos to MP3 format. You can personalize the app by using themes, setting cover art, and tag editor to organize your playlist in a visually attractive way.
Pros:
- Looking for HD quality viewing? You have 4K quality videos with Videoder.
- Multiple downloading is possible with a single tap.
- Downloading speed is accelerated by the number of network connections and utilizing it to the maximum.
Cons:
- Because of the numerous features, it may take time to learn all the functionalities.
- An audio encoding pop-up may sometimes appear asking to install a plug-in.
- It doesn’t support files other than MP3 and MP4 format.
3. KeepVid
KeepVid is a handy YouTube downloader that can download videos from YouTube and 27 other sites. It is a fantastic downloading tool that comes with a user-friendly interface and allows you to download videos from many sites, including YouTube, Vimeo, and Dailymotion. KeepVid also allows you to download multiple videos simultaneously with the option of selecting the quality of the videos.
Pros:
- The app does not have any size limit to the video.
- It does not have any Ads.
- It can download videos as good as 4K.
Cons:
- The only disadvantage is that you must download the app from the official site KeepVid.com.
Conclusion
In the end, we would like to say that as time passes by and with the tight schedules a YouTube video downloader on your phone frees you from your computer. For all those offline viewing needs of yours, the above-mentioned downloaders are excellent alternatives and help you save YouTube videos on Android.
Ollie Mattison
Ollie Mattison is a writer and a lover of all things video.
Follow @Ollie Mattison
Also read:
- [Updated] Building a Successful Career Through YouTube Short Film-Making
- Design Channels - Get Free Visuals Now for 2024
- [Updated] Cutting-Edge Video Editing in YouTube Studio Explained
- Elevate Your Gameplay Videos The Ultimate Collection of FreeFire Tags
- In 2024, Copyright Concerns with Recording YouTube Content
- [New] A Visual Hook Creating Captivating YouTube Thumbnails to Drive Traffic
- Guidelines to Erase YouTube Recordings on PC
- [Updated] Decoding the YouTube View Number for Profitability
- In 2024, Dialing Up Engagement YouTube Thumbnails That Convert
- Choosing the Right Video Sharing Platform TikTok vs YouTubes' Shorts for 2024
- [New] Enhance YouTube Trademarks Tips on Logo and Watermark Addition
- In 2024, Crafting Engaging Video Content for Live Streams
- Channel Dominance Plan Studio Protocol Vs. Beta Update
- Evaluating Dailymotion vs YouTube Profitability for 2024
- Unifying Your Digital Storytelling via Merged YouTube Media
- Trendsetters’ Tunes Hits of the Week for YT Shorts Soundtracks
- 2024 Approved Cultivate Creativity Best Video Concepts for Viewers
- Expert Advice on Leveraging YouTube's Video Editor
- Apex Producers Blending Photography & Music for 2024
- Mastering YouTube Notes & Alerts Implementation
- Enchanting Editing YouTube's Best Video Magic Hits for 2024
- [Updated] Analyzing Channels Monetization Status at a Glance
- Streaming Made Simple Convert and Broadcast MP3 Songs Online
- Optimize Your Virtual Space with Zoom Setup
- In 2024, Tips and Tricks for Setting Up your Nokia C02 Phone Pattern Lock
- [Updated] Understanding Snapchat's Emojis More Than Just Fun
- How To Check if Your Samsung Galaxy S24+ Is Unlocked
- [New] Cinematic Surprises The Most Impactful TikTok Editing Tools for 2024
- Top 10 Best Spy Watches For your Motorola Moto G84 5G | Dr.fone
- New Top Free DJ Beats Downloads Site for 2024
- 5 Solutions For Nokia C110 Unlock Without Password
- How to Bypass Google FRP Lock on Infinix Smart 8 HD Devices
- Discovering the Uncharted WINDOW 11 Functions for Efficiency
- In 2024, Instagram Verified Posts - Do They Matter?
- Making MP3s From Your Facebook Videos with Ease for 2024
- [Updated] In 2024, Beat the Heat Learn Trending, Easy TikTok Moves
- In 2024, Unlocking the Power of DaVinci Resolve Scopes Enhance Your Color Grad
- How to Remove Apple iPhone 8 Plus Device from iCloud
- Echoes of the Northmen Essential Sites to Grab GoT Audio Calls
- Prank Your Friends! Easy Ways to Fake and Share Google Maps Location On HTC U23 Pro | Dr.fone
- [New] Gaming with Style - Perfecting Your Steam Footage for 2024
- In 2024, Top 5 Tracking Apps to Track Xiaomi Redmi A2 without Them Knowing | Dr.fone
- Is GSM Flasher ADB Legit? Full Review To Bypass Your Oppo A38FRP Lock
- In 2024, Easy Steps on How To Create a New Apple ID Account On iPhone 13 Pro Max | Dr.fone
- Boost Color Accuracy FREE + Paid LUTs for Canon Users for 2024
- Title: "Quick Tips IOS Devices & YouTube Video Submission"
- Author: Kevin
- Created at : 2024-05-25 16:13:27
- Updated at : 2024-05-26 16:13:27
- Link: https://youtube-videos.techidaily.com/quick-tips-ios-devices-and-youtube-video-submission/
- License: This work is licensed under CC BY-NC-SA 4.0.
